Philips Grind & Brew Cafetière: 5 Using the appliance
5 Using the appliance: Philips Grind & Brew Cafetière
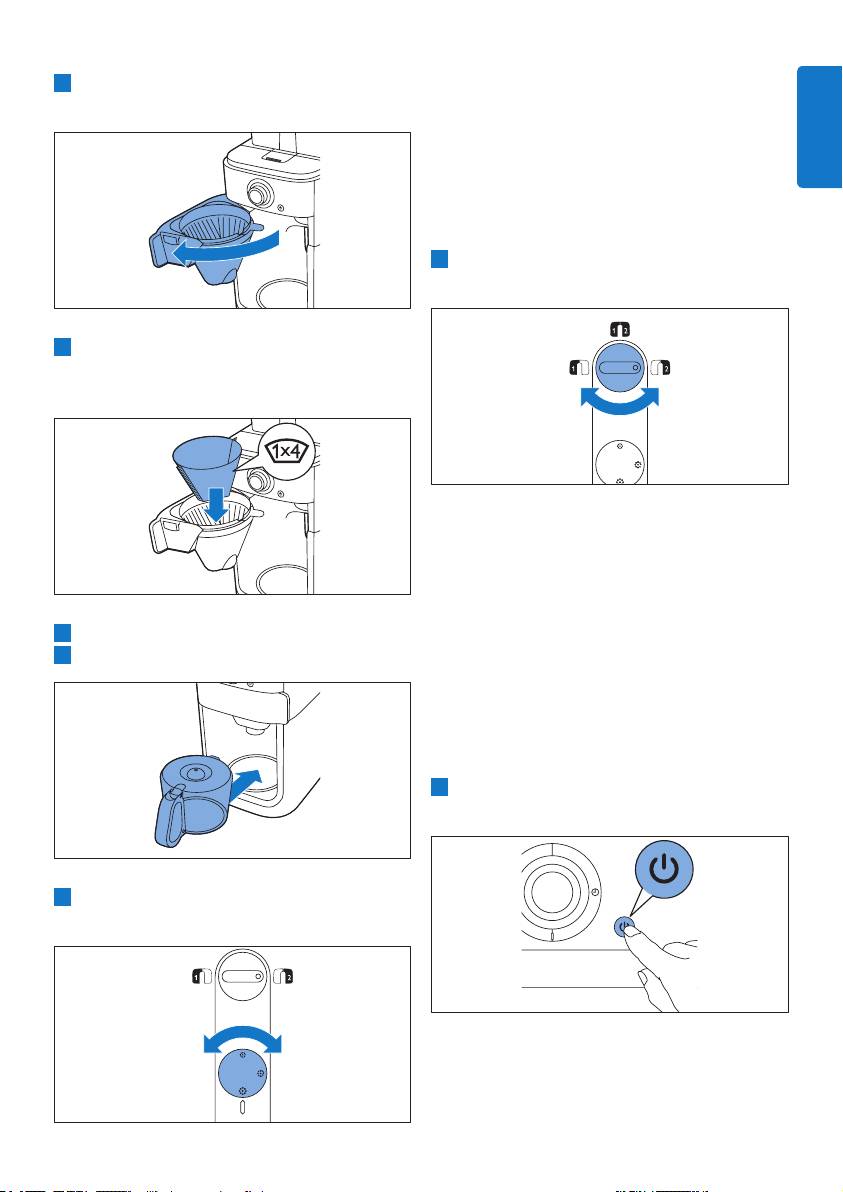
7 Press in the centre of the knob to conrm.
5.2 Using coffee beans
Then press in the centre of the knob again
to start the ushing process.
B Warning:
Always keep the water reservoir lid closed when
youllthecoffeebeancontainerwithcoffee
beans.Otherwisecoffeebeanscanfallintothe
water reservoir and block up the water inlet.
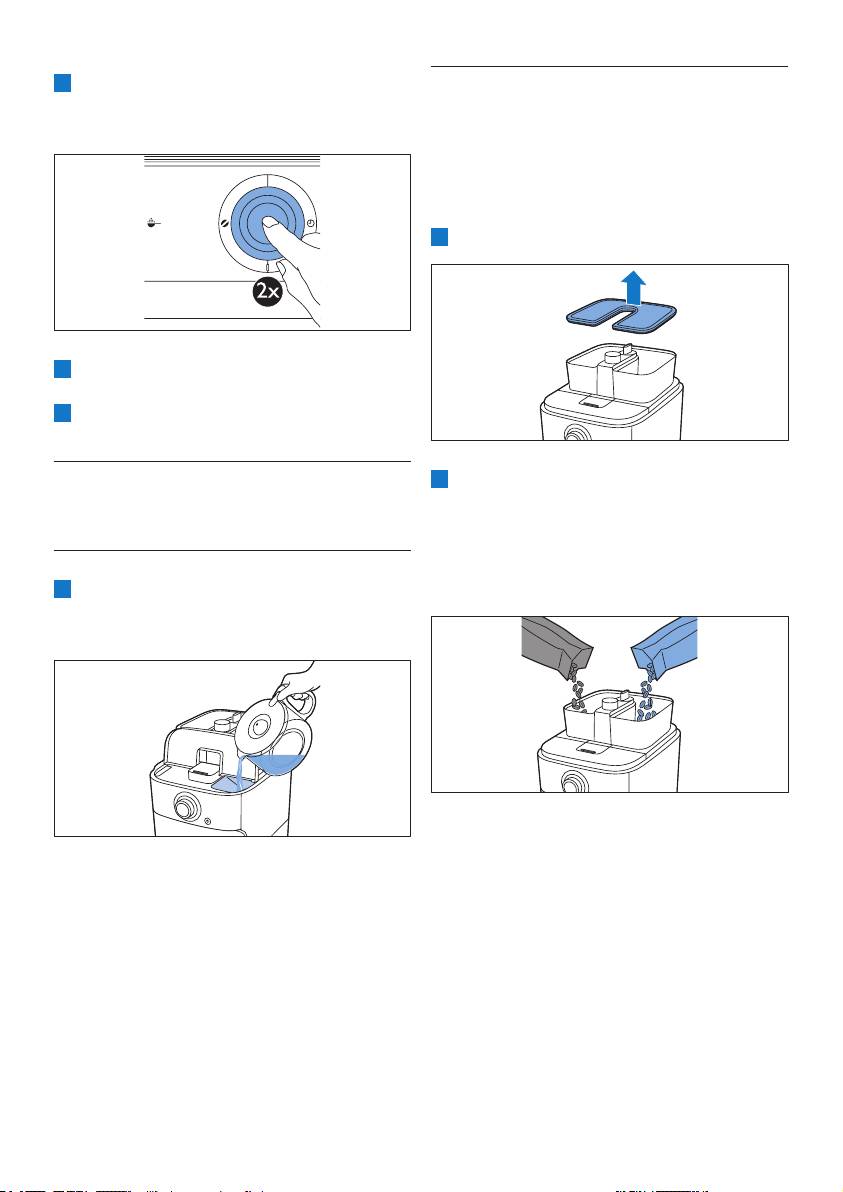
1 Remove the coffee bean container lid.
8 Let the appliance operate until the ushing
process has been completed.
9 Empty the jug.
2 Fill the duo coffee bean container with
5 Using the appliance
coffee beans. You can ll the duo coffee bean
container with two different types of coffee
beans. Make sure there are enough coffee
5.1Fillingthewaterreservoir
beans in the container for the amount of
1 Open the water reservoir lid and ll the
coffee you want to brew.
water reservoir with the required amount
of cold water.
D
Note:
Always make sure the coffee bean container is
When you open the water reservoir lid, there
at least half full.
are indications for 2 to 10 cups on the inside
of the appliance. You can use these indications
B
Warning:
to determine how much water to put in the
Topreventthegrinderfromjamming,do
water reservoir.
not use unroasted or caramelised beans.
Weadvisetousecoffeebeansinsteadof
D
Note:
espresso beans as this may cause damage.
Do not ll the water reservoir beyond the
10-cup indication.
6
3 To open the lter basket holder, pull at its tab
E Tip:
on the right side of the coffeemaker.
The coarseness knob allows you to
choose between nine different settings.
We preselected 3 optimal settings but you
ENGLISH
can also choose any setting in between the
icons. We advise you to experiment with
the different grind settings to nd out which
setting you prefer.
8 Turn the container selector to choose
between the two types of coffee beans.
4
Take a paper lter (type 1x4 or no. 4) and fold
the sealed edges to prevent tearing and folding.
Place the paper lter in the lter basket.
B
Warning:
Wheneveryouswitchbetweencoffeebean
containersorcoffeebeans,therewillalways
betracesofcoffeeleftofthepreviously
groundtypeofcoffeebeans.Cleanthe
5 Close the lter basket holder.
coffeebeanchuteafteryouswitchtoa
6 Put the jug in the appliance.
newtypeofcoffeebeantopreventthis.
D
Note:
Depending on your taste, you can either
select one of the two types of coffee beans
or a mix of both types.
9 Press the on/off button on the front of the
appliance.
7 Turn the coarseness knob to select the
desired type of grind (from ne to coarse).
• The number of cups starts to ash.
7
10 To select the number of cups, turn the knob
13 Turn the knob to select the desired coffee
until the desired number of cups appears on
strength (mild: 1 bean, medium: 2 beans or
the display.
strong: 3 beans).
D
Note:
• The display shows the selected coffee
Make sure that the number of cups you select
strength.
with the 2-10 cups button is consistent with
the amount of water in the water reservoir.
E
Tip:
Please keep in mind that the coffeemaker
We advise you to experiment with
uses all the water in the water reservoir. If you
the amount of water to nd out which
select a number of cups that is smaller than
strength you prefer. If you select a number
the amount of water, the coffee becomes
of cups that is higher than the amount of
weaker than you intended.
water, the coffee becomes stronger. If you
11 Press in the centre of the knob to conrm the
select a number of cups that is smaller
number of cups.
than the amount of water, the coffee
12 Press the strength select button.
becomes weaker.
14 Press in the centre of the knob to conrm,
Then press in the centre of the knob again to
start the brewing process.
• The coffee bean icons start to ash.
• The grinder grinds the required amount of
coffee beans.
15 Wait until the coffeemaker has stopped
brewing before you remove the jug.
D
Note:
After brewing, coffee drips from the lter
basket for several seconds.
8

5.3 Using pre-ground coffee
4 Put pre-ground coffee in the paper lter.
If you want to use pre-ground coffee instead of
coffee beans, follow the steps below.
D
Note:
1 Open the water reservoir lid and ll the
You can adjust the strength of the coffee
ENGLISH
water reservoir with the required amount
to your own personal taste. For a medium-
of cold water.
strong cup of coffee, use one measuring
spoon (approximately 6g) of ground coffee
for each cup (120ml). For stronger coffee,
use 1.5 measuring spoons of ground coffee
for each cup of coffee.
5 Close the lter basket holder.
6 Put the jug in the appliance.
2 To open the lter basket holder, pull at its tab
on the right side of the coffeemaker.
7 Press the on/off button.
3 Take a paper lter (type 1x4 or no. 4) and
fold the sealed edges to prevent tearing
and folding. Place the paper lter in the
lter basket.
• The display lights up.
8 Press the strength select button.
9
9 Turn the knob to choose the pre-ground
5.4 Setting the timer
coffee setting.
The timer enables you to program the time at
which you want the brewing process to start.
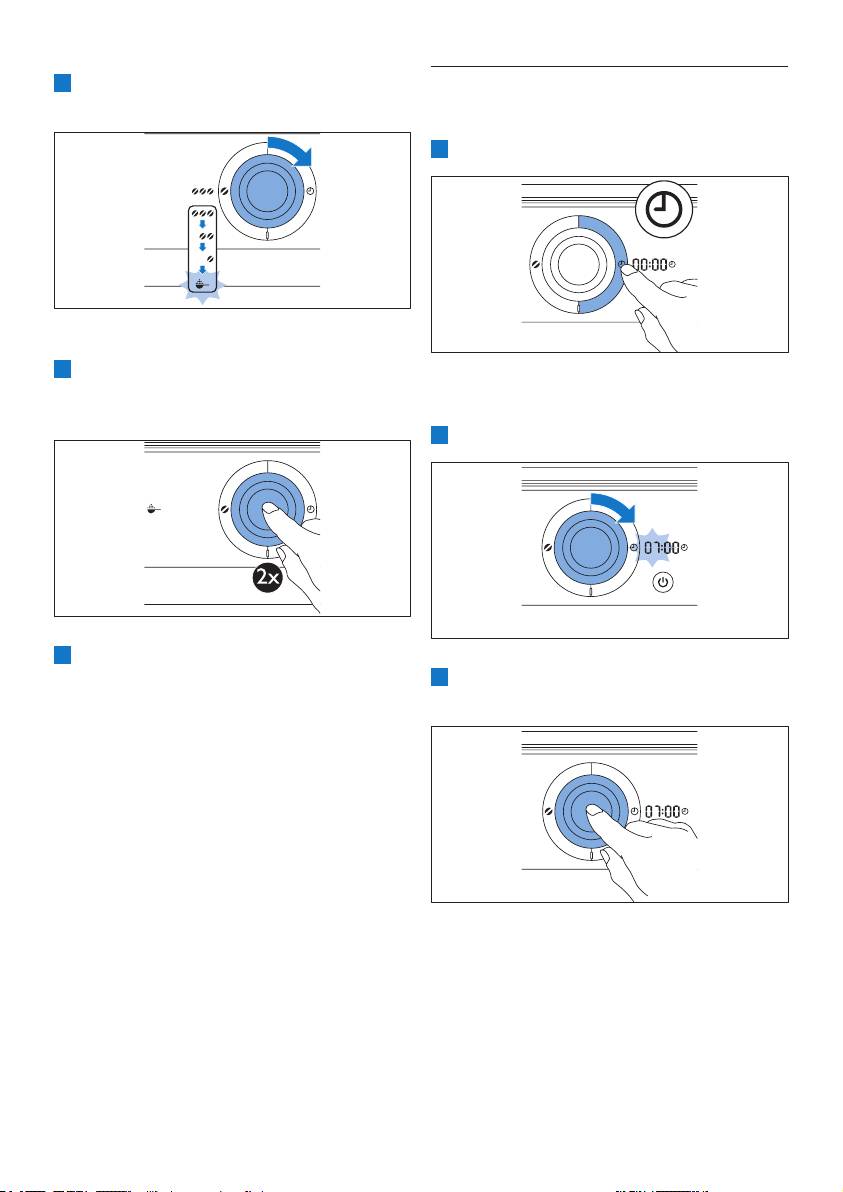
1 Press the timer button.
• The pre-ground coffee icon lights up.
10 Press in the centre of the knob to conrm.
Then press in the centre of the knob again to
• On the display 00:00 ashes to indicate
start the brewing process.
that you have to set the timer.
2 Turn the knob to set the hour.
11 Wait until the coffeemaker has stopped
brewing before you remove the jug.
3 Press in the centre of the knob to conrm
the hour.
D
Note:
After brewing, coffee drips from the lter
basket for several seconds.
• The minutes starts to ash to indicate that
you have to set the minutes.
10
Оглавление
- 1 Introduction
- 4 Beforerstuse
- 5 Using the appliance
- 6 Cleaning and maintenance
- 7 Ordering accessories 10 Troubleshooting
- 1 Introduktion
- 4 Førapparatettages
- 5 Sådan bruges apparatet
- 6 Rengøringog
- 8 Miljøhensyn
- 1 Einführung 3 Wichtig
- 4 Vor dem ersten Gebrauch
- 5 Das Gerät benutzen
- 6 Reinigung und
- 7 Zubehör bestellen
- 8 Umwelt
- 1 Johdanto
- 4 Käyttöönotto
- 5 Käyttö
- 6 Puhdistusjahoito
- 9 Takuujatuki
- 1 Introduction
- 4 Avantlapremière
- 5 Utilisation de l’appareil
- 6 Nettoyageet
- 7 Commande d’accessoires
- 9 Garantie et
- 1 Introduzione
- 4 Primo utilizzo
- 5 Modalitàd’uso
- 6 Pulizia e manutenzione
- 7 Ordinazione degli 10 Risoluzione dei accessori problemi
- 1 Кіріспе
- 4 Алғашқолданар
- 5 Құрылғыны пайдалану
- 6 Тазалаужәне күтіпұстау
- 9 Кепілдікжәне
- 1 소개
- 4 처음사용전
- 5 제품사용
- 6 청소및유지관리
- 9 보증및지원
- 1 Introductie 3 Belangrijk
- 4 Voor het eerste
- 5 Het apparaat gebruiken
- 6 Reiniging en
- 7 Accessoires bestellen
- 9 Garantie en
- 1 Innledning
- 4 Førførstegangs
- 5 Bruke apparatet
- 6 Rengjøringog vedlikehold
- 7 Bestilletilbehør
- 8 Miljø
- 1 Введение 3 Важная
- 4 Передпервым использованием
- 5 Использование прибора
- 6 Очисткаиуход
- 7 Заказаксессуаров
- 8 Защита
- 1 Introduktion
- 4 Föreförsta
- 5 Användaapparaten
- 6 Rengöring och
- 7 Beställa tillbehör
- 10Felsökning
- 1 Вступ 3 Важлива
- 4 Передпершим
- 5 Застосування пристрою
- 6 Чищеннятадогляд
- 7 Замовлення приладь
- 8 Навколишнє
- 1 简介
- 4 首次使用之前
- 5 使用本产品
- 6 清洁和保养
- 7 订购附件
- 10故障种类和处理方法
