Karcher Balayeuse KM 130-300 R Bp: Maintenance and care
Maintenance and care: Karcher Balayeuse KM 130-300 R Bp
-
7
Caution
Risk of damage!
Do not rinse out the dust filter.
First switch off the appliance, remove
the key and remove the battery plug or
disconnect the battery before perform-
ing any cleaning or maintenance tasks
on the appliance, replacing parts or
switching over to another function.
–
Maintenance work may only be carried
out by approved customer service out-
lets or experts in this field who are famil-
iar with the respective safety
regulations.
–
Mobile appliances used for commercial
purposes are subject to safety inspec-
tions according to VDE 0701.
Park the sweeper on an even surface.
Turn ignition key to "0" and remove it.
Lock parking brake.
Caution
Risk of damage! Do not clean the appliance
with a water hose or high-pressure water jet
(danger of short circuits or other damage).
Danger
Risk of injury! Wear dust mask and protec-
tive goggles.
Clean machine with a cloth.
Blow through machine with com-
pressed air.
Clean the machine with a damp cloth which
has been soaked in mild detergent.
Note:
Do not use aggressive cleaning
agents.
See inspection checklist 5.950-648.0!
Note:
The elapsed-time counter shows the
timing of the maintenance intervals.
Note:
Where maintenance is carried out by
the customer, all service and maintenance
work must be undertaken by a qualified
specialist. If required, a specialised Kärch-
er dealer may be contacted at any time.
Daily maintenance:
Check the sweeping roller and the side
brush for wear and wrapped belts.
Check function of all operator control el-
ements.
Check appliance for damages.
Weekly maintenance:
Clean the hydraulic oil cooler.
Check hydraulic unit.
Check the hydraulic oil level.
Check brake fluid status.
Check the pad for wear, replace if re-
quired.
Check the container lid and lubricate it.
Maintenance following wear:
Replace sealing strips.
Readjust the side seals or replace them.
Replace roller brush.
Replace side brush.
Note:
For description, see section on Main-
tenance work.
Maintenance to be carried out after 50
operating hours:
Have the first inspection done accord-
ing to the service manual.
Maintenance to be carried out after 250
operating hours:
Have the inspection done according to
the service manual.
Note:
In order to safeguard warranty
claims, all service and maintenance work
during the warranty period must be carried
out by the authorised Kärcher Customer
Service in accordance with the mainte-
nance booklet.
Preparation:
Park the sweeper on an even surface.
Turn ignition key to "0" and remove it.
Lock parking brake.
Danger
Risk of injury! Always apply the safety bar
when the waste container is raised.
1 Holder of safety rod
2 Safety rod
Fold the safety rod for the high empty-
ing up and insert it into the holder (se-
cured).
The batteries can only be exchanged as a
set. The exchange has to be performed by
trained personnel.
Due to the heavy weight (460 kg), the
replacement must be performed by
means of a crane.
Note
: The cross strut must be un-
screwed prior to replacing the battery.
When removing the battery, disconnect
the negative terminal wire first.
Fasten the crane chains in the four eye-
lets of the battery set and carefully lift
out the batteries.
Note
The waste container must not be raised.
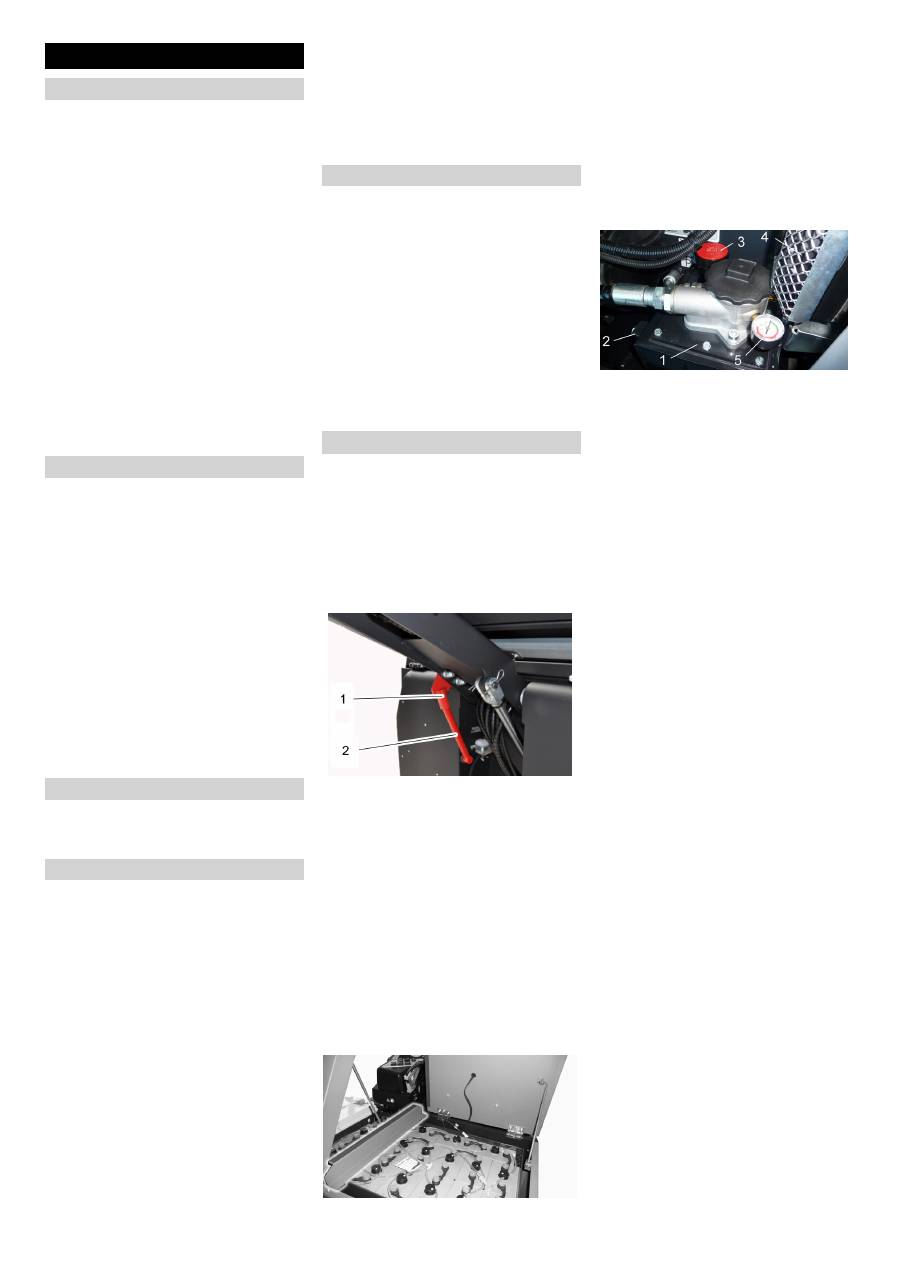
Open engine cover.
1 Hydraulic oil tank
2 Looking glass
3 Screw cap, oil fill opening
4 Hydraulic oil cooler
5 Manometer
Check hydraulic oil level in the looking
glass.
–
The oil level must lie between “MIN“
and “MAX“ marking.
–
Add hydraulic oil if the oil level is below
the "MIN" marking.
Loosen the closing cap of the oil filling
opening.
Clean the filling area.
Refill hydraulic oil.
Oil grade: see Technical Data
Replace and tighten the closing cap of
the oil filling opening.
Note
If the pressure gauge shows an increased
hydraulic oil pressure, the hydraulic oil filter
must be replaced by Kärcher customer ser-
vice.
Lock parking brake.
Start the motor.
Only Kärcher Customer Service is author-
ised to carry out maintenance tasks on the
hydraulic unit.
Check all hydraulic hoses and connec-
tions and ensure that they are leak-
proof.
Turn the ignition key to position "I".
Raise the waste container up to the
end-position.
Turn the ignition key to 0 position.
Lock parking brake.
Use the safety bar for emptying from a
height.
Remove belts or cords from roller
brush.
Remove the safety bar.
Insert the ignition key into the ignition
switch.
Turn the ignition key to position "I".
Maintenance and care
General notes
Cleaning
Cleaning the inside of the machine
External cleaning of the appliance
Maintenance intervals
Maintenance by the customer
Maintenance by Customer Service
Maintenance Works
General notes on safety
Replace batteries
Check hydraulic oil level and refill hy-
draulic oil
Check hydraulic unit
Checking roller brush
20 EN
-
8
Lower the waste container up to the
end-position.
Turn ignition key to "0" and remove it.
1 Fastening screws of the roller brush in-
take
2 Roller brush
3 Roller brush intake
4 Holding plate for side seal
5 Side seal
Open the side covers using a key.
Unscrew the wingnuts from the holding
plate side seals and remove the holding
plate.
Flip the side seal out.
Uncscrew the retaining screw of the
roller brush intake, and swing the intake
to the outside.
Pull out roller brush.
Installation position of roller brush in direc-
tion of travel (top view)
Note:
When installing the new roller brush,
ensure correct positioning of the bristle as-
sembly.
Install new roller brush. The nuts of the
roller brush must be inserted on the
notches of the opposite crank.
Note:
Once the new roller brush has been
installed, the sweeping track must readjust-
ed.
Note
: The sweeping track is factory-set to
80 mm; it is steplessly adjustable if the
brush roller wears down.
Check tyre pressure.
Switch off suction blower.
Drive sweeper on to a smooth, even
surface covered with a visible layer of
dust or chalk.
Set the programme switch to sweep
with roller brush.
Set programme selection switch to
"Transport drive".
Drive machine backwards.
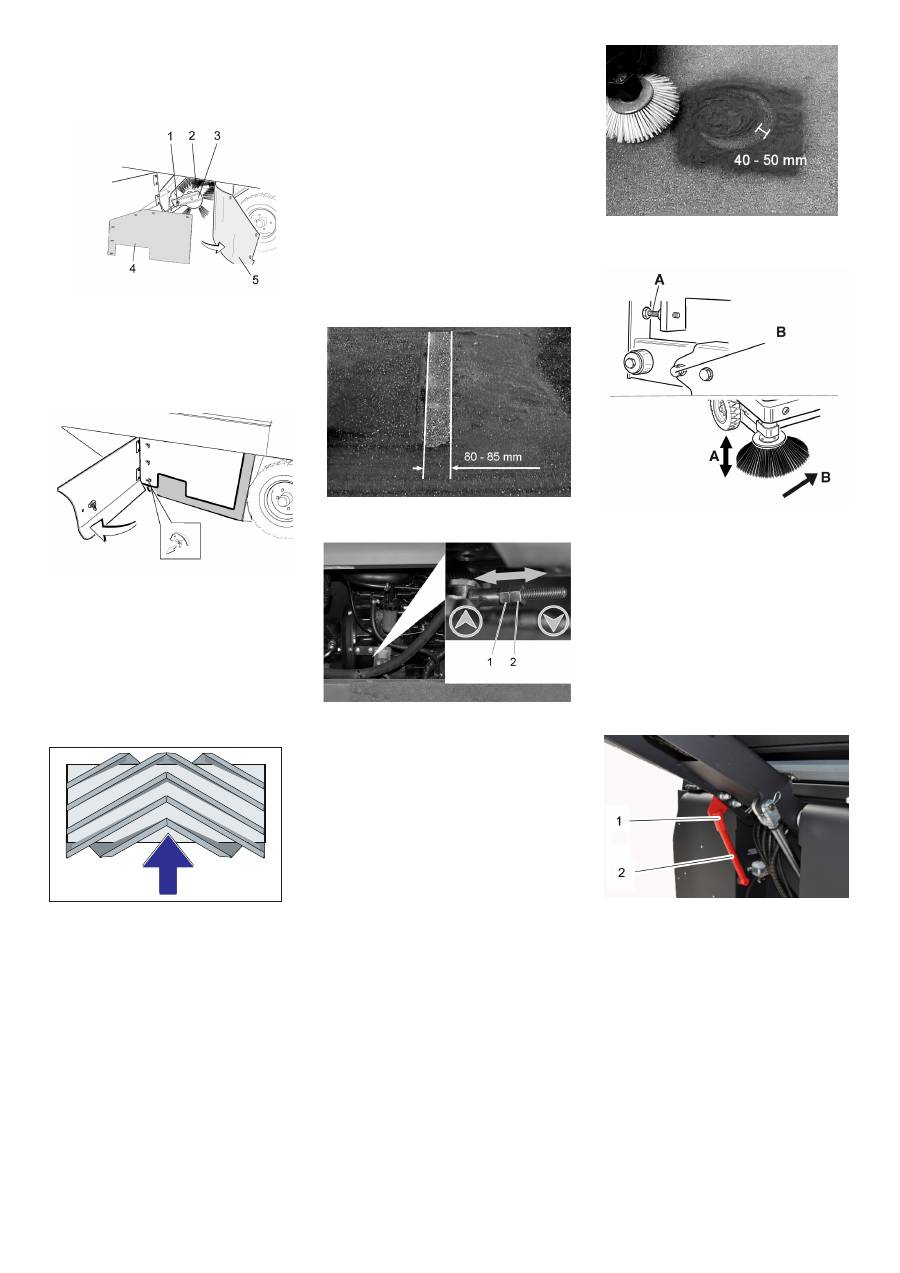
Check sweeping mirror.
The sweeping track should have an even
rectangular shape which is 80-85 mm wide.
1 Rating nut
2 Counter-nut
Open the side engine panel.
Loosen counter-nut.
Adjust sweeping track
Tighten counter nut.
Check the sweeping track of the sweep-
ing roller.
The side-brushes lift up.
Drive sweeper on to a smooth, even
surface covered with a visible layer of
dust or chalk.
Set the programme switch to sweep
with roller brush and side brush.
The side-brushes lift up.
Set programme selection to "Drive".
Drive machine backwards.
Check sweeping mirror.
The width of the sweeping track should lie
between 40-50 mm.
Set the sweeping track using the two
adjusting screws.
Check sweeping mirror.
Drive the waste container up and se-
cure it with the safety rod.
Danger
Risk of injury! Always apply the safety bar
when the waste container is raised.
Fold the safety rod for the high empty-
ing up and insert it into the holder (se-
cured).
1 Holder of safety rod
2 Safety rod
Open the side cover as described in
Chapter "Replace brush roller".
Release the 6 wing nuts on the side
holding plate.
Loosen 3 nuts (SW 13) on the front
holding plate.
Press the side seal down (elongated
hole) until it is about 1 to 3 mm to the
floor.
Screw in the holding plates.
Repeat the procedure on the other side
of the appliance.
Replacing roller brush
Check and adjust roller brush sweeping
track
Check and adjust sweeping track of the
side-brush
Adjust the side seals
21 EN
Оглавление
- Inhaltsverzeichnis
- Funktion Bestimmungsgemäße Ver- wendung
- Bedien- und Funktionselemente
- Vor Inbetriebnahme
- Betrieb
- TransportLagerung Stilllegung
- Pflege und Wartung
- 1 2
- Hilfe bei Störungen
- Technische Daten
- Contents
- Function Proper use
- Operating and Functional Elements
- Before Startup
- Operation
- Transport Storage Shutdown
- Maintenance and care
- 1 2
- Troubleshooting
- Technical specifications
- Table des matières
- Fonction Utilisation conforme
- Eléments de commande et de fonction
- Avant la mise en service
- Fonctionnement
- Transport Stockage Remisage
- Entretien et maintenance
- 1 2
- Déclaration de conformité CE
- Assistance en cas de panne
- Caractéristiques techniques
- Indice
- Funzione Uso conforme a destinazione
- Elementi di comando e di funzione
- Prima della messa in funzione
- Funzionamento
- Trasporto Conservazione Fermo dell'impianto
- Cura e manutenzione
- 1 2
- Dichiarazione di conformità CE
- Guida alla risoluzione dei guasti
- Dati tecnici
- Inhoudsopgave
- Functie Reglementair gebruik
- Elementen voor de bediening en de functies
- Voor de inbedrijfstelling
- Werking
- Transport Opslag Stillegging
- Onderhoud
- 1 2
- Hulp bij storingen
- Technische gegevens
- Índice de contenidos
- Función Uso previsto
- Elementos de operación y funcionamiento
- Antes de la puesta en marcha
- Funcionamiento
- Transporte Cojinete Parada
- Cuidados y mantenimiento
- 1 2
- Declaración de conformidad CE
- Ayuda en caso de avería
- Datos técnicos
- Índice
- Funcionamento Utilização conforme o fim a que se destina a máquina
- Elementos de comando e de funcionamento
- Antes de colocar em funcionamento
- Funcionamento
- Transporte Armazenamento Desactivação da máquina
- Conservação e manutenção
- 1 2
- Declaração de conformidade CE
- Ajuda em caso de avarias
- Dados técnicos
- Indholdsfortegnelse
- Funktion Bestemmelsesmæssig‚ anvendelse
- Betjenings- og funktionselementer
- Inden ibrugtagning
- Drift
- Transport Opbevaring Afbrydning/nedlæggelsePleje og vedligeholdelse
- 1 2
- EU-overensstemmelses-er- klæring
- Hjælp ved fejl
- Tekniske data
- Innholdsfortegnelse
- Funksjon Forskriftsmessig bruk
- Betjenings- og funksjonelementer
- Før den tas i bruk
- Drift
- Transport Lagring Sette bort Pleie og vedlikehold
- 1 2
- EU-samsvarserklæring
- Feilretting
- Tekniske data
- Innehållsförteckning
- Funktion Ändamålsenlig användning
- Manövrerings- och funktionselement
- Före ibruktagande
- Drift
- Transport Lagring Nedstängning Skötsel och underhåll
- 1 2
- Försäkran om EU-överensstämmelse
- Åtgärder vid störningar
- Tekniska data
- Sisällysluettelo
- Toiminta Käyttötarkoitus
- Ohjaus- ja käyttölaitteet
- Ennen käyttöönottoa
- Käyttö
- Kuljetus Säilytys Seisonta-aika Hoito ja huolto
- 1 2
- EU-standardinmukaisu- ustodistus
- Häiriöapu
- Tekniset tiedot
- Πίνακας περιεχομένων
- Λειτουργία Χρήση σύμφωνα με τους κανονισμούς
- Στοιχεία χειρισμού και λειτουργίας
- Πριν τη θέση σε λειτουργία
- Λειτουργία
- Μεταφορά Αποθήκευση Διακοπή της λειτουργίας
- Φροντίδα και συντήρηση
- 1 2
- Δήλωση Συμμόρφωσης των Ε . Κ .
- Αντιμετώπιση βλαβών
- Τεχνικά χαρακτηριστικά
- İ çindekiler
- Fonksiyon Kurallara uygun kullan ı m
- Kullan ı m ve çal ı ş ma elemanlar ı
- Cihaz ı çal ı ş t ı rmaya ba ş lamadan önce
- Çal ı ş t ı rma
- Ta ş ı ma DepolamaDurdurma Koruma ve Bak ı m
- 1 2
- AB uygunluk bildirisi
- Ar ı zalarda yard ı m
- Teknik Bilgiler
- Оглавление
- Назначение Использование по назначению
- Защита окружающей среды
- Описание элементов управления и рабочих узлов
- Перед началом работы
- Эксплуатация
- Транспортировка
- Хранение Вывод из эксплуатации Уход и техническое обслуживание
- 1 2
- Заявление о соответствии ЕС
- Помощь в случае неполадок
- Технические данные
- Tartalomjegyzék
- Funkció Rendeltetésszer ű használat
- Kezelési- és funkciós elemek
- Üzembevétel el ő tt
- Üzem
- Szállítás A készülék tárolása Leállítás Ápolás és karbantartás
- 1 2
- EK konformitási nyilatkozat
- Segítség üzemzavar esetén
- M ű szaki adatok
- Obsah
- Funkce Používání v souladu s ur č ením
- Ovládací a funk č ní prvky
- P ř ed uvedením do provozu
- Provoz
- P ř eprava Uskladn ě ní p ř ístroje Odstavení Ošet ř ování a údržba
- 1 2
- Prohlášení o shod ě pro ES
- Pomoc p ř i poruchách
- Technické údaje
- Vsebinsko kazalo
- Delovanje Namenska uporaba
- Upravljalni in funkcijski elementi
- Pred zagonom
- Obratovanje
- Transport Shranjevanje stroja Mirovanje naprave Nega in vzdrževanje
- 1 2
- ES-izjava o skladnosti
- Pomo č pri motnjah
- Tehni č ni podatki
- Spis tre ś ci
- Funkcja U ż ytkowanie zgodne z przeznaczeniem
- Elementy urz ą dzenia
- Przed pierwszym uruchomieniem
- Dzia ł anie
- Transport Przechowywanie Wy łą czenie z eksploatacji Czyszczenie i konserwacja
- 1 2
- Usuwanie usterek
- Dane techniczne
- Cuprins
- Func ţ ionarea Utilizarea corect ă
- Elemente de utilizare ş i func ţ ionale
- Înainte de punerea în func ţ iune
- Func ţ ionarea
- Transportul Depozitarea aparatului Scoaterea din func ţ iune Îngrijirea ş i între ţ inerea
- 1 2
- Remedierea defec ţ iunilor
- Date tehnice
- Obsah
- Funkcia Používanie výrobku v súlade s jeho ur č ením
- Ovládacie a funk č né prvky
- Pred uvedením do prevádzky
- Prevádzka
- Preprava Uloženie prístroja Odstavenie Starostlivos ť a údržba
- 1 2
- Pomoc pri poruchách
- Technické údaje
- Pregled sadržaja
- Funkcija Namjensko korištenje
- Komandni i funkcijski elementi
- Prije prve uporabe
- U radu
- Transport Skladištenje ure đ aja Stavljanje ure đ aja van pogona Njega i održavanje
- 1 2
- EZ izjava o uskla đ enosti
- Otklanjanje smetnji
- Tehni č ki podaci
- Pregled sadržaja
- Funkcija Namensko koriš ć enje
- Komandni i funkcioni elementi
- Pre upotrebe
- Rad
- Transport Skladištenje ure đ aja Stavljanje ure đ aja van pogona Nega i održavanje
- 1 2
- Izjava o uskla đ enosti sa propisima EZ
- Otklanjanje smetnji
- Tehni č ki podaci
- Съдържание
- Функция Употреба по предназначение
- Опазване на околната среда
- Обслужващи и функционални елементи
- Преди пускане в експлоатация
- Експлоатация
- Транспорт Съхранение на уреда Спиране от експлоатация
- Грижи и поддръжка
- 1 2
- Декларация за съответствие на ЕО
- Помощ при неизправности
- Технически данни
- Sisukord
- Funktsioon Sihipärane kasutamine
- Teenindus- ja funktsioonielemendid
- Enne seadme kasutuselevõttu
- Käitamine
- Transport Hoiustamine Seismapanek Korrashoid ja tehnohooldus
- 1 2
- EÜ vastavusdeklaratsioon
- Abi häirete korral
- Tehnilised andmed
- Satura r ā d ī t ā js
- Darb ī ba Noteikumiem atbilstoša lietošana
- Vad ī bas un funkcijas elementi
- Pirms ekspluat ā cijas uzs ā kšanas
- Darb ī ba
- Apar ā ta p ā rvietošana Glab ā šana Iekonserv ē šana Kopšana un tehnisk ā apkope
- 1 2
- EK Atbilst ī bas deklar ā cija
- Pal ī dz ī ba darb ī bas trauc ē jumu gad ī jum ā
- Tehniskie dati
- Turinys
- Veikimas Naudojimas pagal paskirt į
- Valdymo ir funkciniai elementai
- Prieš pradedant naudoti
- Naudojimas
- Transportavimas Laikymas Laikinas prietaiso nenaudojimas Prieži ū ra ir aptarnavimas
- 1 2
- EB atitikties deklaracija
- Pagalba gedim ų atveju
- Techniniai duomenys
- Перелік
- Призначення Правильне застосування
- Захист навколишнього середовища
- Елементи управління і функціональні вузли
- Перед початком роботи
- Експлуатація
- Транспортування ЗберіганняЗберігання Догляд та технічне обслуговування
- 1 2
- Заява при відповідність Європейського співтовариства
- Допомога у випадку неполадок
- Технічні характеристики
- Ⳃᔩ
- ࡳ㛑 ড়Т㾘ᅮⱘՓ⫼
- ᪡ܗӊࡳ㛑ܗӊ
- 䆒䖤ࠡ
- 䆒䖤
- 䖤䕧ᄬᬒᇕᄬ ֱݏϢ㓈ᡸ
- 1 2
- ⲳ䖒ᷛໄᯢ
- ᬙ䱰ᥦ䰸
- ѻક㾘Ḑ খ᭄
- ҩҵҸҫҳҫҮҫӃҷӃҫӄҭ
- ҫӃӇҼӉӀҭ ҫӃҫҷҮҲҳҫӄҫӃӄһҫҬӁ ӃӃҮҽӃӉӄҫҮ
- ұӄҫӉҭҫӃҬӉҪҭ
- ҽӅҫҹҵҫӃҫҷҮҽӄҫӃӇҫӃҽӅҫҹҵҫӃӇҼӉӀӉҭ
- ӁҬӃҫӃҮҸҾӉӃ
- ҫӃҮҸҾӉӃ
- ӅӁӃҫӃҰӆҫҶ ҫӃҮҲҶӉӅ ҩӉӁҫӀҫӃҰӆҫҶӃӀҮҵҭһӇӉӃҭ
- ҫӃҽӅҫӉҭӇҫӃҹӉҫӅҭ
- 1 2
- ҫӃҺӄҫӅ
- ҫӃӄҷҫҽҳҭҽӅҳұҳӇүҧҽһҫӃ
