Karcher Balayeuse KM 130-300 R Bp: 1 2
1 2: Karcher Balayeuse KM 130-300 R Bp
-
9
Clean the dust filter with the filter clean-
ing button.
몇
Warning
Empty waste container before replacing
dust filter. Wear a dust mask when working
around the dust filter. Observe safety regu-
lations on the handling of fine particulate
material.
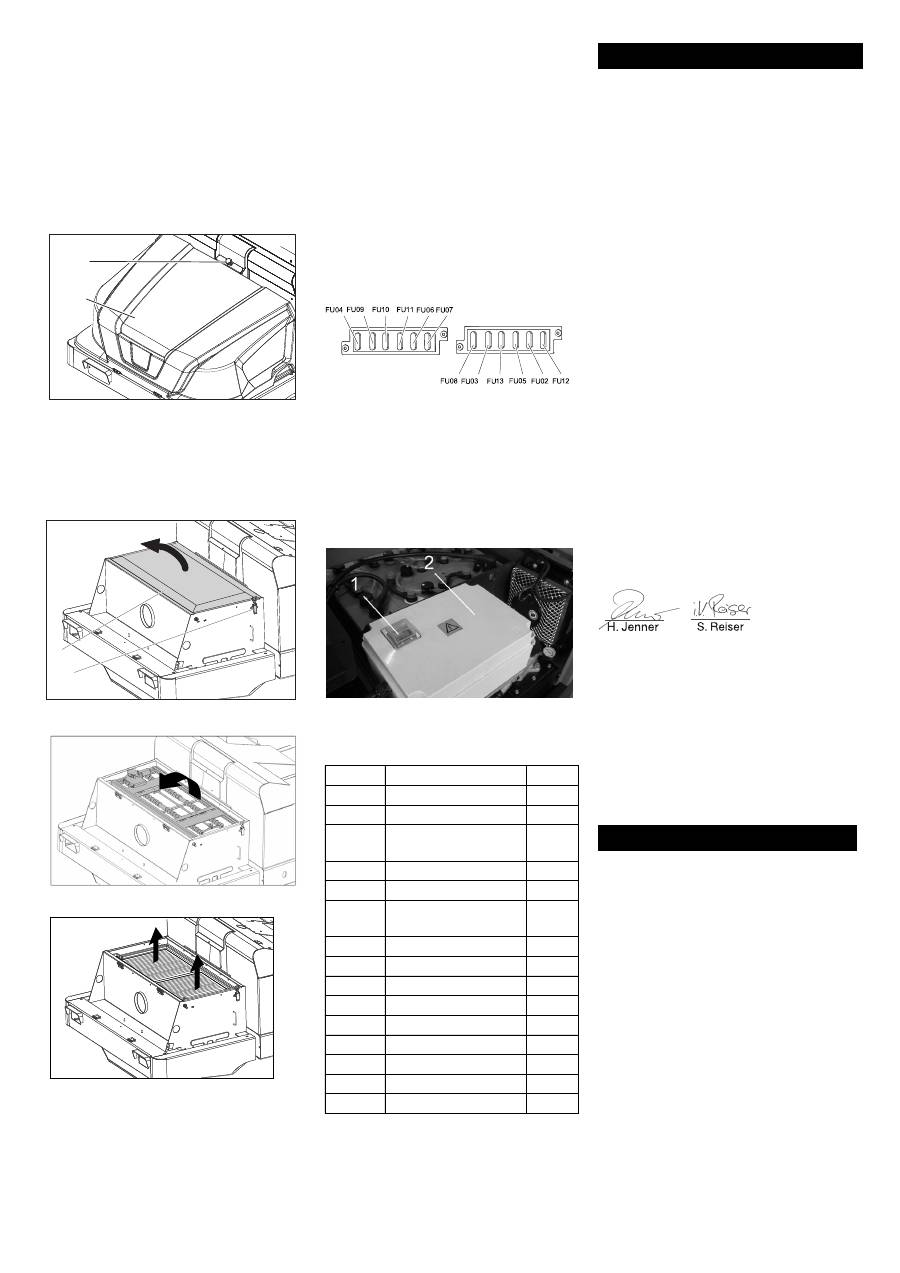
1 Lock of appliance hood
2 Cover
Open the lock, remove the star grip
screw to do this.
Fold cover forwards.
Open filter cap.
Fold the filter vibrator forward.
Replace the dust filter.
Close the filter cover.
Unscrew the head lamps.
Take out the head lamps and pull out
the plug.
Note:
Note the positions of the plugs.
Dismantle the head lamps.
Dismantle the head lamp casing and
hold it horizontally because the lamp
unit is not fastened.
Unlock the bracked and take out the
bulb.
Insert new bulb.
Reinstall in reverse sequence.
Note:
Remove the glass of the direction-in-
dicator lamp from its casing to replace the
bulb.
Open the fuse holder.
Check the fuses.
Replace defective fuses.
Note:
The fuse FU 01 (main fuse) is locat-
ed on the electronics casing.
The fuses FU 14, FU 15 and FU 16 are lo-
cated in the electronics casing.
Attention
:
Opening of electronics casing and replac-
ing of fuses only by customer service.
1 Fuse FU 01 (main fuse)
2 Electronics casing
Note:
Only use fuses with identical safety
ratings.
We hereby declare that the machine de-
scribed below complies with the relevant
basic safety and health requirements of the
EU Directives, both in its basic design and
construction as well as in the version put
into circulation by us. This declaration shall
cease to be valid if the machine is modified
without our prior approval.
The undersigned act on behalf and under
the power of attorney of the company man-
agement.
Authorised Documentation Representative
S. Reiser
Alfred Kärcher GmbH Co. KG
Alfred-Kärcher-Str. 28 - 40
71364 Winnenden (Germany)
Phone: +49 7195 14-0
Fax: +49 7195 14-2212
Winnenden, 2012/04/01
The warranty terms published by the rele-
vant sales company are applicable in each
country. We will repair potential failures of
your appliance within the warranty period
free of charge, provided that such failure is
caused by faulty material or defects in man-
ufacturing. In the event of a warranty claim
please contact your dealer or the nearest
authorized Customer Service centre.
Please submit the proof of purchase.
Manually clean the dust filter
Replacing dust filter
Changing the headlight bulb (option)
1 2
2
1
Changing the blinker bulb (option)
Replacing fuses
FU 01
Main fuse
220 A
FU 02
Seat contact switch
3 A
FU 03
Driver cabin (optional) 10 A
FU 04
Driving direction
switch
5 A
FU 05
Multifunction display
3 A
FU 06
Hydraulic oil cooler
25 A
FU 07
Program selection
switch
15 A
FU 08
Horn
10 A
FU 09
Left lighting
7.5 A
FU 10
Right lighting
7.5 A
FU 11
Working light
10 A
FU 12
Beacon lamp
5 A
FU 13
Vibrator system
10 A
FU 14
Motor
3 A
FU 15
Voltage converter
20 A
FU 16
Key switch
3 A
EC Declaration of Conformity
Product:
Sweeper
Type:
1.186-xxx
Relevant EU Directives
2006/42/EC (+2009/127/EC)
2004/108/EC
2000/14/EC
Applied harmonized standards
EN 55012: 2007 + A1: 2009
EN 61000–6–2: 2005
EN 60335–1
EN 60335–2–29: 2004+A2: 2010
EN 60335–2–72
EN 61000–3–2: 2006+A1: 2009+A2: 2009
EN 61000–3–3: 2008
EN 62233: 2008
Applied conformity evaluation method
2000/14/EC: Appendix V
Sound power level dB(A)
Measured:
90
Guaranteed: 93
Warranty
CEO
Head of Approbation
22 EN
Оглавление
- Inhaltsverzeichnis
- Funktion Bestimmungsgemäße Ver- wendung
- Bedien- und Funktionselemente
- Vor Inbetriebnahme
- Betrieb
- TransportLagerung Stilllegung
- Pflege und Wartung
- 1 2
- Hilfe bei Störungen
- Technische Daten
- Contents
- Function Proper use
- Operating and Functional Elements
- Before Startup
- Operation
- Transport Storage Shutdown
- Maintenance and care
- 1 2
- Troubleshooting
- Technical specifications
- Table des matières
- Fonction Utilisation conforme
- Eléments de commande et de fonction
- Avant la mise en service
- Fonctionnement
- Transport Stockage Remisage
- Entretien et maintenance
- 1 2
- Déclaration de conformité CE
- Assistance en cas de panne
- Caractéristiques techniques
- Indice
- Funzione Uso conforme a destinazione
- Elementi di comando e di funzione
- Prima della messa in funzione
- Funzionamento
- Trasporto Conservazione Fermo dell'impianto
- Cura e manutenzione
- 1 2
- Dichiarazione di conformità CE
- Guida alla risoluzione dei guasti
- Dati tecnici
- Inhoudsopgave
- Functie Reglementair gebruik
- Elementen voor de bediening en de functies
- Voor de inbedrijfstelling
- Werking
- Transport Opslag Stillegging
- Onderhoud
- 1 2
- Hulp bij storingen
- Technische gegevens
- Índice de contenidos
- Función Uso previsto
- Elementos de operación y funcionamiento
- Antes de la puesta en marcha
- Funcionamiento
- Transporte Cojinete Parada
- Cuidados y mantenimiento
- 1 2
- Declaración de conformidad CE
- Ayuda en caso de avería
- Datos técnicos
- Índice
- Funcionamento Utilização conforme o fim a que se destina a máquina
- Elementos de comando e de funcionamento
- Antes de colocar em funcionamento
- Funcionamento
- Transporte Armazenamento Desactivação da máquina
- Conservação e manutenção
- 1 2
- Declaração de conformidade CE
- Ajuda em caso de avarias
- Dados técnicos
- Indholdsfortegnelse
- Funktion Bestemmelsesmæssig‚ anvendelse
- Betjenings- og funktionselementer
- Inden ibrugtagning
- Drift
- Transport Opbevaring Afbrydning/nedlæggelsePleje og vedligeholdelse
- 1 2
- EU-overensstemmelses-er- klæring
- Hjælp ved fejl
- Tekniske data
- Innholdsfortegnelse
- Funksjon Forskriftsmessig bruk
- Betjenings- og funksjonelementer
- Før den tas i bruk
- Drift
- Transport Lagring Sette bort Pleie og vedlikehold
- 1 2
- EU-samsvarserklæring
- Feilretting
- Tekniske data
- Innehållsförteckning
- Funktion Ändamålsenlig användning
- Manövrerings- och funktionselement
- Före ibruktagande
- Drift
- Transport Lagring Nedstängning Skötsel och underhåll
- 1 2
- Försäkran om EU-överensstämmelse
- Åtgärder vid störningar
- Tekniska data
- Sisällysluettelo
- Toiminta Käyttötarkoitus
- Ohjaus- ja käyttölaitteet
- Ennen käyttöönottoa
- Käyttö
- Kuljetus Säilytys Seisonta-aika Hoito ja huolto
- 1 2
- EU-standardinmukaisu- ustodistus
- Häiriöapu
- Tekniset tiedot
- Πίνακας περιεχομένων
- Λειτουργία Χρήση σύμφωνα με τους κανονισμούς
- Στοιχεία χειρισμού και λειτουργίας
- Πριν τη θέση σε λειτουργία
- Λειτουργία
- Μεταφορά Αποθήκευση Διακοπή της λειτουργίας
- Φροντίδα και συντήρηση
- 1 2
- Δήλωση Συμμόρφωσης των Ε . Κ .
- Αντιμετώπιση βλαβών
- Τεχνικά χαρακτηριστικά
- İ çindekiler
- Fonksiyon Kurallara uygun kullan ı m
- Kullan ı m ve çal ı ş ma elemanlar ı
- Cihaz ı çal ı ş t ı rmaya ba ş lamadan önce
- Çal ı ş t ı rma
- Ta ş ı ma DepolamaDurdurma Koruma ve Bak ı m
- 1 2
- AB uygunluk bildirisi
- Ar ı zalarda yard ı m
- Teknik Bilgiler
- Оглавление
- Назначение Использование по назначению
- Защита окружающей среды
- Описание элементов управления и рабочих узлов
- Перед началом работы
- Эксплуатация
- Транспортировка
- Хранение Вывод из эксплуатации Уход и техническое обслуживание
- 1 2
- Заявление о соответствии ЕС
- Помощь в случае неполадок
- Технические данные
- Tartalomjegyzék
- Funkció Rendeltetésszer ű használat
- Kezelési- és funkciós elemek
- Üzembevétel el ő tt
- Üzem
- Szállítás A készülék tárolása Leállítás Ápolás és karbantartás
- 1 2
- EK konformitási nyilatkozat
- Segítség üzemzavar esetén
- M ű szaki adatok
- Obsah
- Funkce Používání v souladu s ur č ením
- Ovládací a funk č ní prvky
- P ř ed uvedením do provozu
- Provoz
- P ř eprava Uskladn ě ní p ř ístroje Odstavení Ošet ř ování a údržba
- 1 2
- Prohlášení o shod ě pro ES
- Pomoc p ř i poruchách
- Technické údaje
- Vsebinsko kazalo
- Delovanje Namenska uporaba
- Upravljalni in funkcijski elementi
- Pred zagonom
- Obratovanje
- Transport Shranjevanje stroja Mirovanje naprave Nega in vzdrževanje
- 1 2
- ES-izjava o skladnosti
- Pomo č pri motnjah
- Tehni č ni podatki
- Spis tre ś ci
- Funkcja U ż ytkowanie zgodne z przeznaczeniem
- Elementy urz ą dzenia
- Przed pierwszym uruchomieniem
- Dzia ł anie
- Transport Przechowywanie Wy łą czenie z eksploatacji Czyszczenie i konserwacja
- 1 2
- Usuwanie usterek
- Dane techniczne
- Cuprins
- Func ţ ionarea Utilizarea corect ă
- Elemente de utilizare ş i func ţ ionale
- Înainte de punerea în func ţ iune
- Func ţ ionarea
- Transportul Depozitarea aparatului Scoaterea din func ţ iune Îngrijirea ş i între ţ inerea
- 1 2
- Remedierea defec ţ iunilor
- Date tehnice
- Obsah
- Funkcia Používanie výrobku v súlade s jeho ur č ením
- Ovládacie a funk č né prvky
- Pred uvedením do prevádzky
- Prevádzka
- Preprava Uloženie prístroja Odstavenie Starostlivos ť a údržba
- 1 2
- Pomoc pri poruchách
- Technické údaje
- Pregled sadržaja
- Funkcija Namjensko korištenje
- Komandni i funkcijski elementi
- Prije prve uporabe
- U radu
- Transport Skladištenje ure đ aja Stavljanje ure đ aja van pogona Njega i održavanje
- 1 2
- EZ izjava o uskla đ enosti
- Otklanjanje smetnji
- Tehni č ki podaci
- Pregled sadržaja
- Funkcija Namensko koriš ć enje
- Komandni i funkcioni elementi
- Pre upotrebe
- Rad
- Transport Skladištenje ure đ aja Stavljanje ure đ aja van pogona Nega i održavanje
- 1 2
- Izjava o uskla đ enosti sa propisima EZ
- Otklanjanje smetnji
- Tehni č ki podaci
- Съдържание
- Функция Употреба по предназначение
- Опазване на околната среда
- Обслужващи и функционални елементи
- Преди пускане в експлоатация
- Експлоатация
- Транспорт Съхранение на уреда Спиране от експлоатация
- Грижи и поддръжка
- 1 2
- Декларация за съответствие на ЕО
- Помощ при неизправности
- Технически данни
- Sisukord
- Funktsioon Sihipärane kasutamine
- Teenindus- ja funktsioonielemendid
- Enne seadme kasutuselevõttu
- Käitamine
- Transport Hoiustamine Seismapanek Korrashoid ja tehnohooldus
- 1 2
- EÜ vastavusdeklaratsioon
- Abi häirete korral
- Tehnilised andmed
- Satura r ā d ī t ā js
- Darb ī ba Noteikumiem atbilstoša lietošana
- Vad ī bas un funkcijas elementi
- Pirms ekspluat ā cijas uzs ā kšanas
- Darb ī ba
- Apar ā ta p ā rvietošana Glab ā šana Iekonserv ē šana Kopšana un tehnisk ā apkope
- 1 2
- EK Atbilst ī bas deklar ā cija
- Pal ī dz ī ba darb ī bas trauc ē jumu gad ī jum ā
- Tehniskie dati
- Turinys
- Veikimas Naudojimas pagal paskirt į
- Valdymo ir funkciniai elementai
- Prieš pradedant naudoti
- Naudojimas
- Transportavimas Laikymas Laikinas prietaiso nenaudojimas Prieži ū ra ir aptarnavimas
- 1 2
- EB atitikties deklaracija
- Pagalba gedim ų atveju
- Techniniai duomenys
- Перелік
- Призначення Правильне застосування
- Захист навколишнього середовища
- Елементи управління і функціональні вузли
- Перед початком роботи
- Експлуатація
- Транспортування ЗберіганняЗберігання Догляд та технічне обслуговування
- 1 2
- Заява при відповідність Європейського співтовариства
- Допомога у випадку неполадок
- Технічні характеристики
- Ⳃᔩ
- ࡳ㛑 ড়Т㾘ᅮⱘՓ⫼
- ᪡ܗӊࡳ㛑ܗӊ
- 䆒䖤ࠡ
- 䆒䖤
- 䖤䕧ᄬᬒᇕᄬ ֱݏϢ㓈ᡸ
- 1 2
- ⲳ䖒ᷛໄᯢ
- ᬙ䱰ᥦ䰸
- ѻક㾘Ḑ খ᭄
- ҩҵҸҫҳҫҮҫӃҷӃҫӄҭ
- ҫӃӇҼӉӀҭ ҫӃҫҷҮҲҳҫӄҫӃӄһҫҬӁ ӃӃҮҽӃӉӄҫҮ
- ұӄҫӉҭҫӃҬӉҪҭ
- ҽӅҫҹҵҫӃҫҷҮҽӄҫӃӇҫӃҽӅҫҹҵҫӃӇҼӉӀӉҭ
- ӁҬӃҫӃҮҸҾӉӃ
- ҫӃҮҸҾӉӃ
- ӅӁӃҫӃҰӆҫҶ ҫӃҮҲҶӉӅ ҩӉӁҫӀҫӃҰӆҫҶӃӀҮҵҭһӇӉӃҭ
- ҫӃҽӅҫӉҭӇҫӃҹӉҫӅҭ
- 1 2
- ҫӃҺӄҫӅ
- ҫӃӄҷҫҽҳҭҽӅҳұҳӇүҧҽһҫӃ
