Karcher B 150 R Bp Adv- Dose: Troubleshooting
Troubleshooting: Karcher B 150 R Bp Adv- Dose

-
9
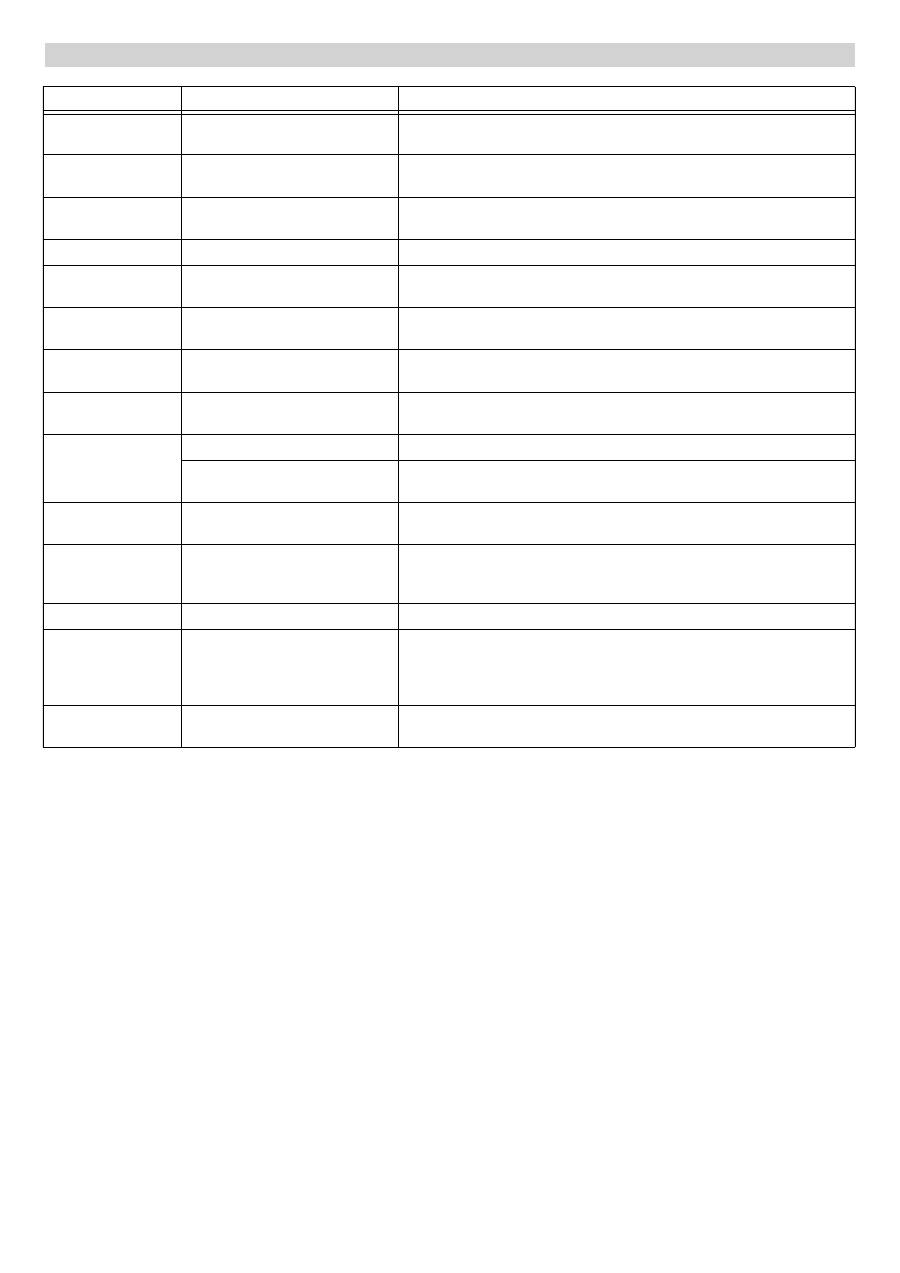
Connect the hose couplers on the
cleaning head to the hose on the appli-
ance.
Insert the tab into the middle of the
cleaning head, between the fork of the
lever.
Align the holder of the cleaning head so
that the drilled holes in the lever and the
cleaning head match.
Insert the stop pin through the bushings
and swivel the locking plate downward.
Insert the cylinder pin into the boring of
the drawbar.
Slide the drawbar with the pin the guide
channel on the cleaning head all the
way to the bottom and lock.
Repeat process on the drawbar on the
opposite side.
Insert the grey intelligent key.
Set brush type "Brush".
Press in the locking plate and swivel the
drawbar upward.
The subsequent removal will take place in
the opposite order of the installation.
The removal will take place in the opposite
order of the installation.
Lift the cleaning head.
Loosen the lock of the wiper flap.
Swivel the wiping flap out of the way.
Loosen the lock of the wiper flap.
Push the bearing lid down and remove.
Pull out the brush roller.
Insert a new brush roller.
Reattach the bearing lid and the wiper
flap in reverse sequence.
Repeat process on the opposite side.
Lift the cleaning head.
Press the pedal for changing the brush-
es downward beyond its resistance.
Pull the disc brush out of the side below
the cleaning head.
Hold the new disc brush under the
cleaning head, push upward and lock.
Loosen 3 screws.
Remove the wiper blade.
Push in the new side brush.
Tighten 3 screws.
In case of danger of frost:
Empty the fresh and dirt water reser-
voirs.
Store the appliance in a frost-protected
room.
DANGER
Risk of injury! Before working on the appli-
ance, remove the Intelligent Key and the
mains plug of the charger.
Pull out the battery plug.
Drain and dispose of the dirt water and
the residual fresh water.
몇
CAUTION
Risk of injury due to overrun of the suction
turbine.
Suction turbine will continue to run for a
while after switch-off. Carry out mainte-
nance tasks only after the suction turbine
has come to a halt.
In case of faults that cannot be remedied
using the table below please contact the
customer service.
If errors appear on the display, then pro-
ceed as follows:
Execute instructions on the display.
Acknowledge the fault by pressing the
info button.
Turn the program selection switch to
"OFF".
Wait till the text on the display has dis-
appeared.
Turn the programme switch into the
previous position.
Only carry out the troubleshooting
measures in the indicated order if the
error occurs again. The key switch must
be in the "0" position and the emergen-
cy stop button pressed.
If the fault cannot be repaired, call cus-
tomer service and mention the error
message.
Note:
Fault messages that are not listed in the fol-
lowing table indicate faults that cannot be
rectified by the operator. Please contact the
aftersales service.
Remove D cleaning head
Remove R cleaning head
Replacing the brush rollers
Replacing the Disk Brushes
Replacing the side brush (only with SB
version)
Frost protection
Troubleshooting
Fault indication
Fault indication as text
Fault indication as numerical code
24 EN
-
10
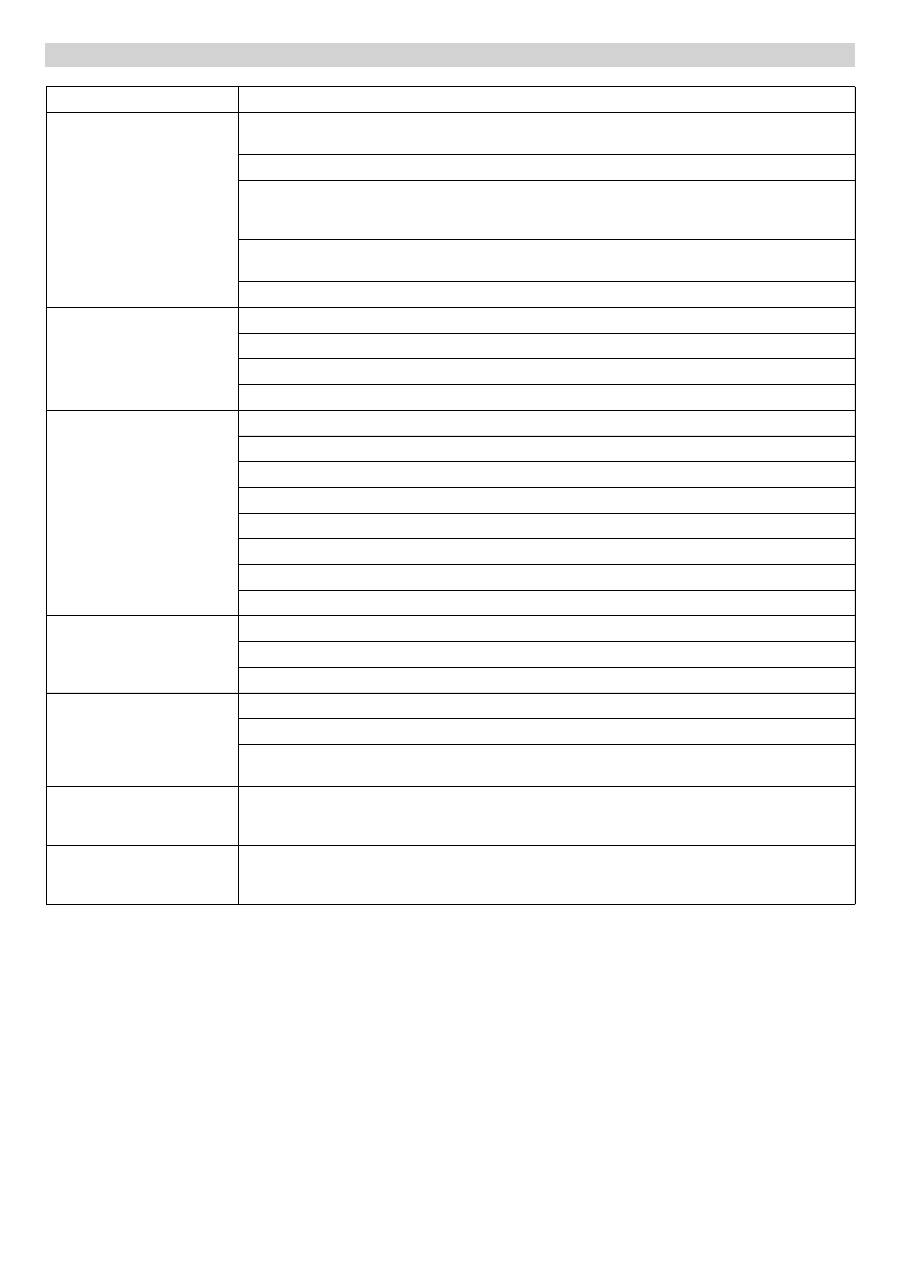
Faults with display
Display
Cause
Remedy
Seat switch open!
Seat contact switch has not been
activated.
Release the drive pedal. Have a seat.
Release accelerator! The gas pedal is depressed when
the main switch is on.
Release drive pedal and reactivate.
No direction of travel! Travel direction switch or cable
connection defective.
Call customer service.
Battery discharged!
Battery voltage too low.
Charge battery.
Battery voltage inad-
missible!
Battery voltage is above or below
the admissible range.
Call customer service.
Charger defective!
Error on the charger, charging is
not possible.
Check the charger.
Fresh water tank
empty!
The fresh water tank is empty.
Fill up fresh water reservoir.
Brush pressure not
reached!
Timeout brush contact pressure
control.
Check brush wear, replace brush if required.
Check the function of the brush heads: lowering, raising.
Waste water tank
full!
wastewater reservoir is full.
Empty the dirt water reservoir.
Level sensor or cable connection
defective.
Call customer service.
Brake defective!
Brake defective.
Do not drive the appliance.
Call customer service.
Propulsion motor
hot! Allow to cool
down!
Motor protection was triggered
Bring the safety switch into the "0" position.
Allow machine to cool down at least for 15 minutes.
Contact aftersales service in case of recurrence.
Horn defective!
Horn defective.
Call customer service.
Control is hot! Allow
to cool down!
Performance electronics of lift
module (A4) too hot
Bring the safety switch into the "0" position.
Allow control to cool down at least 5 minutes.
Significantly reduce the brush pressure with rough ground.
Contact aftersales service in case of recurrence.
Brush motors over-
loaded!
Load of the brush heads asym-
metric.
Adjust brush level.
25 EN
-
11
Faults without display on the console
Fault
Remedy
Appliance cannot be started
Seat switch not operated, sit down on the seat.
The machine operates only if the operator is seated on the seat.
Bring the safety switch into the "1" position.
Set the programme switch to "OFF". Wait for 10 seconds. Set the programme selector switch to pre-
vious function. If possible, drive the appliance on level grounds only. Check parking brake and foot
brake if necessary.
Take the foot off the accelerator pedal prior to switching on the safety switch. If the fault recurs, call
the aftersales service.
Check battery; charge it, if needed
Insufficient water quantity
Check fresh water level, refill tank if necessary.
Check hoses for blockages; clean if required.
R cleaning head: Remove the water distributor strip and clean it.
Clean the fresh water filter.
Insufficient vacuum perfor-
mance
Clean the seals between dirt water reservoir and cover and check for tightness, replace if required.
Check protective turbine strainer for soiling, clean if necessary.
Clean the vacuum lips on the vacuum bar, turn or replace if required
Check if the cover on the dirt water discharge hose is closed
Check suction hose for blockages; clean if required.
Check the suction hose for tightness; replace if required.
Check the setting of the vacuum bar.
Attach additional weight (accessory) to the vacuum bar.
Insufficient cleaning result
Set/ adjust contact pressure.
Adjust wiper lips.
Check the brushes for wear, replace if required.
Brushes do not turn
Reduce contact pressure.
Check if foreign matters block the brushes; remove foreign matter if required.
Motor overloaded, allow to cool down. Set the programme switch to "OFF". Wait for 10 seconds. Set
the programme selector switch to previous function.
Drain hose for dirty water is
blocked
Open dosing equipment at the drain hose. Pull out the suction hose from suction beam and close it by
hand. Set the program selection switch to suction or vacuuming. The blockage will be sucked out from
the drain hose into the dirt water tank.
Detergent metering Dose (on-
ly Dose) does not function
properly
Inform Customer Service.
26 EN
Оглавление
- Inhaltsverzeichnis
- Bedienelemente
- Vor Inbetriebnahme
- Betrieb
- Grauer Intelligent Key
- Hilfe bei Störungen
- Technische Daten
- Zubehör und Ersatzteile Garantie EG-Konformitätserklärung
- Contents
- Control elements
- Before Startup
- Operation
- Grey Intelligent Key
- Transport
- Troubleshooting
- Technical specifications
- Accessories and Spare Parts Warranty EC Declaration of Conformity
- Table des matières
- Eléments de commande
- Avant la mise en service
- Fonctionnement
- Intelligent Key grise
- Assistance en cas de panne
- Caractéristiques techniques
- Accessoires et pièces de rechange Garantie Déclaration de conformité CE
- Indice
- Dispositivi di comando
- Prima della messa in funzione
- Funzionamento
- Intelligent Key grigia
- Cura e manutenzione
- Guida alla risoluzione dei guasti
- Dati tecnici
- Accessori e ricambi Garanzia Dichiarazione di conformità CE
- Inhoud
- Bedieningselementen
- Voor de inbedrijfstelling
- Werking
- Grijze Intelligent Key
- Hulp bij storingen
- Technische gegevens
- Toebehoren en reserveonderdelen Garantie EG-conformiteitsverklaring
- Índice de contenidos
- Elementos de mando
- Antes de la puesta en marcha
- Funcionamiento
- Intelligent Key gris
- Ayuda en caso de avería
- Datos técnicos
- Accesorios y piezas de repuesto Garantía Declaración de conformidad CE
- Índice
- Elementos de manuseamento
- Antes de colocar em funcionamento
- Funcionamento
- Intelligent Key cinzento
- Ajuda em caso de avarias
- Dados técnicos
- Acessórios e peças sobressalentes Garantia Declaração de conformidade CE
- Indholdsfortegnelse
- Betjeningselementer
- Inden ibrugtagning
- Drift
- Grå Intelligent Key
- Transport
- Hjælp ved fejl
- Tekniske data
- Tilbehør og reservedele Garanti EU- overensstemmelseserklæring
- Innholdsfortegnelse
- Betjeningselementer
- Før den tas i bruk
- Drift
- Grå Intelligent Key
- Transport
- Feilretting
- Tekniske data
- Tilbehør og reservedeler Garanti EU-samsvarserklæring
- Innehållsförteckning
- Reglage
- Före ibruktagande
- Drift
- Grå Intelligent Key
- Transport
- Åtgärder vid störningar
- Tekniska data
- Tillbehör och reservdelar Garanti Försäkran om EU- överensstämmelse
- Sisällysluettelo
- Hallintalaitteet
- Ennen käyttöönottoa
- Käyttö
- Harmaa Intelligent Key
- Kuljetus
- Häiriöapu
- Tekniset tiedot
- Varusteet ja varaosat Takuu EU- standardinmukaisuustodistus
- Πίνακας περιεχομένων
- Στοιχεία χειρισμού
- Πριν τη θέση σε λειτουργία
- Λειτουργία
- Γκρίζο Intelligent Key
- Μεταφορά
- Αντιμετώπιση βλαβών
- Τεχνικά χαρακτηριστικά
- Εξαρτήματα και ανταλλακτικά Εγγύηση Δήλωση Συμμόρφωσης των Ε . Κ .
- İ çindekiler
- Kumanda elemanlar ı
- Cihaz ı çal ı ş t ı rmaya ba ş lamadan önce
- Çal ı ş t ı rma
- Gri Ak ı ll ı Anahtar
- Ta ş ı ma
- Ar ı zalarda yard ı m
- Teknik Bilgiler
- Aksesuarlar ve yedek parçalar Garanti AB uygunluk bildirisi
- Оглавление
- Элементы управления
- Перед началом работы
- Эксплуатация
- Серый чип - ключ
- Транспортировка
- Помощь в случае неполадок
- Технические данные
- Принадлежности и запасные детали Гарантия
- Tartalomjegyzék
- Kezelési elemek
- Üzembevétel el ő tt
- Üzem
- Szürke Intelligent Key
- Segítség üzemzavar esetén
- M ű szaki adatok
- Tartozékok és alkatrészek Garancia EK konformitási nyilatkozat
- Obsah
- Ovládací prvky
- P ř ed uvedením do provozu
- Provoz
- Šedý Intelligent Key
- P ř eprava
- Pomoc p ř i poruchách
- Technické údaje
- P ř íslušenství a náhradní díly Záruka Prohlášení o shod ě pro ES
- Vsebinsko kazalo
- Upravljalni elementi
- Pred zagonom
- Obratovanje
- Sivi Inteligentni klju č
- Transport
- Pomo č pri motnjah
- Tehni č ni podatki
- Pribor in nadomestni deli Garancija ES-izjava o skladnosti
- Spis tre ś ci
- Elementy obs ł ugi
- Przed pierwszym uruchomieniem
- Dzia ł anie
- Szary Intelligent Key
- Czyszczenie i konserwacja
- Usuwanie usterek
- Dane techniczne
- Wyposa ż enie dodatkowe i cz ęś ci zamienne Gwarancja Deklaracja zgodno ś ci UE
- Cuprins
- Elemente de operare
- Înainte de punerea în func ţ iune
- Func ţ ionarea
- Cheie inteligent ă gri
- Remedierea defec ţ iunilor
- Date tehnice
- Accesorii ş i piese de schimb Garan ţ ie Declara ţ ie de conformitate CE
- Obsah
- Ovládacie prvky
- Pred uvedením do prevádzky
- Prevádzka
- Šedý Intelligent Key
- Preprava
- Pomoc pri poruchách
- Technické údaje
- Príslušenstvo a náhradné diely Záruka Vyhlásenie o zhode s normami EÚ
- Pregled sadržaja
- Komandni elementi
- Prije prve uporabe
- U radu
- Sivi klju č "Intelligent Key"
- Transport
- Otklanjanje smetnji
- Tehni č ki podaci
- Pribor i pri č uvni dijelovi Jamstvo EZ izjava o uskla đ enosti
- Pregled sadržaja
- Komandni elementi
- Pre upotrebe
- Rad
- Sivi klju č "Intelligent Key"
- Transport
- Otklanjanje smetnji
- Tehni č ki podaci
- Pribor i rezervni delovi Garancija Izjava o uskla đ enosti sa propisima EZ
- Съдържание
- Обслужващи елементи
- Преди пускане в експлоатация
- Експлоатация
- Сив интелигентен ключ
- Транспорт
- Помощ при неизправности
- Технически данни
- Принадлежности и резервни части Гаранция Декларация за съответствие на ЕО
- Sisukord
- Teeninduselemendid
- Enne seadme kasutuselevõttu
- Käitamine
- Hall Intelligent Key
- Transport
- Abi häirete korral
- Tehnilised andmed
- Lisavarustus ja varuosad Garantii EÜ vastavusdeklaratsioon
- Satura r ā d ī t ā js
- Vad ī bas elementi
- Pirms ekspluat ā cijas uzs ā kšanas
- Darb ī ba
- Pel ē k ā Intelligent Key
- Apar ā ta p ā rvietošana
- Pal ī dz ī ba darb ī bas trauc ē jumu gad ī jum ā
- Tehniskie dati
- Piederumi un rezerves da ļ as Garantija EK Atbilst ī bas deklar ā cija
- Turinys
- Valdymo elementai
- Prieš pradedant naudoti
- Naudojimas
- Pilkas išmanusis raktas
- Transportavimas
- Pagalba gedim ų atveju
- Techniniai duomenys
- Priedai ir atsargin ė s dalys Garantija EB atitikties deklaracija
- Зміст
- Елементи керування
- Перед початком роботи
- Експлуатація
- Сірий чіп - ключ
- Транспортування
- Допомога у випадку неполадок
- Технічні характеристики
- Приладдя й запасні деталі Гарантія Заява при відповідність Європейського співтовариства
