Karcher B 150 R Bp Adv- Dose: Transport
Transport: Karcher B 150 R Bp Adv- Dose
-
7
In this menu item the authorisations for yel-
low intelligent keys as well as the
language of the display texts are selected.
Turn the info button until "key man-
agem." is shown on the display.
Press Info button.
Remove the grey Intelligent Key and in-
sert the yellow Intelligent Key to be pro-
grammed.
Select the desired menu item to be
modified by turning the Info button.
Press Info button.
Adjust the menu item by turning the Info
button.
Confirm the setting by pressing the
menu item.
Select the next menu item to be modi-
fied by turning the Info button.
In order to save the authorisations, call
the "Save?" menu by turning the info
button and then press the info button.
"Continue key menu":
Yes: Programme further Intelligent Key.
No: Exit key menu.
Press Info button.
This function is required when changing the
cleaning head.
Turn the info button until "brush head" is
shown on the display.
Press Info button.
Turn the info button until the desired
brush shape is highlighted.
Press Info button.
Move the hoist drive for replacement of
the cleaning head by turning the info
button:
up: Raise
down: Lower
OFF: Stop
Exit menu: Select "OFF" by turning the
info button and press the info button.
When exiting the menu, the control per-
forms a restart.
Turn the info button until "stopping
times" is shown on the display.
Press Info button.
Turn the info button until the desired as-
sembly is highlighted.
Press Info button.
Turn the info button until the desired
stopping time is reached.
Press Info button.
Turn the info button until "Battery menu"
is displayed.
Press Info button.
Turn the info button until the desired
battery type is highlighted.
Press Info button.
Changes of the parameters of the individu-
al cleaning programmes that were made
during the operation are reset to the basic
setting after switching off the appliance.
Turn the info button until "Basic setting"
is displayed.
Press Info button.
Turn the info button until the desired
cleaning programme is displayed.
Press Info button.
Turn the info button until the desired pa-
rameter is displayed.
Press Info button - the set value blinks.
Set the desired value by turning the info
button.
Press Info button.
Turn the info button until "Language" is
displayed.
Press Info button.
Turn the info button until the desired
language is highlighted.
Press Info button.
The factory settings of all parameters are
restored.
Parameters that are adjusted with the grey
Intelligent Key, are kept until another set-
ting is selected.
Turn the program selection switch to
the desired cleaning program.
Press the info button - the first adjusta-
ble parameter is displayed.
Press Info button - the set value blinks.
Set the desired value by turning the info
button.
Confirm the changed setting by press-
ing the Info button or wait till the set val-
ue is automatically accepted after 10
seconds.
Select the next parameter by turning
the Info button.
After all desired parameters have been
modified, turn the info button until "Exit
menu" is displayed.
Press the info button - you will exit the
menu.
DANGER
Risk of injury! When loading or unloading
the machine, it may only be operated on
gradients of max. 10%. Drive slowly.
몇
CAUTION
Risk of injury and damage! Observe the
weight of the appliance when you transport
it.
When transporting in vehicles, secure
the appliance according to the guide-
lines from slipping and tipping over.
Remove brushes from the brush head.
몇
CAUTION
Risk of injury and damage! Note the weight
of the appliance in case of storage.
This appliance must only be stored in
interior rooms.
Select the storage site for the appliance
taking into consideration the permissi-
ble total weight of the appliance in order
not to impact its stability.
DANGER
Risk of injury! Before working on the appli-
ance, remove the Intelligent Key and the
mains plug of the charger.
Pull out the battery plug.
Drain and dispose of the dirt water and
the residual fresh water.
몇
CAUTION
Risk of injury due to overrun of the suction
turbine.
Suction turbine will continue to run for a
while after switch-off. Carry out mainte-
nance tasks only after the suction turbine
has come to a halt.
ATTENTION
Risk of damage. Do not sluice the appli-
ance with water and do not use aggressive
detergents.
Drain off dirt water.
Clean protective turbine strainer.
Only with R cleaning head Remove bulk
waste container and empty it.
Clean the outside of the appliance with
a damp cloth which has been soaked in
mild detergent.
Clean the vacuum lips and the wiping
lips, check for wear and replace if re-
quired.
Check the brushes for wear, replace if
required.
Charge battery.
During long operating pauses: Carry
out refill charging for the battery.
Check battery poles for oxidation, brush
off if necessary. Ensure firm seating of
the connection cable.
Clean the seals between dirt water res-
ervoir and cover and check for tight-
ness, replace if required.
Check the acid density of the cells if the
batteries are not maintenance-free bat-
teries.
Clean the brush tunnel (only R cleaning
head)
Remove the water distribution strip from
the cleaning head and clean water ca-
nal (only R cleaning head).
Have the prescribed inspection carried
out by the customer service.
Key management
Selecting the brush shape
Stopping times
Setting the battery type
Standard setting
Setting the language
Factory setting
Cleaning Programs
Transport
With mounted D cleaning head
Storage Maintenance and care
Maintenance schedule
After the work
Monthly
Yearly
22 EN
-
8
To ensure a reliable operation of the appli-
ance maintenance contracts can be con-
cluded with the competent Kärcher sales
office.
Open the cover of the wastewater res-
ervoir.
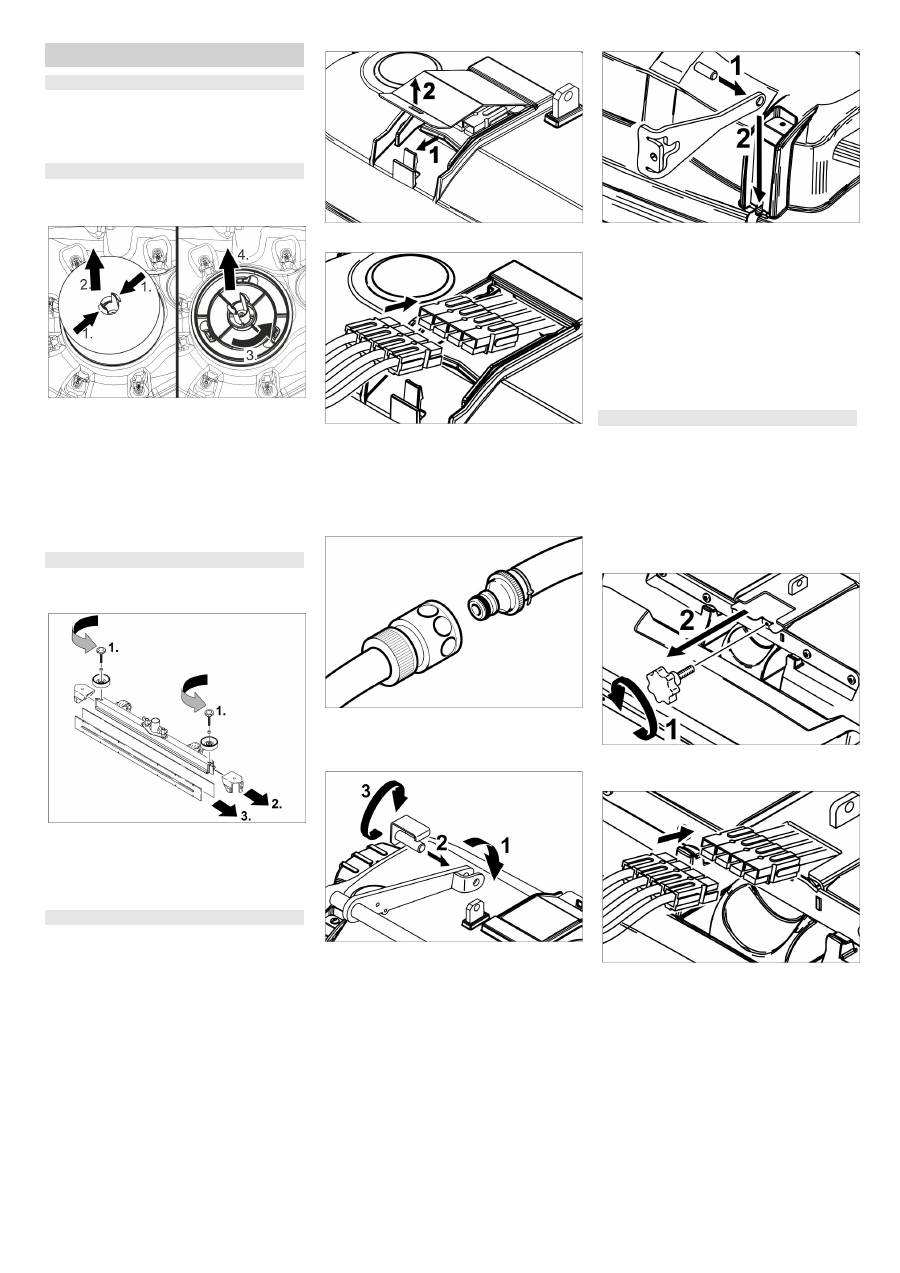
Squeeze the locking hooks.
Pull off the float.
Turn the protective turbine strainer in a
counter-clockwise direction.
Remove protective turbine strainer.
Rinse dirt off the protective turbine
strainer with water.
Reattach protective turbine strainer.
Attach float.
Remove the vacuum bar.
Unscrew the star grips.
Remove the plastic parts.
Remove the vacuum lips.
Insert new vacuum lips.
Insert the plastic parts.
Screw in and tighten the star grips.
Lift the holder of the cleaning head (see
Chapter "Grey intelligent key/.../clean-
ing head replacement".
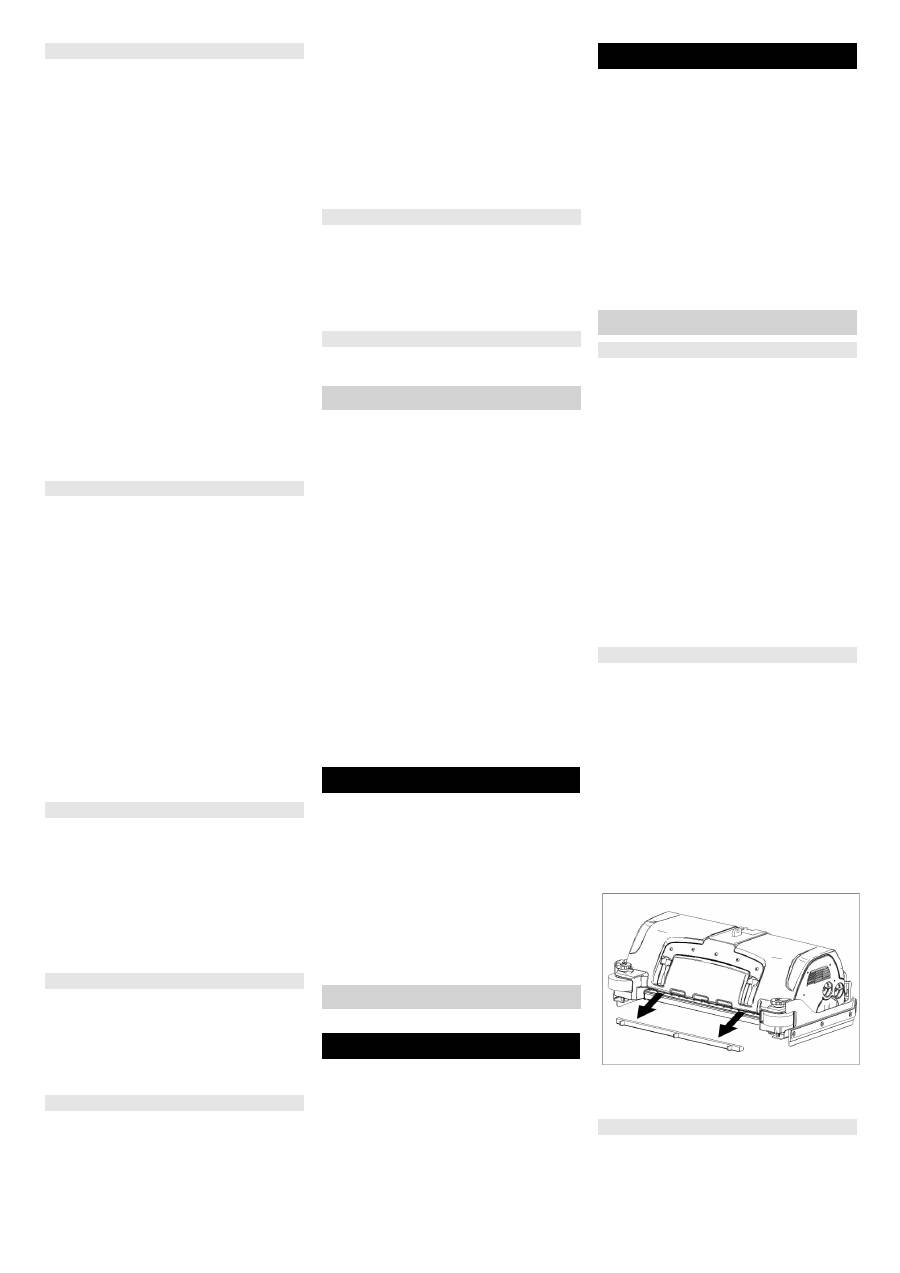
Slide the cleaning head under the appli-
ance so that the hose points toward the
rear.
Only slide the cleaning head halfway
under the appliance.
Remove the lid of the cleaning head.
Connect the power cord of the cleaning
head to the appliance (same colours
must meet).
Replace the lid and lock it.
Slide the cleaning head halfway under
the appliance.
Connect the hose couplers on the
cleaning head to the hose on the appli-
ance.
Insert the tab into the middle of the
cleaning head, between the fork of the
lever.
Align the holder of the cleaning head so
that the drilled holes in the lever and the
cleaning head match.
Insert the stop pin through the bushings
and swivel the locking plate downward.
Insert the cylinder pin into the boring of
the drawbar.
Slide the drawbar with the pin the guide
channel on the cleaning head all the
way to the bottom.
Insert the locking plate into the guide
channel and lock it in.
Repeat process on the drawbar on the
opposite side.
Insert the grey intelligent key.
Set brush type "Disc".
Lift the holder of the cleaning head (see
Chapter "Grey intelligent key/.../clean-
ing head replacement".
Slide the cleaning head under the appli-
ance so that the hose points toward the
rear.
Only slide the cleaning head halfway
under the appliance.
Unscrew the star handle and remove
the lid.
Connect the power cord of the cleaning
head to the appliance (same colours
must meet).
Slide the lid in and screw tight.
Slide the cleaning head halfway under
the appliance.
Maintenance Works
Maintenance contract
Cleaning the protective turbine strainer
Replacing the vacuum lips
Install D cleaning head
Install R cleaning head
23 EN
Оглавление
- Inhaltsverzeichnis
- Bedienelemente
- Vor Inbetriebnahme
- Betrieb
- Grauer Intelligent Key
- Hilfe bei Störungen
- Technische Daten
- Zubehör und Ersatzteile Garantie EG-Konformitätserklärung
- Contents
- Control elements
- Before Startup
- Operation
- Grey Intelligent Key
- Transport
- Troubleshooting
- Technical specifications
- Accessories and Spare Parts Warranty EC Declaration of Conformity
- Table des matières
- Eléments de commande
- Avant la mise en service
- Fonctionnement
- Intelligent Key grise
- Assistance en cas de panne
- Caractéristiques techniques
- Accessoires et pièces de rechange Garantie Déclaration de conformité CE
- Indice
- Dispositivi di comando
- Prima della messa in funzione
- Funzionamento
- Intelligent Key grigia
- Cura e manutenzione
- Guida alla risoluzione dei guasti
- Dati tecnici
- Accessori e ricambi Garanzia Dichiarazione di conformità CE
- Inhoud
- Bedieningselementen
- Voor de inbedrijfstelling
- Werking
- Grijze Intelligent Key
- Hulp bij storingen
- Technische gegevens
- Toebehoren en reserveonderdelen Garantie EG-conformiteitsverklaring
- Índice de contenidos
- Elementos de mando
- Antes de la puesta en marcha
- Funcionamiento
- Intelligent Key gris
- Ayuda en caso de avería
- Datos técnicos
- Accesorios y piezas de repuesto Garantía Declaración de conformidad CE
- Índice
- Elementos de manuseamento
- Antes de colocar em funcionamento
- Funcionamento
- Intelligent Key cinzento
- Ajuda em caso de avarias
- Dados técnicos
- Acessórios e peças sobressalentes Garantia Declaração de conformidade CE
- Indholdsfortegnelse
- Betjeningselementer
- Inden ibrugtagning
- Drift
- Grå Intelligent Key
- Transport
- Hjælp ved fejl
- Tekniske data
- Tilbehør og reservedele Garanti EU- overensstemmelseserklæring
- Innholdsfortegnelse
- Betjeningselementer
- Før den tas i bruk
- Drift
- Grå Intelligent Key
- Transport
- Feilretting
- Tekniske data
- Tilbehør og reservedeler Garanti EU-samsvarserklæring
- Innehållsförteckning
- Reglage
- Före ibruktagande
- Drift
- Grå Intelligent Key
- Transport
- Åtgärder vid störningar
- Tekniska data
- Tillbehör och reservdelar Garanti Försäkran om EU- överensstämmelse
- Sisällysluettelo
- Hallintalaitteet
- Ennen käyttöönottoa
- Käyttö
- Harmaa Intelligent Key
- Kuljetus
- Häiriöapu
- Tekniset tiedot
- Varusteet ja varaosat Takuu EU- standardinmukaisuustodistus
- Πίνακας περιεχομένων
- Στοιχεία χειρισμού
- Πριν τη θέση σε λειτουργία
- Λειτουργία
- Γκρίζο Intelligent Key
- Μεταφορά
- Αντιμετώπιση βλαβών
- Τεχνικά χαρακτηριστικά
- Εξαρτήματα και ανταλλακτικά Εγγύηση Δήλωση Συμμόρφωσης των Ε . Κ .
- İ çindekiler
- Kumanda elemanlar ı
- Cihaz ı çal ı ş t ı rmaya ba ş lamadan önce
- Çal ı ş t ı rma
- Gri Ak ı ll ı Anahtar
- Ta ş ı ma
- Ar ı zalarda yard ı m
- Teknik Bilgiler
- Aksesuarlar ve yedek parçalar Garanti AB uygunluk bildirisi
- Оглавление
- Элементы управления
- Перед началом работы
- Эксплуатация
- Серый чип - ключ
- Транспортировка
- Помощь в случае неполадок
- Технические данные
- Принадлежности и запасные детали Гарантия
- Tartalomjegyzék
- Kezelési elemek
- Üzembevétel el ő tt
- Üzem
- Szürke Intelligent Key
- Segítség üzemzavar esetén
- M ű szaki adatok
- Tartozékok és alkatrészek Garancia EK konformitási nyilatkozat
- Obsah
- Ovládací prvky
- P ř ed uvedením do provozu
- Provoz
- Šedý Intelligent Key
- P ř eprava
- Pomoc p ř i poruchách
- Technické údaje
- P ř íslušenství a náhradní díly Záruka Prohlášení o shod ě pro ES
- Vsebinsko kazalo
- Upravljalni elementi
- Pred zagonom
- Obratovanje
- Sivi Inteligentni klju č
- Transport
- Pomo č pri motnjah
- Tehni č ni podatki
- Pribor in nadomestni deli Garancija ES-izjava o skladnosti
- Spis tre ś ci
- Elementy obs ł ugi
- Przed pierwszym uruchomieniem
- Dzia ł anie
- Szary Intelligent Key
- Czyszczenie i konserwacja
- Usuwanie usterek
- Dane techniczne
- Wyposa ż enie dodatkowe i cz ęś ci zamienne Gwarancja Deklaracja zgodno ś ci UE
- Cuprins
- Elemente de operare
- Înainte de punerea în func ţ iune
- Func ţ ionarea
- Cheie inteligent ă gri
- Remedierea defec ţ iunilor
- Date tehnice
- Accesorii ş i piese de schimb Garan ţ ie Declara ţ ie de conformitate CE
- Obsah
- Ovládacie prvky
- Pred uvedením do prevádzky
- Prevádzka
- Šedý Intelligent Key
- Preprava
- Pomoc pri poruchách
- Technické údaje
- Príslušenstvo a náhradné diely Záruka Vyhlásenie o zhode s normami EÚ
- Pregled sadržaja
- Komandni elementi
- Prije prve uporabe
- U radu
- Sivi klju č "Intelligent Key"
- Transport
- Otklanjanje smetnji
- Tehni č ki podaci
- Pribor i pri č uvni dijelovi Jamstvo EZ izjava o uskla đ enosti
- Pregled sadržaja
- Komandni elementi
- Pre upotrebe
- Rad
- Sivi klju č "Intelligent Key"
- Transport
- Otklanjanje smetnji
- Tehni č ki podaci
- Pribor i rezervni delovi Garancija Izjava o uskla đ enosti sa propisima EZ
- Съдържание
- Обслужващи елементи
- Преди пускане в експлоатация
- Експлоатация
- Сив интелигентен ключ
- Транспорт
- Помощ при неизправности
- Технически данни
- Принадлежности и резервни части Гаранция Декларация за съответствие на ЕО
- Sisukord
- Teeninduselemendid
- Enne seadme kasutuselevõttu
- Käitamine
- Hall Intelligent Key
- Transport
- Abi häirete korral
- Tehnilised andmed
- Lisavarustus ja varuosad Garantii EÜ vastavusdeklaratsioon
- Satura r ā d ī t ā js
- Vad ī bas elementi
- Pirms ekspluat ā cijas uzs ā kšanas
- Darb ī ba
- Pel ē k ā Intelligent Key
- Apar ā ta p ā rvietošana
- Pal ī dz ī ba darb ī bas trauc ē jumu gad ī jum ā
- Tehniskie dati
- Piederumi un rezerves da ļ as Garantija EK Atbilst ī bas deklar ā cija
- Turinys
- Valdymo elementai
- Prieš pradedant naudoti
- Naudojimas
- Pilkas išmanusis raktas
- Transportavimas
- Pagalba gedim ų atveju
- Techniniai duomenys
- Priedai ir atsargin ė s dalys Garantija EB atitikties deklaracija
- Зміст
- Елементи керування
- Перед початком роботи
- Експлуатація
- Сірий чіп - ключ
- Транспортування
- Допомога у випадку неполадок
- Технічні характеристики
- Приладдя й запасні деталі Гарантія Заява при відповідність Європейського співтовариства
