Philips 10FF3CDW: . Using the Photo Manager
. Using the Photo Manager: Philips 10FF3CDW
Philips Photo Manager Overview / Using the Photo Manager
. Using the Photo Manager
5.1
Setting up Photo Manager
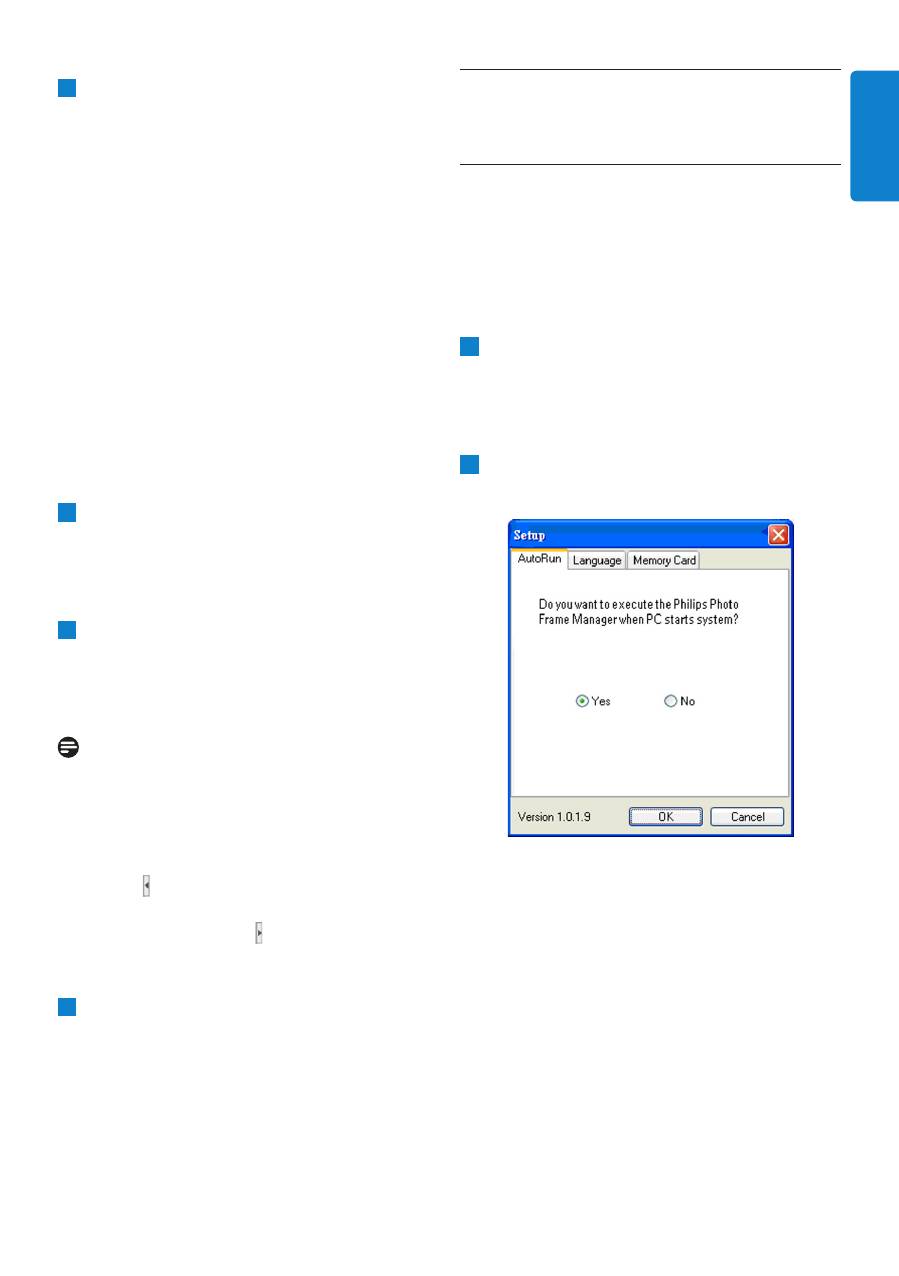
Setup Tool: You may setup application execution
and language preferences from this window.
AutoRun Tab :
1
Select the “
Yes
” radio button to execute the
Philips PhotoFrame Manager automatically,
or select “
No
” to execute the Philips
PhotoFrame Manager manually.
2
Click “
OK
” to confirm the change you have
just made.
3
The PC Frame
The PC Frame displays a folder tree
structures similar to Windows Explorer,
photos are shown as thumbnails. If no JPEG
images are available “
No Photo
” will be
displayed.
Warning
:
Even if this view displays the “No Photo”
message, this folder may contain other files and
may not be empty.
Folder Tree View
:
Displays all folders and the recycle bin in a tree
structures similar to Windows Explorer. If the
user clicks the desired folder, all photos in the
folder will be shown in Photo Thumbnail View.
4
Thumbnail Previews
Display all photos in thumbnail view based on
the user selected folder from folder tree
view.
5
PhotoFrame Storage
Displays all of the storage devices on the
PhotoFrame. The available devices are
highlighted.
Note :
Philips PhotoFrame is not connected to your PC
the “Disconnected” message will be shown.
Between the
PhotoFrame storage
(5) and
the
PC thumbnail Preview
(4) is the
Slide
Bar
: Click to move the Slide Bar left and
increase the PhotoFrameTM Storage area and
vice versa (you may click to increase the PC
Thumbnail preview).
6
Album View
Displays the albums in the storage device.
ENGLISH

Using the Photo Manager
Language Tab:
1
Select the required application language from
the list.
2
Click “OK” to confirm the change.
Warning
:
If your computer doesn’t support the selected
language, the characters may not be displayed
correctly. To solve this problem, update the
language service packs from the Microsoft
Website.
Memory Card Tab:
1
Select the “
Yes
” radio button to prevent
users from deleting or making changes to
photos in the PhotoFrame or select “
No
” to
allow users to perform those operations on
photos in the PhotoFrame.
2
Click “
OK
” to confirm the change you have
just made.
3
If users try to delete photos when the
PhotoFrame has been locked, the following
warning message will be displayed.
5.2
Crop Photos
• Photo Manager will automatically resize all
photos copied to the PhotoFrame.
• Photos larger than 540x720 or 720x540 pixels
can be manually cropped by double clicking
the photos in the thumbnail view as shown
below.
1
Preview in PhotoFrame
In this preview area, the cropped photo
results are shown as it will be display in
PhotoFrame.
2
Original Picture
• Displays the original photo in the
thumbnail view and the area to be cropped
in a blue rectangle, which presents the
cropping area with 540x720 or 720x540
pixels.
• Use the mouse to drag this rectangle area
to your desired area.
3
Tools Information Area
• Displays the Album Name, Date Time, and
Photo Description information of the
selected photo.
• Displays the submenu icons based on the
selected command keys.
4
Tools
The Tools Pane is just located on the bottom
of the Photo Edit Window, and contains the
buttons for photo editing.
Information
:
The
Information
button shows the Album
Name, Date Time, and Photo Description
information of the selected photo.
Rotate
:
The
Rotate
button allows you to rotate the
angle of the selected photo. Available angles are
+90°, -90° and 180°. Once the desired angle
has been selected, both images in
Original
Picture
and
Preview in PhotoFrame
will be
automatically adjusted to the new angle.
Using the Photo Manager
ENGLISH

Zoom & Crop:
Click the
Zoom & Crop
button to bring up
the scaling control bar into
Tools
informa
tion Area. Users can zoom in to the photo by
dragging the control bar up, or zoom out by
dragging the control bar down.
To confirm the crop operation simply click
OK
button. It will save the cropped file in the
same folder. The saved file will carry the same
filename plus an index number. For example, if
the original filename is orginal.jpg, the saved file
will be original(1).jpg
Note :
If the Photo size is less than 540x720 or
720x540 pixels, it will display the following
warning message.
5.3
Cutting, Copying and Pasting
Photos
Copy
:
Select the photos first, and then click the
Copy
button to copy the selected photos. Copying
leaves the selected photos in their original
folder.
Cut
:
Select the photos first, and then click the
Cut
button to cut the selected photos. Cutting
removes the selected photos from their original
folder.
Warning
:
Photos can be cut from a memory card to a PC,
but cannot be cut from a PC to a storage device.
Warning:
Do not disconnect USB connection between the
PC and the PhotoFrame when copying, moving
or deleting photos in PhotoFrame as this may
cause the loss of data or the photo.
Paste
:
Once the photo has been cut or copied it needs
to be pasted into the chosen folder.
1
Select the folder to paste into.
2
Either click the
Paste
icon or right click
for the secondary menu and click
Paste
.
Using the Photo Manager
Using your PhotoFrame
5.4
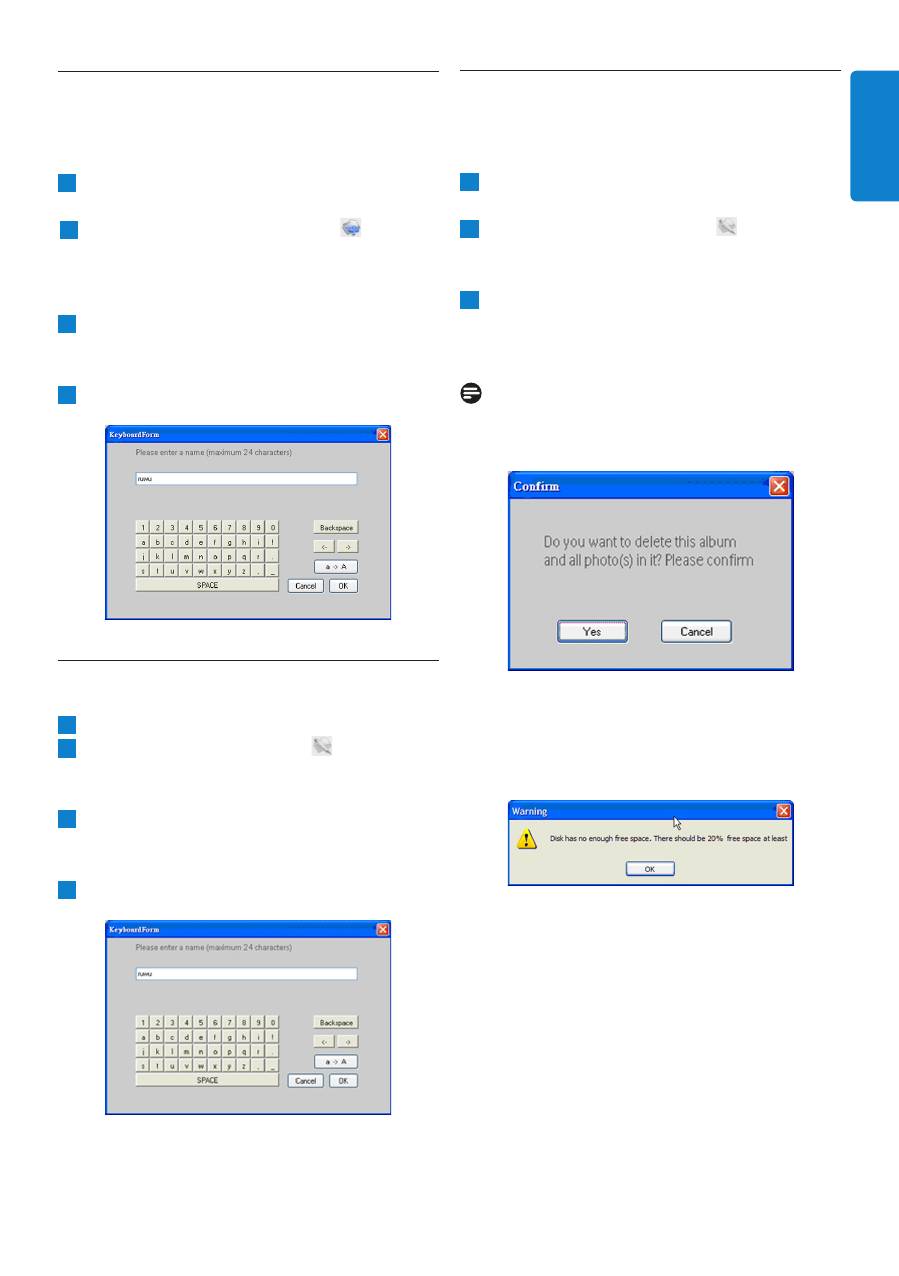
Create New Albums
To create a new album
1
Select the PhotoFrame or target
memory card
.
2
Click on the
New Album
icon to bring
up Keyboard Form window.
the album to bring up the secondary menu
and click
Rename
.
3
Input the name for the album using either
the computer keyboard or by clicking on the
keyboard buttons.
4
Click
OK
to add the new name.
5.5
Renaming Albums
1
Select the album to rename.
2
Either click the rename icon or
right
click
the album to bring up the secondary
menu and click
Rename
.
3
Input the name for the album using either
the computer keyboard or by clicking on the
keyboard buttons.
4
Click
OK
to add the new name.
5.6
Deleting Albums and Photos
Albums and files are deleted in the same way:
1
Select albums / photo that you want to be
removed.
2
Either click the
Delete
icon or
right
click
for the secondary menu and click
Delete Album/Delete.
3
A confirmation window similar to the
one below will pop up and ask you to
double confirm. Click
Yes
.
Note :
All deleted files will be moved into the Recycle
Bin.
Warning
:
If the HDD has minumim free memory space, it
does not allow to backup.
ENGLISH

10
Оглавление
- Table of contents
- 1. Welcome to Photo Manager . Photo Manager Features
- . Getting Started
- . Phillips Photo ManagerOverview
- . Using the Photo Manager
- Contenu
- 1. Bienvenu aux utilisateurs de Photo Manager . Fonctionnalités de Photo Manager
- . Pour commencer
- . Vue d’ensemble de Phillips Photo Manager
- . Utiliser Photo Manager
- Inhalt
- 1. Willkommen bei Photo Manager . Leistungsmerkmale von Photo Manager
- . Erste Schritte
- . Übersicht über Philips Photo Manager
- . Bedienungsgrundlagen für Photo Manager
- Sommario
- 1. Benvenuti in Photo Manager . Funzioni di Photo Manager
- . Operazioni preliminari
- . Cenni generali su Philips Photo Manager
- . Uso di Photo Manager
- .
- Contenido
- 1. Bienvenido a Photo Manager . Características de Photo Manager
- . Primeros pasos
- . Vista general de Phillips Photo Manager
- . Utilizar Photo Manager
- Inhoud
- 1. Welkom bij Photo Manager . Photo Manager eigenschappen.
- . Beginnen
- . Overzicht Philips Photo Manager
- . Het gebruik van de Philips Photo Manager
- Indhold
- 1. Velkommen til Photo Manager . Photo Manager Funktioner
- . Kom Godt Igang
- . Phillips Photo Manager Overblik
- . Brug Af Photo Manager
- 目录
- 1. 欢迎使用 Photo Manager . Photo Manager 特点
- . 入门
- . Phillips Photo Manager 概述
- . 使用 Photo Manager
- 1.
- .
- .
