Philips 10FF3CDW: . Phillips Photo ManagerOverview
. Phillips Photo ManagerOverview: Philips 10FF3CDW
Philips Photo Manager Overview
. Phillips Photo Manager Overview
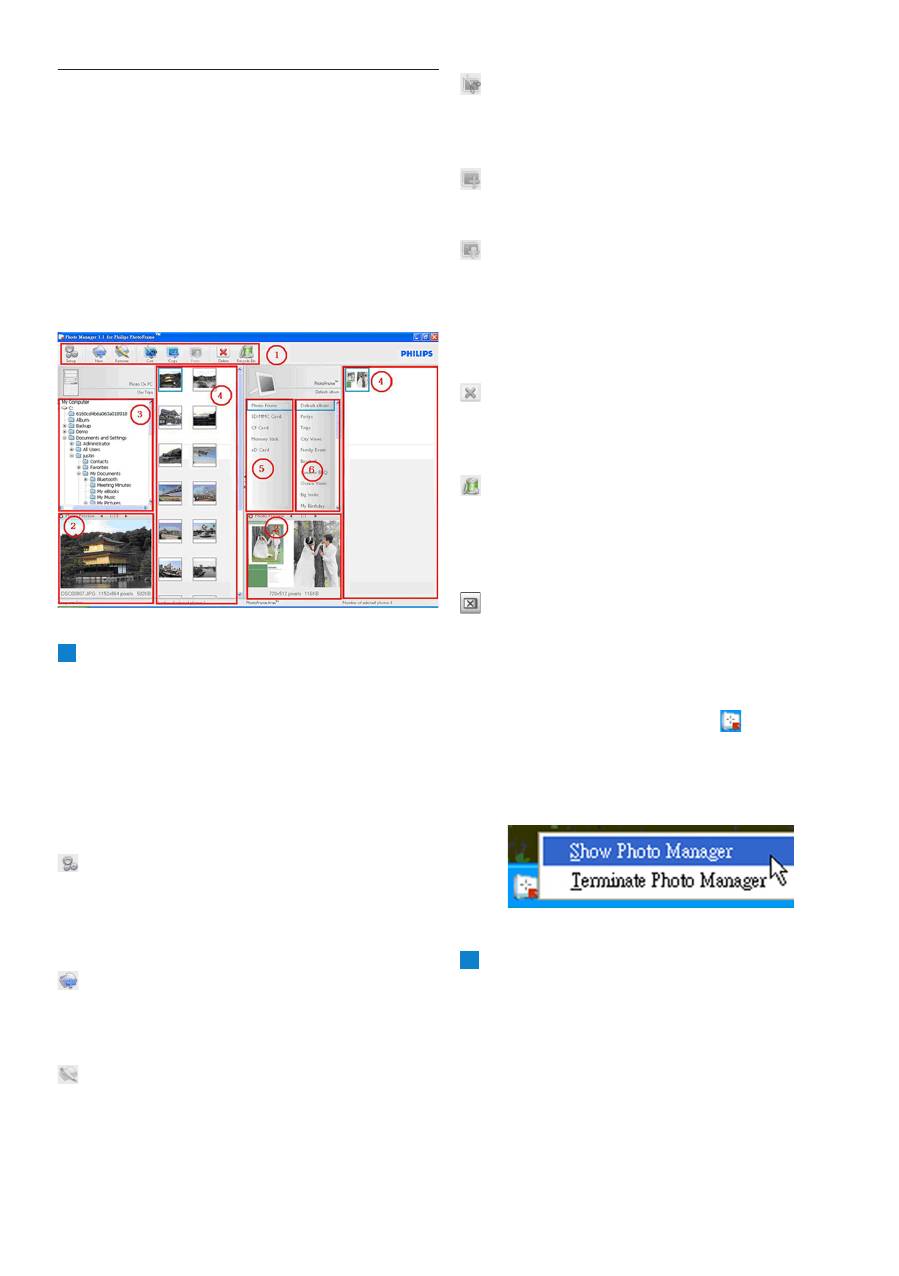
The screen below is the first one you will see
when launching the Photo Manager. From here
you control the functionality of the software.
The screen is divided into the sections
described below:
1
Photo Manager Toolbar
Command Key Pane is just beneath PC/
PhotoFrame Panes and contains the
functional button for Photo Copy, Cut,
Past and Delete operations. Within the
Command Key Pane, you may click the setup
button to set the desired language, and use
the recycle bin button to undelete photos.
Setup
: The
Setup
button allows you
to change such features as Photo Manager
automatically running when the PC starts, and
the language of the application.
New Album
: The
New Album
button
allows you to create new albums on a memory
card or the PhotoFrame.
Rename Album:
Click the Rename Album
button to bring up a Keyboard Input Window.
Cut
: You should select photos first and then
click on the
Cut
button to cut the selected
photos.
Copy
: Select photos first and then click on
the
Copy
button to copy the selected photos.
Paste
: Immediately after you click on the
Copy or Cut buttons, the
Paste
button will
become available. You can select the target
folder from the previous selected photos into
the target folder (album).
Delete
: Select the photos or album that you
want to remove and click on the
Delete
button
to remove them.
Recycle Bin: Click the
Recycle Bin
button to
switch the target folder to the recycle bin folder.
You may browse those removed photos and
move them back to desired folders.
Close: Clicking the
Close
button minimizes
the application, which will be shown as a tray
icon in the taskbar.
Your can always bring back this application
by right-clicking on this tray icon and
selecting the “
Show Photo Manager
” option.
Alternatively, you may terminate this application
by selecting “
Terminate Photo Manager
”.
2
Photo Preview
Display the user selected picture with detail
information, such as file name, file size and
photo resolution.
Оглавление
- Table of contents
- 1. Welcome to Photo Manager . Photo Manager Features
- . Getting Started
- . Phillips Photo ManagerOverview
- . Using the Photo Manager
- Contenu
- 1. Bienvenu aux utilisateurs de Photo Manager . Fonctionnalités de Photo Manager
- . Pour commencer
- . Vue d’ensemble de Phillips Photo Manager
- . Utiliser Photo Manager
- Inhalt
- 1. Willkommen bei Photo Manager . Leistungsmerkmale von Photo Manager
- . Erste Schritte
- . Übersicht über Philips Photo Manager
- . Bedienungsgrundlagen für Photo Manager
- Sommario
- 1. Benvenuti in Photo Manager . Funzioni di Photo Manager
- . Operazioni preliminari
- . Cenni generali su Philips Photo Manager
- . Uso di Photo Manager
- .
- Contenido
- 1. Bienvenido a Photo Manager . Características de Photo Manager
- . Primeros pasos
- . Vista general de Phillips Photo Manager
- . Utilizar Photo Manager
- Inhoud
- 1. Welkom bij Photo Manager . Photo Manager eigenschappen.
- . Beginnen
- . Overzicht Philips Photo Manager
- . Het gebruik van de Philips Photo Manager
- Indhold
- 1. Velkommen til Photo Manager . Photo Manager Funktioner
- . Kom Godt Igang
- . Phillips Photo Manager Overblik
- . Brug Af Photo Manager
- 目录
- 1. 欢迎使用 Photo Manager . Photo Manager 特点
- . 入门
- . Phillips Photo Manager 概述
- . 使用 Photo Manager
- 1.
- .
- .
