Samsung NV24 HD: Connecting to the HDTV using the HDMI cable
Connecting to the HDTV using the HDMI cable: Samsung NV24 HD
EN-15
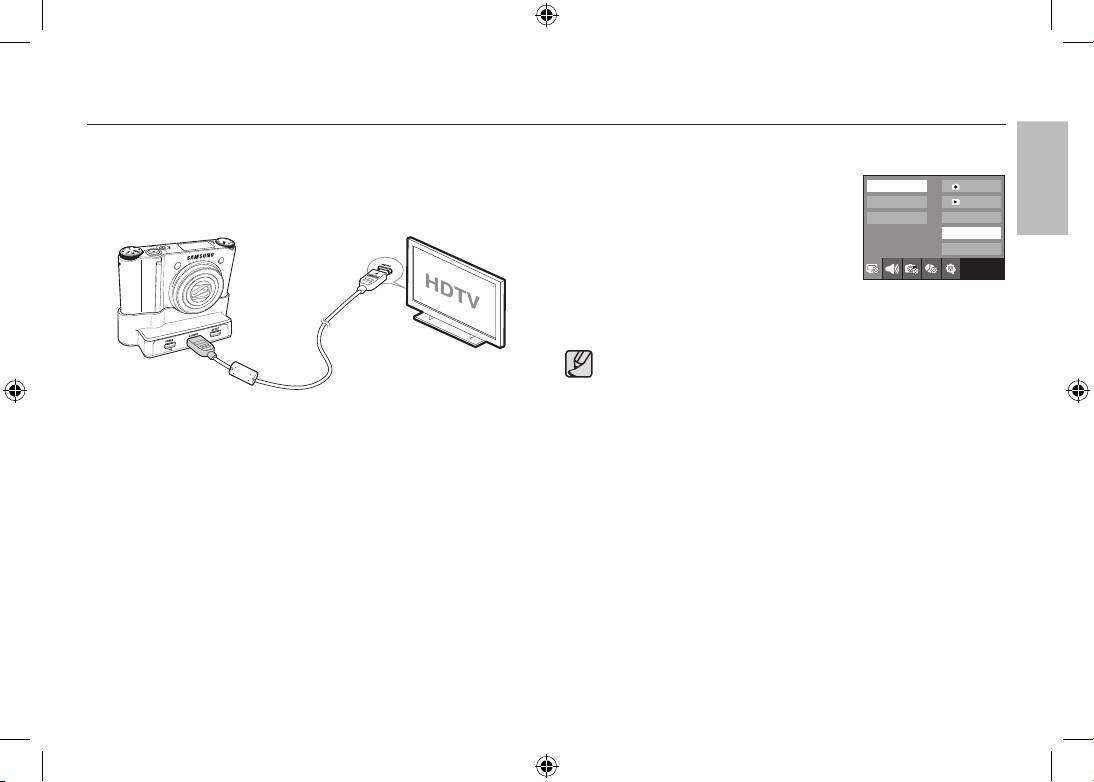
Connecting to the HDTV using the HDMI cable
How to connect the camera with the HDTV
Setting the HDMI resolution
Connect the cradle with the HDTV by using the HDMI cable to the HDMI
When the camera is connected with the HDTV, you
1080i
OSD set
connection ports.
can select image size that is compatible with the
720p
OSD set
HDTV. The image size are [1080i], [720p], [480p]
480p
Display Bright
and [576p]. Only when [480p] is set to [NTSC]
HDMI Size
Start Image
and [576p] is set to [PAL], those resolutions will be
displayed in the menu.
Exit:BACK
HDMI cable
● HDMI (High Definition Multimedia Interface) is a function that allows
transferring the recorded images without compression by using
the HDMI cable. You can see the images in a high resolution in the
HDTV.
● When Anynet+(CEC) is used and HDMI resolution is set to
[480p](NTSC) or [576p](PAL), it is only available to play back the
image, movie clip, voice.
● If the selected HDMI resolution is not supported by HDTV, the clear
image can not be shown in the screen.
● If you try to select the HDMI resolution that is not supported by
HDTV, the resolution is adjusted to the maximum resolution of the
HDTV. For example, if you select “1080i” when the HDTV supports
the “720p” by the maximum resolution, it is adjusted to “720p.”
● You can playback the normal resolution of the movie clip as well.
● You can not connect HDMI to HDTV which is not supported. Please
check up the specification of HDTV before connecting it.
● For more information of the HDTV connection, see the user manual
of the HDTV.
ENGLISH
EN-16
99
98
Connecting to the HDTV using the HDMI cable
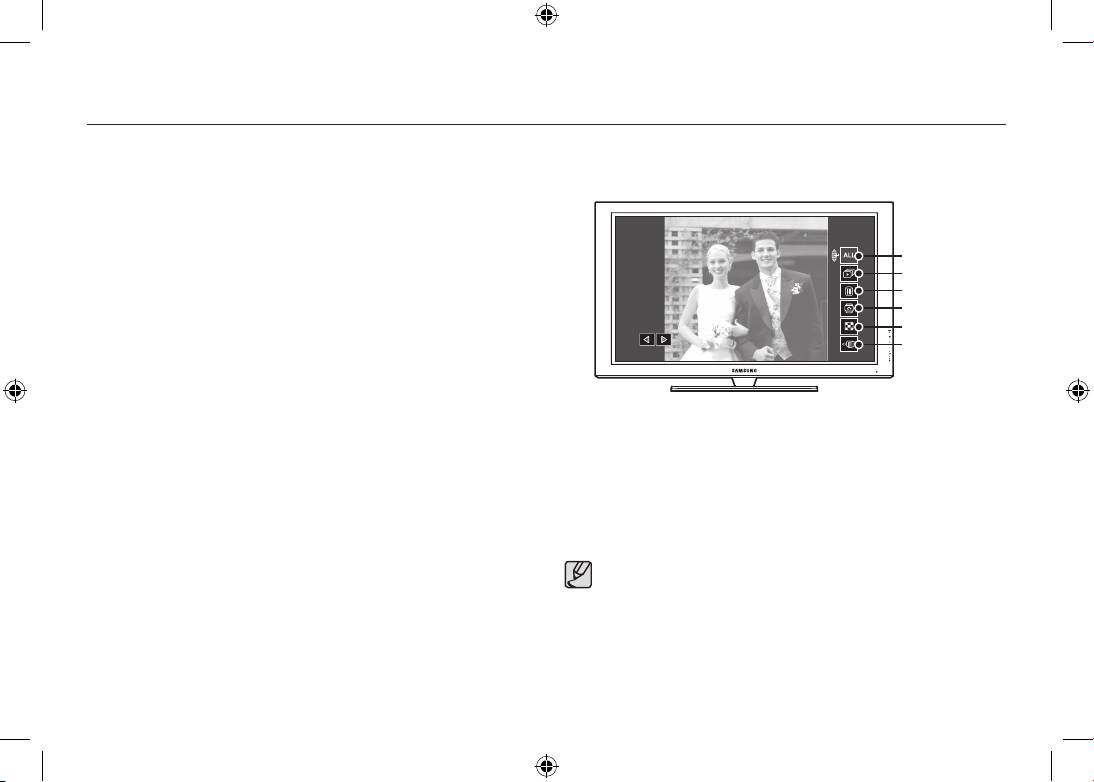
Using the Anynet+(CEC)
5.
Playback menu appears in the TV screen when you press the menu button on
the TV remote control. (Or the playback button on the camera’s remote control).
Anynet+(CEC) is an AV network system which controls over all your
connected SAMSUNG AV devices when using the TV remote control that
supports Anynet+. When connected to the SAMSUNG HDTV, you can
operate the playback functions by using the camera or the TV remote
Play type
control.
Slide show
Delete
1. Connect the cradle with the HDTV by using the HDMI cable to the HDMI
Rotate
connection ports while the camera is connected to the cradle.
Thumbnail
2. TV turns on as soon as the power button is pressed on the camera.
Exit
3. If there is no picture after turning on the TV, press the source button on the
TV remote control to change to the HDMI mode.
- Depending on the TV, it might not change to the HDMI mode although
※
you press the source button.
The playback menu appearing on TV screen operates the same function
of the camera.
4. Press the Anynet+ button on the TV remote control.
6. Select the desired playback function by using the remote control of the TV
or the camera.
※
To select the sub menus, move to the desired playback menu and then
press the Enter button.
● Only available when using the TV that supports Anynet+(CEC).
(Not available by using TV that supports Anynet)
● As soon as you connect the camera with the cradle(with the
camera’s power turned on), the playback menu appears in the
TV screen. (Available when the cradle and the TV are already
connected.)
● For more detailed information of the HDTV connection, see the user
manual of HDTV.
Оглавление
- Getting to know your camera
- Getting to know your camera
- Identification of features / Contents of camera
- Battery life & Number of shot (Recording time)
- When Using the Camera for the First Time : Smart button
- When Using the Camera for the First Time : Setting up the Date / Time and Language
- AMOLED monitor indicator
- Mode dial
- Taking a picture
- Playingback, Deleting and Protecting Images
- Using the remote control
- Connecting to the HDTV using the HDMI cable
- Downloading images
- Specifications
- Specifications Correct Disposal of This Product
- Correct disposal of batteries in this product
- MEMO
- Die Kamera kennen lernen Korrekte Entsorgung dieses Produkts
- Die Kamera kennen lernen
- Identifikation der Funktionen / Lieferumfang der Kamera
- Batteriebetriebsdauer und Anzahl der Aufnahmen (Aufnahmezeit)
- Wenn die Kamera zum ersten Mal benutzt wird : Smarttaste
- Wenn die Kamera zum ersten Mal benutzt wird : Einstellung von Datum / Uhrzeit und Sprache
- AMOLED Monitoranzeige
- Betriebsarten-Einstellra
- Fotografieren
- Wiedergabe, Löschen und Schützen von Bildern
- Verwenden der Fernbedienung
- Herstellen einer Verbindung mit dem HDTV mithilfe des HDMI-Kabels
- Herunterladen von Bildern
- Technische Daten
- Technische Daten Korrekte Entsorgung der Batterien dieses Produkts
- Kameraan tutustuminen Tuotteen hävittäminen
- Kameraan tutustuminen
- Toimintojen tunnistaminen / kameran sisältö
- Akun kesto ja kuvien määrä (tallennusaika)
- Kameran käyttäminen ensimmäistä kertaa : Smart-painike
- Kameran käyttäminen ensimmäistä kertaa : Päivämäärän, kellonajan ja kielen asettaminen
- AMOLED-näytössä näkyvät kuvakkeet
- Tilanvalitsin
- Kuvan ottaminen
- Kuvien toistaminen, poistaminen ja suojaaminen
- Kaukosäätimen käyttäminen
- Yhdistäminen teräväpiirtotelevisioon HDMI-kaapelin avulla
- Kuvien lataaminen
- Tekniset tiedot
- Tekniset tiedot Tuotteen paristojen oikea hävittäminen
- Att bli bekant med din kamera Korrekt avfallshantering av produkten
- Att bli bekant med din kamera
- Identifiering av egenskaper / innehåll hos kamera
- Batteriets livslängd & antalet tagningar (inspelningstid)
- När du använder kameran första gången : Smart-knapp
- När du använder kameran första gången : Ställa in tid, datum och språk
- AMOLED skärmsindikator
- Lägesomkopplare
- Att ta en blid
- Uppspelning, radering och skyddande av bilder
- Använda fjärrkontrollen
- Ansluta till en HDTV med hjälp av HDMI-kabeln
- Nedladdning av bilder
- Specifikationer
- Specifikationer Korrekt avfallshantering av batterierna i denna produkt
- Korrekt bortskaffelse af dette produkt
- Kameraets funktioner/Kameraets indhold
- Batterilevetid og antal billeder (optagetid)
- Når du bruger kameraet for første gang : Smart-knap
- Når du bruger kameraet for første gang : Indstilling af dato / klokkeslæt og sprog
- Indikatorer på AMOLED-monitoren
- Funktionsknap
- Optagelse af et billede
- Afspilning, sletning og beskyttelse af billeder
- Brug af fjernbetjeningen
- Tilslutning til HDTV’et ved hjælp af HDMI-kablet
- Overførsel af billeder
- Specifikationer
- Specifikationer Korrekt bortskaffelse af batterierne i dette produkt
- Знакомство с фотокамерой
- Рабочие элементы / содержимое упаковки
- Ресурс батарей и доступное количество снимков (время записи)
- Первое включение фотокамеры : "умные" кнопки
- Первое включение фотокамеры : Настройка даты / времени и выбор языка
- Информация, отображаемая на AMOLED-дисплее
- Селектор режимов
- Фотосъемка
- Воспроизведение, удаление и защита изображений
- Использование пульта ДУ
- Подключение кабеля HDMI к ТВЧ
- Загрузка изображений
- Технические характеристики
- MEMO
