Samsung LE-40 B530 P7W: PICTURE CONTROL
PICTURE CONTROL: Samsung LE-40 B530 P7W
English - 12
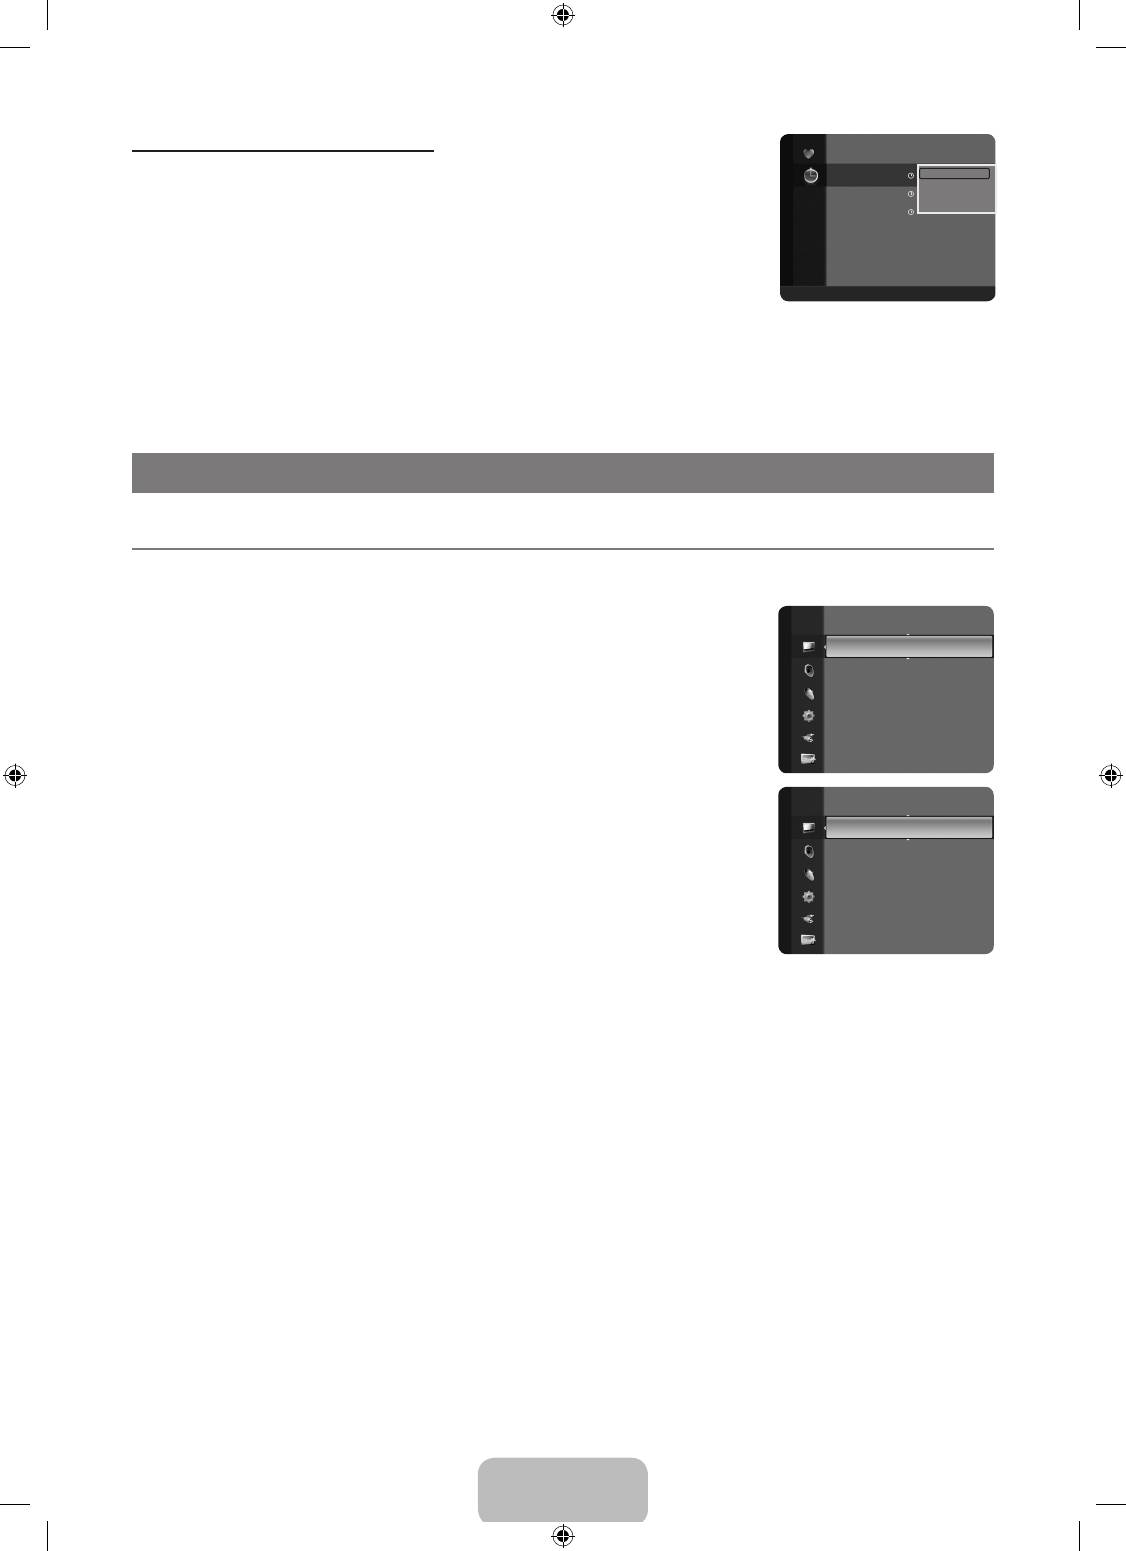
Channel List Option Menu (in Programmed )
Programmed
1 / 1 / 2009
You can view, modify or delete a reservation.
13:59 5 TV1
Quincy, M.E
Change Info
N
Press the TOOLS button to use the option menu.
Cancel Schedules
18:59 2 TV3
The Equalizer
Information
20:59 2 TV3
McMillan & Wife
Select All
Change Info
Select to change a viewing reservation.
Cancel Schedules
Select to cancel a viewing reservation.
All ■ Zoom ■ Select T Tools E Information
Information
Select to view a viewing reservation. (You can also change the reservation information.)
Select All
Select all reserved programmes.
PICTURE CONTROL
¦
ConguringthePictureMenu
❑
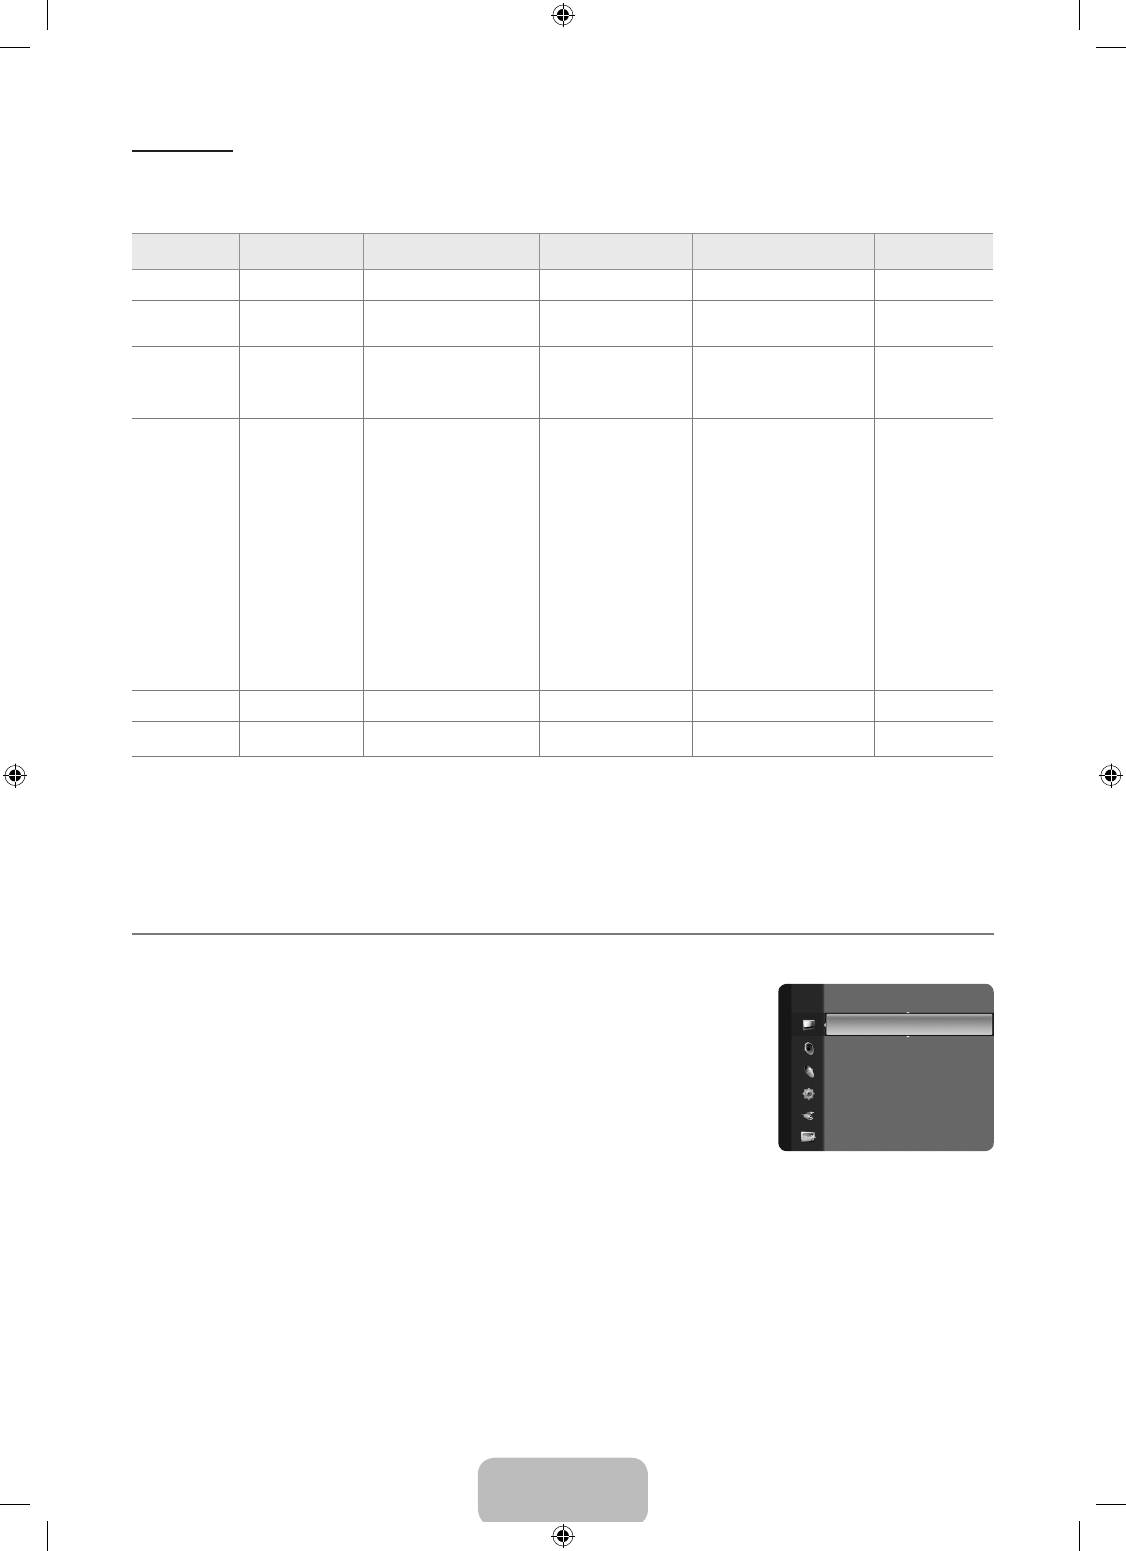
Mode
You can select the type of picture which best corresponds to your viewing requirements.
T
Press the TOOLS button to display the Tools menu. You can also set the picture mode by
Picture
selecting Tools→PictureMode.
Mode :Standard ►
Backlight : 7
Dynamic
Contrast : 95
Selects the picture for high-denition in a bright room.
Brightness : 45
Standard
Sharpness : 50
Colour : 50
Selects the picture for the optimum display in a normal environment.
Tint (G / R) : G50 / R50
Movie
Colour : 50
Selects the picture for viewing movies in a dark room.
Picture
Tint (G / R) : G50 / R50
AdvancedSettings ►
❑
Backlight / Contrast / Brightness / Sharpness / Colour / Tint(G/R)
Picture Options
Your television has several setting options that allow you to control the picture quality.
Picture Reset
●
Backlight: Adjusts the brightness of LCD back light.
●
Contrast: Adjusts the contrast level of the picture.
●
Brightness: Adjusts the brightness level of the picture
●
Sharpness: Adjusts the edge denition of the picture.
●
Colour: Adjusts colour saturation of the picture.
●
Tint(G/R): Adjusts the colour tint of the picture.
N
Select a picture mode to be adjusted rst. The adjusted values are saved for each picture mode.
N
When you make changes to Backlight, Contrast, Brightness, Sharpness, Colour or Tint(G/R), the OSD will be adjusted
accordingly.
N
In analogue TV, Ext., AV modes of the PAL system, you cannot use the Tint(G/R) Function.
N
In PC mode, you can only make changes to Backlight, Contrast and Brightness.
N
Settings can be adjusted and stored for each external device you have connected to an input of the TV.
N
The energy consumed during use can be signicantly reduced if the brightness level of the picture is reduced, which will
reduce the overall running cost.
❑
Advanced Settings
Samsung’s new TVs allow you to make even more precise picture settings than previous models. See below to adjust detailed
picture settings.
N
Advanced Settings is available in Standard or Movie mode.
N
In PC mode, you can only make changes to Gamma and White Balance from among the Advanced Settings items.
BN68-01893F-Eng.indd 12 2009-02-24 �� 2:57:20

English - 13
BlackTone→Off/Dark/Darker/Darkest
You can select the black level on the screen to adjust the screen depth.
DynamicContrast→Off/Low/Medium/High
You can adjust the screen contrast so that the optimal contrast is provided.
Gamma
You can adjust the Primary Colour (Red, Green, Blue) Intensity.
Colour Space
Colour Space is a colour matrix composed of red, green and blue colours. Select your favourite Colour Space to experience the
most natural colour.
●
Native: Native Colour Space offers deep and rich colour tone.
●
Auto: Auto Colour Space automatically adjusts to the most natural colour tone based on programme sources.
White Balance
You can adjust the colour temperature for more natural picture colours.
●
R-Offset / G-Offset / B-Offset / R-Gain / G-Gain / B-Gain: You can adjust the Colour ‘temperature’ in the light areas by
changing the values of R, G, B. Recommended for advanced users only.
●
Reset: The previously adjusted white balance will be reset to the factory defaults.
Flesh Tone
You can emphasize the pink ‘esh tone’ in the picture.
N
Changing the adjustment value will refresh the adjusted screen.
EdgeEnhancement→Off/On
You can emphasize object boundaries in the picture.
❑
Picture Options
N
In PC mode, you can only make changes to the Colour Tone and Size from among the items in Picture Options.
ColourTone→Cool/Normal/Warm1/Warm2
You can select the most comfortable colour tone to your eyes.
N
Settings can be adjusted and stored for each external device you have connected to an input of the TV.
N
Warm1 or Warm2 is only activated when the picture mode is Movie.
Size
You can select the picture size which best corresponds to your viewing requirements.
T
Press the TOOLS button to display the Tools menu. You can also set the size by selecting Tools→PictureSize.
O
You can select these options by simply pressing the P.SIZE button on the remote control.
●
Auto Wide: Automatically adjusts the picture size to the 16:9 aspect ratio.
●
16:9: Adjusts the picture size to 16:9 appropriate for DVDs or wide broadcasting.
●
Wide Zoom: Magnify the size of the picture more than 4:3.
●
Zoom: Magnies the 16:9 wide picture (in the vertical direction) to t the screen size.
●
4:3: This is the default setting for a video movie or normal broadcasting.
●
Screen Fit: Use the function to see the full image without any cut-off when HDMI (720p / 1080i / 1080p) or Component (1080i
/ 1080p) signals are input.
N
Depending on the input source, the picture size options may vary.
N
The items available may differ depending on the selected mode.
N
In PC Mode, only 16:9 and 4:3 mode can be adjusted.
N
Settings can be adjusted and stored for each external device you have connected to an input of the TV.
N
Temporary image retention may occur when viewing a static image on the set for more than two hours.
N
Wide Zoom: Press the ► button to Select Position, then press the ENTER
E
button. Press the ▲ or ▼ button to move the
picture up / down. Then press the ENTER
E
button.
N
Zoom: Press the ► button to Select Position, then press the ENTER
E
button. Press the ▲ or ▼ button to move the picture
up and down. Then press the ENTER
E
button. Press the ► button to Select Size, then press the ENTER
E
button. Press
the ▲ or ▼ button to magnify or reduce the picture size in the vertical direction. Then press the ENTER
E
button.
N
After selecting Screen Fit in HDMI (1080i / 1080p) or Component (1080i / 1080p) mode: Select Position by pressing the ◄ or
►button. Use the ▲, ▼, ◄ or ► button to move the picture.
Reset: Press the ◄ or ► button to select Reset, then press the ENTER
E
button. You can initialize the setting.
N
If you use the Screen Fit function with HDMI 720p input, 1 line will be cut at the top, bottom, left and right as in the Overscan
function.
BN68-01893F-Eng.indd 13 2009-02-24 �� 2:57:20

English - 14
ScreenMode→16:9/WideZoom/Zoom/4:3
When setting the picture size to Auto Wide in a 16:9 wide TV, you can determine the picture size you want to see the 4:3 WSS
(Wide Screen Service) image or nothing. Each individual European country requires different picture size so this function is
intended for users to select it.
●
16:9: Sets the picture to 16:9 wide mode.
●
Wide Zoom: Magnify the size of the picture more than 4:3.
●
Zoom: Magnify the size of the picture vertically on screen.
●
4:3: Sets the picture to 4:3 normal mode.
N
This function is available in Auto Wide mode.
N
This function is not available in PC, Component or HDMI mode.
DigitalNR→Off/Low/Medium/High/Auto
If the broadcast signal received by your TV is weak, you can activate the Digital Noise Reduction feature to help reduce any static
and ghosting that may appear on the screen.
N
When the signal is weak, select one of the other options until the best picture is displayed.
HDMIBlackLevel→Normal/Low
You can directly select the black level on the screen to adjust the screen depth.
N
This function is active only when the external input connects to HDMI (RGB signals).
FilmMode→Off/Auto
The TV can be set to automatically sense and process lm signals from all sources and adjust the picture for optimum quality.
N
Film Mode is supported in TV, AV, COMPONENT(480i / 1080i) and HDMI(480i / 1080i).
❑
PictureReset→ResetPictureMode/Cancel
Resets all picture settings to the default values.
N
Select a picture mode to be reset. The reset is performed for each picture mode.
●
Reset Picture Mode: Current picture values return to default settings.
¦
Using Your TV as a Computer (PC) Display
Setting Up Your PC Software (Based on Windows XP)
The Windows display-settings for a typical computer are shown below. The actual screens on your PC will probably be different,
depending upon your particular version of Windows and your particular video card. However, even if your actual screens look
different, the same basic set-up information will apply in almost all cases. (If not, contact your computer manufacturer or Samsung
Dealer.)
1.
First, click on ‘Control Panel’ on the Windows start menu.
2.
When the control panel window appears, click on ‘Appearance and Themes’ and a display dialog-box will appear.
3.
When the control panel window appears, click on ‘Display’ and a display dialogbox will appear.
4.
Navigate to the ‘Settings’ tab on the display dialog-box.
The correct size setting (resolution): Optimum-1920 X 1080 pixels
If a vertical-frequency option exists on your display settings dialog box, the correct value is ‘60’ or ‘60 Hz’. Otherwise, just click
‘OK’ and exit the dialog box.
BN68-01893F-Eng.indd 14 2009-02-24 �� 2:57:20
English - 15
Display Modes
Both screen position and size will vary depending on the type of PC monitor and its resolution. The resolutions in the table are
recommended.
D-Sub and HDMI/DVI Input
Mode Resolution
Horizontal Frequency
Vertical Frequency
Pixel Clock Frequency
Sync Polarity
(KHz)
(Hz)
(MHz)
(H / V)
IBM 640 x 350 31.469 70.086 25.175 +/-
720 x 400 31.469 70.087 28.322 -/+
MAC 640 x 480 35.000 66.667 30.240 -/-
832 x 624 49.726 74.551 57.284 -/-
1152 x 870 68.681 75.062 100.000 -/-
VESA CVT 720 x 576 35.910 59.950 32.750 -/+
1152 x 864 53.783 59.959 81.750 -/+
1280 x 720 44.772 59.855 74.500 -/+
1280 x 960 75.231 74.857 130.000 -/+
1280 x 720 56.456 74.777 95.750 -/+
VESA DMT 640 x 480 31.469 59.940 25.175 -/-
640 x 480 37.861 72.809 31.500 -/-
640 x 480 37.500 75.000 31.500 -/-
800 x 600 37.879 60.317 40.000 +/+
800 x 600 48.077 72.188 50.000 +/+
800 x 600 46.875 75.000 49.500 +/+
1024 x 768 48.363 60.004 65.000 -/-
1024 x 768 56.476 70.069 75.000 -/-
1024 x 768 60.023 75.029 78.750 +/+
1152 x 864 67.500 75.000 108.000 +/+
1280 x 1024 63.981 60.020 108.000 +/+
1280 x 1024 79.976 75.025 135.000 +/+
1280 x 800 49.702 59.810 83.500 -/+
1280 x 800 62.795 74.934 106.500 -/+
1280 x 960 60.000 60.000 108.000 +/+
1360 x 768 47.712 60.015 85.500 +/+
1440 x 900 55.935 59.887 106.500 -/+
1440 x 900 70.635 74.984 136.750 -/+
1680 x 1050 65.290 59.954 146.250 -/+
VESA GTF 1280 x 720 52.500 70.000 89.040 -/+
1280 x 1024 74.620 70.000 128.943 -/-
VESA DMT /
DTV CEA
1920 x 1080p 67.500 60.000 148.500 +/+
N
When using an HDMI / DVI cable connection, you must use the HDMI IN 1 jack.
N
The interlace mode is not supported.
N
The set might operate abnormally if a non-standard video format is selected.
N
Separate and Composite modes are supported. SOG is not supported.
N
Too long or low quality VGA cable can cause picture noise at high resolution modes (1920x1080 or 1600x1200).
¦
Setting up the TV with your PC
N
Preset: Press the SOURCE button to select PC mode.
❑
Auto Adjustment
Brightness : 45
Auto Adjustment allows the PC screen of set to self-adjust to the incoming PC video signal.
Picture
Sharpness : 50
AutoAdjustment ►
The values of ne, coarse and position are adjusted automatically.
Screen
N
This function does not work in DVI-HDMI mode.
Advanced Settings
T
Press the TOOLS button to display the Tools menu. You can also set the Auto Adjustment
Picture Options
by selecting Tools→AutoAdjustment.
Picture Reset
❑
Screen
Coarse / Fine
The purpose of picture quality adjustment is to remove or reduce picture noise. If the noise is not removed by Fine-tuning alone,
then adjust the frequency as best as possible (Coarse) and Fine-tune again. After the noise has been reduced, readjust the picture
so that it is aligned on the centre of screen.
PC Position
Adjust the PC’s screen positioning if it does not t the TV screen. Press the ▲ or ▼ button to adjusting the Vertical-Position. Press
the ◄ or ► button to adjust the Horizontal-Position.
Image Reset
You can replace all image settings with the factory default values.
BN68-01893F-Eng.indd 15 2009-02-24 �� 2:57:21
Оглавление
- CONTENTS
- GENERAL INFORMATION
- OPERATION
- CHANNEL CONTROL
- PICTURE CONTROL
- SOUND CONTROL
- SETUP
- INPUT / SUPPORT
- ABOUT ANYNET +
- RECOMMENDATIONS FOR USE
- СОДЕРЖАНИЕ
- ОБЩАЯ ИНФОРМАЦИЯ
- ЭКСПЛУАТАЦИЯ
- УПРАВЛЕНИЕ КАНАЛАМИ
- УПРАВЛЕНИЕ ИЗОБРАЖЕНИЯМИ
- УПРАВЛЕНИЕ ЗВУКОМ
- УСТАНОВКА
- ВХОД / ПОДДЕРЖКА
- О ФУНКЦИИ ANYNET +
- РЕКОМЕНДАЦИИ ПО ИСПОЛЬЗОВАНИЮ


