Samsung ITP5021D: APPLICATION MENUS
APPLICATION MENUS: Samsung ITP5021D
APPLICATION MENUS
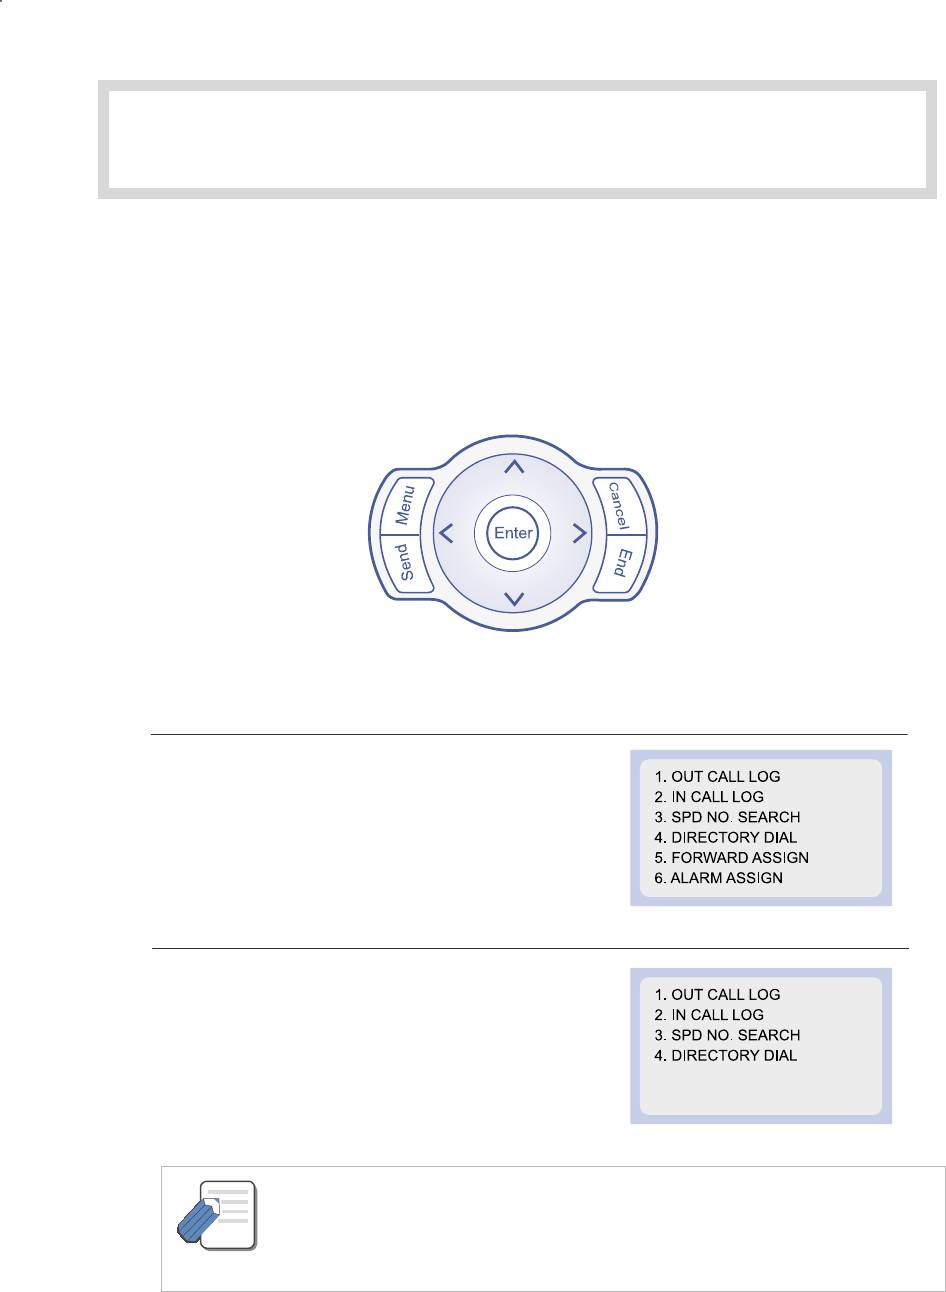
1. Navigation Buttons
The DS-5021D and DS-5014D digital phones are equipped with navigation buttons for convenient
use of the digital phone functions. This chapter introduces the functions available using the
navigation buttons and procedures for using the various applications.
Menu Button
The main menu is displayed when the
[Menu]
button is pressed in the idle state,
You can select from the presented options.
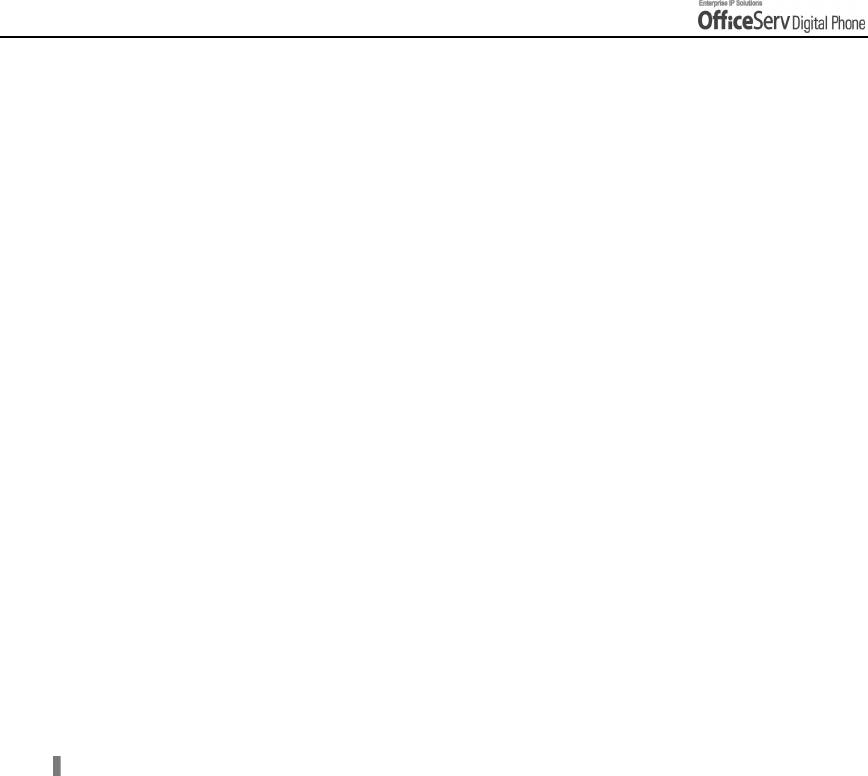
This menu is displayed when the
[Menu]
button is pressed when dialling mode
or when transferring calls. This allows you select
to select and perform a function.
- Calls will be maintained even if the [Menu] button is pressed while you are talking.
If you press the [End] button or the other buttons except the Navigation buttons
NOTE
in menu mode, you will automatically exit from the menu mode and return to the idle
screen.
© SAMSUNG Electronics Co., Ltd. Page 115
APPLICATION MENUS
Send Button
If you press the [Send] button while the [OUT CALL LOG], [IN CALL LOG], [SPD NO. SEARCH],
or [DIRECTORY DIAL] function is selected, the corresponding number will be dialled.
!
If you press the [Send] button in idle mode, you enter the [OUT CALL LOG] menu.
!
If you press the [Send] button in dial mode, you enter the [OUT CALL LOG] menu
regardless of the numbers previously dialled.
!
If you press the [Send] button while a call is arriving(ringing status), you will
answer the call on the speakerphone.
End Button
This button is used to disconnect calls or to exit the digital phone menus and return to the idle display.
Cancel button
The [Cancel] button is used in menu mode to move to the previous level.
If the [Cancel] button is pressed when you first enter menu mode, the menu mode is exited.
The [Cancel] button is also used to delete the characters previously entered when entering numbers or
characters.
Enter button
This button is used in the menu mode to select or save the item that the cursor is indicating.
This button may also be used for the [NND(Name Number Display)] button when receiving calls.
!
The [NND] button displays ‘caller number’, ‘caller name’, and ‘received time’
when you press the button, if the caller information is available.
Page 116 © SAMSUNG Electronics Co., Ltd.
APPLICATION MENUS
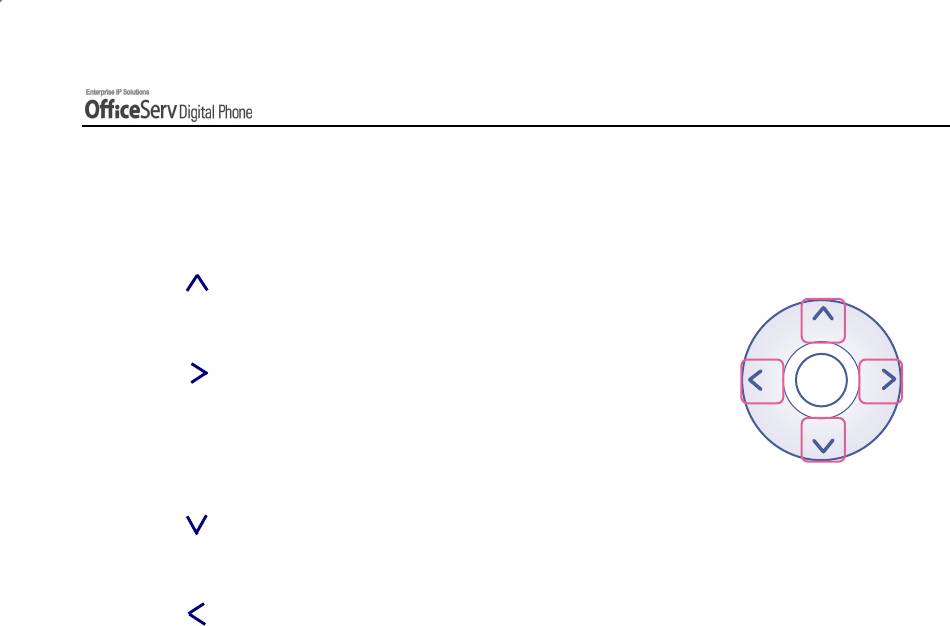
Direction button
These buttons are used when editing menu entries, or when moving between menu items.
1
11
1
[ ] button is used
- Used for moving to the previous menu.
2
22
2
[ ] button is used
Enter
- In cases where the phone number is long, this button is used
for displaying the rear part of the number which is
not displayed on the LCD screen.
3
33
3
[ ] button is used
- Used for moving to the next menu.
4
44
4
[ ] button is used
- In cases where the phone number is long, this button is
used for displaying the front part of the number which is not displayed on the LCD screen.
© SAMSUNG Electronics Co., Ltd. Page 117
APPLICATION MENUS
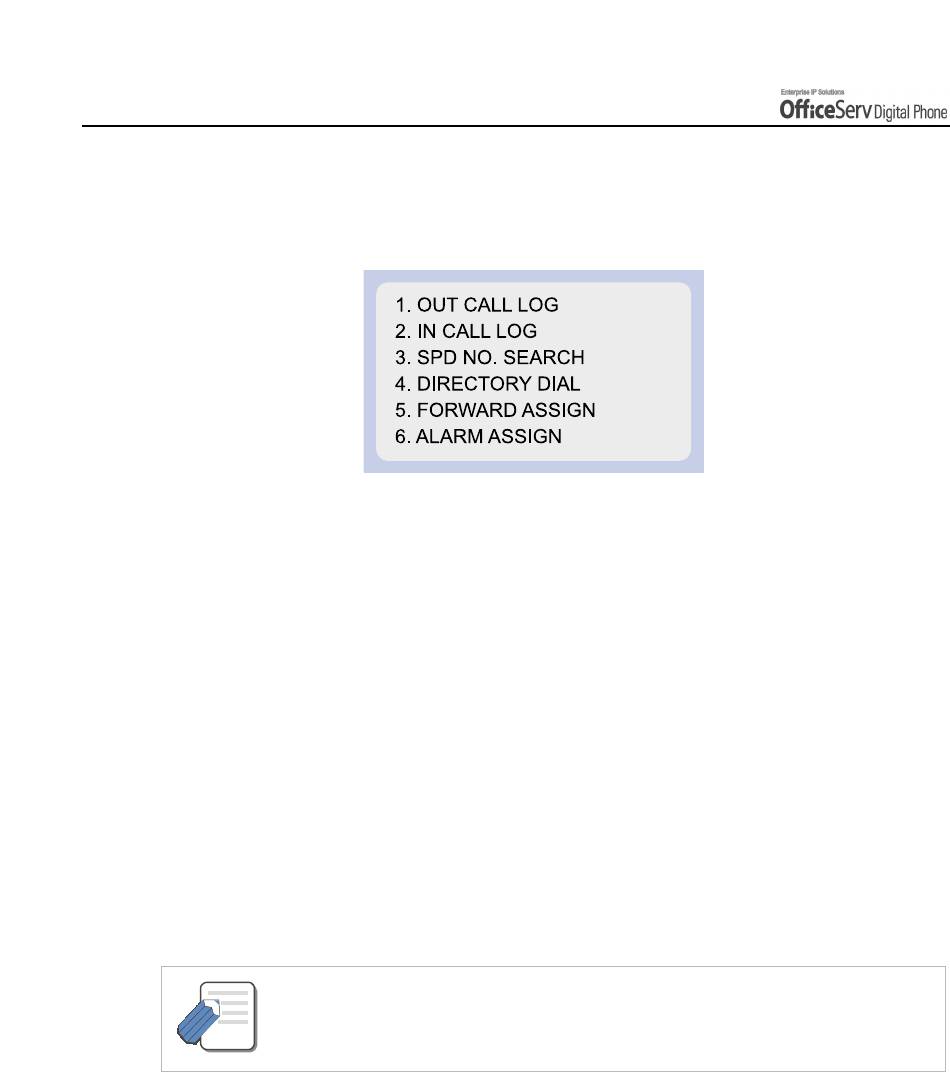
2. Main Menus
Press the [Menu] button to display the main menu below.
How to Select Items
To select a menu items, you can use the navigation direction buttons, volume button
or the dial buttons.
!
Use the [
∧∧
∧
∧
]/[
∨∨
∨
∨
] direction buttons or the [
!
!
!!
Volume
"
"
""
]
button and move to
the preferred menu.
!
You can select the menu directly by pressing the dial button corresponding to
the menu number.
!
Press the [Enter] button to select the menu underlined by the cursor to expose sub-
menus.
!
Press the [End] button to exit the menu and return to the idle screen.
!
When buttons other than the navigation buttons are pressed, the menu mode will end.
- When your station is called while in menu mode, your phone will appear as busy to the
calling party.
NOTE
Page 118 © SAMSUNG Electronics Co., Ltd.
APPLICATION MENUS
3. Reviewing and Calling Recently Called Numbers
Up to 50 recently called numbers can be saved.
The actual number is allocated by your System Administrator. You can verify recently called numbers
and redial them as required.
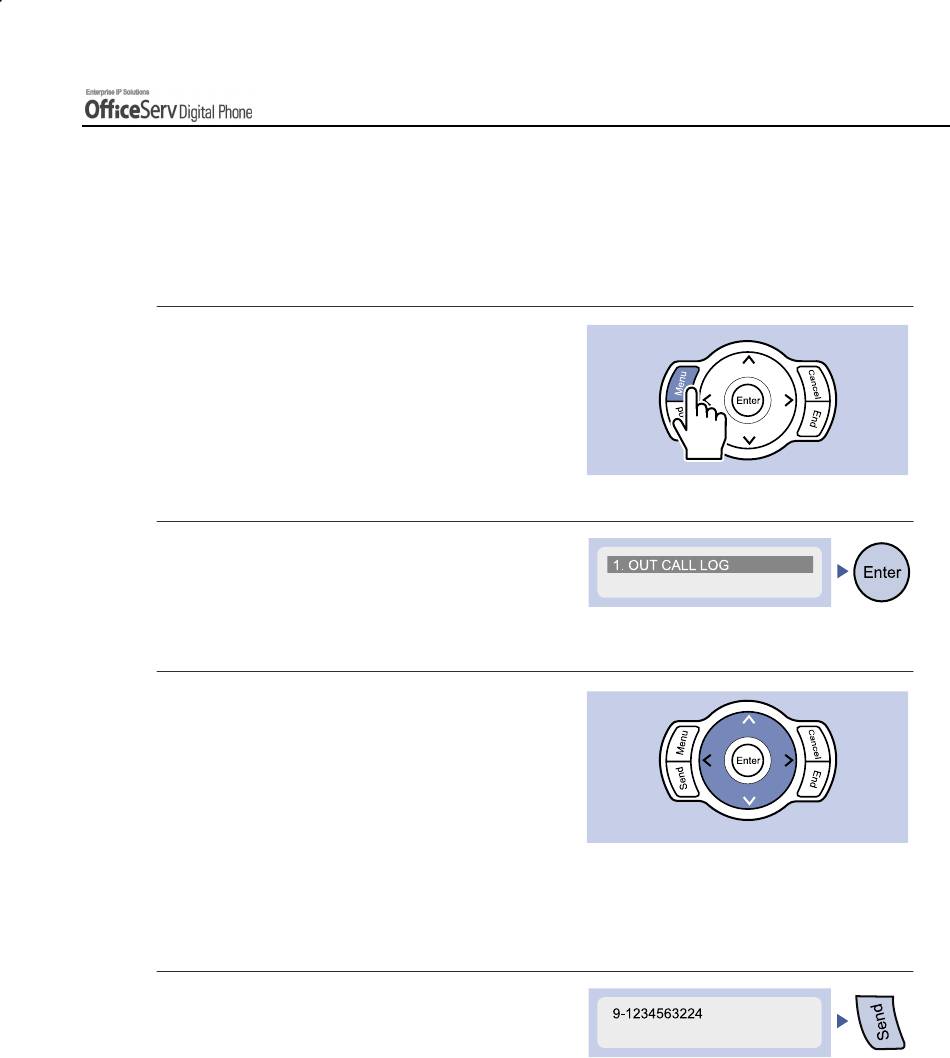
1.
Press the
[Menu]
button
to
display the main menu screen.
2.
Dial
[1]
to select
[1. OUT CALL LOG]
or select and press the
[Enter]
button
3.
The list of recently called numbers
is displayed. You can review each
of the numbers in the list in turn by
using the [
∧
∧∧
∧
]/[
∨∨
∨
∨
] direction buttons
or the [
!
Volume
"
]
button.
Use the [
<<
<
<
]/[
>
>>
>
] direction buttons
to view long numbers that do not fully
appear on the screen.
4.
Move to the number you intend to dial
and press the
[Send]
button to make
the call.
© SAMSUNG Electronics Co., Ltd. Page 119
APPLICATION MENUS
4. Reviewing and Calling Recently Received Numbers
Up to 50 recently received numbers can be saved. The actual number is allocated by the System
Administrator. You can verify recently called numbers or dial them as required.
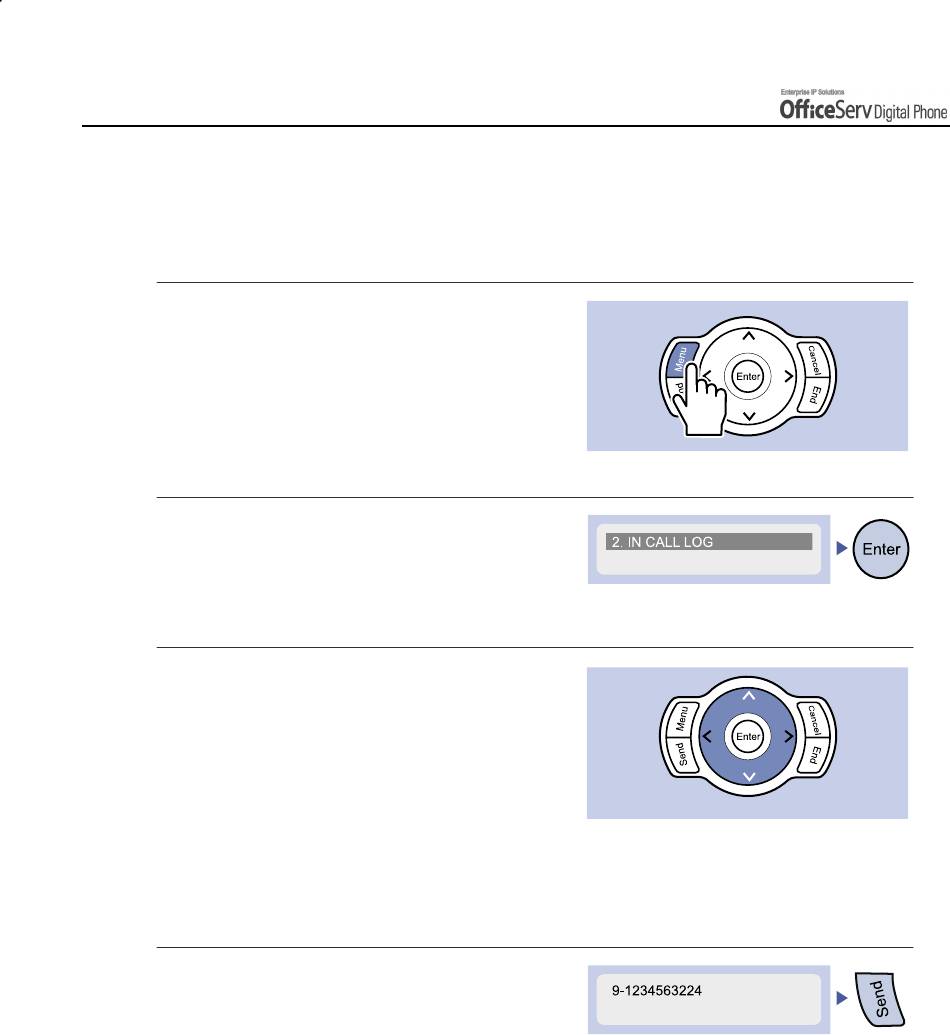
1.
Press the
[Menu]
button
to
display the main menu screen.
2.
Dial
[2]
to select
[2. IN CALL LOG],
or select and press the
[Enter]
button
3.
The list of recently received numbers
is displayed. You can review each
of the numbers in the list in turn by
using the [
∧
∧
∧∧
]/[
∨∨
∨
∨
] direction buttons
or the [
!
Volume
"
]
button.
Use the [
<<
<
<
]/[
>
>>
>
] direction button to
view long numbers that do not fully
appear on the screen.
4.
Move to the number you intend to dial
and press the
[Send]
button to make
the call.
Page 120 © SAMSUNG Electronics Co., Ltd.
APPLICATION MENUS
5. Reviewing and Calling Speed Dial Numbers
You can review or call a speed number you have personally programmed or system speed number
programmed in the OfficeServ system. The System Administrator can program the system speed
numbers and names.
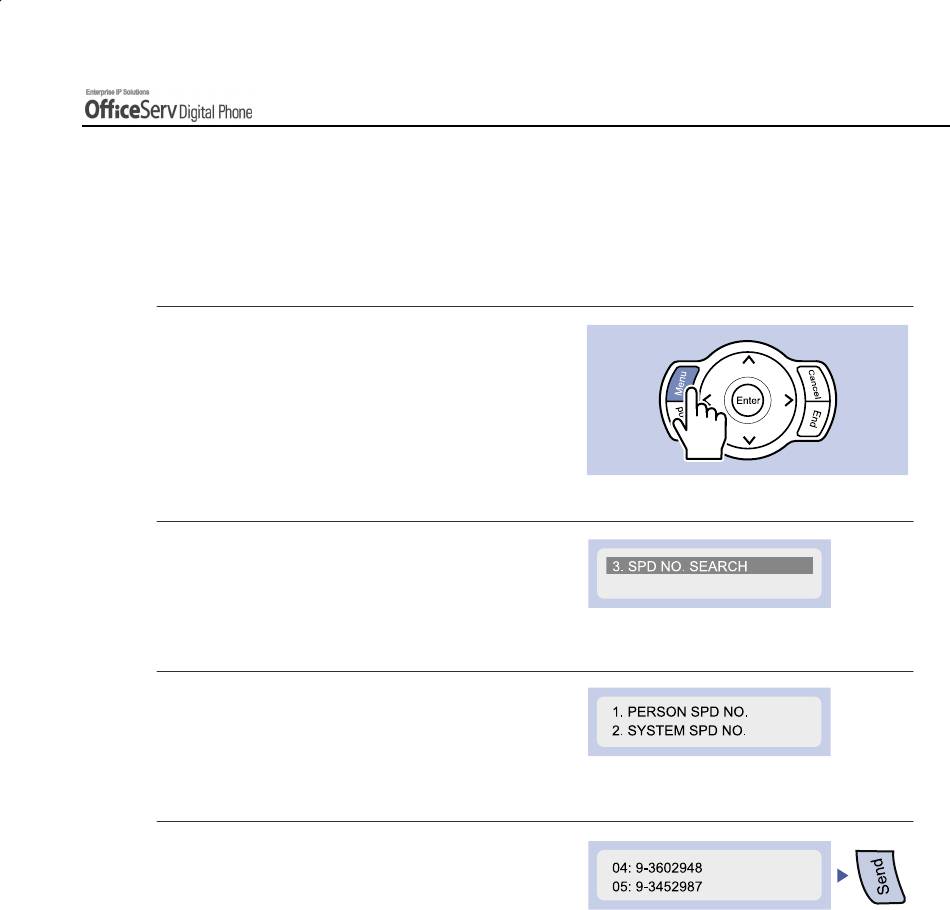
1.
Press the
[Menu]
button to display
the main menu screen.
2.
Dial [3] to select
[3. SPD NO. SEARCH]
.
3.
Dial
[1]
to select
[1. PERSON SPD NO.]
or
dial
[2]
to select
[2. SYSTEM SPD NO.]
.
4.
The saved speed dial number list appears.
You can review each of the numbers in the
list in turn by using the direction buttons or
the [
!
Volume
"
]
buttons.
Use the direction button to view long numbers
that do not fully appear on the screen.
Move to the number you intend to dial and
press the
[Send]
button to make the call.
© SAMSUNG Electronics Co., Ltd. Page 121
APPLICATION MENUS
6. Reviewing and Calling Numbers by Name
Using the OfficeServ system’s internal directories you can review by name and then call personal or
system speed dial numbers or internal station numbers.
The System Administrator can program system speed numbers and names.
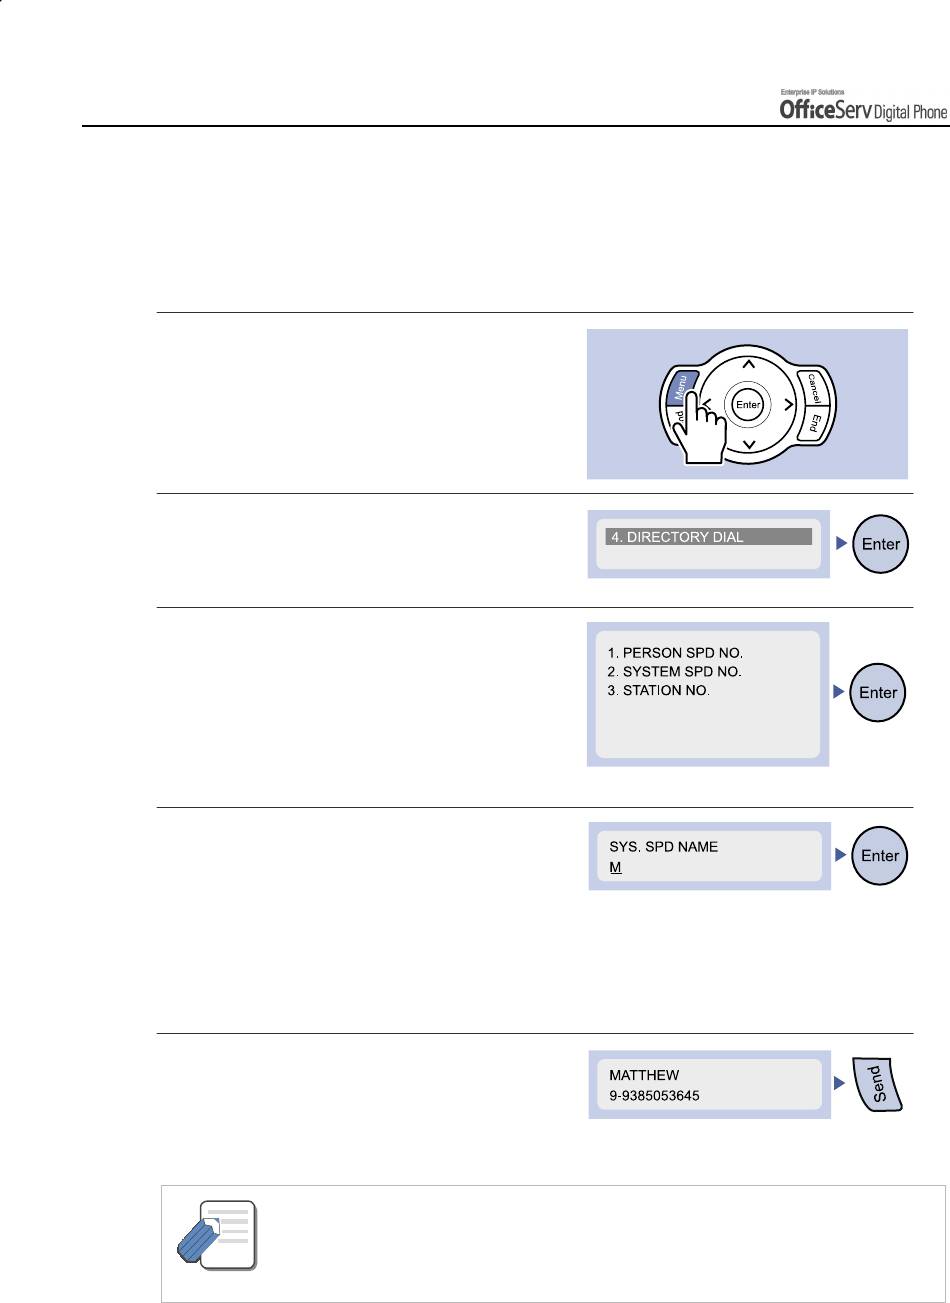
1.
Press the
[Menu]
button to display
the main menu screen.
2.
Dial
[4]
to select
[4. DIRECTORY DIAL]
or
select and press the
[Enter]
button.
The submenu below is displayed.
3.
Dial
[1]
to select
[1. PERSON SPD NO.]
or
dial
[2]
to select
[2. SYSTEM SPD NO.]
or
dial
[3]
to select
[3. STATION NO.]
,
or select by using the
[
!
!!
!
Volume
"
""
"
]
button
and press the
[Enter]
button.
4.
Use the dial buttons to enter the first letter
of the name you intend to review, and press
the
[Enter]
button. The numbers with names
starting with the entered letter are displayed.
If there is no number with a name starting
with the letter entered, ‘It is not found’ will
be displayed and you may enter a new letter.
5.
Move to the name in the list you intend
to dial and press the
[Send]
button to
make the call.
- Refer to the ‘Things You Should Know’ of this guide for how to enter characters.
Use the [
∧
∧∧
∧
]/[
∨∨
∨
∨
] direction buttons to move the cursor in the input screen.
NOTE
Press the [Cancel] button to erase the entered letter.
- Press the [Cancel] button to return to the previous menu.
Page 122 © SAMSUNG Electronics Co., Ltd.
APPLICATION MENUS
7. Setting Forward Type and Number
When you are unavailable to answer your calls on the DS-5021D or DS-5014D digital phone, you can
set the forwarding function to have the calls answered at another station, station group or external
number. Procedures for setting the forward type and numbers are described below.
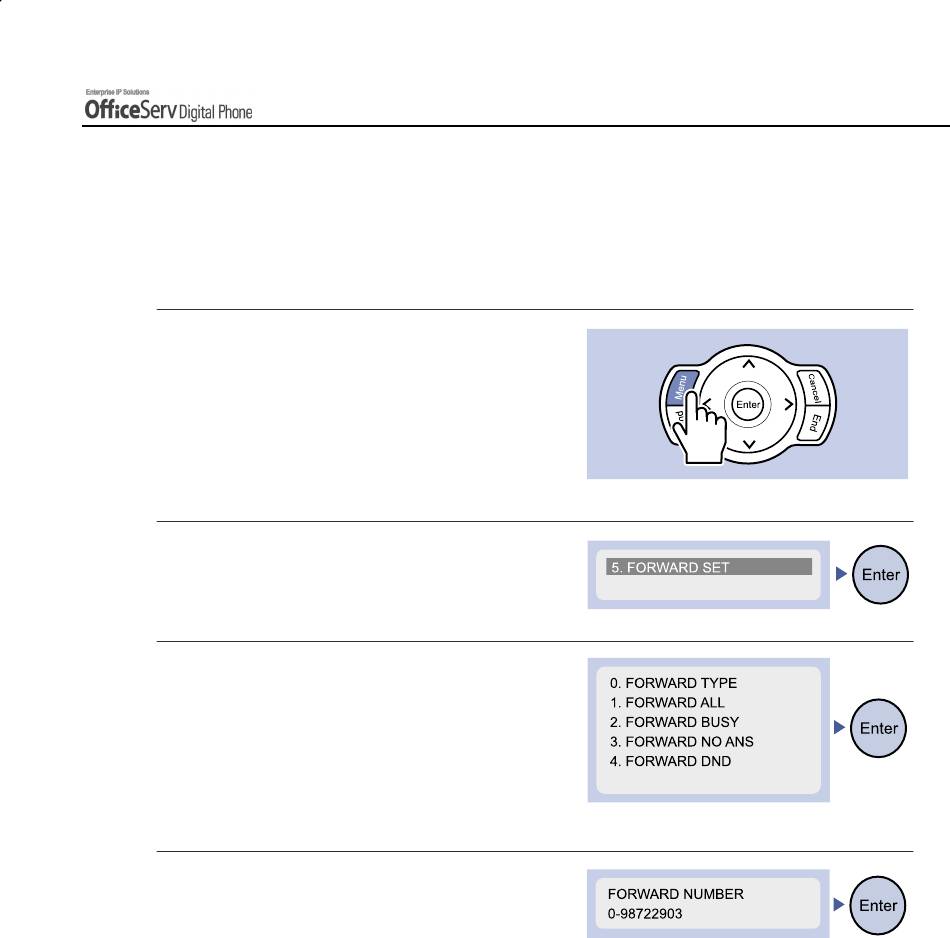
1.
Press the
[Menu]
button to display
the main menu screen.
2.
Dial
[5]
to select
[5. FORWARD SET]
or
select and press the
[Enter]
button.
3.
Select the type of forward you wish to set
a destination for using the [
∧
∧∧
∧
]/[
∨∨
∨
∨
] direction
buttons or the [
!
Volume
"
]
button and press
the
[Enter] button
. Or select using
the dial button corresponding to the forward
type.
4.
Enter the destination number using
the dial buttons. For example, if you
selected [1. FORWARD ALL], enter
the numbers in the LCD screen as shown.
If an external number is required please
insert the trunk access code(e.g. 0) before
the number.
Press the
[Enter]
button to save the number
entered and to move to the upper menu.
If a destination number already exists you do
not need to erase it-just enter the new destination
number.
© SAMSUNG Electronics Co., Ltd. Page 123
APPLICATION MENUS
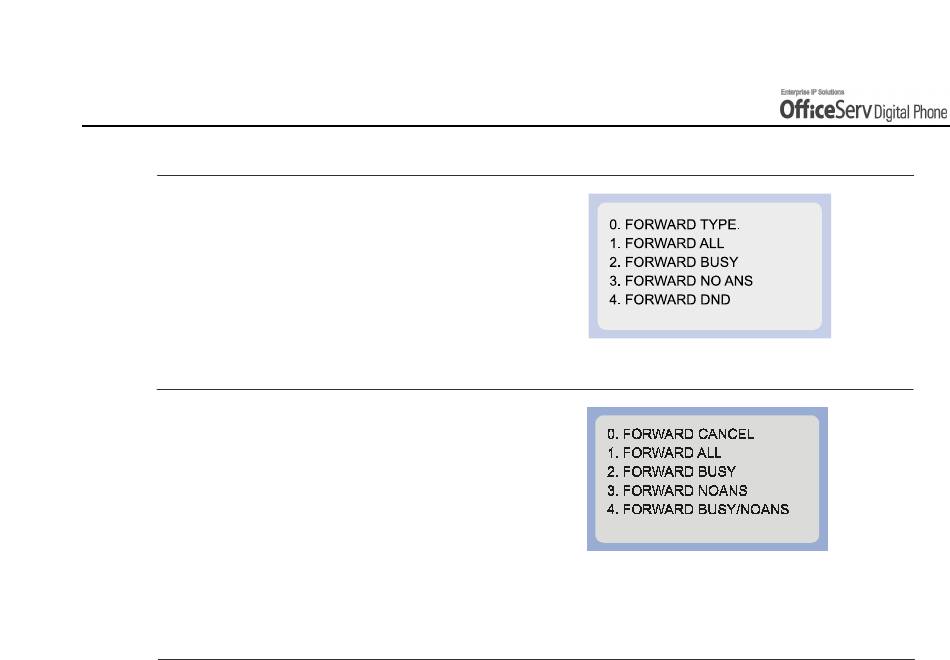
5.
Select the forward type you wish to set.
Dial
[0]
to select
[0. FORWARD TYPE]
.
The current forward setting is displayed.
6.
Select the required forward type to be set
by using the [
∧
∧∧
∧
]/[
∨∨
∨
∨
] direction button,
the [
!
Volume
"
]
button and press the
[Enter]
button, or by pressing the dial
button corresponding to the forward type.
[0. FORWARD CANCEL]
cancels your
previous setting.
7.
Press
[End]
to return to the idle screen
Page 124 © SAMSUNG Electronics Co., Ltd.
APPLICATION MENUS
8. Setting Alarm Reminders
This function works like an alarm clock and is useful to remind you of upcoming appointments. You
can set the time and type of alarm for up to three alarms.
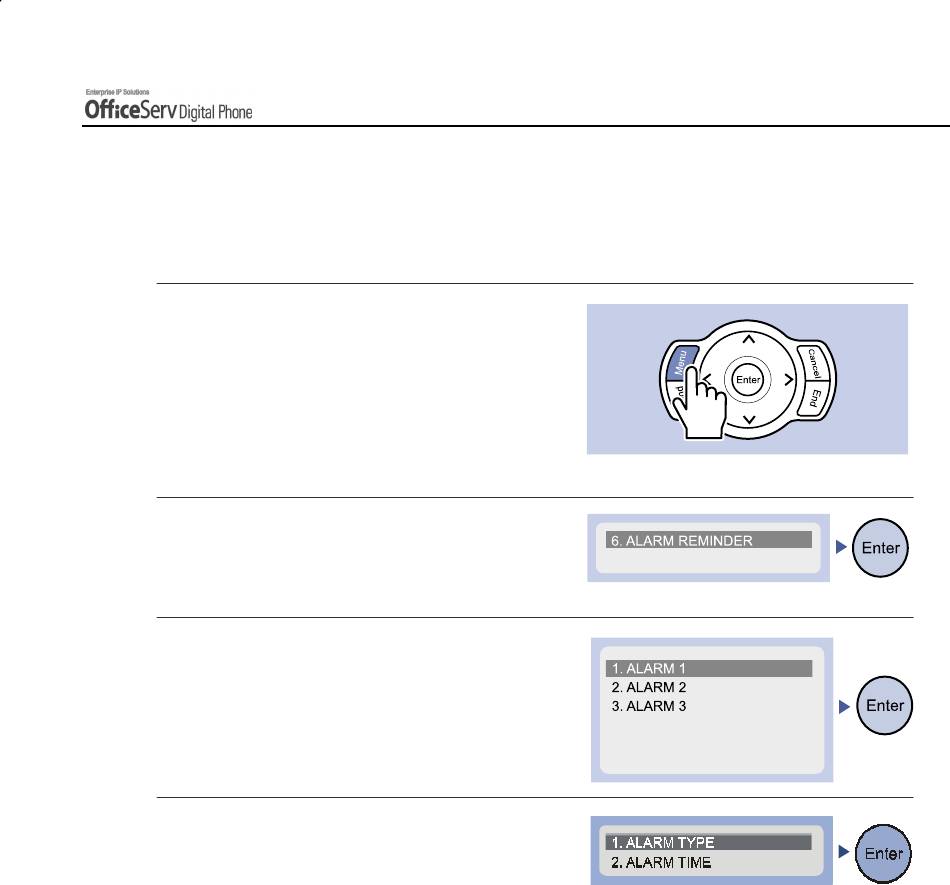
1.
Press the
[Menu]
button to display
the main menu screen.
2.
Dial [6] to select
[6. ALARM REMINDER]
.
The submenu below is displayed.
3.
Use the [
∧
∧∧
∧
]/[
∨
∨∨
∨
] direction button
or the [
!
Volume
"
]
button and press
the
[Enter]
button, or select the dial
button corresponding to the alarm
number you wish to set.
4.
For example, if you selected
[1. ALARM 1],
the submenu for setting
the alarm type and time appears.
To select
[1. ALARM TYPE]
use the
[
∧
]/[
∨
] direction buttons or the
[
!
Volume
"
]
button and press
the
[Enter]
button, or dial
[1]
.
© SAMSUNG Electronics Co., Ltd. Page 125
APPLICATION MENUS
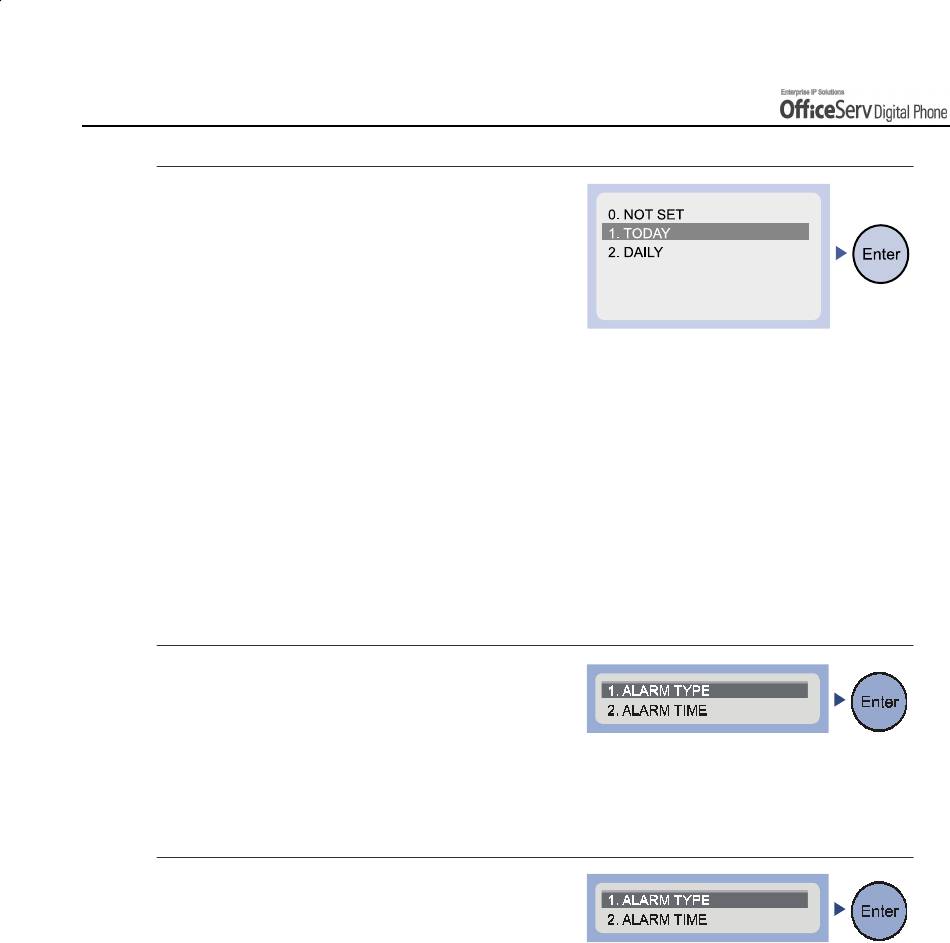
5.
The submenu for the three alarm types
is displayed as shown.
Use the [
∧∧
∧
∧
]/[
∨
∨∨
∨
] direction buttons,
the[
!
Volume
"
]
button, or the dial
buttons to select to select the alarm
type, and press the
[Enter]
button.
[0. NOT SET]
the alarm does not ring.
[1. TODAY]
the alarm rings only once at the set
time when selected.
[2. DAILY]
an alarm rings every day at the set time
when selected.
The selected alarm type is saved and
you move to the upper menu displaying
the submenu shown below.
6.
To select
[2. ALARM TIME]
use the
[
∧∧
∧
∧
]/[
∨∨
∨
∨
] direction buttons or the
[
!
Volume
"
]
button and press the
[Enter]
button, or the dial
[2]
to set the
alarm time.
7.
Use the dial buttons to enter the alarm
time in 24 hour mode.
Use the [
Cancel
] button to erase all entered
numbers. Press the
[Enter]
button
to save
the entered time and move to the previous
menu.
Page 126 © SAMSUNG Electronics Co., Ltd.


