Samsung LW-46 G15 W: ➢
➢: Samsung LW-46 G15 W
Setting up Your PC Software (Windows only)
The Windows display-settings for a typical computer are shown below. But the actual screens on your
PC will probably be different, depending upon your particular version of Windows and your particular
video card. But even if your actual screens look different, the same, basic set-up information will apply
in almost all cases. (If not, contact your computer manufacturer or Samsung Dealer.)
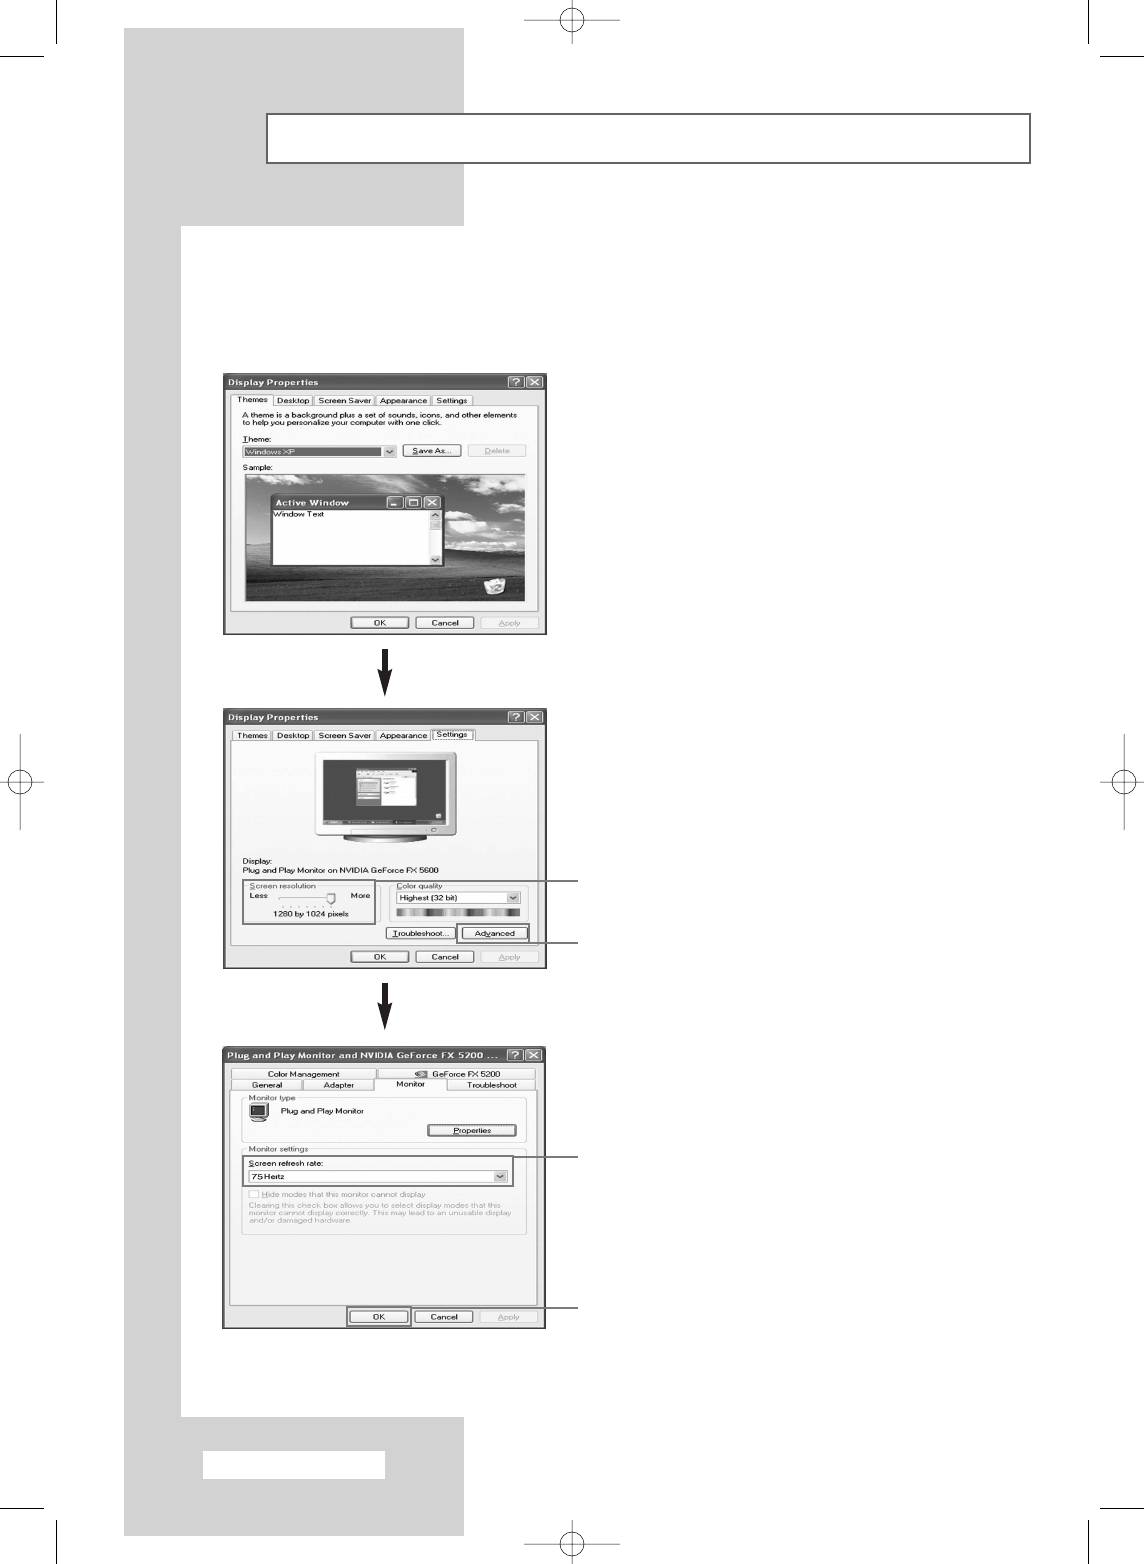
1 Right click the mouse on the Windows Desktop,
then click on Properties. The Display Properties
will be displayed.
2 Click on Settings, then set the display mode with
reference to the Display Modes Table. You do not
need to change the colours settings.
3 Click on Advanced. A new settings dialog box
will be displayed.
4 Click on the Monitor tab, then set the Screen
2
refresh rate with reference to the Display Modes
Table. Set the vertical frequency and horizontal
frequency individually if you can do so instead of
3
setting the Screen refresh rate.
5 Press the OK button, close the window, then
press the OK button on the Display Properties
window. Automatic re-booting may commence at
this moment.
6 Shutdown the PC, and connect it to your TV
(see page 63).
➢
◆
The actual screens on your PC may look
different, depending on your particular
4
version of Windows and the type of your
PC.
◆
When you use your TV as a PC monitor, it
supports Colours up to 32 bits.
◆
In this case, the display on the TV may look
different depending on your particular
version of Windows or the PC
5
manufacturer.
◆
When connecting a PC (including the DVI
connection), you must set it to the display
settings that are supported by the TV.
Otherwise, the message
Out Of Range
will be displayed.
English - 64
BN68-00746A(GAIA2_Euro_ENG) 2004/08/23 03:56 PM Page 64
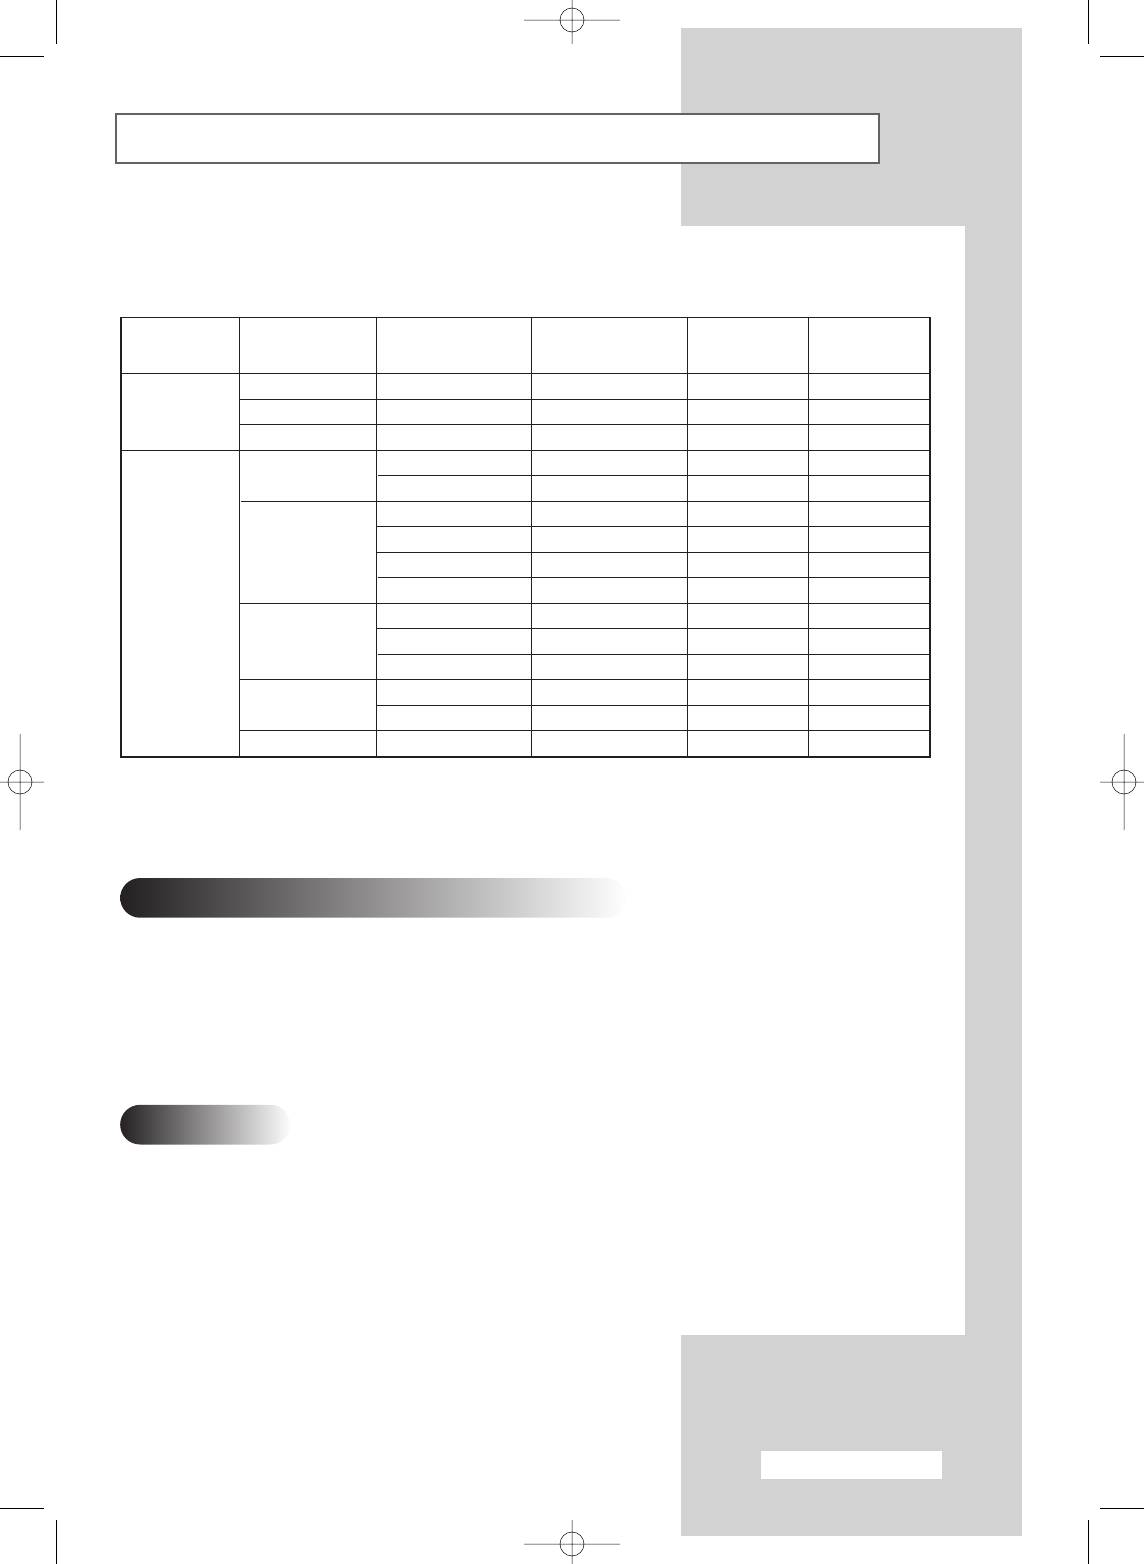
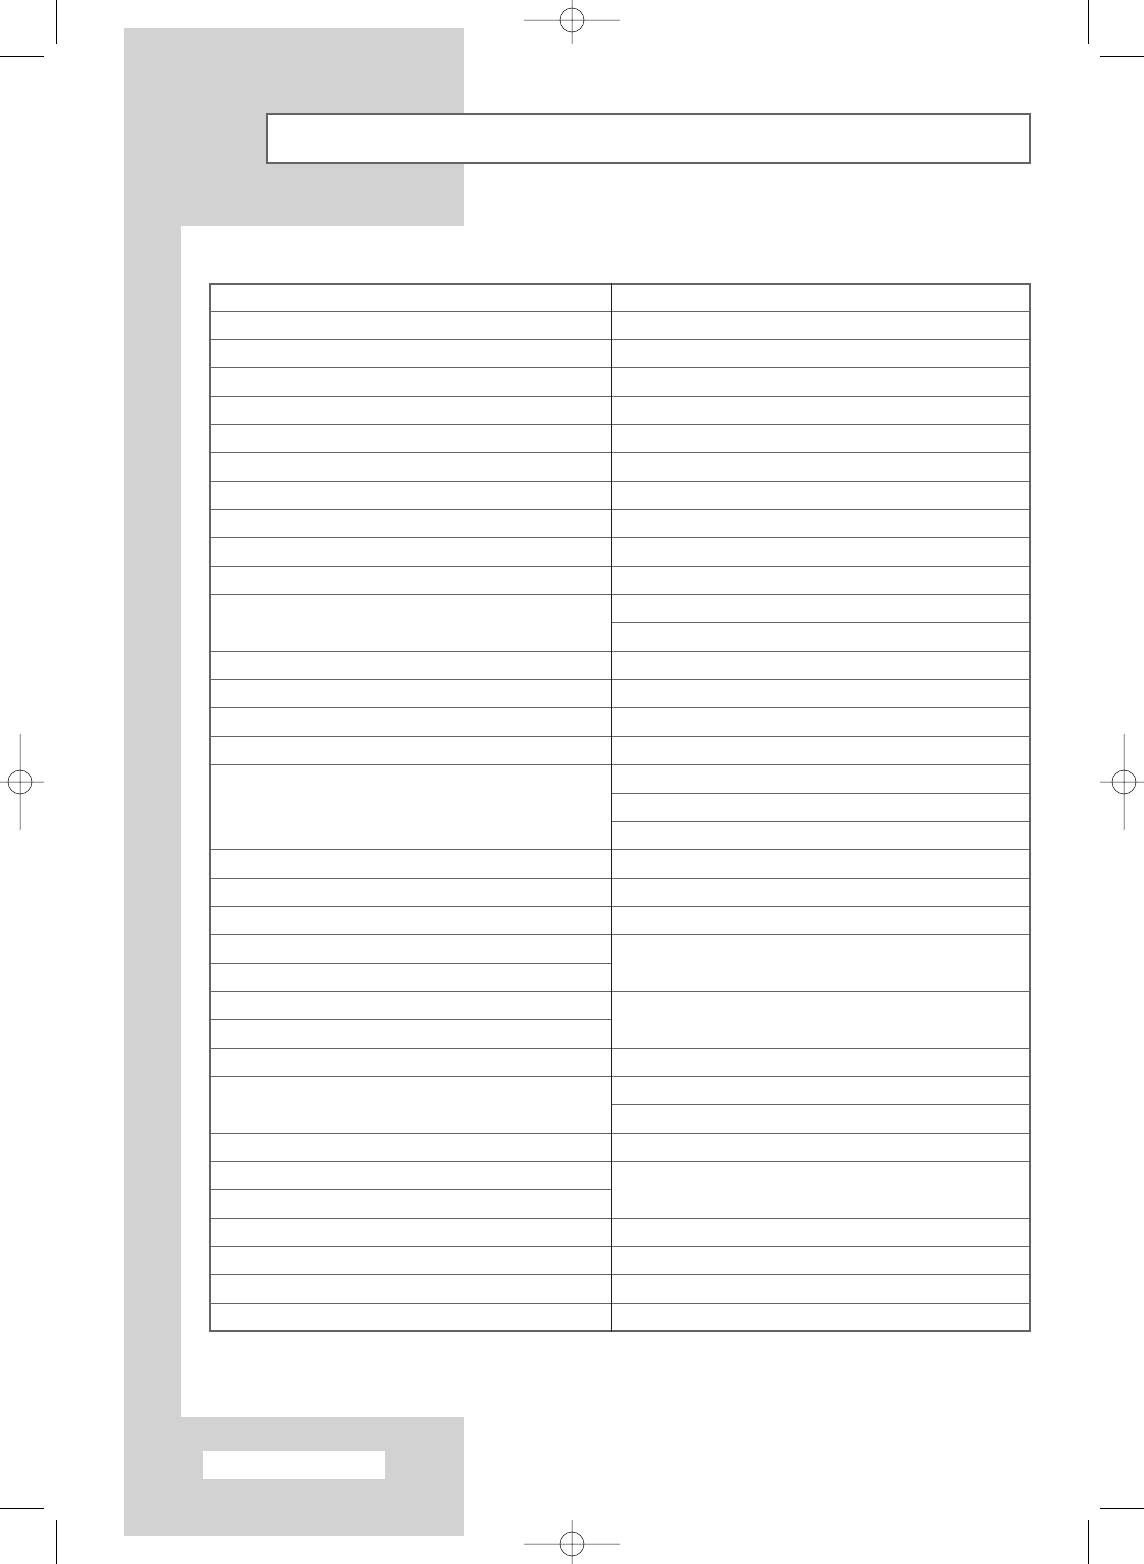
Input Mode (PC/DVI)
Both screen position and size will vary depending on the type of PC monitor and its resolution.
The table below shows all of the display modes that are supported:
Resolution
Vertical
Horizontal
Vertical
Horizontal
Mode
(Dot x Line)
frequency (Hz)
frequency (kHz)
polarity
polarity
640 x 350
70.086
31.469
N
N
IBM
640 x 480
59.940
31.469
N
N
720 x 400
70.087
31.469
P
N
72.809
37.861
N
N
640 x 480
75.000
37.500
N
N
56.250
35.156
P/N
P/N
60.317
37.897
P
P
800 x 600
72.188
48.077
P
P
VESA
75.000
46.875
P
P
60.004
48.363
N
N
1024 x 768
70.069
56.476
N
N
75.029
60.023
P
P
60.020
63.981
P
P
1028 x 1024
75.025
79.976
P
P
1920 x 1080
59.988
66.647
N
P
(N: Negative / P: Positive)
Checklist Before Connecting to a PC
◆ Adjust the PC display setup to the resolution and frequency values that are supported by the TV.
◆ Please read the user’s manual provided with the PC (Graphic Card & Sound Card).
◆ Do not supply power to either device until all connections are complete. Supplying power in the middle of
connecting may cause damage to the product.
◆ Check the terminal types for the PC’s graphic card.
Notes
◆ The modes table conforms to the regulations of IBM/VESA and is prepared based on analog input standards.
◆ The mode for DVI is the same as those for the PC.
◆ The optimal resolution is 1920 x 1080 @ 60Hz.
◆ The optimal timing per each mode is the vertical frequency 60Hz.
English - 65
BN68-00746A(GAIA2_Euro_ENG) 2004/08/23 03:56 PM Page 65
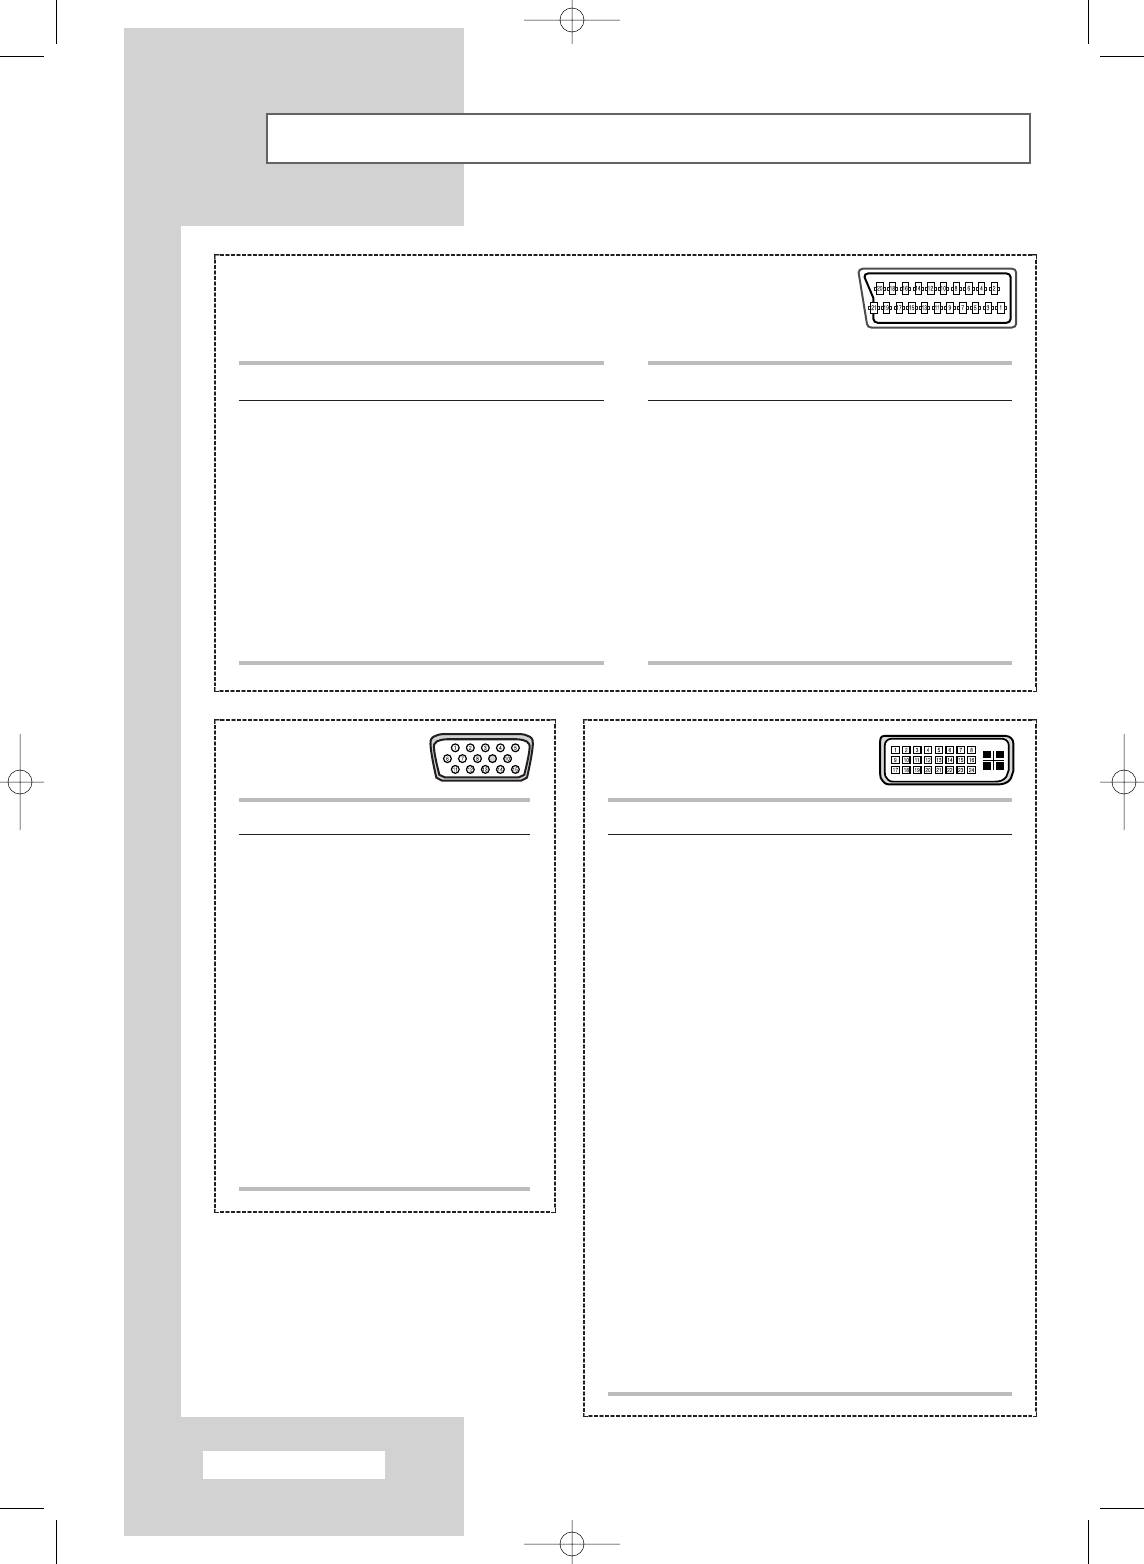
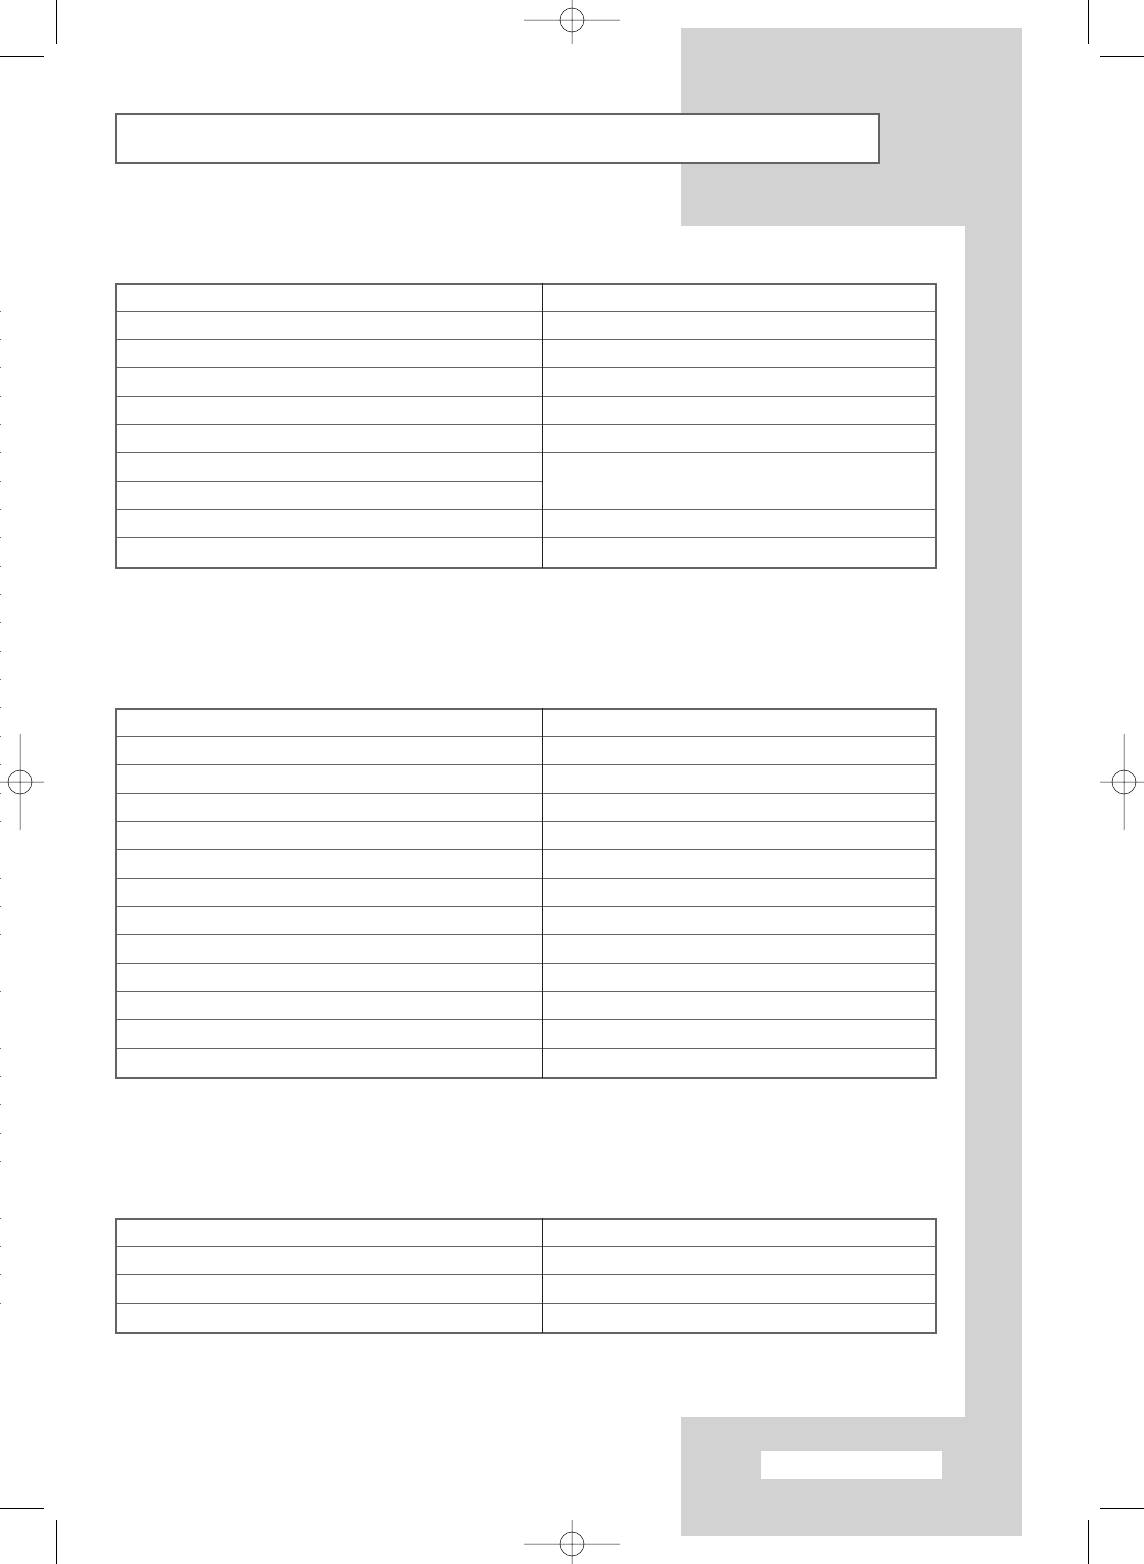
Pin Configurations
SCART Connector (EXT 1/EXT 2/EXT 3)
➢
Pins 5, 7, 9, 11, 13, 15, and 16 are used for RGB processing and are
only wired on the EXT 1, EXT 2, or EXT 3 connector.
Pin Signal
Pin Signal
1 Audio output R
12 -
2 Audio input R
13 Video chassis return (RGB red)
3 Audio output L
14
-
4 Audio chassis return
15 RGB red input
5 Video chassis return (RGB blue)
16 Blanking signal (RGB switching)
6 Audio input L
17 Video chassis return
7 RGB blue input
18 Blanking signal ground
8 Switching voltage
19 Video output
9 Video chassis return (RGB green)
20 Video input
10 AV-Link (Ext 1)
21 Screening/chassis return
11 RGB green input
PC Input Connector
DVI Input Connector
(15Pin)
(24Pin)
Pin PC IN
Pin Signal
1 Red (R)
1T.M.D.S. Data2-
2 Green (G)
2 T.M.D.S. Data2+
3 Blue (B)
3 T.M.D.S. Data2/4 Shield
4 Grounding
4T.M.D.S. Data4-
5 Grounding (DDC)
5 T.M.D.S. Data4+
6Red (R) Grounding
6 Clock (DDC)
7Green (G) Grounding
7Data (DDC)
8 Blue (B) Grounding
8 Not Connected
9 Reserved
9T.M.D.S. Data1-
10 Sync Grounding
10 T.M.D.S. Data1+
11 Grounding
11 T.M.D.S. Data1/3 Shield
12 Data (DDC)
12 T.M.D.S. Data3-
13 Horizontal sync.
13 T.M.D.S. Data3+
14 Vertical sync.
14 +5V Power
15 Clock (DDC)
15 5V Grounding
16 Hot Plug Detect
17 T.M.D.S. Data0-
18 T.M.D.S. Data0+
19 T.M.D.S. Data0/5 Shield
20 T.M.D.S. Data5-
21 T.M.D.S. Data5+
22 T.M.D.S. Clock Shield
23 T.M.D.S. Clock+
24 T.M.D.S. Clock-
English - 66
BN68-00746A(GAIA2_Euro_ENG) 2004/08/23 03:56 PM Page 66
Programming the Remote Control for Other Components
Your TV comes equipped with a universal remote control. In
addition to controlling the TV, the universal remote control can
also operate a VCR, Cable box (CATV), DVD player, and Set-Top
Box made by Samsung (even if your VCR, Cable box, and DVD
player are made by manufacturers other than Samsung).
VCR
➢
The remote control might not be compatible with all
VCRs, DVD players, and Cable boxes.
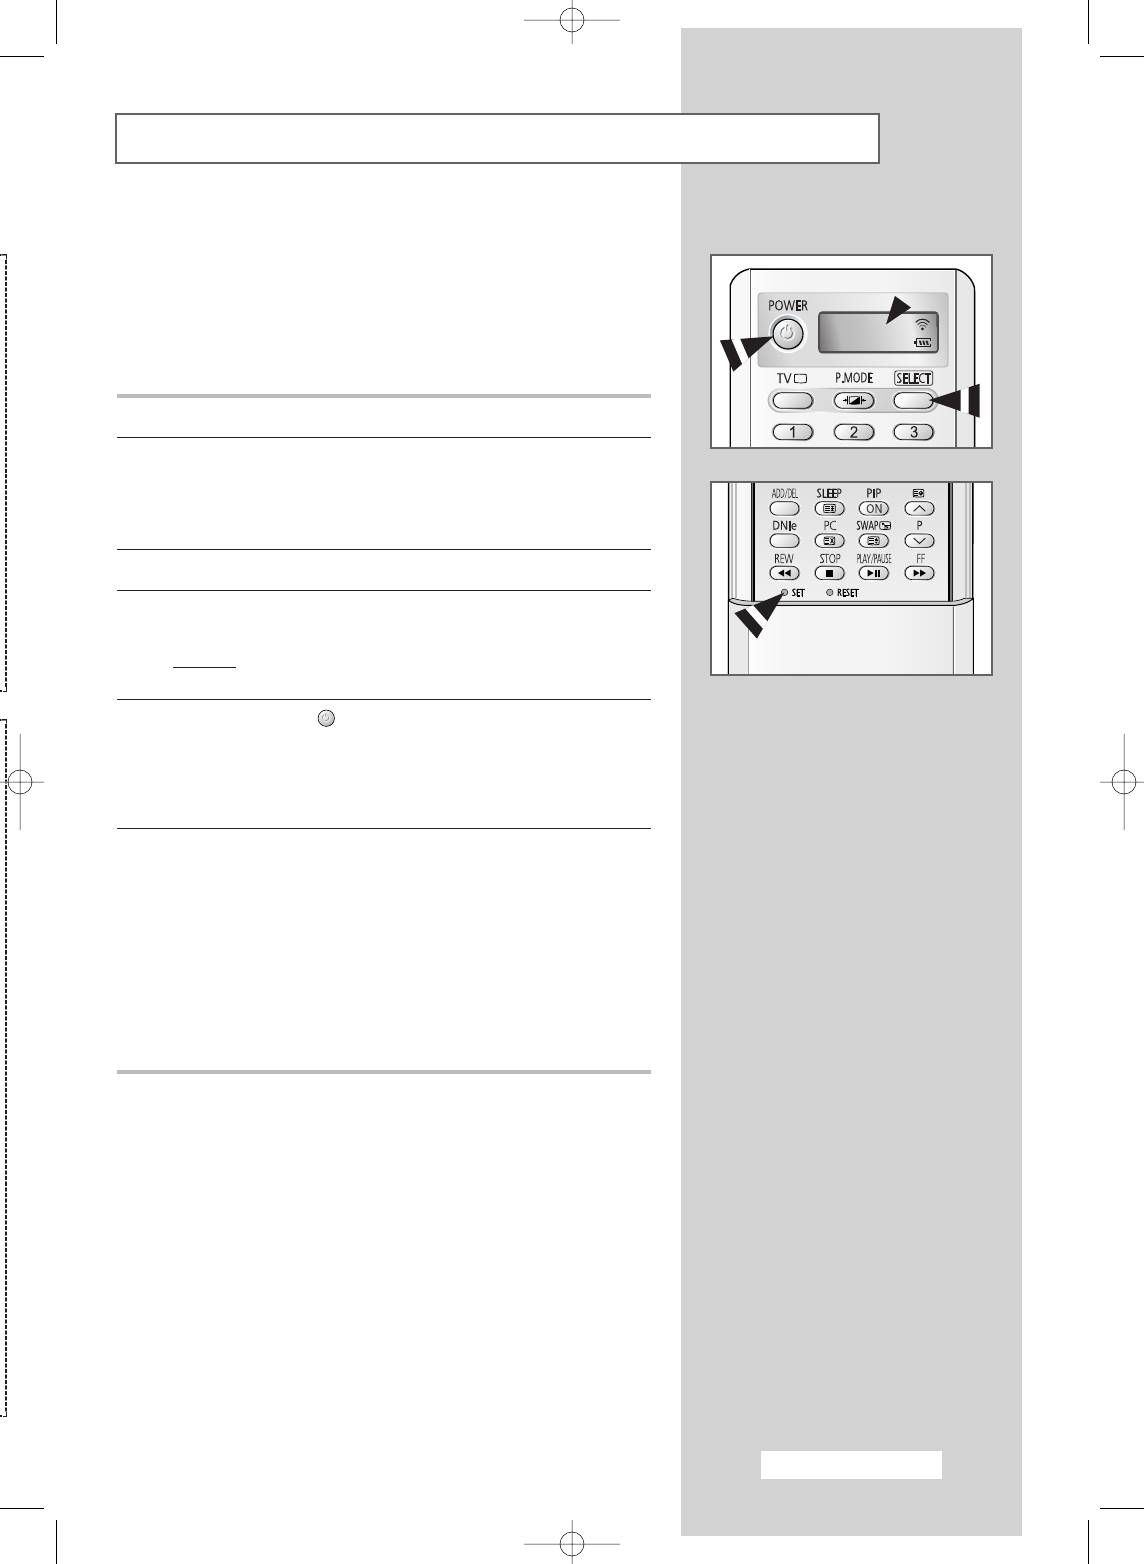
1 Turn off your VCR (Cable box or DVD player).
2 Press the SELECT button to switch the remote control to the VCR
(CATV or DVD) mode.
➢
The remote control has five modes : TV, VCR, CATV, DVD,
and STB.
3 Press the SET button.
4 Enter 3 digits of the VCR (Cable box or DVD player) code listed on
the next page for your VCR (Cable box or DVD player).
Example
: To enter code “6”, press 0, 0, and 6.
To enter code “76”, press 0, 7, and 6.
5 Press the POWER () button. Your VCR (Cable box or DVD
player) should turn on. If it turns on, your remote control is now set
correctly.
➢
If it does not turn on, repeat the steps above, but try one of
the other codes listed for your particular brand.
6 Once your remote control is set up, press the SELECT button any
time you want to use the remote control to operate the VCR
(Cable box or DVD player).
➢
◆ When your remote control is in VCR, CATV, DVD, or STB
mode, the volume buttons still control your television’s
volume.
◆ When your remote control is in TV mode, the VCR or
DVD player control buttons (backward, stop, play/pause,
and fast forward) still operate your VCR or DVD player.
English - 67
BN68-00746A(GAIA2_Euro_ENG) 2004/08/23 03:56 PM Page 67
Programming the Remote Control for Other Components (continued)
VCR Remote Control Codes
Admiral
020
Marantz
007, 008, 018, 021, 026, 036, 037, 062
Aiwa
025
Marta
006
Akai
004, 027, 032
MEI
021
Audio Dynamics
007, 026
Memorex
006, 021, 024, 025
Bell&Howell
018
MGA
034
Broksonic
022
Midland
005
Candle
002, 003, 006, 008, 015, 055
Minolta
019, 041
Canon
021, 056
Mitsubishi
019, 034, 041, 046
Citizen
002, 003, 006, 008, 015, 055
Montgomery Ward
020
Colortyme
007
MTC
002, 025
Craig
002, 024
Multitech
002, 005, 025, 038
Curtis Mathes
002, 007, 008, 017, 021, 025, 056, 064,
NEC
007, 008, 018, 026, 037, 062, 064
066
Optimus
020
Daewoo
003, 010, 011, 012, 013, 014, 015, 016
Panasonic
021, 056, 071, 072
DBX
007, 026
Pentax
019, 041
Dimensia
017
Pentex Research
008
Dynatech
034
Philco
021, 036, 056, 059
Emerson
001, 003, 006, 021, 022, 025, 030, 032,
Philips
021, 036
034, 040, 047, 050, 052, 060, 063, 065,
Pioneer
019, 026, 039, 053
066, 067, 069
Portland
015, 049, 055
Fisher
018, 024, 028, 029, 048, 051, 061
PROSCAN
017
Funai
025
Quartz
018
General Electric
002, 005, 017, 021, 056
Quasar
021, 056
Go Video
002
Radio Shack/Realistic
006, 018, 020, 021, 024, 025, 029,
LG (Goldstar)
006, 007, 008, 009, 010
034, 048, 056
Harman Kardon
007
RCA
002, 017, 019, 021, 035, 041, 043,
Hitachi
019, 025, 041, 042
057, 068
Instant Replay
021
Samsung
000, 001, 002, 003, 004, 005
JC Penny
002, 007, 018, 019, 021, 026, 037, 041,
Sansui
026
054, 056
Sanyo
018, 024
JVC
007, 008, 018, 021, 026, 037
Scott
003, 047, 052, 067
Kenwood
007, 008, 018, 026, 037
Sears
006, 018, 019, 024, 028, 029, 041,
KLH
070
048, 051
Lioyd
025
Sharp
020, 034, 045, 015
Logik
038
Shimom
027, 033, 038, 058
LXI
025
Signature
025
Magnavox
021, 036, 056, 059
Sony
027, 033, 044
English - 68
BN68-00746A(GAIA2_Euro_ENG) 2004/08/23 03:56 PM Page 68
Programming the Remote Control for Other Components (continued)
VCR Remote Control Codes (continued)
Sylvania
021, 025, 036, 056, 059
Totevision
002, 006
Symphonic
025
Unitech
002
Tandy
018, 025
Vector Research
007, 026
Tashika
006
Victor
026
Tatung
037
Video Concepts
007, 026
Teac
025, 037, 068
Videosonic
002
Technics
021
Wards
002, 003, 006, 019, 020, 021, 024, 025,
Teknika
006, 021, 025, 031
034, 038, 041
TMK
066
Yamaha
007, 008, 018, 026, 037
Toshiba
003, 019, 029, 051, 052
Zenith
023, 027, 033, 073
Cable Box (CATV) Remote Control Codes
Anvision
017, 018
Regency
015, 023
GI
041
SA
042, 043
Hamlin
003, 024, 031
Samsung
000, 001, 002, 003, 004, 005, 006, 007
Hitachi
025, 030
Scientific Atlanta
042, 043
Jerrold
038, 039
Sprucer
022
Macom
025, 030
Stargate 2000
036
Magnavox
019, 023, 028
Sylvania
016
Oak
026
Texscan
016
Panasonic
003, 022, 027, 037, 044
Tocom
032
Philips
019, 021, 023, 028
Universal
033, 034
Pioneer
004, 018, 020, 044
Viewstar
019, 021, 023, 028
RCA
014, 022, 040
Wamer amex
046
Regal
003
Zenith
017, 029, 035, 037, 045
DVD Remote Control Codes
Samsung
000, 001
LG (Goldstar)
006
JVC
002
Sony
007
PROSCAN/RCA
003
Denon
008
Panasonic
005
Curtis Mathes
009
English - 69
BN68-00746A(GAIA2_Euro_ENG) 2004/08/23 03:56 PM Page 69
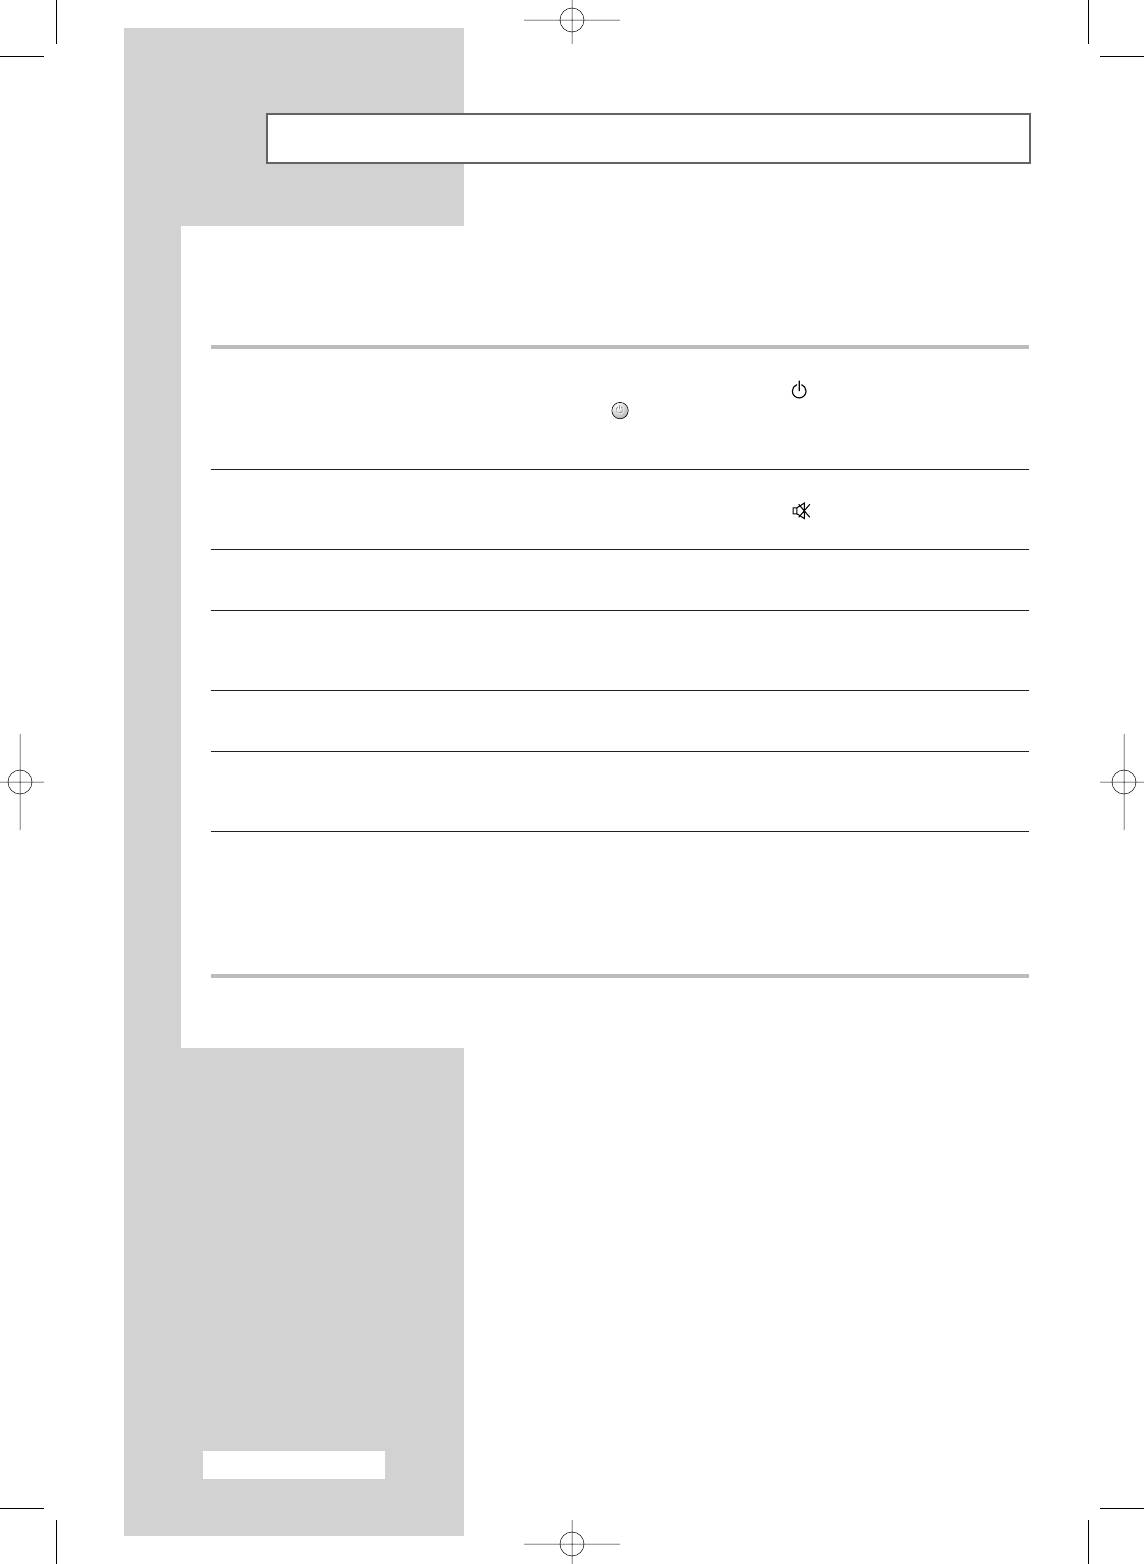
Troubleshooting: Before Contacting Service Personnel
Before contacting Samsung after-sales service, perform the following simple checks.
If you cannot solve the problem using the instructions below, note the model and serial number of the
television and contact your local dealer.
No sound or picture
◆ Check that the mains lead has been connected to a wall socket.
◆ Check that you have pressed the “ ” button (On/Off) and the
POWER () button.
◆ Check the picture contrast and brightness settings.
◆ Check the volume.
Normal picture but no sound
◆ Check the volume.
◆ Check whether the volume MUTE () button on the remote control
has been pressed.
No picture or black and white picture
◆ Adjust the colour settings.
◆ Check that the broadcast system selected is correct.
Sound and picture interference
◆ Try to identify the electrical appliance that is affecting the television,
then move it further away.
◆ Plug your television into a different mains socket.
Blurred or snowy picture,
◆ Check the direction, location and connections of your aerial.
distorted sound
This interference often occurs due to the use of an indoor aerial.
Remote control malfunctions
◆ Replace the remote control batteries.
◆ Clean the upper edge of the remote control (transmission window).
◆ Check the battery terminals.
TFT LCD panel manufactured by using advanced semiconductor technology with precision of 1ppm(one millionth)
above is used for this product. But the pixels of RED, GREEN, BLUE and WHITE color seem to be bright
sometimes or some of black pixels could be seen. This is not from bad quality and you can use it without
uneasiness.
For example, the number of TFT LCD sub pixels that is contained in this product are 6,220,800.
English - 70
BN68-00746A(GAIA2_Euro_ENG) 2004/08/23 03:56 PM Page 70
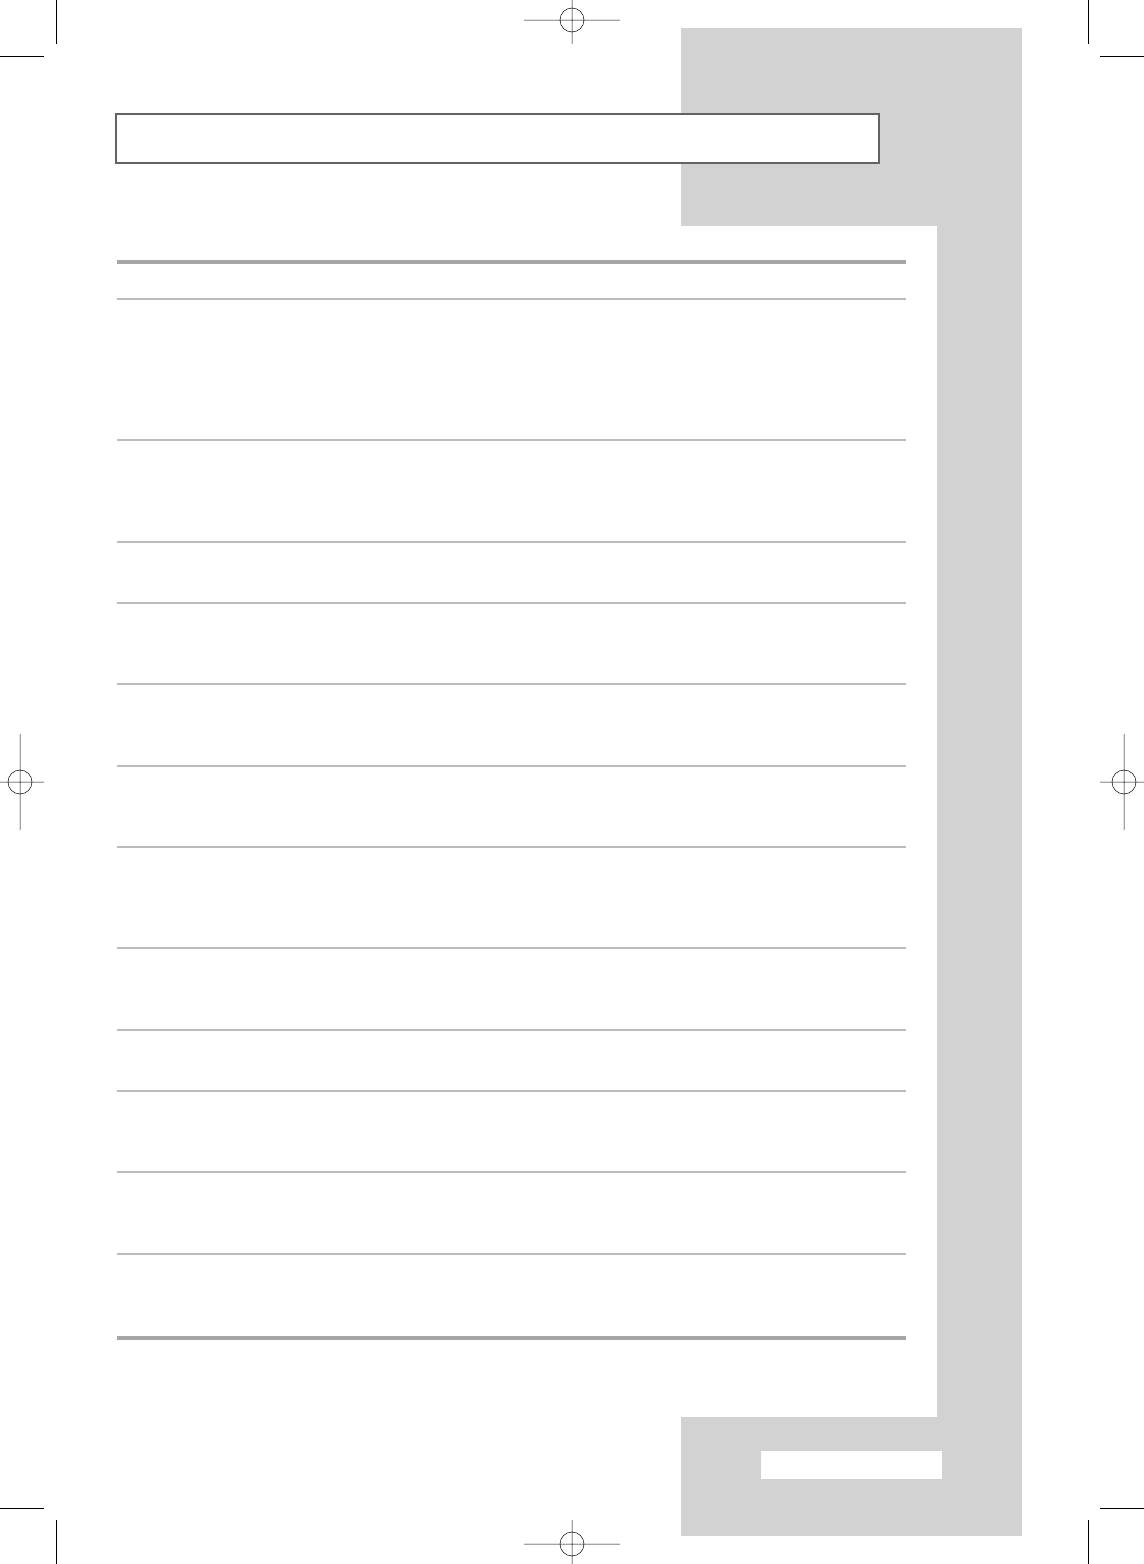
Technical and Environmental Specifications
Model LW46G15W
Panel
Size 46" Diagonal
Display Size 1018.08 (H)x572.67 (V)mm
Type a-si TFT active matrix
Pixel Pitch 0.17675 (H) x 0.53025 (V)mm
Viewing Angle 170/170 (H/V)
Frequency
Horizontal 30 ~ 68 kHz
Vertical 56 ~ 85 Hz
Display Color 16,777,216 colour
Resolution
Maximum 1920 x 1080 @ 60Hz
Input Signal
Sync. H/V Separate, TTL, P.or N.
Video Signal 0.7 Vp-p @ 75 ohm
TV
Colour System PAL/SECAM/NTSC 4.43
Sound System B/G, D/K, I, L
Video
Colour System PAL/NTSC/SECAM
Video System CVBS, S-VHS, RGB
SCART 1/2/3
Video Input/Output 1.0 Vp-p @ 75ohm
RGB Input 0.7 Vp-p @ 75 ohm
Audio Input/ Output 500mV rms
Component
Video In 1.0 Vp-p @75 ohm
Audio In 500mV rms
Power Supply
Input AC 100~240V, 60/50 Hz ±3Hz
Power Consumption
Maximum 350 W
Power Saving < 1.0 W
Dimensions (W x D x H)
Body 1374 X144.5 X 688 mm
With Stand 1374 X 402 X 786 mm
Weight
Body 37 kg
With stand 47 kg
English - 71
BN68-00746A(GAIA2_Euro_ENG) 2004/08/23 03:56 PM Page 71
ELECTRONICS
-
AFTER SALES SERVICE
-
Do not hesitate to contact your retailer or service agent
if a change in the performance of your product indicates
that a faulty condition may be present.
BN68-00746A-00
BN68-00746A(GAIA2_Euro_ENG) 2004/08/23 03:56 PM Page 72

