Philips FC7070: 5 Using your AquaTrio
5 Using your AquaTrio: Philips FC7070

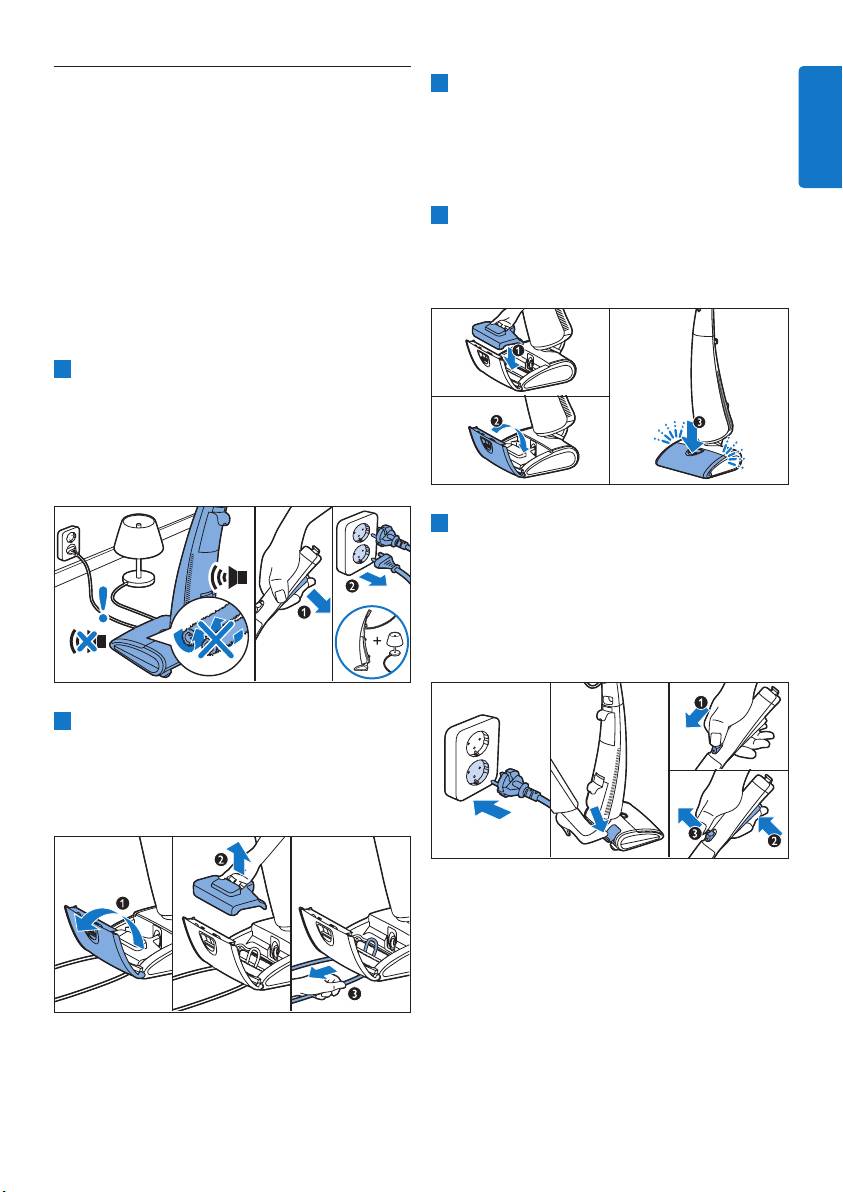
7 Lift and hold the lever (1) and slide the clean
water tank back into the appliance completely
(2). Then press down the lever (3) to lock the
clean water tank into place (‘click’).
3 Press the parking position release button
and release the appliance from parking
position. To avoid bending your back, press the
parking position release button with your foot.
4.1.1 Important to know
•
make sure the lever is closed properly. If
the lever is not locked properly, the clean
water tank may fall out when you release the
appliance from its parking position.
•
the clean water tank, it can take a little while
before water comes out of the nozzle. The
4 Push the unlock slide forwards (1) and press
and the appliance may switch off automatically.
and hold the power-on button (2). You can
If this happens, switch on the appliance again.
release the unlock slide when the appliance
switches on (3), but keep the power-on
button pressed during cleaning (4).
5 Using your AquaTrio
5.1Cleaningoors
1
4
other appliances.
2 Turn the cord storage hook downwards and
remove the mains cord. Put the mains plug in
a wall socket.
10

5.2 Cleaning tips
• After you switch off the appliance, move
• Hold the handgrip in one hand and the mains
it forwards and backwards a few times to
cord in your other hand to avoid tripping over
remove the liquid that is present between
the mains cord and to prevent water traces
the two mopping brushes. If you switch off
ENGLISH
the appliance and lift it up, the water that was
present between the brushes leaves a trace of
C
Caution:
Nevertilttheupperbodyoftheappliancetoo
farbackwardsorputtheapplianceonitssideto
preventleakagefromthedirtywatertank.
• Work backwards and in the direction of a
5.3 Pausing during use
1 If you want to pause for a moment, release
the power-on button to switch off the
appliance. Place the appliance in upright
position. It automatically locks in parking
position (‘click’).
• Do not move the mopping nozzle sideways, as
2 To continue cleaning, press the parking
position release button to release the
appliance from parking position.
• You can move the appliance just as quickly as
3 Push the unlock slide forwards and press and
hold the power-on button. You can release the
move the appliance slowly over the stain.
unlock slide when the appliance switches on,
• Switch off the appliance before you pull it
but keep the power-on button pressed during
over a threshold to prevent water traces on
cleaning.
mopping nozzle.
11

5.4 Tank full/tank empty light
3 Pour the dirty water out. To prevent spilling,
1 The tank full/tank empty light starts
always pour out from one of the corners of
ashing and the appliance stops operating
the tank.
when the clean water tank is empty. Fill the
4 Rinse the empty dirty water tank and its lid
clean water tank (see chapter ‘Preparing for
under the tap.
use’, section ‘Filling the clean water tank’).
2 The tank full/tank empty light lights up
continuously and the appliance stops
operating when the dirty water tank is full.
Empty the dirty water tank (see section
‘Emptying the dirty water tank’ below).
5 Place the lid back onto the dirty water tank
and pull the lid unlocking slides backwards
(towards the handle) to lock the lid.
5.5 Emptying the dirty water
tank
1 Pull up the lever to unlock the dirty water
tank and remove the dirty water tank.
6 Lift and hold the lever (1) and slide the dirty
water tank back into the appliance completely
(2). Press down the lever (3) to lock the
the lever for the dirty water tank is locked
properly. If the lever is not locked properly, the
dirty water tank may fall out during cleaning.
2 Push the lid unlocking slides forwards (away
from the handle) to unlock the lid and remove
the lid from the dirty water tank.
12
5.6 Active protection system is
3 If the active protection system was activated
activated
because the mopping brushes are too wet,
The active protection system has been designed
remove the mopping brushes and squeeze
to recognise when a foreign object other than dirt
them over the sink (see chapter ‘Cleaning and
ENGLISH
maintenance’, section ‘ Cleaning the mopping
system is activated, it stops the mopping brushes
nozzle’).
immediately to prevent damage to the object and
4 Place the mopping brush cover (1) and close
appliance. The motor sound decreases and the
the mopping brush lid (2). Press the mopping
nozzle lid (3) to lock it (‘click’), otherwise the
active protection system is also activated when
appliance is not reset.
the mopping brushes are too wet or when you
move the appliance over a carpet. To continue
cleaning, follow the instructions below!
1 Release the power-on button to switch off
the appliance (1). Put the appliance upright
in parking position (‘click’) and pull the plug
out of the wall socket. If the object picked up
is the cord of another appliance, unplug this
appliance as well (2).
5 Put the plug in the wall socket. Press the
parking position release button. Push the
unlock slide forwards (1) and press and hold
the power-on button (2). You can release the
unlock slide when the appliance switches on
(3). Keep the power-on button pressed to
continue cleaning.
2 Open the mopping nozzle lid (1), remove the
mopping brush cover (2) and take out the
can remove the mopping brushes to have a
better look.
5.6.1 Important to know
To reset the active protection system you need
sure you always remove any object from between
the mopping brushes before you switch on the
appliance.
13
Оглавление
- Table of contents
- 2 Your AquaTrio
- 4 Preparing for use
- 5 Using your AquaTrio
- 6 Cleaning and maintenance
- 7 Storing and moving your AquaTrio
- 8 Replacing the
- 11 Guarantee and
- 12 Troubleshooting
- Obsah
- 2 PřístrojAquaTrio
- 4 Přípravakpoužití
- 5 Používánípřístroje
- 6 Čištěníaúdržba
- 7 Skladovánía přemístěnípřístroje AquaTrio
- 8 Výměnamopovacích
- 10Životníprostředí
- 12Odstraňováníproblémů
- Tartalomjegyzék
- 2 Az Ön AquaTrio
- 4 Előkészítésa használatra
- 5 Az AquaTrio
- 6 Tisztításés
- 7 Az AquaTrio tárolása ésmozgatása
- 8 Akefékcseréje
- 10Környezetvédelem
- 12Hibaelhárítás
- Spistreści
- 2 Twojeurządzenie
- 3 Przed pierwszym 4 Przygotowanie do użyciem użycia
- 5 Korzystanie z urządzeniaAquaTrio
- 6 Czyszczenie i konserwacja
- 7 Przechowywanie
- 8 Wymiana szczotek
- 10Ochronaśrodowiska
- 12Rozwiązywanieproblemów
- Cuprins
- 2 AquaTrio
- 3 Înainte de prima 4 Pregătireapentru utilizare utilizare
- 5 Utilizarea AquaTrio
- 6 Curăţareşi întreţinere
- 7 Depozitareaşi
- 8 Înlocuirea periilor de
- 10Protecţiamediului
- 12 Depanare
- Содержание
- 2 ПылесосAquaTrio
- 3 Передпервым
- 4 Подготовка приборакработе
- 5 Использование
- 6 Очисткаиуход
- 7 Хранениеи
- 8 Заменащеток
- 10Защита окружающейсреды
- 12Поискиустранениенеисправностей
- Obsah
- 2 Vašezariadenie
- 3 Pred prvým 4 Prípravanapoužitie použitím
- 5 Používanie zariadenia AquaTrio
- 6 Čistenieaúdržba
- 7 Odloženiea
- 8 Výmenačistiacich
- 10Životnéprostredie
- 12Riešenieproblémov
- Vsebina
- 2 VašAquaTrio
- 4 Priprava za uporabo
- 5 Uporaba sesalnika AquaTrio
- 6 Čiščenjein vzdrževanje
- 7 Shranjevanjein prenašanjesesalnika AquaTrio
- 8 Zamenjavačistilnih
- 9 Naročanjepribora
- 12Odpravljanjetežav
- İçindekiler
- 2 AquaTrio’nuz
- 4 Cihazıkullanıma hazırlama
- 5 AquaTriocihazını
- 6 Temizlikvebakım
- 7 AquaTrio’nuzu
- 8 Temizleme
- 10 Çevre
- 12 Sorun giderme
