Karcher Balayeuse mécanique KM 70-30 C Bp Pack Confort: Special accessories
Special accessories: Karcher Balayeuse mécanique KM 70-30 C Bp Pack Confort
-
4
Do not clean the appliance with a water
hose or high-pressure water jet (danger of
short circuits or other damage).
Note
Do not use aggressive and abrasive clean-
ing agents.
몇
Warning
Risk of injury! Wear dust mask and protec-
tive goggles.
Blow through machine with com-
pressed air.
Clean the machine with a damp cloth
which has been soaked in mild deter-
gent.
Clean the machine with a damp cloth
which has been soaked in mild deter-
gent.
Daily maintenance:
Check the sweeping roller and the side
brush for wear and wrapped belts.
Check function of all operator control el-
ements.
Weekly maintenance:
Clean both the foam filters under flow-
ing water.
Only Adv. model: Check flat-fold filter.
Check moving parts for freedom of
movement.
Check the sealing strips in the sweep-
ing area for wear.
Half-yearly maintenance:
Check tension, wear and tear and func-
tioning of the drive belts.
Maintenance following wear:
Replace sealing strips.
Replace roller brush.
Replace side brush.
For description, see section on Mainte-
nance work.
Note
Where maintenance is carried out by the
customer, all service and maintenance
work must be undertaken by a qualified
specialist. If required, a specialised Archer
dealer may be contacted at any time.
Park the sweeper on an even surface.
Turn the program selection switch to
"OFF".
Loosen 3 fastening screws.
Replace side brushes and tighten the
screws.
It is necesary to replace them if the sweep
results are visibly poorer due to wear and
tear of the brushes and it is not possible to
readjust them using "Lever contact pres-
sure of sweep roller".
Remove the waste container.
Figure 8, see cover page
Pull the lever for contact pressure of
sweep roller fully backwards.
Loosen 3 screws each on both the
sides of the sweep roller.
Separate the roller halves and remove
them.
Place new roller halfs on the sweep roll-
er shaft. Ensure that the pins are sitting
correctly.
Fix in the screws and tighten them.
Loosen the screws as shown in the re-
spective diagram.
Remove the sealing strip and replace it
with a new sealing strip.
Fix in the screws and tighten them.
Front sealing strip
(at the waste contain-
er)
Figure 9, see cover page
Rear sealing strip
Figure 10, see cover page
Side sealing strips
Figure 11, see cover page
Pull the handle of the filter shake-off
many times and releaes it.
Tilt the dust suction upward.
Figure 12, see cover page
Lift out the flat-fold filter and insert a
new flat-fold filter.
Remove both the foam filters.
Clean the foam filters under flowing wa-
ter and let them dry.
Push in the foam filters into the casing.
Ensure that the foam filters are gap-free
on all sides.
Danger
Risk of injury. Before performing any tasks
at the machine, first turn the programme
selection switch to "OFF“and clamp the ca-
ble at the minus pole of the battery.
Cleaning the inside of the machine
External cleaning of the appliance
Maintenance intervals
Maintenance Works
Replacing side brush
Replacing roller brush
Replace the sealing strips
Replace flat fold filter (only Adv. model).
Cleaning the flat-fold filter
Special accessories
Roller-brush, soft
Order no. 6.903-995.0
For fine dust on all surfaces, exterior and
interior areas (wetness-resistant)
Roller-brush, hard
Order no. 6.903-999.0
To remove sticky contamination in exterior
areas
Roller brush, antistatic
Order no. 6.907-023.0
For statically chargeable surfaces such as
carpet or artificial turf
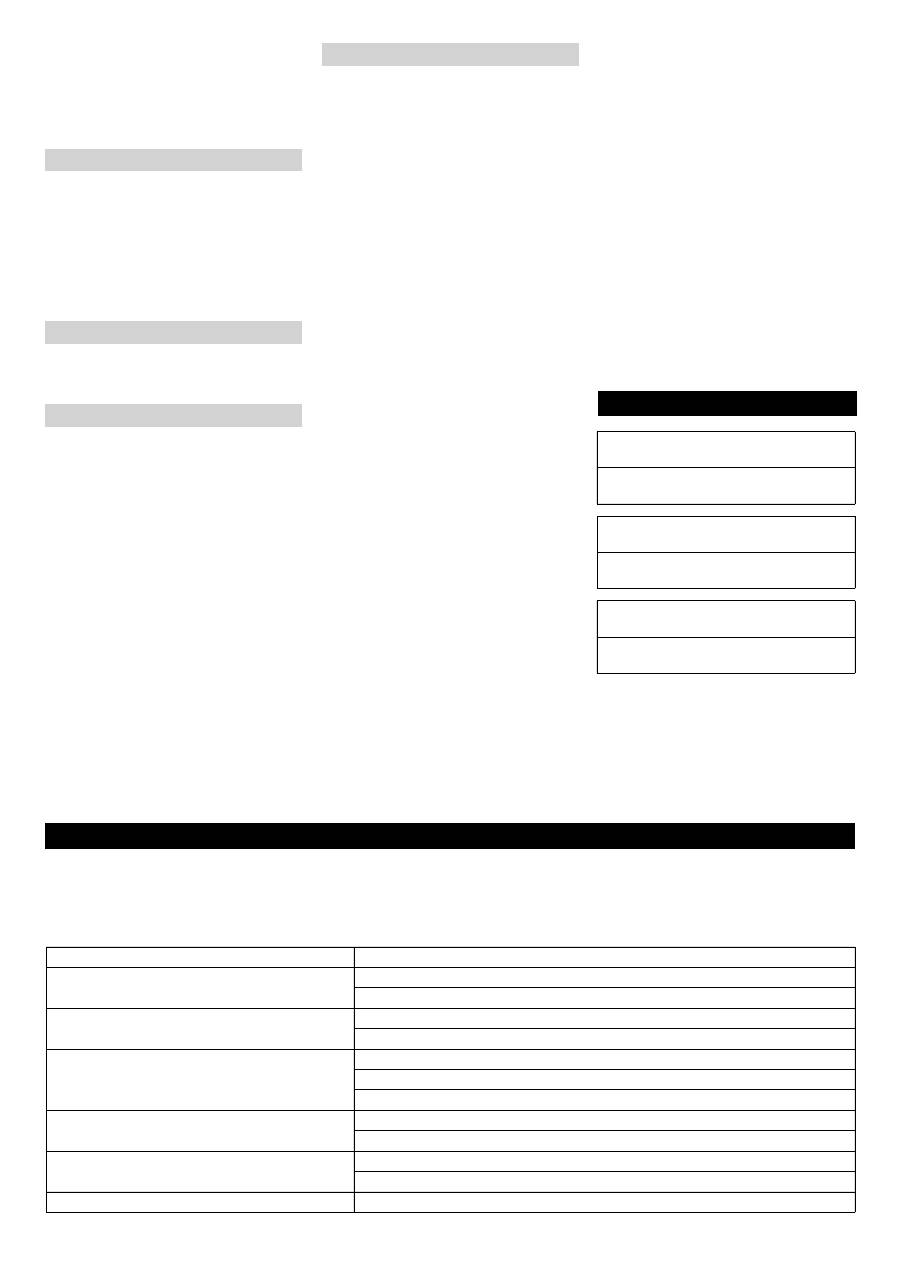
Faults
Fault
Remedy
Appliance cannot be started
Check fuse; replace it, if required *
Check battery; charge it, if needed
Machine is not sweeping properly
Check roller brush and side brushes for wear, replace if necessary.
Check the pad for wear, replace if required.
Dust gathers in the machine
Empty waste container
Check dust filter - clean or replace it (only Adv. model)
Check the pad for wear, replace if required.
Poor cleaning performance at edges
Replace side brush
Check the pad for wear, replace if required.
Inadequate sweep performance (only Adv. model). Check filter case seal
Check washers of the dust suction
Roller brush does not turn.
Remove belts or cords from roller brush.
11 EN
Оглавление
- 2 1 34 5 6 7 8 9 10 11 12
- Inhaltsverzeichnis
- Bedien- und Funktionsele- mente Vor Inbetriebnahme
- Inbetriebnahme
- Sonderzubehör
- Technische Daten
- Contents
- Operating and Functional Elements Before Startup
- Start up
- Special accessories
- Technical specifications
- Table des matières
- Eléments de commande et de fonction Avant la mise en service
- Mise en service
- Entreposage Entretien et maintenance
- Caractéristiques techniques
- Indice
- Elementi di comando e di fun- zione Prima della messa in funzione
- Messa in funzione
- Supporto Cura e manutenzione
- Dati tecnici
- Inhoudsopgave
- Elementen voor de bediening en de functies Voor de inbedrijfstelling
- Inbedrijfstelling
- Onderhoud
- Technische gegevens
- Índice de contenidos
- Elementos de operación y funcionamiento Antes de la puesta en marcha
- Puesta en marcha
- Accesorios especiales
- Datos técnicos
- Índice
- Elementos de comando e de funcionamento Antes de colocar em funcio- namento
- Colocação em funcionamento
- Armazenamento Conservação e manutenção
- Dados técnicos
- Indholdsfortegnelse
- Betjenings- og funktionsele- menter Inden ibrugtagning
- Ibrugtagning
- Ekstratilbehør
- Tekniske data
- Innholdsfortegnelse
- Betjenings- og funksjonele- menter Før den tas i bruk
- Ta i bruk
- Tilleggsutstyr
- Tekniske data
- Innehållsförteckning
- Manövrerings- och funktions- element Före ibruktagande
- Idrifttagning
- Specialtillbehör
- Tekniska data
- Sisällysluettelo
- Ohjaus- ja käyttölaitteet Ennen käyttöönottoa
- Käyttöönotto
- Erikoisvarusteet
- Tekniset tiedot
- Πίνακας περιεχομένων
- Στοιχεία χειρισμού και λει - τουργίας Πριν τη θέση σε λειτουργία
- Έναρξη λειτουργίας
- Διακοπή της λειτουργίας Μεταφορά Αποθήκευση Φροντίδα και συντήρηση
- Βλάβες
- Δήλωση Συμμόρφωσης των Ε . Κ .
- İ çindekiler
- Kullan ı m ve çal ı ş ma eleman- lar ı Cihaz ı çal ı ş t ı rmaya ba ş lama- dan önce
- İş letime alma
- Özel aksesuar
- Teknik Bilgiler
- Оглавление
- Описание элементов управ - ления и рабочих узлов Перед началом работы
- Начало работы
- Вывод из эксплуатации Транспортировка Хранение Уход и техническое обслу - живание
- Специальные принадлеж - ности
- Технические данные
- Tartalomjegyzék
- Kezelési- és funkciós elemek Üzembevétel el ő tt
- Üzembevétel
- Ápolás és karbantartás
- M ű szaki adatok
- Obsah
- Ovládací a funk č ní prvky P ř ed uvedením do provozu
- Uvedení do provozu
- Zvláštní p ř íslušenství
- Technické údaje
- Vsebinsko kazalo
- Upravljalni in funkcijski ele- menti Pred zagonom
- Zagon
- Poseben pribor
- Tehni č ni podatki
- Spis tre ś ci
- Elementy urz ą dzenia Przed pierwszym uruchomie- niem
- Uruchamianie
- Przechowywanie Czyszczenie i konserwacja
- Dane techniczne
- Cuprins
- Elemente de utilizare ş i func- ţ ionale Înainte de punerea în func ţ iu- ne
- Punerea în func ţ iune
- Depozitarea Îngrijirea ş i între ţ inerea
- Date tehnice
- Obsah
- Ovládacie a funk č né prvky Pred uvedením do prevádzky
- Uvedenie do prevádzky
- Uskladnenie Starostlivos ť a údržba
- Technické údaje
- Pregled sadržaja
- Komandni i funkcijski ele- menti Prije prve uporabe
- Stavljanje u pogon
- Poseban pribor
- Tehni č ki podaci
- Pregled sadržaja
- Komandni i funkcioni elementi Pre upotrebe
- Stavljanje u pogon
- Poseban pribor
- Tehni č ki podaci
- Съдържание
- Обслужващи и функцио - нални елементи Преди пускане в експлоата - ция
- Пускане в експлоатация
- Спиране от експлоатация T рансп o рт Съхранение Грижи и поддръжка
- Елементи от специалната окомплектовка
- Декларация за съответ - ствие на ЕО
- Sisukord
- Teenindus- ja funktsiooniele- mendid Enne seadme kasutuselevõt- tu
- Kasutuselevõtt
- Erivarustus
- Tehnilised andmed
- Satura r ā d ī t ā js
- Vad ī bas un funkcijas elementi Pirms ekspluat ā cijas uzs ā k- šanas
- Ekspluat ā cijas uzs ā kšana
- Speci ā lie piederumi
- Tehniskie dati
- Turinys
- Valdymo ir funkciniai elemen- tai Prieš pradedant naudoti
- Naudojimo pradžia
- Special ū s priedai
- Techniniai duomenys
- Перелік
- Елементи управління і функціональні вузли Перед початком роботи
- Введення в експлуатацію
- Зберігання Транспортування Зберігання Догляд та технічне обслуговування
- Спеціальне допоміжне обладнання
- Технічні характеристики
