Samsung PS-63 A756T1M – страница 3
Инструкция к Телевизору Samsung PS-63 A756T1M
English - 41
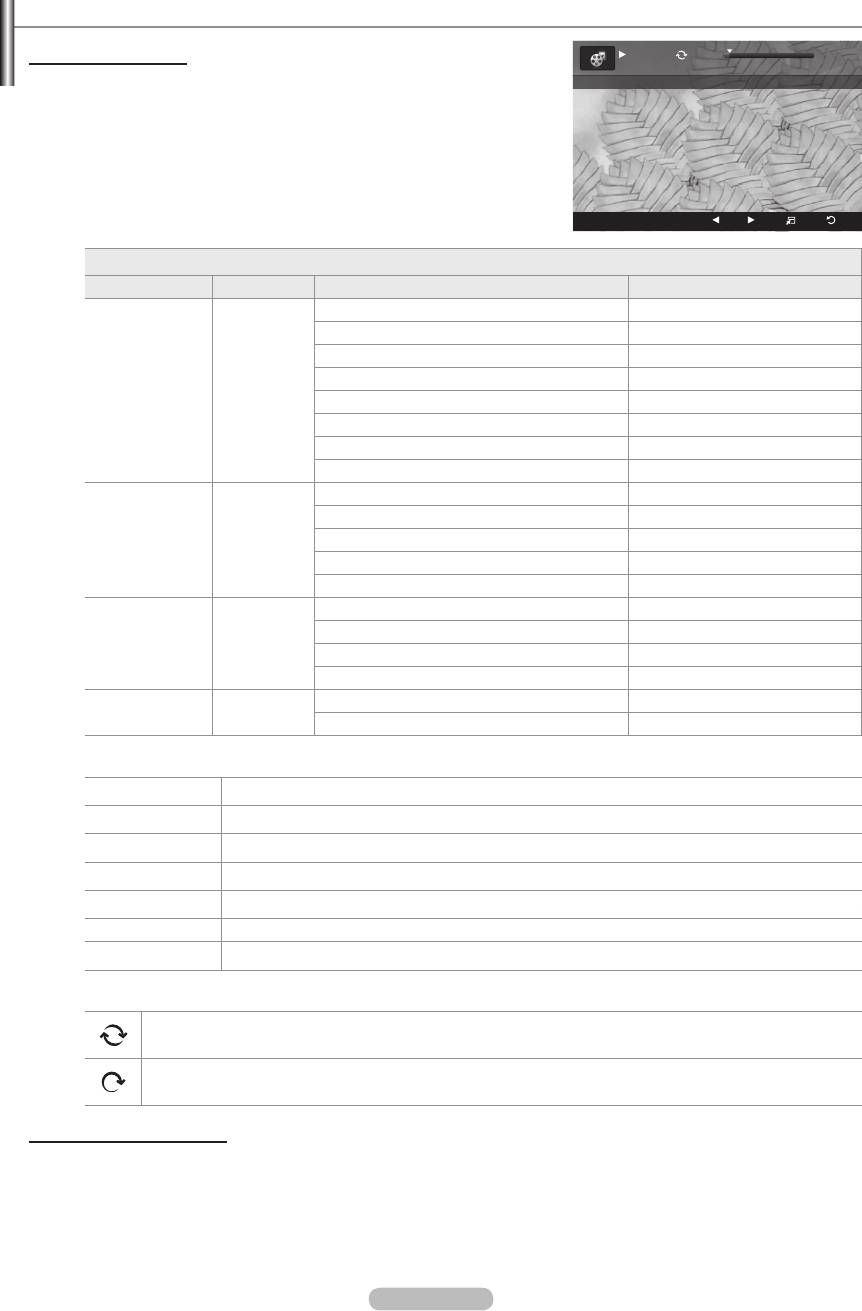
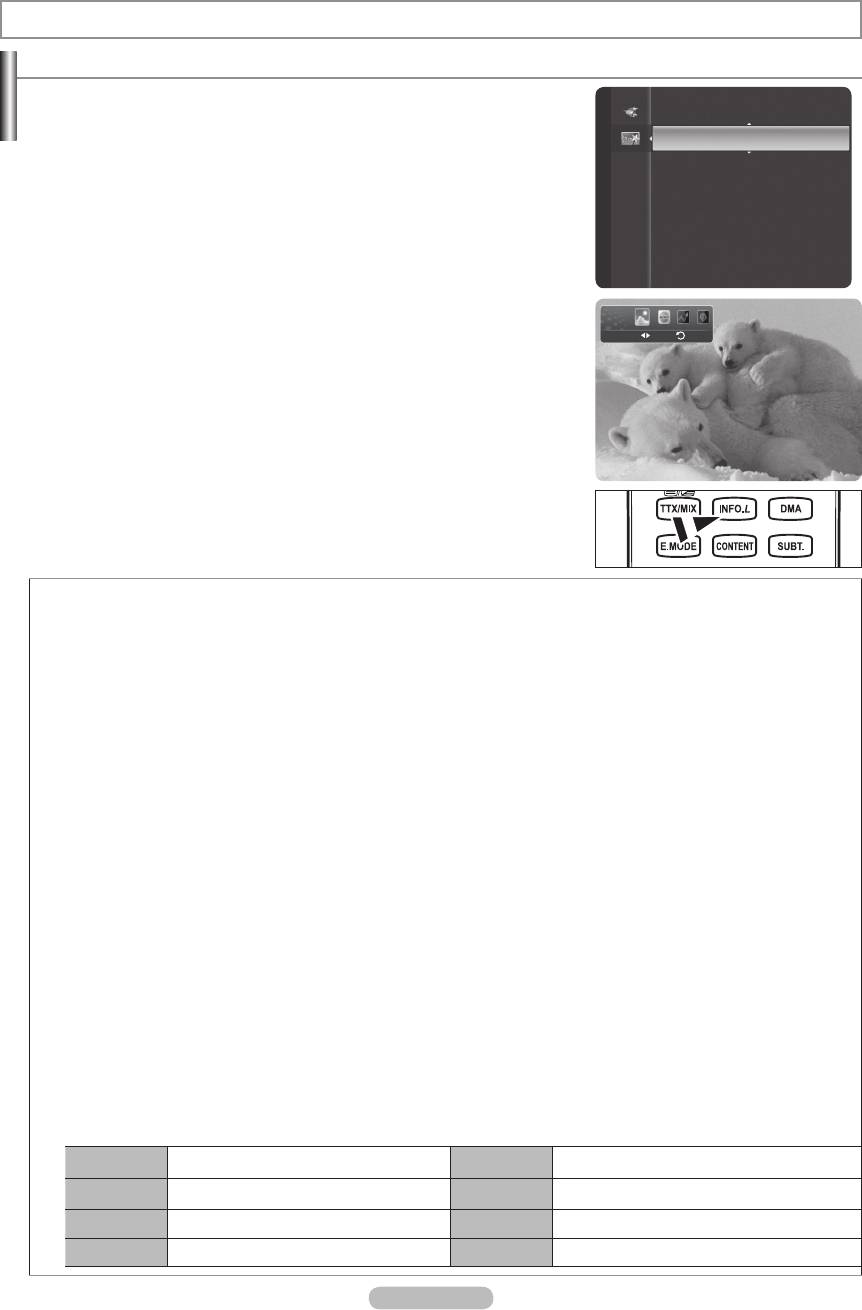
Playing a Movie File
1/5 00:00:48 00:23:05
1.
ABC.avi
2. Press the
∂
(Play)/ENTER
E
button.
N
N
N
SUM
E
Pause
-20sec
+20sec
Option
Return
N
Supported Video Formats
Video Codec
File Extention Container Video Decoder Max Resolution Sti
XviD 720x576
MPEG1 720x576
MPEG2 720x576
H.264 BP 1920x1088
*.avi AVI
H.264 BP 1920x1088
H.264 HP 1920x1088
MPEG-4 SP 720x576
MPEG-4 ASP 720x576
H.264 BP 1920x1088
H.264 MP 1920x1088
*.mp4 MP4
H.264 HP 1920x1088
MPEG-4 SP 720x576
MPEG-4 ASP 720x576
*.mpg
MPEG1 (Program Stream) 1920x1088
*.mpeg MPEG2 (Program Stream) 1920x1088
PS
*.vro MPEG2 VOB 1920x1088
*.vob MPEG2 VRO 1920x1088
others
MPEG2 (Transport Stream) 1920x1088
TS
(ts)
H.264 (Transport Stream) 1920x1088
N
Video Play Control Buttons
ENTER
E
Play/Pauses the
∂
∑
∫
Exit play mode and return to the movie list.
TOOLS
Run various functions from the movie menus.
N
Movie function information icon
Repeat Mode is On.
Repeat Mode is Off.
Playing the movie group
1. Title, Timeline, Folder, Preference)
2. Press the π (REW) or µ (FF) button to select the desired group.
3. Press the TOOLS button.
4. Play Current Group, then press the ENTER
E
button.
BN68-01757D-Eng_.indb 41 2008-08-20 오후 7:18:53
1.
2.
N
The c
3.
Press the ∂ (Play)/ENTER
E
button.
N
Playing movie continuously
If you exit playing movie, playing it continuously later is possible.
With Play continuously function, you can watch movie without watching again from beginning or bothering searching.
1.
Play continuously
2.
Press the ∂ (Play)/ENTER
E
button.
3.
Select play continuously by pressing Blue button.
N
Movie will begin to play from where it was stopped being played.
N
If Cont. movie play help function was set OnPlay
continuously. (Refer to page 43)
4.
To exit WISELINK Pro mode, press the W.LINK button on the remote control.
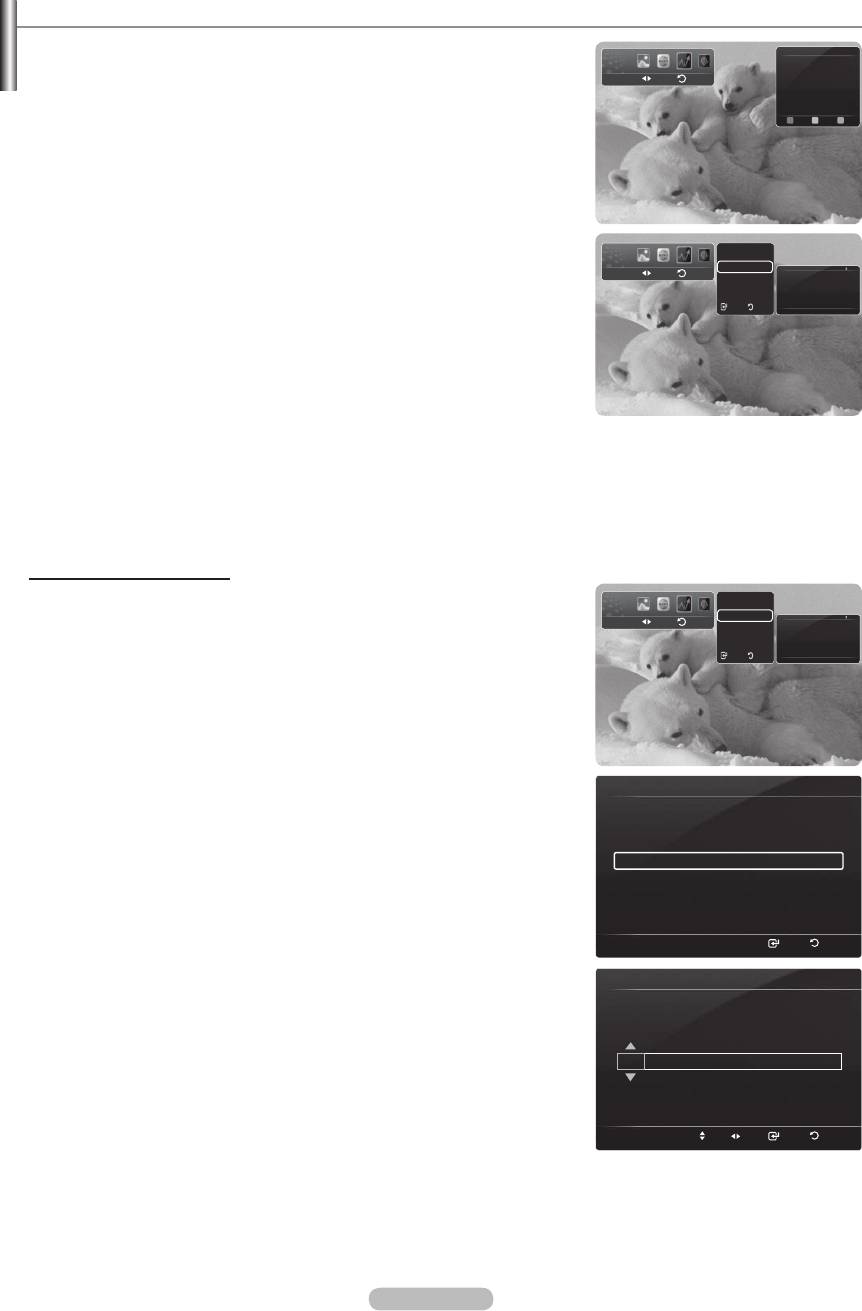
Movie Play Option Menu
Repeat Mode
You can play the movie repeatedly.
Tools
Picture Setting
Picture Setting / Sound Setting
Sound Setting
Refer to page 43.
Picture Size : Fit
Information
Picture Size
Remove Safely
U
Move
L
Adjust
e
Exit
•
Fit: Play video at the TV screen size.
•
Original: Play video at the original size.
Information
Remove Safely
You can remove the device safely from the TV.
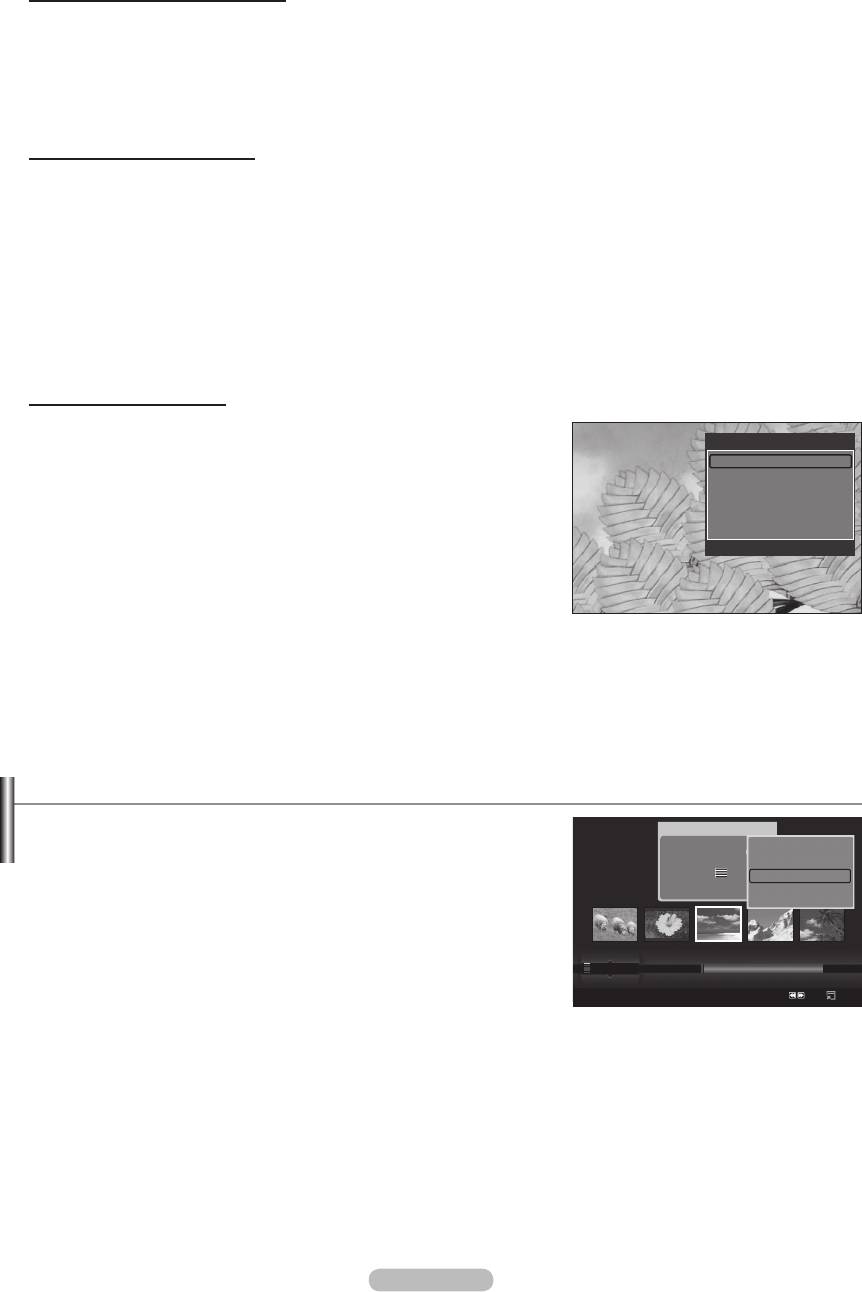
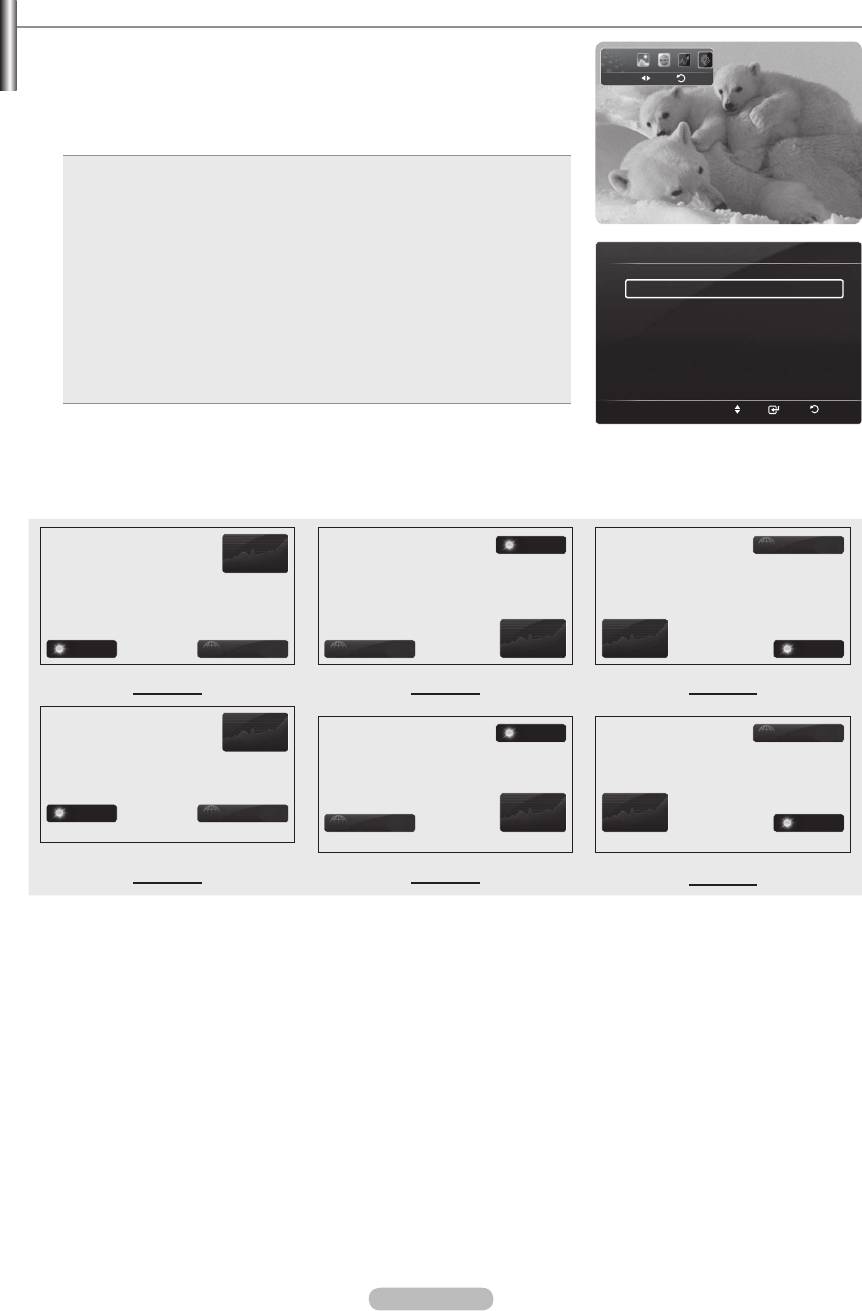
Deleting the Photo/Music/Movie File
1.
Photo
image_1.jpg
list.
Month : Jan
Date : Jan.01.2008
Slide Show
N
Color : Gray
Play Current Group
Composition :
Delete
2.
Press the TOOLS button.
Folder : P-other
Favourites :
★ ★ ★
Information
3.
Delete (or Delete Selected File), then
press the ENTER
E
button.
4.
OK, then press the ENTER
E
button.
Preference
N
Monthly
Jan Nov
Timeline
N
SUM
Device
Favourites Settings
Select
Jump
Option
it? message appear.
N
N
If you select Cancel, the deletion is cancelled.
N
N
N
English - 42
BN68-01757D-Eng_.indb 42 2008-08-20 오후 7:18:54

English - 43
Picture/Music Settings Using WISELINK Pro
When watching a SlideShow or listening to music using WISELINK Pro, you can set the picture and sound.
Picture Setting
1. Press the TOOLS button during a Slide Show or while music is playing.
Picture Setting
2.
Picture Setting.
3.
Picture Mode (Dynamic, Standard,
Contrast : 90
or Movie).
Brightness : 45
4.
Contrast, Brightness, Color,
Color : 50
Dynamic Contrast, Black Adjust, or Reset)
Dynamic Contrast : Off
N
Select Reset to initialize the picture settings.
Black Adjust : Off
5.
Reset
N
For more information on the picture settings, refer to pages 15~18.
U
Move
L
Adjust
E
Enter
R
Return
Sound Setting
1. Press the TOOLS button during a Slide Show or while music is playing.
Sound Setting
2.
Sound Setting.
3.
Sound Mode. (Standard, Music,
Balance : L50 R50
Movie, Speech, or Custom)
100Hz : 0
4.
300Hz : 0
N
Select Reset to initialize the sound settings.
1KHz : 0
3KHz : 0
5.
10KHz : 0
N
For more information on the sound settings, refer to page 21~22.
Reset
U
Move
L
Adjust
E
Enter
R
Return
Using the Setup Menu
Setup displays the user settings of the WISELINK Pro menu.
WISELINK Pro
851.98MB/995.00MB Free
1.
Press the W.LINK button on the remote control to display the WISELINK
SUM
Pro menu.
2.
Setup, then press the ENTER
E
button.
SETUP
3.
4 .
ENTER
E
button.
N
To exit WISELINK Pro mode, press the W.LINK button on the remote
Photo
Music Setup
Movie
control.
SUM
Device
e
Exit
Setup
Select to control the slide show speed.
Music Repeat Mode : On
Movie Repeat Mode : On
Cont. movie play help : On
Screen Saver Run Time : 3 min
Information
Remove Safely
Cont. movie play help
Select to display the help pop-up message for continuous movie playback.
SUM
Device
Move Adjust
Return
Select to set the waiting time before the screen saver appears.
Information
Select to viewing the information of the connected device.
Remove Safely
You can remove the device safely from the TV.
BN68-01757D-Eng_.indb 43 2008-08-20 오후 7:18:54

WISELINK Pro-DLNA
Setting the DLNA Network
DLNA allows you to watch videos and pictures saved on your PC on your TV through a network connection in Wiselink Pro mode.
This removes the need to copy them to a USB storage device and then connect the device to your TV. To use DLNA, the TV must
be connected to the network and the DLNA application must be installed on your PC.
Network Connections Diagram
TV
PC
LAN
LAN
External Modem
(ADSL/VDSL/Cable TV)
1
3
2
1. Connect the [LAN] port on the rear panel of the TV to the external modem with a LAN Cable.
2.
Connect the PC to which the “DLNA PC Share Manager” programme will be installed and the external modem using a LAN
cable.
3.
Connect the LAN port on the wall and the external modem with a Modem Cable.
Connecting to the Network
1. When connecting to the network is complete, set up the network on the TV.
N
A Wireless Internet connection does not support DLNA.
N
Three parts(subnet address) before the TV and PC IP addresses should be same. The last part (host address) should be
changed. (e.g. IP Address: 123.456.789.** )
2.
Run a Network Test to check the network settings.
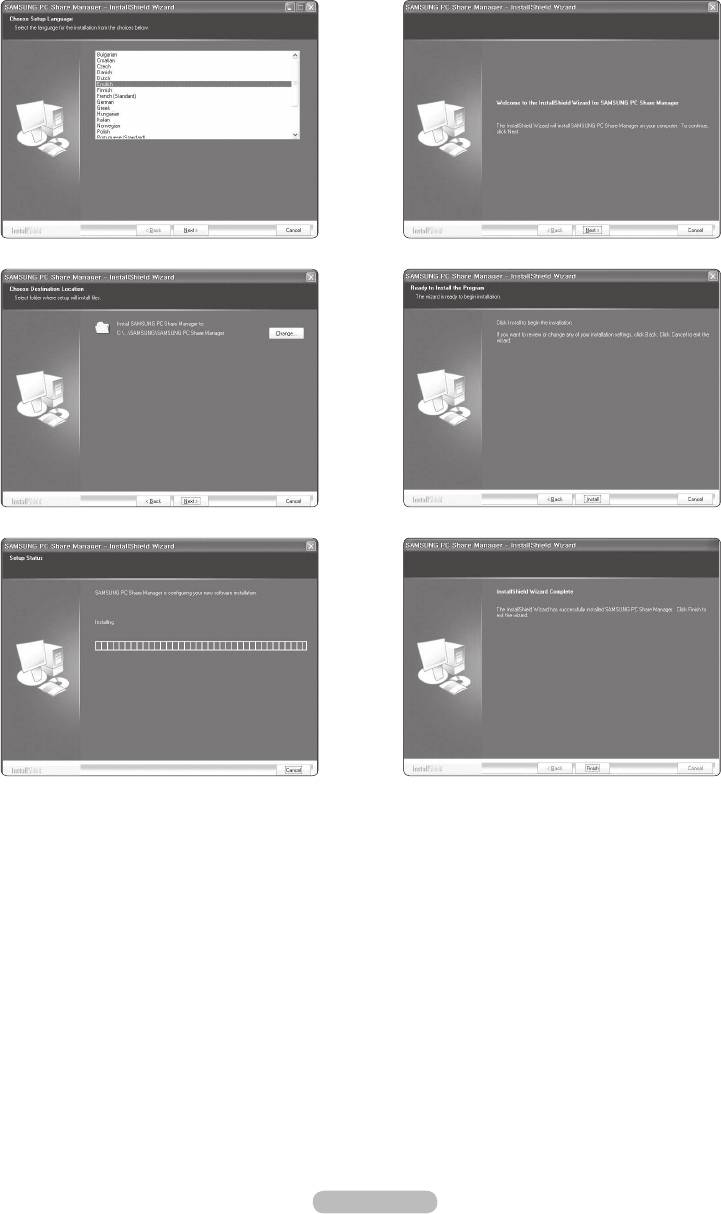
Installing the DLNA Application
System Requirements
1. Insert the Programme CD supplied with this TV into your PC.
2.
20MB of free hard disk space is needed for the programme installation.
N
N
Supported Formats
1. Image: JPEG (jpg, jpeg)
2.
Audio: MP3 (mp3)
3.
Video: MPEG1(mpg, mpeg), MPEG2 PS/TS(mpg, mpeg, trp, ts, tp), divx(mpg, mpeg, avi), MPEG4/H.264 (mpg, mpeg)
English - 44
BN68-01757D-Eng_.indb 44 2008-08-20 오후 7:18:55
English - 45
Install the application
1.
N
2.
► ►
► ►
►
3. When the installation is complete, the PC Share Manager icon appears on your Desktop.
N
Double-click the icon to run the programme.
BN68-01757D-Eng_.indb 45 2008-08-20 오후 7:18:58
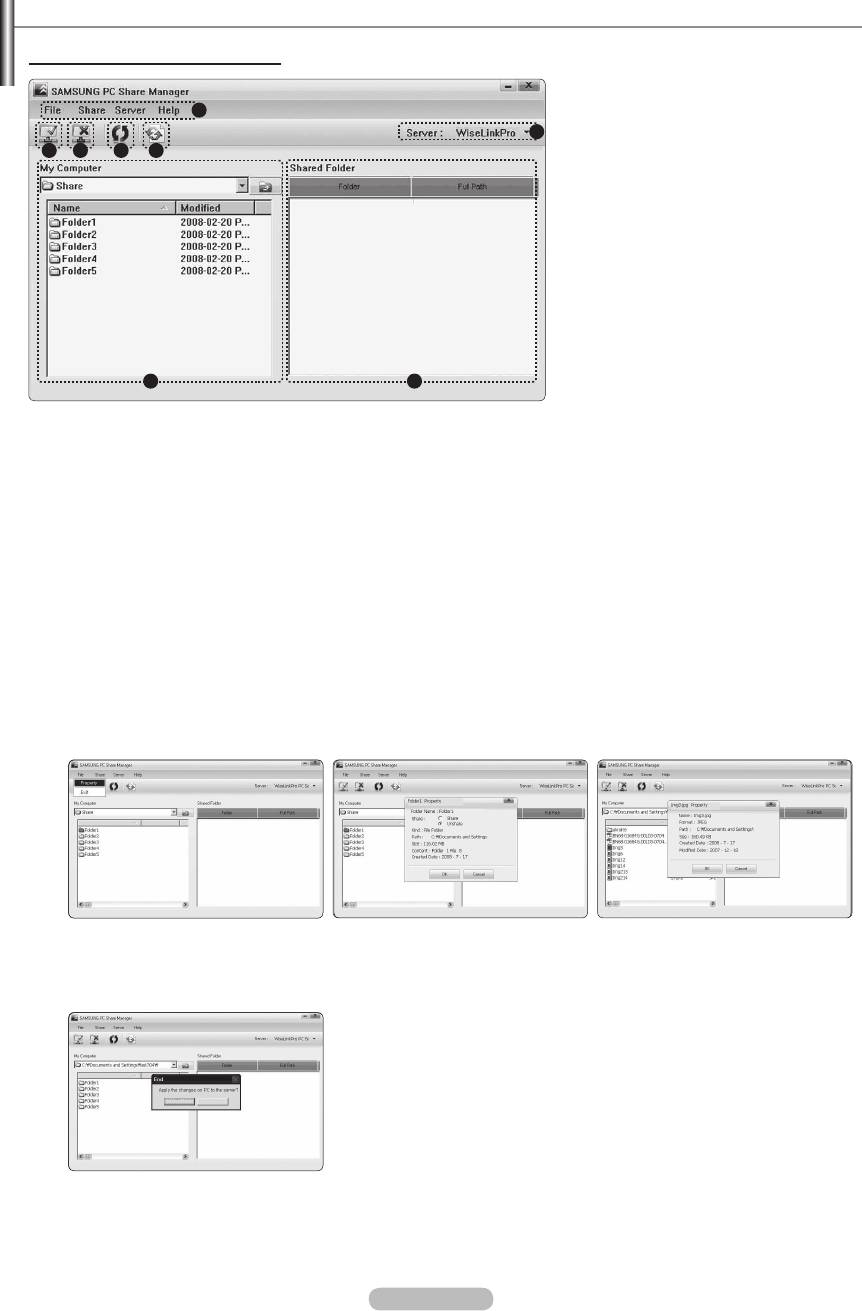
Using the DLNA Application
The Programme Screen Layout
1. Menus: The following application menus are provided : File, Share, Server, and Help.
2.
Click to share the selected PC server folder.
3.
Click to cancel sharing.
4.
5.
Click to synchronize the share status.
6.
7.
Folders shared by the user are listed.
8.
PC server name shown on the device list of the WISELINK Pro: Click to change the name.
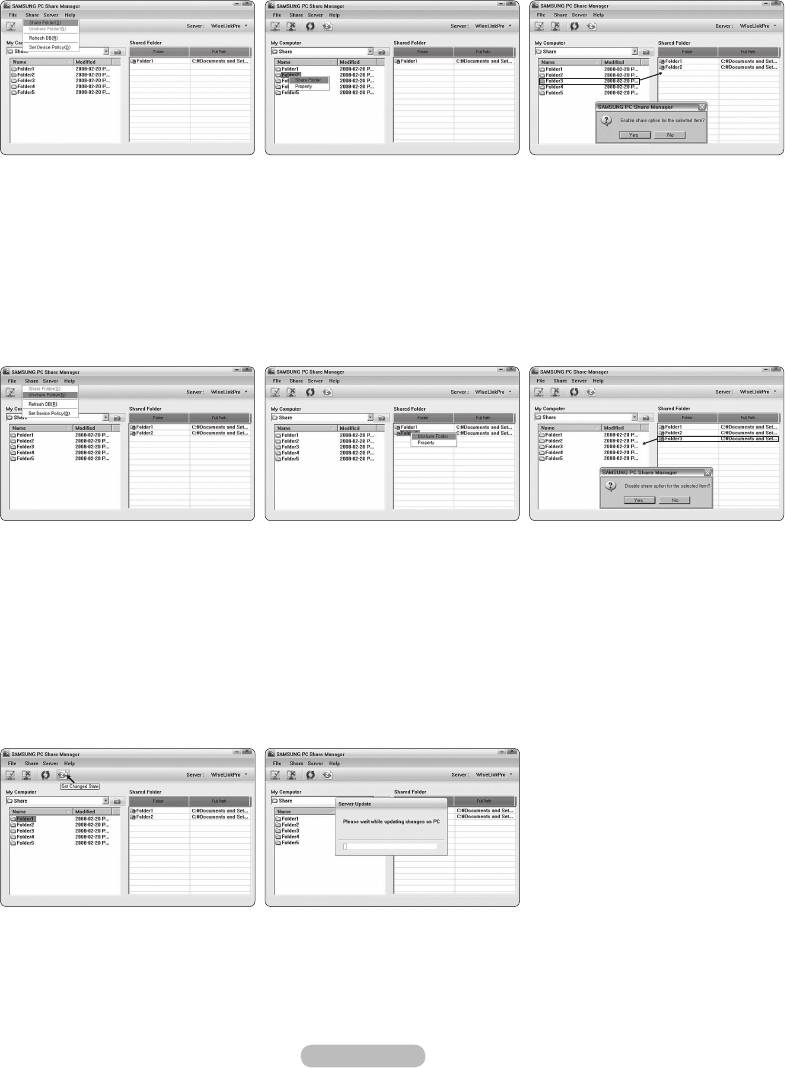
File
Property: Shows information on the selected file or folder.
Method 1File menu and then select the Property sub-menu.
Method 2
Property from the pop-up menu.
<Method 1> <Method 2>
English - 46
Name Md
Name
Name
Exit: Exits the DLNA application.
If you select Exit without applying the changes after changing the shared status, a message will appear asking if you want to
apply the changed settings to the PC. Select Yes to apply the changes and exit the application.
Name
Yes No
1
8
2 3 4 5
6 7
❑
-
-
BN68-01757D-Eng_.indb 46 2008-08-20 오후 7:19:01
English - 47
❑
Share
Sharing a Folder
You can share a folder from your PC to the TV. The maximum number of folders that can be shared is 32.
N
Your PC will operate as a server to the TV.
-
Method 1: Select a folder in My Computer, select the Share menu and then select the Share Folder sub-menu.
-
Method 2
: Select a folder in My Computer, right-click over the selected folder and then select Share Folder from the pop-
up menu.
-
Method 3: Locate the mouse pointer over a folder in the My Computer folder list in the left pane and drag&drop the folder
Yes.
<Method 1> <Method 2> <Method 3>
Cancelling a Shared Folder
You can cancel a shared folder on your PC. Select a folder from the Shared Folder pane and select Unshare Folder.
-
Method 1: Select a folder from the Shared Folder pane, select the Share menu and then select Unshare Folder.
-
Method 2
: Select a folder from the Shared Folder pane, right-click over the selected folder and then select Unshare Folder
from the pop-up menu.
-
Method 3: Locate the mouse pointer over a folder in the Shared Folder pane and drag&drop the folder into the My
ComputerYes.
<Method 1> <Method 2> <Method 3>
Applying the Current Settings
Perform this when synchronization is necessary due to a new shared folder or canceling a shared folder. The Set Changed
State menu applies changes to shared folders to the data saved with the PC share programme.
Since applying changes to the internal data is a time-consuming process, this function enables users to apply changes to the
data only when required.
Until the Set Changed State menu is selected, the changed state of the shared folder is not applied to the server.
Changes to the shared folders are not applied to your PC until you select the Set Changed State menu.
-
Method 1: Select the Share menu and select the Refresh DB sub-menu.
-
Method 2
: Click the Set Changed State icon.
BN68-01757D-Eng_.indb 47 2008-08-20 오후 7:19:02
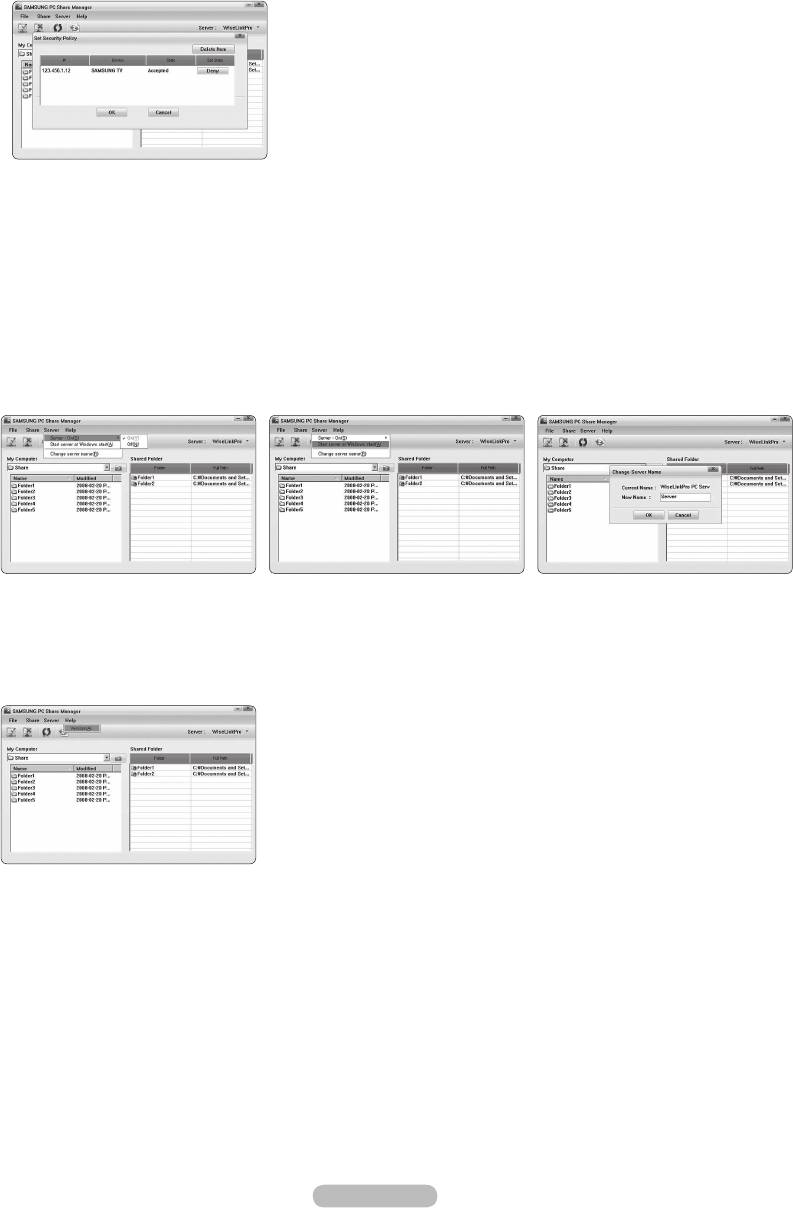
Setting the Access Permission
Set Device Policy in the Access Permission Settings window. In
addition, the PC server and the TV must be on the same subnet.
-
Method: Select the Share menu and select Set Device Policy. Rejected items are represented in gray. You can change the
access permissions by using the Allow Accept / Deny button. To delete an item, select the item and select Delete Item.
❑
Server
Server
You can run or stop using your PC as a server.
Start Server at Windows start
You can determine whether to start the PC server automatically when Windows starts.
Change server name
You can rename the PC server. Enter a new name and click OK. The new name will appear at the top right of the window and
will appear on the TV.
❑
Help
Version
The programme version information message box appears.
English - 48
BN68-01757D-Eng_.indb 48 2008-08-20 오후 7:19:02
English - 49
Using the DLNA Function
Using the DLNA Menu
DLNA (Digital Living Network Alliance) enables content saved on a DLNA server
WISELINK Pro
DLNA : Server
(usually your PC) connected to your TV or over a network to be played.
Wiselink Pro enables playing content saved on a USB memory device connected
to the TV, while DLNA enables playing content saved on a DLNA server (your
PHOTO
PC) connected to your TV or over the network. The procedures to use the
content are the same as those for WISELINK Pro.
If you install the PC share manager programme supplied with the TV onto a PC,
you can have the PC perform the role of a DLNA server over the network.
Photo
Music Setup
Movie
1.
Press the W.LINK button on the remote control to display the DLNA menu.
SUM
Device
e
Exit
2.
press the ENTER
E
button.
N
To exit DLNA mode, press the W.LINK button on the remote control.
❑
Photo
Photo List option menu
During a Slide Show option menu
Play & Pause/Slide Show Speed/Zoom/Rotate
❑
Music
Music List option menu
Music Play Option Menu
Play & Pause/Repeat Mode
❑
Movie
Movie List option menu
Movie Play Option Menu
Play & Pause/Repeat Mode
❑
Setup
Slide Show Speed/Music Repeat Mode/Movie Repeat Mode/Screen Saver Run Time/Information
N
DLNA does not support the following functions.
-
The Background Music and Background Music Setting functions.
-
-
The Change Group Info function.
-
The Delete function.
-
The Safe Remove function.
-
The π (REW)/µ (FF) button functions while a movie is playing.
N
depending on the corresponding content information.
N
The playing time may not be displayed while a movie is playing.
BN68-01757D-Eng_.indb 49 2008-08-20 오후 7:19:03
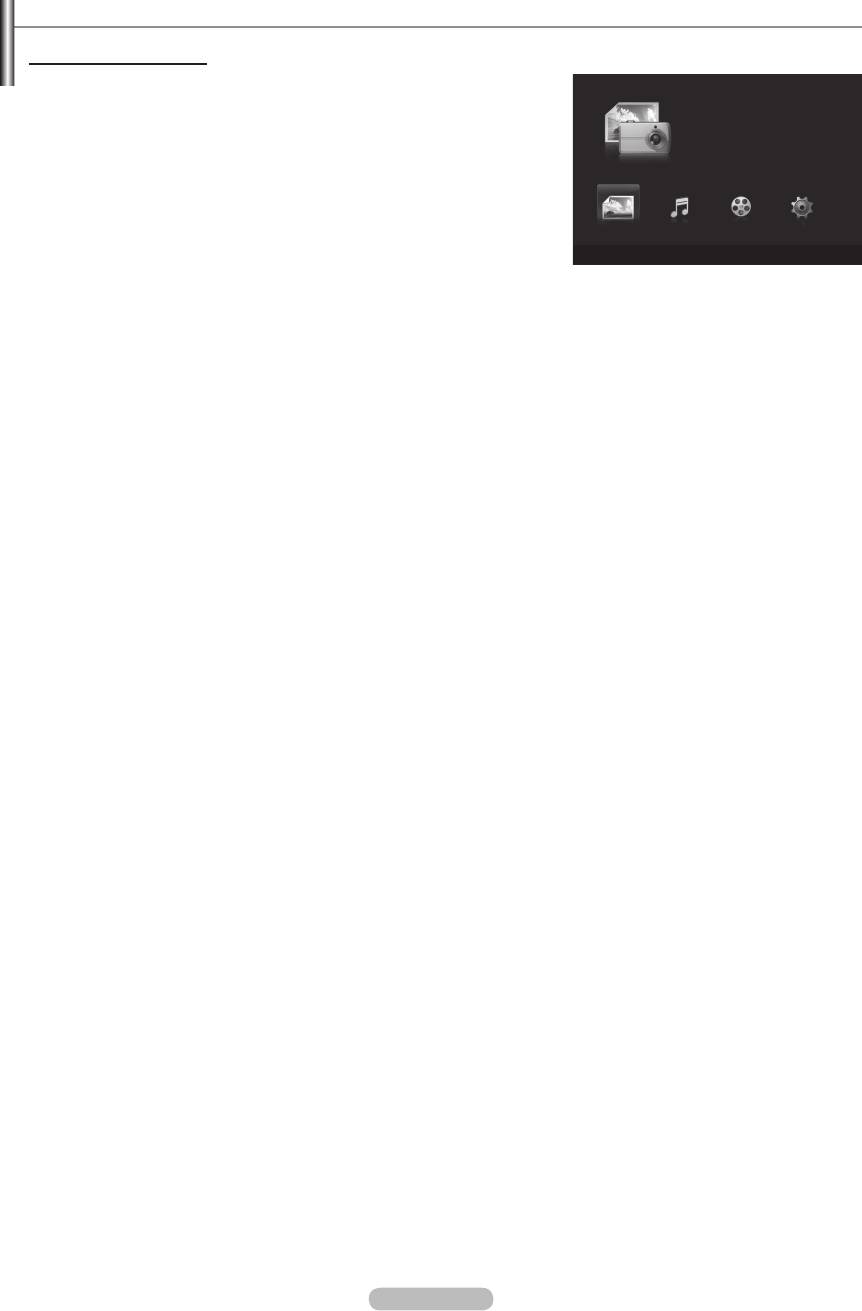
Content Library
Activating the Content Library
The Content Library enables you to view or play the built-in contents on the TV
WISELINK Pro
or stored on your USB device. The Delete, Move and Update functions will not
Application
Anynet+ (HDMI-CEC)
work with the built-in content on the TV.
1.
Press the MENUApplication,
InfoLive
then press the ENTER
E
button.
Product Guide
2.
Content Library, then press the
ENTER
E
button.
The Content Library main menu is displayed.
N
Press the CONTENT button on the remote control to display the Content
Library main menu.
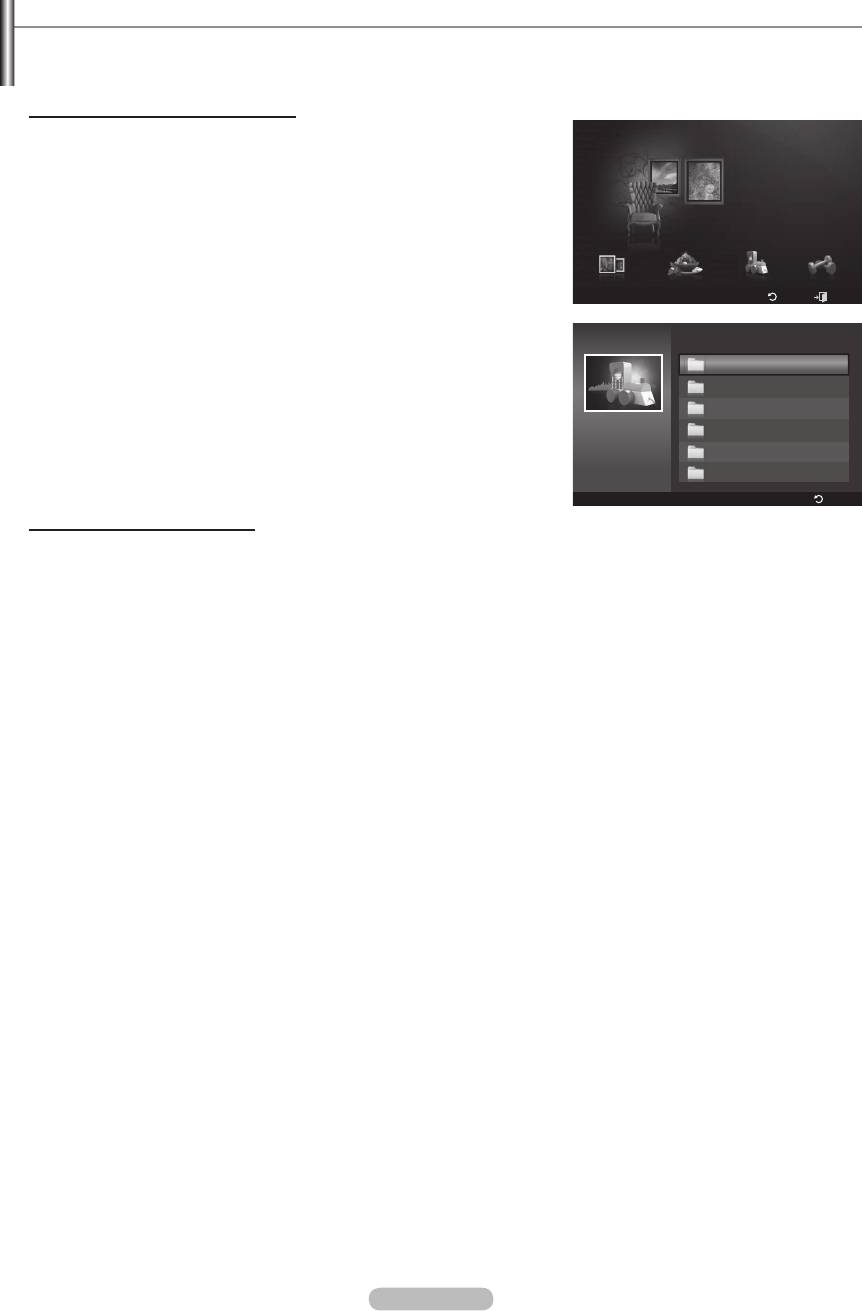
3.
Gallery, Cooking, Children,
Content Library
Fitness), then press the ENTER
E
button.
N
The selected item will be run.
N
Refer to the explanation for the button in the display when the user uses
the button while content is running.
Gallery
Gallery
Cooking Children Fitness
Setup
USB
Return
Exit
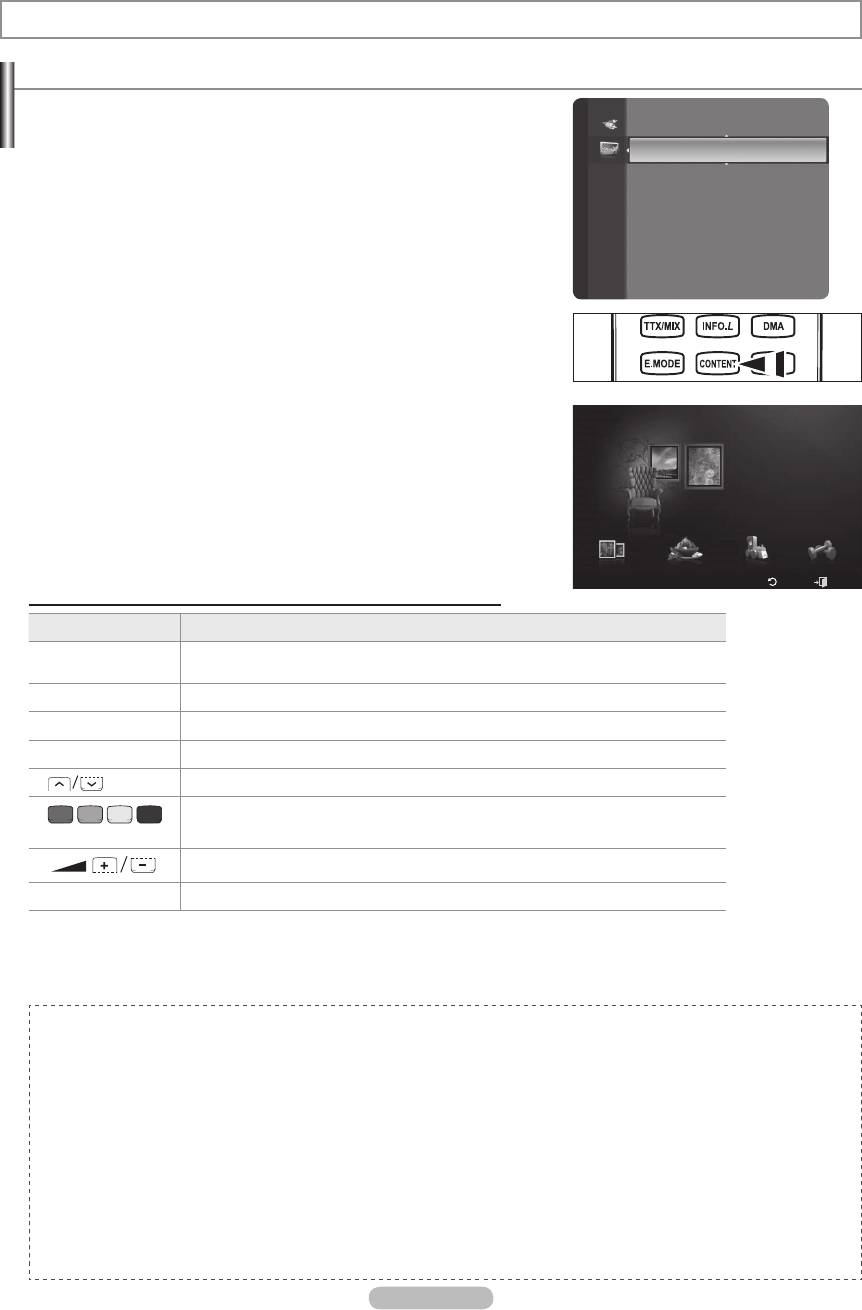
Using the Remote Control Button in Content Library Menu
Button Operations
(Wheel)
Move the cursor and select an item.
ENTER
E
Select the currently selected item.
RETURN Return to the previous menu.
EXIT Stop the current function and return to the Content Library main menu.
P
,
PRE-CH
Stop Content Library mode and Returns to TV mode.
Button that provide functions are described on the corresponding page.
(colour button)
You can control the volume of the played content.
CONTENT Exit Content Library mode.
N
If you press the Volume or MUTE button, no OSD is displayed, but the function operates accordingly.
N
CONTENTS LIBRARY CONTAINS TEXT, GRAPHICS, IMAGES, MULTIMEDIA, AND OTHER MATERIALS FOR
INFORMATIONAL AND PROMOTIONAL PURPOSES ONLY. MATERIALS IN CONTENTS LIBRARY HAS BEEN
MODIFIED AND KEEPS BEING REVISED AND UPDATED. THE MATERIALS IN THE CONTENTS LIBRARY MAY NOT
BE SUITABLE FOR ALL AUDIENCES.
N
INFORMATION IN THE CONTENTS LIBRARY IS PROVIDED “AS IS.” ALTHOUGH THE INFORMATION PROVIDED
TO YOU IN THE CONTENTS LIBRARY IS OBTAINED OR COMPLIED FROM SOURCES WE BELIEVE TO BE
RELIABLE, SAMSUNG CANNOT AND DOES NOT GUARANTEE THE ACCURACY, VALIDITY, TIMELINESS OR
COMPLETENESS OF ANY INFORMATION OR DATA MADE AVAILABLE TO YOU FOR ANY PARTICULAR PURPOSE.
UNDER NO CIRCUMSTANCES, INCLUDING NEGLIGENCE, SHALL SAMSUNG BE HELD LIABLE, WHETHER IN
CONTRACT OR TORT, FOR ANY DIRECT, INDIRECT, INCIDENTAL, SPECIAL OR CONSEQUENTIAL DAMAGES,
ATTORNEY FEES, EXPENSES, OR ANY OTHER DAMAGES WHATSOEVER ARISING OUT OF, OR IN CONNECTION
WITH, ANY INFORMATION CONTAINED IN, OR THE USE OF, THE CONTENTS LIBRARY, EVEN IF ADVISED OF THE
POSSIBILITY OF SUCH DAMAGES.
English - 50
BN68-01757D-Eng_.indb 50 2008-08-20 오후 7:19:04

English - 51
Using the Content Library
❑
Gallery
Art/Relaxation/Party:
This function plays a SlideShow with high resolution images and background music and produces
various atmospheres. Using the Gallery function of the TV, you can change your home atmosphere.
N
Press the yellow button to playback all imageries.
N
There is default music for each for the Art, Relaxation, and Party options.
N
Press INFO button to see the credit and detail information in English for the imagery. Press INFO button again or press
N
The copyrights of the Gallery contents and all issues related to them are reserved by Gallery Player, Inc.
N
For additional Gallery contents, check for information through www.samsung.com. Please refer to the Using Additional
Content Using External USB Memory Storage section to see how to play additional imagery.
❑
Cooking
Starters/Main Courses/Desserts:
You can view various recipes that you can then easily follow step by step. Enjoy these
contents which give you great ideas for meals.
N
The recipes introduced in the Cooking contents on the Samsung TV are based on recipes published by Anness
Publishing.
N
The copyrights of the Cooking contents and all issues related to them are reserved by Practical Pictures.
❑
Children
Story/Song/Play:
This is educational and interactive content that children can watch repeatedly. Enjoy existing stories,
songs and plays with the Boowa and Kwala characters.
N
The copyrights of the Children contents and issues related to them are reserved by UpToTen.
❑
Fitness
Basic Stretches/Massage:
that can be enjoyed by the whole family.
N
whole family. The Basic Stretches contents for the Samsung TV are based on the book Stretching by Suzanne Martin
which is published by DK and the Massage contents are based on the books published by Anness Publishing.
N
The copyrights to Basic Stretches are reserved by the DK Publishing Company. The copyrights to the Massage content
are reserved by Practical Pictures. All issues related to copyrights are reserved by the corresponding company.
Using the Remote Control Button in Fitness menu
Button Operations
(Wheel)
View to previous step/View to next step
ENTER
E
Play or pause (in Basic and Advanced Stretches)
❑
Screen Saver Run Time
Select to set the waiting time before the screen saver appears.
Press the yellow button to select Setup in the Content Library main menu.
BN68-01757D-Eng_.indb 51 2008-08-20 오후 7:19:04
Using Additional Content Using External USB Memory Storage
You can download contents onto a USB memory device and play them on your TV. (The contents on the external USB device are
played directly without being copied to the built-in Flash memory of the TV.)
Playing and Exiting New Content
1. Press the Red button in the Content Library main menu.
Content Library
N
The USB Browser main screen is displayed.
N
2.
Gallery
the ENTER
E
button.
N
The selected content is played.
N
The use of contents is the same as in using the TV memory contents.
N
To return to the USB browser main screen, press the EXIT button.
Gallery
Cooking Children Fitness
N
To exit Content Library mode, press the P>/< button on the remote
Setup
USB
Return
Exit
control.
N
Content Library only supports USB Mass Storage Class devices
Content Library
USB
<<
1/1
>>
(MSC). MSC is a Mass Storage Class Bulk-Only Transport device.
Children
Examples of MSC are Thumb drives and Flash Card Readers (Both
Cooking
USB HDD and HUB are not supported.)
Fitness
Children
Gallery
Living
Sub Item : 2
Others
TV Memory
Show UDN
Return
Downloading New Contents
New content other than the built-in contents will be provided via the Samsung.com website with or without charge.
Downloading Content
1. Visit the www.samsung.com website and open the Content Library page.
2. Enter the product number (UDN, Unique Device Number) when it is asked.
3. Select a content item in the Contents Download page.
4. Download the contents onto the USB memory device.
N
Content Library only supports USB Mass Storage Class devices (MSC). MSC is a Mass Storage Class Bulk-Only
Transport device. Examples of MSC are Thumb drives and Flash Card Readers (Both USB HDD and HUB are not
supported.)
5. Go to Content Library main menu by pressing CONTENT button or choosing Content Library
Content Library)
6. Plug the USB memory into USB port on the side of the TV.
Finding a product number (Unique Device Number, UDN)
1. Insert the USB memory into the USB port on the side of the TV.
2. In the USB Browser main screen, press the Green button (Show UDN).
3. The 18-digit number on the screen is the product code.
Provided Content
-
Additional contents are available on www.samsung.com.
English - 52
BN68-01757D-Eng_.indb 52 2008-08-20 오후 7:19:05
About Anynet
+
Connecting Anynet
+
Devices
Anynet
+
is a function that enables you to control all connected Samsung devices that support Anynet
+
with your Samsung TV’s
remote.
The Anynet
+
system can be used only with Samsung devices that have the Anynet
+
feature. To be sure your Samsung device has
this feature, check if there is an Anynet
+
logo on it.
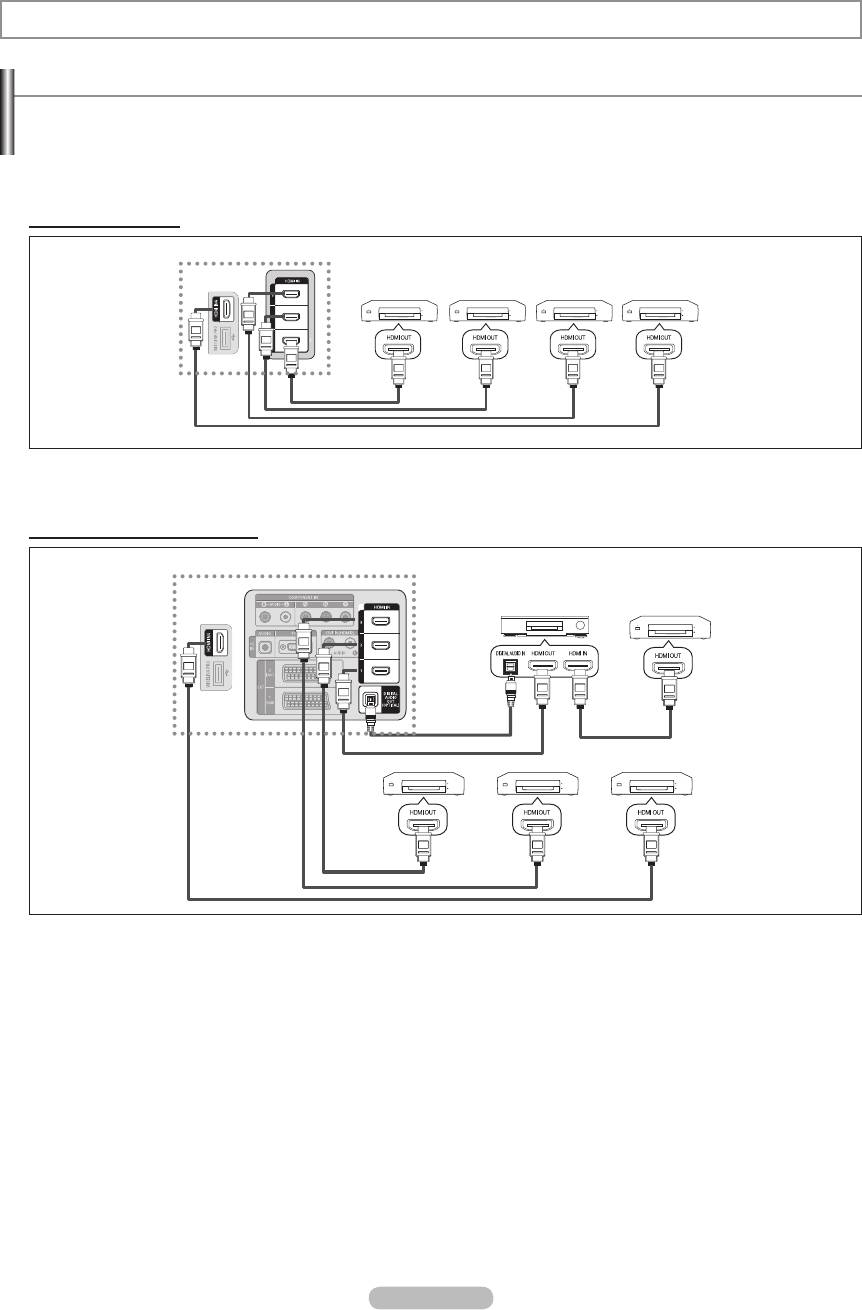
To connect to a TV
TV
Anynet
+
Anynet
+
Anynet
+
Anynet
+
Device 1
Device 2
Device 3
Device 4
HDMI 1.3 Cable
HDMI 1.3 Cable
HDMI 1.3 Cable
HDMI 1.3 Cable
1. Connect the [HDMI 1], [HDMI 2], [HDMI 3] or [HDMI 4] jack on the TV and the HDMI OUT jack of the corresponding Anynet
+
device using an HDMI cable.
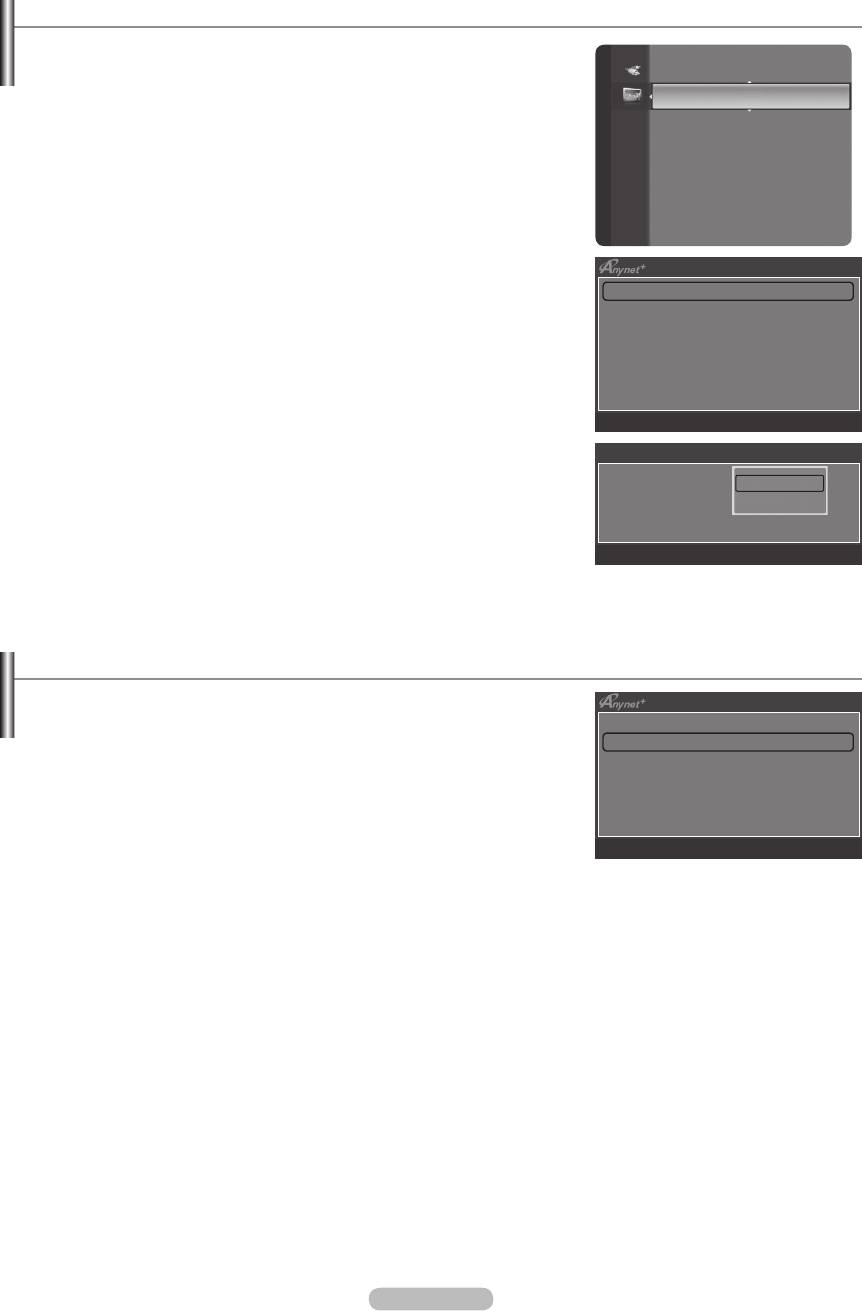
To connect to Home Theater
TV
Home Theatre
Anynet
+
Device 1
Optical Cable
HDMI 1.3 Cable
HDMI 1.3 Cable
Anynet
+
Device 2 Anynet
+
Device 3
Anynet
+
Device 4
HDMI 1.3 Cable
HDMI 1.3 Cable
HDMI 1.3 Cable
1. Connect the [HDMI 1], [HDMI 2], [HDMI 3] or [HDMI 4] jack on the TV and the HDMI OUT jack of the corresponding Anynet
+
device using an HDMI cable.
2. Connect the HDMI IN jack of the home theater and the HDMI OUT jack of the corresponding Anynet
+
device using an HDMI
cable.
N
Connect the Optical cable between the Digital Audio Out (Optical) jack on your TV and the Digital Audio Input on the Home
Theater.
N
When following the connection above, the Optical jack only outputs 2 channel audio. You will only hear sound from the Home
Theater’s Front Left and Right speakers and the subwoofer. If you want to hear 5.1 channel audio, connect the Digital Audio
not the TV.
N
Connect only one Home Theater.
N
You can connect an Anynet
+
device using the HDMI 1.3 cable. Some HDMI cables may not support Anynet
+
functions.
N
Anynet
+
works when the AV device supporting Anynet
+
is in the Standby or On status.
N
Anynet
+
supports up to 12 AV devices in total. Note that you can connect up to 3 devices of the same type.
English - 53
BN68-01757D-Eng_.indb 53 2008-08-20 오후 7:19:07
Setting Up Anynet
+
❑
Anynet
+
(HDMI-CEC)
Application
performs the same function.
WISELINK Pro
Setup
Content Library
•
Anynet
+
: To use the Anynet+ Function, Anynet
+
InfoLive
(HDMI-CEC) must be set to On.
Product Guide
N
When the Anynet+ (HDMI-CEC) function is disabled, all the Anynet
+
related operations are deactivated.
•
: Setting an Anynet
+
Device to turn Off
Automatically when the TV is Turned Off
N
The active source on the TV remote must be set to TV to use the
Anynet
+
function.
N
If you set Auto Turn Off to Yes, connected external devices are also
Device List
turned off when the TV is turned off. If an external device is still recording,
Setup
it may or may not turn off.
U
Move
E
Enter
R
Return
Set up
Anynet+ (HDMI-CEC) : ON
Off
Auto Turn Off : Yes
On
U
Move
E
Enter
R
Return
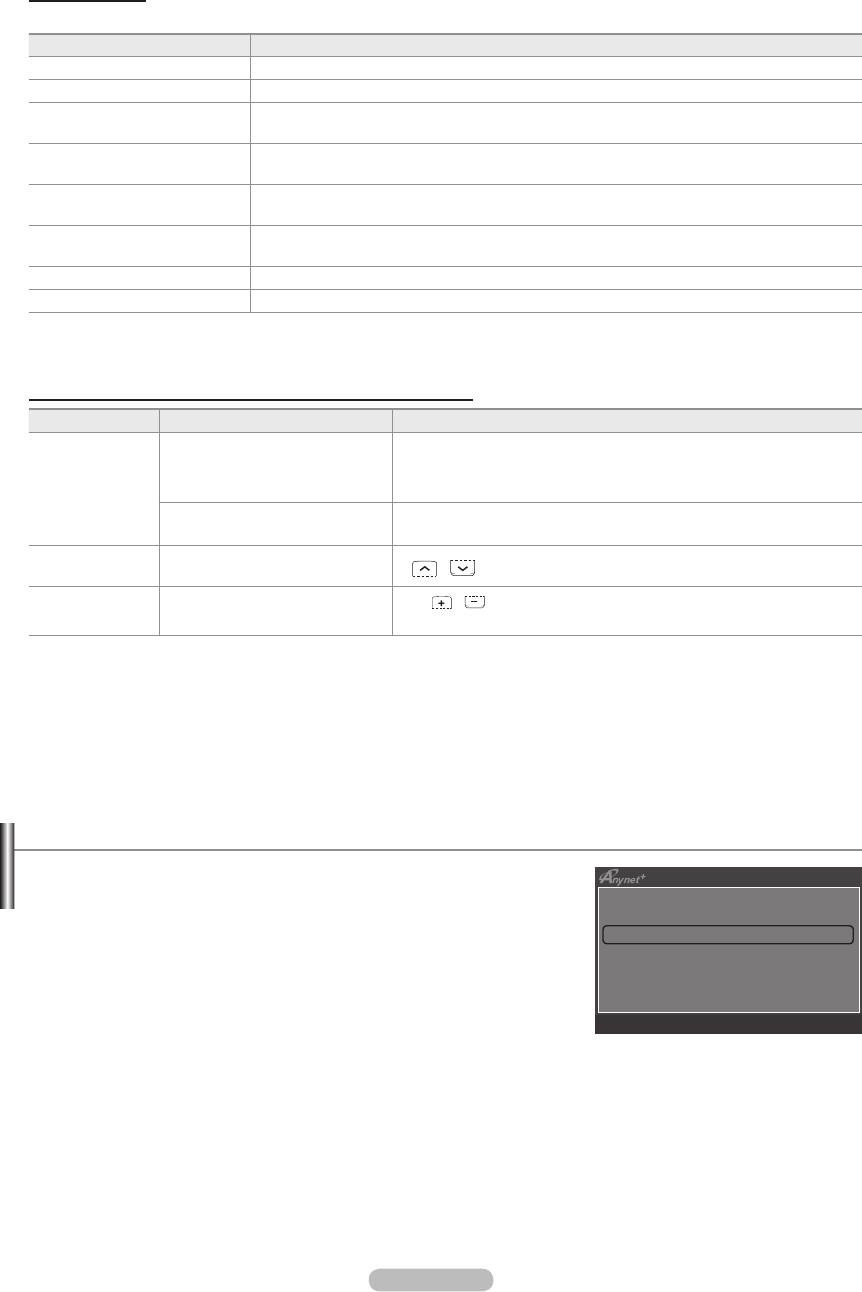
Scanning and Switching between Anynet+ Devices
1. Press the TOOLS button. Press the ENTER
E
button to select Anynet+
(HDMI-CEC).
View TV
2.
Device List, then press the ENTER
E
Device List
button.
Recording : DVDR
N
DVDR Operation
you want, press the red button to scan for devices.
Receiver : On
Setup
N
Only when you set Anynet+ (HDMI-CEC) to On in the Setup menu, the
Device List menu appears.
U
Move
E
Enter
R
Return
3.
ENTER
E
button. It is switched to the selected device.
N
Switching to the selected devices may take up to 2 minutes. You cannot cancel the operation during the switching operation.
N
The time required to scan for devices is determined by the number of connected devices.
N
When the device scan is complete, the number of devices found are not displayed.
N
Although the TV automatically searches the device list when the TV is turned on via the power button, devices connected to
the TV when the TV is on or under some conditions are not automatically displayed in the device list. Press the red button to
search for the connected device.
N
If you have selected external input mode by pressing the SOURCE button, you cannot use the Anynet+ function. Make sure to
switch to an Anynet+ device by using the Device List.
English - 54
BN68-01757D-Eng_.indb 54 2008-08-20 오후 7:19:08
English - 55
Anynet
+
Menu
The Anynet
+
menu changes depending on the type and status of the Anynet+ devices connected to the TV.
Anynet
+
Menu Description
View TV Anynet+ mode changes to TV broadcast mode.
Device List Shows the Anynet+ device list.
(device_name) Menu Shows the connected device menus. E.g. If a DVD recorder is connected, the disc menu of
the DVD recorder will appear.
(device_name) Operation Shows the play menu of the connected device. E.g. If a DVD recorder is connected, the play
menu of the DVD recorder will appear.
Record: (*recorder) Starts recording immediately using the recorder. (This is only available for devices that
support the recording function.)
(*recorder) Reserve Recording Enables reserving a recording for the recorder. (This is only available for devices that support
the recording reservation function.)
Stop Recording: (*recorder) Stops recording.
Receiver Sound is played through the receiver.
N
If more than one recording device is connected, they are displayed as (*recorder) and if only one recording device is
connected, it will be represented as (*device_name).
TV Remote Control Buttons Available in Anynet
+
Mode
Device Type Operating Status Available Buttons
After switching to the device, when
Numeric buttons
the menu of the corresponding
ENTER
E
buttons
Anynet
+
Device
device is displayed on the screen.
Colour buttons / EXIT button
After switching to the device, while
π
(Backward search) /
µ
(Forward search)
∫
(Stop) /
∂
(Play) /
∑
(Pause)
Device with built-
After switching to the device, when
in Tuner
you are watching a TV programme
P
/ button
VOL
/ button
Audio Device When Receiver is activated
MUTE button
N
The Anynet+ function only works when the active source on the TV remote control is set to TV.
N
The
∏
button works only while in the recordable state.
N
You cannot control Anynet+ devices using the buttons on the TV. You can control Anynet+ devices only using the TV remote
control.
N
The TV remote control may not work under certain conditions. In this case, reselect the Anynet+ device.
N
The Anynet+ functions do not operate with other manufacturers’ products.
N
The
π
,
µ
operations may differ depending on the device.
Recording
You can make a recording of a TV programme using a Samsung recorder.
1.
Press the TOOLS button. Press the ENTER
E
button to select Anynet+
View TV
(HDMI-CEC).
Device List
2.
Recording: (device_name), then press the
Recording : DVDR
ENTER
E
button. Recording begins.
DVDR Operation
N
When there is more than one recording device
Receiver : On
Setup
When multiple recording devices are connected, the recording devices are
U
Move
E
R
Return
ENTER
E
Enter
button. Recording begins.
N
When the recording device is not displayed
Select Device List and press the red button to search devices.
3. Press the EXIT button to exit.
N
You can record the source streams by selecting Recording: (device_name).
N
Pressing the
∏
button will record whatever you are currently watching. If you are watching video from another device, the video
from the device is recorded.
N
Before recording, check whether the antenna jack is properly connected to the recording device. To properly connect an
antenna to a recording device, refer to the recording device’s users manual.
BN68-01757D-Eng_.indb 55 2008-08-20 오후 7:19:09
Listening through a Receiver (Home theater)
You can listen to sound through a receiver instead of the TV speaker.
1.
Press the TOOLS button. Press the ENTER
E
button to select Anynet+
View TV
(HDMI-CEC).
Device List
2.
Receiver
Recording : DVDR
On or Off.
DVDR Operation
3.
Press the EXIT button to exit.
Setup
N
If your receiver supports audio only, it may not appear in the device list.
N
The receiver will work when you have properly connected the Optical IN jack of
U
Move
L
Adjust
R
Return
the receiver to the Optical Out jack of the TV.
N
When the receiver (home theater) is set to On, you can hear sound output from the TV’s Optical jack. When the TV is
displaying a DTV(air) signal, the TV will send out 5.1 channel sound to the Home theater receiver. When the source is a digital
component such as a DVD and is connected to the TV via HDMI, only 2 channel sound will be heard from the Home Theater
receiver.
N
When using the WISELINK Pro feature, sound may not output properly through the receiver.
N
When listening through the receiver, there are restrictions for using the PIP and audio-related (MTS, Preferred language)
menus.
N
If there is a power interruption to the TV when the Receiver is set to On (by disconnecting the power cord or a power failure),
the Select Speaker may be set to External Speaker when you turn the TV on again. (see page 22)
Troubleshooting for Anynet
+
Symptom Solution
Anynet
+
does not work. Check if the device is an Anynet+ device. The Anynet+ system supports Anynet
•
+
devices only.
•
Connect only one receiver (home theater).
•
Check if the Anynet
+
device power cord is properly connected.
•
Check the Anynet
+
device’s Video/Audio/HDMI 1.3 cable connections.
•
Check whether Anynet
+
(HDMI-CEC) is set to On in the Anynet+ setup menu.
•
Check whether the TV remote control is in TV mode.
•
Check whether it is Anynet
+
exclusive remote control.
•
Anynet+ doesn’t work in certain situations. (Searching channels, Operating WISELINK Pro, Plug
& Play, etc.)
•
When connecting or removing the HDMI 1.3 cable, please make sure to search devices again or
turn your TV off and on again.
•
Check if the Anynet
+
Function of Anynet
+
device is set on.
I want to start Anynet
+
. Check if the Anynet+ device is properly connected to the TV and check if the Anynet
•
+
(HDMI-
CEC) is set to On in the Anynet
+
Setup menu.
•
Press the TV button on the TV remote control to switch to TV. Then press the TOOLS button to
show the Anynet
+
menu and select a menu you want.
I want to exit Anynet
+
. Select View TV in the Anynet
•
+
menu.
•
Press the SOURCE button on the TV remote control and select a device other than Anynet+
devices.
•
Press P
>
/
<
and PRE-CH to change the TV mode.
•
(Note that the channel button operates only when a tuner-embedded Anynet
+
device is not
connected.)
The message Connecting
•
+
or switching to a view
to Anynet+ device...
mode.
appears on the screen.
•
Use the remote control when the Anynet
+
setting or switching to view mode is complete.
The Anynet
+
device does
You cannot use the play function when Plug & Play is in progress.
not play.
The connected device is
•
Check whether or not the device supports Anynet
+
functions.
not displayed.
•
Check whether or not the HDMI 1.3 cable is properly connected.
•
Check whether Anynet
+
(HDMI-CEC) is set to On in the Anynet
+
setup menu.
•
Search Anynet
+
devices again.
•
You can connect an Anynet
+
device using the HDMI 1.3 cable only. Some HDMI cables may not
support Anynet
+
functions.
•
If it is terminated by an abnormal situation such as disconnecting the HDMI cable or power cord
or a power failure, please repeat the device scan.
The TV programme cannot
Check whether the antenna jack on the recording device is properly connected.
be recorded.
The TV sound is not output
Connect the optical cable between TV and the receiver.
through the receiver.
English - 56
BN68-01757D-Eng_.indb 56 2008-08-20 오후 7:19:09
English - 57
InfoLive
Using InfoLive
You can view news, stock market and weather information services using SAMSUNG’s
Anynet+ (HDMI-CEC)
InfoLive service.
Application
Content Library
N
Set up the network. (Refer to pages 27~28)
InfoLive
N
InfoLive is available only in UK, France, Germany, Italy, Spain, Norway, Sweden,
Product Guide
Denmark, Finland and Russia. Country is selected depending on the country
which is set in Plug & Play.
1. Press the MENU button to display the menu.
Application, then press the ENTER
E
button.
2.
InfoLive, then press the ENTER
E
button.
Weather
Move
Return
3.
Weather, News, Stocks or Setup)
and press the ENTER
E
button.
N
You can select and view more than one service at the same time only for
‘News (without detailed information)’, ‘Weather-Today’s Weather’, and
‘Stocks-Favorite Stocks, Market Summary’.
O
Press the
INFO.L
button on the remote control to display the InfoLive menu.
ALL THE MATERIALS AVAILABLE THROUGH INFOLIVE [‘INFOLIVE CONTENT’] ARE THE PROPERTY OF THE
ORIGINATOR OF THE CONTENT [“CONTENT OWNER’] AND/OR ITS AFFILIATES OR LICENSORS, AND ARE PROTECTED
BY COPYRIGHT, TRADEMARK, AND OTHER INTELLECTUAL PROPERTY LAWS. ALL INFOLIVE CONTENT IS PROVIDED
SOLELY FOR YOUR PERSONAL NONCOMMERCIAL USE. YOU MAY NOT USE ANY INFOLIVE CONTENT IN A MANNER
THAT CONSTITUTES AN INFRINGEMENT OF THE CONTENT OWNERS’ RIGHTS OR THAT HAS NOT BEEN AUTHORIZED
BY THE CONTENT OWNER. MORE SPECIFICALLY, UNLESS EXPLICITLY AUTHORIZED IN THIS DISCLAIMER OR BY
THE CONTENT OWNER, YOU MAY NOT MODIFY, COPY, REPRODUCE, REPUBLISH, UPLOAD, POST, TRANSMIT,
TRANSLATE, SELL, CREATE DERIVATIVE WORKS, EXPLOIT, OR DISTRIBUTE IN ANY MANNER OR MEDIUM
(INCLUDING BY EMAIL OR OTHER ELECTRONIC MEANS) ANY INFOLIVE CONTENT OR ANY OTHER MATERIAL FROM
THE INFOLIVE SERVICE. CONTENT PROVIDED CONTENT OWNERS IN CONNECTION WITH THE INFOLIVE SERVICE
MAY BE TIME-DELAYED AS SPECIFIED BY THE CONTENT OWNER AND/OR ITS AFFILIATES.
INFOLIVE IS PROVIDED THROUGH AGREEMENT BETWEEN SAMSUNG AND THE CONTENT OWNER. INFOLIVE MAY
BE TERMINATED OR INTERUPTED AT ANY TIME BY EITHER SAMSUNG OR THE CONTENT PROVIDER OR THROUGH
TERMINATION OF THE AGREEMENT BETWEEN THEM. UNDER NO CIRCUMSTANCES, INCLUDING NEGLIGENCE,
SHALL SAMSUNG OR THE CONTENT PROVIDER BE HELD LIABLE, WHETHER IN CONTRACT OR TORT, FOR ANY
DIRECT, INDIRECT, INCIDENTAL, SPECIAL OR CONSEQUENTIAL DAMAGES, ATTORNEY FEES, EXPENSES, OR
ANY OTHER DAMAGES WHATSOEVER ARISING OUT OF, OR IN CONNECTION WITH, SUCH TERMINATION OR
INTERUPTION. SINCE CONTENT TRANSMITTED VIA INFOLIVE IS RECEIVED BY MEANS OF NETWORKS AND
TRANSMISSION FACILITIES OVER WHICH SAMSUNG HAS NO CONTROL, SAMSUNG EXPRESSLY DISCLAIMS ANY
RESPONSIBILITY OR LIABILITY FOR ANY INTERRUPTION OR SUSPENSION OF INTERLINK SERVICE OR FOR THE
ABSENCE OF CONTENT RESULTING THEREFROM. INFORMATION IN THE INFOLIVE IS PROVIDED “AS IS,”AND
CONSEQUENTLY, SAMSUNG DOES NOT WARRANT THE INFORMATION SO PROVIDED, EITHER EXPRESSLY OR
IMPLIEDLY, FOR ANY PARTICULAR PURPOSE; AND SAMSUNG EXPRESSLY DISCLAIMS ANY IMPLIED WARRANTIES,
INCLUDING BUT NOT LIMITED TO, WARRANTIES OF MERCHANTABILITY OR FITNESS FOR A PARTICULAR PURPOSE.
SAMSUNG DOES NOT GUARANTEE THE ACCURACY, VALIDITY, TIMELINESS, LEGALITY, OR COMPLETENESS OF ANY
INFORMATION OR DATA MADE AVAILABLE THROUGH INFOLIVE FOR ANY PARTICULAR PURPOSE AND UNDER NO
CIRCUMSTANCES, INCLUDING NEGLIGENCE, SHALL SAMSUNG BE HELD LIABLE, WHETHER IN CONTRACT OR TORT,
FOR ANY DIRECT, INDIRECT, INCIDENTAL, SPECIAL OR CONSEQUENTIAL DAMAGES, ATTORNEY FEES, EXPENSES,
OR ANY OTHER DAMAGES WHATSOEVER ARISING OUT OF, OR IN CONNECTION WITH, ANY INFORMATION
CONTAINED IN, OR AS A RESULT OF THE USE OF INFOLIVE BY YOU OR ANY THIRD PARTY, EVEN IF ADVISED OF THE
POSSIBILITY OF SUCH DAMAGES.
N
ACCESS TO INFOLIVE IS SUBJECT TO THE YAHOO’S TERMS OF SERVICE AVAILABLE ON PAGE 67.
N
YAHOO TERMS OF SERVICE IN **LANGUAGE** ARE AVAILABLE ON THE WEB AT **ADDRESS**.
French
http://fr.docs.yahoo.com/info/utos.html
Swedish
http://se.docs.yahoo.com/seterms.html
German
http://de.docs.yahoo.com/info/utos.html
Danish
http://dk.docs.yahoo.com/termsofservice.html
Italian
http://it.docs.yahoo.com/info/utos.html
Finnish
Spanish
http://es.docs.yahoo.com/info/utos.html
BN68-01757D-Eng_.indb 57 2008-08-20 오후 7:19:12

Using the Weather Service
1. Press the INFO.L button on the remote control.
2.
Weather service and press the
ENTER
E
button.
Weather
Move
Return
Set up the Region
3.
the location you want, then press the ENTER
E
button.
4.
Sarreguemines
the location you want and press the ENTER
E
-00°C
button.
Options Location Close
N
You can check the weather of the selected region.
Set up Weather Option
Weather
Move
Return
5.
Press the Red button while using the service to change the Weather service
option.
6.
Weather option.
Options
Today’s Weather
N
To exit the Weather service, press the Blue button.
Weekly Forecast
ReturnSelect
N
To exit the InfoLive service, press the EXIT button.
Sarreguemines
-00°C
Using the News Service
N
The news provider may be changed in the future.
1. Press the INFO.L button on the remote control.
News
Move
Return
2.
News service and press the ENTER
E
button.
N
Press the ENTER
E
button to view the detailed article.
N
Press the button to view the previous or next article.
3. Press the Red button while using the service to change the News service Option.
GM turns 100 with focus on future
Enter Options Close
4. News service option.
N
The News service option changes depending on the provided web service.
N
To exit the News service, press the Blue button.
News
Move
Return
N
To exit the InfoLive service, press the EXIT button.
Options
Politics
Business
News
Entertainment
Sports
Select Return
GM turns 100 with focus on future
English - 58
BN68-01757D-Eng_.indb 58 2008-08-20 오후 7:19:15
English - 59
Using the Stock Service
1. Press the INFO.L button on the remote control.
2.
Stocks service and press the ENTER
E
No Favorite Stocks
Stocks
Move
Return
button.
Quotes delayed at least 20 minutes.
Data provided by interastive Data.
3. Press the Red button while using the service to change the Stocks service option.
Options Favorite Close
4. Stocks service option, then press the ENTER
E
button.
N
Stock quotes delayed up to 20 minutes. The delay time can vary depending on
country.
N
To exit the Stocks service, press the Blue button.
N
To exit the InfoLive service, press the EXIT button.
Options
Stocks
Move
Return
Favorite Stocks
AAAAAA $0.000,000
12/24 Mon 15:00 Updated 1/2
Market Summary
BBBBBB $0.000,000
Stocks & News
CCCCCC $0.000,000
DDDDDD $0.000,000 $000,000 +00,00%
Favorite Stocks: The Favorite stock information is displayed. You can set up the
EEEEEE $0.000,000
ReturnSelect
Quotes delayed at least 20 minutes.
– – – – – – help area – – – – – –
Brought to you by Yahoo! Finance
Favorite Stocks by pressing the Yellow button.
Market Summary: Major indices are toggled and the entire index, amount of up or
down, and % are displayed.
Stocks & News: The Favorite stock information and major indices and Financial
news are displayed.
Setting Favorite Stocks Items
1. Press the Yellow button when Favorite Stocks or Stocks & News is selected.
Options
2.
Stocks
Move
Return
Favorite Stocks
12/24 Mon 15:00 Updated 1/2
Market Summary
BBBBBB $0.000,000
AAAAAA $0.000,000
ENTER
E
button.
Stocks & News
CCCCCC $0.000,000
DDDDDD $0.000,000 $000,000 +00,00%
EEEEEE $0.000,000
ReturnSelect
Quotes delayed at least 15 minutes.
N
The set Favorite Stocks screen appears.
– – – – – – help area – – – – – –
Brought to you by Yahoo! Finance
3.
ENTER
E
button.
N
The result is displayed.
N
You can check the stock symbols by newspaper or Internet.
4. Press the ENTER
E
button to set a favourite stock.
N
The selected stock is set as a Favorite Stock.
Set Favorite Stocks
N
To delete your favourite stocks
Select the exchange market.
Press the Green button when Favorite Stocks or Stocks & News is selected.
ENTER
E
button.
O London Stock Exchange
The
c
mark will disappear to the left of the stock name. Press the RETURN
button.
Select
Return
Set Favorite Stocks
Enter stock symbol.
Adjust
Move Select
Return
BN68-01757D-Eng_.indb 59 2008-08-20 오후 7:19:17
InfoLive Setup
1. Press the INFO.L button on the remote control.
2.
Setup, then press the ENTER
E
button.
Setup
Move
Return
3.
Auto Launch, Display
Time, Font Size, Background Color, InfoLive’s Position)
4.
ENTER
E
button.
•
Auto Launch: Determines whether to launch InfoLink automatically
when the TV is turned on. You can select either Off or On.
•
Display Time: Determines the time to display the service on the TV
screen. You can select :10 minutes, 20 minutes, 1 hour, or Always.
•
Font Size: You can select letter size Standard or Large through
InfoLive’s Setup
InfoLink service.
•
Background Colour: You can select the Background Colours (black,
Auto Launch : Off
blue, red, grean, gray) of InfoLink service. The colour is applied to each
Display Time : 10 minutes
service, option and setup window.
Font Size : Standard
•
InfoLink’s Position: You can set the position of each InfoLink service
Background Color : Black
on the screen. You can select from six preset InfoLink positions
InfoLive’s Position
(Position 1~Position 6).
Move Select
Return
N
To exit the Setup service, press the RETURN button.
N
To exit the InfoLive service, press the EXIT button.
InfoLive’s Position
Stocks
Weather
News
Stocks
Stocks
Weather News
News
Weather
Position 1 Position 2 Position 3
Stocks
Weather
News
Weather News
Stocks
Stocks
News
Weather
Position 4 Position 5 Position 6
English - 60
BN68-01757D-Eng_.indb 60 2008-08-20 오후 7:19:20


