Karcher Autolaveuse BR 40-10 C: Transport Storage Maintenance and care
Transport Storage Maintenance and care: Karcher Autolaveuse BR 40-10 C
-
4
Note
To polish underneath furniture, the fresh
water and wastewater reservoirs can be re-
moved.
Release the switch for detergent solu-
tion.
Push the appliance forward for another
1-2 m to draw off residual water.
Release the brush drive button.
Press the pedal to lower the vacuum
bar.
Place the slider vertically - the brushes
are elevated.
Disconnect the mains plug.
Caution
Danger of deforming the brushes. When
switching off the appliance, take the load
off the appliance by placing the slider verti-
cally.
Open the locks for the fresh water res-
ervoir.
Tilt the carrying hanlde for the wastewa-
ter reservoir towards the side.
Lift up the fresh water reservoir and car-
ry it to the disposal site.
몇
Warning
Please observe the local provisions regard-
ing the wastewater treatment.
Remove the cover of the fresh water
reservoir and pour out the liquid via the
notch.
Note
If the dirt water reservoir is full the float
closes the suction channel. The suction op-
eration is interrupted. Empty the dirt water
reservoir.
Remove the fresh water reservoir, as
described above.
Lift up the wastewater reservoir and
carry it to the disposal site.
몇
Warning
Please observe the local provisions regard-
ing the wastewater treatment.
Pour out dirty water.
Rinse the dirty water tank with clear wa-
ter.
Caution
Risk of injury and damage! Observe the
weight of the appliance when you transport
it.
When transporting in vehicles, secure
the appliance according to the guide-
lines from slipping and tipping over.
To reduce the required space, the pushing
handle can be folded or disassembled:
Release the star grips of the pushing
handle fastening.
Unscrew the star grips, remove the
screws and take off the upper push
handle half.
Caution
Risk of injury and damage! Note the weight
of the appliance in case of storage.
This appliance must only be stored in inte-
rior rooms.
Danger
Risk of electric shock, risk of injury!
Pull the plug from the mains before carrying
out any tasks on the appliance.
Caution
Risk of damage to the appliance on ac-
count of water leakage. Drain out dirt water
and the remaining free water before wok-
ring at the machine.
Caution
Risk of damage. Do not wash down the ap-
pliance with water and do not use aggres-
sive detergents.
Pour out dirty water.
Rinse the dirty water tank with clear wa-
ter.
Empty the fresh water reservoir.
Fill the fresh water tank with clear water
and rinse the appliance to avoid residue
buildup.
Remove the remaining water from the
fresh water tank.
Check the seal in the ball valve in the
fresh water reservoir.
Check the fluff filter, clean if required.
Let the reservoirs dry prior to closing
them to prevent odor creation.
Clean the outside of the appliance with
a damp cloth which has been soaked in
mild detergent.
Clean the vacuum lips, check for wear
and replace the vacuum bar if required.
Check the brushes for wear, replace if
required.
Clean the water distribution bars above
the brushes, remove if necessary and
flush with water.
Check the condition of the seals be-
tween the appliance and the wastewa-
ter reservoir; replace if required.
Clean the brush tunnel.
Have the prescribed inspection carried
out by the customer service.
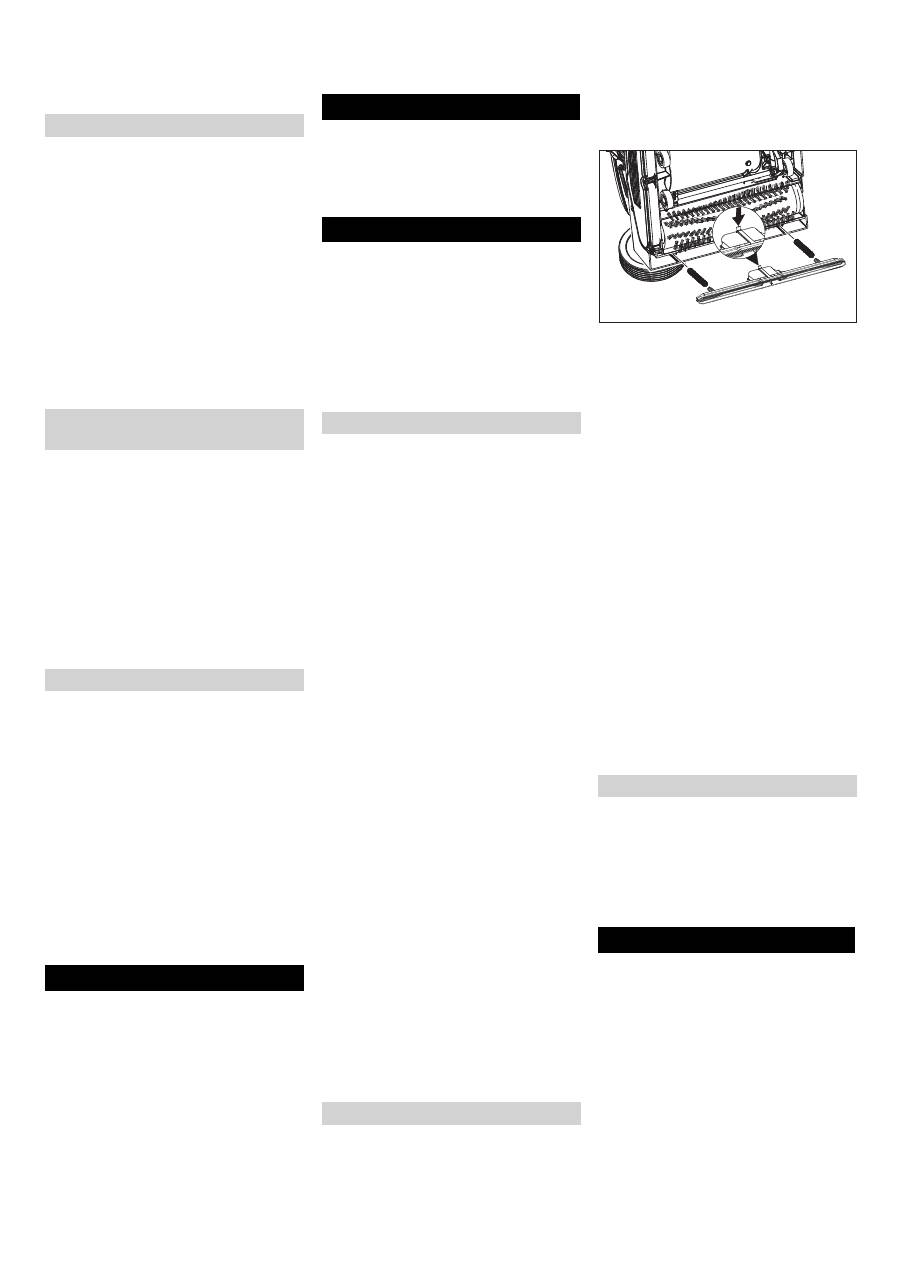
Lift the vacuum bar by activating the
pedal for the vacuum bar lowering.
Press the push-button for the vacuum
bar change toward the inside - the vac-
uum bar will release.
Pull off the vacuum bar downwards.
Remove the screw springs and install
the new vacuum bar.
Align the new vacuum bar so that the
locking nose points toward the centre of
the appliance.
Insert the screw springs into the pick-
ups on the appliance.
Insert the vacuum bar into the appli-
ance and lock it in.
Repeat process on the second bar.
Note
Regular exchanges of the two vacuum bars
will improve the scraping effect and will pro-
long their life.
Lay the device on its side.
Press the brush change button and si-
multaneously tilt the brush roller down-
wards.
Pull out the brush roller.
Place the new brush roller on the driver
and lock into place.
To ensure a reliable operation of the appli-
ance maintenance contracts can be con-
cluded with the competent Kärcher sales
office.
In case of danger of frost:
Empty the fresh and dirt water reser-
voirs.
Push the button for detergent solution
until no more water is expelled.
Store the appliance in a frost-protected
room.
Danger
Risk of electric shock, risk of injury!
Pull the plug from the mains before carrying
out any tasks on the appliance.
Caution
Risk of damage to the appliance on ac-
count of water leakage. Drain out dirt water
and the remaining free water before wok-
ring at the machine.
In case of faults that cannot be remedied
using the table below please contact the
customer service.
Shutting Down the Appliance
Emptying the Fresh Water Reser-
voir
Emptying the Dirt Water Reservoir
Transport Storage Maintenance and care
Maintenance schedule
After the work
Monthly
Yearly
Maintenance Works
Replacing the vacuum bar
Replacing the brush rollers
Maintenance contract
Frost protection
Faults
13 EN
-
5
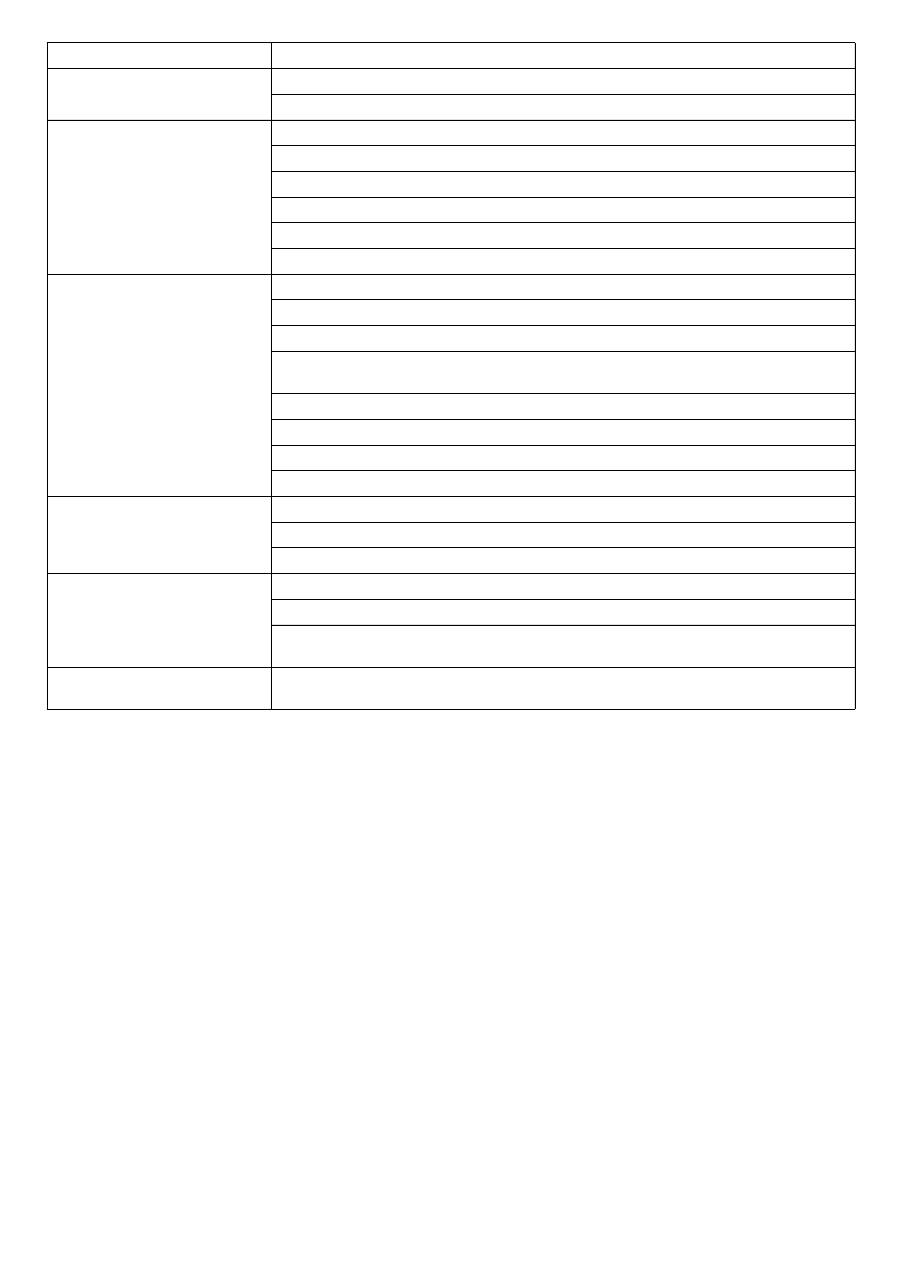
Fault
Remedy
Appliance cannot be started
Check if the mains plug is connected.
Socket fuse rating too low, look for proper socket.
Insufficient water quantity
Check fresh water level, refill tank if necessary.
Clean the ball valve in the fresh water reservoir.
Check and ensure that the fresh water reservoir is seated properly on the appliance.
Filter in the fresh water reservoir is plugged, clean filter.
Pull out the water distribution bars above the brushes and flush with water.
Check hoses for blockages; clean if required.
Insufficient vacuum performance
Empty the wastewater reservoir.
Check and ensure that the fresh water reservoir is seated properly on the wastewater reservoir.
Check seals on the fresh water reservoir, clean if necessary.
Clean the seals between the appliance and the dirt water reservoir and check for tightness, re-
place if required.
Clean the fluff filter.
Clean the vacuum lips on the vacuum bar, replace if required
Suction channel plugged, clean.
Check if the vacuum bar is plugged, remove plug if required
Insufficient cleaning result
Increase brush contact pressure.
Check the brushes for wear, replace if required.
Use brush rollers suited for the type of dirt and floor covering.
Brushes do not turn
Check if foreign matters block the brushes; remove foreign matter if required.
Reduce contact pressure.
Overcurrent protective switch was triggered. The overcurrent protective switch will allow the op-
eration after max. one minute.
Appliance vibrates.
Brush rollers are deformed because they were not unloaded by tilting the slider vertically when
parking the appliance; replace brush rollers.
14 EN
Оглавление
- Inhaltsverzeichnis
- Bedienelemente Vor Inbetriebnahme
- Transport Lagerung Pflege und Wartung
- Technische Daten
- Zubehör
- Contents
- Operating elements Before Commissioning
- Transport Storage Maintenance and care
- Specifications
- Accessories
- Table des matières
- Eléments de commande Avant la mise en service
- Transport Entreposage Entretien et maintenance
- Pannes
- Données techniques
- Accessoires
- Indice
- Dispositivi di comando Prima della messa in funzio- ne
- Trasporto Supporto Cura e manutenzione
- Guasti
- Dati tecnici
- Accessori
- Inhoudsopgave
- Bedieningselementen Voor ingebruikneming
- Vervoer Opslag Zorg en onderhoud
- Storingen
- Technische gegevens
- Toebehoren
- Índice de contenidos
- Elementos de mando Antes de la puesta en marcha
- Transporte Almacenamiento Conservación y mantenimien- to
- Averías
- Datos técnicos
- Accesorios
- Índice
- Elementos de manuseamento Antes de colocar em funcio- namento
- Transporte Armazenamento Conservação e manutenção
- Avarias
- Dados técnicos
- Acessórios
- Indholdsfortegnelse
- Betjeningselementer Inden idrifttagning
- Transport Opbevaring Pleje og vedligeholdelse
- Tekniske data
- Tilbehør
- Innholdsfortegnelse
- Betjeningselementer Før igangsetting
- Transport Lagring Pleie og vedlikehold
- Tekniske data
- Tilbehør
- Innehållsförteckning
- Reglage Före idrifttagandet
- TransportFörvaring Skötsel och underhåll
- Tekniska data
- Tillbehör
- Sisällysluettelo
- Hallintaelementit Ennen käyttöönottoa
- KuljetusSäilytys Hoito ja huolto
- Tekniset tiedot
- Tarvikkeet
- Πίνακας περιεχομένων
- Στοιχεία χειρισμού Πριν την ενεργοποίηση
- Μεταφορά Αποθήκευση Φροντίδα και συντήρηση
- Βλάβες
- Τεχνικά χαρακτηριστικά
- Εξαρτήματα
- İ çindekiler
- Kumanda elemanlar ı Cihaz ı çal ı ş t ı rmaya ba ş lama- dan önce
- Ta ş ı ma Depolama Koruma ve Bak ı m
- Teknik bilgiler
- Aksesuar
- Оглавление
- Элементы управления Перед началом работы
- Транспортировка Хранение Уход и техническое обслу - живание
- Неполадки
- Технические данные
- Принадлежности
- Tartalomjegyzék
- Kezelési elemek Üzembevétel el ő tt
- Transport Tárolás Ápolás és karbantartás
- M ű szaki adatok
- Tartozékok
- Obsah
- Ovládací prvky Pokyny p ř ed uvedením p ř í- stroje do provozu
- P ř eprava Ukládání Ošet ř ování a údržba
- Technické údaje
- P ř íslušenství
- Vsebinsko kazalo
- Upravljalni elementi Pred zagonom
- Transport Skladiš č enje Nega in vzdrževanje
- Tehni č ni podatki
- Pribor
- Spis tre ś ci
- Elementy obs ł ugi Przed uruchomieniem
- Transport Przechowywanie Czyszczenie i konserwacja
- Zak ł ócenia
- Dane techniczne
- Akcesoria
- Cuprins
- Elemente de operare Înainte de punerea în func ţ iu- ne
- Transport Depozitarea Îngrijirea ş i între ţ inerea
- Date tehnice
- Accesorii
- Obsah
- Ovládacie prvky Pred uvedením do prevádzky
- Transport Uskladnenie Starostlivost' a údržba
- Technické údaje
- Príslušenstvo
- Pregled sadržaja
- Komandni elementi Prije prve uporabe
- Transport Skladištenje Njega i održavanje
- Tehni č ki podaci
- Pribor
- Pregled sadržaja
- Komandni elementi Pre upotrebe
- Transport Skladištenje Nega i održavanje
- Tehni č ki podaci
- Pribor
- Съдържание
- Обслужващи елементи Преди пускане в експлоата - ция
- T рансп o рт Съхранение Грижи и поддръжка
- Повреди
- Технически данни
- Принадлежности
- Sisukord
- Teeninduselemendid Enne seadme kasutuselevõt- tu
- Transport Hoiulepanek Korrashoid ja tehnohooldus
- Tehnilised andmed
- Tarvikud
- Satura r ā d ī t ā js
- Vad ī bas elementi Pirms ekspluat ā cijas s ā kuma
- Transport ē šana Glab ā šana Kopšana un tehnisk ā apkope
- Tehniskie parametri
- Piederumi
- Turinys
- Valdymo elementai Prieš pradedant naudoti
- Transportavimas Laikymas Technin ė prieži ū ra ir aptarna- vimas
- Techniniai duomenys
- Dalys
- Перелік
- Елементи пристрою Перед введенням в експлуатацію
- Транспортування Зберігання Догляд та технічне обслуговування
- Неполадки
- Технічні дані
- Аксесуари
