Karcher Aspiro-brosseur CV 85-2 RS: Transport Storage Maintenance and care
Transport Storage Maintenance and care: Karcher Aspiro-brosseur CV 85-2 RS
-
5
Danger
Danger of accident. If the appliance cannot
brake adequately while going downhill,
press the emergency stop button.
Carry out the initial trials in an open surface
so that you familiarise yourself with the ap-
pliance.
Danger
Danger of tipping if gradient is too high.
Î
The gradient in the direction of travel
should not exceed 10%.
Danger of tipping when driving round
bends at high speed.
Danger of slipping on wet floors.
Î
Drive slowly when cornering.
Danger of tipping on unstable ground.
Î
Only use the machine on sound surfaces.
Danger of tipping with excessive sideways
tilt.
Î
The gradient perpendicular to the direc-
tion of travel should not exceed 10%.
Î
Get on to the standing area and keep
the safety pedal depressed with the left
foot.
Î
Do not press the accelerator pedal.
Î
Release emergency-stop button by
turning.
Î
Set main switch to “1”.
Î
Set the drive direction using the drive
direction button at the operator console.
Î
Select speed range using the speed
button (3 stages).
Î
Press the unlocking key.
Î
Press the accelerator carefully to drive.
Note
The drive direction can also be changed
during the drive. You can thus clean very
dirty surfaces by driving back and forth a
couple of times.
In case of overloading, the drive motor auto-
matically switches off after a certain period.
Î
Allow machine to cool down at least for
15 minutes.
Î
Press again the drive fuse on the oper-
ating panel.
Î
While vacuuming bulky waste, remove
wires and threads from the area to be
vacuumed to avoid these getting stuck
in the brushes.
몇
Warning!
Risk of damage to the floor covering. Do
not operate the appliance on the spot. Only
raise and lower suction/brush head while
driving. Do not stop with lowered brush/
suction head.
Î
Move downward the lever for raising /
lowering brushing/ vacuuming unit -
side-brush and brushing/ vacuuming
head will be lowered.
Start brush drive and suction turbine as
soon as the brush-vacuuming unit is
lowered
Î
Press accelerator pedal and drive to the
surface to be cleaned.
Note
Speed level 2 is recommended for cleaning.
Speed stage 3 is only meant for driving dur-
ing transportation.
Î
Select the smallest speed range using
the speed button.
Î
Move upward the lever for raising / low-
ering brushing/ vacuuming unit - side-
brush and brushing/ vacuuming head
will be raised and switched off.
Î
Park the machine on an even surface.
Î
Turn key to "0" and remove it.
Î
Carry out maintenance jobs "daily/ after
finishing work" (see section "Mainte-
nance and Care").
Î
Secure the machine with wheel
chock(s) to prevent it from rolling away.
Danger
Risk of injury! When loading or unloading
the machine, it may only be operated on
gradients of max. 10%. Drive slowly.
Caution
Risk of injury and damage! Observe the
weight of the appliance when you transport it.
Î
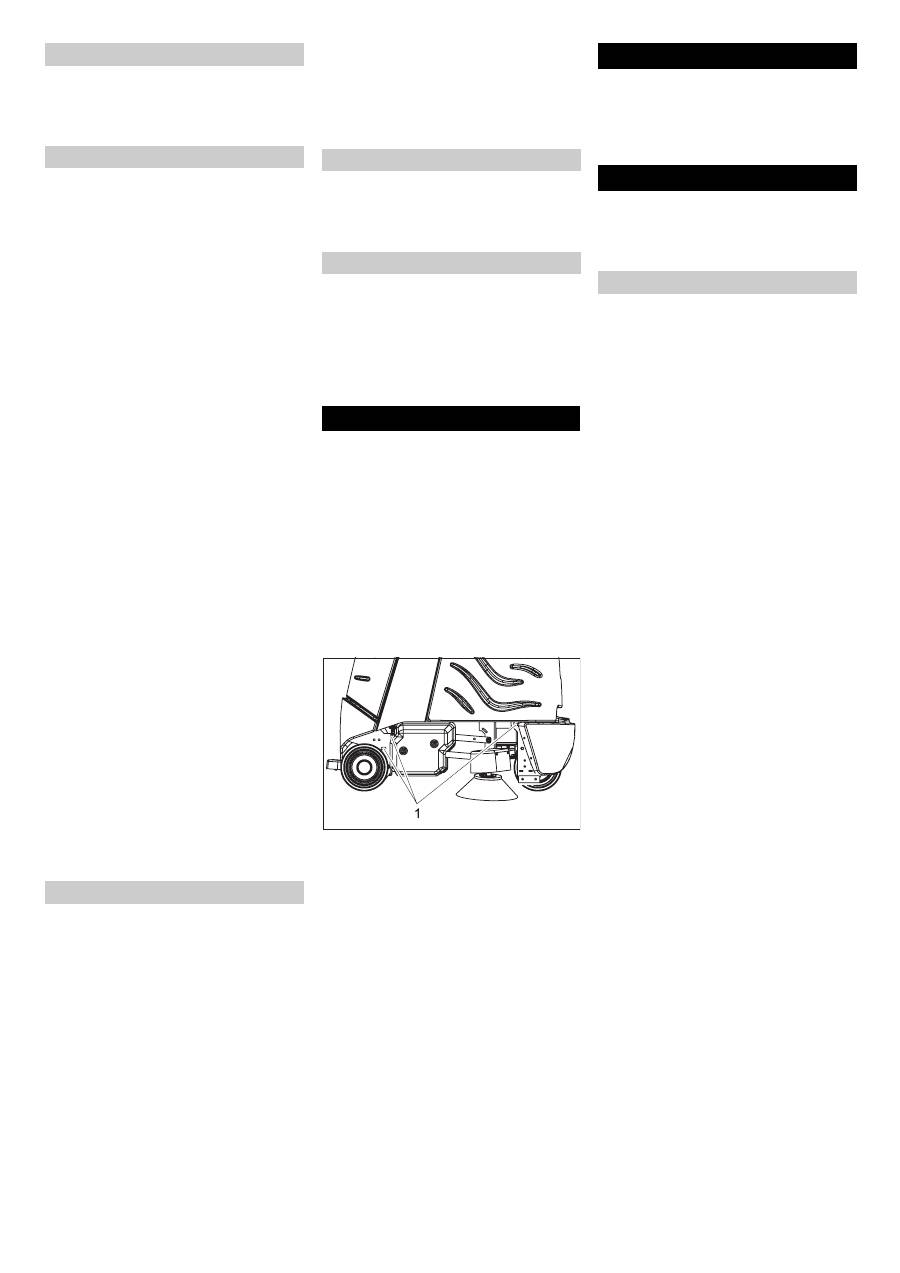
Remove vacuum bar, brushes and
spray guard from the device.
Î
When transporting in vehicles, secure
the appliance according to the guide-
lines from slipping and tipping over.
1 Fastening points
Caution
Risk of injury and damage! Note the weight
of the appliance in case of storage.
This appliance must only be stored in inte-
rior rooms.
Danger
Risk of injury! Before carrying out any tasks
on the machine, set the main key to "0" and
remove it. Pull out the battery plug.
Before starting working:
Î
Check tyre status.
Î
Check whether the inner lid of the filter
chamber.
Î
Check suction hose for blockages;
clean if required.
Î
Check the inserts of the suction hose
for leaks.
Î
Check safety pedal, accelerator pedal and
steering wheel for correct functioning.
Î
Check acid level in wet batteries; refill
distilled water, if required.
Î
Check filled level of the filter bag; re-
place, if required.
After finishing working:
Î
Clean brushes and check for wear and
tear.
The bristles are worn out when they
reach the length of the yellow bristles.
Î
Clean the outside of the appliance with
a damp cloth which has been soaked in
mild detergent.
Î
Check device externally for damage.
Î
Charge the batteries.
Î
Clean upper side of the batteries.
Î
Check acid density in wet batteries.
Î
Check battery cable for correct positioning.
Î
Clean battery room and battery casing.
Î
Check tension of the drive chain (see
"Maintenance tasks").
Î
Check drive belt for wear and tear.
Î
Check alignment of the brush/ vacuum
head.
Î
Check immobilising brake. *
Î
Check chains, ropes and deflection pul-
leys for raising the brushing/ vacuuming
head and the side-brush for wear and
tear and tension. *
Î
Check carbon brushes and commuta-
tors of all motors for wear and tear. *
Î
Check tightening device of steering
chains. *
* To be done by Customer Service.
Brakes
Driving
Overload
Vacuuming
Vacuuming completed
Shutting down
Transport Storage Maintenance and care
Maintenance schedule
Daily
Every 50 operating hours
Every 100 operating hours
Every 200 operating hours
15 EN
-
6
To ensure a reliable operation of the appli-
ance maintenance contracts can be con-
cluded with the competent Kärcher sales
office.
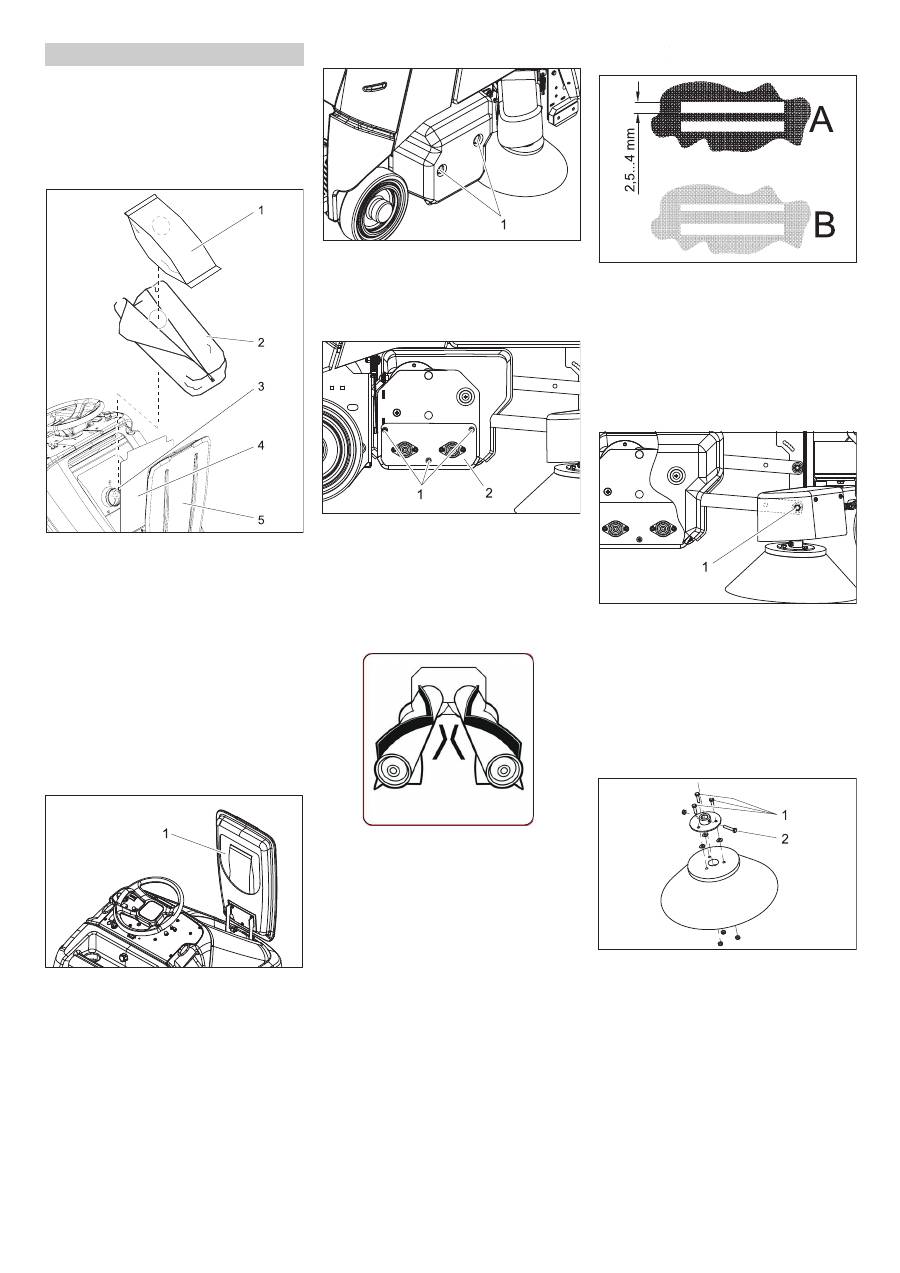
1 Filter bag
2 Filter sack
3 Connection nozzle
4 Inner lid of filter chamber
5 Lid of filter chamber
Î
Open both the lids of the filter chamber.
Î
Open the zip of the filter sack.
Î
Pull out the full filter bag from the con-
necting nozzle.
Î
Remove and dispose off the filter bag
from the filter sack.
Î
Clean filter chamber if required.
Î
Pull out the filter bag from the nozzle
and shake it off or clean it, if required.
1 Storage compartment for filter bags
Î
Remove a new filter bag from the stor-
age compartment in the lid and insert it
in the filter sack.
Î
Push the opening of the filter bag over
the connection nozzle.
Î
Close the zip of the filter sack.
Î
Close both the lids of the filter chamber.
1 Screw
Î
Remove both the screws of the cover
on the right side of the device.
Î
Remove cover.
1 Screw
2 Bearing plate
Î
Loosen the screws for fastening the
bearing plate.
Î
Pull out the bearing plate.
Î
Pull out the brushes.
Î
Insert new brushes and turn till the tow-
ing arm locks in. The arrangement of
the bristles should be as shown in the
above figure.
Î
Replace the bearing plate and cover.
Î
Drive the device on a hard, smooth floor
(not a carpet).
Î
Operate the device with lowered brush-
ing/ vacuuming head at one place for 30
seconds. (press the accelerator slowly
so that the brushes work without the de-
vice moving forward).
Î
Raise the brushing/ vacuuming head
and drive forward for approx. 1 m.
Î
The brushes have left a pattern on the
floor. Evaluate the pattern according to
the diagram shown below:
A Both the brushes generate a marking
that is equal in width - the brushing/
vacuuming head is aligned parallel to
the floor.
B Brushes generate markings of various
widths - the brush/ vacuuming head
needs to be aligned.
1 Screw
Î
Loosen the screw on both the sides, in-
sert in the long hole and tighten it again.
– To increase the contact area of the rear
brush - move the screw forward.
– To increase the contact area of the front
brush - move the screw backward.
1 Fastening screw for flange
2 Fastening screw for brush
Î
Turn out the fastening screw for the
flange and pull out the brush along with
the flange from the drive shaft.
Î
Turn out the fastening screws of the
brush and separate the brush from the
flange.
Î
Install new brush in reverse sequence.
Maintenance Works
Maintenance contract
Replacing the filter bag
Replacing the brush rollers
Checking the alignment of brush/ vacu-
um head.
Adjusting the alignment of brush/ vacu-
um head.
Replacing the side-brushes
16 EN
Оглавление
- Inhaltsverzeichnis
- Bedien- und Funktionselemente
- Vor Inbetriebnahme
- Betrieb
- Transport Lagerung Pflege und Wartung
- Störungen
- Technische Daten
- Contents
- Operating and Functional Elements
- Before Commissioning
- Operation
- Transport Storage Maintenance and care
- Faults
- Specifications
- Table des matières
- Eléments de commande
- Avant la mise en service
- Fonctionnement
- Pannes
- Accessoires
- Indice
- Elementi di comando e di funzione
- Prima della messa in funzione
- Funzionamento
- Trasporto Supporto Cura e manutenzione
- Guasti
- Dati tecnici
- Inhoudsopgave
- Bediening- en werkingsonderdelen
- Voor ingebruikneming
- Gebruik
- Vervoer Opslag Onderhoud
- Storingen
- Technische gegevens
- Índice de contenidos
- Elementos de operación y funcionamiento
- Antes de la puesta en marcha
- Funcionamiento
- Transporte Almacenamiento Conservación y mantenimien- to
- Averías
- Accesorios
- Declaración CE
- Índice
- Elementos de comando e de funcionamento
- Antes de colocar em funcio- namento
- Funcionamento
- Transporte Armazenamento Conservação e manutenção
- Avarias
- Acessórios
- Indholdsfortegnelse
- Betjenings- og funktionselementer
- Inden idrifttagning
- Drift
- Transport Opbevaring Pleje og vedligeholdelse
- Fejl
- Tekniske data
- Innholdsfortegnelse
- Betjenings- og funksjonsorganer
- Før igangsetting
- Drift
- Transport Lagring Pleie og vedlikehold
- Funksjonsfeil
- Tekniske data
- Innehållsförteckning
- Manövrerings- och funktionselement
- Före idrifttagandet
- Drift
- Transport Förvaring Skötsel och underhåll
- Störningar
- Tekniska data
- Sisällysluettelo
- Ohjaus- ja toimintaelementit
- Ennen käyttöönottoa
- Käyttö
- Kuljetus Säilytys Hoito ja huolto
- Häiriöt
- Tekniset tiedot
- Πίνακας περιεχομένων
- Στοιχεία χειρισμού και λειτουργίας
- Πριν την ενεργοποίηση
- Λειτουργία
- Βλάβες
- Τεχνικά χαρακτηριστικά
- İ çindekiler
- Kullan ı m ve çal ı ş ma elemanlar ı
- Cihaz ı çal ı ş t ı rmaya ba ş lamadan önce
- Çal ı ş t ı rma
- Ta ş ı ma Depolama Koruma ve Bak ı m
- Ar ı zalar
- Teknik bilgiler
- Оглавление
- Описание элементов управления и рабочих узлов
- Перед началом работы
- Эксплуатация прибора
- Транспортировка Хранение Уход и техническое обслуживание
- Неполадки
- Технические данные
- Tartalomjegyzék
- Kezelési- és funkciós elemek
- Üzembevétel el ő tt
- Üzem
- Transport Tárolás Ápolás és karbantartás
- Üzemzavarok
- M ű szaki adatok
- Obsah
- Ovládací a funk č ní prvky
- Pokyny p ř ed uvedením p ř ístroje do provozu
- Provoz
- Transport Ukládání Ošet ř ování a údržba
- Poruchy
- Technické údaje
- Vsebinsko kazalo
- Upravljalni in funkcijski elementi
- Pred zagonom
- Obratovanje
- Transport Skladiš č enje Nega in vzdrževanje
- Motnje
- Tehni č ni podatki
- Spis tre ś ci
- Elementy obs ł ugi urz ą dzenia
- Przed uruchomieniem
- Dzia ł anie
- Transport Przechowywanie Czyszczenie i konserwacja
- Zak ł ócenia
- Dane techniczne
- Cuprins
- Elemente de utilizare ş i func ţ ionale
- Înainte de punerea în func ţ iune
- Func ţ ionarea
- Transport Depozitarea Îngrijirea ş i între ţ inerea
- Defec ţ iuni
- Date tehnice
- Obsah
- Ovládacie a funk č né prvky
- Pred uvedením do prevádzky
- Prevádzka
- Transport Uskladnenie Starostlivos ť a údržba
- Poruchy
- Technické údaje
- Pregled sadržaja
- Komandni i funkcijski elementi
- Prije prve uporabe
- U radu
- Transport Skladištenje Njega i održavanje
- Smetnje
- Tehni č ki podaci
- Pregled sadržaja
- Komandni i funkcioni elementi
- Pre upotrebe
- Rad
- Transport Skladištenje Nega i održavanje
- Smetnje
- Tehni č ki podaci
- Съдържание
- Обслужващи и функционални елементи
- Преди пускане в експлоатация
- Експлоатация
- Повреди
- Технически данни
- Sisukord
- Teenindus- ja funktsioonielemendid
- Enne seadme kasutuselevõttu
- Käitamine
- Transport Hoiulepanek Korrashoid ja tehnohooldus
- Rikked
- Tehnilised andmed
- Satura r ā d ī t ā js
- Vad ī bas sist ē mas un funkciju elementi
- Pirms ekspluat ā cijas s ā kuma
- Ekspluat ā cija
- Transport ē šana Glab ā šana Kopšana un tehnisk ā apkope
- Trauc ē jumi
- Tehniskie parametri
- Turinys
- Aptarnavimo ir funkciniai elementai
- Prieš pradedant naudoti
- Naudojimas
- Transportavimas Laikymas Technin ė prieži ū ra ir aptarnavimas
- Gedimai
- Techniniai duomenys
- Перелік
- Елементи управління і функціональні вузли
- Перед введенням в експлуатацію
- Експлуатація
- Неполадки
- Технічні дані
