Karcher Aspiro-brosseur CV 85-2 RS: Operation
Operation: Karcher Aspiro-brosseur CV 85-2 RS
-
4
Note
Average charging time is approx. 10 hours.
The recommended chargers (matching the
batteries used) are regulated electronically
and will automatically switch off the charg-
ing process.
Danger
Danger of explosion. Wet batteries can
only be charged with opened battery cover.
Î
Unscrew the locking screw of the bat-
tery cover.
Î
Tilt the battery cover backwards.
Î
Remove battery plug and join it to the
charging cable.
Î
Connect the charger to the mains and
turn it on.
Î
Switch off the charger and remove the
plug from the socket.
Î
Pull the battery cable from the charger
cable and connect it to the machine.
Î
Tilt the battery cover towards the front
and tighten the locking screw.
Î
Add distilled water one hour before the
charging process comes to an end; fol-
low the correct acid level. There are
corresponding indicators on the battery.
At the end of the charging process, all
cells must gas.
Danger
Danger of causticization!
–
Adding water to the battery in its dis-
charged state can cause the acid to
leak.
–
Use safety glasses while handling bat-
tery acid and follow the safety instruc-
tions to avoid personal injury or damage
to clothes.
–
Should the acid spray on to the skin or
clothes, rinse immediately with lots of
water.
Caution
Risk of damage!
–
Use only distilled or desalinated water
(EN 50272-T3) for filling the battery.
–
Do not add any substances (so-called
performance improving agents), else
warranty claims will not be entertained.
Batteries and chargers are available in spe-
cialised stores.
Please follow these instructions if you are
using wet batteries:
– It is necessary to conform to the maxi-
mum battery dimensions.
– The battery cover needs to be opened
while charging wet (maintenance-free)
batteries.
– While charging wet batteries, follow the
specifications of the battery manufac-
turer.
Î
Unscrew the locking screw of the bat-
tery cover.
Î
Tilt the battery cover backwards.
Î
Push the lock of the battery insert to-
wards the left and tilt it downward.
Î
Pull the battery insert towards the rear.
Î
Clamp off the minus pole of the battery.
Î
Clamp off the remaining cables from the
battery.
Î
Remove the batteries.
Î
Dispose of the used batteries according
to the local provisions.
While standing, the device is protected
against rolling off with the help of an electri-
cal immobilising brake. To push the de-
vice, you need to first unlock the
immobilising brake.
Î
Press the unlocking lever downward to
unlock the immobilising brake.
Danger
Risk of accident if the device rolls off. Apply
the immobilising brake again immediately
after finishing pushing the machine by
pushing the unlocking lever upward.
Note
Take the foot off the aceelerator pedal,
press the emergency-stop button to imme-
diately deactivate all functions and turn the
key switch to the "0" position.
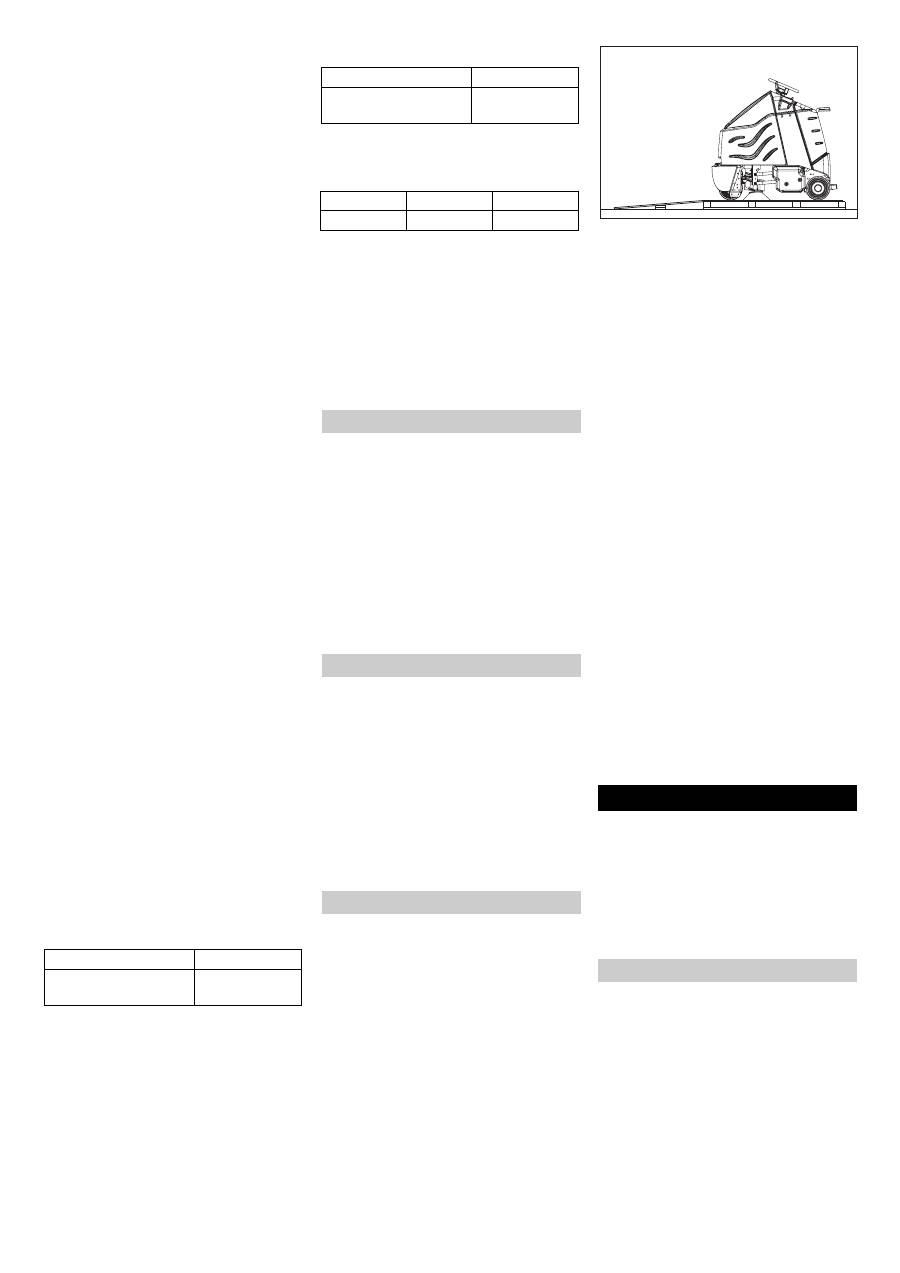
Î
Loosen the screws and remove the
wooden cage.
Î
Cut plastic packing belt and remove foil.
Î
Loosen the fixing at the wheels.
Î
Place the enclosed wooden board at
the back of the appliance on the pallet
as a ramp and attach with screws.
Î
Remove both blocks from behind the
rear wheels.
Î
Open the battery cover and remove the
steering wheel.
Î
Insert the steering wheel and straight-
align the front wheel.
Î
Pull out the steering wheel, align and in-
sert back.
Î
Fasten the steering wheel using en-
closed nut.
Î
Insert the cover in the steering wheel.
Î
In appliances without battery: Install
batteries.
Î
Connect the battery plug to the appli-
ance.
Î
Get on to the standing area and keep
the safety pedal depressed with the left
foot.
Î
Release emergency-stop button by
turning.
Î
Set main switch to “1”.
Î
Set the drive direction to backwards us-
ing the drive direction button at the op-
erator console.
Î
Select the smallest speed range using
the speed button.
Î
Press the unlocking key.
Î
To drive, press the accelerator pedal
carefully and drive down slowly from the
palette.
Î
Set main switch to “0”.
Î
Attach hubcaps to the rear wheels.
Note
Take the foot off the aceelerator pedal,
press the emergency-stop button to imme-
diately deactivate all functions and turn the
key switch to the "0" position.
Î
Carry out maintenance jobs "daily be-
fore starting work" (see section "Mainte-
nance and Care").
Danger
Danger of accident. The immobilizing brake
must always be checked first on an even
surface before starting the machine.
Î
Set main switch to “0”.
Î
Press emergency-stop button.
If the appliance can be moved by hand, the
parking brake is not engaged.
Î
Pull up the reset lever of the parking
break.
If the appliance can still be moved by hand,
the parking break is defective. Shut down
the appliance and call Customer Service.
After charging
Further, in case of maintenance-free bat-
teries (wet batteries):
Recommended batteries
Battery
Order No.
3 x 12V/105 A, mainte-
nance-free (Gel)
6.654-141.0
Recommended chargers
Charger
Order No.
36V, for maintenance-
free batteries
6.654-229.0
Maximum battery dimensions
Length
Width
Height
406 mm
533 mm
432 mm
Removing the batteries
Pushing the device
Unloading
Operation
Check immobilizing brake
14 EN
Оглавление
- Inhaltsverzeichnis
- Bedien- und Funktionselemente
- Vor Inbetriebnahme
- Betrieb
- Transport Lagerung Pflege und Wartung
- Störungen
- Technische Daten
- Contents
- Operating and Functional Elements
- Before Commissioning
- Operation
- Transport Storage Maintenance and care
- Faults
- Specifications
- Table des matières
- Eléments de commande
- Avant la mise en service
- Fonctionnement
- Pannes
- Accessoires
- Indice
- Elementi di comando e di funzione
- Prima della messa in funzione
- Funzionamento
- Trasporto Supporto Cura e manutenzione
- Guasti
- Dati tecnici
- Inhoudsopgave
- Bediening- en werkingsonderdelen
- Voor ingebruikneming
- Gebruik
- Vervoer Opslag Onderhoud
- Storingen
- Technische gegevens
- Índice de contenidos
- Elementos de operación y funcionamiento
- Antes de la puesta en marcha
- Funcionamiento
- Transporte Almacenamiento Conservación y mantenimien- to
- Averías
- Accesorios
- Declaración CE
- Índice
- Elementos de comando e de funcionamento
- Antes de colocar em funcio- namento
- Funcionamento
- Transporte Armazenamento Conservação e manutenção
- Avarias
- Acessórios
- Indholdsfortegnelse
- Betjenings- og funktionselementer
- Inden idrifttagning
- Drift
- Transport Opbevaring Pleje og vedligeholdelse
- Fejl
- Tekniske data
- Innholdsfortegnelse
- Betjenings- og funksjonsorganer
- Før igangsetting
- Drift
- Transport Lagring Pleie og vedlikehold
- Funksjonsfeil
- Tekniske data
- Innehållsförteckning
- Manövrerings- och funktionselement
- Före idrifttagandet
- Drift
- Transport Förvaring Skötsel och underhåll
- Störningar
- Tekniska data
- Sisällysluettelo
- Ohjaus- ja toimintaelementit
- Ennen käyttöönottoa
- Käyttö
- Kuljetus Säilytys Hoito ja huolto
- Häiriöt
- Tekniset tiedot
- Πίνακας περιεχομένων
- Στοιχεία χειρισμού και λειτουργίας
- Πριν την ενεργοποίηση
- Λειτουργία
- Βλάβες
- Τεχνικά χαρακτηριστικά
- İ çindekiler
- Kullan ı m ve çal ı ş ma elemanlar ı
- Cihaz ı çal ı ş t ı rmaya ba ş lamadan önce
- Çal ı ş t ı rma
- Ta ş ı ma Depolama Koruma ve Bak ı m
- Ar ı zalar
- Teknik bilgiler
- Оглавление
- Описание элементов управления и рабочих узлов
- Перед началом работы
- Эксплуатация прибора
- Транспортировка Хранение Уход и техническое обслуживание
- Неполадки
- Технические данные
- Tartalomjegyzék
- Kezelési- és funkciós elemek
- Üzembevétel el ő tt
- Üzem
- Transport Tárolás Ápolás és karbantartás
- Üzemzavarok
- M ű szaki adatok
- Obsah
- Ovládací a funk č ní prvky
- Pokyny p ř ed uvedením p ř ístroje do provozu
- Provoz
- Transport Ukládání Ošet ř ování a údržba
- Poruchy
- Technické údaje
- Vsebinsko kazalo
- Upravljalni in funkcijski elementi
- Pred zagonom
- Obratovanje
- Transport Skladiš č enje Nega in vzdrževanje
- Motnje
- Tehni č ni podatki
- Spis tre ś ci
- Elementy obs ł ugi urz ą dzenia
- Przed uruchomieniem
- Dzia ł anie
- Transport Przechowywanie Czyszczenie i konserwacja
- Zak ł ócenia
- Dane techniczne
- Cuprins
- Elemente de utilizare ş i func ţ ionale
- Înainte de punerea în func ţ iune
- Func ţ ionarea
- Transport Depozitarea Îngrijirea ş i între ţ inerea
- Defec ţ iuni
- Date tehnice
- Obsah
- Ovládacie a funk č né prvky
- Pred uvedením do prevádzky
- Prevádzka
- Transport Uskladnenie Starostlivos ť a údržba
- Poruchy
- Technické údaje
- Pregled sadržaja
- Komandni i funkcijski elementi
- Prije prve uporabe
- U radu
- Transport Skladištenje Njega i održavanje
- Smetnje
- Tehni č ki podaci
- Pregled sadržaja
- Komandni i funkcioni elementi
- Pre upotrebe
- Rad
- Transport Skladištenje Nega i održavanje
- Smetnje
- Tehni č ki podaci
- Съдържание
- Обслужващи и функционални елементи
- Преди пускане в експлоатация
- Експлоатация
- Повреди
- Технически данни
- Sisukord
- Teenindus- ja funktsioonielemendid
- Enne seadme kasutuselevõttu
- Käitamine
- Transport Hoiulepanek Korrashoid ja tehnohooldus
- Rikked
- Tehnilised andmed
- Satura r ā d ī t ā js
- Vad ī bas sist ē mas un funkciju elementi
- Pirms ekspluat ā cijas s ā kuma
- Ekspluat ā cija
- Transport ē šana Glab ā šana Kopšana un tehnisk ā apkope
- Trauc ē jumi
- Tehniskie parametri
- Turinys
- Aptarnavimo ir funkciniai elementai
- Prieš pradedant naudoti
- Naudojimas
- Transportavimas Laikymas Technin ė prieži ū ra ir aptarnavimas
- Gedimai
- Techniniai duomenys
- Перелік
- Елементи управління і функціональні вузли
- Перед введенням в експлуатацію
- Експлуатація
- Неполадки
- Технічні дані
