Karcher IC 15-240 W Municipal: Start up
Start up: Karcher IC 15-240 W Municipal
-
4
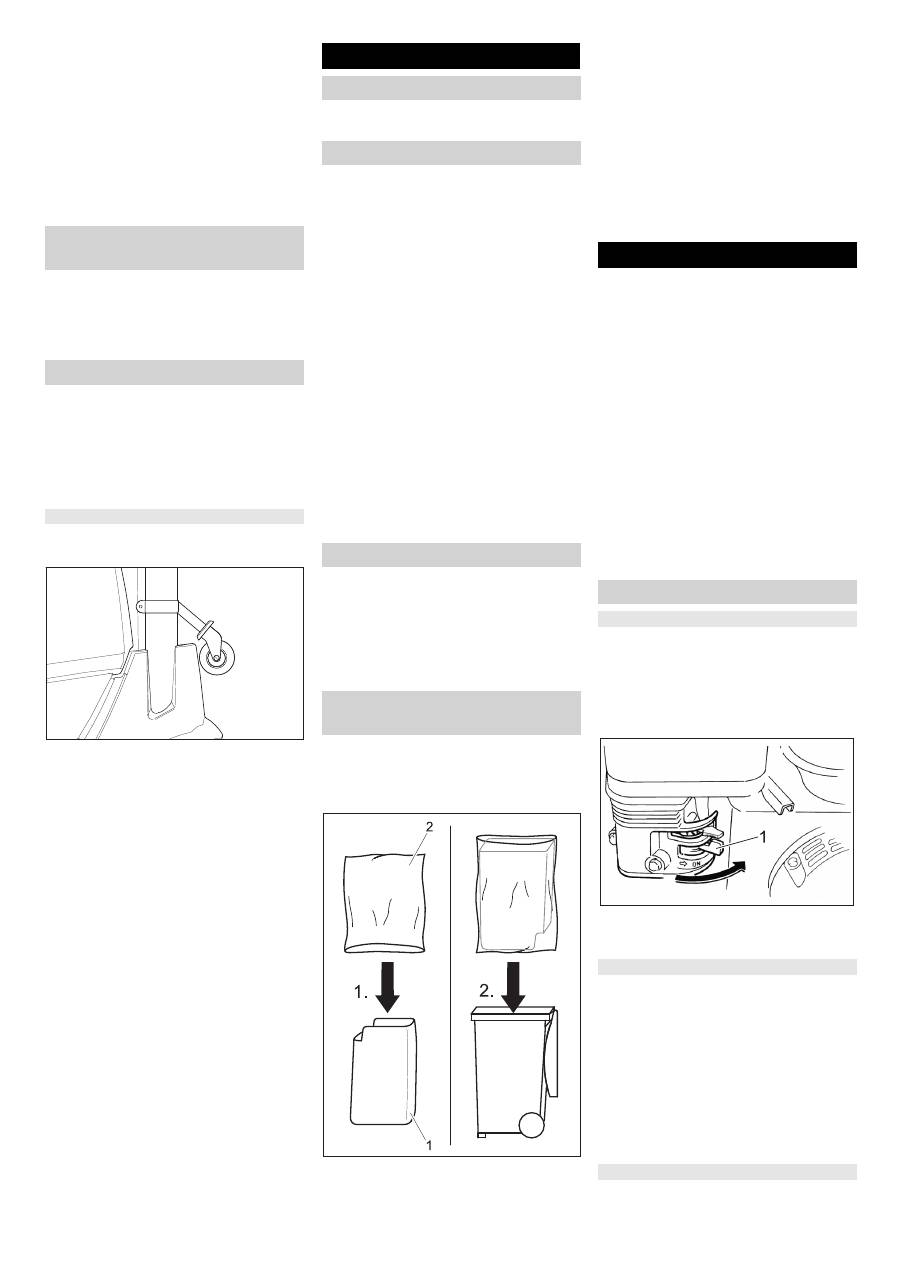
1 Freewheel lever
Press the red freewheel lever down-
wards, then move it to the left and lock
it in.
This blocks the travel drive function.
Close cover.
The machine can now be pushed.
Note:
Do not move the small waste vacu-
um cleaner for long distances without en-
gaging self-propulsion, a speed of 6 km/h
should not be exceeded.
Press the freewheel lever downwards,
then move it to the right and lock it in.
The travel drive is now ready for operation.
Close cover.
The appliance can now be driven.
Note:
The attachment sets mentioned here
are not part of standard delivery of the de-
vice and need to be ordered separately ac-
cording to requirements.
Note:
The attachment sets not listed here
have their own separate assembling in-
structions.
The steering roller is attached to the front
end of the suction pipe.
Move the fastening clip of the steering
roller over the suction pipe.
Align steering roller and close quick-
snap.
Park the machine on an even surface.
Remove ignition key.
Danger
Risk of explosion!
–
Only use the fuels specified in the Op-
erations Manual.
–
Do not refuel the machine in enclosed
spaces.
–
Smoking and naked flames are strictly
prohibited.
–
Ensure that no fuel reaches the hot
open surfaces.
–
Use only those cans that have been ap-
proved for fuel.
Switch off engine.
Open the device hood and secure it us-
ing the hood support.
Open fuel filler cap.
Use "regular unleaded petrol".
Fill tank to max. 2.5 cm below the upper
edge of the filler nozzle.
Wipe off any spilt fuel and close fuel fill-
er cap.
Close cover.
Check engine oil level. *
Check fill level of fuel tank.
Check hydraulics fluid fill level. *
Empty the waste container.
Check tyre pressure. *
* For description, see section on Care and
maintenance.
You need the garbage bag accessory kit if
the vacuumed material is to be collected in
a garbage bag.
Tilt the suction head upward.
1 Sleeve
2 Garbage bag, 240 litres
Place the cover down on the floor with
the holder loops.
Push the garbage sack over the cover.
Turn the cover along with the garbage
back and insert it into the garbage con-
tainer with the shorter side at the rear.
Place the upper edge of the garbage
sack around the edge of the garbage
container.
Tilt down the suction head.
Danger
Long hours of using the appliance can
cause circulation problems in the hands on
account of vibrations.
It is not possible to specify a generally valid
operation time, since this depends on sev-
eral factors:
–
Proneness to blood circulation deficien-
cies (cold, numb fingers).
–
Low ambient temperature. Wear warm
gloves to protect hands.
–
A firm grip impedes blood circulation.
–
Continuous operation is worse than an
operation interrupted by pauses.
In case of regular, long-term operation of
the device and in case of repeated occur-
rence of the symptoms (e.g. cold, numb fin-
gers) please consult a physician.
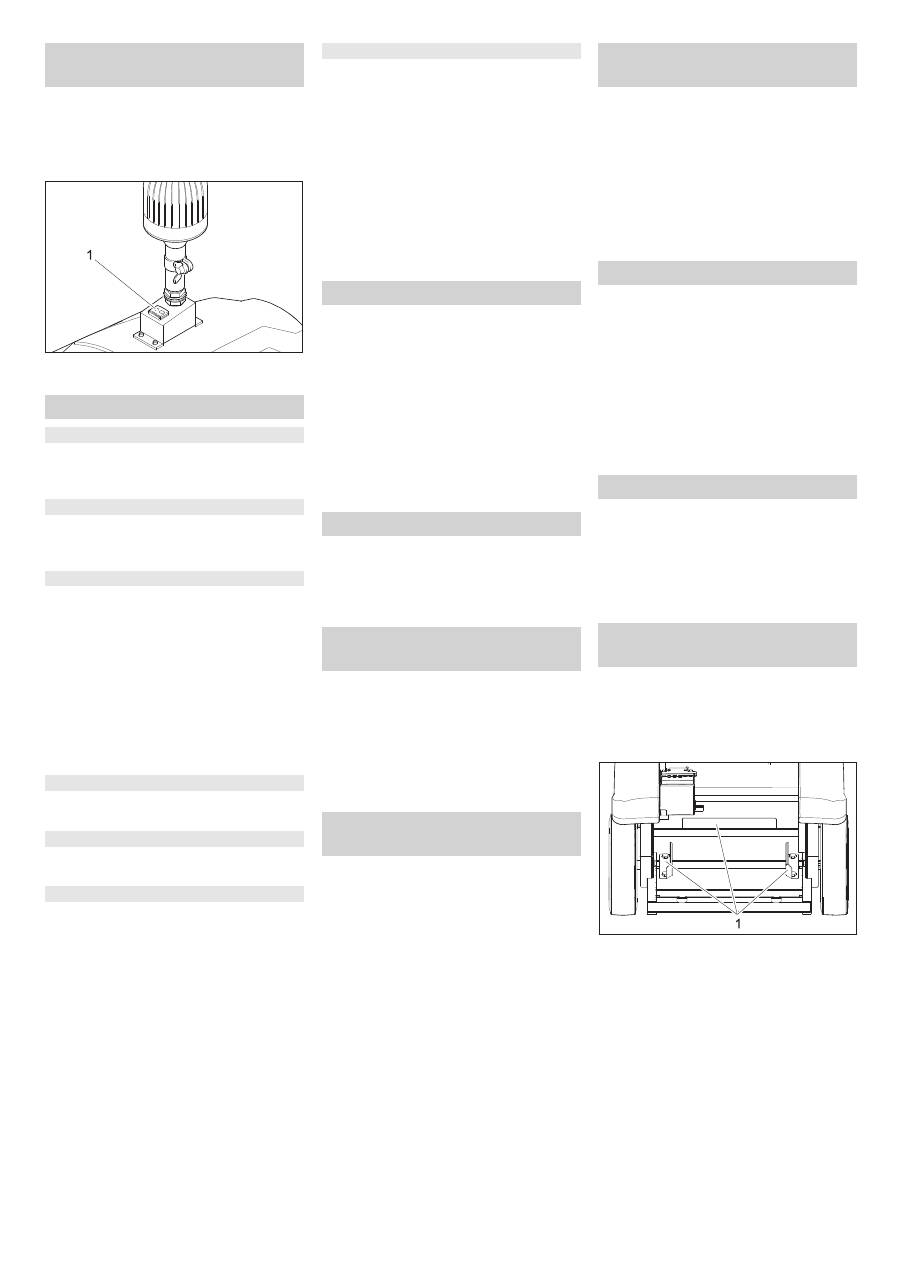
Note:
The fuel cock is supplied from the
factory open. If the machine has been out
of use for a longer period of time, open the
fuel cock.
Open the device hood and secure it us-
ing the hood support.
1 Fuel tap
Push lever in "ON" direction.
Close cover.
Release the drawbar.
Pull out the choke lever.
Turn ignition key past position 1.
If the machine starts, release the igni-
tion key.
Once the engine is running, re-insert
the choke lever.
Note:
Never operate the starter motor for
longer than 10 seconds. Wait at least 10
seconds before operating the starter motor
again.
You can use the accelerator to regulate
the engine speed.
Moving device by engaging self-
propulsion
Install attachment sets
Attacchment set: Steering roller
Start up
General notes
Refuelling
Inspection and maintenance work
Insert the garbage sack (only with
the garbage sack accessory kit)
Operation
Starting the machine
Open fuel cock
Turning on the Appliance
Setting the motor rpm
17 EN
-
5
Note:
With model 1.183-904.0, the beacon
light is part of the scope of the delivery.
The beacon light increases the attention of
others in the traffic towards the appliance
and the operator.
1 Switch
Switch on the beacon light.
Pull the unlock/ brake lever and move
the drawbar cautiously towards the
front.
Pull the unlock/ brake lever and move
the drawbar cautiously towards the
rear.
–
You can release the unlock/ brake lever
if the drawbar is not in the central posi-
tion.
–
The drawbarl can be used to regulate
the driving speed infinitely.
–
Avoid pressing the drawbar suddenly
as this may damage the hydraulic sys-
tem.
–
In the event of power loss on inclined
surfaces, slightly reduce the pressure
on the drawbar.
Direct the device in the desired direc-
tion using the drawbar.
Release the drawbar; the machine
brakes automatically and stops.
Driving over fixed obstacles which are 50
mm high or less:
Drive forwards slowly and carefully.
Driving over fixed obstacles which are
more than 50 mm high:
Only drive over these obstacles using a
suitable ramp.
Note:
With model 1.183-904.0, the kerb ac-
cess help is part of the scope of the deliv-
ery.
With the kerb access help, steps featuring
a max. height of 14 cm can be accessed
without the use of a ramp.
Approach the kerb at a right angle.
Slowly drive the front wheel slowly the
edge of the kerb.
As soon as the front wheel has reached
the top of the kerb, steer in either direc-
tion. The two rear wheels should not
pass the kerb simultaneously.
Note:
During operations, the waste con-
tainer must be emptied at regular intervals
or replaced through an empty waste con-
tainer.
In appliances with the leaf blower at-
tachment set: Open Exhaust openings
for vacuuming.
Pull the suction pipe from the holder
and hold it at the handle.
Suck off dirt using the suction pipe.
Insert the suction pipe back into the
holder after vacuuming.
Garbage that is too big for the suction pipe
can be thrown into the bulk waste flap.
Tilt the bulk waste flap upwards and
throw in the garbage.
Close the bulk waste flap.
Close exhaust openings for vacuuming.
Pull the blower pipe out of the holder.
Use the air jet from the blower pipe to
blow the leaves in the desired direction.
Insert the blower pipe back into the
blower after vacuuming and open the
ventilation louvers for suction opera-
tion.
Note:
With model 1.183-904.0, the fine
dust filter is part of the scope of the deliv-
ery.
The fine dust filter must be cleaned when
the vacuuming performance diminishes
and before removing the waste container.
Move the filter cleaning handle back
and forth and couple of times and wait
till the dust has settled down in the
waste container.
Note:
Wait till the dust has settled down be-
fore removing the garbage sack.
Stop the machine.
Turn the ignition key to 0 position.
Tilt the suction head upward.
Pull out the cover from the garbage
sack by holding it at the two holder
loops.
Close the mouth of the garbage sack
and take it out of the garbage container.
Note:
Wait till the dust has settled down be-
fore removing the waste container.
Stop the machine.
Turn the ignition key to 0 position.
Tilt the suction head upward.
Close the waste container lid.
Pull the waste container backwards out
of the device.
Note:
You can remove the waste contain-
er, empty it and re-insert it or replace it
through another, empty waste container.
Tilt the suction head upward.
Insert the waste container into the appli-
ance.
Open the waste container lid.
Tilt down the suction head.
Check whether the washers of the suc-
tion head are sealing properly.
Note:
You can use all standard waste con-
tainers according to DIN EN 840-1 with 240
litre capacity. It may be necessary to slight-
ly adjust the intake due to the manufactur-
er's tolerances.
1 Stopper
Loosen the fastening screws of the
stopper.
Insert the waste container with open lid
into the device.
Tilt down the suction head.
Align the waste container in such a way
that the suction head seals off from all
direction.
Move the stoppers to touch the contain-
er and tighten the fastening screws.
Switch on beacon light (only with
accessory beacon light kit)
Drive the machine
Drive forward
Reverse drive
Driving method
Steering
Brakes
Driving over obstacles
Kerb access help (option) *
Vacuuming
Throwing in bulk waste
Blowing (only using the Leaf Blower
attachment set)
Cleaning the fine dust filter (only
Fine dust filter attachment set)
Removing the garbage sack (only
with the garbage sack accessory kit)
Removing the waste container
Insert waste container
Adjusting the intake for the waste
container
18 EN
Оглавление
- Inhaltsverzeichnis
- Umweltschutz
- Bedien- und Funktionselemente Vor Inbetriebnahme
- Inbetriebnahme
- Stilllegung
- Hilfe bei Störungen
- Technische Daten
- EG-Konformitätserklärung
- Contents
- Environmental protection
- Operating and Functional Elements Before Startup
- Start up
- Shutdown
- Troubleshooting
- Technical specifications
- EC Declaration of Conformity
- Table des matières
- Protection de l’environne- ment
- Eléments de commande et de fonction Avant la mise en service
- Mise en service
- Remisage
- Assistance en cas de panne
- Caractéristiques techniques
- Déclaration CE
- Indice
- Protezione dell’ambiente
- Elementi di comando e di funzione Prima della messa in funzione
- Messa in funzione
- Fermo dell'impianto
- Guida alla risoluzione dei guasti
- Dati tecnici
- Dichiarazione CE
- Inhoudsopgave
- Zorg voor het milieu
- Elementen voor de bediening en de functies Voor de inbedrijfstelling
- Inbedrijfstelling
- Stillegging
- Hulp bij storingen
- Technische gegevens
- CE-verklaring
- Índice de contenidos
- Protección del medio ambiente
- Elementos de operación y funcionamiento Antes de la puesta en marcha
- Puesta en marcha
- Parada
- Ayuda en caso de avería
- Datos técnicos
- Declaración CE
- Índice
- Protecção do meio-ambiente
- Elementos de comando e de funcionamento Antes de colocar em funcionamento
- Colocação em funcionamento
- Desactivação da máquina
- Ajuda em caso de avarias
- Dados técnicos
- Declaração CE
- Indholdsfortegnelse
- Miljøbeskyttelse
- Betjenings- og funktionselementer Inden ibrugtagning
- Ibrugtagning
- Afbrydning/nedlæggelse
- Hjælp ved fejl
- Tekniske data
- Overensstemmelseserklæring
- Innholdsfortegnelse
- Miljøvern
- Betjenings- og funksjonelementer Før den tas i bruk
- Ta i bruk
- Sette bort
- Feilretting
- Tekniske data
- CE-erklæring
- Innehållsförteckning
- Miljöskydd
- Manövrerings- och funktionselement Före ibruktagande
- Idrifttagning
- Nedstängning
- Åtgärder vid störningar
- Tekniska data
- CE-försäkran
- Sisällysluettelo
- Ympäristönsuojelu
- Ohjaus- ja käyttölaitteet Ennen käyttöönottoa
- Käyttöönotto
- Seisonta-aika
- Häiriöapu
- Tekniset tiedot
- CE-todistus
- Πίνακας περιεχομένων
- Προστασία περιβάλλοντος
- Στοιχεία χειρισμού και λειτουργίας Πριν τη θέση σε λειτουργία
- Έναρξη λειτουργίας
- Διακοπή της λειτουργίας
- Αντιμετώπιση βλαβών
- Τεχνικά χαρακτηριστικά
- Δήλωση συμμόρφωσης CE
- İ çindekiler
- Çevre koruma
- Kullan ı m ve çal ı ş ma elemanlar ı Cihaz ı çal ı ş t ı rmaya ba ş lamadan önce
- İş letime alma
- Durdurma
- Ar ı zalarda yard ı m
- Teknik Bilgiler
- CE Beyan ı
- Оглавление
- Защита окружающей среды
- Описание элементов управления и рабочих узлов Перед началом работы
- Начало работы
- Вывод из эксплуатации
- Уход и техническое обслуживание
- Помощь в случае неполадок
- Технические данные
- Заявление о соответствии требованиям СЕ
- Tartalomjegyzék
- Környezetvédelem
- Kezelési- és funkciós elemek Üzembevétel el ő tt
- Üzembevétel
- Leállítás
- Segítség üzemzavar esetén
- M ű szaki adatok
- CE-Nyilatkozat
- Obsah
- Ochrana životního prost ř edí
- Ovládací a funk č ní prvky P ř ed uvedením do provozu
- Uvedení do provozu
- Odstavení
- Pomoc p ř i poruchách
- Technické údaje
- ES prohlášení o shod ě
- Vsebinsko kazalo
- Varstvo okolja
- Upravljalni in funkcijski elementi Pred zagonom
- Zagon
- Mirovanje naprave
- Pomo č pri motnjah
- Tehni č ni podatki
- CE izjava
- Spis tre ś ci
- Ochrona ś rodowiska
- Elementy urz ą dzenia Przed pierwszym uruchomieniem
- Uruchamianie
- Wy łą czenie z eksploatacji
- Usuwanie usterek
- Dane techniczne
- Deklaracja UE
- Cuprins
- Protec ţ ia mediului înconjur ă tor
- Elemente de utilizare ş i func ţ ionale Înainte de punerea în func ţ iune
- Punerea în func ţ iune
- Scoaterea din func ţ iune
- Remedierea defec ţ iunilor
- Date tehnice
- Declara ţ ia CE
- Obsah
- Ochrana životného prostredia
- Ovládacie a funk č né prvky Pred uvedením do prevádzky
- Uvedenie do prevádzky
- Odstavenie
- Pomoc pri poruchách
- Technické údaje
- Vyhlásenie CE
- Pregled sadržaja
- Zaštita okoliša
- Komandni i funkcijski elementi Prije prve uporabe
- Stavljanje u pogon
- Stavljanje ure đ aja van pogona
- Otklanjanje smetnji
- Tehni č ki podaci
- CE-izjava
- Pregled sadržaja
- Zaštita životne sredine
- Komandni i funkcioni elementi Pre upotrebe
- Stavljanje u pogon
- Stavljanje ure đ aja van pogona
- Otklanjanje smetnji
- Tehni č ki podaci
- CE-izjava
- Съдържание
- Опазване на околната среда
- Обслужващи и функционални елементи Преди пускане в експлоатация
- Пускане в експлоатация
- Спиране от експлоатация
- Помощ при неизправности
- Технически данни
- СЕ – декларация
- Sisukord
- Keskkonnakaitse
- Teenindus- ja funktsioonielemendid Enne seadme kasutuselevõttu
- Kasutuselevõtt
- Seismapanek
- Abi häirete korral
- Tehnilised andmed
- CE-vastavusdeklaratsioon
- Satura r ā d ī t ā js
- Vides aizsardz ī ba
- Vad ī bas un funkcijas elementi Pirms ekspluat ā cijas uzs ā kšanas
- Ekspluat ā cijas uzs ā kšana
- Iekonserv ē šana
- Pal ī dz ī ba darb ī bas trauc ē jumu gad ī jum ā
- Tehniskie dati
- CE deklar ā cija
- Turinys
- Aplinkos apsauga
- Valdymo ir funkciniai elementai Prieš pradedant naudoti
- Naudojimo pradžia
- Laikinas prietaiso nenaudojimas
- Pagalba gedim ų atveju
- Techniniai duomenys
- CE deklaracija
- Перелік
- Захист навколишнього середовища
- Елементи управління і функціональні вузли Перед початком роботи
- Введення в експлуатацію
- Зберігання
- Допомога у випадку неполадок
- Технічні характеристики
- Заява про відповідність вимогам CE
