Karcher IC 15-240 W Municipal: Shutdown
Shutdown: Karcher IC 15-240 W Municipal
-
6
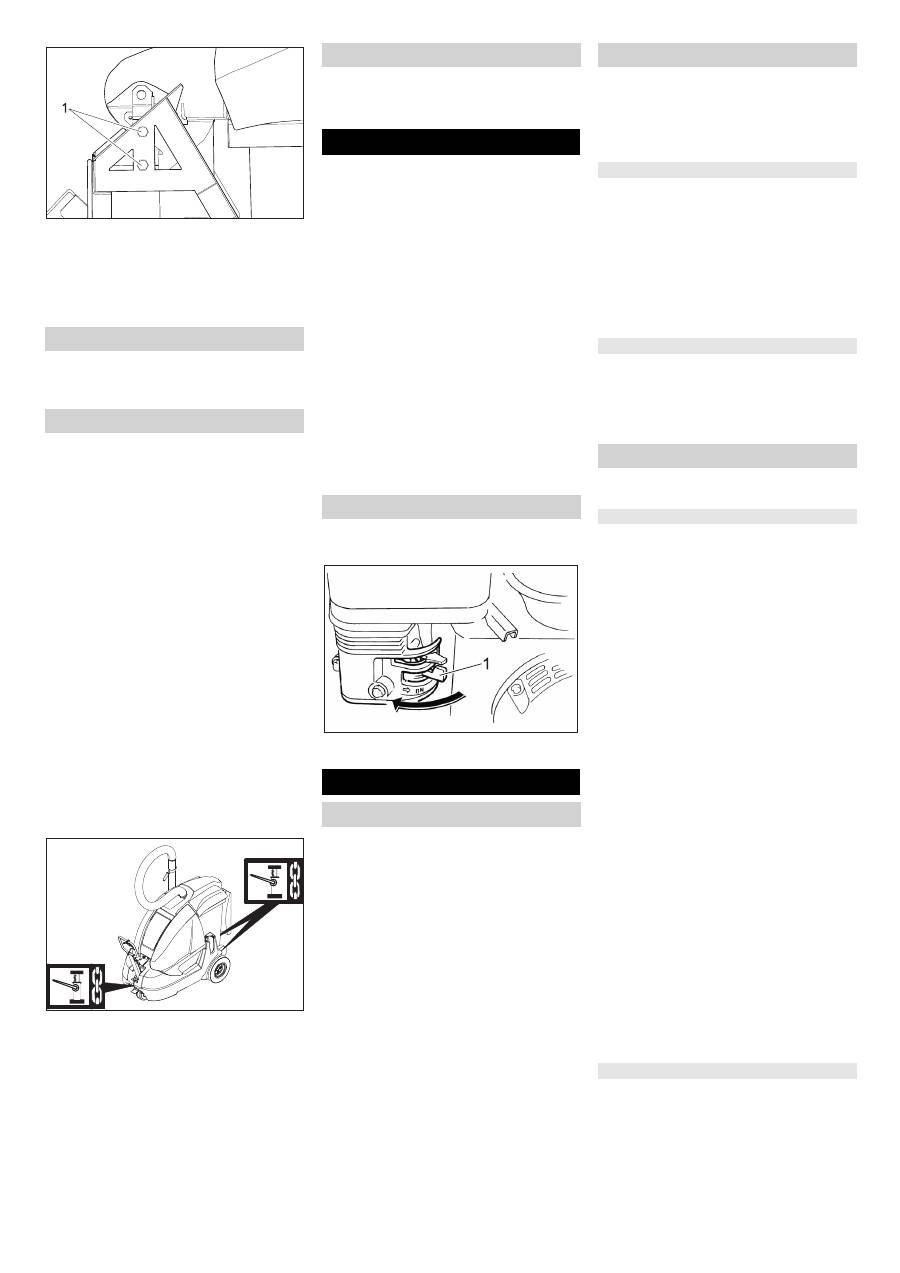
1 Fastening screw of suction head
Loosen the fastening screws of the suc-
tion head on both the sides.
Press the suction head on to the waste
container and tighten the fastening
screws at the same time.
Lock the parking brakes by releasing
the drawbar.
Turn ignition key to "0" and remove it.
Danger
Risk of injury and damage! Observe the
weight of the appliance when you transport
it.
Danger
In general, when shipping the machine, the
freewheel lever must be engaged in the up-
per position. Only once this has been done,
will the travel drive be ready for operation.
The machine must always be moved up or
down slopes by engaging self-propulsion.
Lock the parking brakes by releasing
the drawbar.
Turn ignition key to "0" and remove it.
Empty tank. Draw off fuel using suitable
pump.
Secure the wheels of the machine with
wheel chocks.
Secure the machine with tensioning
straps or cables.
When transporting in vehicles, secure
the appliance according to the guide-
lines from slipping and tipping over.
Note:
Observe markings for fixing points
on base frame (chain symbols). When
loading or unloading the machine, it may
only be operated on gradients of max. 18%.
Danger
Risk of injury and damage! Note the weight
of the appliance in case of storage.
If the device is going to be out of service for
a longer time period, observe the following
points:
Park the machine on an even surface.
Lock the parking brakes by releasing
the drawbar.
Fill fuel tank and close fuel cock.
Change engine oil.
Turn ignition key to "0" and remove it.
Unscrew spark plugs and pour approx.
3 cm³ of oil into the spark plug hole.
Crank the engine several times before
replacing the spark plug. Screw in the
spark plug.
Clean the inside and outside of the ma-
chine.
Park the machine in a safe and dry
place.
Disconnect battery.
Charge battery approx. every 2 months.
Open the device hood and secure it us-
ing the hood support.
1 Fuel tap
Push lever in "OFF" direction.
Switch off the appliance and remove
the ignition key prior to performing any
cleaning or maintenance tasks on the
appliance, replacing parts or switching
over to another function.
Always disconnect the battery when
working on the electrics.
–
Maintenance work may only be carried
out by approved customer service out-
lets or experts in this field who are famil-
iar with the respective safety regula-
tions.
–
Mobile appliances used for commercial
purposes are subject to safety inspec-
tions according to VDE 0701.
Caution
Risk of damage! Do not clean the appliance
with a water hose or high-pressure water
jet (danger of short circuits or other dam-
age).
Danger
Risk of injury! Wear dust mask and protec-
tive goggles.
Open the device hood and secure it us-
ing the hood support.
Clean machine with a cloth.
Blow through machine with com-
pressed air.
Close cover.
Clean the machine with a damp cloth
which has been soaked in mild deter-
gent.
Note:
Do not use aggressive cleaning
agents.
Note:
The elapsed-time counter shows the
timing of the maintenance intervals.
Daily maintenance:
Check engine oil level.
Check axle drive oil level.
Check tyre pressure.
Check function of all operator control el-
ements.
Clean seal on suction head and large
dirt flap.
Weekly maintenance:
Check fuel pipes for leaks.
Check air filter.
Check moving parts for freedom of
movement.
Maintenance to be carried out every 100
operating hours:
Check fuel pipes for leaks.
Change engine oil (initial change after
20 operating hours).
Check spark plug.
Check battery acid level.
Check status of the brake springs and
ensure that they are fitting properly.
Check tension, wear and function of
drive belts (V-belt and circular belt).
Check the tension of the drive chains.
Note:
For description, see section on Main-
tenance work.
Note:
Where maintenance is carried out by
the customer, all service and maintenance
work must be undertaken by a qualified
specialist. If required, a specialised Kärch-
er dealer may be contacted at any time.
Maintenance to be carried out after 20 op-
erating hours:
Carry out initial inspection.
Maintenance to be carried out every 100
operating hours
Maintenance to be carried out every 200
operating hours
Turn off the appliance
Transport
Storage
Shutdown
Close fuel cock
Maintenance and care
General notes
Cleaning
Cleaning the inside of the machine
External cleaning of the appliance
Maintenance intervals
Maintenance by the customer
Maintenance by Customer Service
19 EN
-
7
Maintenance to be carried out every 300
operating hours
Note:
In order to safeguard warranty
claims, all service and maintenance work
during the warranty period must be carried
out by the authorised Kärcher Customer
Service in accordance with the mainte-
nance booklet.
Preparation:
Park the machine on an even surface.
Lock the parking brakes by releasing
the drawbar.
Turn ignition key to "0" and remove it.
Danger
Risk of injury due to engine overrun. Once
the engine has been switched off, wait for 5
seconds. Stay well clear of the working
area for this time.
–
Allow the machine sufficient time to cool
down before carrying out any mainte-
nance and repair work.
–
Do not touch any hot parts, such as the
drive motor and exhaust system.
Please observe the following warning notes
when handling batteries:
Danger
Risk of explosion! Do not put tools or similar
on the battery, i.e. on the terminal poles
and cell connectors.
Danger
Risk of injury! Ensure that wounds never
come into contact with lead. Always clean
your hands after having worked with batter-
ies.
Danger
Risk of explosion. Ensure proper ventila-
tion.
Risk of injury, risk of explosion. Observe
the safety instructions for handling batter-
ies in the separate operating instructions of
the unit.
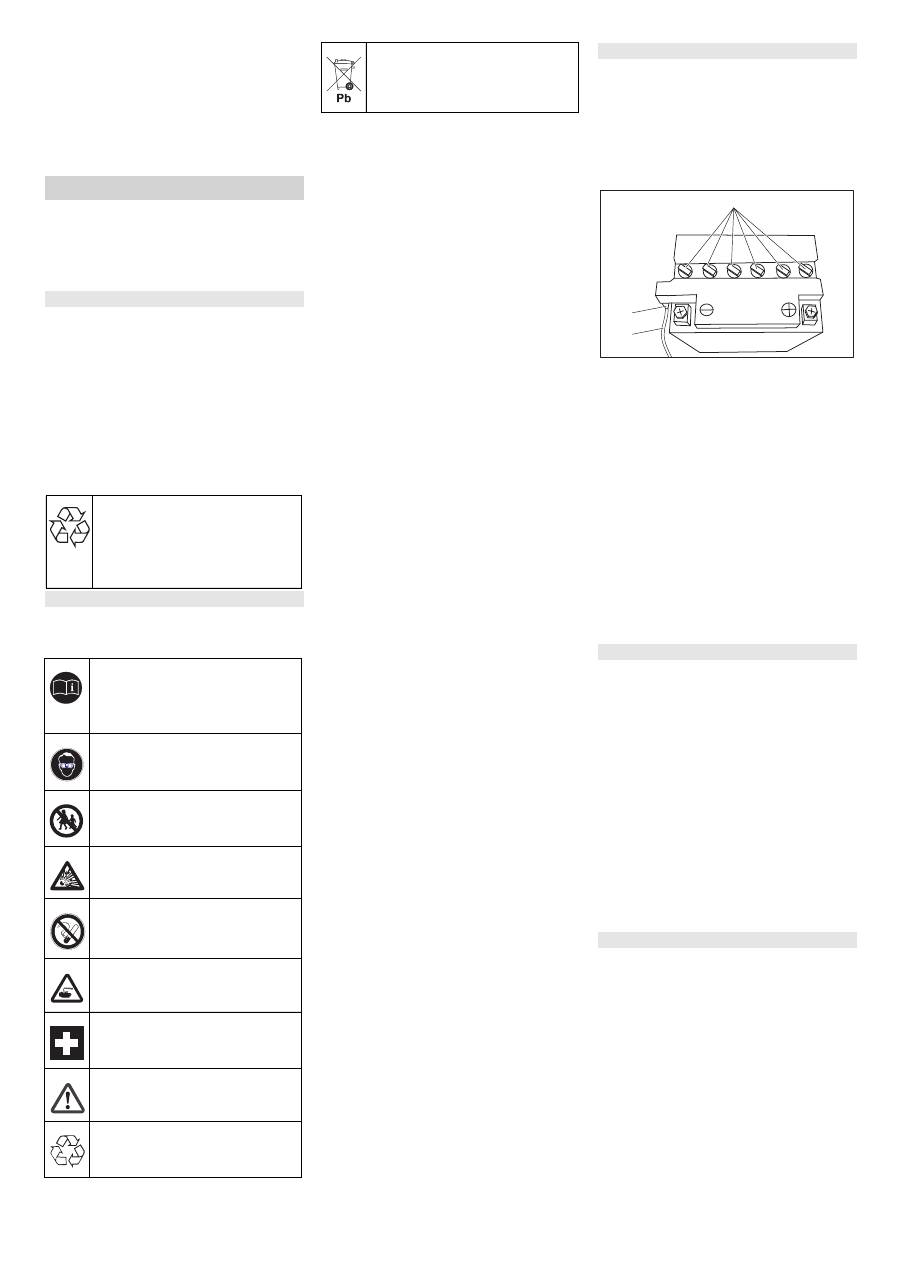
1 Cell cap
2 Hose nipple
3 Battery overflow hose
Open the device hood and secure it us-
ing the hood support.
Remove the battery overflow hose.
Tilt the suction head upward.
Close the waste container lid.
Pull the waste container backwards out
of the device.
Loosen the fastening belt of the battery.
Remove the battery from the battery
holder.
Unscrew the cell caps.
Fill the enclosed acid into the cells up to
„UPPER LEVEL“ mark.
Screw in the cell caps.
Tilt the suction head upward.
Close the waste container lid.
Pull the waste container backwards out
of the device.
Insert battery in battery mount.
Lay the holder belt around the battery
and tighten it.
Open the device hood and secure it us-
ing the hood support.
Connect pole terminal (red cable) to
positive pole (+).
Connect pole terminal to negative pole
(-).
Note:
Check that the battery pole and pole
terminals are adequately protected with
pole grease.
Danger
Risk of injury! Comply with safety regula-
tions on the handling of batteries. Observe
the directions provided by the manufacturer
of the charger.
Disconnect battery.
Connect positive terminal cable from
the charger to the positive pole connec-
tion on the battery.
Connect negative terminal cable from
the charger to the negative pole con-
nection on the battery.
Plug in mains connector and switch on
charger.
Maintenance Works
General notes on safety
Please do not release engine oil,
fuel oil, diesel and petrol into the
environment. Protect the ground
and dispose of used oil in an en-
vironmentally-clean manner.
Safety notes regarding the batteries
Observe the directions on the bat-
tery, in the instructions for use
and in the vehicle operating in-
structions
Wear eye protection
Keep children away from acid and
batteries
Danger of explosion
Fire, sparks, naked flames and
smoking must be strictly avoided
Danger of chemical burns
First aid
Warning note
Disposal
Do not throw the battery into the
regular waste
Fill battery with battery acid
Installing and connecting the battery
Charging battery
1
2
3
20 EN
-
8
Charge battery using lowest possible
level of charging current.
Open the device hood and secure it us-
ing the hood support.
Disconnect pole terminal to negative
pole (-).
Disconnect pole terminal to positive
pole (-).
Tilt the suction head upward.
Close the waste container lid.
Pull the waste container backwards out
of the device.
Loosen the fastening belt of the battery.
Remove the battery from the battery
holder.
Dispose of the used battery according
to the local provisions.
Caution
Regularly check the fluid level in acid-filled
batteries.
Unscrew all cell caps.
Where fluid level is too low, top up cells
to the mark provided with distilled wa-
ter.
Charge battery.
Screw in cell caps.
Danger
Risk of injury!
Park the machine on an even surface.
Lock the parking brakes by releasing
the drawbar.
Remove ignition key.
When carrying out repairs on public
highways, wear warning clothing when
working close to passing traffic.
Check stability of ground. Also secure
the machine with wheel chock(s) to pre-
vent it rolling away.
Check tyres
Check tyre contact face for foreign ob-
jects.
Remove objects found.
Use suitable, commercially available
materials to carry out tyre repairs.
Note:
Observe the manufacturer's recom-
mendations. The journey may be resumed
providing that the directions supplied by the
product manufacturer have been observed.
The tyre/wheel change should nonetheless
be carried out as soon as possible.
Loosen wheel nuts.
Position vehicle jack at the appropriate
mounting point for the front or rear
wheel.
Raise machine using vehicle jack.
Note:
Use a suitable commercially availa-
ble vehicle jack.
Remove the wheel nuts; unscrew the
axle at the front wheel.
Remove wheel.
Mount spare wheel.
Screw on wheel nuts.
Lower machine using vehicle jack.
Tighten wheel nuts.
Caution
The engine is equipped with an oil deficien-
cy switch. When the fill level is insufficient,
the engine switches off and can only be re-
started once the engine oil has been re-
plenished.
Danger
Risk of burns!
Allow engine to cool down.
Wait for at least 5 minutes after switch-
ing off the engine before checking the
engine oil fill level.
Open the device hood and secure it us-
ing the hood support.
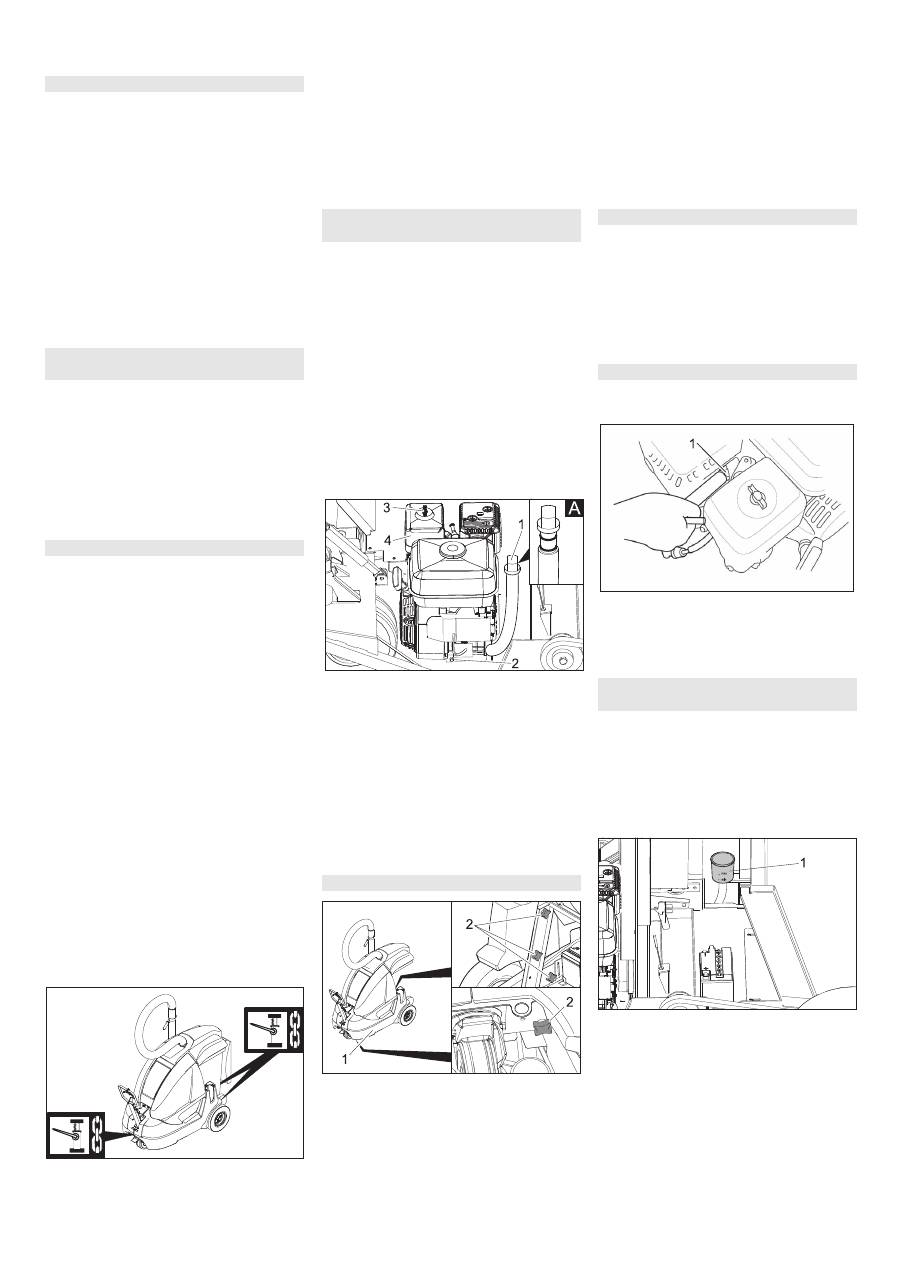
1 Oil dipstick
2 Oil drain screw
3 Wing nut
4 Air filter
Pull out oil dipstick.
Wipe off the oil dipstick and insert until
the head of the oil dipstick rests on the
oil filler neck (see Fig. A).
Pull out oil dipstick.
Check engine oil level.
If required, top up oil carefully.
Oil grade: see Technical Data
1 Left side part
2 Fastening screw for side part
Open the device hood and secure it us-
ing the hood support.
Unscrew all the 4 fastening screws of
the left side part.
Remove the side part.
Pull out oil dipstick.
Keep a collection basin for old oil ready.
Unscrew the oil drain screw and collect
used oil.
Screw in oil drain plug.
Fill in motor oil.
Oil grade: see Technical Data
Close oil filler opening.
Wait at least 5 minutes.
Check engine oil level.
Replace side part.
Open the device hood and secure it us-
ing the hood support.
Unscrew wing nut.
Remove, check and clean filter car-
tridge.
Use either a new or cleaned filter car-
tridge in the vacuum container.
Screw on wing nut.
Open the device hood and secure it us-
ing the hood support.
1 Spark plug
Remove spark-plug connector.
Unscrew and clean spark plug.
Screw in cleaned or new spark plug.
Push on spark-plug connector.
(1) Checking fill level
Open the device hood and secure it us-
ing the hood support.
Check the fill level in the header tank.
Note:
The oil level must lie between the
“MAX“ mark and a distance of 2 cm above
the base of the tank.
1 Equalising container
Caution
This inspection may only be carried out
when the engine is warm
(2) Adjusting fill level
Open the device hood and secure it us-
ing the hood support.
Remove the lid of the container.
If required, top up oil carefully.
Close container.
Oil grade: see Technical Data
Remove the battery
Check fluid level in the battery and
adjust if required
Replacing wheel
Check engine oil level and top up, if
required
Change the engine oil
Check air filter and replace, if necessary
Clean or replace the spark plug
Check and adjust hydraulic fluid fill level
and change oil – axle drive circuit
21 EN
Оглавление
- Inhaltsverzeichnis
- Umweltschutz
- Bedien- und Funktionselemente Vor Inbetriebnahme
- Inbetriebnahme
- Stilllegung
- Hilfe bei Störungen
- Technische Daten
- EG-Konformitätserklärung
- Contents
- Environmental protection
- Operating and Functional Elements Before Startup
- Start up
- Shutdown
- Troubleshooting
- Technical specifications
- EC Declaration of Conformity
- Table des matières
- Protection de l’environne- ment
- Eléments de commande et de fonction Avant la mise en service
- Mise en service
- Remisage
- Assistance en cas de panne
- Caractéristiques techniques
- Déclaration CE
- Indice
- Protezione dell’ambiente
- Elementi di comando e di funzione Prima della messa in funzione
- Messa in funzione
- Fermo dell'impianto
- Guida alla risoluzione dei guasti
- Dati tecnici
- Dichiarazione CE
- Inhoudsopgave
- Zorg voor het milieu
- Elementen voor de bediening en de functies Voor de inbedrijfstelling
- Inbedrijfstelling
- Stillegging
- Hulp bij storingen
- Technische gegevens
- CE-verklaring
- Índice de contenidos
- Protección del medio ambiente
- Elementos de operación y funcionamiento Antes de la puesta en marcha
- Puesta en marcha
- Parada
- Ayuda en caso de avería
- Datos técnicos
- Declaración CE
- Índice
- Protecção do meio-ambiente
- Elementos de comando e de funcionamento Antes de colocar em funcionamento
- Colocação em funcionamento
- Desactivação da máquina
- Ajuda em caso de avarias
- Dados técnicos
- Declaração CE
- Indholdsfortegnelse
- Miljøbeskyttelse
- Betjenings- og funktionselementer Inden ibrugtagning
- Ibrugtagning
- Afbrydning/nedlæggelse
- Hjælp ved fejl
- Tekniske data
- Overensstemmelseserklæring
- Innholdsfortegnelse
- Miljøvern
- Betjenings- og funksjonelementer Før den tas i bruk
- Ta i bruk
- Sette bort
- Feilretting
- Tekniske data
- CE-erklæring
- Innehållsförteckning
- Miljöskydd
- Manövrerings- och funktionselement Före ibruktagande
- Idrifttagning
- Nedstängning
- Åtgärder vid störningar
- Tekniska data
- CE-försäkran
- Sisällysluettelo
- Ympäristönsuojelu
- Ohjaus- ja käyttölaitteet Ennen käyttöönottoa
- Käyttöönotto
- Seisonta-aika
- Häiriöapu
- Tekniset tiedot
- CE-todistus
- Πίνακας περιεχομένων
- Προστασία περιβάλλοντος
- Στοιχεία χειρισμού και λειτουργίας Πριν τη θέση σε λειτουργία
- Έναρξη λειτουργίας
- Διακοπή της λειτουργίας
- Αντιμετώπιση βλαβών
- Τεχνικά χαρακτηριστικά
- Δήλωση συμμόρφωσης CE
- İ çindekiler
- Çevre koruma
- Kullan ı m ve çal ı ş ma elemanlar ı Cihaz ı çal ı ş t ı rmaya ba ş lamadan önce
- İş letime alma
- Durdurma
- Ar ı zalarda yard ı m
- Teknik Bilgiler
- CE Beyan ı
- Оглавление
- Защита окружающей среды
- Описание элементов управления и рабочих узлов Перед началом работы
- Начало работы
- Вывод из эксплуатации
- Уход и техническое обслуживание
- Помощь в случае неполадок
- Технические данные
- Заявление о соответствии требованиям СЕ
- Tartalomjegyzék
- Környezetvédelem
- Kezelési- és funkciós elemek Üzembevétel el ő tt
- Üzembevétel
- Leállítás
- Segítség üzemzavar esetén
- M ű szaki adatok
- CE-Nyilatkozat
- Obsah
- Ochrana životního prost ř edí
- Ovládací a funk č ní prvky P ř ed uvedením do provozu
- Uvedení do provozu
- Odstavení
- Pomoc p ř i poruchách
- Technické údaje
- ES prohlášení o shod ě
- Vsebinsko kazalo
- Varstvo okolja
- Upravljalni in funkcijski elementi Pred zagonom
- Zagon
- Mirovanje naprave
- Pomo č pri motnjah
- Tehni č ni podatki
- CE izjava
- Spis tre ś ci
- Ochrona ś rodowiska
- Elementy urz ą dzenia Przed pierwszym uruchomieniem
- Uruchamianie
- Wy łą czenie z eksploatacji
- Usuwanie usterek
- Dane techniczne
- Deklaracja UE
- Cuprins
- Protec ţ ia mediului înconjur ă tor
- Elemente de utilizare ş i func ţ ionale Înainte de punerea în func ţ iune
- Punerea în func ţ iune
- Scoaterea din func ţ iune
- Remedierea defec ţ iunilor
- Date tehnice
- Declara ţ ia CE
- Obsah
- Ochrana životného prostredia
- Ovládacie a funk č né prvky Pred uvedením do prevádzky
- Uvedenie do prevádzky
- Odstavenie
- Pomoc pri poruchách
- Technické údaje
- Vyhlásenie CE
- Pregled sadržaja
- Zaštita okoliša
- Komandni i funkcijski elementi Prije prve uporabe
- Stavljanje u pogon
- Stavljanje ure đ aja van pogona
- Otklanjanje smetnji
- Tehni č ki podaci
- CE-izjava
- Pregled sadržaja
- Zaštita životne sredine
- Komandni i funkcioni elementi Pre upotrebe
- Stavljanje u pogon
- Stavljanje ure đ aja van pogona
- Otklanjanje smetnji
- Tehni č ki podaci
- CE-izjava
- Съдържание
- Опазване на околната среда
- Обслужващи и функционални елементи Преди пускане в експлоатация
- Пускане в експлоатация
- Спиране от експлоатация
- Помощ при неизправности
- Технически данни
- СЕ – декларация
- Sisukord
- Keskkonnakaitse
- Teenindus- ja funktsioonielemendid Enne seadme kasutuselevõttu
- Kasutuselevõtt
- Seismapanek
- Abi häirete korral
- Tehnilised andmed
- CE-vastavusdeklaratsioon
- Satura r ā d ī t ā js
- Vides aizsardz ī ba
- Vad ī bas un funkcijas elementi Pirms ekspluat ā cijas uzs ā kšanas
- Ekspluat ā cijas uzs ā kšana
- Iekonserv ē šana
- Pal ī dz ī ba darb ī bas trauc ē jumu gad ī jum ā
- Tehniskie dati
- CE deklar ā cija
- Turinys
- Aplinkos apsauga
- Valdymo ir funkciniai elementai Prieš pradedant naudoti
- Naudojimo pradžia
- Laikinas prietaiso nenaudojimas
- Pagalba gedim ų atveju
- Techniniai duomenys
- CE deklaracija
- Перелік
- Захист навколишнього середовища
- Елементи управління і функціональні вузли Перед початком роботи
- Введення в експлуатацію
- Зберігання
- Допомога у випадку неполадок
- Технічні характеристики
- Заява про відповідність вимогам CE
