Pioneer S-21W: Connections and Use
Connections and Use : Pioneer S-21W
Connections and Use
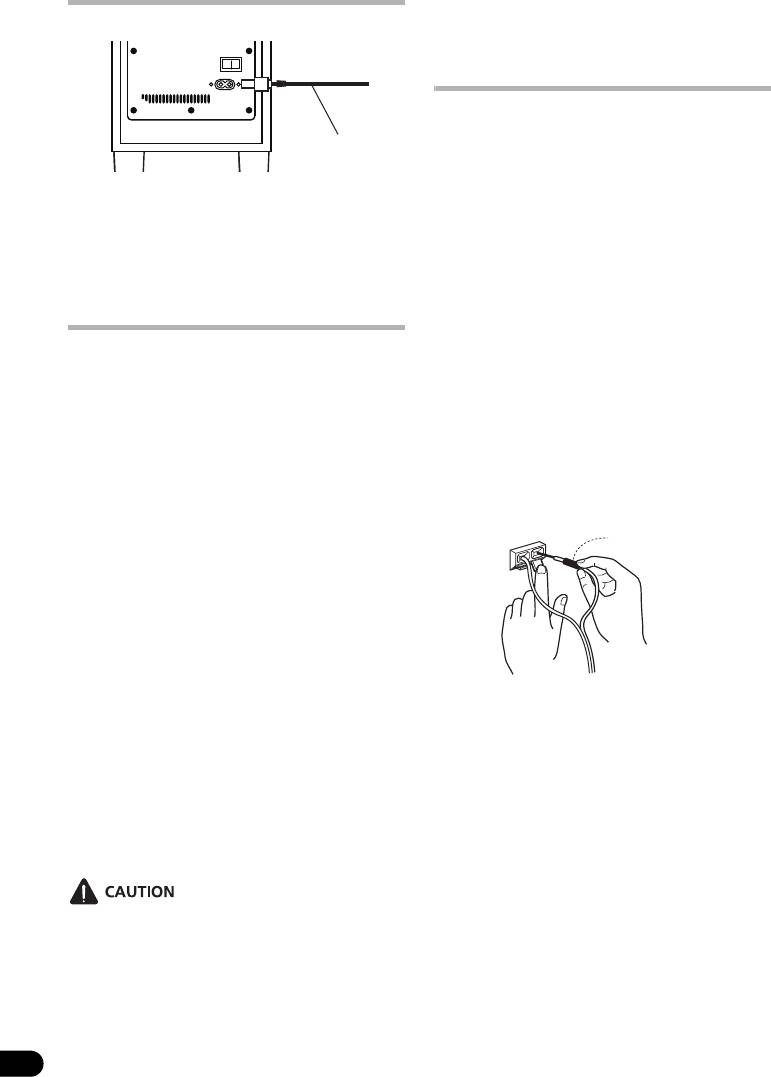
Connecting the power cord
(S-11)
Connection
Before making or changing the
connections, switch off the power and
disconnect the power cord from the AC
Connect the power cord for the this unit to the
outlet.
unit’s power connector (AC IN), and the other
Connecting the speakers
ends to an AC power supply. When turning on
the power, turn on the power to the receiver
To get the best out of your speakers it is
first, then the power to this unit.
important that you connect them properly to
your receiver. Each speaker connection
consists of a positive (+) and a negative (–)
terminal. These should be matched between
the receiver and the speaker.
Operation
1 Attach one end of the supplied speaker
For details regarding operating part functions,
cord to the rear of the each speaker.
refer to Panel facilities on page 8.
• Connect the wire with the colored
1 Turn the POWER switch (5) ON.
marker to the red (+) terminal; the plain
• If the unit’s power cord is connected to a
wire to the black (–) terminal. Press
switched AC outlet on the receiver and
down the spring-loaded tab and insert
the switch is left ON, the unit can be
the wire, as shown below. Release the
turned ON/OFF together with the
tab to secure the wire.
receiver.
• If the unit’s power cord cannot be
connected to the receiver, turn the
power to the receiver ON before turning
the power to the unit ON. When turning
the power OFF, turn the power to the unit
OFF before turning the power to the
receiver OFF.
• Set the cross-over frequency to match
that of the speakers actually used.
2 Connect the other end of each speaker
2 Operate the receiver and adjust the
cord to your receiver.
volume of the other speakers.
• To connect, insert the colored wire into
3 Adjust the volume of the bass with the
the matching positive (colored) terminal
volume knob (2).
and the other wire into the negative
• Turn the knob slowly from the MIN
(black) terminal. See also the Operating
position.
Instructions that came with your
receiver.
4 Turn the POWER switch (5) OFF.
• The power indicator disappears.
• Do not use the speaker to output distorted
sound for long periods of time. This can
result in damages to the speaker and poses
a potential fire hazard.
10
En
ON
POWER
AC IN
Power Cord
Red (+)
Black (–)
Red colored marker
01_S-21W&S-11.book 10 ページ 2010年3月16日 火曜日 午前11時28分
English Français Deutsch
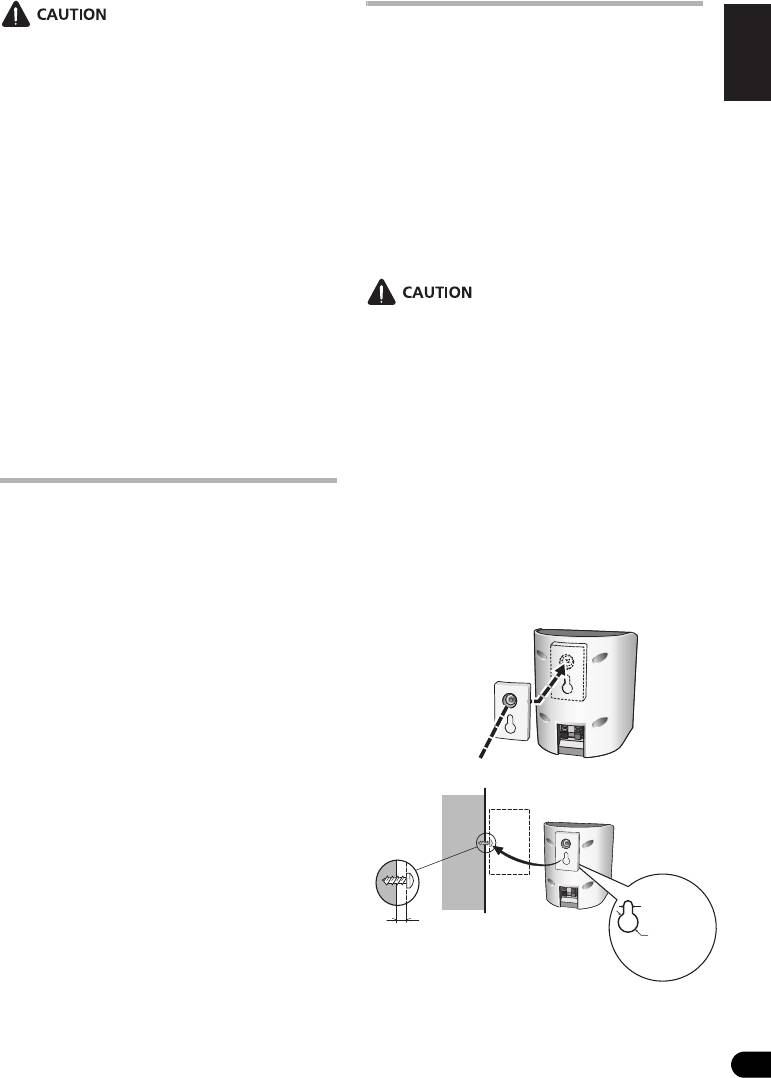
Wall-mounting the front
• These speaker terminals carry
and surround speaker
HAZARDOUS LIVE voltage. To prevent the
system
risk of electric shock when connecting or
disconnecting the speaker cords,
Attaching the brackets
disconnect the power cord before touching
• When attaching the speakers to brackets,
any uninsulated parts.
always use the furnished brackets for wall
• After connecting the plugs, pull lightly on
mounting.
the cords to make sure that the ends of the
• Make sure to tighten the supplied screw as
cords are securely connected to the
securely as possible when attaching the
terminals. Poor connections can create
bracket to the back of the speaker.
noise and interruptions in the sound.
• Do not attach brackets to center speaker or
• If the cords’ wires happen to be pushed out
subwoofer.
of the terminals, allowing the wires to come
into contact with each other, it places an
excessive additional load on the receiver.
This may cause the amp to stop
• Use the M5 metric thread screw. Do not
functioning, and may even damage the
use inch thread screw.
receiver.
Italiano Español
Before mounting
• When using a set of speakers connected to
an receiver, you won’t be able to obtain the
• Remember that the speaker system is
normal stereo effect if the polarity (+, –) of
heavy and that its weight could cause the
one of the speakers (left or right) is
wood screws to work loose, or the wall
reversed.
material to fail to support it, resulting in the
Nederlands
speaker falling. Make sure that the wall on
which you intend to mount the speakers is
Operation
strong enough to support them. Do not
• Set the receiver’s cross-over frequency
mount on plywood or soft surface walls.
at 200 Hz.
• Mounting screws are not supplied. Use
screws suitable for the wall material and
support the weight of the speaker. If you are
unsure of the qualities and strength of the
walls, consult a professional for advice.
Pyccкий
Screw (supplied)
11
En
5 mm
(3/16 in.)
5 mm (3/16 in.) to 7 mm (9/32 in.)
10 mm
Mounting screw (not supplied)
(13/32 in.)
01_S-21W&S-11.book 11 ページ 2010年3月16日 火曜日 午前11時28分
Оглавление
- IMPORTANT
- Contents Installation
- Connections and Use
- Connections and Use
- Specifications
- Troubleshooting
- IMPORTANT
- Sommaire Installation
- Branchements et
- Branchements et
- Fiche technique
- Guide de dépannage
- WICHTIG
- Inhaltsverzeichnis Aufstellung
- Anschlüsse und
- Anschlüsse und
- Technische Daten
- Störungsbeseitigung
- IMPORTANTE
- Indice Installazione
- Collegamenti ed uso
- Collegamenti ed uso
- Dati tecnici
- Diagnostica
- BELANGRIJK
- Inhoudsopgave Installatie
- Aansluitingen en
- Aansluitingen en
- Technische gegevens
- Oplossen van problemen
- IMPORTANTE
- Índice Instalación
- Conexiones y
- Conexiones y
- Especificaciones
- Solución de problemas
- BAЖHO
- Содержание Установка
- Подключение и
- Подключение и
- Технические характеристики
- Поиск и устранение неполадок
- 目錄 安裝
- 連接及使用 (S-21W)
- 連接及使用 (S-11)
- 規格
- 故障排除


