Siemens ET375GA11E – страница 2
Инструкция к Планшету Siemens ET375GA11E
Оглавление
- Содержание
- На что нужно обращать внимание Перед монтажом
- Указания по безопасному использованию
- 85
- Причины повреждений Перед первым использованием Принадлежности
- Ваш новый прибор Перед вами ваша новая фритюрница
- Селектор температуры (1) Лампочка работы (2) Лампочка нагрева (3) Нагревательный элемент
- Настройка фритюрницы Указания по использованию масла/жира для фритирования Фритирование Жир для фритирования сначала нужно
- Защитное отключение
- Слив масла/жира для фритирования
- Таблицы и полезные советы Таблица настройки Фритируемый продукт Количество Температура Время (мин.) Примечание
- Фритируемый продукт Количество Температура Время (мин.) Примечание
- Советы по фритированию
- Уход и очистка
- 96
- Служба сервиса

21
Ventilation
Keep ventilation openings open (doors, windows,
switch on extractor hoods).
Caution! Over-greased filters are a fire risk if the
appliance is positioned under an extractor hood or
adjacent to a hob ventilator!
In the event of fire
•
Switch off the deep-fryer or pull out mains plug!
•
Remove the basket!
•
Attach the glass ceramic cover!
•
Switch off extractor hood immediately! The
draught will intensify the fire!
Explosion risk! Never attempt to extinguish a
grease fire with water!
After deep frying
Switch off the deep fryer after use. Regularly clean
the deep fryer.
Glass ceramic cover
Always place the glass ceramic cover on the deep-
fryer when it is not in use since oil or fat is very
sensitive to light.
Do not place the glass ceramic cover on the deep
fryer while you are frying food.
Changing oil or fat
Caution, fire risk! Old oil or fat may foam over or
ignite more easily.
Replace old or soiled oil or fat if it becomes brown,
has an unpleasant smell and/or smokes prematurely.
Replace oil or fat if it contains too much water
(e.g. after frequent frying of frozen food).
You will notice:
– rising bubbles
– water drops
– steam
– excessive splashing
Repairs
Incorrect repairs are dangerous. Risk of electric
shock! Repairs must be carried out by one of our
experienced after-sales engineers.
If the appliance is damaged, switch off the
corresponding household fuse. Call after-sales
service.

22
How to avoid
damage
Hard or pointed objects
Hard or pointed objects may cause damage if they
fall onto the glass ceramic panel or the glass ceramic
cover.
Glass ceramic cover
Wait until the appliance has cooled down completely
before placing the glass ceramic cover on the
appliance. Do not switch on the deep fryer with the
glass cover placed on it. Do not use the glass
ceramic cover as a surface for placing objects or for
keeping things warm.
Before first use
Clean the frying basin and the frying basket with a
sponge and soapy water. Polish with a clean, dry
cloth.
Accessories
Only use the frying baskets suitable for this deep
fryer.
Do not place plastic cutlery into the oil or fat.

23
Your new appliance
Your new appliance and its accessories are
described in this section.
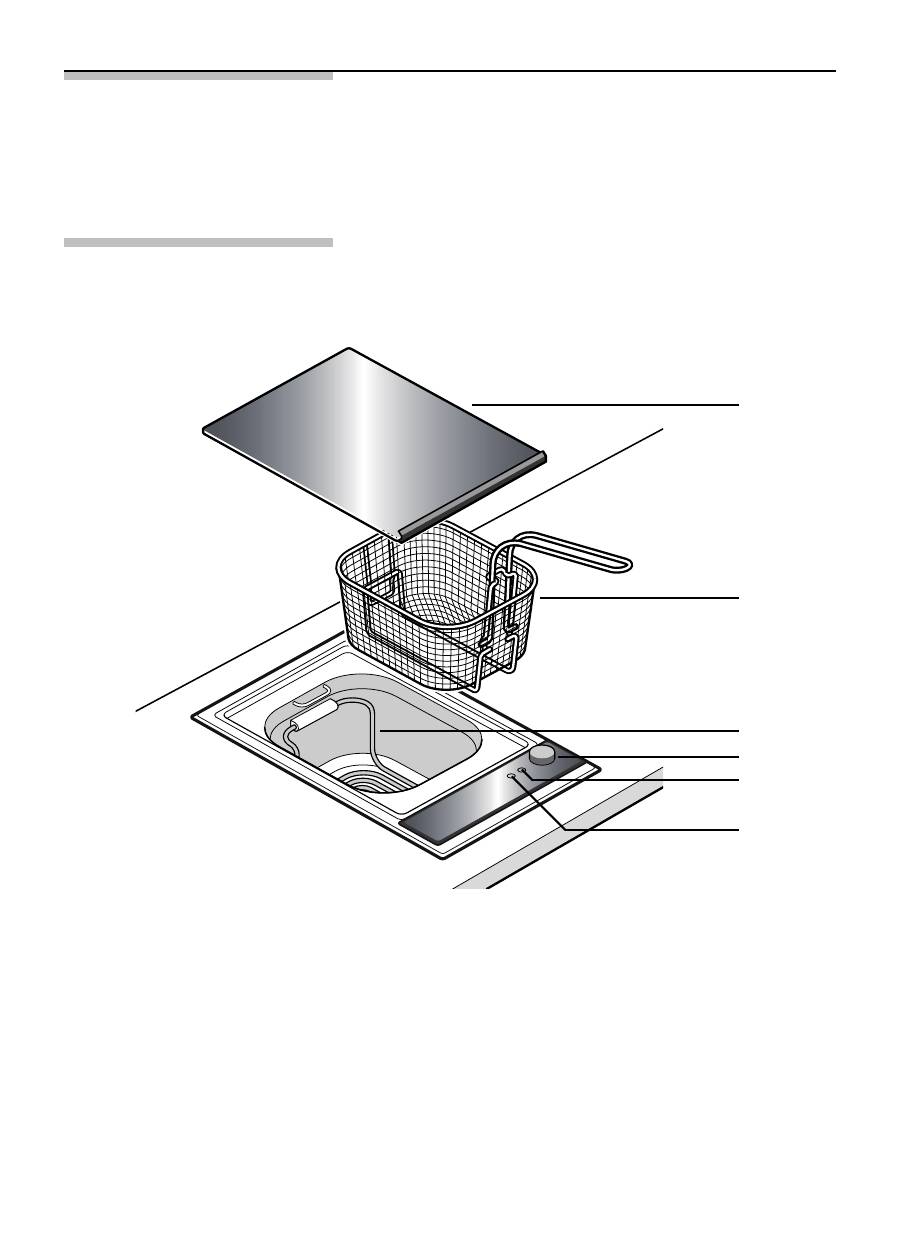
This is your new
deep-fryer
1
Glass ceramic cover
2
Frying basket
3
Heating element
4
Temperature switch
5
Indicator light
6
Heating up light
1
2
3
4
5
6

24
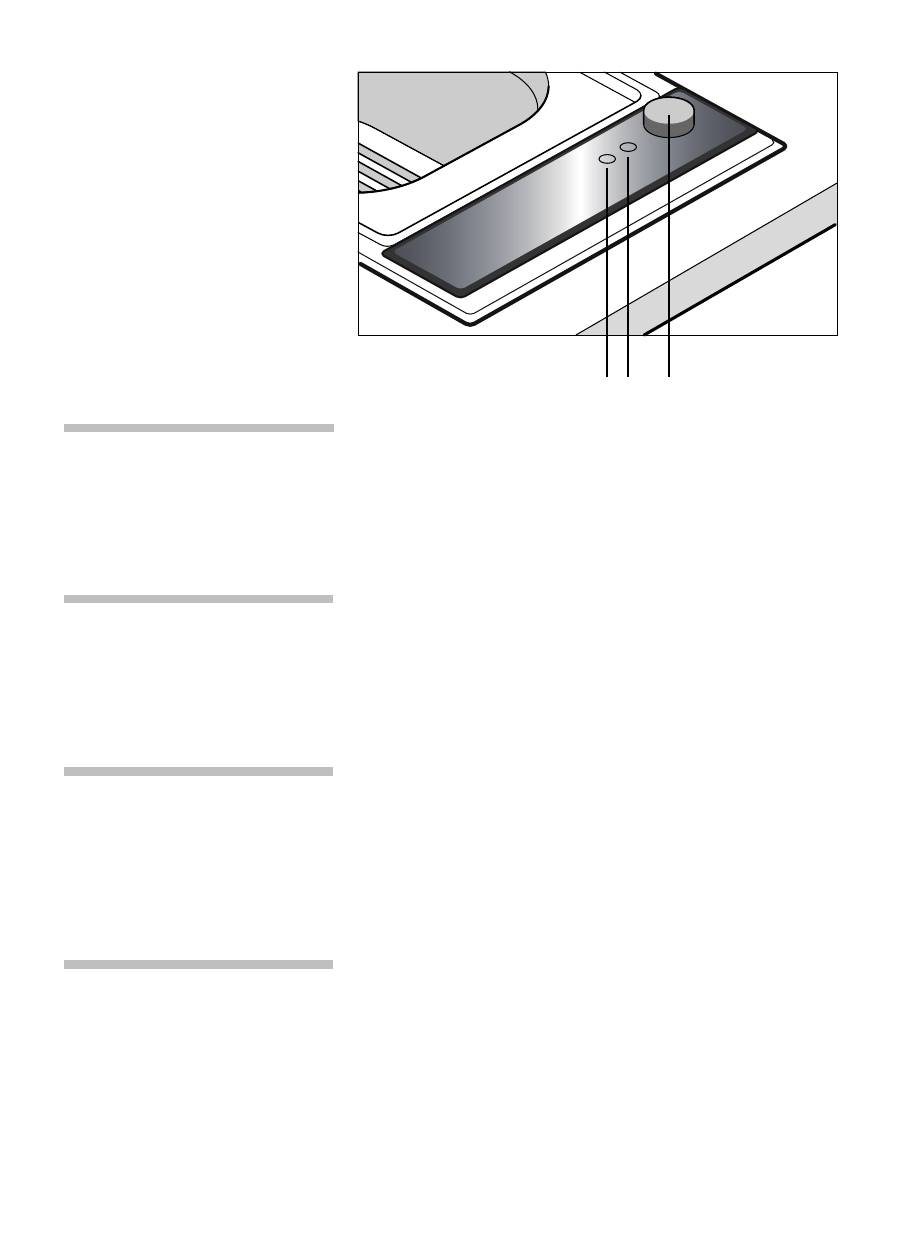
Temperature switch (1)
The temperature of the frying oil or fat can be set
with the temperature switch.
Indicator light (2)
The indicator light goes on when the deep fryer is
switched on and warns that the appliance is hot.
Heating up light (3)
The heating up light goes on while the heating
element of the deep fryer is heating up. When the
frying oil or fat has reached the set temperature the
heating up light goes off.
Heating element
You can tilt up the heating element to clean the frying
basin.
Caution, risk of burns! Never switch on the deep
몇
fryer while the heating element is tilted up.
3 2
1

25
Setting the deep-fryer
During deep frying, the heat that is generated by the
appliance is transmitted by the fat to the food you
are frying.
When this fast cooking method is employed, a tasty
crust is formed around the food.
The deep frying temperature range lies between
160 and 190°C.
Notes regarding the
deep frying oil or fat
Use only pure vegetable oil or fat for deep frying.
Avoid using mixtures of different fats.
Fill the frying basin with 4 litres frying oil or 3.5 kg
frying fat. Cut fresh fat into small pieces before
melting. When using the deep-frying fat the next
time, you should press a hole down through the solid
grease as far as the heating element (e.g. with a
wooden kitchen spoon).
Caution, fire risk! Thaw frozen frying fat before
몇
melting it.
Caution, fire risk! When using frying fat, first melt it at
몇
100°C. Wait until the fat is mostly melted before
setting a higher temperature.
Top up oil or fat as soon as it is below the minimum
몇
level (bottom marking).
Caution: There is a risk of fire if the filling should drop
below the bottom marking!
Frying fat may smoke during melting.This is normal.
Deep frying
When using frying fat, first melt it at 100°C.
1.
Set the required temperature. Wait until the
frying oil or fat has reached the set temperature
and the heating up light goes off.
2.
Lower the frying basket with the food into the oil
or fat.
26
Safety switch-off
Your appliance is fitted with a safety switch-off
function switching the appliance off automatically, if
the frying basin is not filled at least to the lower mark
with oil or fat.
You will know that an automatic safety switch-off has
been effected, if the heating up light does not light
up and the oil or fat is no longer heated.
1.
Turn the temperature switch to 0 and wait until
the deep fryer has cooled down.
2.
Fill the frying basin with at least 3 litres of frying oil
or fat.
3.
Firmly press in the pin on the front of the deep
fryer (with a pen, for example).
You will now be able to operate the deep fryer in the
usual manner.
3.
Having finished frying, lift out the basket and
shake it lightly in order to remove excess oil.
To allow the rest of the oil or fat to drip off, the
basket can be placed onto the suspension rack.

27
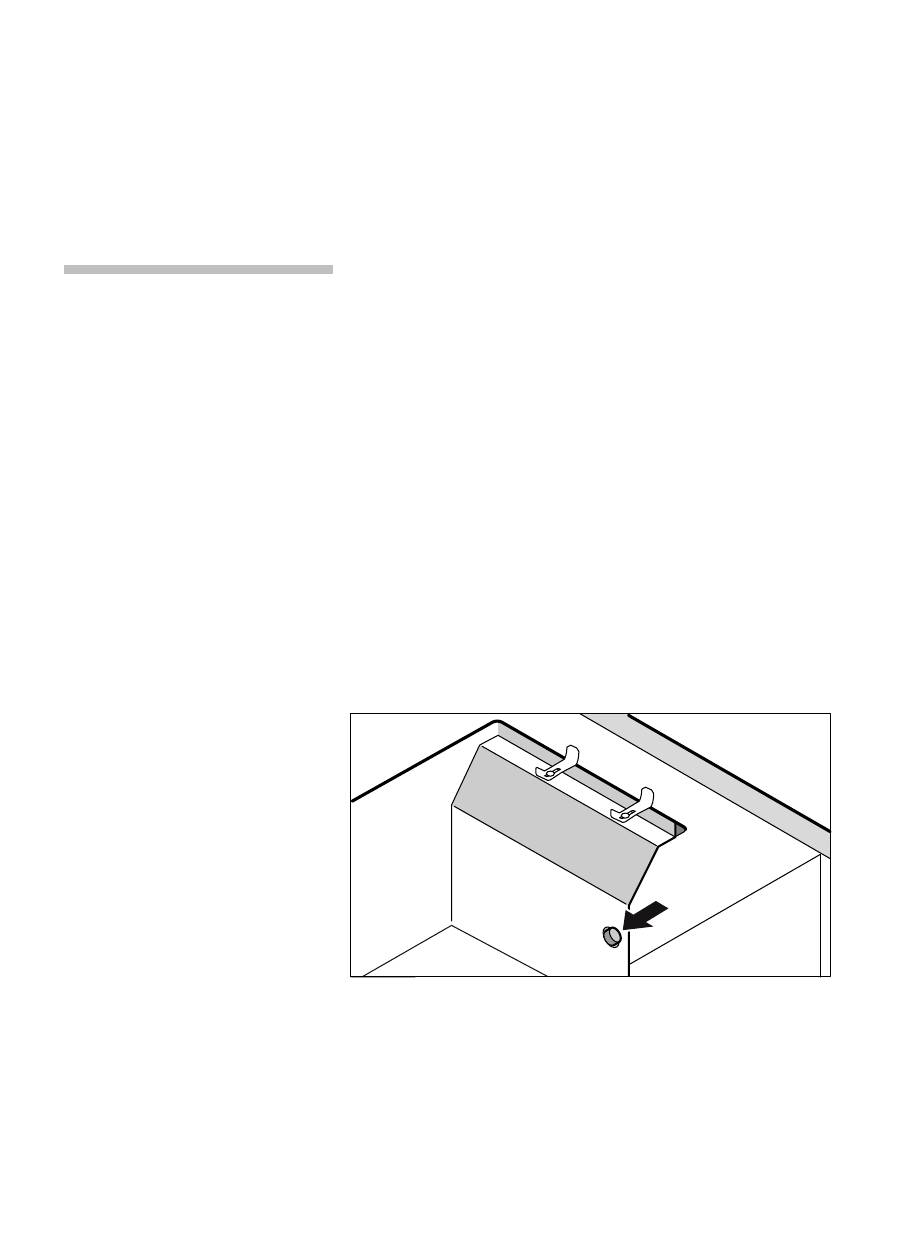
Draining the deep frying oil or fat
Caution, risk of burns! Before draining fat or oil, wait
몇
until it has cooled down.
If the deep fried food no longer becomes the usual
crispy brown despite the correct temperature setting
or if the oil or fat turns slightly brown you have to
replace it.
Place a temperature resistant container with a
capacity of at least 4 litres under the drainage tap on
the bottom of the deep fryer. Drain used oil or fat by
opening the drainage tap.
Note: Drain the fat while it is still warm and in a liquid
state.
If the fat is solid in the drainage outlet, pierce it using
a thin stick such as a wooden spoon handle.
Do not pour the used oil or fat down the drain, but
arrange for it to be disposed off at special disposal
sites.

28
Tables and tips
A selection of recipes and the correct frying times
are specified in the following table.
Settings table
The frying time will depend on the quality, the size
and the amount of the food.
Food
Quantity
Temperature Time in min. Remarks
To melt deep-frying fat
3.5 kg
100°C
Fresh food
Flaky pasties, filled
5 pieces
190°C
6 – 8
Fry meat filling first.
Vegetable filling raw.
Turn.
King prawns in batter
12 pieces
170 – 180°C
4 – 6
Pre-cooked and
peeled. Turn.
Vegetables in batter
8 pieces
170 – 180°C 4 – 8
e.g. cauliflower
florets*, courgette
slices, mushroom
heads, onion rings.
Turn.
Fish fillet, breaded
100-200 g each 160 – 170°C
5 – 10
Chicken legs, breaded
200-350 g each 160°C
15 – 20
Potato croquettes
6 – 8 pieces
170°C
5 – 6
French fries
500 g
180°C
first 2 -4
Wait at least 15 min
then 6 – 8
between the first and
the second frying.
Use starchy / floury
potatoes.
Cutlet, breaded
2 cutlets
170 – 180°C
5 – 8
*pre-cooked

29
Food
Quantity
Temperature Time in min. Remarks
Desserts
Doughnuts
6 pieces
160 – 170°C
6 – 10
Deep fry without the
basket. Turn.
Fruit wrapped in pastry
8 pieces
170 – 180°C
5 – 7
e.g. slices of pine-
apple, apples or kiwi
Turn.
Beignets / Churros
4 pieces
170 – 180°C 6 – 8
Turn
Frozen food**
Camembert, breaded
75–100 g each 160°C
6 – 8
Fish fillet, breaded
150 g each
170°C
5 – 7
Fish fingers
500 g
170°C
3 – 5
Small spring rolls / nems
500 g
180°C
3 – 5
Chicken nuggets
500 g
160°C
5 – 6
Potato croquettes
500 g
170°C
3 – 5
French fries
500 g
180°C
5 – 7
Calamari
500 g
180°C
3 – 5
**please also refer to the information specified on the packaging

30
Tips and tricks
Correct temperature
The correct temperature is very important for
achieving the desired deep frying result:
• temperature too low: The food is fried too slowly
and absorbs too much oil or fat.
• temperature too high: The food is browned too
quickly and remains raw on the inside.
Suitable food for deep frying
Nearly all foodstuffs are suitable for deep frying, e.g.:
poultry, fish, meat, vegetables, fruit, potatoes.
Foods with a high water content are less suitable.
Before lowering food into the frying fat, dry carefully,
shake off any surplus flour, and firmly press on the
breadcrumb layer.
Frozen food
Remove ice from deep frozen foodstuffs. Fill the
basket outside the deep fryer.
Moist or frozen food leads to violent foaming of the
fat when it is inserted. Slowly lower the filled basket
several times. This prevents overflowing of the fat.
Deep frying large amounts
If you wish to fry a large amount of food at once, we
recommend that you remove the basket after
1-2 minutes and place it in the hanger rack to enable
the oil or fat to reach its original temperature more
quickly. This makes the fried food more crispy.
Deep frying fat or oil
After every use of the deep fryer, remove any
remainders of food from the oil or fat. Line a metal
sieve with kitchen paper and filter the lukewarm oil or
fat through the paper.
If the deep fried food no longer becomes the usual
crispy brown despite the correct temperature setting
or if the oil or fat turns slightly brown you have to
replace it.

31
Care and cleaning
Do not use high-pressure or steam jet cleaning
devices.
Caution, risk of burns! Wait until the appliance has
몇
cooled down completely before cleaning it.
Caution, risk of burns! Never switch on the deep
몇
fryer while the heating element is tilted up.
Cleaning the deep fryer
After draining the oil, remove coarse soiling in the
frying basin with kitchen paper.
Fill up the frying basin to the lower marking with
warm water and added detergent. Clean the frying
basin and the heating element using a soft brush.
Avoid scratching or scrubbing as this could cause
permanent scratches.
Tilt up the heating element so that it clicks into the
bracket. Then you can clean the bottom of the frying
basin under the heating element.
Drain the water, lower the heating element so that it
is on the base of the basin and rinse with clear
water. Important: Do not leave any cleaner residues
in the frying basin. Dry the frying basin and the
heating element with a soft cloth.

32
Cleaning the frying basket
Wash the frying basket by hand with warm
water. Do not clean the frying basket in a dish
washer.
Cleaning the glass ceramic
Remove light soiling using a damp cloth or with
panel and the glass ceramic
warm soapy water.
cover
Rinse any left-over detergent with cold water and dry
the surface well.
Do not clean the glass ceramic cover in a dish
washer.
Unsuitable cleaning agents
Do not use an abrasive sponge or a scouring agent.
Nor should any chemically aggressive cleaners such
as oven sprays or stain removers be used.

33
After-sales service
Our after-sales service is there for you if your
appliance should need to be repaired. You will find
the address and telephone number of your nearest
after-sales service centre in the phone book. The
after-sales service centres listed will also be happy to
inform you of a service point in your local area.
E-number and FD-number
Please quote the E number (product number ) and
the FD number (production number) of your appliance
when contacting the after-sales service. The
nameplate containing these numbers can be found
on the appliance. For future reference you can note
these numbers here:
E-Nr.
FD

34
Sommaire
Remarques importantes
. . . . . . . . . . . . . . . . . . . .
35
Avant l’installation . . . . . . . . . . . . . . . . . . . . . . . . . .
35
Consignes de sécurité . . . . . . . . . . . . . . . . . . . . . .
36
Causes des dommages . . . . . . . . . . . . . . . . . . . . .
38
Avant la première utilisation . . . . . . . . . . . . . . . . . . .
38
Accessoires . . . . . . . . . . . . . . . . . . . . . . . . . . . . . .
38
Votre nouvelle friteuse
. . . . . . . . . . . . . . . . . . . . .
39
Voici votre nouvelle friteuse . . . . . . . . . . . . . . . . . . .
39
Sélecteur de température . . . . . . . . . . . . . . . . . . . .
40
Témoin lumineux de mise sous tension . . . . . . . . . .
40
Témoin lumineux de chauffe . . . . . . . . . . . . . . . . .
40
Résistance chauffante . . . . . . . . . . . . . . . . . . . . . . .
40
Réglage de la friteuse . . . . . . . . . . . . . . . . . . . . . .
41
Remarques concernant l’huile et la graisse . . . . . . .
41
Friture . . . . . . . . . . . . . . . . . . . . . . . . . . . . . . . . . .
41
Coupure de sécurité . . . . . . . . . . . . . . . . . . . . . . . .
40
Vidange de l’huile ou de la graisse . . . . . . . . . . .
43
Tableaux et conseils . . . . . . . . . . . . . . . . . . . . . . .
44
Tableau de réglage . . . . . . . . . . . . . . . . . . . . . . . . .
45
Conseils de friture . . . . . . . . . . . . . . . . . . . . . . . . . .
46
Entretien et nettoyage . . . . . . . . . . . . . . . . . . . . .
47
Service après-vente . . . . . . . . . . . . . . . . . . . . . . .
49

Remarques importantes
Lisez attentivement cette notice d’utilisation. Cela est
indispensable pour utiliser votre appareil de manière
correcte et sûre.
Conservez avec soin cette notice d’utilisation et de
montage. Si vous cédez l’appareil à une autre
personne, remettez-lui aussi les notices.
Avant l’installation
Respectez l’environnement
Déballez l’appareil et jetez l’emballage sans
nuisances pour l’environnement.
Cet appareil est marqué conformément à la
Directive européenne 2002/96/CE relative aux
déchets d’équipements électriques et électroniques
(DEEE). Cette directive fixe un cadre pour la reprise
et la valorisation des appareils usagés sur tout le
territoire de l’Union européenne.
Dommages de transport
Après avoir déballé l’appareil, examinez-le. Si vous
constatez qu’il a été endommagé pendant le
transport, ne le branchez pas.
Branchement électrique
Si le cordon d’alimentation est endommagé, il faut
qu’il soit remplacé par un technicien formé par le
fabricant afin d’éviter tout risque.
Installation et branchement
Veuillez respecter la notice spéciale de montage.
35

36
Consignes de
sécurité
Cet appareil est destiné exclusivement à un usage
domestique. Utilisez-le uniquement pour des
préparations culinaires.
Pour une utilisation sûre
Ne laissez jamais des adultes ou des enfants utiliser
l’appareil sans surveillance :
– s’ils ne sont pas physiquement ni mentalement en
mesure de le faire,
– ou bien s’ils n’ont ni le savoir ni l’expérience
nécessaires pour se servir de l’appareil de manière
correcte et sûre.
Ne pas laisser des enfants jouer avec l’appareil.
Huiles et graisses
Ne faites jamais fonctionner l’appareil sans huile ou
graisse. L’appareil est doté d’une protection
thermique qui l’arrête s’il est mis en marche à vide.
Ajoutez de l’huile ou de la graisse dès que le niveau
minimum (marque inférieure) n’est plus atteint.
Attention : risque d’incendie si le niveau n’atteint pas
la marque minimale.
Remplissage du panier
Attention, risque de brûlure ! Ne pas faire frire des
aliments trop mouillés ou en trop grande quantité :
cela ferait mousser l’huile ou la graisse de manière
extrême.
Surchauffe de l’huile ou
Attention, risque d’incendie ! Ne laissez pas l’appareil
de la graisse
fonctionner sans surveillance. Ne laissez jamais des
aliments frire dans l’huile ou la graisse sans
surveillance. L’huile ou la graisse surchauffée peuvent
facilement s’enflammer.
Appareil très chaud
Attention, risque de brûlure ! L’appareil chauffe
beaucoup. Maintenez les enfants à distance !
Faites particulièrement attention lorsque vous utilisez
de l’eau à proximité de la friteuse chaude. Risque
d’explosion !
Risque de court-circuit ! Ne faites jamais passer des
cordons d’alimentation d’appareils électriques
au-dessus de surfaces de cuisson chaudes.
L’isolation des cordons pourrait fondre.
Ne mettez jamais la friteuse en marche tant que la
résistance chauffante est relevée.

Attention, risque d’incendie ! Ne conservez jamais
des objets inflammables dans l’appareil (produit de
nettoyage, bombes aérosol, etc.).
Aération
Servez-vous des possibilités d’aération (portes,
fenêtres, hotte aspirante).
Attention ! Si l’appareil est placé sous une hotte
aspirante ou près d’un extracteur de table de
cuisson, les filtres surchargés en graisse peuvent
s’enflammer.
Conduite à tenir en
•
Arrêtez la friteuse ou débranchez le cordon
cas de feu
d’alimentation.
•
Sortez le panier.
•
Posez le couvercle en verre sur la friteuse.
•
Arrêtez immédiatement la hotte aspirante, car
l’appel d’air attise le feu !
Risque d’explosion ! N’essayez jamais d’éteindre
le feu avec de l’eau.
Après la friture
Après usage, éteignez la friteuse. Nettoyez
régulièrement la friteuse.
Couvercle en vitrocéramique
Lorsque vous n'utilisez pas la friteuse, laissez
toujours le couvercle en vitrocéramique dessus, car
l'huile et la graisse sont très sensibles à la lumière.
En revanche, ne laissez pas le couvercle en
vitrocéramique sur l'appareil pendant la cuisson.
Remplacement de l’huile
Attention, risque d’incendie ! Les huiles ou graisses
ou de la graisse
usées tendent à mousser de manière excessive et
leur température d’inflammation s’abaisse.
Remplacez les huiles ou graisses usées ou
encrassées, lorsqu’elles deviennent marron, qu’elles
produisent une odeur désagréable ou qu’elles
dégagent rapidement de la fumée.
Lorsque l’huile ou la graisse contiennent beaucoup
d’eau (par exemple parce que vous faites souvent
frire des surgelés), il faut la changer dans les cas
suivants :
– apparition de bulles en surface
– gouttes d’eau
– vapeur d’eau
– fortes projections
37

38
Causes des
dommages
Objets durs et pointus
La chute d'objets durs ou pointus sur le bandeau en
vitrocéramique ou sur le couvercle en vitrocéramique
peut provoquer des dommages.
Couvercle en vitrocéramique
Pour remettre le couvercle en vitrocéramique sur
l'appareil, attendez que ce dernier soit bien refroidi.
Ne mettez jamais la friteuse en marche avec le
couvercle. N'utilisez jamais le couvercle comme
desserte ou chauffe-plat.
Avant la première
utilisation
Nettoyez la cuve et le panier de la friteuse avec une
éponge et de l’eau savonneuse.
Polissez avec un chiffon propre et sec.
Accessoires
Utilisez seulement les paniers prévus pour cette
friteuse.
Ne plongez jamais des couverts en plastique dans la
graisse.
Réparations
Les réparations non-conformes sont source de
danger. Risque de choc électrique ! Les réparations
doivent être faites exclusivement par un technicien
d’après-vente formé par nous.
Si l’appareil est défectueux, désactivez le coupe-
circuit concerné sur le tableau électrique. Appelez le
service après-vente.
Votre nouvelle friteuse
Faites connaissance avec votre nouvelle friteuse et
ses accessoires.
Voici votre nouvelle
friteuse
1
couvercle en vitrocéramique
2
panier
3
résistance chauffante
4
sélecteur de température
5
témoin lumineux de mise sous tension
6
témoin lumineux de chauffe
1
2
3
4
5
6
39
40
Sélecteur de
température (1)
Le sélecteur vous permet de choisir la température
de l’huile ou de la graisse de friture.
Témoin lumineux de
mise sous tension (2)
Ce témoin s’allume lorsque la friteuse est sous
tension, afin d’avertir des risques de brûlure.
Témoin lumineux de
chauffe (3)
Le témoin de chauffe s’allume dès que la résistance
chauffante est en marche. Il s’éteint lorsque l’huile ou
la graisse ont atteint la température programmée.
Résistance chauffante
Pour faciliter le nettoyage de la cuve, vous pouvez
relever la résistance.
Attention, risque de brûlure ! Ne mettez jamais la
몇
friteuse en marche tant que la résistance chauffante
est relevée.
3 2
1
