Siemens TE502206RW: инструкция
Раздел: Кухонная техника
Тип:
Инструкция к Siemens TE502206RW
Оглавление
- Указания по безопасности
- Содержание
- Обзор Элементы управления
- Сообщения на дисплее
- Перед первым использованием
- Выключение прибора
- Фильтр для воды
- Установки меню
- Установка Приготовление степени помола кофейных напитков из кофейных зерен
- Приготовление горячей воды Приготовление кофейных напитков из молотого кофе
- Приготовление молочной пены Уход и ежедневная очистка
- Очистка системы подачи молока
- Разборка системы подачи молока для очистки:
- Очистка блока заваривания
- Сервисные программы Советы по экономии энергии ● Полностью автоматическая кофе-
- Удаление накипи
- Очистка Calc‘n‘Clean
- Сообщения на дисплее проведут по пунктам программы.
- Принадлежности Утилизация Защита от замерзания Условия гарантийного обслуживания
- Самостоятельное устранение небольших проблем Проблема Причина Устранение
- Проблема Причина Устранение
- Проблема Причина Устранение Технические характеристики
TE 502
siemens-home.com/welcome
en Instruction manual
fr Mode d’emploi
pl Instrukcjaobsługi
nl Gebruiksaanwijzing
cs Návodkpoužití
ru Инструкцияпоэксплуатации
Register
your
product
online
en
�����������������������������������������������������������������������������������������������������������������������������������2
fr
���������������������������������������������������������������������������������������������������������������������������������22
pl
���������������������������������������������������������������������������������������������������������������������������������43
nl
���������������������������������������������������������������������������������������������������������������������������������64
cs
���������������������������������������������������������������������������������������������������������������������������������86
ru
�������������������������������������������������������������������������������������������������������������������������������106
Included in delivery (see page 4) / Contenu de l’emballage (voir page 24)
Zakres dostawy (patrz strona 45) / Leveringsomvang (zie pagina 66)
Součást dodávky (informace naleznete na straně 88)
Объем поставки (см. стр. 108)
2
TE 502
siemens-home.com/welcome
siemens-home.com/welcome
en Instruction manual
fr Mode d’emploi
pl ,QVWUXNFMDREVãXJL
nl *HEUXLNVDDQZLM]LQJ
cs 1iYRGNSRXçLWt
ru ǣȈȌȍȋȎȅȑȃȚȊȉȘȅȌȊȆ Ȏǻȍǻȑȃȃ
Register
your
Register
product
your
online
product
online
1
E-Nr. ……… FD… …
3 4
A
4
1 2 3
17
16
15
14
13
5
12
11
6
10
9
78
B
18
20
19
DC
6c
8a 8b
6a
6b
8e
6e
8c
8d
6d
E
5a
5b
5d
5c

deen
Safety instructions
Please read and follow the operating instructions carefully and
keep them for later reference. Enclose these instructions when
you give this appliance to someone else. This appliance is
designed for the preparation of normal household quantities in
the home, or in household-like, non-commercial environments.
Household-like environments include staff kitchens in shops,
of ces, agricultural and other small businesses or for use by
guests at bed-and-breakfast establishments, small hotels and
similar residential facilities.
¡ Danger of electric shock!
Connect and operate the appliance only according to the type plate
speci cations. To avoid potential hazards, repairs such as replacing
a damaged cable must only be carried out by our customer service
personnel�
This appliance may be used by children aged 8 years and older and
by persons with reduced physical, sensory or mental capabilities
or who lack experience and/or knowledge if they are supervised or
have been given instruction in the safe use of the appliance and
have understood the dangers involved. Keep children under 8 years
of age away from the appliance and connecting cable and do not
allow them to use the appliance. Children shall not play with the
appliance� Cleaning and user maintenance shall not be made by
children unless they are older than 8 years and supervised.
Never immerse the appliance or mains cable in water� Use only if
power cord and appliance show no signs of damage� Should a fault
occur, pull the plug or disconnect from the mains immediately.
2

deen
¡ Risk of suffocation!
Do not allow children to play with packaging material�
¡ Risk of scalding!
The milk frother 6 for milk / hot water
gets very hot. After use, allow to
cool down rst before touching.
¡ Risk of injury!
Do not reach into the grinding unit.
3

deen
Dear Coffee Connoisseur.
Table of Contents
Congratulations on purchasing this fully
Included in delivery ������������������������������������� 4
automatic espresso machine from Siemens.
Overview�����������������������������������������������������5
Controls ������������������������������������������������������5
- Power on/off switch O / I ��������������������������5
Included in delivery
- e off / j button �����������������������������������������5
- h button �������������������������������������������������5
See the illustration at the beginning of this
- start button ���������������������������������������������5
instruction manual.
- “Coffee strength” rotary knob ������������������5
- “Drink selection” rotary knob �������������������6
1 Fully automatic espresso machine
- Milk frother ����������������������������������������������6
TE502
Display messages ��������������������������������������6
2 Instruction manual
Before using for the rst time����������������������6
3 Water hardness testing strip
Water lter ��������������������������������������������������8
4 Measuring spoon
Menu settings ���������������������������������������������9
- Shut off ���������������������������������������������������� 9
- Filter ��������������������������������������������������������9
- Start Calc‘n‘Clean �����������������������������������9
- Temp. ������������������������������������������������������9
- Language ������������������������������������������������9
- Water hardness ��������������������������������������� 9
Adjusting the grinding unit ������������������������10
Preparation using coffee beans ���������������� 10
Preparation using ground coffee ������������� 11
Dispensing hot water �������������������������������� 11
Preparing milk froth ���������������������������������� 11
Maintenance and daily cleaning ���������������12
- Cleaning the milk system ����������������������13
- Cleaning the brewing unit����������������������14
Tips on energy saving ������������������������������15
Service Programmes ��������������������������������15
- Descaling ����������������������������������������������16
- Cleaning ������������������������������������������������17
- Calc‘n‘Clean ������������������������������������������17
Frost protection�����������������������������������������18
Accessories ����������������������������������������������19
Disposal ���������������������������������������������������� 19
Guarantee�������������������������������������������������19
Technical data�������������������������������������������19
Simple troubleshooting �����������������������������20
4

deen
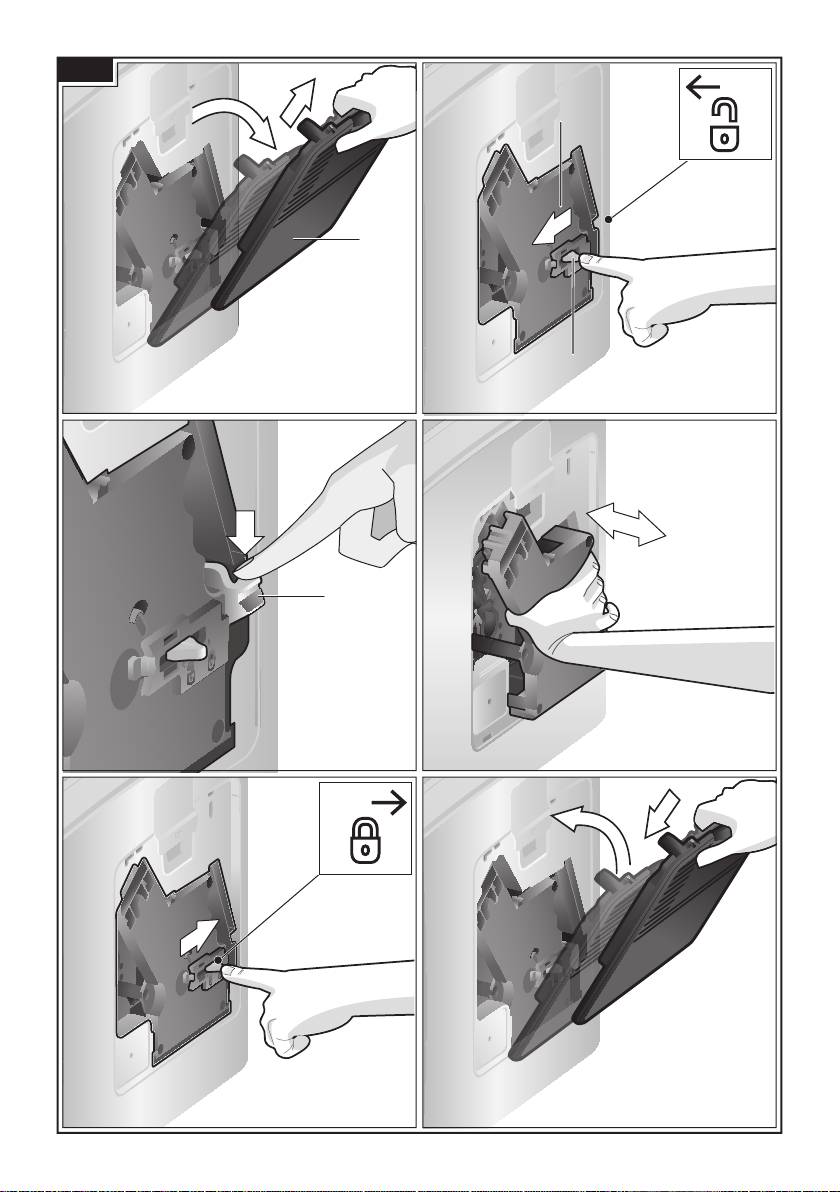
Overview
Controls
Figures A, B, C, D and E
Power on/off switch O / I
The power switch O / I (9) is used to switch
1 Bean container
the appliance on or to switch it off fully
2 Aroma cover
(power supply off).
3 Selector for grind setting
Important: Before switching off, run the
4 Drawer
cleaning programme or use the e off / j
(ground coffee/cleaning tablet)
button (12) to switch off.
5 Brewing unit (Fig. E)
a) Brewing unit
e off / j button
b) Door
When the e off / j button (12) is pressed
c) Eject lever for brewing unit
briey, the appliance rinses and switches
d) Lock
off� Pressing and holding down the e off / j
6 Milk frother (Fig. C)
button (12) displays the user settings or
a) Steam valve
starts the descaling and cleaning function.
b) Metal sleeve
c) Frothing tube
h button
d) Steam nozzle
Press the h button (11) to generate steam
e) Air hole
for preparing milk froth�
7 Coffee outlet, height-adjustable
8 Drip tray (Fig. D)
start button
a) Drip tray panel
Press the start button (10) to begin drink
b) Coffee grounds container
preparation or to start a service programme�
c) Drip tray for coffee outlet
Press the start button (10) again during
d) Grate for coffee outlet
drink preparation to cut the dispensing
e) Float
process short�
9 Power on/off switch O / I
10 start button
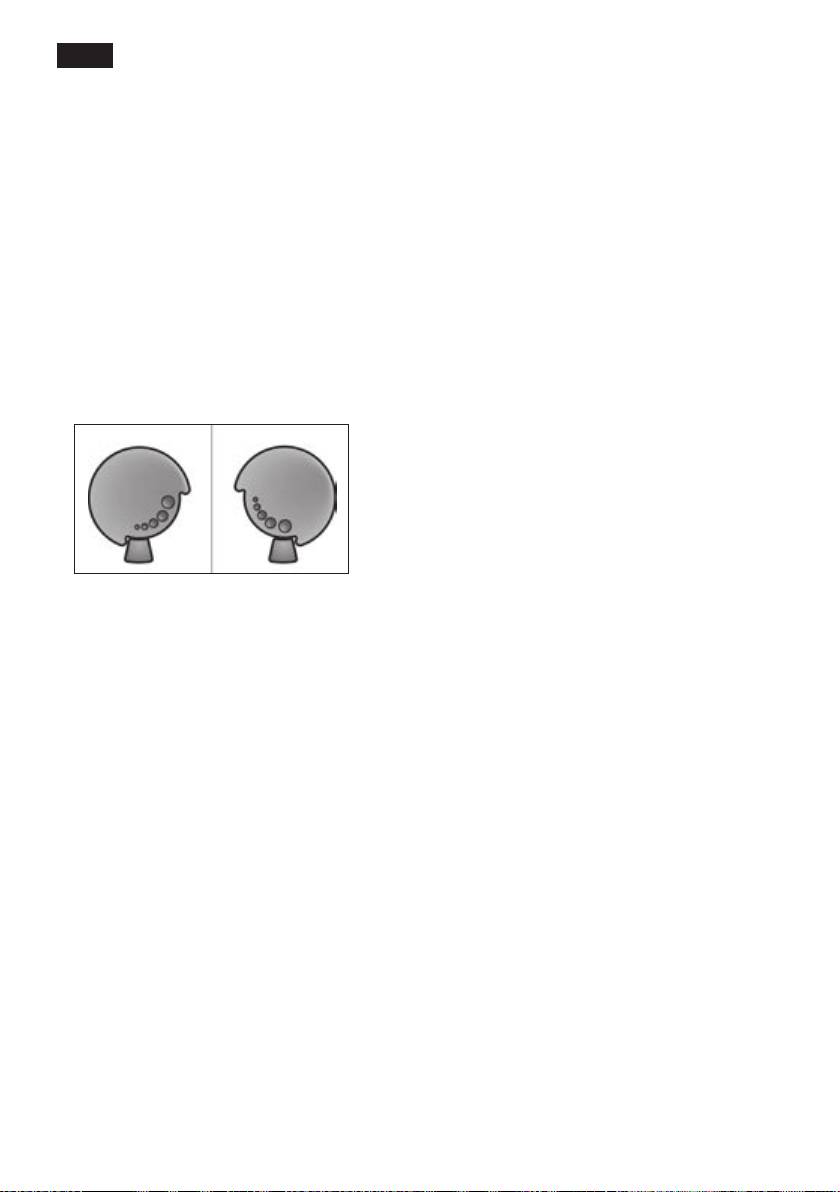
“Coffee strength” rotary knob
11 h button
12 e off / j button
This rotary knob (13) is used
13 “Coffee strength” rotary knob
to set the coffee strength�
14 “Drink selection” rotary knob
Very mild
h
15 Display
Mild
16 Removable water tank
Mild +
17 Lid for water tank
to
Normal
18 Measuring spoon
Normal +
(insertion aid for water lter)
g
Strong
19 Storage compartment for
measuring spoon
20 Power cable with storage compartment
5
deen
“Drink selection” rotary knob
Display messages
This rotary knob (14) is used
The display (15) shows not only the current
to select the required drink
operating status, but also various mes-
and the per-cup quantity. It
sages that give you status information or
is also used to change user
let you know when you need to take action.
settings�
As soon as you have taken the necessary
action, the message disappears and the
Small Espresso
a
menu for drink selection is displayed again.
Espresso
to
Small Café Crème
Café Crème
c
Large Café Crème
Before using for the
rst time
2 small Espresso
b
2 Espresso
General
to
2 small Café Crème
Fill the water tank with fresh, cold, uncar-
2Café Crème
bonated water only, and preferably use
d
2 large Café Crème
only beans for fully automatic coffee and
espresso machines. Do not use coffee
e
Rinse machine
beans that have been glazed, caramelised
or treated with other additives containing
f
Rinse milk system
sugar, since they will block the brewing unit.
N.B.: If a drink is selected that cannot be
The water hardness setting can be adjusted
prepared,
Invalid combination appears in
on this appliance. The factory default setting
the display� Change the coffee strength or
for the water hardness is 4� Check the
the selected drink�
water hardness with the enclosed test strip�
If the check reveals a value other than 4,
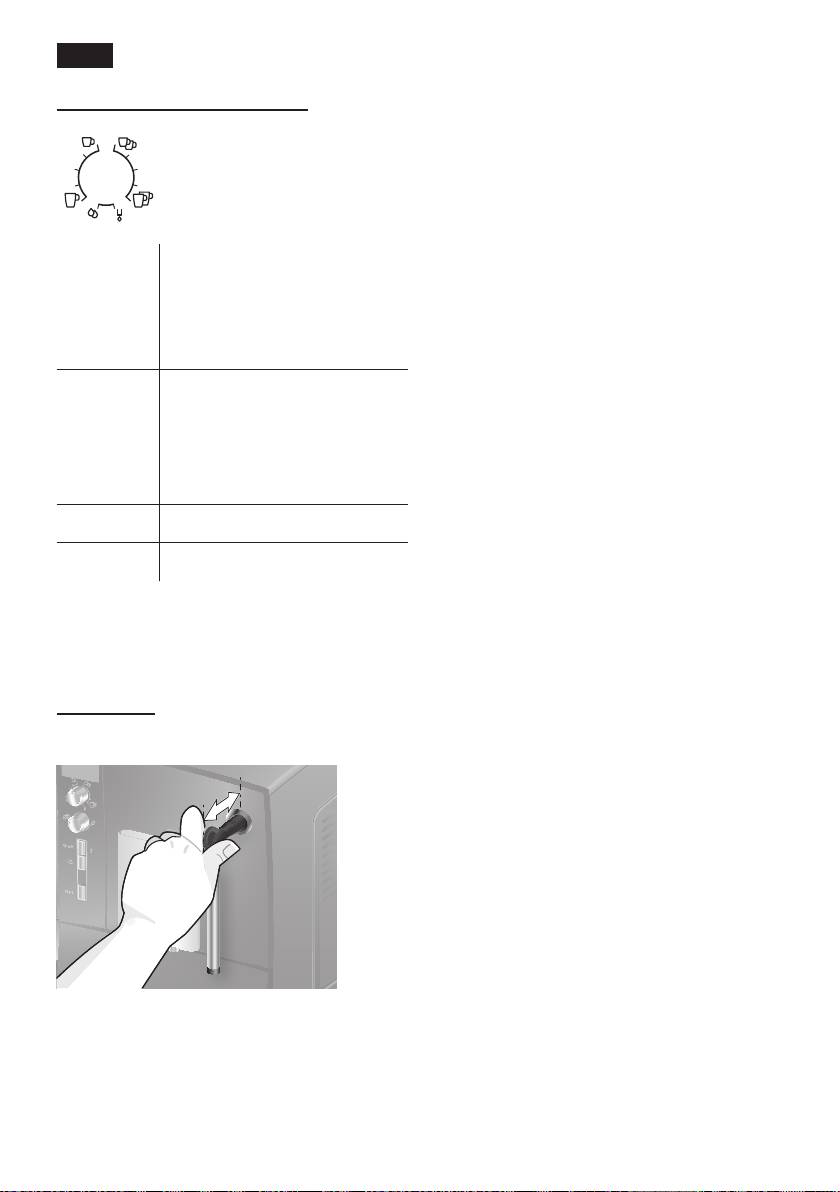
Milk frother
change the setting on the appliance accord-
Pull the milk frother (6) out to open it and
ingly after switching on (see “Menu settings”
push it back in to close it.
Water hardness on page 9)�
Switching on the appliance
1� Remove the protective lm.
2� Place the fully automatic espresso
machine on a at, water-resistant
surface that can take its weight. Make
sure that the machine’s ventilation slots
remain unobstructured.
Important: Only use the appliance in
frost-free rooms� If the appliance has been
transported or stored at temperatures below
0 °C, wait at least 3 hours before operation.
6
deen
3� Pull the power cord out of the storage
12� Press the start button (10). The
compartment (20) and plug in. Adjust
language you selected is saved. The
the length of the cable by pushing it
display shows
Pull milk frother�
back in or pulling it out. The easiest way
13� Place a receptacle under outlet.
to do this is to place the appliance so
14� Carefully pull out the milk frother (6) to
that its back is ush with the edge of the
open it. The appliance rinses out the
counter and either pull the cable down-
milk frother (6) with water. The display
ward or push it upward�
shows
Push milk frother�
4� Install the milk frother� Operate the
15� Push the milk frother (6) in to close it.
machine only after the milk frother (6)
The appliance heats up and rinses. Some
has been fully assembled and installed.
water will run out of the coffee outlet.
When the drink selection menu is shown in
the display, the appliance is ready for use.
Switching off the appliance
If the appliance has not been used for
an hour, it rinses automatically and
then switches off (time span can be
programmed, see “Menu settings”
Shutoff
on page 9)�
5� Lift the lid of the water tank (17)�
6� Remove and rinse the water tank (16)
Exception: The appliance switches off
and ll it with fresh cold water.
without rinsing if only hot water or steam
Do not ll above the max mark�
were dispensed�
7� Replace the water tank (16) and push it
rmly downward into place.
To switch the appliance off manually before
8� Close the lid of the water tank (17)
this, press the e off / j button (12). The
again�
appliance rinses and switches off�
9� Fill the bean container (1) with coffee
beans. (For preparation using ground
N.B.: If the appliance is being used for the
coffee, see “Preparation using
rst time, a service program has been run,
ground coffee” on page 11.)
or the appliance has not been operated
10� Press the power switch O / I (9). The
for a long period, the rst beverage will
display (15) shows the menu for setting
not have the full aroma and should not be
the display language.
consumed.
11� Select the required display language
with the upper rotary knob (14). The
When using the espresso machine for the
following languages are available:
rst time, you will achieve a suitably thick
English Nederlands
and stable “crema” only after the rst few
Français Italiano
cups have been dispensed.
Svenska Español
Polski Magyar
After extended use, water droplets may
Türkçe Dansk
form on the ventilation slots. This is normal.
Norsk Suomi
Português Čeština
ελληνικα български
русский
7
deen
Water lter
A water lter can prevent scale buildup.
Before a new water lter is used, it must be
rinsed. To do this, proceed as follows:
1� Press the water lter rmly into the
water tank with the aid of the measuring
spoon (18)�
2� Fill the water tank (16) with water up to
the max mark�
3� Press and hold the e off / j button (12)
for at least three seconds. The menu
opens�
4� Press the e off / j button (12)
repeatedly until the display shows
Note: You can use the lter indicator to
No / Oldfilter�
mark the month in which you inserted the
5� Select Activate filter with the upper
lter. You can also mark the month in which
rotary knob (14)�
you will need to replace the lter next (at
6� Press the start button (10).
the latest after two months)�
7� Place a receptacle with a capacity of
0.5 litres under the outlet.
8� Press the start button (10).
9� Pull the milk frother (6) to open it.
10� Water will now ow through the lter to
rinse it�
11� Push the milk frother (6) in to close it.
12� Empty the container.
The appliance is ready to use once more.
Note: If the appliance has not been used
Note: Rinsing the lter simultaneously
for a prolonged period (e�g� vacation) the
activates the setting for the
Change filter!
lter should be rinsed before the appliance
display�
is used again. To do so, dispense a cup of
hot water and pour it away.
The lter is no longer effective when the
Change filter! display appears, or at
the latest after 2 months� It needs to be
replaced for reasons of hygiene and so that
there is no build-up of limescale (this could
damage the appliance)�
Replacement lters can be obtained from
retailers (TZ70003) or from customer
service (467873). If no new lter is used,
turn the
filter setting to No / Old�
8

deen
Language
Menu settings
The display language can be set here.
You can adapt the appliance to your
individual needs in the menu settings.
Water hardness
1� Hold the e off / j button (12) down for at
The water hardness setting can be adjusted
least 3 seconds�
on this appliance� It is important to set the
2� Press the e off / j button (12) repeatedly
water hardness correctly, so that the appli-
until the required menu item appears in
ance indicates accurately when the descal-
the display�
ing programme should be run. The factory
3� Select the required setting with the
setting for the water hardness is 4�
upper rotary knob (14).
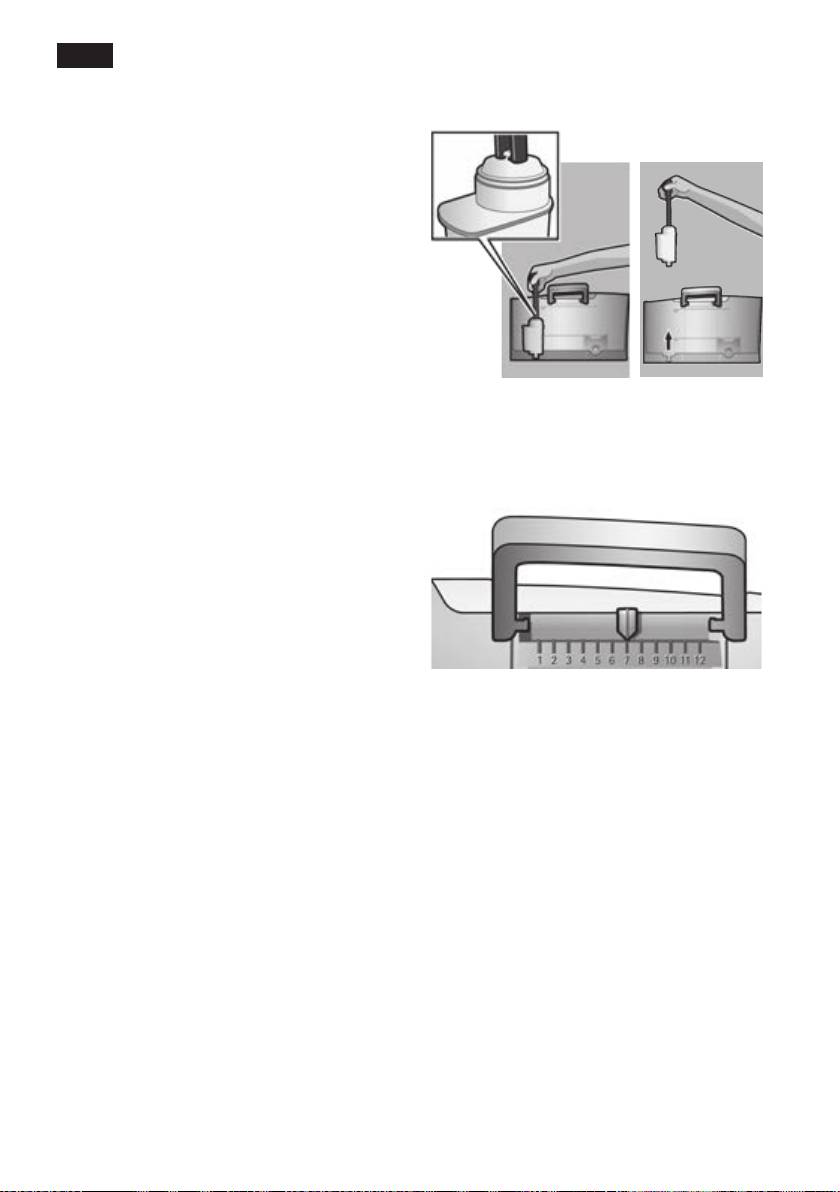
You can check the water hardness using
4� Conrm by pressing the start button
the enclosed test strip or by asking your
(10)�
local water supplier.
To leave the menu without making any
Dip the test strip briey in water, gently
changes, turn the rotary selector to Exit
shake off any drips, and check the result
and press the start button (10).
after one minute.
You can set the following:
Level Water hardness
German (°dH) French (°fH)
Shut off
1
1-7
1-13
Here you can set the time span after which
2
8-14
14-25
the appliance automatically switches off
3
15-21
26-38
following the last drink preparation� A time
4
22-30
39-54
between 15 minutes and 4 hours can be
set. The default time is 1 hour, but this can
be shortened to save energy�
Filter
Here you can set whether a water lter is
being used. If a water lter is not being
used, turn the setting to No / Old� If a
water lter is being used, turn the setting to
Activate filter. New water lters have to
be rinsed before use (see “Water lter” on
page 8)�
Start Calc‘n‘Clean
The service programmes (Calc‘n‘Clean
/ descaling / cleaning) can be selected
manually here. Press the start button (10)
and run the selected programme (see “Ser-
vice Programmes” on page 15)�
Temp.
The brewing temperature (high / middle /
low) can be set here�
9
deen
Adjusting the
Preparation using
grinding unit
coffee beans
The rotary selector (3) adjusts the grind
This fully automatic espresso machine
settings from coarse to ne.
grinds beans freshly for each brew�
¡
Warning
Tip: If possible, use only beans for fully
Adjust the grinding unit only while it is
automatic coffee and espresso machines.
running! Otherwise the appliance may be
For optimal quality, deep-freeze the beans
damaged� Do not reach into the grinding
or store in a cool place in sealed containers�
unit.
Coffee beans can be ground while frozen.
● While the grinding unit is running, adjust
the rotary selector (3) from ne (a: Turn
Important: Fill the water tank (16) with
anticlockwise) to coarse (b: Turn clock-
fresh water every day. The tank (16) should
wise) as required.
always contain sufcient water for operating
the appliance�
a b
Different coffee drinks can be prepared
quite simply at the press of a button.
Preparation
The appliance must be ready for use.
1� Place the pre-warmed cup(s) under the
Note: The new setting will not become
coffee outlet (7).
apparent until after the second cup of
Tip: For a small espresso, always pre-
coffee�
heat the cup, e.g. using hot water.
2� Select the required coffee and the
Tip: For dark roast coffee beans, choose a
required per-cup quantity by turning the
ner grind, for lighter beans a coarser grind.
upper rotary knob (14). The selected
coffee and the per-cup quantity are
shown in the display�
3� Select the required coffee strength by
turning the lower rotary knob (13). The
selected coffee strength is shown in the
display�
4� Press the start button (10)�
The coffee is brewed and then dispensed
into the cup(s).
Press the start button (10) again to cut the
brewing process short�
10

deen
Preparation using
Preparing milk froth
ground coffee
¡
Risk of burns
This fully automatic espresso machine can
The milk frother (6) gets very hot. Hold the
also be operated with ground coffee (not
milk frother (6) by the plastic part only�
instant coffee powder)�
Tip: You can foam the milk rst and then
Important: Fill the water tank (16) with
dispense coffee, or foam the milk separately
fresh water every day. The tank (16) should
and pour it onto the coffee.
always contain sufcient water for operating
the appliance�
The appliance must be ready for use with
the cleaned milk frother attached�
Preparation
1� Press the h button (11).
1� Open the drawer (4)�
The h button (11) ashes and the
2� Pour in no more than 2 level measuring
appliance now heats up for approx.
spoons of ground coffee.
20 seconds. The display then shows
Warning: Do not use whole beans or
Pull milk frother�
instant coffee�
2� Immerse the milk frother so that it
3� Close the drawer (4)�
reaches the bottom of a cup or glass
4� Select the required drink by turning the
that is one-third lled with milk.
upper rotary knob (14) (only one cup
3� Pull the milk frother (6) to open it.
possible)�
5� Press the start button (10)�
¡
Risk of scalding
The coffee is brewed and then dispensed
Splashes of milk can scald. Do not touch
into the cup.
the outlet (6a) or aim it at anyone.
N.B.: Repeat the procedure for another
4� Close milk frother (6) by pushing it in.
cup of coffee. If no coffee is taken within
90 seconds, the brewing chamber empties
Tip: For optimal milk froth quality, use cold
automatically to avoid overlling. The appli-
milk with a fat content of at least 1�5 % if
ance rinses�
possible�
Important: Dried milk residue is difcult
Dispensing hot water
to remove, so the milk frother (6) must be
¡
Risk of burns
cleaned with lukewarm water immediately
The milk frother (6) gets very hot. Hold the
after use and rinse using the Rinse milk
milk frother (6) by the plastic part only�
system
programme (see page 13)�
The appliance must be ready for use with
the cleaned milk frother attached�
1� Place the pre-warmed cup or glass
under the outlet of the milk frother (6).
2� Pull the milk frother (6) to open it. The
appliance heats up. Hot water runs out
of the milk frother outlet (6) for about 40
seconds�
3� Stop the process by pushing in the milk
frother (6)�
11
deen
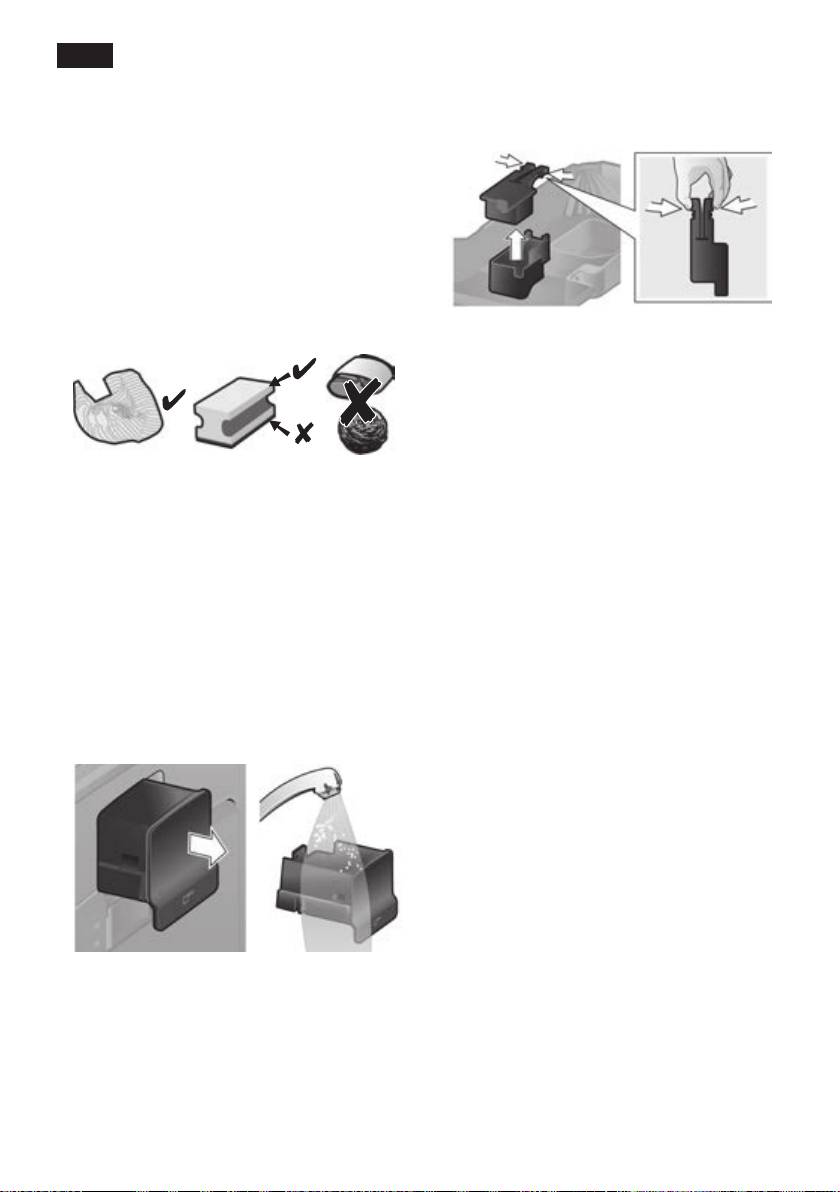
● Remove the oat (8e) and clean with a
Maintenance and
damp cloth�
daily cleaning
¡
Risk of electric shock
Unplug the appliance before cleaning it.
Never immerse the appliance in water�
Do not use a steam cleaner.
● Wipe the outside of the appliance with a
soft, damp cloth.
● Do not use abrasive cloths or cleaning
agents�
Do not put the following items in the
K
dishwasher: drip tray panel (8a), oat
(8e), drawer (4), brewing unit (5a).
The following items are dishwasher-
J
safe: drip tray for coffee outlet (8c),
coffee grounds container (8b), grate for
coffee outlet (8d), aroma cover (2) and
● Always remove any limescale, coffee,
measuring spoon (18).
milk or descaling uid residue immedi-
● Wipe out the inside of the appliance (tray
ately. Such residue can cause corrosion.
holders and drawer)�
New sponge cloths may contain salts�
Salts can cause rust lm on stainless
Important: Drip tray for coffee outlet (8c)
steel and must therefore be washed out
and coffee grounds container (8b) should
thoroughly before use.
be emptied and cleaned daily to prevent
● Pull the drip tray (8c) with the coffee
mould from developing.
grounds container (8b) forward and out.
Remove the panel (8a) and the grate
N.B.: If the appliance is cold when switched
(8d). Empty and clean the drip tray and
on with the power switch O / I (9) or if it
coffee grounds container.
switches off automatically after coffee has
● Remove drawer (4) and clean�
been dispensed, it rinses automatically. In
other words the system cleans itself�
Important: If the appliance has not been
used for a prolonged period of time (e.g.
after a vacation), clean the entire appliance
thoroughly, including the milk system and
brewing unit.
12
deen
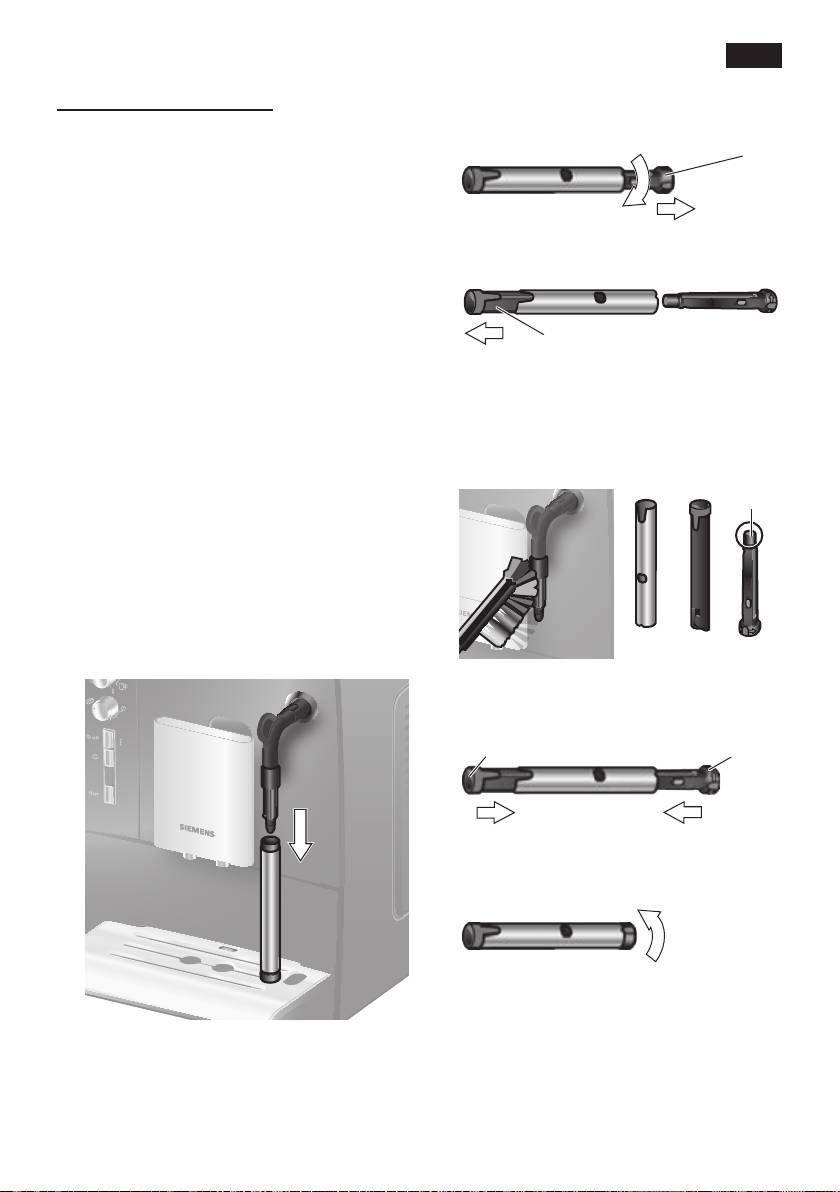
Cleaning the milk system
2� Twist the steam nozzle (6d) anticlock-
If the milk system was not cleaned after
wise and remove it�
milk has been dispensed, after a certain
amount of time the message Rinse milk
system!
will appear on the display�
Clean the milk system immediately after use!
To pre-clean the milk system automatically:
1� Select
f
by turning the rotary knob (14).
2� Place a receptacle under the milk frother
(6)�
3� Press the start button (10).
4� Pull the milk frother (6) to open it. The
appliance now automatically lls the
receptacle with water. The rinse proce-
dure stops automatically after about 1
minute.
5� Push the milk frother (6) in to close it.
6� Let the milk frother (6) cool down�
7� Empty the receptacle and wipe dry the
outside of the milk frother (6).
In addition to this, clean the milk system
thoroughly at regular intervals (by hand or
in the dishwasher)�
Dismantling the milk system for cleaning:
1� To remove, take hold of the metal sleeve
and pull it downwards and off.
13
1
6d
2
3� Remove the frothing tube (6c).
6c
4� Clean the individual parts with a
detergent solution and a soft brush. If
necessary, soak in a warm detergent
solution. Clean the air hole (6e)
thoroughly.
6e
5� Rinse all parts with clean water and dry�
6� Fit the steam nozzle (6d) and frothing
tube
(6c) back into the metal sleeve�
6d6c
1 2
7� Twist the steam nozzle clockwise until
the marks are aligned�
deen
8� Attach the milk frother to the steam
6� Rinse the brewing unit (5a) thoroughly
valve� Check that the red mark on the
under running water.
steam valve is covered�
7� Hold the brewing unit sieve under the
running water.
¡
Risk of scalding
Only use the appliance when the milk
frother (6) is completely assembled and
tted.
Cleaning the brewing unit
Clean the brewing unit regularly.
To pre-clean the brewing unit automatically:
1� Select e by turning the rotary knob (14).
Important: Do not clean with detergent or
2� Place an empty glass under outlet (7).
other cleaning agents and do not put it in
3� Press the start button (10).
the dishwasher�
The appliance rinses.
8� Wipe out the inside of the appliance
In addition to the automatic cleaning
thoroughly with a damp cloth and
programme, the brewing unit (5a) should be
remove any coffee residues.
removed regularly for cleaning. (See gure
9� Allow the brewing unit (5a) and the
E at the start of the operating instructions.)
inside of the appliance to dry�
1� Switch the appliance off at the power
10� Reinsert the brewing unit (5a) fully into
on/off switch O / I (9). No buttons are lit.
the appliance�
2� Open the door (5b) to the brewing unit.
11� Press the eject lever (5c) up fully.
3� Slide the red lock (5d) on the brewing
12� Slide the red lock (5d) fully to the right
unit completely to the left.
and close the door (5b)�
4� Press the eject lever (5c) down fully. The
brewing unit is released.
5� Grasp the brewing unit (5a) by the
recessed grips and remove carefully.
14

deen
Tips on energy saving
Service Programmes
● The fully automatic espresso machine
Depending on usage, the following
switches off automatically after one hour
messages will appear on the display at
(factory setting). The default time of
certain intervals:
one hour can be shortened (see “Menu
Descale required!
settings – Shut off” on page 9)�
or
● Switch off the fully automatic espresso
Clean required!
machine when not in use. To do this,
or
press the e off / j (12) button. The appli-
Calc‘n‘Clean required!
ance rinses and switches off�
● If possible, do not interrupt coffee or milk
The appliance should be cleaned or des-
froth dispensing. Cutting the coffee or milk
caled immediately using the corresponding
froth dispensing process short results in
programme. You also have the option
higher energy consumption and in more
of combining both processes with the
residual water collecting in the drip tray.
Calc‘n‘Clean function (see “Calc‘n‘Clean”
● Descale the appliance regularly to avoid
on page 17)� If the service programme is not
a build-up of limescale. Limescale residue
run as instructed, the appliance may be
results in higher energy consumption.
damaged�
¡
Warning
Each time you run the service programme,
you should follow the instructions for using
the descaling and cleaning agents� Please
observe the safety instructions on the pack-
aging of the cleaning agent�
Never interrupt the service programme!
Do not drink the liquids!
Never use vinegar, vinegar-based products,
citric acid or citric acid-based products!
Never put descaling tablets or other descal-
ing agents in the ground coffee drawer or
the drawer for cleaning tablets (4)!
Specially developed descaling and
cleaning tablets are available from retail-
ers or customer service.
Order number Retail Customer
service
Cleaning
TZ60001 310575
tablets
Descaling
TZ60002 310967
tablets
15

deen
Descaling
Place container
Duration: approx. 25 minutes.
Pull milk frother
● Place a receptacle with a capacity of at
Important: If there is a lter in the water
least 0.5 litres under the outlet.
tank (16), it needs to be removed before the
● Pull the milk frother (6) to open it.
descaling programme is run.
Descale in progress
If the message Descale required!
The descaling pro gramme will now run for
appears on the display, press the e off / j
about 12 minutes.
button (12) for 3 seconds and then press
the start button (10). The descaling pro-
Clean / Fill water tank
gramme will start�
Press start
To descale the appliance before being
● Rinse the water tank (16) and rell it with
prompted, press the e off / j button (12) for
fresh water up to the max mark�
at least 3 seconds. Then press the e off / j
● Press the start button (10).
button (12) briey twice. Turn the upper
rotary knob (14) until Start descaling
Descale in progress
appears in the display�
The descaling pro gramme now runs for
To start the descaling procedure, press the
about 30 seconds and rinses the appliance.
start button (10).
The display will guide you through the
Push milk frother
programme�
● Push the milk frother (6) in to close it.
Empty drip tray
Descale in progress
Insert drip tray
The descaling pro gramme now runs for
● Empty drip tray (8) and replace them.
about 1 minute.
Empty drip tray
N.B.: If the water lter is activated, the
Insert drip tray
display will prompt you to remove the
● Empty drip tray (8) and replace them.
lter and then press the start button (10)
Replace the lter if one is being used. The
again. Remove the lter now if you have
appliance has completed descaling and is
not already done so� Press the start button
ready for use again.
(10)�
Important: Wipe down the appliance using
Fill descaler
a soft, damp cloth to immediately remove
Press start
any descaler residue. Such residue can
● Pour lukewarm water into the empty
cause corrosion. New sponge cloths may
water tank (16) up to the 0,5l mark and
contain salts. Salts can cause rust lm
dissolve 2 Siemens descaling tablets in it�
on stainless steel and must therefore be
● Press the start button (10).
washed out thoroughly before use.
Descale in progress
The descaling pro gramme will now run for
about 10 minutes.
16
