Karcher ICC 2 D ADV STAGE IIIa: Before Startup
Before Startup: Karcher ICC 2 D ADV STAGE IIIa
-
6
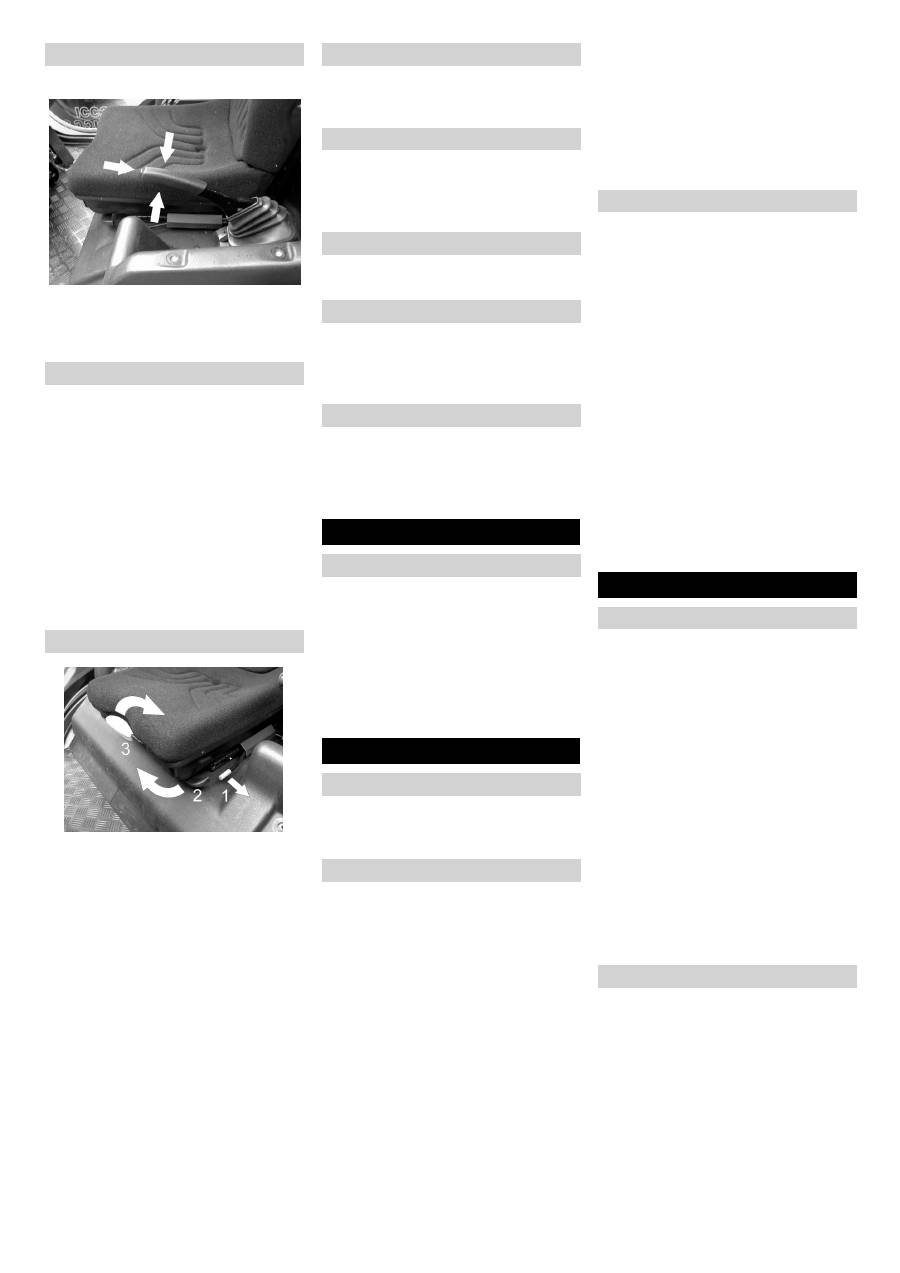
Pull up the handle.
Press the locking button and release
the handle.
Pull upwards the lever located under
the seat.
Slide seat, release lever and lock in
place.
Check that the seat is properly locked in
position by attempting to move it back-
wards and forwards.
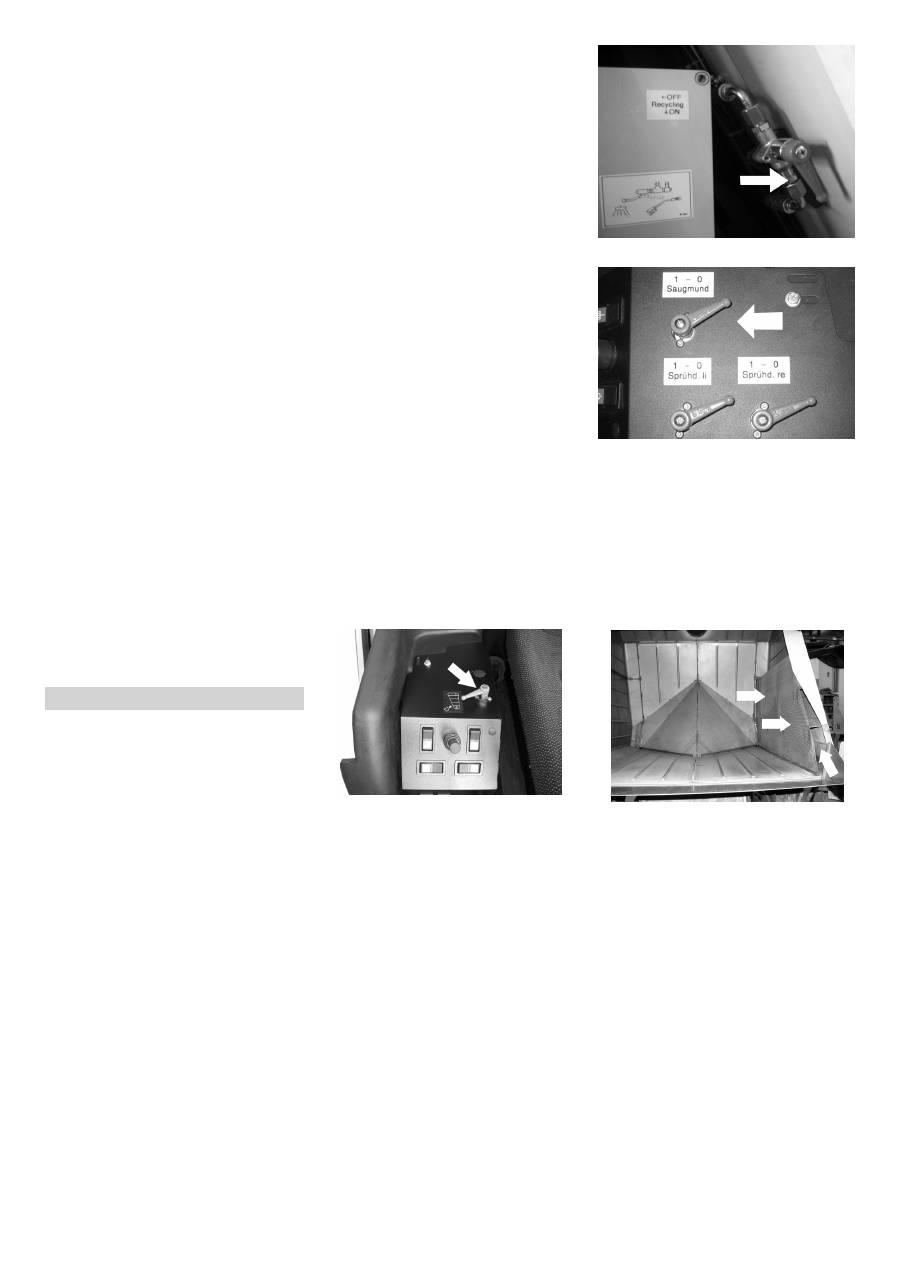
Turn the hand-wheel at the rear of the
seat.
–
In clock-wise direction: Spring harder
–
Anti-clockwise direction: Spring softer
Press the lever (1).
Slide seat, release lever and lock in
place.
Check that the seat is properly locked in
position by attempting to move it back-
wards and forwards.
Tilt the lever (2) until the scales show
your body weight.
–
Set the body weight between 50-130
kg.
–
If you tilt until the end, the setting is
done for 50 kg.
Tilt the handle (3).
Adjust the seat.
Insert the consumer load at 12V-con-
nection.
(see switch strip)
Switch on/off the blower.
(see switch strip)
–
for heating: level 2
–
for air-conditioner: level 3
Turn on/off the air-conditioner.
(see switch strip)
Activate the slide.
(see switch strip)
–
Slide is pushed in = fresh air
–
Slide is pulled out = air circulation
Activate the slide.
(see switch strip)
–
Slide is pushed in = cold
–
Slide is pulled out = warm
Note
The appliance is fitted with tension belts for
safe transport.
To unload the machine, proceed as follows:
Remove tension belts.
Release parking brake.
Drive down the appliance from the
transport vehicle.
Park the sweeper on an even surface.
Remove ignition key.
Lock parking brake.
Danger
Risk of explosion!
–
Only use the fuels specified in the Op-
erations Manual.
–
Do not refuel the machine in enclosed
spaces.
–
Smoking and naked flames are strictly
prohibited.
–
Ensure that no fuel reaches the hot
open surfaces.
Switch off engine.
Open fuel filler cap.
Fill in diesel.
Fill in the tank up to a level 1 cm below
the lower edge of the filling nozzle be-
cause the fuel expands on heating.
Wipe off any spilt fuel and close fuel fill-
er cap.
–
Estimate the fuel requirement in order
to avoid overflows.
–
Insert the fuelling gun as deep as possi-
ble into the fuel nozzle. Do not add any
more fuel once the fuelling gun stops
according to the settings.
Check engine oil level. *
Check water cooler and maintain it. *
Check tyre pressure. *
Check fill level of fuel tank. *
Adjust driver's seat.
Check suction channel. *
Check setting of suction opening. *
Check lights and ensure that they are
functioning properly. *
Check signaling and warning systems
for proper functioning. *
Fill the water reservoir. *
Check side brush. *
Empty waste container.
* For description, see section on Care and
maintenance.
몇
Warning
Rectify any defect you may find immediate-
ly or bring the vehicle to a halt.
Sit on the driver's seat.
Do NOT press the accelerator pedal.
Lock parking brake.
Switch off the working hydraulic.
Set the drive direction indicator to posi-
tion (0) (neutral).
Turn the ignition key to position "I".
Pre-heat lamp glows.
When the pre-heating lamp goes off,
turn the ignition key to position "II".
If the machine starts, release the igni-
tion key.
Note
Never operate the starter motor for longer
than 10 seconds. Wait at least 10 seconds
before operating the starter motor again.
Press the brake pedal.
Set the drive direction indicator to posi-
tion (1) (drive forwardl).
Release parking brake.
Press accelerator pedal down slowly.
Danger
Risk of injury! While reversing, ensure that
there is nobody in the way, ask them to
move if somebody is around.
Press the brake pedal.
Parking brake
Lock parking brake
Release parking brake
Adjusting driver's seat
Adjusting the seat position
Adjusting the seat springs
Comfortable seat (accessory)
Adjusting the seat position
Adjusting the seat springs
Adjust seat position
12V connection
Blower
Air-conditioner (accessory)
Fresh air circulation
Heating
Before Startup
Unloading
Start up
General notes
Refuelling
Fuelling using a can
Fuelling using the fuelling gun
Inspection and maintenance work
Operation
Starting the machine
Pre-heat
Start the engine
Drive the machine
Drive forward
Reverse drive
28 EN
-
7
Set the drive direction indicator to posi-
tion (2) (reverse drive).
Release parking brake.
Press accelerator pedal down slowly.
Note
Driving method
–
A warning tone is sounded while revers-
ing.
–
The accelerator pedal can be used to
vary the driving speed infinitely.
–
Avoid pressing the pedal suddenly as
this may damage the hydraulic system.
–
In the event of power loss on inclined
surfaces, slightly reduce the pressure
on the accelerator pedal.
–
Change the driving direction only after
the vehicle has come to a halt.
Release the accelerator pedal, the ma-
chine brakes automatically and stops.
Note
The braking effect can be supported by
pressing the foot-brake.
몇
Warning
Raise the side-brushes and the suction
opening before overtaking hurdles.
Hurdles up to 150 mm in height:
Bypass the hurdle slowly and carefully
at an angle of 45°.
Hurdles more than 150 mm in height:
Only drive over these obstacles using a
suitable ramp.
몇
Warning
Risk of damage! Ensure that the vehicle
does not get stuck up.
Danger
Risk of injury! If the bulk waste flap is open,
stones or gravel may be flung forwards by
the roller brush. Make sure that this does
not endanger persons, animals or objects.
몇
Warning
Do not sweep up packing strips, wire or
similar objects as this may choke up the
suction canal.
몇
Warning
To avoid damaging the floor, do not contin-
ue to operate the sweeping machine in the
same position.
Note
To achieve an optimum cleaning result, the
driving speed should be adjusted to take
specific situations into account.
Note
During operation, the waste container
should be emptied at regular intervals.
Set the idle running for the motor rpm
setting to 1600-1800 1/min.
(see console ).
Note
The motor rpm can be called via the multi-
functional display.
Turn on the working hydraulics (1st lev-
el).
(see operating panel).
Switch on the suction turbine and the
side-brushes (2nd step).
Note
Only driving is possible if the working hy-
draulics is switched off.
Set the side-brush speed on the speed
regulator.
(see operating panel).
–
In clock-wise direction: Side-brush
speed increases
–
Anti-clockwise direction: Side-brush
speed decreases
Press spray water button.
(see console ).
Spray water for side-brushes and suction
opening gets activated.
Note
The function of the spray-water pump is
displayed on a yellow indicator lamp, see
multi-functional display.
If the tank is empty, the yellow indicator
lamp goes off.
Switch-off spray water.
Fill the water reservoir.
Adjust the water flow to the side-brush-
es using the regulation valve.
–
In clock-wise direction: Water flow in-
creases
–
Anti-clockwise direction: Water flow de-
creases
Note
There is an accessory with 2 regulation
valves for separately controlling the water
flow to both the sides.
The applicance is fitted with a water circu-
lation system for increasing the duration of
usage (fresh water reservoir). In the water
circulation system, the water from the
waste container is guided to the suction
opening and thus circulated. Further, it is
also possible to add fresh water.
Fill the waste container with water up to
the end of the front slant. To suck in
leaves, fill lesser quantity of water in the
waste container.
Set the lever for recycling to ON.
Regulate additional supply of fresh wa-
ter to the suction opening using the le-
ver for suction opening.
Switch on the suction turbine; start
cleaning work.
After finishing operations, switch off the
suction turbine approx. 30 seconds af-
ter the suction opening has got raised.
This will prevent water from leaking
when the appliance has been switched
off.
Every time you empty the waste con-
tainer, rinse the sieve in the waste con-
tainer using the water hose and clean
the space behind the sieve.
Set the lever for recycling to OFF while
operating without water circulation.
When the appliance is switched off,
make sure the lever for recycling is set
to OFF because otherwise the hoses
leading to the suction opening will get
blocked.
The sieve and the space behind the
sieve must be cleaned every time you
empty the waste container even if you
are operating the appliance without wa-
ter circulation.
4-brush system:
Press the toggle switch downward. The
side-brushes will be lowered.
(see console ).
Brakes
Driving over obstacles
Sweeping mode
Setting the motor rpm
Switching on the working hydraulics
Adjusting the side-brush speed
Turn on/off the spray water
Regulate the water flow to the side-
brushes.
Water circulation system
Operating without water circulation sys-
tem
Raise/lower side-brushes
29 EN
-
8
Press the toggle switch upward. Side
brushes lift up.
2-brush system:
Press the toggle switch downward. The
side-brushes will be lowered.
(see console ).
Press the toggle switch upward. Side
brushes lift up.
–
The hydraulic side-brush relief reduces
the contact pressure of the brush on the
track.
–
The floor is protected against friction
and wear if the brushes are relieved
and this also increases the life of the
brushes.
–
The relief can be adjusted in infinitely
variable steps depending on the track
surface and the dirt that appears.
Raise/lower side-brushes:
Press the toggle switch downward. The
side-brushes are lowered; the relief is
deactivated.
(see console ).
Toggle switch in central position. The
side-brushes are lowered; the relief is
activated.
Press the toggle switch upward. Side
brushes lift up.
Setting the hydraulic side-brush relief:
Setting the relief of the brushes at the
speed regulator.
The side-brushes can individually be
stopped in a raised position.
Close the ball tap when the side-brush-
es are lifted up.
Move joystick to position (2). Side-
brushes are driven out.
Move joystick to position (4). Side-
brushes are drawn in.
Note
Only 2-brush system: The side-brushes
can only be driven out when they are rotat-
ing.
Note
To sweep in larger objects such as bever-
age cans or larger quantities of leaves, it is
necessary to briefly raise the bulk waste
flap.
Raising bulk waste flap:
Press the pedal for the bulk waste flap
forwards and keep pressed down.
To lower it, take foot off pedal.
Note
An optimum cleaning result can only be
achieved if the bulk waste flap has been
lowered completely.
To avoid deposits in the suction channel
and durst formation, the water supply to the
brush nozzles must be on.
Switch on the spray water.
(see console ).
Switch off the water supply to the brush
nozzles if there is practically no dust forma-
tion.
Switch-off spray water.
(see console ).
Note
To achieve an optimum cleaning result, the
driving speed or rahter the sweeping width
should be adjusted to take specific situa-
tions into account.
The front side-brushes can be driven in or
out depending on how dirty the plane sur-
face is.
Drive out the side-brushes (2).
Drive in the side-brushes (4).
Note
The sweeping width should be adjusted ac-
cording to how dirty the plane surface is so
that the waste can be sucked in completely.
The inclination of the front side-brushes
can be adjusted according to the geometry
of the driving path.
Tilt the right side-brushes (1).
Tilt the left side-brushes (2).
Tilt the right side-brushes if required.
Hydraulic side-brush relief (attachment)
Position
Relief on the brushes
1
minimum
5-8
medium (recommended
setting)
11
maximum
Stop side-brush lift up (only 2-brush
system)
Move in/out the side-brush
Sweeping in larger objects
Sweeping dry floors
Sweeping damp or wet floors
Sweeping plane surfaces
Inclination of the front side-brushes (on-
ly 4-brush system)
Sweeping along the limitations of the
driving path (only 4-brush system)
30 EN
-
9
To sweep in edge area on right-hand side:
Drive in the left side-brush and drive out
the right side-brush (1).
To sweep in edge area on left-hand side:
Drive in the right side-brush and drive
out the left side-brush (3).
–
The left side-brushes can be locked to
sweep narrow passages or foot-paths.
–
The right side-brushes can still be
moved using the joystick in position (1)
and (3).
–
If you move the joystick to position (2)
and (4), both the side-brushes in or out.
–
At narrow bends, turn in the external
brushes.
Danger
Risk of injury! While reversing, ensure that
there is nobody in the way, ask them to
move if somebody is around.
Danger
Danger of tipping. Place the machine on an
even surface during emptying.
Danger
Danger of tipping. Maintain the required
safety distance while emptying on dumps
or ramps.
Danger
Risk of injury! Switch off the suction turbine
before emptying the waste container.
Danger
Risk of injury! When emptying the waste
container, care should be taken to ensure
that no persons or animals are within its
swivelling range.
Danger
Danger of crushing. Never reach into the
rod assembly for the drainage mechanism.
Note
Always raise the waste container complete-
ly until its end position.
Switch off the spray water for side-
brushes and suction opening.
Stop the machine.
Lock parking brake.
Set the drive direction indicator to posi-
tion (0) (neutral).
Drive in the side-brushes.
The side-brushes lift up.
Switch off the suction turbine and the
side-brushes (2nd step).
Open the side-flaps.
Drain off water on both sides.
Raise waste container (1).
Empty waste container.
Lower waste container (2).
Note
There is a warning sound signal when the
waste container is lowered.
Lock parking brake.
Open the side-flaps.
Drain off water on both sides.
Remove the operating lever for the
pump.
Insert the operating lever on the pump
lever.
몇
Warning
Manually lift the lid of the waste container
before starting the pumping operations.
This will help in avoiding damage to the
rear panel.
Raise the waste container through
pumping.
Switch off the spray water for side-
brushes and suction opening.
Stop the machine.
Lock parking brake.
Set the drive direction indicator to posi-
tion (0) (neutral).
Drive in the side-brushes.
The side-brushes lift up.
Switch off the suction turbine and the
side-brushes (2nd step).
Turn off the working hydraulics (1st lev-
el).
Set the dry run speed.
Turn ignition key to "0" and remove it.
Open the screw cap.
Hang in the special tool (accessory)
and turn in anti-clockwise direction.
Loosen the fasteners of the suction
hose.
Connect the hose to the nozzle.
Loosen the fasteners of the suction
nozzle
Sweeping at narrow places
Emptying waste container
Emptying the waste container man-
ually
Turn off the appliance
Leaf suction (accessory)
31 EN
Оглавление
- Inhaltsverzeichnis
- Funktion Bestimmungsgemäße Ver- wendung
- Bedien- und Funktionselemente
- Bedienung
- Vor Inbetriebnahme
- Stilllegung Pflege und Wartung
- Zubehör
- Hilfe bei Störungen
- Technische Daten
- EG-Konformitätserklärung
- Contents
- Function Proper use
- Operating and Functional Elements
- Operation
- Before Startup
- Shutdown Maintenance and care
- Accessories
- Troubleshooting
- Technical specifications
- EC Declaration of Conformity
- Table des matières
- Fonction Utilisation conforme
- Eléments de commande et de fonction
- Utilisation
- Avant la mise en service
- Remisage Entretien et maintenance
- Accessoires
- Assistance en cas de panne
- Caractéristiques techniques
- Déclaration de conformité CE
- Indice
- Funzione Uso conforme a destinazione
- Elementi di comando e di funzione
- Uso
- Prima della messa in funzione
- Fermo dell'impianto Cura e manutenzione
- Accessori
- Guida alla risoluzione dei guasti
- Dati tecnici
- Dichiarazione di conformità CE
- Inhoudsopgave
- Functie Reglementair gebruik
- Elementen voor de bediening en de functies
- Bediening
- Voor de inbedrijfstelling
- Stillegging Onderhoud
- Toebehoren
- Hulp bij storingen
- Technische gegevens
- EG-conformiteitsverklaring
- Índice de contenidos
- Función Uso previsto
- Elementos de operación y funcionamiento
- Manejo
- Antes de la puesta en marcha
- Parada
- Cuidados y mantenimiento
- Accesorios
- Ayuda en caso de avería
- Datos técnicos
- Declaración de conformidad CE
- Índice
- Funcionamento Utilização conforme o fim a que se destina a máquina
- Elementos de comando e de funcionamento
- Manuseamento
- Antes de colocar em funcio- namento
- Desactivação da máquina Conservação e manutenção
- Acessórios
- Ajuda em caso de avarias
- Dados técnicos
- Declaração de conformidade CE
- Indholdsfortegnelse
- Funktion Bestemmelsesmæssig‚ anvendelse
- Betjenings- og funktionselementer
- Betjening
- Inden ibrugtagning
- Afbrydning/nedlæggelse Pleje og vedligeholdelse
- Tilbehør
- Hjælp ved fejl
- Tekniske data
- EU-overensstemmelseser- klæring
- Innholdsfortegnelse
- Funksjon Forskriftsmessig bruk
- Betjenings- og funksjonelementer
- Betjening
- Før den tas i bruk
- Sette bort Pleie og vedlikehold
- Tilbehør
- Feilretting
- Tekniske data
- EU-samsvarserklæring
- Innehållsförteckning
- Funktion Ändamålsenlig användning
- Manövrerings- och funktionselement
- Handhavande
- Före ibruktagande
- Nedstängning Skötsel och underhåll
- Tillbehör
- Åtgärder vid störningar
- Tekniska data
- Försäkran om EU-överens- stämmelse
- Sisällysluettelo
- Toiminta Käyttötarkoitus
- Ohjaus- ja käyttölaitteet
- Käyttö
- Ennen käyttöönottoa
- Seisonta-aika Hoito ja huolto
- Tarvikkeet
- Häiriöapu
- Tekniset tiedot
- EU-standardinmukaisuusto- distus
- Πίνακας περιεχομένων
- Λειτουργία Χρήση σύμφωνα με τους κα - νονισμούς
- Στοιχεία χειρισμού και λειτουργίας
- Χειρισμός
- Πριν τη θέση σε λειτουργία
- Διακοπή της λειτουργίας Φροντίδα και συντήρηση
- Εξαρτήματα
- Αντιμετώπιση βλαβών
- Τεχνικά χαρακτηριστικά
- Δήλωση Συμμόρφωσης των Ε . Κ .
- İ çindekiler
- Fonksiyon Kurallara uygun kullan ı m
- Kullan ı m ve çal ı ş ma elemanlar ı
- Kullan ı m ı
- Cihaz ı çal ı ş t ı rmaya ba ş lama- dan önce
- Durdurma Koruma ve Bak ı m
- Aksesuar
- Ar ı zalarda yard ı m
- Teknik Bilgiler
- AB uygunluk bildirisi
- Оглавление
- Назначение Использование по назначе - нию
- Описание элементов управления и рабочих узлов
- Управление
- Перед началом работы
- Эксплуатация
- Вывод из эксплуатации Уход и техническое обслу - живание
- Принадлежности
- Помощь в случае неполадок
- Технические данные
- Заявление о соответствии ЕС
- Spis tre ś ci
- Funkcja U ż ytkowanie zgodne z prze- znaczeniem
- Elementy urz ą dzenia
- Obs ł uga
- Przed pierwszym uruchomie- niem
- Wy łą czenie z eksploatacji
- Czyszczenie i konserwacja
- Akcesoria
- Usuwanie usterek
- Dane techniczne
- Deklaracja zgodno ś ci UE
