Karcher Balayeuse KM 75-40 W Bp Pack: R L
R L: Karcher Balayeuse KM 75-40 W Bp Pack
-
7
Lock parking brake.
Remove the waste container.
Tilt the appliance rearward.
Lift the waste flap, press in the bearing
cap and swivel the roller brush toward
the front.
Pull out roller brush.
Attach the new roller brush to the drive
pin (left).
Engage the bearing cup into the boring
of the roller brush swinging arm on the
opposite side.
CAUTION
Risk of damage! Make sure that no bristles
are jammed into the boring of the roller
brush swinging arm.
Note:
Once the new roller brush has been
installed, the sweeping track must readjust-
ed.
Raise the sweeper from the front and
drive it on to a smooth, even surface
covered with a visible layer of dust or
chalk.
Lock parking brake.
Let the sweeping roller rotate for ap-
prox. 15-30 seconds.
Raise the sweeper at the front and drive
it towards the side.
The sweeping track should have an even
rectangular shape which is between 30 and
40 mm wide.
Adjust sweeping track:
Open the device hood.
Adjust the left and right adjustment le-
vers and engage into the same boring.
– Engage adjustment lever into the lower
boring (+): Sweeping track becomes
bigger
– Engage the adjustment lever into the
upper boring (-): Sweeping track be-
comes smaller
Check sweeping mirror.
Replacement is due if a visible deteriora-
tion in sweeping performance caused by
bristle wear is evident.
Note:
Remove the waste container and
move the pushing handle to the front prior
to tilting the appliance. Do not rest the ap-
pliance on the pushing handle.
Unscrew 3 screws from the underside
of the side brush.
Remove the wiper blade.
Clip new side brushes on to driver and
screw on.
Adjustment is necessary if a visible deterio-
ration in sweeping performance caused by
side-brush is evident.
Open the device hood.
Release the wing nut.
Adjust the adjustment screw.
Tighten the wing nut.
– Adjustment is necessary if the bulk
waste flap cannot be raised wide
enough.
– The Bowden cable needs to be re-
leased a little if the sweeper results be-
come poorer, for e.g. due to the wearing
of the front lip.
Open the device hood.
Loosen counter-nut.
Adjust the adjustment screw.
Tighten the counter-nut.
Note:
Remove the waste container and
move the pushing handle to the front prior
to tilting the appliance. Do not rest the ap-
pliance on the pushing handle.
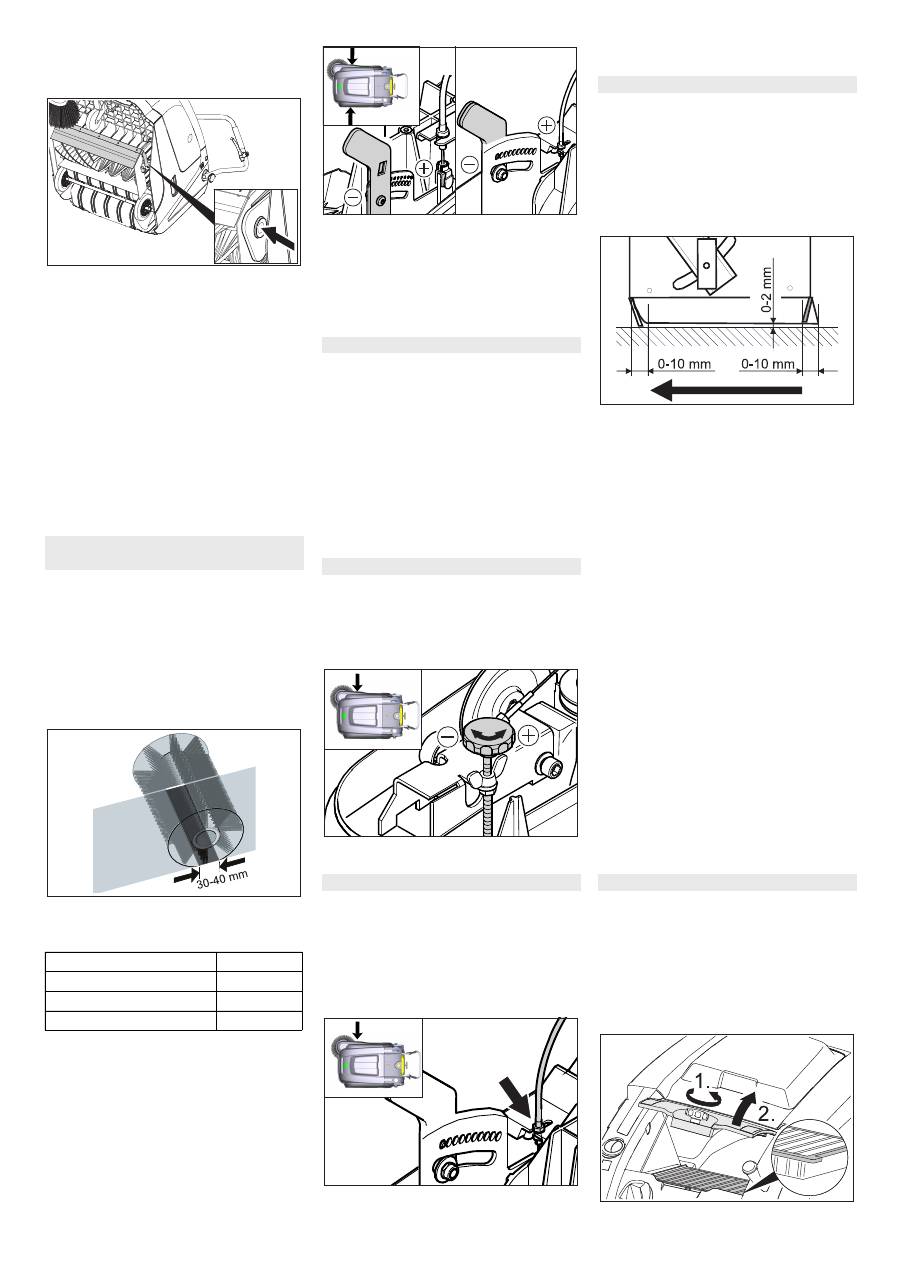
Front sealing strip
Loosen the fastening screws of the
sealing strip.
Adjust or replace sealing strip.
Set the distance between the sealing
strip and the floor so that the bottom
edge trails behind at a distance of be-
tween 0-10 mm.
Adjust sealing strip.
Tighten the fastening of the sealing
strip.
Rear sealing strip
Remove the waste container.
Loosen the fastening screws of the
sealing strip.
Adjust or replace sealing strip.
Set the distance between the sealing
strip and the floor so that the bottom
edge trails behind at a distance of be-
tween 0-10 mm.
Tighten the fastening of the sealing
strip.
Side sealing strips
Loosen the fastening screws of the
sealing strip.
Adjust or replace sealing strip.
To set the floor clearance, insert a
sheet with a thickness of max. 2 mm un-
der the sealing strip.
Adjust sealing strip.
Tighten the fastening of the sealing
strip.
몇
WARNING
Empty waste container before replacing
dust filter. Wear a dust mask when working
around the dust filter. Observe safety regu-
lations on the handling of fine particulate
material.
Lock parking brake.
Shake off dust filter.
Check and adjust roller brush sweeping
track
Setting range
(-) 1...10 (+)
Minimum sweeping track
1
Maximum sweeping track
10
New roller brush
1...3
Replacing side brush
Adjust side-brush lowering
Adjust the raising of the bulk waste flap
R
L
R L
Adjusting and replacing sealing strips
Replacing dust filter
18 EN
Оглавление
- Inhalt
- Sicherheitshinweise
- Bedien- und Funktionselemente 17 1 2 3 456 201918 14 9 8 7 101112131615
- Vor Inbetriebnahme
- Inbetriebnahme
- Stilllegung Pflege und Wartung
- R L
- Zubehör
- Hilfe bei Störungen
- Technische Daten
- Contents
- Safety instructions
- Operating and Functional Elements 17 1 2 3 456 201918 14 9 8 7 101112131615
- Before Startup
- Start up
- Shutdown Maintenance and care
- R L
- Accessories
- Troubleshooting
- Technical specifications
- Contenu
- Consignes de sécurité
- Eléments de commande et de fonction 17 1 2 3 456 201918 14 9 8 7 101112131615
- Avant la mise en service
- Mise en service
- Remisage Entretien et maintenance
- R L
- Accessoires
- Assistance en cas de panne
- Caractéristiques techniques
- Indice
- Norme di sicurezza
- Elementi di comando e di funzione 17 1 2 3 456 201918 14 9 8 7 101112131615
- Prima della messa in funzione
- Messa in funzione
- Fermo dell'impianto Cura e manutenzione
- R L
- Accessori
- Guida alla risoluzione dei guasti
- Dati tecnici
- Inhoud
- Veiligheidsinstructies
- Elementen voor de bediening en de functies 17 1 2 3 456 201918 14 9 8 7 101112131615
- Voor de inbedrijfstelling
- Inbedrijfstelling
- Stillegging Onderhoud
- R L
- Toebehoren
- Hulp bij storingen
- Technische gegevens
- Índice de contenidos
- Indicaciones de seguridad
- Elementos de operación y funcionamiento 17 1 2 3 456 201918 14 9 8 7 101112131615
- Antes de la puesta en marcha
- Puesta en marcha
- Parada Cuidados y mantenimiento
- R L
- Accesorios
- Ayuda en caso de avería
- Datos técnicos
- Índice
- Avisos de segurança
- Elementos de comando e de funcionamento 17 1 2 3 456 201918 14 9 8 7 101112131615
- Antes de colocar em funcionamento
- Colocação em funcionamento
- Desactivação da máquina Conservação e manutenção
- R L
- Acessórios
- Ajuda em caso de avarias
- Dados técnicos
- Indhold
- Sikkerhedsanvisninger
- Betjenings- og funktionselementer 17 1 2 3 456 201918 14 9 8 7 101112131615
- Inden ibrugtagning
- Ibrugtagning
- Afbrydning/nedlæggelse Pleje og vedligeholdelse
- R L
- Tilbehør
- Hjælp ved fejl
- Tekniske data
- Innhold
- Sikkerhetsanvisninger
- Betjenings- og funksjonelementer 17 1 2 3 456 201918 14 9 8 7 101112131615
- Før den tas i bruk
- Ta i bruk
- Sette bort Pleie og vedlikehold
- R L
- Tilbehør
- Feilretting
- Tekniske data
- Innehåll
- Säkerhetsanvisningar
- Manövrerings- och funktionselement 17 1 2 3 456 201918 14 9 8 7 101112131615
- Före ibruktagande
- Idrifttagning
- Nedstängning Skötsel och underhåll
- R L
- Tillbehör
- Åtgärder vid störningar
- Tekniska data
- Sisältö
- Turvaohjeet
- Ohjaus- ja käyttölaitteet 17 1 2 3 456 201918 14 9 8 7 101112131615
- Ennen käyttöönottoa
- Käyttöönotto
- Seisonta-aika Hoito ja huolto
- R L
- Tarvikkeet
- Häiriöapu
- Tekniset tiedot
- Περιεχόμενα
- Υποδείξεις ασφαλείας
- Στοιχεία χειρισμού και λειτουργίας 17 1 2 3 456 201918 14 9 8 7 101112131615
- Πριν τη θέση σε λειτουργία
- Έναρξη λειτουργίας
- Διακοπή της λειτουργίας Φροντίδα και συντήρηση
- R L
- Εξαρτήματα
- Αντιμετώπιση βλαβών
- Τεχνικά χαρακτηριστικά
- İ çindekiler
- Güvenlik uyar ı lar ı
- Kullan ı m ve çal ı ş ma elemanlar ı 17 1 2 3 456 201918 14 9 8 7 101112131615
- Cihaz ı çal ı ş t ı rmaya ba ş lamadan önce
- İş letime alma
- Durdurma Koruma ve Bak ı m
- R L
- Aksesuar
- Ar ı zalarda yard ı m
- Teknik Bilgiler
- Содержание
- Указания по технике безопасности
- Описание элементов управления и рабочих узлов 1 7 1 2 3 456 20191 8 1 4 9 8 7 101112131 6 1 5
- Перед началом работы
- Начало работы
- Вывод из эксплуатации Уход и техническое обслуживание
- R L
- Принадлежности
- Заявление о соответствии ЕС
- Помощь в случае неполадок
- Технические данные
- Tartalom
- Biztonsági tanácsok
- Kezelési- és funkciós elemek 17 1 2 3 456 201918 14 9 8 7 101112131615
- Üzembevétel el ő tt
- Üzembevétel
- Leállítás Ápolás és karbantartás
- R L
- Tartozékok
- Segítség üzemzavar esetén
- M ű szaki adatok
- Obsah
- Bezpe č nostní pokyny
- Ovládací a funk č ní prvky 17 1 2 3 456 201918 14 9 8 7 101112131615
- P ř ed uvedením do provozu
- Uvedení do provozu
- Odstavení Ošet ř ování a údržba
- R L
- P ř íslušenství
- Pomoc p ř i poruchách
- Technické údaje
- Kazalo
- Varnostna navodila
- Upravljalni in funkcijski elementi 17 1 2 3 456 201918 14 9 8 7 101112131615
- Pred zagonom
- Zagon
- Mirovanje naprave Nega in vzdrževanje
- R L
- Pribor
- Pomo č pri motnjah
- Tehni č ni podatki
- Spis tre ś ci
- Wskazówki bezpiecze ń stwa
- Elementy urz ą dzenia 17 1 2 3 456 201918 14 9 8 7 101112131615
- Przed pierwszym uruchomieniem
- Uruchamianie
- Wy łą czenie z eksploatacji Czyszczenie i konserwacja
- R L
- Akcesoria
- Usuwanie usterek
- Dane techniczne
- Cuprins
- M ă suri de siguran ţă
- Elemente de utilizare ş i func ţ ionale 17 1 2 3 456 201918 14 9 8 7 101112131615
- Înainte de punerea în func ţ iune
- Punerea în func ţ iune
- Scoaterea din func ţ iune Îngrijirea ş i între ţ inerea
- R L
- Accesorii
- Remedierea defec ţ iunilor
- Date tehnice
- Obsah
- Bezpe č nostné pokyny
- Ovládacie a funk č né prvky 17 1 2 3 456 201918 14 9 8 7 101112131615
- Pred uvedením do prevádzky
- Uvedenie do prevádzky
- Odstavenie Starostlivos ť a údržba
- R L
- Príslušenstvo
- Pomoc pri poruchách
- Technické údaje
- Sadržaj
- Sigurnosni napuci
- Komandni i funkcijski elementi 17 1 2 3 456 201918 14 9 8 7 101112131615
- Prije prve uporabe
- Stavljanje u pogon
- Stavljanje ure đ aja van pogona Njega i održavanje
- R L
- Pribor
- Otklanjanje smetnji
- Tehni č ki podaci
- Sadržaj
- Sigurnosne napomene
- Komandni i funkcioni elementi 17 1 2 3 456 201918 14 9 8 7 101112131615
- Pre upotrebe
- Stavljanje u pogon
- Stavljanje ure đ aj5a van pogona Nega i održavanje
- R L
- Pribor
- Otklanjanje smetnji
- Tehni č ki podaci
- Съдържание
- Указания за безопасност
- Обслужващи и функционални елементи 17 1 2 3 456 201918 14 9 8 7 101112131615
- Преди пускане в експлоатация
- Пускане в експлоатация
- Спиране от експлоатация Грижи и поддръжка
- R L
- Принадлежности
- Декларация за съответствие на ЕО
- Помощ при неизправности
- Технически данни
- Sisukord
- Ohutusalased märkused
- Teenindus- ja funktsioonielemendid 17 1 2 3 456 201918 14 9 8 7 101112131615
- Enne seadme kasutuselevõttu
- Kasutuselevõtt
- Seismapanek Korrashoid ja tehnohooldus
- R L
- Tarvikud
- Abi häirete korral
- Tehnilised andmed
- Saturs
- Droš ī bas nor ā d ī jumi
- Vad ī bas un funkcijas elementi 17 1 2 3 456 201918 14 9 8 7 101112131615
- Pirms ekspluat ā cijas uzs ā kšanas
- Ekspluat ā cijas uzs ā kšana
- Iekonserv ē šana Kopšana un tehnisk ā apkope
- R L
- Piederumi
- Pal ī dz ī ba darb ī bas trauc ē jumu gad ī jum ā
- Tehniskie dati
- Turinys
- Saugos reikalavimai
- Valdymo ir funkciniai elementai 17 1 2 3 456 201918 14 9 8 7 101112131615
- Prieš pradedant naudoti
- Naudojimo pradžia
- Laikinas prietaiso nenaudojimas Prieži ū ra ir aptarnavimas
- R L
- Dalys
- Pagalba gedim ų atveju
- Techniniai duomenys
- Зміст
- Правила безпеки
- Елементи управління і функціональні вузли 17 1 2 3 456 201918 14 9 8 7 101112131615
- Перед початком роботи
- Введення в експлуатацію
- Зберігання Догляд та технічне обслуговування
- R L
- Аксесуари
- Заява при відповідність Європейського співтовариства
- Допомога у випадку неполадок
- Технічні характеристики
