Karcher BD 80/120 W Bp: Shutting Down the Appliance
Shutting Down the Appliance: Karcher BD 80/120 W Bp
-
5
Î
Also press the switch for reverse drive
in addition to the drive switch.
Î
Open the cover of the fresh water reser-
voir.
Î
Fill fresh water (max. 60 °C) until 15 cm
below the upper edge of the tank.
Î
Pour in detergent.
Î
Close the cover of the fresh water res-
ervoir.
몇
Warning
Risk of damage. Only use the recommend-
ed detergents. With respect to different de-
tergents the operator bears the increased
risk regarding the operational safety and
danger of accident.
Only use detergents that are free from sol-
vents, hydrochloric acid and hydrofluoric
acid.
Follow the safety instructions for using de-
tergents.
Note
Do not use highly foaming detergents.
Recommended detergents:
Î
Set the water quantity at the regulation
knob for water quantity according to the
dirt level and the type of flooring.
Î
Lower the lever for lowering the vacu-
um bar downwards; the vacuum bar is
lowered.
Î
Switch on the suction turbine using the
vacuuming switch.
Î
Switch on the brush operations using
the brush operations switch.
The brushes will start automatically
when driven forward; at the same time,
the detergent solution is led in.
Î
Lower the cleaning head using the
brush contact pressure switch.
Î
Press drive switch.
Î
Adjust the contact pressure using the
brush contact pressure switch while the
brushes are turning.
The contact pressure that has been set
can be read in the contact pressure dis-
play.
Note
Carry out initial cleaning attempts with low
contact pressure. Slowly increase the con-
tact pressure till the desired cleaning result
is achieved. Correctly set contact pressure
saves power and wear and tear of the
brushes.
Note
Very dirty floors can be cleaned in two
rounds. In the first work step, the detergent
liquid is applied and brushed in. The first
round is carried out with raised vacuum bar
and the suction turbine being switched off.
Further, the Aqua-Mizer
TM
at the cleaning
head is also removed. The surface is
cleaned normally in the second step after
the detergent has worked normally.
Î
Lift the cleaning head.
Î
Turn key to "0" and remove it.
Î
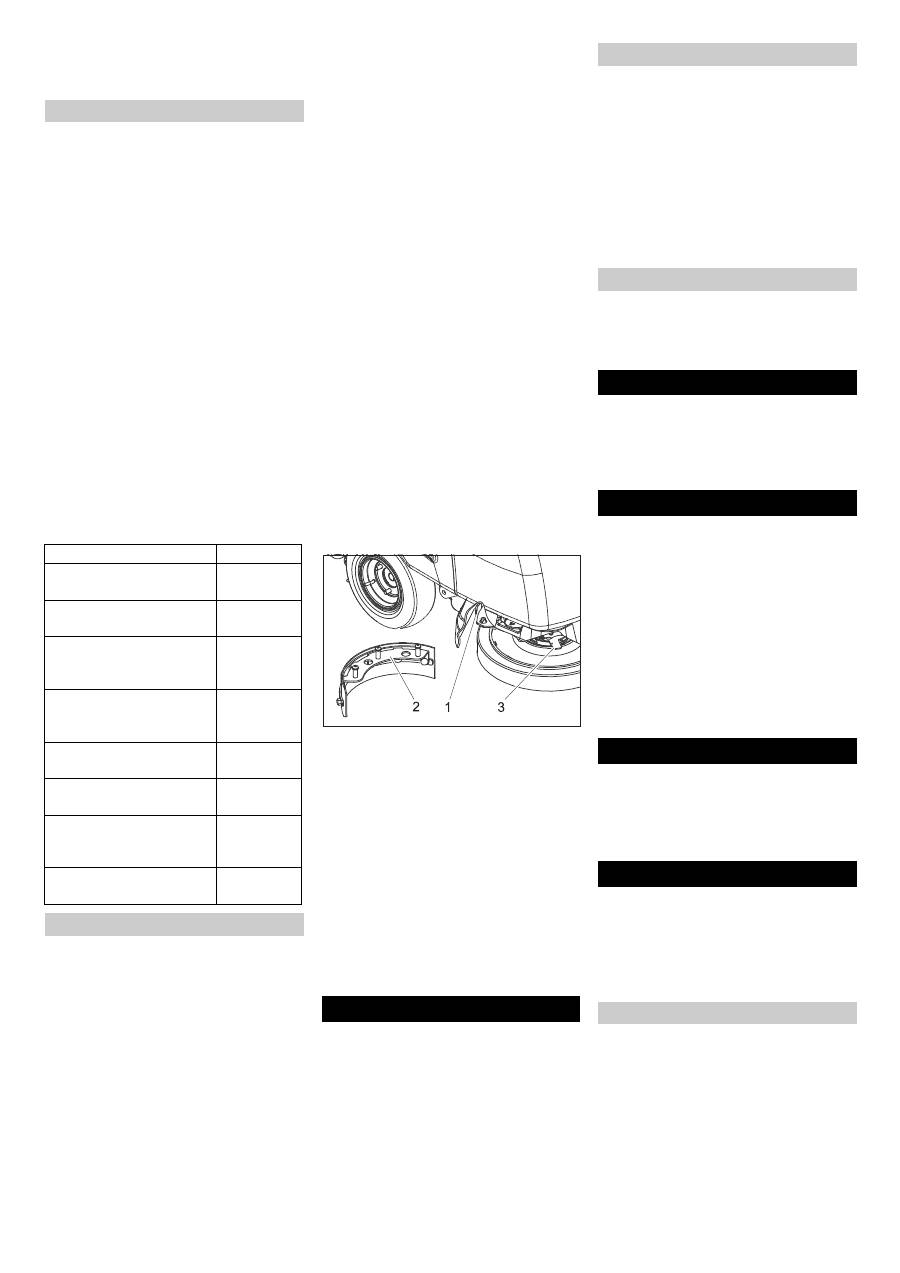
Open the lock of spray-guard.
Î
Move both the spray-guard halves to-
wards the sides.
1 Aqua-Mizer unlocking lever
2 Aqua-Mizer
3 Unlocking lever for sliding brushes
Î
Turn the unlocking lever of the sliding
brush in an anti-clockwise direction -
the brushes will fall downward and can
be pulled outward at the bottom of the
device.
Î
Pull the unlocking lever of the Aqua-
Mizer towards the sides and remove the
Aqua-Mizer downward.
Î
Re-insert the brush.
Î
Repeat process on the opposite side.
Î
Replace the spray-guard.
Î
Switch off the brush drive.
Î
Lift the cleaning head.
Î
Briefly drive forward and suck of the re-
maining water.
Î
Raise the vacuum bar.
Î
Switch off the suction turbine after 5
seconds.
Î
Set the key switch at the operator con-
sole to "0" and remove the key.
Î
Charge battery, if required.
Caution
Please observe the local provisions regard-
ing the wastewater treatment.
Î
Remove the dirt water drain hose from
the holder.
Î
Lossen the toggle handle and remove
the stopper from the hose.
Î
Lower the drain hose into a suitable col-
lector and drain off the dirt water.
Î
Rinse the dirt water tank with clear wa-
ter.
Î
Pull out the upper end of the fresh water
drain hose from the hose nipple.
Î
Lower the drain hose into a suitable col-
lector and drain off the fresh water.
In case of danger of frost:
Î
Empty the fresh and dirt water reser-
voirs.
Î
Store the appliance in a frost-protected
room.
Danger
Risk of injury! When loading or unloading
the machine, it may only be operated on
gradients of max. 10%. Drive slowly.
Caution
Risk of injury and damage! Observe the
weight of the appliance when you transport
it.
Î
Remove brushes from the brush head.
Î
When transporting in vehicles, secure
the appliance according to the guide-
lines from slipping and tipping over.
Caution
Risk of injury and damage! Note the weight
of the appliance in case of storage.
This appliance must only be stored in inte-
rior rooms.
Danger
Risk of injury! Before carrying out any tasks
on the machine, set the main key to "0" and
remove it. Pull out the battery plug.
Î
Drain and dispose of the dirt water and
the residual fresh water.
Caution
Risk of damage. Do not wash down the ap-
pliance with water and do not use aggres-
sive detergents.
Before starting working:
Î
Check the inserts of the suction hose
for leaks.
Î
Check the brushes for wear, replace if
required.
Reverse drive
Filling in detergents
Fresh water
Detergent
Application
Detergent
Routine cleaning of all wa-
ter resistant floors
RM 780
RM 746
Routine cleaning of glossy
surfaces (e.g. granite)
RM 755 es
Routine cleaning and ba-
sic cleaning of industrial
floors
RM 69 ASF
Routine cleaning and ba-
sic cleaning of fine stone-
ware tiles
RM 753
Routine cleaning of tiles in
sanitary areas
RM 751
Cleaning and disinfection
in sanitary areas
RM 732
Removal of coating from
all alkali-resistant floors
(e.g. PVC)
RM 752
Removal of coating from li-
noleum floors
RM 754
Cleaning
Removing Aqua-Mizer
Shutting Down the Appliance
Drain off dirt water
Drain off clean water
Frost protection Transport Storage Maintenance and care
Maintenance schedule
Daily
16 EN
-
6
Î
Check cables and joints for wear and
tear and damage.
Î
Check acid level in wet batteries; refill
distilled water, if required.
After finishing working:
Î
Drain off dirt water.
Î
Rinse the dirt water tank with clear wa-
ter.
Î
Clean the sieve in the lid of the dirt wa-
ter tank.
Î
Clean fresh water tank.
Î
Clean the outside of the appliance with
a damp cloth which has been soaked in
mild detergent.
Î
Clean the vacuum lips and the wiping
lips, check for wear and replace if re-
quired.
Î
Switch on the suction for drying the sys-
tem.
Î
Do not close the lids of the fresh water
and dirt water tanks so that the tanks
can dry up.
Î
Charge battery.
Î
Check spray-guard at the cleaning
head.
Î
Clean the seals between dirt water res-
ervoir and cover and check for tight-
ness, replace if required.
Î
Check the setting of the vacuum bar.
Î
Lubricate the drive axle and the steer-
ing rollers.
Î
Check the vacuum bar for damages.
Î
Check functioning of the appliance.
Î
Check brush carrier of the device for
wear.
Î
Check battery pole for oxidation; brush
it if required and lubricate it using pole
grease. Ensure that the connection ca-
ble sits firmly.
Î
Check the acid density of the cells if the
batteries are not maintenance-free bat-
teries.
Î
Clean vacuum bar elevation.
Î
Clean the joints at the vacuum bar at-
tachment and at the cleaning head.
Î
Check carbon brushes and commuta-
tors of all motors for wear and tear. *
* To be done by Customer Service.
Î
Have the prescribed inspection carried
out by the customer service.
To ensure a reliable operation of the appli-
ance maintenance contracts can be con-
cluded with the competent Kärcher sales
office.
Î
Drive the device on a smooth surface.
Î
Lower the lever for lowering the vacu-
um bar downwards; the vacuum bar is
lowered.
Î
Drive at least 60 cm forward.
Î
Stop the device, turn key to "0" and re-
move it. Ensure that the device does
not roll backward.
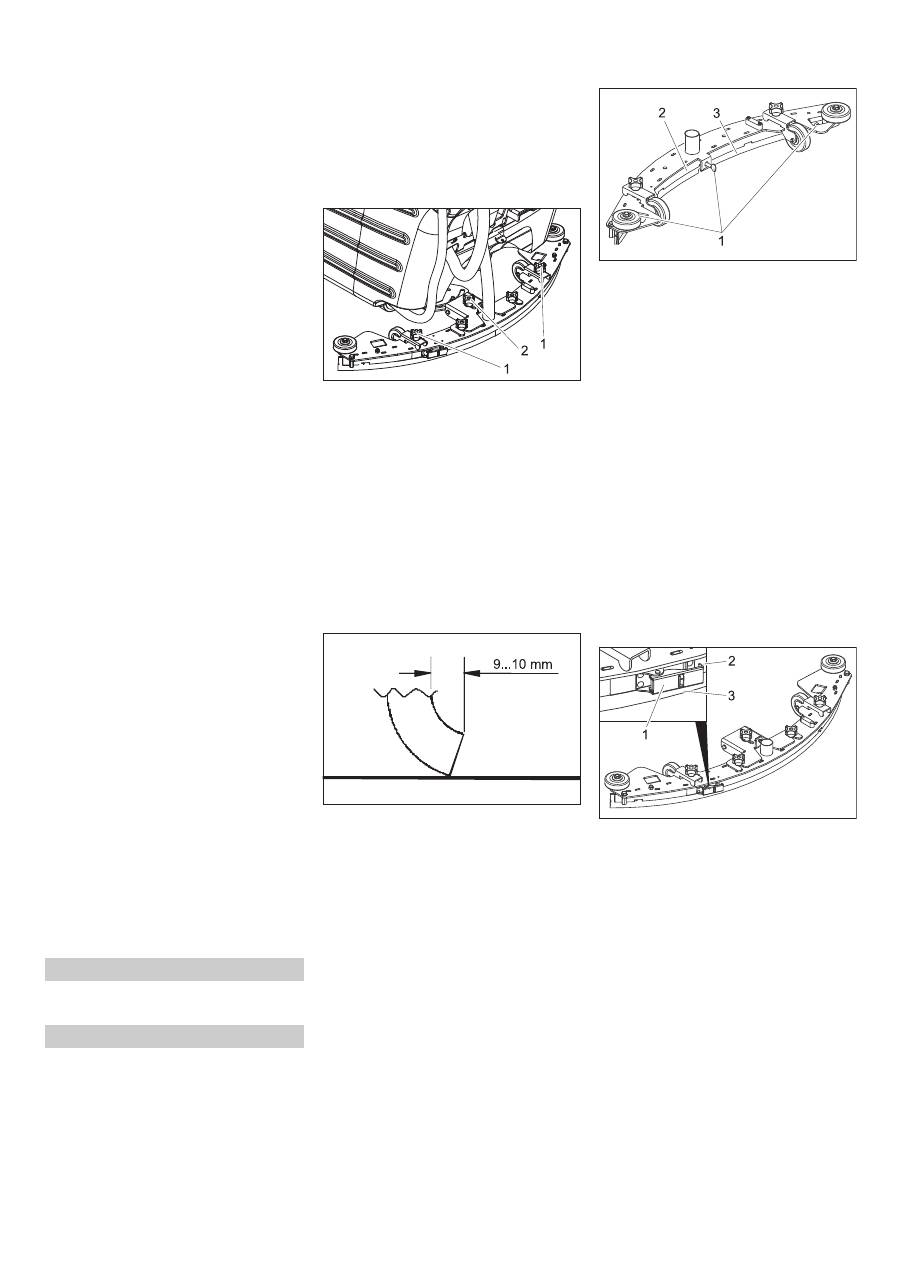
1 Cross-handle for height adjustment
2 Levelling adjustment
-
Î
Align the vacuum bar using the cross-
handles in such a way that the rear vac-
uum lip is bent backward (symmetrical
to the centre) on both sides of the vac-
uum bar.
Î
Adjust the levelling in such a way that
the rear vacuum lip is bent much to-
wards the back across the entire length.
Î
To check the setting, drive 60 cm for-
ward and check the effect of the new
setting.
Î
Adjust the vacuum bar by simultane-
ously turning both the cross-handles in
such a way that the rear vacuum lip is
bent almost 9 to 10 mm backward.
In clock-wise direction: Bend is lesser.
Anti-clockwise direction: Bend be-
comes larger.
Î
To check the setting, drive 60 cm for-
ward and check the effect of the new
setting.
Î
Raise the vacuum bar.
Î
Turn key to "0" and remove it.
Î
Pull out the suction hose from the vacu-
um bar.
Î
Loosen the cross-handles of the vacu-
um bar fastening and pull out the vacu-
um bar downwards.
Î
Dismantle the vacuum bar.
1 Wing bolt
2 Pressure plate
3 Vacuum lip
Î
Loosen the wing nuts.
Î
Remove the pressure plate.
Î
Take out the vacuum lips.
Note
The vacuum lips can be turned thrice till all
edges are worn off. After that you need a
new vacuum lip.
Î
Turn the vacuum lip or replace and in-
sert it back into the vacuum bar and
align.
Î
Replace pressure plate.
Î
First tighten the central wing bolt. En-
sure that the pressure plate is lying firm-
ly on the vacuum lip.
Î
Tighten the remaining wing bolts.
Î
Dismantle the vacuum bar.
1 Clamping lock
2 Strap
3 Vacuum lip
Î
Open the clamping lock and remove the
strap.
Î
Take out the vacuum lips.
Note
The vacuum lips can be turned thrice till all
edges are worn off. After that you need a
new vacuum lip.
Î
Turn the vacuum lip or replace and in-
sert it back into the vacuum bar and
align.
Î
Insert the strap and close the clamping
lock. The tension must just be sufficient
to hold the vacuum lip without wrinkling.
Adjust the clamping lock, as required.
Weekly
Monthly
Every 100 operating hours
Yearly
Maintenance Works
Maintenance contract
Setting the Vacuum Bar
Dismantling the vacuum bar
Turn/ replace front vacuum lip
Turn/ replace rear vacuum lip
17 EN
Оглавление
- Inhaltsverzeichnis
- Bedien- und Funktionselemente
- Vor Inbetriebnahme
- Betrieb
- Anhalten und abstellen
- Störungen
- Zubehör
- CE-Erklärung
- Contents
- Operating and Functional Elements
- Before Commissioning
- Operation
- Shutting Down the Appliance
- Faults
- Accessories
- CE declaration
- Table des matières
- Eléments de commande
- Avant la mise en service
- Fonctionnement
- Arrêt et mise hors marche de l'appareil
- Protection antigel Transport Entreposage Entretien et maintenance
- Pannes
- Accessoires
- Données techniques
- Indice
- Elementi di comando e di funzione
- Prima della messa in funzione
- Funzionamento
- Arresto e spegnimento
- Trasporto Supporto Cura e manutenzione
- Guasti
- Accessori
- Dati tecnici
- Inhoudsopgave
- Bediening- en werkingsonderdelen
- Voor ingebruikneming
- Gebruik
- Stoppen en stilleggen
- Storingen
- Accessoires
- CE-verklaring
- Índice de contenidos
- Elementos de operación y funcionamiento
- Antes de la puesta en marcha
- Funcionamiento
- Detención y apagado
- Almacenamiento Conservación y mantenimiento
- Averías
- Accesorios
- Datos técnicos
- Índice
- Elementos de comando e de funcionamento
- Antes de colocar em funcio- namento
- Funcionamento
- Parar e desligar
- Transporte Armazenamento Conservação e manutenção
- Avarias
- Acessórios
- Dados técnicos
- Indholdsfortegnelse
- Betjenings- og funktionselementer
- Inden idrifttagning
- Drift
- Standse og stille til siden
- Fejl
- Tekniske data
- Innholdsfortegnelse
- Betjenings- og funksjonsorganer
- Før igangsetting
- Drift
- Stansing og parkering
- Funksjonsfeil
- Tilbehør
- Innehållsförteckning
- Manövrerings- och funktionselement
- Före idrifttagandet
- Drift
- Stoppa och parkera
- Störningar
- Tekniska data
- Sisällysluettelo
- Ohjaus- ja toimintaelementit
- Ennen käyttöönottoa
- Käyttö
- Pysähdys ja pysäköinti
- Häiriöt
- Tekniset tiedot
- Πίνακας περιεχομένων
- Στοιχεία χειρισμού και λειτουργίας
- Πριν την ενεργοποίηση
- Λειτουργία
- Αντιπαγετική προστασία Μεταφορά Αποθήκευση Φροντίδα και συντήρηση
- Βλάβες
- Εξαρτήματα
- Τεχνικά χαρακτηριστικά
- İ çindekiler
- Kullan ı m ve çal ı ş ma elemanlar ı
- Cihaz ı çal ı ş t ı rmaya ba ş lamadan önce
- Çal ı ş t ı rma
- Durma ve durdurma
- Ar ı zalar
- Aksesuar
- CE Beyan ı
- Оглавление
- Описание элементов управления и рабочих узлов
- Перед началом работы
- Эксплуатация прибора
- Защита от замерзания Транспортировка Хранение Уход и техническое обслуживание
- Неполадки
- Технические данные
- Заявление о соответствии требованиям СЕ
- Tartalomjegyzék
- Kezelési- és funkciós elemek
- Üzembevétel el ő tt
- Üzem
- Megállás és leállítás
- Ápolás és karbantartás
- Üzemzavarok
- Tartozékok
- CE-Nyilatkozat
- Obsah
- Ovládací a funk č ní prvky
- Pokyny p ř ed uvedením p ř ístroje do provozu
- Provoz
- Zastavení a vypnutí p ř ístroje
- Poruchy
- P ř íslušenství
- ES prohlášení o shod ě
- Vsebinsko kazalo
- Upravljalni in funkcijski elementi
- Pred zagonom
- Obratovanje
- Zaustavljanje in odlaganje
- Motnje
- Tehni č ni podatki
- Spis tre ś ci
- Elementy obs ł ugi urz ą dzenia
- Przed uruchomieniem
- Dzia ł anie
- Zatrzymywanie i odstawianie
- Ochrona przeciwmrozowa Transport Przechowywanie Czyszczenie i konserwacja
- Zak ł ócenia
- Akcesoria
- Dane techniczne
- Cuprins
- Elemente de utilizare ş i func ţ ionale
- Înainte de punerea în func ţ iune
- Func ţ ionarea
- Oprirea ş i depozitarea
- Depozitarea Îngrijirea ş i între ţ inerea
- Defec ţ iuni
- Accesorii
- Date tehnice
- Declara ţ ia CE
- Obsah
- Ovládacie a funk č né prvky
- Pred uvedením do prevádzky
- Prevádzka
- Zastavenie a odstavenie
- Poruchy
- Príslušenstvo
- Vyhlásenie CE
- Pregled sadržaja
- Komandni i funkcijski elementi
- Prije prve uporabe
- U radu
- Zaustavljanje i odlaganje
- Smetnje
- Pribor
- CE-izjava
- Pregled sadržaja
- Komandni i funkcioni elementi
- Pre upotrebe
- Rad
- Zaustavljanje i odlaganje
- Smetnje
- Pribor
- CE-izjava
- Съдържание
- Обслужващи и функционални елементи
- Преди пускане в експлоатация
- Експлоатация
- Защита от замръзване T рансп o рт Съхранение Грижи и поддръжка
- Повреди
- Принадлежности
- Технически данни
- Sisukord
- Teenindus- ja funktsioonielemendid
- Enne seadme kasutuselevõttu
- Käitamine
- Peatumine ja seiskamine
- Rikked
- Tehnilised andmed
- Satura r ā d ī t ā js
- Vad ī bas sist ē mas un funkciju elementi
- Pirms ekspluat ā cijas s ā kuma
- Ekspluat ā cija
- Aptur ē šana un izsl ē gšana
- Kopšana un tehnisk ā apkope
- Trauc ē jumi
- Piederumi
- Tehniskie parametri
- Turinys
- Aptarnavimo ir funkciniai elementai
- Prieš pradedant naudoti
- Naudojimas
- Sustojimas ir palikimas stov ė ti
- Technin ė prieži ū ra ir aptarnavimas
- Gedimai
- Priedai
- Techniniai duomenys
- Перелік
- Елементи управління і функціональні вузли
- Перед введенням в експлуатацію
- Експлуатація
- Захист від замерзання Транспортування Зберігання Догляд та технічне обслуговування
- Неполадки
- Аксесуари
- Технічні дані
")


