Karcher Autolaveuse BD 80-120 W Bp Pack: Operation
Operation: Karcher Autolaveuse BD 80-120 W Bp Pack
-
4
The BAT package model contains built-in
batteries.
Î
Tilt up the battery cover.
Î
Insert the batteries in the battery com-
partment.
Î
Grease the battery poles using pole
grease.
Î
Connect poles with the enclosed con-
necting cables.
몇
Warning
Pay attention to correct poles.
Î
Connect the connection cable to the
free battery poles (+) and (-).
Î
Close the battery cover.
몇
Warning
Charge the battery before commissioning
the machine.
The load status of the battery is displayed
with leds on the battery control display.
Deep battery discharge is indicated as fol-
lows:
– The leds on the left side of the display
are blinking on the battery control dis-
play.
– The empty battery indicator lamp turns
on.
– A warning beeps if a drive switch is
pressed.
Protection against deep discharge:
Î
Switch the suction turbine and the side
brushes off.
Î
Drive the machine directly to the charg-
ing station; avoid any steep gradients in
the process.
Danger
Danger of explosion. Wet batteries can
only be charged with opened battery cover.
Danger
Risk of injury on account of electric shock.
Ensure proper mains connection voltage
and the socket fuse.
Use the charger only in dry rooms with suf-
ficient ventilation!
Note
Average charging time is approx. 10 -15
hours.
The recommended chargers (matching the
batteries used) are regulated electronically
and will automatically switch off the charg-
ing process.
All functions of the machine are automati-
cally interrupted during the charging proc-
ess.
Î
Tilt up the battery cover.
Î
Remove battery plug and join it to the
charging cable.
Î
Connect the charger to the mains and
turn it on.
Î
Add distilled water one hour before the
charging process comes to an end; fol-
low the correct acid level. There are
corresponding indicators on the battery.
Danger
Danger of causticization!
–
Adding water to the battery in its dis-
charged state can cause the acid to
leak.
–
Use safety glasses while handling bat-
tery acid and follow the safety instruc-
tions to avoid personal injury or damage
to clothes.
–
Should the acid spray on to the skin or
clothes, rinse immediately with lots of
water.
Caution
Risk of damage!
–
Use only distilled or desalinated water
(EN 50272-T3) for filling the battery.
–
Do not add any substances (so-called
performance improving agents), else
warranty claims will not be entertained.
몇
Warning
Only use maintenance-free batteries while
replacing batteries in package appliances.
It is necessary to have a power supply ca-
ble/ adapter 6.649-582 for the charger.
Batteries and chargers are available in spe-
cialised stores.
Î
Tilt up the battery cover.
Î
Clamp off the minus pole of the battery.
Î
Clamp off the remaining cables from the
battery.
Î
Remove the batteries.
Î
Dispose of the used batteries according
to the local provisions.
Danger
Risk of injury. Press emergency-stop
switch to immediately switch off all func-
tions of the machine.
Î
Insert batteries and connect (see "Be-
fore Start-up").
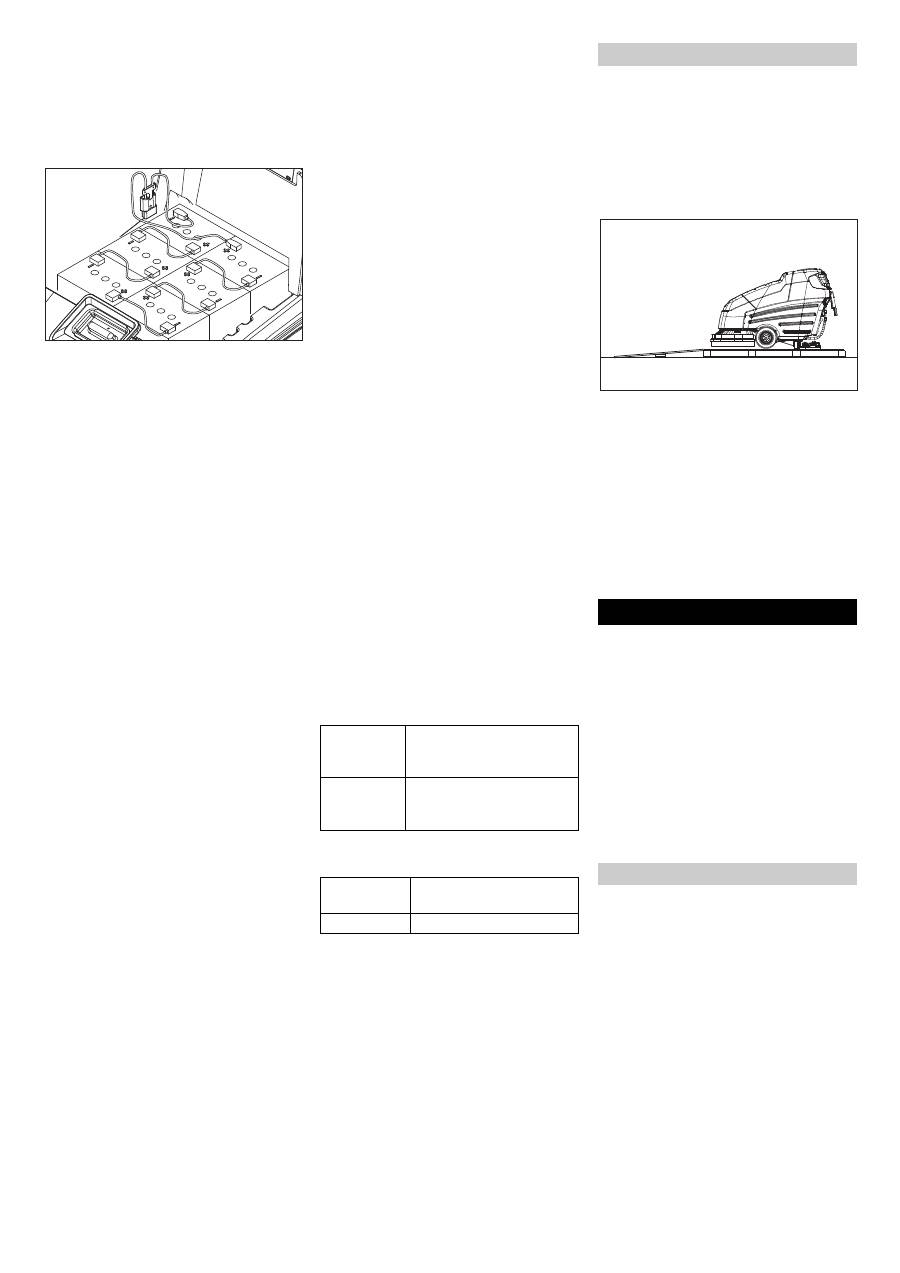
Î
Place long lateral boards of the packag-
ing as a ramp next to the pallet.
Î
Fix the ramp on the pallet with nails.
Î
Place short boards as a support under-
neath the ramp.
Î
Remove the wooden bars in front of the
wheels.
Î
Remove fastening bracket at the axle.
Î
Set main switch to “1”.
Î
Lift the cleaning head.
Î
Press the driving lever and slowly move
the machine down from the ramp.
Î
Set main switch to “0”.
Note
Press the emergency-stop button to imme-
diately deactivate all functions and turn the
key switch to the "0" position.
Danger
Risk of injury. Press on the foot pedal only
with one foot. The other foot must firmly be
placed on the floor. Press emergency-stop
switch to immediately switch off all func-
tions of the machine.
Î
Carry out maintenance jobs "daily be-
fore starting work" (see section "Mainte-
nance and Care").
Note
The machine is designed in such a way that
the brush head protrudes on the right. This
helps in working in a proper way even close
to the edges.
The machine has been approved for use on
surfaces with gradients of up to 2%.
Î
Release emergency-stop button by
turning.
Î
Insert key in key switch at the operator
console and turn to "1".
Î
First select the driving speed at the ro-
tary knob.
Î
Hold the device firmly at both the sliding
handles and press one driving switch -
the device will move.
Î
Release the driving switch to stop it.
Insert batteries and connect
Battery load indicator
Charging battery
Further, in case of maintenance-free
batteries (wet batteries):
Recommended batteries
Manufactur-
er, Kärcher
order no.
Description
DETA
6.654-124.0
Battery, 6 V, 180 Ah, main-
tenance-free, 6 pieces re-
quired
Recommended chargers
Kärcher Or-
der No.
Description
6.654-051.0
230V/36V, 25 A
Removing the batteries
Unloading
Operation
Driving
15 EN
Оглавление
- Inhaltsverzeichnis
- Bedien- und Funktionselemente
- Vor Inbetriebnahme
- Betrieb
- Anhalten und abstellen
- Störungen
- Zubehör
- CE-Erklärung
- Contents
- Operating and Functional Elements
- Before Commissioning
- Operation
- Shutting Down the Appliance
- Faults
- Accessories
- CE declaration
- Table des matières
- Eléments de commande
- Avant la mise en service
- Fonctionnement
- Arrêt et mise hors marche de l'appareil
- Protection antigel Transport Entreposage Entretien et maintenance
- Pannes
- Accessoires
- Données techniques
- Indice
- Elementi di comando e di funzione
- Prima della messa in funzione
- Funzionamento
- Arresto e spegnimento
- Trasporto Supporto Cura e manutenzione
- Guasti
- Accessori
- Dati tecnici
- Inhoudsopgave
- Bediening- en werkingsonderdelen
- Voor ingebruikneming
- Gebruik
- Stoppen en stilleggen
- Storingen
- Accessoires
- CE-verklaring
- Índice de contenidos
- Elementos de operación y funcionamiento
- Antes de la puesta en marcha
- Funcionamiento
- Detención y apagado
- Almacenamiento Conservación y mantenimiento
- Averías
- Accesorios
- Datos técnicos
- Índice
- Elementos de comando e de funcionamento
- Antes de colocar em funcio- namento
- Funcionamento
- Parar e desligar
- Transporte Armazenamento Conservação e manutenção
- Avarias
- Acessórios
- Dados técnicos
- Indholdsfortegnelse
- Betjenings- og funktionselementer
- Inden idrifttagning
- Drift
- Standse og stille til siden
- Fejl
- Tekniske data
- Innholdsfortegnelse
- Betjenings- og funksjonsorganer
- Før igangsetting
- Drift
- Stansing og parkering
- Funksjonsfeil
- Tilbehør
- Innehållsförteckning
- Manövrerings- och funktionselement
- Före idrifttagandet
- Drift
- Stoppa och parkera
- Störningar
- Tekniska data
- Sisällysluettelo
- Ohjaus- ja toimintaelementit
- Ennen käyttöönottoa
- Käyttö
- Pysähdys ja pysäköinti
- Häiriöt
- Tekniset tiedot
- Πίνακας περιεχομένων
- Στοιχεία χειρισμού και λειτουργίας
- Πριν την ενεργοποίηση
- Λειτουργία
- Αντιπαγετική προστασία Μεταφορά Αποθήκευση Φροντίδα και συντήρηση
- Βλάβες
- Εξαρτήματα
- Τεχνικά χαρακτηριστικά
- İ çindekiler
- Kullan ı m ve çal ı ş ma elemanlar ı
- Cihaz ı çal ı ş t ı rmaya ba ş lamadan önce
- Çal ı ş t ı rma
- Durma ve durdurma
- Ar ı zalar
- Aksesuar
- CE Beyan ı
- Оглавление
- Описание элементов управления и рабочих узлов
- Перед началом работы
- Эксплуатация прибора
- Защита от замерзания Транспортировка Хранение Уход и техническое обслуживание
- Неполадки
- Технические данные
- Заявление о соответствии требованиям СЕ
- Tartalomjegyzék
- Kezelési- és funkciós elemek
- Üzembevétel el ő tt
- Üzem
- Megállás és leállítás
- Ápolás és karbantartás
- Üzemzavarok
- Tartozékok
- CE-Nyilatkozat
- Obsah
- Ovládací a funk č ní prvky
- Pokyny p ř ed uvedením p ř ístroje do provozu
- Provoz
- Zastavení a vypnutí p ř ístroje
- Poruchy
- P ř íslušenství
- ES prohlášení o shod ě
- Vsebinsko kazalo
- Upravljalni in funkcijski elementi
- Pred zagonom
- Obratovanje
- Zaustavljanje in odlaganje
- Motnje
- Tehni č ni podatki
- Spis tre ś ci
- Elementy obs ł ugi urz ą dzenia
- Przed uruchomieniem
- Dzia ł anie
- Zatrzymywanie i odstawianie
- Ochrona przeciwmrozowa Transport Przechowywanie Czyszczenie i konserwacja
- Zak ł ócenia
- Akcesoria
- Dane techniczne
- Cuprins
- Elemente de utilizare ş i func ţ ionale
- Înainte de punerea în func ţ iune
- Func ţ ionarea
- Oprirea ş i depozitarea
- Depozitarea Îngrijirea ş i între ţ inerea
- Defec ţ iuni
- Accesorii
- Date tehnice
- Declara ţ ia CE
- Obsah
- Ovládacie a funk č né prvky
- Pred uvedením do prevádzky
- Prevádzka
- Zastavenie a odstavenie
- Poruchy
- Príslušenstvo
- Vyhlásenie CE
- Pregled sadržaja
- Komandni i funkcijski elementi
- Prije prve uporabe
- U radu
- Zaustavljanje i odlaganje
- Smetnje
- Pribor
- CE-izjava
- Pregled sadržaja
- Komandni i funkcioni elementi
- Pre upotrebe
- Rad
- Zaustavljanje i odlaganje
- Smetnje
- Pribor
- CE-izjava
- Съдържание
- Обслужващи и функционални елементи
- Преди пускане в експлоатация
- Експлоатация
- Защита от замръзване T рансп o рт Съхранение Грижи и поддръжка
- Повреди
- Принадлежности
- Технически данни
- Sisukord
- Teenindus- ja funktsioonielemendid
- Enne seadme kasutuselevõttu
- Käitamine
- Peatumine ja seiskamine
- Rikked
- Tehnilised andmed
- Satura r ā d ī t ā js
- Vad ī bas sist ē mas un funkciju elementi
- Pirms ekspluat ā cijas s ā kuma
- Ekspluat ā cija
- Aptur ē šana un izsl ē gšana
- Kopšana un tehnisk ā apkope
- Trauc ē jumi
- Piederumi
- Tehniskie parametri
- Turinys
- Aptarnavimo ir funkciniai elementai
- Prieš pradedant naudoti
- Naudojimas
- Sustojimas ir palikimas stov ė ti
- Technin ė prieži ū ra ir aptarnavimas
- Gedimai
- Priedai
- Techniniai duomenys
- Перелік
- Елементи управління і функціональні вузли
- Перед введенням в експлуатацію
- Експлуатація
- Захист від замерзання Транспортування Зберігання Догляд та технічне обслуговування
- Неполадки
- Аксесуари
- Технічні дані
