Karcher KM 120/150 R P: Shutdown
Shutdown: Karcher KM 120/150 R P
-
9
Note
During operation, the waste container
should be emptied at regular intervals.
Note
When cleaning surfaces, only lower the
roller brush.
Note
Also lower side brush when cleaning along
edges.
Note
Two operating modes are possible with the
roller brush. In the basic-operating mode,
the roller brush is only subjected to a small
amount of wear and tear.
Set programme switch to step 2. Roller
brush is lowered.
Note
Two operating modes are possible with the
roller brush. Power-operating mode in-
creases cleaning performance.
Set programme switch to step 2. Roller
brush is lowered.
Press power button. Indicator lamp
lights up.
Note
The following actions reset the power but-
ton automatically:
–
Press the power button again.
–
Set programme switch to step 1 (driv-
ing).
–
Switching off the machine.
The indicator lamp goes out and the basic-
operating mode is activated.
Note
To sweep up larger items with a height of
60 mm, e.g. soft drink cans, the bulk waste
flap must be raised briefly.
Raising bulk waste flap:
Press the pedal for the bulk waste flap
forwards and keep pressed down.
To lower it, take foot off pedal.
Note
An optimum cleaning result can only be
achieved if the bulk waste flap has been
lowered completely.
To sweep in edge area on right-hand side:
Set programme switch to step 3. The
right side brush and roller brush are
lowered.
To sweep in edge area on left-hand side:
Set programme switch to step 4. The
left side brush and roller brush are low-
ered.
To sweep in edge areas on right- and left-
hand side:
Set programme switch to step 5. Both
side brushes and roller brush are low-
ered.
Note
Roller brush and side brush start operating
automatically.
Close wet/dry flap on waste container.
Installation set suction hose (option):
Press wet sweeping button repeatedly.
Open wet/dry flap on waste container.
Installation set suction hose (option):
Press wet sweeping button.
Note
This protects the filter from moisture.
Note
Wait until the automatic filter shaking proc-
ess is finished and the dust has settled be-
fore you open or empty the waste
container.
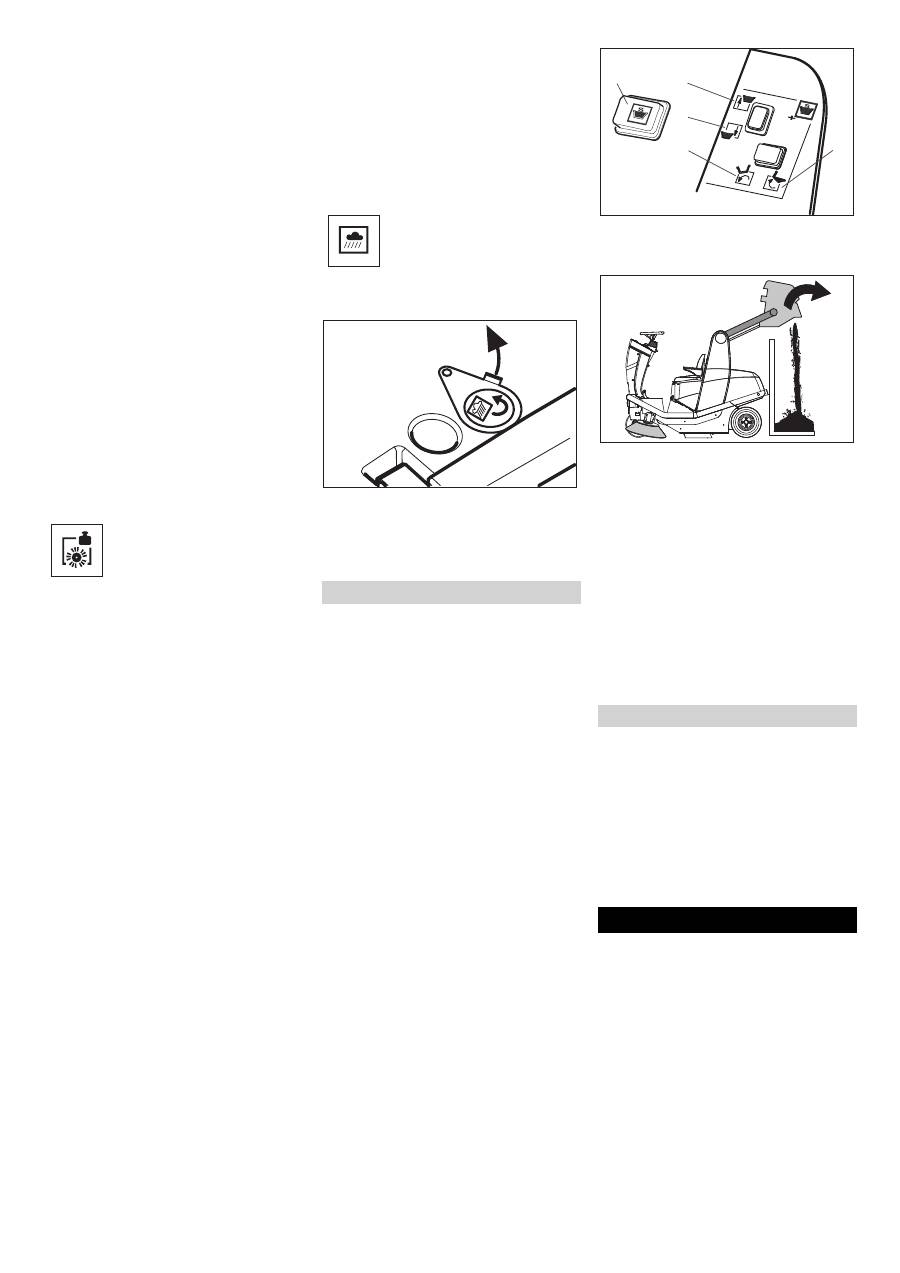
Danger
Risk of injury! When emptying the waste
container, care should be taken to ensure
that no persons or animals are within its
swivelling range.
Danger
Danger of crushing. Never reach into the
rod assembly for the drainage mechanism.
Stay away from the area under the raised
container.
Danger
Danger of tipping. Place the machine on an
even surface during emptying.
Stop the machine.
Set programme switch to step 1 (driv-
ing).
Note
The container can only be tilted and emp-
tied once a set minimum level has been
reached.
Note
A two-handed operation is required to carry
out the following steps.
Raise waste container. Press button 1
(operator console) and 2 simultaneous-
ly.
Once the required height has been
reached:
Tip waste container out. Press button 1
(operator console) and 5 simultaneous-
ly.
Tip waste container back in. Press but-
ton 1 (operator console) and 4 simulta-
neously.
Lower waste container. Press button 1
(operator console) and 3 simultaneous-
ly.
Note
The container can only be fully retracted if
it is tipped back into its starting position be-
forehand.
Set programme switch to step 1 (driv-
ing). The side brush and roller brush are
raised.
Turn ignition key to "0" and remove it.
Lock parking brake.
Note
Once the machine has been switched off,
the dust filter is shaked automatically for
approx. 15 seconds.
If the sweeper is going to be out of service
for a longer time period, observe the follow-
ing points:
Park the sweeper on an even surface.
Only KM 120/150 R G and R D: Fill fuel
tank and close fuel cock.
Only KM 120/150 R LPG: Close the gas
cylinder valve and remove the cylinder.
Store the gas cylinder according to the
safety regulations for LPG vehicles.
Change engine oil.
Set programme switch to step 1 (driv-
ing). The roller brush and side brushes
are raised to prevent the bristles being
damaged.
Turn ignition key to "0" and remove it.
Sweeping with roller brush (basic-oper-
ating mode)
Sweeping with roller brush (power-oper-
ating mode)
Sweeping with bulk waste flap raised
Sweeping with side brushes
Sweeping dry floors
Sweeping damp or wet floors
Emptying waste container
Turn off the appliance
Shutdown
2
3
4
5
1
29 EN
Оглавление
- Inhaltsverzeichnis
- Funktion Bestimmungsgemäße Ver- wendung
- Bedien- und Funktionselemente
- Vor Inbetriebnahme
- Betrieb
- Stilllegung
- Transport Lagerung des Gerätes Pflege und Wartung
- Hilfe bei Störungen
- Technische Daten
- Zubehör
- Contents
- Function Proper use
- Operating and Functional Elements
- Before Startup
- Operation
- Shutdown
- Transport Storing the device Maintenance and care
- Troubleshooting
- Technical specifications
- Accessories
- Table des matières
- Fonction Utilisation conforme
- Eléments de commande et de fonction
- Avant la mise en service
- Fonctionnement
- Remisage
- Assistance en cas de panne
- Caractéristiques techniques
- Accessoires
- Indice
- Funzione Uso conforme a destinazione
- Elementi di comando e di funzione
- Prima della messa in funzione
- Funzionamento
- Fermo dell'impianto
- Guida alla risoluzione dei guasti
- Dati tecnici
- Accessori
- Inhoudsopgave
- Functie Reglementair gebruik
- Elementen voor de bediening en de functies
- Voor de inbedrijfstelling
- Werking
- Stillegging
- Hulp bij storingen
- Technische gegevens
- Toebehoren
- Índice de contenidos
- Función Uso previsto
- Elementos de operación y funcionamiento
- Antes de la puesta en marcha
- Funcionamiento
- Parada
- Ayuda en caso de avería
- Datos técnicos
- Accesorios
- Índice
- Funcionamento Utilização conforme o fim a que se destina a máquina
- Elementos de comando e de funcionamento
- Antes de colocar em funcio- namento
- Funcionamento
- Desactivação da máquina
- Ajuda em caso de avarias
- Dados técnicos
- Acessórios
- Indholdsfortegnelse
- Funktion Bestemmelsesmæssig an- vendelse
- Betjenings- og funktionselementer
- Inden ibrugtagning
- Drift
- Afbrydning/nedlæggelse
- Transport Opbevaring af maskinenPleje og vedligeholdelse
- Hjælp ved fejl
- Tekniske data
- Tilbehør
- Innholdsfortegnelse
- Funksjon Forskriftsmessig bruk
- Betjenings- og funksjonelementer
- Før den tas i bruk
- Drift
- Sette bort
- Transport Lagring av maskinen Pleie og vedlikehold
- Feilretting
- Tekniske data
- Tilbehør
- Innehållsförteckning
- Funktion Ändamålsenlig användning
- Manövrerings- och funktionselement
- Före ibruktagande
- Drift
- Nedstängning
- Transport Lagring av maskinen Skötsel och underhåll
- Åtgärder vid störningar
- Tekniska data
- Tillbehör
- Sisällysluettelo
- Toiminta Käyttötarkoitus
- Ohjaus- ja käyttölaitteet
- Ennen käyttöönottoa
- Käyttö
- Seisonta-aika
- Kuljetus Koneen säilytys Hoito ja huolto
- Häiriöapu
- Tekniset tiedot
- Tarvikkeet
- Πίνακας περιεχομένων
- Λειτουργία Χρήση σύμφωνα με τους κα - νονισμούς
- Προστασία περιβάλλοντος
- Στοιχεία χειρισμού και λειτουργίας
- Πριν τη θέση σε λειτουργία
- Λειτουργία
- Διακοπή της λειτουργίας
- Αποθήκευση της συσκευής Φροντίδα και συντήρηση
- Αντιμετώπιση βλαβών
- Τεχνικά χαρακτηριστικά
- Εξαρτήματα
- İ çindekiler
- Fonksiyon Kurallara uygun kullan ı m
- Kullan ı m ve çal ı ş ma elemanlar ı
- Cihaz ı çal ı ş t ı rmaya ba ş lama- dan önce
- Çal ı ş t ı rma
- Durdurma
- Ta ş ı ma Cihaz ı n depolanmas ı Koruma ve Bak ı m
- Ar ı zalarda yard ı m
- Teknik Bilgiler
- Aksesuar
- Оглавление
- Назначение Использование по назначе - нию
- Защита окружающей среды
- Описание элементов управления и рабочих узлов
- Перед началом работы
- Эксплуатация
- Вывод из эксплуатации
- Хранение прибора Уход и техническое обслу - живание
- Помощь в случае неполадок
- Технические данные
- Принадлежности
- Tartalomjegyzék
- Funkció Rendeltetésszer ű használat
- Kezelési- és funkciós elemek
- Üzembevétel el ő tt
- Üzem
- Leállítás
- Szállítás A készülék tárolása Ápolás és karbantartás
- Segítség üzemzavar esetén
- M ű szaki adatok
- Tartozékok
- Spis tre ś ci
- Funkcja U ż ytkowanie zgodne z prze- znaczeniem
- Elementy urz ą dzenia
- Przed pierwszym uruchomie- niem
- Dzia ł anie
- Wy łą czenie z eksploatacji
- Usuwanie usterek
- Dane techniczne
- Akcesoria


