Karcher KM 120/150 R P: Before Startup
Before Startup: Karcher KM 120/150 R P
-
7 몇
Warning
Do not use a forklift truck to unload the ma-
chine as this may damage it.
To unload the machine, proceed as follows:
Cut plastic packing belt and remove foil.
Connect battery (see section on Care
and maintenance)
Remove the elastic tape fasteners at
the stop points.
Four indicated floor boards of the pallet
are fastened with screws. Unscrew
these boards.
Place the boards on the edge of the pal-
let. Place the boards in such a way that
they lie in front of the four wheels of the
machine. Fasten the boards with screws.
Slide the four support beams included
in the packaging under the ramp.
Remove the wooden blocks used for ar-
resting the wheels and slide them under
the ramp.
The machine can be moved in 2 ways:
(1) By pushing it (see Moving sweeper
without engaging self-propulsion).
(2) By driving it (see Moving sweeper by
engaging self-propulsion).
Danger
Risk of injury! Before engaging the free-
wheel operation, the machine must be se-
cured to prevent it rolling away.
Lock parking brake.
Open cover and secure it (Diag. 3).
Engage freewheel lever in hole.
This blocks the travel drive function.
Close cover.
Release parking brake.
The machine can now be pushed.
Note
Do not move the machine for long distanc-
es without engaging self-propulsion, a
speed of 6 km/h should not be exceeded.
Unhook the free wheel lever.
The travel drive is now ready for operation.
Close cover.
Release parking brake.
The appliance can now be driven.
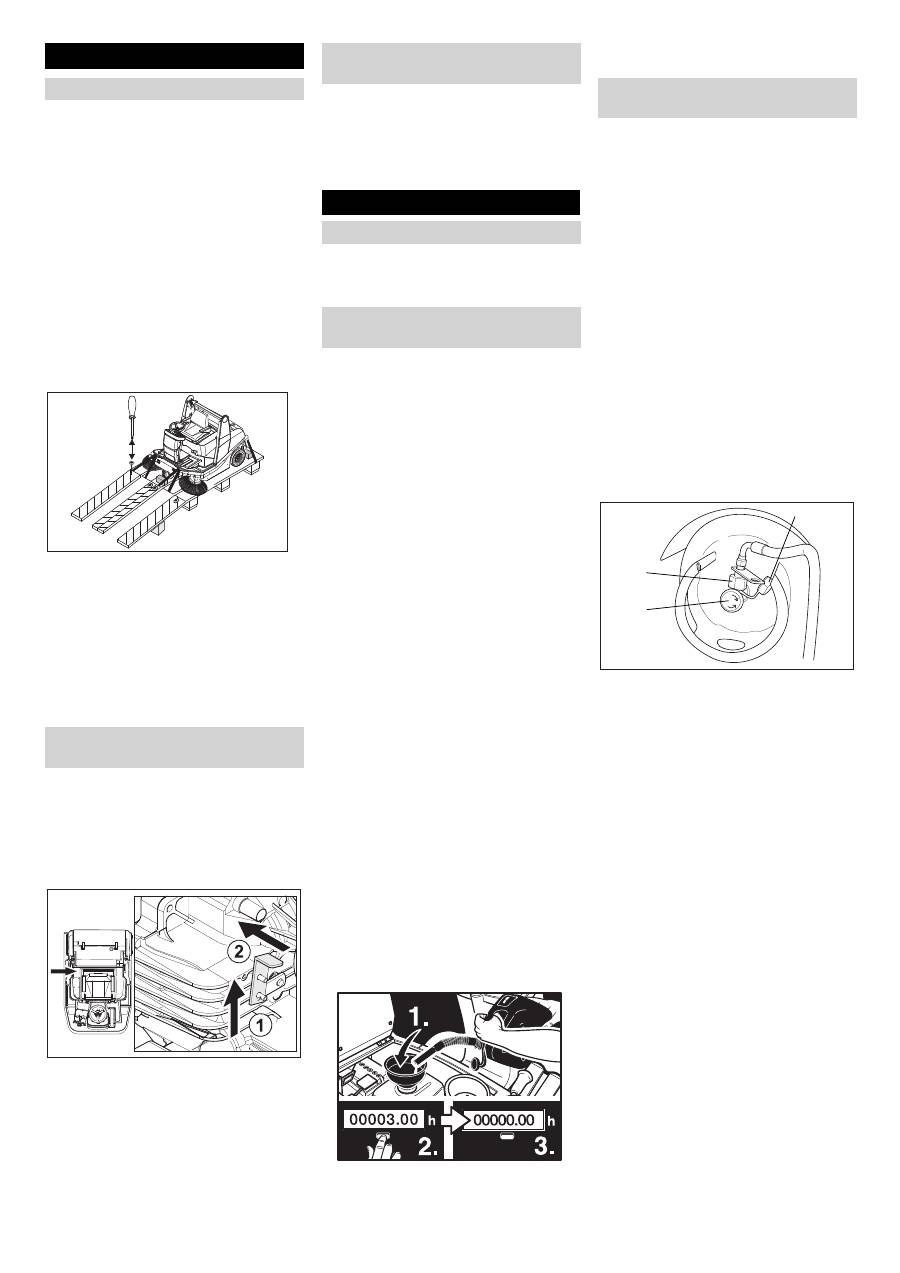
Park the sweeper on an even surface.
Remove ignition key.
Lock parking brake.
Danger
Risk of explosion!
–
Only use the fuels specified in the Op-
erations Manual.
–
Do not refuel the machine in enclosed
spaces.
–
Smoking and naked flames are strictly
prohibited.
–
Ensure that no fuel reaches the hot
open surfaces.
Switch off engine.
Only KM 120/150 without driver cabin:
Open cover and secure it (Diag. 3).
Open fuel filler cap.
Insert funnel provided.
KM 120/150 R G: Use regular unleaded
petrol.
KM 120/150 R D: Use diesel.
Fill tank to max. 1 cm below the lower
edge of the filler nozzle.
Wipe off any spilt fuel, remove funnel
and close fuel filler cap.
Only KM 120/150 without driver cabin:
Close cover.
Note
After the machine is switched on, the num-
ber of operating hours is displayed for 10
seconds. The fuel gauge is then automati-
cally displayed.
Note
The fuel gauge shows the length of time the
machine has been in operation since the
elapsed-time counter was last reset.
Note
The machine can be operated for a maxi-
mum of 3 hours on a full tank.
Press reset button (2) on the elapsed-
time counter.
몇
Warning
Only use replacement cylinders with 11 kg
contents of tested models.
Danger
Risk of injury!
–
Follow safety regulations for LPG vehi-
cles.
–
Formation of crusts and yellow-frothing
deposits on the gas cylinder indicate
leakiness.
–
Cylinders must be changed only by in-
structed persons.
–
Cylinders containing propellant gases
must not be changed in garages and
underground areas.
–
Do not smoke and use uncovered light
while changing the cylinder.
–
While changing cylinders, first close the
locking valve of the LPG cylinder firmly
and immediately put the protective cap
on the empty cylinder.
Place the cylinder in such a way that the
connection threading of the locking
valve vertically points upwards.
Close the bracket closure.
Attach safety splint.
Remove protective lid (1) from the con-
nection valve of the cylinder.
Connect the gas tube with Union nut (2)
(use 30 mm spanner).
Note
Connection has a left threading.
몇
Warning
Open the gas drawing valve (3) only after
starting the appliance (refer chapter Start-
ing the appliance).
Before Startup
Unloading
Moving sweeper without engaging
self-propulsion
Moving sweeper by engaging self-
propulsion
Start up
General notes
Refuelling (only KM 120/150 R G and
R D)
Refuelling the machine
Resetting fuel gauge
Connect/ change gas cylinder (only
KM 120/150 R LPG)
1 2 3 27 EN
Оглавление
- Inhaltsverzeichnis
- Funktion Bestimmungsgemäße Ver- wendung
- Bedien- und Funktionselemente
- Vor Inbetriebnahme
- Betrieb
- Stilllegung
- Transport Lagerung des Gerätes Pflege und Wartung
- Hilfe bei Störungen
- Technische Daten
- Zubehör
- Contents
- Function Proper use
- Operating and Functional Elements
- Before Startup
- Operation
- Shutdown
- Transport Storing the device Maintenance and care
- Troubleshooting
- Technical specifications
- Accessories
- Table des matières
- Fonction Utilisation conforme
- Eléments de commande et de fonction
- Avant la mise en service
- Fonctionnement
- Remisage
- Assistance en cas de panne
- Caractéristiques techniques
- Accessoires
- Indice
- Funzione Uso conforme a destinazione
- Elementi di comando e di funzione
- Prima della messa in funzione
- Funzionamento
- Fermo dell'impianto
- Guida alla risoluzione dei guasti
- Dati tecnici
- Accessori
- Inhoudsopgave
- Functie Reglementair gebruik
- Elementen voor de bediening en de functies
- Voor de inbedrijfstelling
- Werking
- Stillegging
- Hulp bij storingen
- Technische gegevens
- Toebehoren
- Índice de contenidos
- Función Uso previsto
- Elementos de operación y funcionamiento
- Antes de la puesta en marcha
- Funcionamiento
- Parada
- Ayuda en caso de avería
- Datos técnicos
- Accesorios
- Índice
- Funcionamento Utilização conforme o fim a que se destina a máquina
- Elementos de comando e de funcionamento
- Antes de colocar em funcio- namento
- Funcionamento
- Desactivação da máquina
- Ajuda em caso de avarias
- Dados técnicos
- Acessórios
- Indholdsfortegnelse
- Funktion Bestemmelsesmæssig an- vendelse
- Betjenings- og funktionselementer
- Inden ibrugtagning
- Drift
- Afbrydning/nedlæggelse
- Transport Opbevaring af maskinenPleje og vedligeholdelse
- Hjælp ved fejl
- Tekniske data
- Tilbehør
- Innholdsfortegnelse
- Funksjon Forskriftsmessig bruk
- Betjenings- og funksjonelementer
- Før den tas i bruk
- Drift
- Sette bort
- Transport Lagring av maskinen Pleie og vedlikehold
- Feilretting
- Tekniske data
- Tilbehør
- Innehållsförteckning
- Funktion Ändamålsenlig användning
- Manövrerings- och funktionselement
- Före ibruktagande
- Drift
- Nedstängning
- Transport Lagring av maskinen Skötsel och underhåll
- Åtgärder vid störningar
- Tekniska data
- Tillbehör
- Sisällysluettelo
- Toiminta Käyttötarkoitus
- Ohjaus- ja käyttölaitteet
- Ennen käyttöönottoa
- Käyttö
- Seisonta-aika
- Kuljetus Koneen säilytys Hoito ja huolto
- Häiriöapu
- Tekniset tiedot
- Tarvikkeet
- Πίνακας περιεχομένων
- Λειτουργία Χρήση σύμφωνα με τους κα - νονισμούς
- Προστασία περιβάλλοντος
- Στοιχεία χειρισμού και λειτουργίας
- Πριν τη θέση σε λειτουργία
- Λειτουργία
- Διακοπή της λειτουργίας
- Αποθήκευση της συσκευής Φροντίδα και συντήρηση
- Αντιμετώπιση βλαβών
- Τεχνικά χαρακτηριστικά
- Εξαρτήματα
- İ çindekiler
- Fonksiyon Kurallara uygun kullan ı m
- Kullan ı m ve çal ı ş ma elemanlar ı
- Cihaz ı çal ı ş t ı rmaya ba ş lama- dan önce
- Çal ı ş t ı rma
- Durdurma
- Ta ş ı ma Cihaz ı n depolanmas ı Koruma ve Bak ı m
- Ar ı zalarda yard ı m
- Teknik Bilgiler
- Aksesuar
- Оглавление
- Назначение Использование по назначе - нию
- Защита окружающей среды
- Описание элементов управления и рабочих узлов
- Перед началом работы
- Эксплуатация
- Вывод из эксплуатации
- Хранение прибора Уход и техническое обслу - живание
- Помощь в случае неполадок
- Технические данные
- Принадлежности
- Tartalomjegyzék
- Funkció Rendeltetésszer ű használat
- Kezelési- és funkciós elemek
- Üzembevétel el ő tt
- Üzem
- Leállítás
- Szállítás A készülék tárolása Ápolás és karbantartás
- Segítség üzemzavar esetén
- M ű szaki adatok
- Tartozékok
- Spis tre ś ci
- Funkcja U ż ytkowanie zgodne z prze- znaczeniem
- Elementy urz ą dzenia
- Przed pierwszym uruchomie- niem
- Dzia ł anie
- Wy łą czenie z eksploatacji
- Usuwanie usterek
- Dane techniczne
- Akcesoria


