Karcher BD 50/40 RS Bp Pack: Faults
Faults: Karcher BD 50/40 RS Bp Pack
-
7
Press the brush change key and tilt the
cover on the brush head towards the
side.
Pull out the brush rollers.
Insert and lock into place the new brush
rollers.
Close the cover, align the brushes and
lock in the cover.
Swivel the spray guard back.
Swivel the unlocking lever downward.
Set programme selection to "Drive".
Turn key to "0" and remove it.
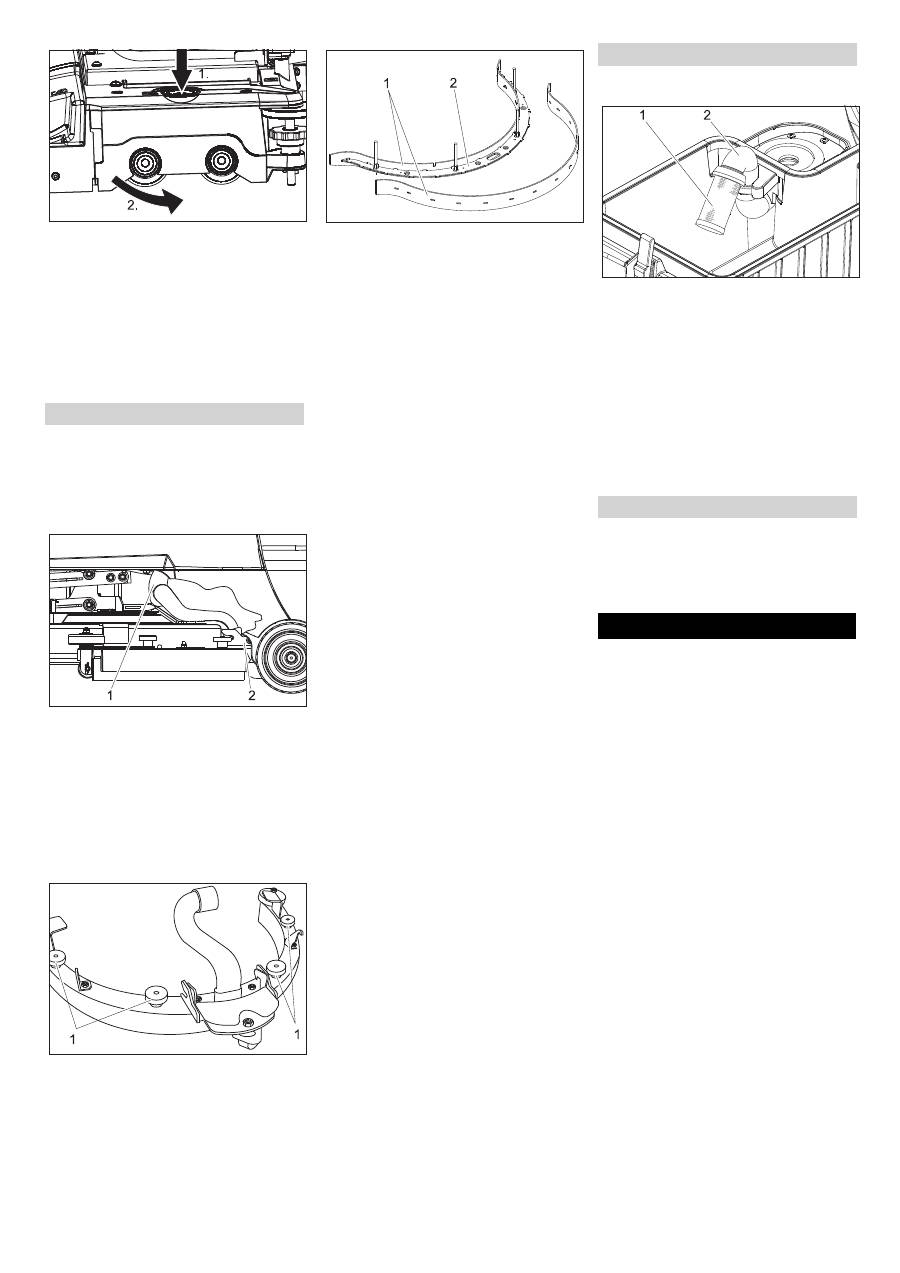
Pull out the suction hose from the vacu-
um bar.
1 Suction hose
2 Suction bar coupling
Pull out the suction hose from the vacu-
um bar.
Loosen the suction bar coupling.
Remove the vacuum bar.
Dismantle the vacuum bar.
1 Lock nut
Unscrew the knurled nuts.
Remove the suction bar insert from the
bottom of the suction bar.
1 Vacuum lip
2 Suction bar insert
Remove the vacuum lips from the suc-
tion bar insert.
Note
The vacuum lips can be turned thrice till all
edges are worn off. After that you need a
new vacuum lip.
Reverse the suction lip or replace it and
rehook it into the hooks of the suction
bar insert.
Place the suction bar insert into the suc-
tion bar.
Screw on the knurled nuts and tighten
them.
Lift the cleaning head.
Turn key to "0" and remove it.
Turn the unlocking lever of the sliding
brush in an anti-clockwise direction -
the brushes will fall downward and can
be pulled outward at the bottom of the
device.
Hold the new brush under the cleaning
head.
Turn the unlocking lever of the sliding
brush in clockwise direction and press
the brush upward.
Release the unlocking lever and check
that the brush is sitting properly.
Replace the spray-guard.
Repeat process on the opposite side.
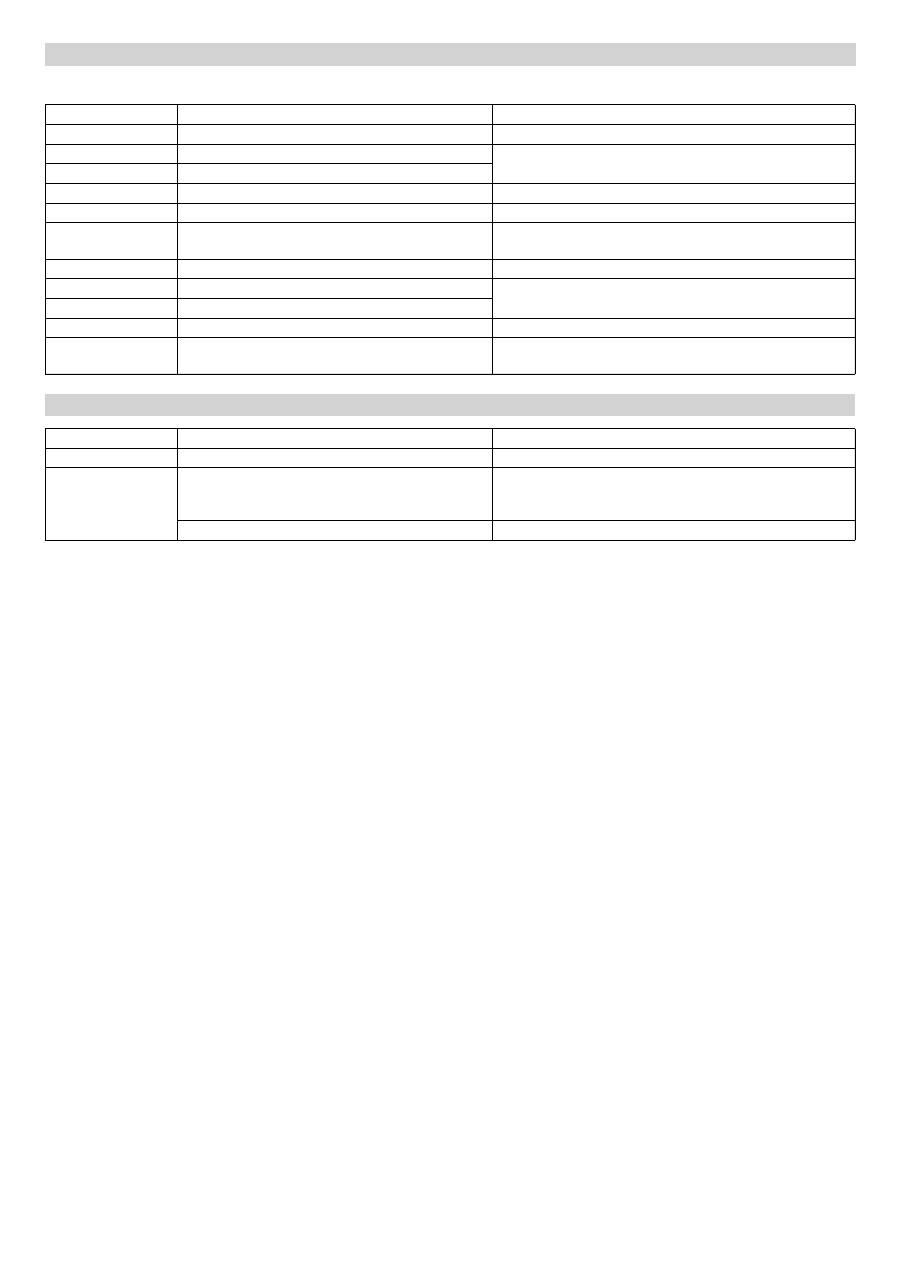
1 Sieve with floater ball
2 Pipe
Clean the sieve from the outside and
rinse it.
Check the mobility of the floater ball.
If it is too dirty:
Hold the pipe firmly and pull out the
sieve from the pipe.
Clean sieve and ball.
Hold the pipe firmly and reinsert the
sieve.
In case of danger of frost:
Empty the fresh and dirt water reser-
voirs.
Store the appliance in a frost-protected
room.
Danger
Risk of injury! Before carrying out any tasks
on the machine, set the main key to "0" and
remove it. Pull out the battery plug.
Note
Suction turbine will continue to run for a
while after switch-off. Carry out mainte-
nance tasks only after the suction turbine
has come to a halt.
In case of faults that cannot be remedied
using the table below please contact the
customer service.
Maintenance tasks BD 50/40 RS
Dismantling the vacuum bar
Replace or turn vacuum lips
Replacing the disk brushes
Maintenance tasks - all types
Cleaning the floater
Frost protection
Faults
21 EN
-
8
A blinking battery display indicates the fol-
lowing faults. The time sequence of the
blinking segments indicates the type of
fault.
Before restarting the charger, pull the
plug out of the socket, wait until the
charge status indicator shuts off and
plug the mains plug back in.
Errors shown by the battery indicator
Number of flashes Fault
Remedy
1
Battery discharged oder battery cable damaged.
Check battery cable, charge battery.
2
Cable to drive motor interrupted.
Inform Customer Service
3
Cable to drive motor shorted.
4
Deep discharge power not reached
Charge battery.
5
--
--
6
Drive attempt while charger is connected (Bp Pack
model only).
Remove the power plug from the charger and hook the
holder into the appliance (model Bp Pack only).
7
Fault in drive pedal.
Release the drive pedal prior to turning on the appliance.
8
Control faulty.
Inform Customer Service
9
Parking brake fault.
10
Shorted connection on battery connection.
Check the terminals on the batteries.
Once every 5 sec-
onds
Control idle.
Turn the main switch to "0" and turn it back to "1".
Errors shown by the charge status indicator (only Bp Pack model)
Blinking signal
Fault
Remedy
Blinks red
Battery poled or is not connected
Check battery cable for correct sitting.
Blinks green and
yellow.
Cable connection between battery and charger is
poor.
Check battery cable for correct sitting.
Check whether the connection to the battery was interrupt-
ed during the charge process.
Battery defective
Check battery.
22 EN
Оглавление
- Inhaltsverzeichnis
- Bedien- und Funktionselemente
- Vor Inbetriebnahme
- Betrieb
- TransportLagerung Pflege und Wartung
- Störungen
- Zubehör
- Technische Daten
- Ersatzteile Garantie EG-Konformitätserklärung
- Contents
- Operating and Functional Elements
- Before Commissioning
- Operation
- Transport Storage Maintenance and care
- Faults
- Accessories
- Specifications
- Spare parts Warranty EC Declaration of Conformity
- Table des matières
- Eléments de commande
- Avant la mise en service
- Fonctionnement
- Transport Entreposage Entretien et maintenance
- Pannes
- Accessoires
- Données techniques
- Pièces de rechange Garantie Déclaration de conformité CE
- Indice
- Elementi di comando e di funzione
- Prima della messa in funzione
- Funzionamento
- Trasporto Supporto Cura e manutenzione
- Guasti
- Accessori
- Dati tecnici
- Ricambi Garanzia Dichiarazione di conformità CE
- Inhoud
- Bediening- en werkingsonderdelen
- Voor ingebruikneming
- Gebruik
- Vervoer Opslag Verzorging en onderhoud
- Storingen
- Accessoires
- Technische gegevens
- Reserveonderdelen Garantie EG-conformiteitsverklaring
- Índice de contenidos
- Elementos de operación y funcionamiento
- Antes de la puesta en marcha
- Funcionamiento
- Transporte Almacenamiento Cuidados y mantenimiento
- Averías
- Accesorios
- Datos técnicos
- Piezas de repuesto Garantía Declaración de conformidad CE
- Índice
- Elementos de comando e de funcionamento
- Antes de colocar em funcionamento
- Funcionamento
- Transporte Armazenamento Conservação e manutenção
- Avarias
- Acessórios
- Dados técnicos
- Peças sobressalentes Garantia Declaração de conformidade CE
- Indholdsfortegnelse
- Betjenings- og funktionselementer
- Inden idrifttagning
- Drift
- Transport Opbevaring Pleje og vedligeholdelse
- Fejl
- Tilbehør
- Tekniske data
- Reservedele Garanti EU-overensstemmelseser- klæring
- Innholdsfortegnelse
- Betjenings- og funksjonsorganer
- Før igangsetting
- Drift
- Transport Lagring Pleie og vedlikehold
- Funksjonsfeil
- Tilbehør
- Tekniske data
- Reservedeler Garanti EU-samsvarserklæring
- Innehållsförteckning
- Manövrerings- och funktionselement
- Före idrifttagandet
- Drift
- TransportFörvaring Skötsel och underhåll
- Störningar
- Tillbehör
- Tekniska data
- Reservdelar Garanti Försäkran om EU-överensstämmelse
- Sisällysluettelo
- Ohjaus- ja toimintaelementit
- Ennen käyttöönottoa
- Käyttö
- KuljetusSäilytys Hoito ja huolto
- Häiriöt
- Varusteet
- Tekniset tiedot
- Varaosat Takuu EU-standardinmukaisuusto- distus
- Πίνακας περιεχομένων
- Στοιχεία χειρισμού και λειτουργίας
- Πριν την ενεργοποίηση
- Λειτουργία
- Μεταφορά Αποθήκευση Φροντίδα και συντήρηση
- Βλάβες
- Εξαρτήματα
- Τεχνικά χαρακτηριστικά
- Ανταλλακτικά Εγγύηση Δήλωση Συμμόρφωσης των Ε . Κ .
- İ çindekiler
- Kullan ı m ve çal ı ş ma elemanlar ı
- Cihaz ı çal ı ş t ı rmaya ba ş lamadan önce
- Çal ı ş t ı rma
- Ta ş ı ma Depolama Koruma ve Bak ı m
- Ar ı zalar
- Aksesuar
- Teknik bilgiler
- Yedek parçalar Garanti AB uygunluk bildirisi
- Оглавление
- Описание элементов управления и рабочих узлов
- Перед началом работы
- Эксплуатация прибора
- Транспортировка Хранение Уход и техническое обслу - живание
- Неполадки
- Принадлежности
- Технические данные
- Запасные части Гарантия Заявление о соответствии ЕС
- Tartalomjegyzék
- Kezelési- és funkciós elemek
- Üzembevétel el ő tt
- Üzem
- Szállítás Tárolás Ápolás és karbantartás
- Üzemzavarok
- Tartozékok
- M ű szaki adatok
- Alkatrészek Garancia EK konformitási nyiltakozat
- Obsah
- Ovládací a funk č ní prvky
- Pokyny p ř ed uvedením p ř ístroje do provozu
- Provoz
- P ř eprava Ukládání Pé č e a údržba
- Poruchy
- P ř íslušenství
- Technické údaje
- Náhradní díly Záruka Prohlášení o shod ě pro ES
- Vsebinsko kazalo
- Upravljalni in funkcijski elementi
- Pred zagonom
- Obratovanje
- Transport Skladiš č enje Nega in vzdrževanje
- Motnje
- Pribor
- Tehni č ni podatki
- Nadomestni deli Garancija ES-izjava o skladnosti
- Spis tre ś ci
- Elementy obs ł ugi urz ą dzenia
- Przed uruchomieniem
- Dzia ł anie
- Transport Przechowywanie Czyszczenie i konserwacja
- Zak ł ócenia
- Akcesoria
- Dane techniczne
- Cz ęś ci zamienne Gwarancja Deklaracja zgodno ś ci UE
- Cuprins
- Elemente de utilizare ş i func ţ ionale
- Înainte de punerea în func ţ iune
- Func ţ ionarea
- Transport Depozitarea Îngrijirea ş i între ţ inerea
- Defec ţ iuni
- Accesorii
- Date tehnice
- Piese de schimb Garan ţ ie Declara ţ ie de conformitate CE
- Obsah
- Ovládacie a funk č né prvky
- Pred uvedením do prevádzky
- Prevádzka
- Transport Uskladnenie Ošetrovanie a údržba
- Poruchy
- Príslušenstvo
- Technické údaje
- Náhradné diely Záruka Vyhlásenie o zhode s normami EÚ
- Pregled sadržaja
- Komandni i funkcijski elementi
- Prije prve uporabe
- U radu
- Transport Skladištenje Njega i održavanje
- Smetnje
- Pribor
- Tehni č ki podaci
- Pri č uvni dijelovi Jamstvo EZ izjava o uskla đ enosti
- Pregled sadržaja
- Komandni i funkcioni elementi
- Pre upotrebe
- Rad
- Transport Skladištenje Nega i održavanje
- Smetnje
- Pribor
- Tehni č ki podaci
- Rezervni delovi Garancija Izjava o uskla đ enosti sa propisima EZ
- Съдържание
- Обслужващи и функционални елементи
- Преди пускане в експлоатация
- Експлоатация
- T рансп o рт Съхранение Грижи и поддръжка
- Повреди
- Принадлежности
- Технически данни
- Резервни части Гаранция Декларация за съответствие на ЕО
- Sisukord
- Teenindus- ja funktsioonielemendid
- Enne seadme kasutuselevõttu
- Käitamine
- Transport Hoiulepanek Korrashoid ja tehnohooldus
- Rikked
- Tarvikud
- Tehnilised andmed
- Varuosad Garantii EÜ vastavusdeklaratsioon
- Satura r ā d ī t ā js
- Vad ī bas sist ē mas un funkciju elementi
- Pirms ekspluat ā cijas s ā kuma
- Ekspluat ā cija
- Transport ē šana Glab ā šana Kop ana un tehnisk ā apkope
- Trauc ē jumi
- Piederumi
- Tehniskie parametri
- Rezerves da ļ as Garantijas nosac ī jumi EK Atbilst ī bas deklar ā cija
- Turinys
- Aptarnavimo ir funkciniai elementai
- Prieš pradedant naudoti
- Naudojimas
- Transportavimas Laikymas Į prastin ė ir technin ė s prieži ū ra
- Gedimai
- Priedai
- Techniniai duomenys
- Atsargin ė s dalys Garantija EB atitikties deklaracija
- Зміст
- Елементи управління і функціональні вузли
- Перед введенням в експлуатацію
- Експлуатація
- Транспортування Зберігання Догляд та технічне обслуговування
- Неполадки
- Аксесуари
- Технічні дані
- Запасні частини Гарантія Заява при відповідність Європейського співтовариства


")
