LG T5100: Camera [Menu 6]
Camera [Menu 6]: LG T5100
Camera [Menu 6]
T5100 has a 1.3 Mega pixel digital camera which allows you to take
pictures at a maximum resolution 1280x960 pixels (also known as
SXGA). The CMOS sensor guarantees high definition and quality of
the images. Taking pictures will be more fun thanks to the additional
functions such as the 4x Zoom (depending on the resolution),
Brightness control, White balancing and Colour effects.
And the integrated flash allows you to take pictures even when light
conditions are poor.
With the integrated camera, it is also possible to record a video clip.
Press the Menu key (<) and select Camera using navigation keys.
Or, you can go to this menu by pressing Q or q in standby
mode.
!
Note: If the battery is too low, you may not use the Camera
feature.
76
Take pictures [Menu 6-1]
Press the Menu key and select Camera ➝ Take pictures. Or, press
the camera hot key (Q or q) longer than 2 seconds in standby
mode. You can see the viewfinder.
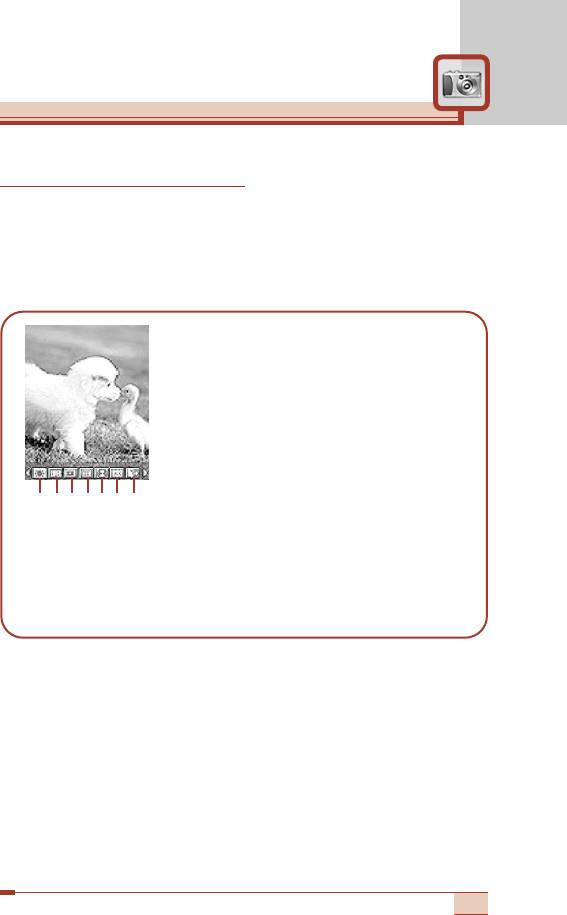
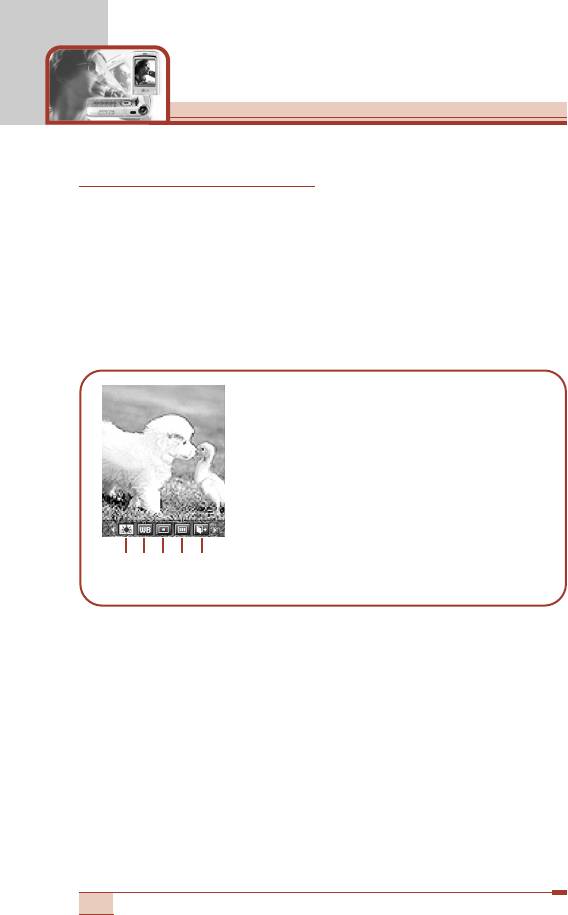
Before taking a shot, press the left soft key [Menu] to set the
following values.
➀ Brightness: 6 grades are available.
➁ White Balance: 5 settings are available:
Auto, Daylight, Incandescent, Cloudy,
and Flourescent.
➂ Resolution: Refer to the page 79 for
further information.
➃ Color Mode: 5 settings are available:
Color, Mono, Sepia, Blue and Negative.
➄ Shot Mode: Select between Single shot
and Multiple shot.
➅ Photo gallery: Access the My photo gallery. After taking a
shot, you can use this to check out the captured image.
➆ Exit: Select this to exit from the setting menu.
To move between the setting menus, use left/right navigation keys.
After highlighting a menu, press the OK key to open the menu.
Select the desired value using left/right navigation keys and press
the OK key to confirm it.
77
Brightness
➀
➁
➂
➃
➄
➅
➆
Camera [Menu 6]
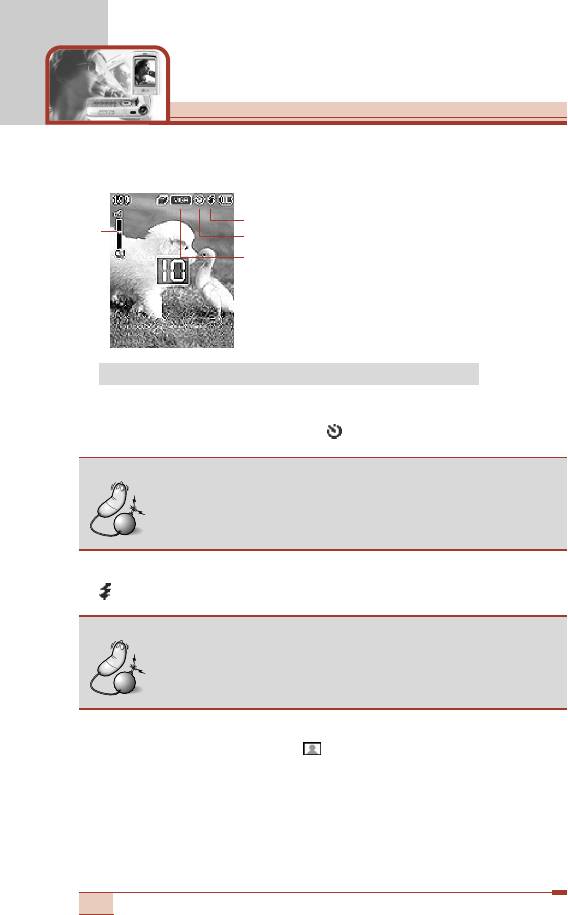
You can also use the following keys before taking a shot.
➀ Zooming bar: You can zoom
➂
in/out using the up/down
➀
➁
navigation keys (U , D) or
Selected
up/down side keys. And this
resolution
bar shows the zooming state.
The maximum zoom scale
depends on the image size as
follows.
SXGA(1x) / VGA(4x) / QVGA(4x) / Panorama(1x)
➁ Self timer: To activate/deactivate the self-timer, press *.
When the self-timer is activated, is shown.
Note
• You can set the desired delay time using Timer
mode menu [Menu 6-6-4].
➂ Flash: To turn the flash on/off, press #. When the flash is on,
is shown.
Note
• You can set the desired flash mode using Flash
mode menu [Menu 6-6-5].
Taking a single still shot ( )
1. In the preview mode, press the left soft key [Menu] to open the
camera setting menu.
2. Highlight the Shot Mode using left/right navigation keys and press
the OK key.
78
3. Select the Single Shot mode ( ).
Note
• In the Single shot mode, you can select the
resolution from QVGA (320X240), VGA (640X480),
SXGA (1280X960), and Panorama (1280X640).
4. After finishing camera option setting, focus on the subject to
capture and press the Camera key (Q). With a click, the image is
captured and then automatically saved in the My photo gallery
(See page 81).
Taking multiple shots in succession ( )
1. In the preview mode, press the left soft key [Menu] to open the
camera setting menu.
2. Highlight the Shot Mode using left/right navigation keys and press
the OK key.
3. Select the Multiple Shot mode ( ).
Note
• In the Multiple shot mode, you can select the
resolution between QVGA (9 shots) and VGA
(3 shots).
4. After finishing camera option setting, focus on the subject to
capture and press the Camera key (Q). With a click, the image is
captured and then automatically saved in the My photo gallery
(See page 81).
79
Camera [Menu 6]
Take movies [Menu 6-2]
You can record the video up to 30 minutes. But it depends on the
resolution, the available memory capacity, and the quantity of data to
be compressed.
Press the Menu key and select Camera ➝ Take movies.
You can record a video clip in this menu by pressing the
Camera key (Q).
1. Before shooting, you can set the desired shooting values by
pressing the left soft key [Menu].
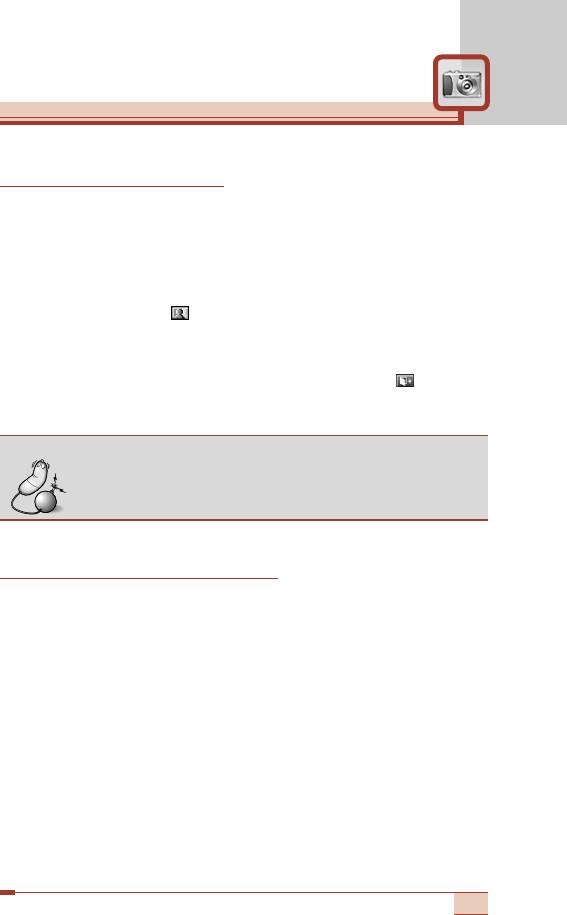
➀ Brightness: 6 grades are available.
➁ White Balance: 5 settings are available:
Auto, Daylight, Incandescent, Cloudy, and
Flourescent.
➂ Resolution: Select the desired resolution
between QCIF(176X44) and S-QCIF
(128X96).
➃ Color mode: 5 settings are available:
Color, Mono, Sepia, Blue, and Negative.
➄ Exit: Select this to exit from the setting
menu.
You can also use the following features. (For more information,
see page 78.)
- Zoom in/out: Use the up/down navigation keys or the up/down
side keys.
- Self timer: Press the *.
- Flash: Press the #.
2. Press the Camera key to start recording a video clip. “Recording”
appears on the LCD screen.
3. To stop recording, press the Camera key again. It is automatically
saved in My movie gallery [Menu 6-5]. And you can keep
recording another video clip by pressing the Camera key.
80
Brightness
➀
➁
➂
➃
➄
Frame shot [Menu 6-3]
Press the Menu key and select Camera ➝ Frame shot.
You can enjoy taking a shot in diverse preset frames. There are 15
preset frames.
1. To select the desired frame to take a shot in, press the left soft
key [Menu].
2. Highlight the Frame( ) using left/right navigation keys and
press the OK key.
3. After selecting the desired frame, press the OK key.
4. After exiting from the option menu by selecting Exit ( ), take a
shot by pressing the Camera key. The captured image is
autoatically saved in the My photo gallery (See page 81).
Note
• The resolution of the frame shots is fixed to 176x220
pixel.
My photo gallery [Menu 6-4]
Press the Menu key and select Camera ➝ My photo gallery.
All the still images taken in the Take pictures menu are stored in
this menu. You can view, organise and send the pictures saved in
your phone.
1. Select the picture you want a full screen of and press the OK key.
Or press the left soft key [Options] to access the following sub-
menus.
• Normal view: You can view one image at a time.
• Multi view/List view: (Shown in the normal view) Go back to
the multi view/list view mode.
• Send via multimedia message: You can send the selected
image via a multimedia message.
81
Camera [Menu 6]
Note
• For details, refer to Multimedia messages – Write
on page 67.
• Because of the big size, the pictures of which
resolution is SXGA cannot be sent via MMS. The
phone will ask if you want to resize the picture in
order to send it via MMS.
• Add to phonebook: You can add the selected image to a
phonebook contact to use the Photo Caller ID feature.
• Slide show:
Plays back every image in succession. To pause/
resume the slide show, press the left soft key. To stop the slide
show and go back to My photo gallery, press the right soft key.
• Set as wallpaper: You can set the selected image as the
internal LCD wallpaper or external LCD wallpaper.
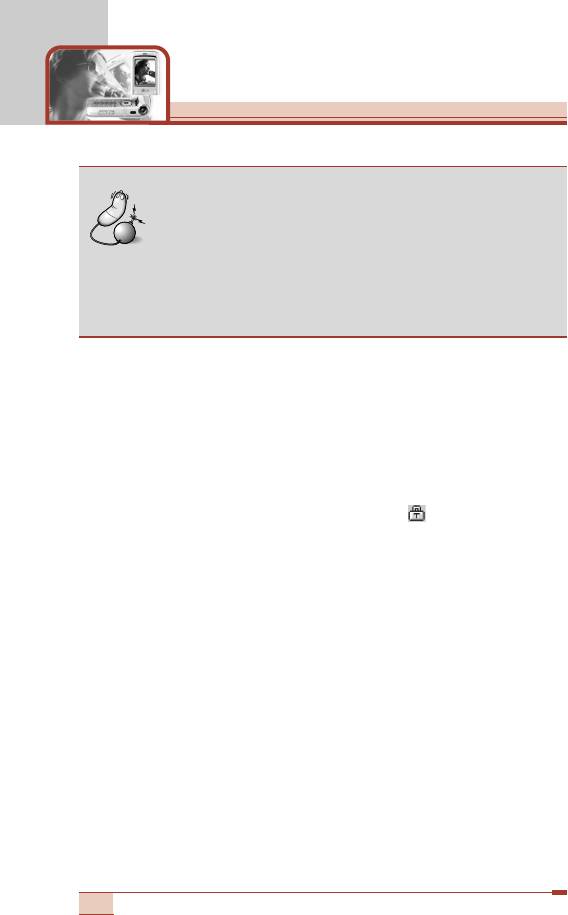
• File protect: You can lock/unlock the selected image by
selecting this. When an image is locked, “” is shown on the
left of the image name. The locked
images cannot be deleted.
• Edit: (Shown in the normal view) After selecting the normal
view of an image, you can edit it as follows. After editing, the
changed image can be saved by pressing the left soft key
[Save]. And the original image is retained.
- Effect filters: You can give various effects to the image. After
selecting the desired effect from 12 effect filters using the
left/right navigation key, press the left soft key [Save]. The
changed image is stored.
- Resize: You can change the image size using the left/right
navigation key.
- Trim: After pressing the right soft key [Zoom], you can zoom
in/out with the right/left soft keys. And display the desired part
using the navigation keys. Press the OK key. The trimmed
image is saved.
!
Note: Trimmed images cannot be edited.
- Rotate: You can rotate the image 90, 180, or 270 degrees.
82
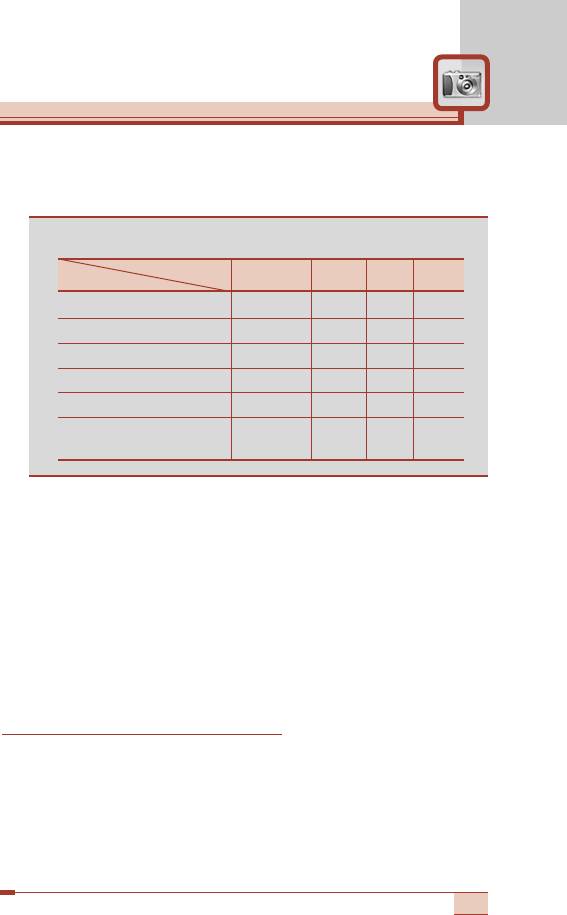
The table below shows the available photo edit features in
each resolution.
!
Note
Photo
Effect filters Resize Trim Rotate
Resolution edit
QVGA (320X240) O X O O
VGA (640X480) O O O O
SXGA (1280X960) X O O X
PANORAMA (1280X640) X O O X
Trimmed image (176X220) X X X X
The resized image from
XXXX
PANORAMA (220X108)
• Rename: You can change the name of the selected image.
• Delete: Deletes the selected image.
• Multiple delete: (Shown in the multi view mode) You can
delete several images at a time. Select the images to delete
through the list by pressing the OK key, then press the left soft
key [Delete].
• Delete all: Deletes all the images in your phone.
• View details: You can check the title, resolution, size, and date
and time of the selected image.
My movie gallery [Menu 6-5]
Press the Menu key and select Camera ➝ My movie gallery.
The list of all the recorded video clips opens. Select the desired
video clip using up/down navigation keys, then press the OK key.
Or you can access the following submenu using the left soft key
[Options].
83
Camera [Menu 6]
• Play: Plays the selected video clip.
• File protect: You can lock/unlock the selected video clip by
selecting this. When a video clip is locked, “” is shown on the
left of the video clip name.
• Rename: You can change the title of the selected video clip.
• Delete: Deletes the selected video clip.
• Multiple delete: You can delete several video clips at a time.
Select the video clips to delete through the list by pressing the OK
key, then press the left soft key [Delete].
• Delete all: You can delete all the video clips in your phone.
While watching a video clip, you can use the following keys.
To pause/resume the playback. Press OK key (
O
).
To change the play option Press Left soft key (
<
).
(between once and repeat).
To skip backward. Use Left navigation key (
L
).
To skip forward. Use Right navigation key (
R
).
To increase the volume. Press Up navigation key (
U
)/Up side key.
To decrease the volume. Press Down navigation key (
D
)/Down side key.
To stop playback and go back to the Press Clear key (
C
) or Right soft key (
>
).
My movie gallery.
Note
• To exit from the playback screen, press the right soft
key or C several times.
84
Camera settings [Menu 6-6]
Press the Menu key and select Camera ➝ Camera settings.
In this menu, you can set the following options.
1. Image quality: Select the desired image quality to be captured.
The higher image quality, the more memories are used.
2. Shutter sound: Select the desired shutter sound.
3. Gallery style: Select the desired My photo gallery style between
List view and Multi view.
4. Timer mode: Select the desired delay time when activating the
self-timer.
5. Flash mode: Select the desired flash mode between Once and
Continuous.
- Once: After taking one shot, the flash is turned off.
- Continuous:
The flash keeps activated. Therefore, Continuous
flash mode will consume the phone’s battery faster.
6. Slideshow interval: Select the desired slideshow interval
between 3 sec and 5 sec.
Memory status [Menu 6-7]
Press the Menu key and select Camera ➝ Memory status.
You can check the current memory status on the phone. Images,
Movie and MP3 Player share the memory.
85
Оглавление
- íÂıÌË͇ ·ÂÁÓÔ‡ÒÌÓÒÚË
- é„·‚ÎÂÌËÂ
- îÛÌ͈ËË T5100
- èÓ‰„ÓÚӂ͇ Í Ì‡˜‡ÎÛ ‡·ÓÚ˚
- [
- éÒÌÓ‚Ì˚ ÙÛÌ͈ËË
- ëÚÛÍÚÛ‡ ÏÂÌ˛
- Ç˚·Ó ÙÛÌ͈ËÈ Ë ÓÔˆËÈ
- èÓÙËÎË [åÂÌ˛ 1]
- ëÔËÒÓÍ Á‚ÓÌÍÓ‚ [åÂÌ˛ 2]
- ê‡Á‚ΘÂÌËfl Ë Ò‚ËÒ [åÂÌ˛ 3]
- 鄇̇ÈÁ [åÂÌ˛ 4]
- ëÓÓ·˘ÂÌËfl [åÂÌ˛ 5]
- ä‡Ï‡ [åÂÌ˛ 6]
- åÛθÚËωˇ [åÂÌ˛ 7]
- èÓ‰‰ÂÊË‚‡ÂÏ˚ ÛÒÎÛ„Ë [åÂÌ˛ 8]
- ìÒÚ‡ÌÓ‚ÍË [åÂÌ˛ 9]
- ÇÓÔÓÒ˚ Ë ÓÚ‚ÂÚ˚
- ÇÓÔÓÒ˚ Ë ÓÚ‚ÂÚ˚
- ÄÍÒÂÒÒÛ‡˚
- íÂıÌ˘ÂÒÍË ı‡‡ÍÚÂËÒÚËÍË
- è‡ÏflÚ͇
- Guidelines for safe and efficient use
- Table of contents
- T5100 features
- Getting started
- General functions
- [
- General functions
- Menu Tree
- Selecting functions and options
- Profiles [Menu 1]
- Call register [Menu 2]
- Tools [Menu 3]
- Organiser [Menu 4]
- Messages [Menu 5]
- Camera [Menu 6]
- Multimedia [Menu 7]
- Service [Menu 8]
- Settings [Menu 9]
- Q&A
- Q&A
- Accessories
- Technical data
- Memo


