LG V-K9765ND: инструкция
Раздел: Бытовая, кухонная техника, электроника и оборудование
Тип: Пылесос
Характеристики, спецификации
Инструкция к Пылесосу LG V-K9765ND
Model
Language
Part No.
Page
인쇄도수(외/내)
재 질 크 기(D*W)
작성일자
담 당 자
V-K97*N**
영어+러시아
24
모조지 100
2010.07.02
3828FI3871A
1/2
182*257
김 기 병
OWNER'S MANUAL
РУКОВОДСТВО ПО ЭКСПЛУАТАЦИИ
Please read all of the information on page 3, 4 carefully. This information contains important instructions for the safe use and the maintenance of the appliance.
Внимательно изучите сведения, приведенные на стр. 5, 6. В них содержатся важные инструкции по безопасности, эксплуатации и обслуживанию пылесоса.
V-K976*N***
P/No.: 3828FI3871A
www.lg.com

Table of contents
ëÓ‰ÂʇÌËÂ
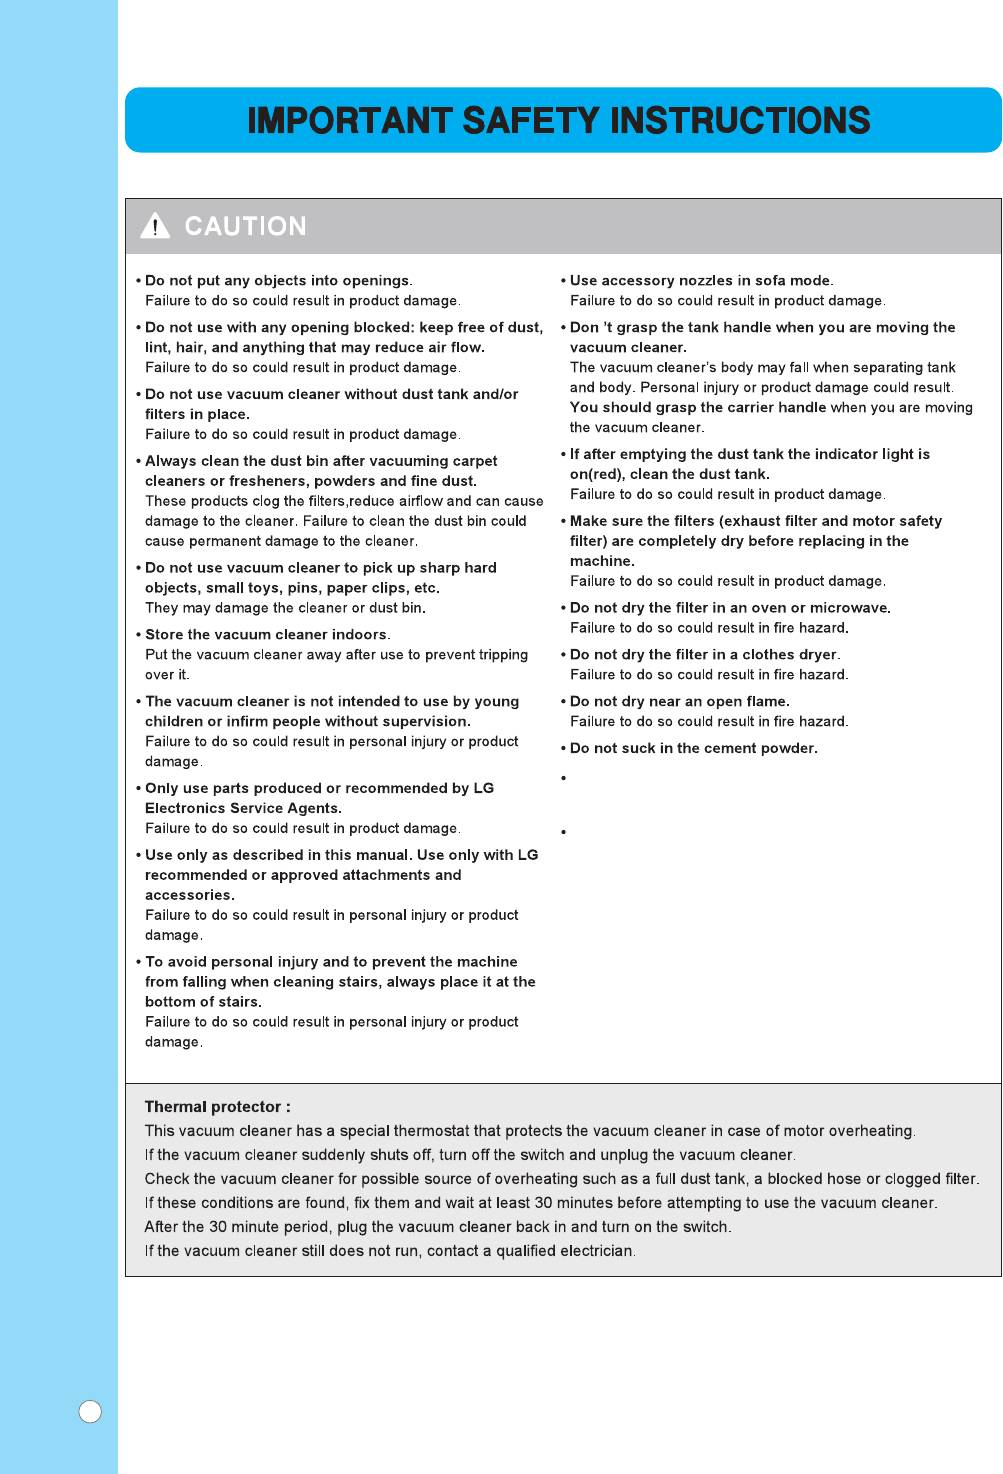
Information safety instructions
....................................................................... 3
LJÊÌ˚ ԇ‚Ë· ÚÂıÌËÍË ·ÂÁÓÔ‡ÒÌÓÒÚË
..................................................... 6
How to use
...................................................................................................... 7
àÒÔÓθÁÓ‚‡ÌË Ô˚ÎÂÒÓÒ‡
............................................................................ 7
Assembling cleaner
.......................................................................................... 7
ë·Ó͇ Ô˚ÎÂÒÓÒ‡
........................................................................................... 7
Using carpet/floor nozzle and carpet master
.......................................................... 8
ç‡Ò‡‰Í‡ ‰Îfl ÍÓ‚Ó‚/ÔÓ· Ë Ì‡Ò‡‰Í‡ (å‡ÒÚ ÍÓ‚Ó‚)
.................................................. 8
Using accessory nozzles
.................................................................................. 8
ÑÓÔÓÎÌËÚÂθÌ˚ ̇҇‰ÍË:
.............................................................................. 8
Dry vacuuming
................................................................................................ 9
ëÛı‡fl ˜ËÒÚ͇
................................................................................................. 9
Wet cleaning
................................................................................................. 12
Ç·Ê̇fl ˜ËÒÚ͇
........................................................................................... 12
Carpet cleaning
............................................................................................. 15
óËÒÚ͇ ÍÓ‚Ó‚
.............................................................................................. 15
Window cleaning
........................................................................................... 16
óËÒÚ͇ ÓÍÓÌ
................................................................................................. 16
Tile cleaning
................................................................................................. 17
óËÒÚ͇ ÔÎËÚÍË
.............................................................................................. 17
Sofa cleaning
................................................................................................ 17
óËÒÚ͇ ‰Ë‚‡ÌÓ‚
............................................................................................ 17
Dust Tank cleaning
........................................................................................ 18
óËÒÚ͇ ÍÓÌÚÂÈ̇ ‰Îfl Ô˚ÎË
........................................................................ 18
Clean filter cleaning
..........................................................................................18
óËÒÚ͇ ÙËθڇ
.............................................................................................18
Exhaust filter cleaning
................................................................................... 19
é˜ËÒÚ͇ ‚˚ÔÛÒÍÌÓ„Ó ÙËθڇ
........................................................................ 19
Carpet master cleaning
.................................................................................. 19
óËÒÚ͇ ̇҇‰ÍË (å‡ÒÚ ÍÓ‚Ó‚)
................................................................... 19
Shampoo tank net cleaning
.............................................................................. 20
óËÒÚ͇ ÒÂÚÍË ÍÓÌÚÂÈ̇ ‰Îfl ¯‡ÏÔÛÌfl
.......................................................... 20
2
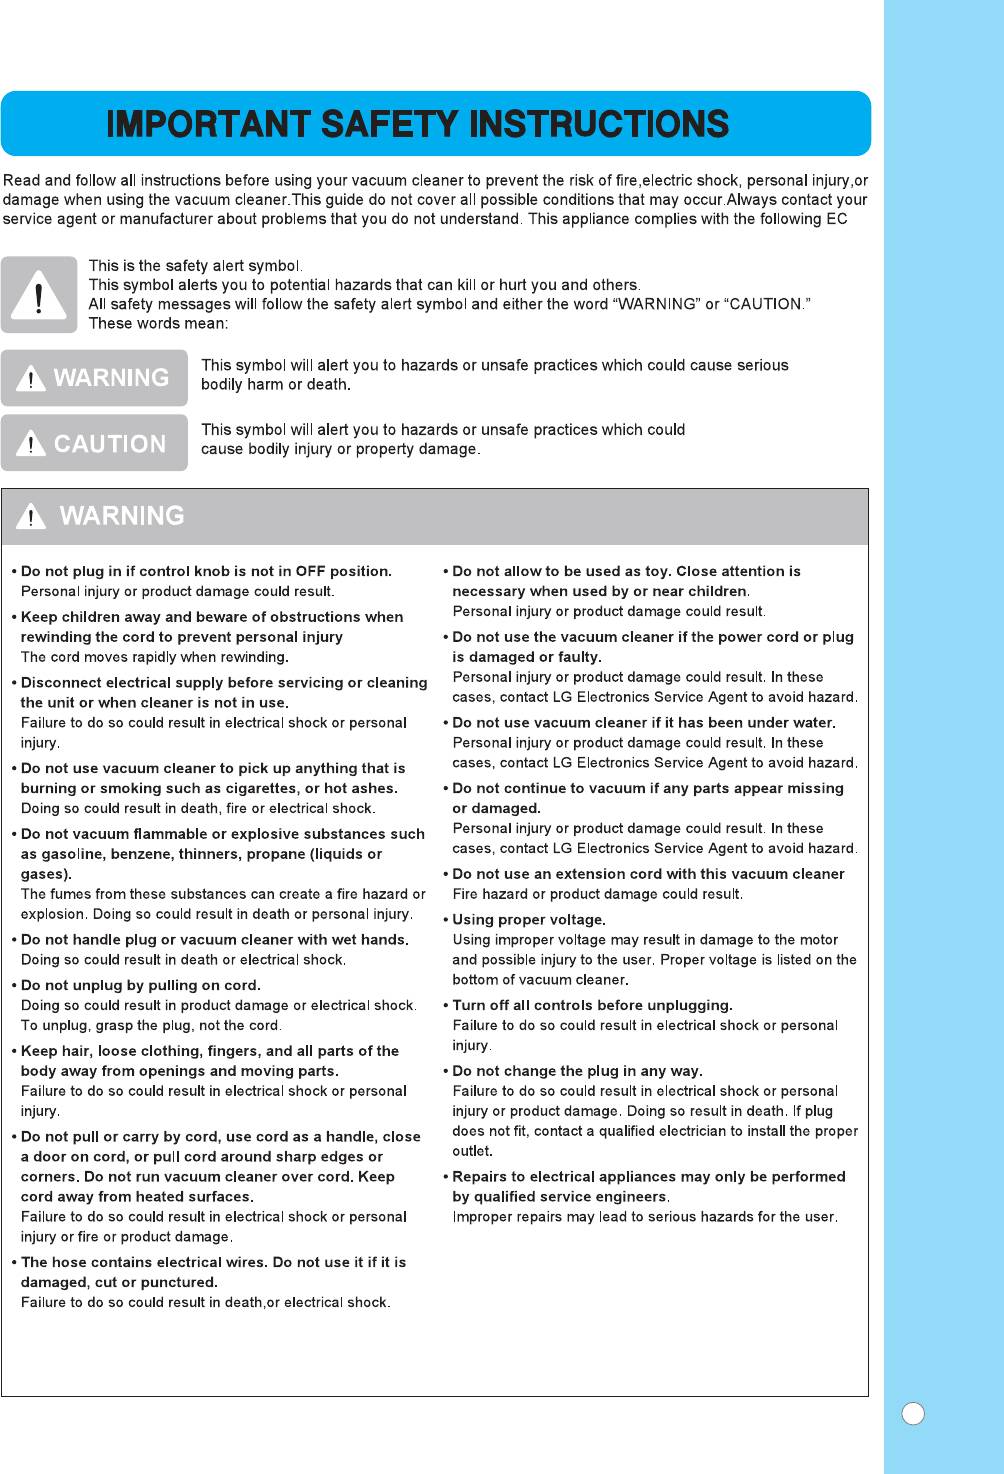
Directives : -2006/95/EC Low Voltage Directive 2004/108/EC EMC Directive.
3
• Do If the power cord is damaged, it must be replaced by an
approved LG Electronics Service Agent to avoid a hazard.
• This appliance is not intended for use by persons
(including children) with reduced physical, sensory or mental
capabilities, or lack of experience and knowledge, unless they
have been given supervision or instruction concerning use of
the appliance by a person responsible for their safety.
Children should be supervised to ensure that they do not play
with the appliance.
4
5
6

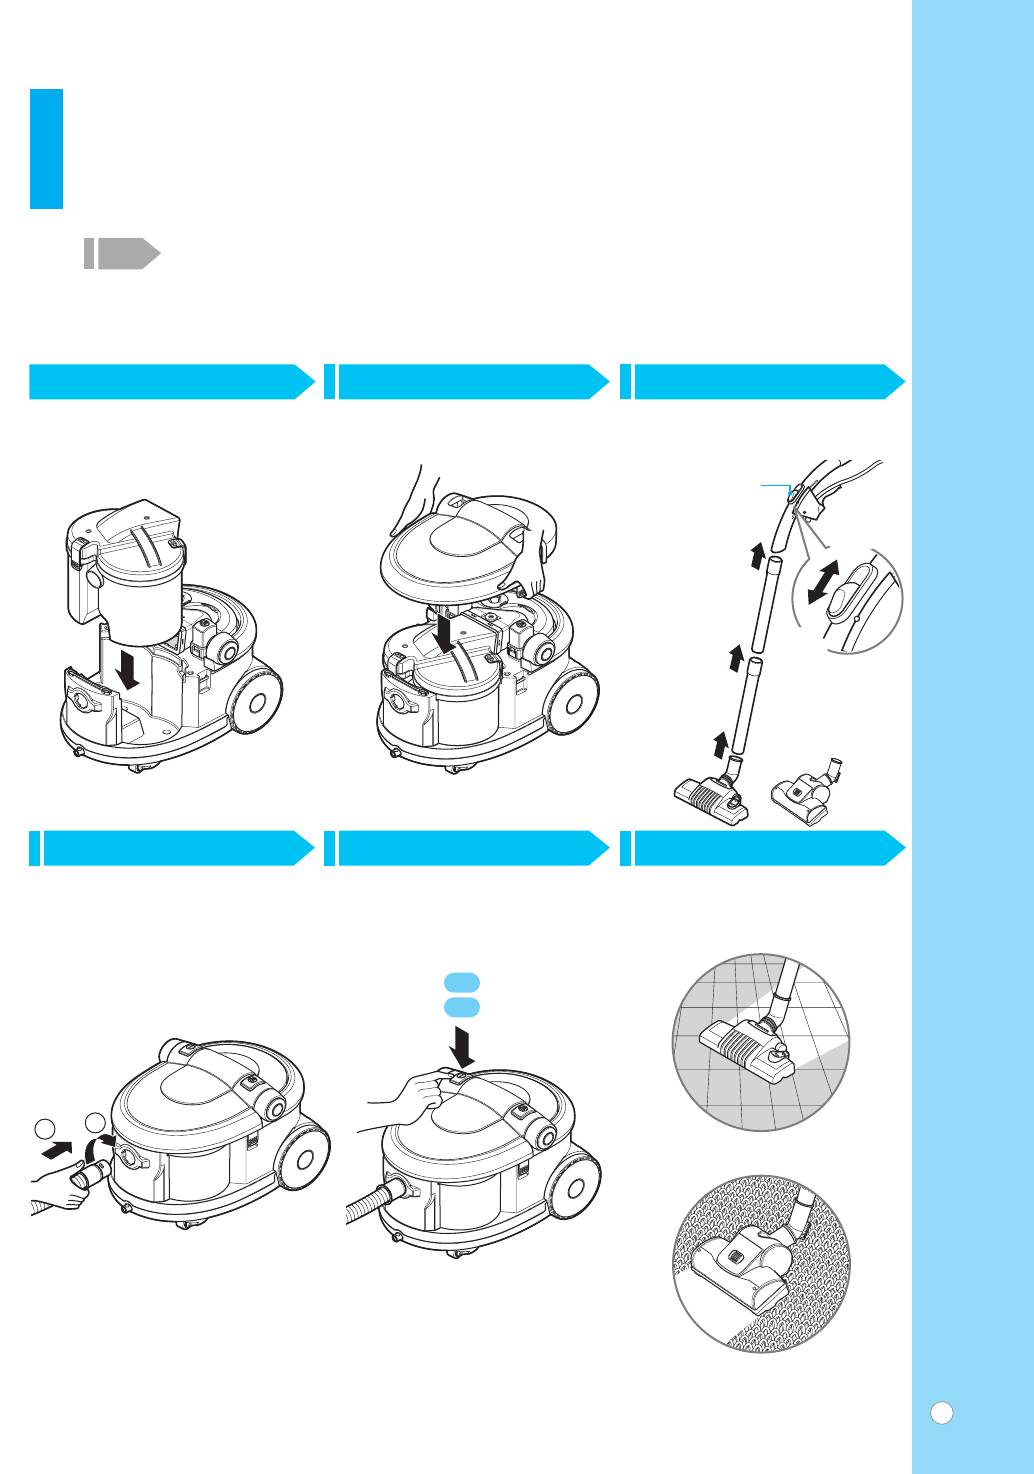
How to use
Assembling cleaner
àÒÔÓθÁÓ‚‡ÌË Ô˚ÎÂÒÓÒ‡
ë·Ó͇ Ô˚ÎÂÒÓÒ‡
Cover
Hose Handle
ä˚¯Í‡
êÛÍÓflÚ͇
¯Î‡Ì„‡
Shampoo
Hose
Clamp
Lever
ò·̄
ᇢÂÎ͇
ê˚˜‡„
ÔÓ‰‡˜Ë
Dust Tank
¯‡ÏÔÛÌfl
äÓÌÚÂÈÌÂ
‰Îfl Ô˚ÎË
Tube
í۷͇
Shampoo
Tank Cap
ä˚¯Í‡
Pipe
ÍÓÌÚÂÈ̇
íÛ·‡
‰Îfl ¯‡ÏÔÛÌfl
Shampoo Tank
äÓÌÚÂÈÌÂ
‰Îfl ¯‡ÏÔÛÌfl
Handle
ê͇ۘ
Switch Button
äÌÓÔ͇
‚˚Íβ˜‡ÚÂÎfl
Cord Reel Button
äÌÓÔ͇ ÒÂÚÂ‚Ó„Ó ¯ÌÛ‡
Inlet Dust
ÇÔÛÒÍÌÓÂ
ÓÚ‚ÂÒÚËÂ
Pipe
‰Îfl Ô˚ÎË
íÛ·‡
Power Cord
Shampoo Button
ëÂÚ‚ÓÈ ¯ÌÛ
äÌÓÔ͇ ÔÓ‰‡˜Ë ¯‡ÏÔÛÌfl
Optional
ç ‚Ó ‚ÒÂı ÏÓ‰ÂÎflı
Carpet Master
Carpet/Floor Nozzle
Window Master
å‡ÒÚ ÍÓ‚Ó‚
ç‡Ò‡‰Í‡ ‰Îfl ڂ‰˚ı
å‡ÒÚ ÓÍÓÌ
ÍÓ‚Ó‚˚ı ÔÓÍ˚ÚËÈ
Spray Nozzle
ê‡ÒÔ˚Îfl˛˘‡fl ̇҇‰Í‡
Spray Nozzle
Shampoo Bottle
Upholstery Nozzle
Small Shampoo Nozzle
ê‡ÒÔ˚Îfl˛˘‡fl
äÓÌÚÂÈÌ ‰Îfl
˘ÂÚ͇ ‰Îfl
å‡Î‡fl ̇҇‰Í‡
̇҇‰Í‡
¯‡ÏÔÛÌfl
˜ËÒÚÍË Ó·Ë‚ÍË
‰Îfl ¯‡ÏÔÛÌfl
Frame Brush Dusting Brush
Crevice Tool
Accessory Bag
˘ÂÚ͇ ‰Îfl ‡Ï
˘ÂÚ͇ ‰Îfl Ô˚ÎË
ç‡Ò‡‰Í‡ ‰Îfl ˘ÂÎÂÈ
ç‡·Ó ‡ÍÒÂÒÒÛ‡Ó‚
7
How to use
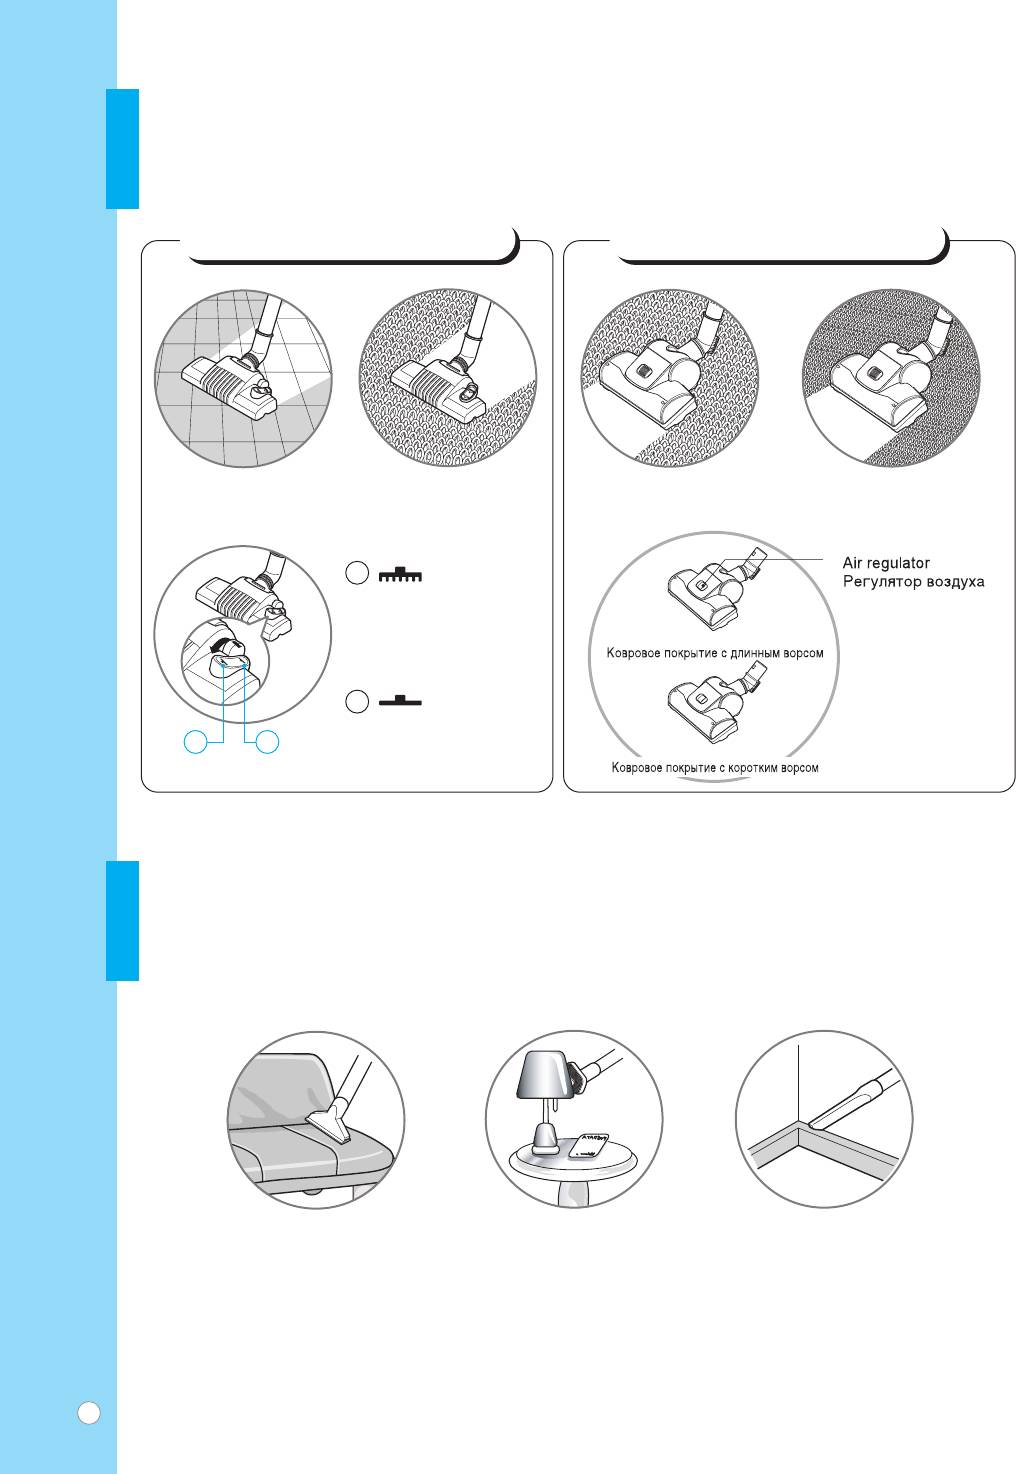
Using carpet/floor nozzle and carpet master plus
àÒÔÓθÁÓ‚‡ÌË Ô˚ÎÂÒÓÒ‡
ç‡Ò‡‰Í‡ ‰Îfl ÍÓ‚Ó‚/ÔÓ· Ë Ì‡Ò‡‰Í‡
(å‡ÒÚ ÍÓ‚Ó‚)
Carpet/Floor Nozzle
Carpet Master
ç‡Ò‡‰Í‡ ‰Îfl ˜ËÒÚÍË ÍÓ‚‡/ÔÓ·
ìÒÚÓÈÒÚ‚Ó ‰Îfl ˜ËÒÚÍË ÍÓ‚Ó‚
Floor
Carpet
Long type Carpet
Hard Floor & Short type Carpet
èÓÎ äÓ‚Â
ÑÎËÌÌÓ‚ÓÒÌ˚È ÍÓ‚Â
ÜÂÒÚÍÓÂ ÔÓÎÓÂ ÔÓÍ˚ÚËÂ Ë
ÍÓÓÚÍÓ‚ÓÒÌ˚È ÍÓ‚Â
1
: Floor
èÓÎ
Long carpet
2
: Carpet
äÓ‚Â
2 1
Short carpet
How to use
Using accessory nozzles
àÒÔÓθÁÓ‚‡ÌË Ô˚ÎÂÒÓÒ‡
ÑÓÔÓÎÌËÚÂθÌ˚ ̇҇‰ÍË
Upholstery Nozzle Dusting Brush Crevice Tool
ç‡Ò‡‰Í‡ ‰Îfl ˜ËÒÚÍË Ó·Ë‚ÍË ôÂÚ͇ ‰Îfl Û‰‡ÎÂÌËfl Ô˚ÎË ç‡Ò‡‰Í‡ ‰Îfl ˜ËÒÚÍË ‚
ÚÛ‰ÌÓ‰ÓÒÚÛÔÌ˚ı ÏÂÒÚ‡ı
8
How to use
Dry vacuuming
àÒÔÓθÁÓ‚‡ÌË Ô˚ÎÂÒÓÒ‡
ëÛı‡fl ˜ËÒÚ͇
The Air Flow Regulator allows you to change the vacuum suction for different fabric and carpet
3
weight. Adjust the suction power with Air Flow Regulator in the handle.
ê„ÛÎflÚÓ ÒËÎ˚ ‚Ò‡Ò˚‚‡ÌËfl ÔÓÁ‚ÓÎflÂÚ ‡‰‡ÔÚËÓ‚‡Ú¸ ÛÒÎÓ‚Ëfl ˜ËÒÚÍË ‰Îfl χÚÂËË Ë ÍÓ‚Ó‚
‡Á΢ÌÓÈ ÔÎÓÚÌÓÒÚË. éÚ„ÛÎËÛÈÚ ÏÓ˘ÌÓÒÚ¸ ÔÂÂÍβ˜‡ÚÂÎÂÏ Ì‡ Û˜ÍÂ.
21 3
Assembling Hose and PipesClosing the Top Cover AssyConnecting the dust tank.
ìÒÚ‡Ìӂ͇ ÍÓÌÚÂÈ̇ ‰Îfl
ë·Ó͇ ¯Î‡Ì„Ó‚ Ë ÚÛ·ÓÍá‡Í˚‚‡ÌË ‚ÂıÌÂÈ Í˚¯ÍË
Ò·Ó‡ Ô˚ÎË
‡ÔÔ‡‡Ú‡
Air Flow Regulator
ê„ÛÎflÚÓ ÒËÎ˚
Open
‚Ò‡Ò˚‚‡ÌËfl
éÚÍ˚Ú¸
Close
á‡Í˚Ú¸
4
5
6
Connecting the Hose Turning on the Power Switch
Cleaning the Floor/Carpet.
èÓ‰ÒÓ‰ËÌÂÌË ¯Î‡Ì„‡ ÇÍβ˜ÂÌË ÔËÚ‡ÌËfl óËÒÚ͇ ÔÓ·/ÍÓ‚‡
ON
Çäã
2
1
9
WARNING!
9
Gently rinse guide buoy separately under a cold running water until the water runs clear.
Do not use detergent or a washing machine or dishwasher. Shake off excess water from the guide buoy.
Re-assemble and place it back in your machine.
èêÖÑìèêÖÜÑÖçàÖ!
ÄÍÍÛ‡ÚÌÓ ÔÓÏÓÈÚÂ Í‡Ê‰Û˛ ‰Âڇθ ÙËθڇ ‚ ıÓÎÓ‰ÌÓÈ ÔÓÚÓ˜ÌÓÈ ‚Ӊ ‰Ó ÚÂı ÔÓ, ÔÓ͇ ‚Ó‰‡ ÌÂ
ÒÚ‡ÌÂÚ ˜ËÒÚÓÈ. çÂθÁfl ËÒÔÓθÁÓ‚‡Ú¸ ÏÓ˛˘Ë Ò‰ÒÚ‚‡, ‡ Ú‡ÍÊ ËÒÔÓθÁÓ‚‡Ú¸ ‰Îfl ÙËθڇ
ÒÚˇθÌÛ˛ ËÎË ÔÓÒÛ‰ÓÏÓ˜ÌÛ˛ χ¯ËÌÛ.
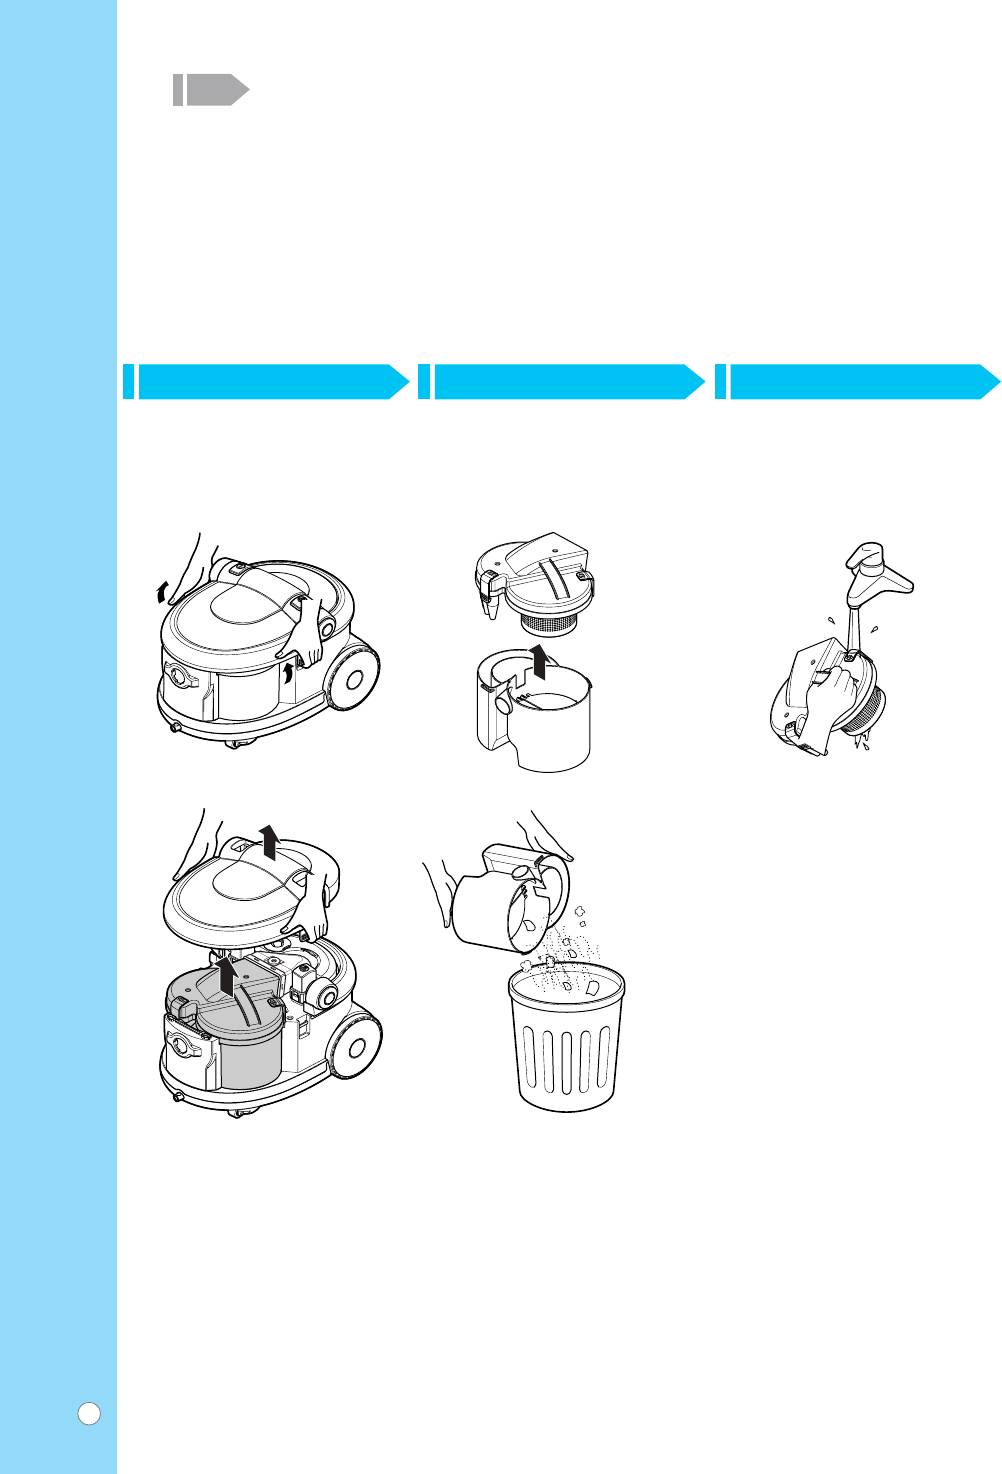
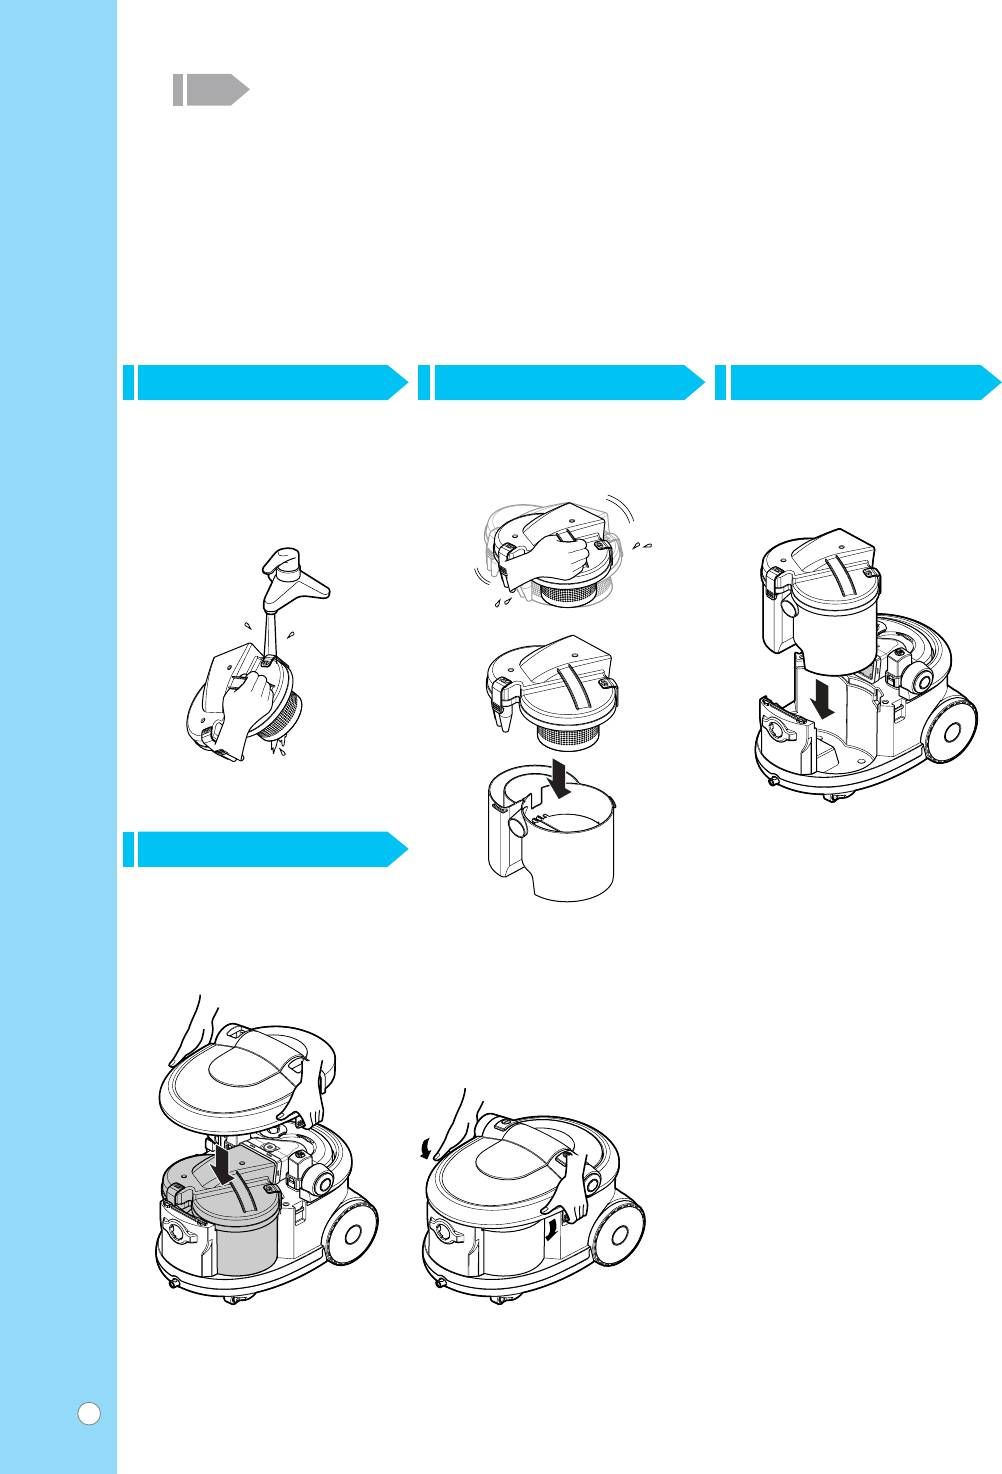
After cleaning
èÓÒΠ˜ËÒÚÍË
7 8 9
Opening the Top Cover Assy
Separating the Dust Cover and
Washing the Guide Buoy.
and Lifting the Dust Tank.
Pouring the cleaning Dust.
èÓÏ˚‚‡ÌË ÙËθڇ.
ëÌflÚË ‚ÂıÌÂÈ Í˚¯ÍË Ë
ëÌflÚË Í˚¯ÍË ÍÓÌÚÂÈ̇
ËÁ‚ΘÂÌË ÍÓÌÚÂÈ̇
‰Îfl Ò·Ó‡ Ô˚ÎË Ë ÓÔÓÓÊÌÂÌËÂ
‰Îfl Ò·Ó‡ Ô˚ÎË.
ÍÓÌÚÂÈ̇.
10
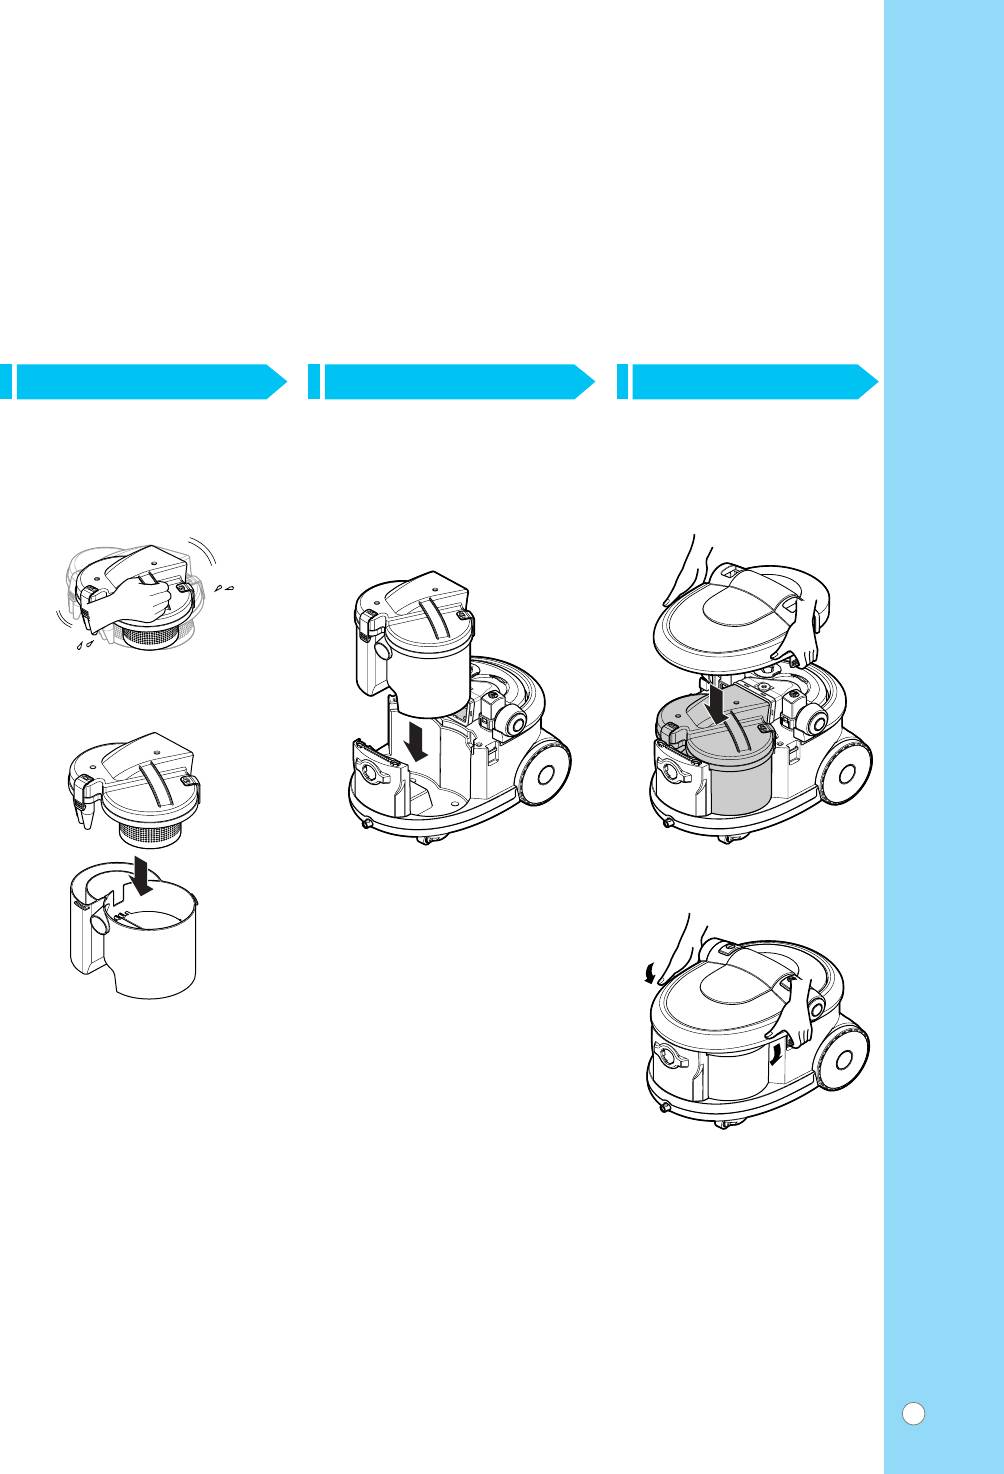
10 11 12
Removing the Cleaning Water &
Connecting the Dust Tank. Closing the Top Cover Assy.
Connecting the Dust Cover.
á‡Í˚‚‡ÌË ‚ÂıÌÂÈ
á‡Í˚‚‡ÌË ‚ÂıÌÂÈ
쉇ÎÂÌË ‚Ó‰˚, ÛÒÚ‡Ìӂ͇
ìÒÚ‡Ìӂ͇ ÍÓÌÚÂÈ̇ ‰Îfl
Í˚¯ÍË ‡ÔÔ‡‡Ú‡
Í˚¯ÍË ÍÓÌÚÂÈ̇ ‰Îfl Ò·Ó‡
Ò·Ó‡ Ô˚ÎË.
Ô˚ÎË.
11
How to use
Wet cleaning
àÒÔÓθÁÓ‚‡ÌË Ô˚ÎÂÒÓÒ‡
Ç·Ê̇fl ˜ËÒÚ͇
7
If there is a strange sound in the pump, put the cleaning fluids into the shampoo tank.
Because it indicates that there is no cleaning fluid in the shampoo tank.
ÖÒÎË Ì‡ÒÓÒ ÔÓËÁ‚Ó‰ËÚ ÔÓÒÚÓÓÌÌËÈ ¯ÛÏ ‰Ó·‡‚¸Ú ‚ ÍÓÌÚÂÈÌ ‰Îfl ¯‡ÏÔÛÌfl ˜ËÒÚfl˘ÂÈ ÊˉÍÓÒÚË.
òÛÏ „Ó‚ÓËÚ Ó ÚÓÏ, ˜ÚÓ ‚ ÍÓÌÚÂÈÌ ‰Îfl ¯‡ÏÔÛÌfl Ì ÓÒÚ‡ÎÓÒ¸ ˜ËÒÚfl˘ÂÈ ÊˉÍÓÒÚË.
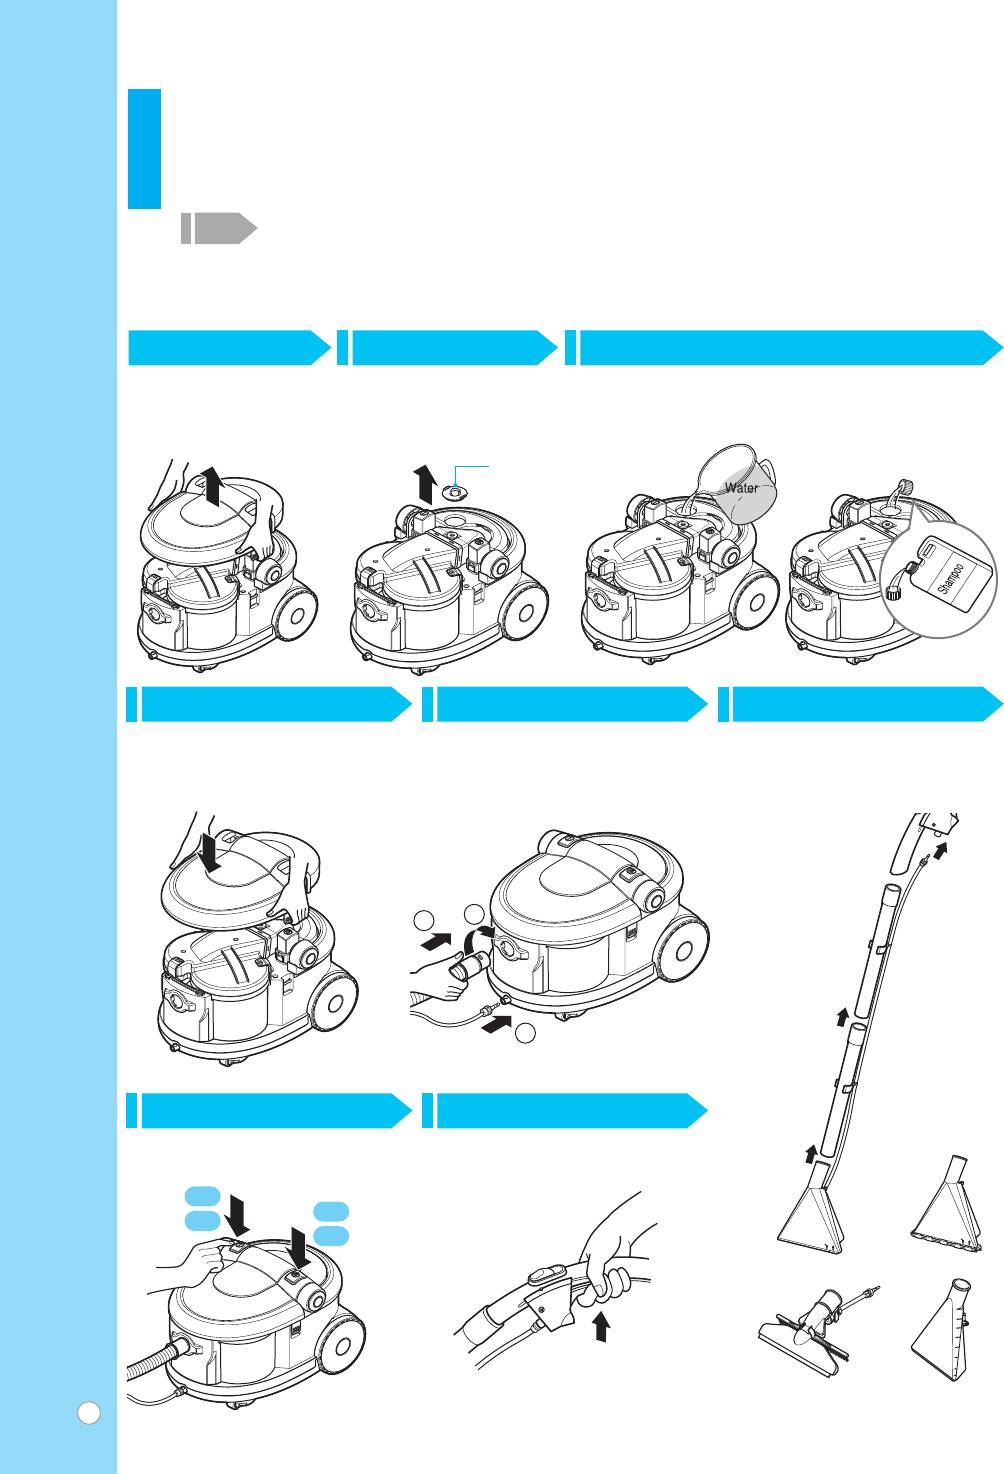
1 2 3
Opening the Top Cover Assy
Opening the Tank Cap Pouring Water & Shampoo
Standard spot 1 Cup
éÚÍ˚‚‡ÌË ‚ÂıÌÂÈ
éÚÍ˚‚‡ÌË Í˚¯ÍË
á‡ÎË‚‡ÌË ‚Ó‰˚ Ë ¯‡ÏÔÛÌfl
Heavy spot 2 Cup
Í˚¯ÍË ‡ÔÔ‡‡Ú‡
ÂÁ‚ۇ‡
ëڇ̉‡ÚÌÓ ÔflÚÌÓ 1 Cup
íÛ‰ÌÓÛ‰‡ÎflÂÏÓ ÔflÚÌÓ 2 Cup
Tank Cap
ä˚¯Í‡
ÂÁ‚ۇ‡
ÇÓ‰‡
¯‡ÏÔÛ̸
5
64
Closing the Tank Cap and
Connecting the Hose & Tube
Assembling Hose & Pipes and
the Top Cover Assy
èÓ‰ÒÓ‰ËÌÂÌË ¯Î‡Ì„‡
Connecting Tube
á‡Í˚‚‡ÌË Í˚¯ÍË ÂÁ‚ۇ‡
ë·Ó͇ ¯Î‡Ì„‡, ÚÛ· Ë
Ë ‚ÂıÌÂÈ Í˚¯ÍË ‡ÔÔ‡‡Ú‡
ÒÓ‰ËÌËÚÂθÌÓ„Ó Ô‡Ú۷͇
2
1
3
7
8
Turning on the Power & Shampoo Switch
Pulling the lever
ÇÍβ˜ÂÌË ÔËÚ‡ÌËfl Ë ÔÓ‰‡˜Ë ¯‡ÏÔÛÌfl
èÂÂÏ¢ÂÌË ˚˜‡„‡
ON
ON
Çäã
Çäã
Carpet
Tile
äÓ‚Â
ä‡ÙÂθ
Window
Sofa
éÍÌÓ
åfl„͇fl Ï·Âθ
12
10
When you hear the big noise from the main body during the operation, empty the dust tank. Because it indicates that the
safety float automatically closes the suction inlet and you will notice that no more liquid is sucked up.
Ç ÒÎÛ˜‡Â ÒËθÌÓ„Ó ¯Ûχ ‚ Ô˚ÎÂÒÓÒ ӘËÒÚËÚ ÍÓÌÚÂÈÌ ‰Îfl ÏÛÒÓ‡. í‡ÍÓÈ ¯ÛÏ „Ó‚ÓËÚ Ó ÚÓÏ, ˜ÚÓ
‡‚ÚÓχÚ˘ÂÒÍËÈ ÍÎ‡Ô‡Ì Á‡Í˚Î ‚ÔÛÒÍÌÓ ÓÚ‚ÂÒÚËÂ. Ç˚ ۂˉËÚÂ, ˜ÚÓ ÊˉÍÓÒÚ¸ ÔÂÂÒڇ· ‚Ò‡Ò˚‚‡Ú¸Òfl.
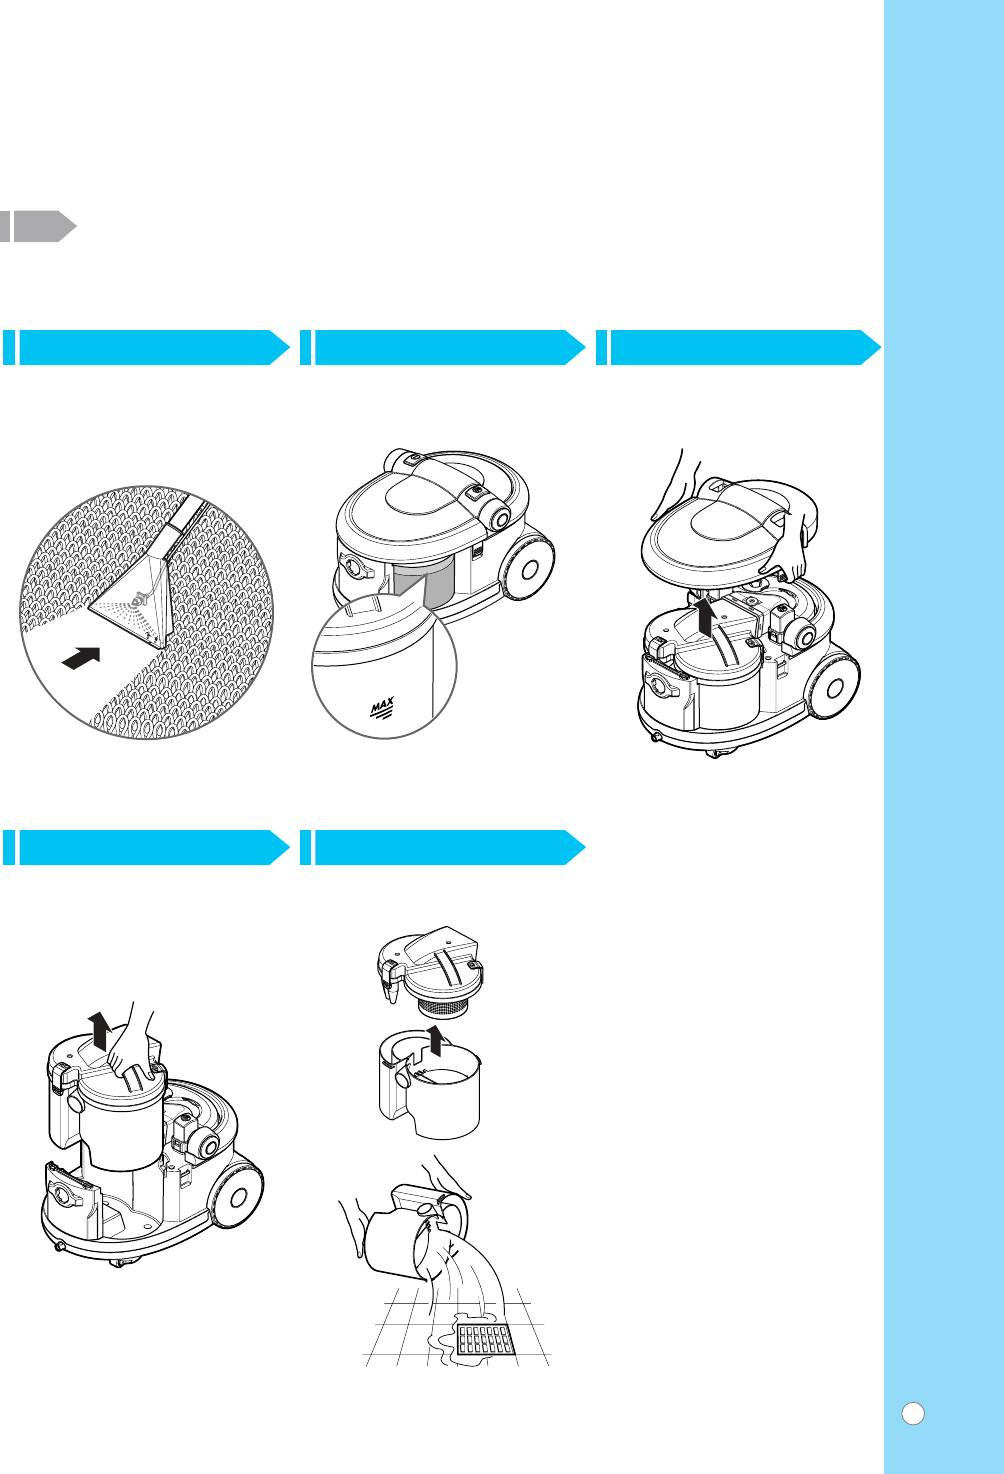
10 119
Wet Cleaning
Checking the Cleaning Liquid Opening the Top Cover Assy
Ç·Ê̇fl ˜ËÒÚ͇
èÓ‚Â͇ ÛÓ‚Ìfl ˜ËÒÚfl˘ÂÈ
éÚÍ˚‚‡ÌË ‚ÂıÌÂÈ Í˚¯ÍË
ÊˉÍÓÒÚË
‡ÔÔ‡‡Ú‡
MAX
å‡ÍÒËχθÌ˚È
1312
Lifting the Dust Tank Pouring the Cleaning Liquid
àÁ‚ΘÂÌË ÂÁ‚ۇ‡
á‡Î˂͇ ˜ËÒÚfl˘ÂÈ ÊˉÍÓÒÚË
‰Îfl Ò·Ó‡ Ô˚ÎË
13
WARNING!
14
Gently rinse guide buoy separately under a cold running water until the water runs clear.
Do not use detergent or a washing machine or dishwasher. Shake off excess water from the guide buoy.
Re-assemble and place it back in your machine.
èêÖÑìèêÖÜÑÖçàÖ!
ÄÍÍÛ‡ÚÌÓ ÔÓÏÓÈÚÂ Í‡Ê‰Û˛ ‰Âڇθ ÙËθڇ ‚ ıÓÎÓ‰ÌÓÈ ÔÓÚÓ˜ÌÓÈ ‚Ӊ ‰Ó ÚÂı ÔÓ, ÔÓ͇ ‚Ó‰‡ ÌÂ
ÒÚ‡ÌÂÚ ˜ËÒÚÓÈ. çÂθÁfl ËÒÔÓθÁÓ‚‡Ú¸ ÏÓ˛˘Ë Ò‰ÒÚ‚‡, ‡ Ú‡ÍÊ ËÒÔÓθÁÓ‚‡Ú¸ ‰Îfl ÙËθڇ
ÒÚˇθÌÛ˛ ËÎË ÔÓÒÛ‰ÓÏÓ˜ÌÛ˛ χ¯ËÌÛ.
14
15
16
Washing the Guide Buoy.
Removing the Cleaning Water &
Connecting the Dust Tank.
èÓÏ˚‚‡ÌË ÙËθڇ.
Connecting the Dust Cover.
ìÒÚ‡Ìӂ͇ ÍÓÌÚÂÈ̇ ‰Îfl
쉇ÎÂÌË ‚Ó‰˚, ÛÒÚ‡Ìӂ͇
Ò·Ó‡ Ô˚ÎË.
Í˚¯ÍË ÍÓÌÚÂÈ̇ ‰Îfl Ò·Ó‡
Ô˚ÎË.
17
Closing the Top Cover Assy
á‡Í˚‚‡ÌË ‚ÂıÌÂÈ
Í˚¯ÍË ‡ÔÔ‡‡Ú‡
14
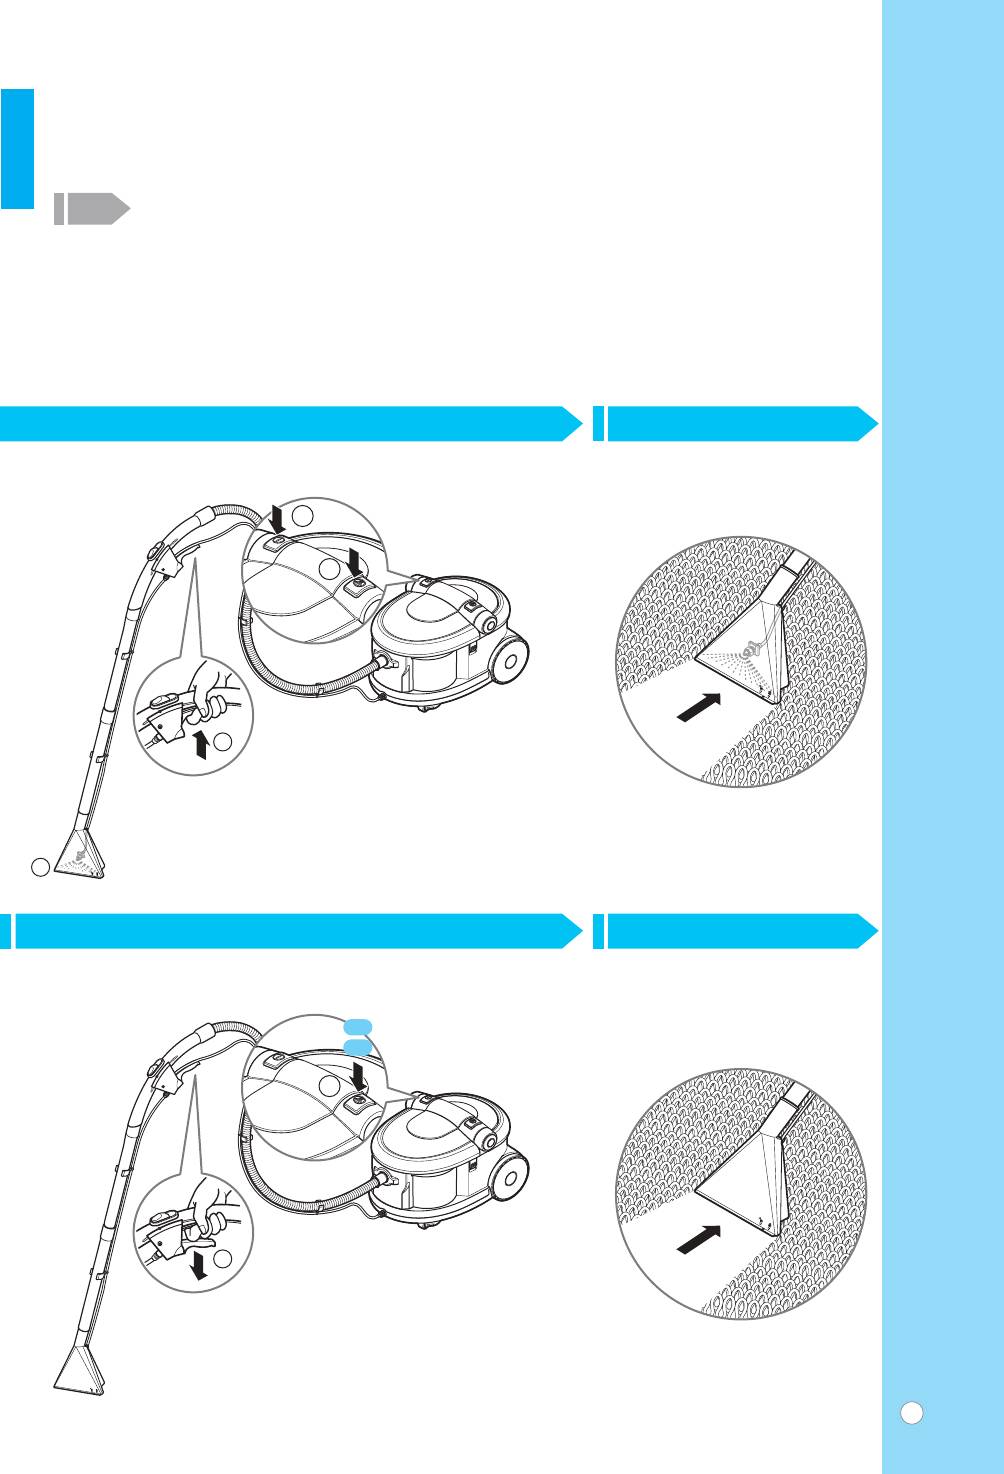
How to use
Carpet cleaning
àÒÔÓθÁÓ‚‡ÌË Ô˚ÎÂÒÓÒ‡
óËÒÚ͇ ÍÓ‚Ó‚
It is possible that the pump's thermal security mechanism has been acticated to protect the pump from overheating
3
in case that the shampoo tank is empty or the shampoo button has remained in the (ON) position without any
operation of the trigger. To check that the pump has not broken down, put the button at the (OFF) position and wait
about 20 to 30 minutes until the pump cools down, then start it again. If your appliance still does not work in spite of
following these instructions, contact the nearest authorized service center.
Ç ÒÎÛ˜‡Â ÓÔÛÒÚÓ¯ÂÌËfl ÍÓÌÚÂÈ̇ ‰Îfl ¯‡ÏÔÛÌfl, ‰‡Ê ÍÓ„‰‡ ÍÌÓÔ͇ ÔÓ‰‡˜Ë ¯‡ÏÔÛÌfl ‚Íβ˜Â̇ (ON),
‡‚ÚÓχÚ˘ÂÒÍËÈ Á‡˘ËÚÌ˚È ÏÂı‡ÌËÁÏ ÏÓÊÂÚ ÓÚÍβ˜ËÚ¸ ̇ÒÓÒ ‚Ó ËÁ·ÂʇÌËÂ Â„Ó Ô„‚‡. èË ˝ÚÓÏ Ì‡Ê‡ÚË ̇
˚˜‡„ ÔÓ‰‡˜Ë ¯‡ÏÔÛÌfl Ì ‰‡ÒÚ ÂÁÛθڇڇ. óÚÓ·˚ ۷‰ËÚ¸Òfl, ˜ÚÓ Ì‡ÒÓÒ ËÒÔ‡‚ÂÌ, ‚˚Íβ˜ËÚ ÍÌÓÔÍÛ ÔÓ‰‡˜Ë
¯‡ÏÔÛÌfl, ÔÓ‰ÓʉËÚ 20-30 ÏËÌÛÚ, ÔÓ͇ ̇ÒÓÒ Ì ÓÒÚ˚ÌÂÚ Ë ÔÓÔÓ·ÛÈÚ ÒÌÓ‚‡. ÖÒÎË ÔÓÒΠ‚˚ÔÓÎÌÂÌËfl Ô
˂‰ÂÌÌ˚ı ‚˚¯Â ËÌÒÚÛ͈ËÈ Ì‡ÒÓÒ Ì Á‡‡·ÓÚ‡ÂÚ, Ó·‡ÚËÚÂÒ¸ ‚ ·ÎËʇȯËÈ ‡‚ÚÓËÁÓ‚‡ÌÌ˚È Ò‚ËÒÌ˚È ˆÂÌÚ.
1 2
Turn on the Power(
①
) & Shampoo Switch(
②
) and Pull the Lever(
③
) Wet Cleaning the Carpet
ÇÍβ˜ËÚ ÔËÚ‡ÌËÂ(
①
) Ë ÔÓ‰‡˜Û ¯‡ÏÔÛÌfl(
②
) Ë ÔÓÚflÌËÚ Á‡ ˚˜‡„(
③
)
Ç·Ê̇fl ˜ËÒÚ͇ ÍÓ‚‡
1
2
3
4
3 4
Turn off the Shampoo Switch(
②
) and Release the Lever(
①
) Dry Cleaning the Carpet
Ç˚Íβ˜ËÚ ÔÓ‰‡˜Û ¯‡ÏÔÛÌfl(
②
) Ë ÓÚÔÛÒÚËÚ ˚˜‡„(
①
)
ëÛı‡fl ˜ËÒÚ͇ ÍÓ‚‡
OFF
Çõäã
2
1
15
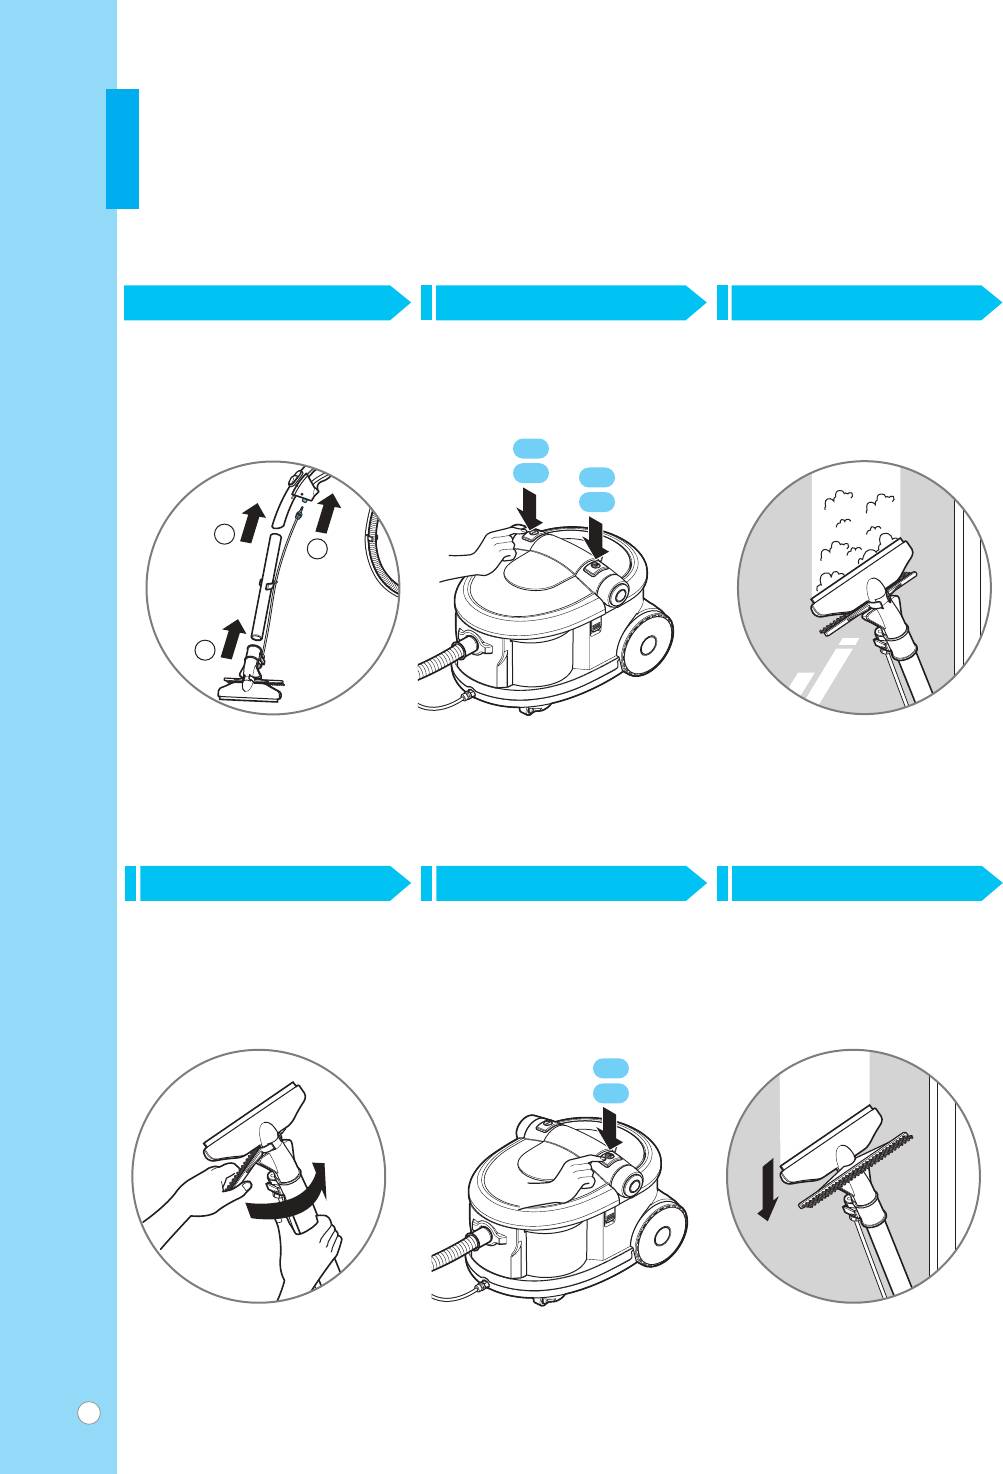
How to use
Window cleaning
àÒÔÓθÁÓ‚‡ÌË Ô˚ÎÂÒÓÒ‡
óËÒÚ͇ ÓÍÓÌ
2 31
Connecting the Window Master Cleaning the Window
Turning on the Power & Shampoo
èËÒÓ‰ËÌÂÌË ÛÒÚÓÈÒÚ‚‡
Switch
óËÒÚ͇ ÓÍ̇
‰Îfl ˜ËÒÚÍË ÓÍÓÌ
ÇÍβ˜ÂÌË ÔËÚ‡ÌËfl Ë ÔÓ‰‡˜Ë
¯‡ÏÔÛÌfl
16
2
3
1
ON
Çäã
ON
Çäã
54 6
Rotating the Frame
Turning off Shampoo Switch
Cleaning Window
LJ˘ÂÌË ‡Ï˚
Ç˚Íβ˜ÂÌË ÔËÚ‡ÌËfl Ë ÔÓ‰‡˜Ë
óËÒÚ͇ ÓÍ̇
¯‡ÏÔÛÌfl
OFF
Çõäã
How to use
Sofa cleaning
àÒÔÓθÁÓ‚‡ÌË Ô˚ÎÂÒÓÒ‡
óËÒÚ͇ ‰Ë‚‡ÌÓ‚
17
2
1
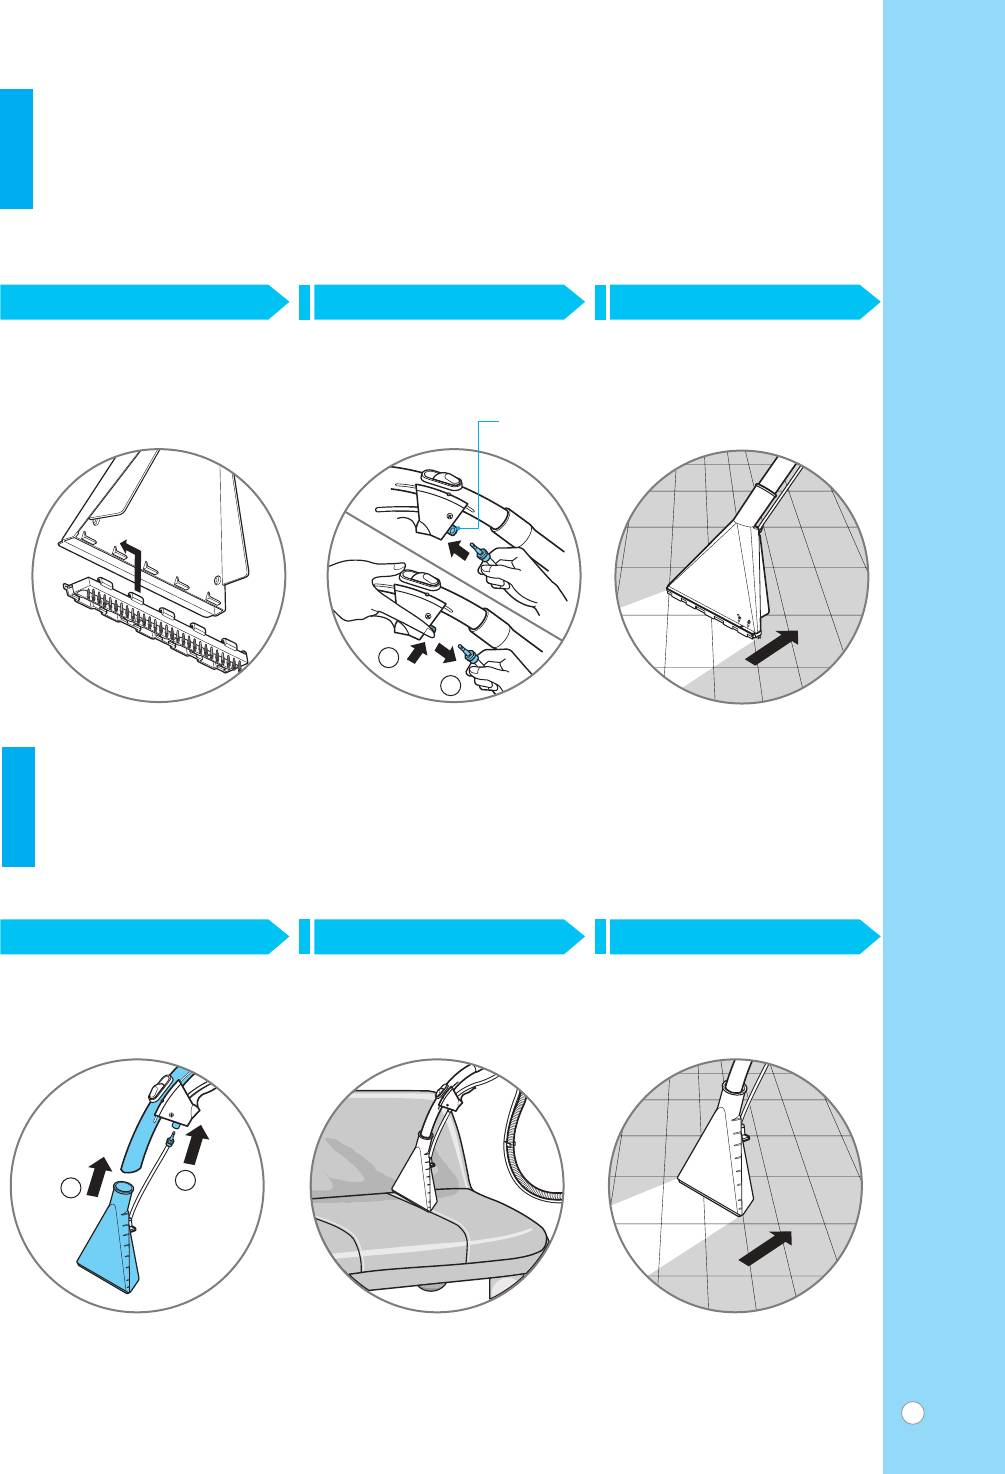
How to use
Tile cleaning
àÒÔÓθÁÓ‚‡ÌË Ô˚ÎÂÒÓÒ‡
óËÒÚ͇ ÔÎËÚÍË
2 31
Connecting the Frame Brush Tube Connecting/Disconnecting Cleaning the Tile
èËÒÓ‰ËÌÂÌË ‡Ï˚ ˘ÂÚÍË èËÒÓ‰ËÌÂÌËÂ/ÓÚÒÓ‰ËÌÂÌËÂ
óËÒÚ͇ ͇ÙÂÎfl
ÚÛ·ÍË
Connecting
Button
èËÒÓ‰ËÌÂÌËÂ
äÌÓÔ͇
1
2
Disconnecting
éÚÒÓ‰ËÌÂÌËÂ
2 31
Connecting the Small Shompoo Nozzle
Cleaning the Sofa Cleaning the Tile
èËÒÓ‰ËÌÂÌË χÎÂ̸ÍÓÈ Ì‡Ò‡‰ÍË
óËÒÚ͇ ‰Ë‚‡Ì‡ óËÒÚ͇ ͇ÙÂÎfl
‰Îfl ¯‡ÏÔÛÌfl

How to use
Dust tank cleaning
àÒÔÓθÁÓ‚‡ÌË Ô˚ÎÂÒÓÒ‡
óËÒÚ͇ ÙËθڇ
2 3 41
Separating Plates
Cleaning the Dust Tank Pouring the Water Connecting Plates
éÚÒÓ‰ËÌÂÌË Ô·ÒÚËÌ
óËÒÚ͇ ÂÁ‚ۇ‡
á‡Î˂͇ ‚Ó‰˚ èËÒÓ‰ËÌÂÌË Ô·ÒÚËÌ
‰Îfl Ò·Ó‡ Ô˚ÎË
How to use
Clean filter cleaning
àÒÔÓθÁÓ‚‡ÌË Ô˚ÎÂÒÓÒ‡
óËÒÚ͇ ÍÓÌÚÂÈ̇ ‰Îfl Ô˚ÎË
CAUTION!
ÇçàåÄçàÖ!
Remove the moisture and dry the filter sufficiently in shade
쉇ÎËÚ ‚·„Û Ë ‰‡ÈÚ ÙËθÚÛ ÓÒÌÓ‚‡ÚÂθÌÓ ‚˚ÒÓıÌÛÚ¸ ‚
about a day.
ÚÂÌË Ì‡ ÔÓÚflÊÂÌËË ‰Ìfl.
The cycle of the cleaning
èÂËӉ˘ÌÓÒÚ¸ ˜ËÒÚÍË
When dusts are full by the position indicated as "MAX" in
ÍÓ„‰‡ Ô˚ÎÂÒ·ÓÌËÍ ÔÓÎÓÌ. Ç ˝ÚÓÏ ÒÎÛ‡Â, Ë̉Ë͇ÚÓ
the dust tank.
Ô˚ÎÂÒ·ÓÌË͇ ÔÓ͇Á˚‚‡ÂÚ "MAX".
When suction power suddenly weakens.
Ç ÒÎÛ˜‡Â ‚ÌÂÁ‡ÔÌÓ„Ó ÒÌËÊÂÌËfl ÏÓ˘ÌÓÒÚË
‚Ò‡Ò˚‚‡ÌËfl Ôӂ¸ÚÂ.
2 31
Separating the Clean Filter Cleaning the Clean Filter
Connecting the Cleaning Filter
éÚÒÓ‰ËÌÂÌËÂ Ó˜Ë˘‡˛˘Â„Ó
óËÒÚ͇ Ó˜Ë˘‡˛˘Â„Ó ÙËθڇ
èÓ‰ÒÓ‰ËÌÂÌËÂ Ó˜Ë˘‡˛˘Â„Ó
ÙËθڇ
ÙËθڇ
Cleaning Filter
é˜Ë˘‡˛˘ËÈ
ÙËθÚ
Reuse the Sponge after drying
èÓ‚ÚÓÌÓ ËÒÔÓθÁÓ‚‡ÌË „Û·ÍË ÔÓÒÎÂ
ÔÓÒÛ¯ÍË
18
How to use
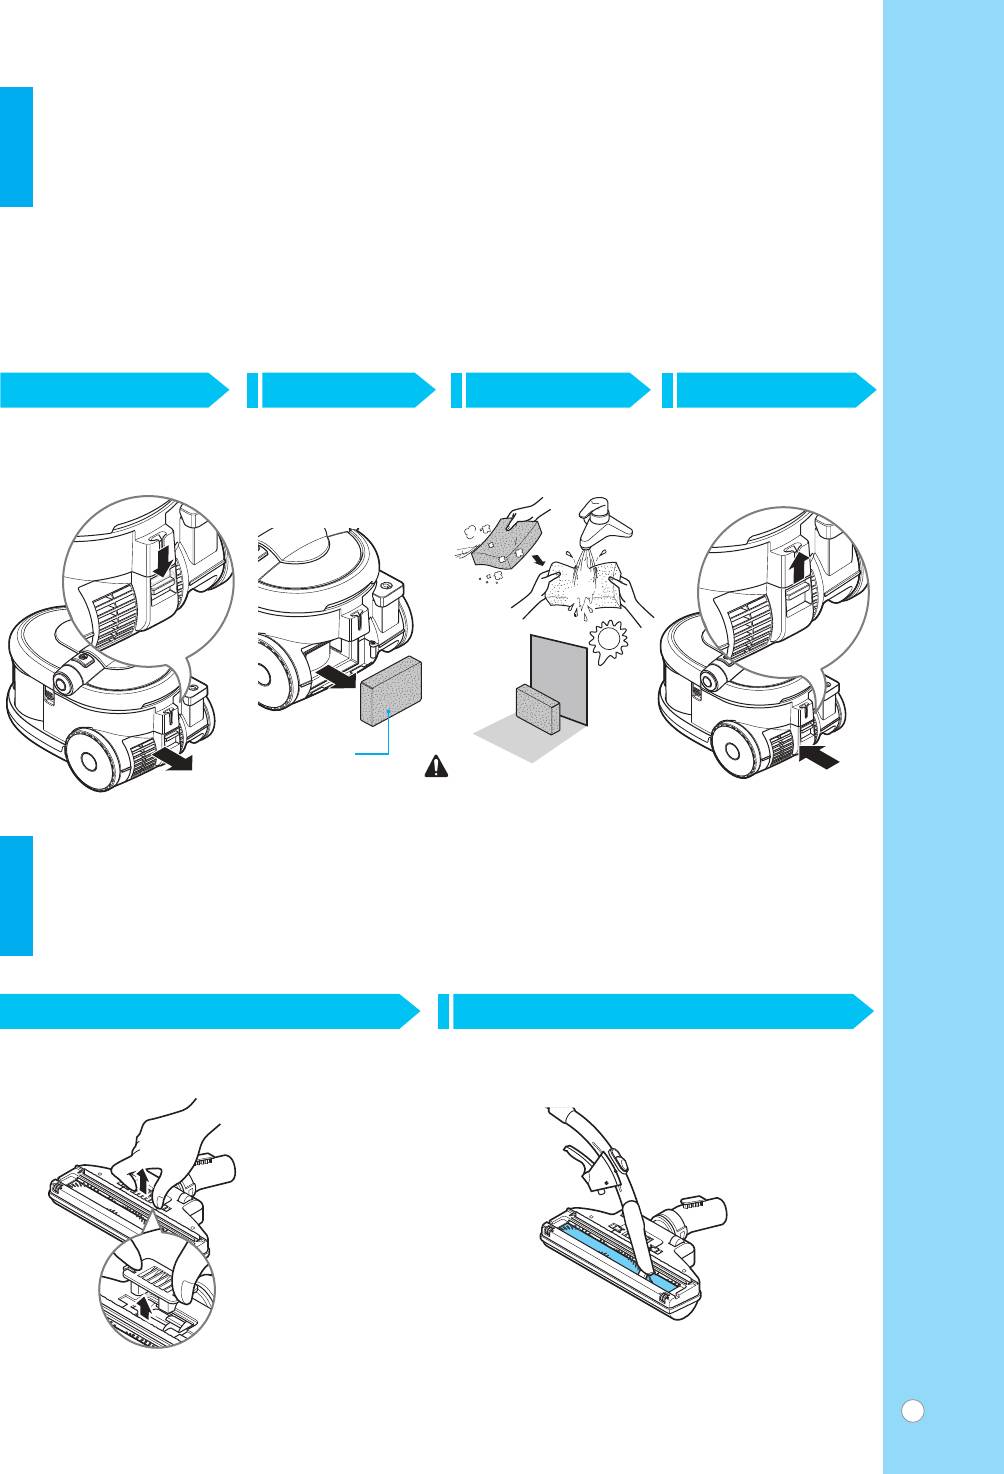
Exhaust filter cleaning
àÒÔÓθÁÓ‚‡ÌË Ô˚ÎÂÒÓÒ‡ é˜ËÒÚ͇ ‚˚ÔÛÛÒÍÌÓ„Ó ÙËθڇ
CAUTION!
ÇçàåÄçàÖ!
Remove the moisture and dry the filter sufficiently in shade
쉇ÎËÚ ‚·„Û Ë ‰‡ÈÚ ÙËθÚÛ ÓÒÌÓ‚‡ÚÂθÌÓ ‚˚ÒÓıÌÛÚ¸ ‚
about a day.
ÚÂÌË Ì‡ ÔÓÚflÊÂÌËË ‰Ìfl.
The cycle of the cleaning
èÂËӉ˘ÌÓÒÚ¸ ˜ËÒÚÍË
When dusts are full by the position indicated as "MAX" in
ÍÓ„‰‡ Ô˚ÎÂÒ·ÓÌËÍ ÔÓÎÓÌ. Ç ˝ÚÓÏ ÒÎÛ‡Â, Ë̉Ë͇ÚÓ
the dust tank.
Ô˚ÎÂÒ·ÓÌË͇ ÔÓ͇Á˚‚‡ÂÚ "MAX".
When suction power suddenly weakens.
Ç ÒÎÛ˜‡Â ‚ÌÂÁ‡ÔÌÓ„Ó ÒÌËÊÂÌËfl ÏÓ˘ÌÓÒÚË
‚Ò‡Ò˚‚‡ÌËfl Ôӂ¸ÚÂ.
2 3 41
Separating the Exhaust Cover Separating the Sponge Washing & Drying the
Connecting the
éÚÒÓ‰ËÌÂÌË ‚˚ıÎÓÔÌÓÈ
éÚÒÓ‰ËÌÂÌË „Û·ÍË
Sponge.
Exhaust Cover
Í˚¯ÍË
èÓÏ˚‚͇ Ë ÔÓÒۯ͇
èËÒÓ‰ËÌÂÌËÂ
„Û·ÍË
‚˚ıÎÓÔÌÓÈ Í˚¯ÍË
Sponge
Reuse the Sponge after drying
èÓ‚ÚÓÌÓ ËÒÔÓθÁÓ‚‡ÌËÂ
„Û·ÍË ÔÓÒΠÔÓÒÛ¯ÍË
How to use
Carpet master plus cleaning
àÒÔÓθÁÓ‚‡ÌË Ô˚ÎÂÒÓÒ‡
óËÒÚ͇ ̇҇‰ÍË (å‡ÒÚ ÍÓ‚Ó‚)
21
Opening the Air Cover Cleaning the Dusting Brush
éÚÍ˚‚‡ÌË ‚ÓÁ‰Û¯ÌÓÈ Í˚¯ÍË óËÒÚ͇ ˘ÂÚÍË ‰Îfl Û‰‡ÎÂÌËfl Ô˚ÎË
19
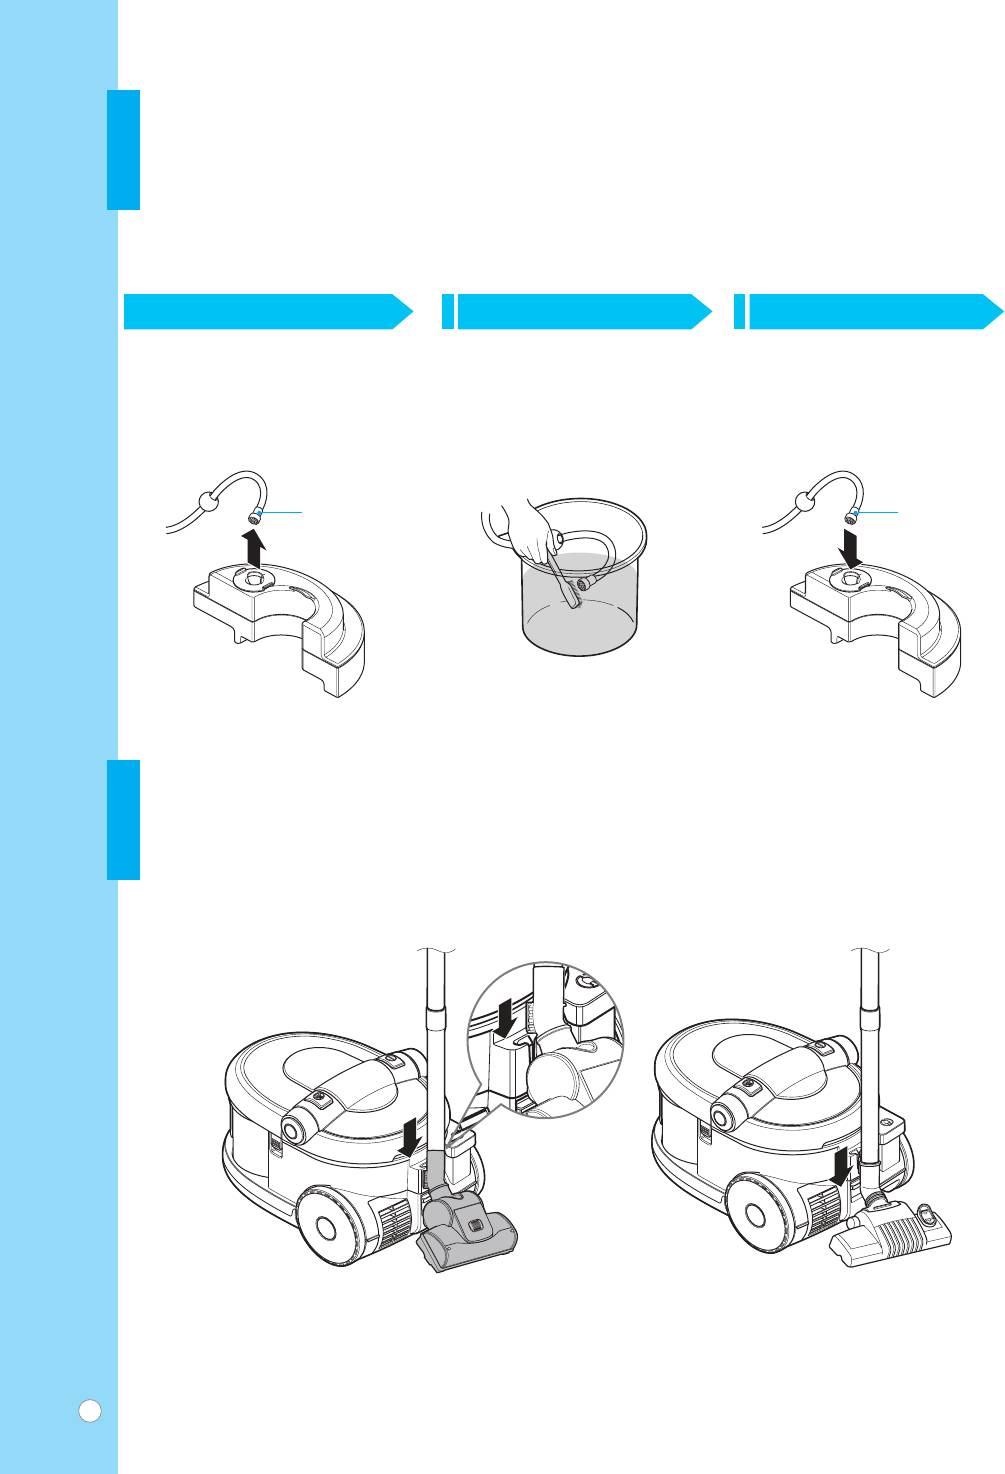
How to use
Shampoo tank net cleaning
àÒÔÓθÁÓ‚‡ÌË Ô˚ÎÂÒÓÒ‡
óËÒÚ͇ ÒÂÚÍË ÍÓÌÚÂÈ̇ ‰Îfl ¯‡ÏÔÛÌfl
2 31
Separating the Net Washing the Net Putting the Net into the
Shampoo Tank
éÚÒÓ‰ËÌÂÌË ÒÂÚÍË èÓÏ˚‚͇ ÒÂÚÍË ç‡Úfl„Ë‚‡ÌË ÒÂÚÍË Ì‡
ÂÁ‚ۇ ‰Îfl ¯‡ÏÔÛÌfl
Net
Net
ëÂÚ͇
ëÂÚ͇
How to use
Storage
àÒÔÓθÁÓ‚‡ÌË Ô˚ÎÂÒÓÒ‡
ï‡ÌÂÌËÂ
20

Disposal of your old appliance
1. When this crossed-out wheeled bin symbol is attached to a product it means the product is covered by the
European Directive 2002/96/EC.
2. All electrical and electronic products should be disposed of separately from the municipal waste stream via
designated collection facilities appointed by the government or the local authorities.
3. The correct disposal of your old appliance will help prevent potential negative consequences for the environment
and human health.
4. For more detailed information about disposal of your old appliance, please contact your city office, waste disposal
service or the shop where you purchased the product.
ìÚËÎËÁ‡ˆËfl ÒÚ‡Ó„Ó Ó·ÓÛ‰Ó‚‡ÌËfl
1. ëËÏ‚ÓΠ̇ ÛÒÚÓÈÒÚ‚Â, ËÁÓ·‡Ê‡˛˘ËÈ Ô˜ÂÍÌÛÚÓ ÏÛÒÓÌÓ ‚Â‰Ó Ì‡ ÍÓÎÂÒ‡ı, ÓÁ̇˜‡ÂÚ, ˜ÚÓ Ì‡
ËÁ‰ÂÎË ‡ÒÔÓÒÚ‡ÌflÂÚÒfl ÑËÂÍÚË‚‡ 2002/96/Öë.
2. ùÎÂÍÚ˘ÂÒÍËÂ Ë ˝ÎÂÍÚÓÌÌ˚ ÛÒÚÓÈÒÚ‚‡ ‰ÓÎÊÌ˚ ÛÚËÎÁÓ‚˚‚‡Ú¸Òfl Ì ‚ÏÂÒÚÂ Ò ·˚ÚÓ‚˚Ï ÏÛÒÓÓÏ,
‡ ˜ÂÂÁ ÒÔˆˇθÌ˚ ÏÂÒÚ‡, Û͇Á‡ÌÌ˚ ԇ‚ËÚÂθÒÚ‚ÂÌÌ˚ÏË ËÎË ÏÂÒÚÌ˚ÏË Ó„‡Ì‡ÏË ‚·ÒÚË.
3. 臂Ëθ̇fl ÛÚËÎËÁ‡ˆËfl ÒÚ‡Ó„Ó Ó·ÓÛ‰Ó‚‡ÌËfl ÔÓÏÓÊÂÚ Ô‰ÓÚ‚‡ÚËÚ¸ ÔÓÚÂ̈ˇθÌÓ ‚‰ÌÓÂ
‚ÓÁ‰ÂÈÒÚ‚Ë ̇ ÓÍÛʇ˛˘Û˛ ÒÂ‰Û Ë Á‰ÓÓ‚¸Â ˜ÂÎÓ‚Â͇.
4. ÑÎfl ÔÓÎÛ˜ÂÌËfl ·ÓΠÔÓ‰Ó·Ì˚ı ҂‰ÂÌËÈ Ó ÒÚ‡ÓÏ Ó·ÓÛ‰Ó‚ÌËË Ó·‡ÚËÚÂÒ¸ ‚ ‡‰ÏËÌËÒÚ‡ˆË˛ „ÓÓ‰‡,
ÒÎÛÊ·Û, Á‡ÌËχ˛˘Û˛Òfl ÛÚËÎËÁ‡ˆËÂÈ ËÎË ‚ χ„‡ÁËÌ, „‰Â ·˚Î ÔËÓ·ÂÚÂÌ ÔÓ‰ÛÍ„.
21

Memo
22

Memo
23

Made in Korea

