LG VK8828HQ: инструкция
Раздел: Бытовая техника
Тип: Пылесос С Контейнером Для Пыли
Характеристики, спецификации
Инструкция к Пылесосу С Контейнером Для Пыли LG VK8828HQ

OWNER'S MANUAL
êìäéÇéÑëíÇé èéãúáéÇÄíÖãü
VK882****
Aü46
New Type Cyclone Vacuum Cleaner
è˚ÎÂÒÓÒ Ò ˆËÍÎÓÌÌ˚Ï ÙËθÚÓÏ ÌÓ‚Ó„Ó ÚËÔ‡
This information contains important instructions for the safe use and maintenance of the vacuum cleaner.
Especially, please read all of the information on page 4,5,6 for your safety.
Please keep this manual in an easily accessible place and refer to it anytime.
ùÚÓ ÛÍÓ‚Ó‰ÒÚ‚Ó ÒÓ‰ÂÊËÚ ‚‡ÊÌ˚ ËÌÒÚÛ͈ËË ÔÓ ·ÂÁÓÔ‡ÒÌÓÈ ˝ÍÒÔÎÛ‡Ú‡ˆËË Ë Ó·ÒÎÛÊË‚‡Ì˲ Ô˚ÎÂÒÓÒ‡.
èÓ˜ÚËÚÂ, ÔÓʇÎÛÈÒÚ‡, ‚Ò˛ ËÌÙÓχˆË˛, ‰‡ÌÌÛ˛ ̇ ÒÚ‡Ìˈ‡ı 7 Ë 8 Ë 9 ÔÓ ‚ÓÔÓÒ‡Ï ·ÂÁÓÔ‡ÒÌÓÒÚË ÁÍÒÔÎÛ‡Ú‡ˆËË
èÓʇÎÛÈÒÚ‡, ı‡ÌËÚ ̇ÒÚÓfl˘Û˛ ËÌÒÚÛÍˆË˛ ‚ Û‰Ó·ÌÓÏ ÏÂÒÚÂ, ˜ÚÓ·˚ Ó·‡ÚËÚ¸Òfl Í ÌÂÈ ‚ β·Ó ‚ÂÏfl

Table of contents
ëÓ‰ÂʇÌËÂ
Important safety instructions ..............................................................................4~5
LJÊÌ˚ Û͇Á‡ÌËfl ÔÓ ÚÂıÌËÍ ·ÂÁÓÔ‡ÒÌÓÒÚË ..................................................6~7
How to use.................................................................................................................8
ä‡Í ÔÓθÁÓ‚‡Ú¸Òfl
Assembling vacuum cleaner....................................................................................................................8
ë·Ó͇ Ô˚ÎÂÒÓÒ‡
Operating vacuum cleaner.....................................................................................................................10
ùÍÒÔÎÛ‡Ú‡ˆËfl Ô˚ÎÂÒÓÒ‡
Using carpet and floor nozzle................................................................................................................11
àÒÔÓθÁÓ‚‡ÌË ̇҇‰ÍË ‰Îfl ˜ËÒÚÍË ÔÓ· Ë ÍÓ‚Ó‚
Using All Floor and mini turbine nozzle .................................................................................................12
àÒÔÓθÁÓ‚‡ÌË ̇҇‰ÍË ‰Îfl ˜ËÒÚÍË ‚ÒÂı ÔÓÎÓ‚ Ë ÏËÌË-ÚÛ·Ó Ì‡Ò‡‰ÍË
Using accessory nozzles.......................................................................................................................13
àÒÔÓθÁÓ‚‡ÌË ‰ÓÔÓÎÌËÚÂθÌ˚ı ̇҇‰ÓÍ
Using the Sani punch nozzle.................................................................................................................14
àÒÔÓθÁÓ‚‡ÌË ̇҇‰ÍË ‰Îfl Ïfl„ÍÓÈ Ï·ÂÎË Ë ÔÓÒÚÂθÌ˚ı ÔË̇‰ÎÂÊÌÓÒÚÂÈ SuniPunch
Emptying dust tank................................................................................................................................18
é˜ËÒÚ͇ ÍÓÌÚÂÈ̇ ÓÚ Ô˚ÎË
Cleaning dust tank.................................................................................................................................19
óËÒÚ͇ Ô˚ÎÂÒ·ÓÌË͇
Cleaning air filter and motor safety filter................................................................................................20
óËÒÚ͇ ‚ÓÁ‰Û¯ÌÓ„Ó ÙËθڇ Ë Á‡˘ËÚÌÓ„Ó ÙËθڇ ˝ÎÂÍÚÓ‰‚Ë„‡ÚÂÎfl
Cleaning exhaust filter...........................................................................................................................21
óËÒÚ͇ ‚˚ıÓ‰ÌÓ„Ó ÙËθڇ
What to do if your vacuum cleaner does not work..............................................22
óÚÓ ‰Â·ڸ, ÂÒÎË ‚‡¯ Ô˚ÎÂÒÓÒ Ì ‡·ÓÚ‡ÂÚ
What to do when suction performance decreases..............................................22
óÚÓ ‰Â·ڸ, ÍÓ„‰‡ ÒÌËʇÂÚÒfl ÏÓ˘ÌÓÒÚ¸ ‚Ò‡Ò˚‚‡ÌËfl
3
ÇÇÄÄÜÜççõõÖÖ èèêêÄÄÇÇààããÄÄ ííÖÖïïççààääàà ÅÅÖÖááééèèÄÄëëççééëëííàà
ÑÎfl Ô‰ÓÚ‚‡˘ÂÌËfl ËÒ͇ ‚ÓÁ„Ó‡ÌËfl, ÔÓ‡ÊÂÌËfl ˝ÎÂÍÚ˘ÂÒÍËÏ ÚÓÍÓÏ, ÔÓÎÛ˜ÂÌËfl Ú‡‚Ï ËÎË Ì‡ÌÂÒÂÌËfl Û˘Â·‡ ÔË ÔÓθÁÓ‚‡ÌËË Ô˚ÎÂÒÓÒÓÏ,
ÔÓ˜ÚËÚ ‚Ò ËÌÒÚÛ͈ËË Ë ÒÚÓ„Ó Ëı Òӷ≇ÈÚÂ. чÌÌÓ ÛÍÓ‚Ó‰ÒÚ‚Ó Ì ‚Íβ˜‡ÂÚ ‚Ò ‚ÓÁÏÓÊÌ˚ ÛÒÎÓ‚Ëfl, Ò ÍÓÚÓ˚ÏË ÏÓÊÌÓ ÒÚÓÎÍÌÛÚ¸Òfl. èÓ
‚ÓÁÌË͇˛˘ËÏ Û Ç‡Ò ‰ÓÔÓÎÌËÚÂθÌ˚Ï ‚ÓÔÓÒ‡Ï Ó·‡˘‡ÈÚÂÒ¸ ‚ ̇¯Ë Ò‚ËÒÌ˚ ˆÂÌÚ˚. чÌÌ˚È ÔË·Ó ÒÓÓÚ‚ÂÚÒÚ‚ÛÂÚ ÒÎÂ‰Û˛˘ËÏ ÑËÂÍÚË‚‡Ï Öë:
73/23/EEC, 93/68/EEC – ÑËÂÍÚË‚‡ ÔÓ ÌËÁÍÓ‚ÓθÚÌÓÈ ‡ÔÔ‡‡ÚÛÂ, 98/336 EEC – ÑËÂÍÚË‚‡ ÔÓ ùåë.
ùÚÓ ÒËÏ‚ÓÎ, Ô‰ÛÔÂʉ‡˛˘ËÈ Ó· ÓÔ‡ÒÌÓÒÚË.
ùÚÓÚ ÁÌ‡Í Ô‰ÛÔÂʉ‡ÂÚ ‚‡Ò Ó ÔÓÚÂ̈ˇθÌ˚ı ËÒÚÓ˜ÌË͇ı ÓÔ‡ÒÌÓÒÚË, ÍÓÚÓ˚ ÏÓ„ÛÚ ÒÚ‡Ú¸ Ô˘ËÌÓÈ Ú‡‚Ï˚ ËÎË
ÒÏÂÚË ‰Îfl ‚‡Ò ËÎË ‰Û„Ëı β‰ÂÈ. ã˛·˚ ÒÓÓ·˘ÂÌËfl ‚ ÓÚÌÓ¯ÂÌËË ·ÂÁÓÔ‡ÒÌÓÒÚË ÒÓÔÓ‚Óʉ‡˛ÚÒfl
Ô‰ÛÔ‰ËÚÂθÌ˚Ï Á̇ÍÓÏ ËÎË ÒÎÓ‚ÓÏ «éëíéêéÜçé» ËÎË «ÇçàåÄçàÖ». ùÚË ÒÎÓ‚‡ ÓÁ̇˜‡˛Ú:
ùÚÓÚ ÁÌ‡Í Ô‰ÛÔÂʉ‡ÂÚ ‚‡Ò Ó· ËÒÚÓ˜ÌË͇ı ÓÔ‡ÒÌÓÒÚË, ÎË·Ó Ó· ÓÔ‡ÒÌ˚ı ‰ÂÈÒÚ‚Ëflı,
éëíéêéÜçé
ÍÓÚÓ˚ ÏÓ„ÛÚ ÒÚ‡Ú¸ Ô˘ËÌÓÈ Ò¸ÂÁÌÓÈ Ú‡‚Ï˚ ËÎË ÒÏÂÚË.
ùÚÓÚ ÁÌ‡Í Ô‰ÛÔÂʉ‡ÂÚ ‚‡Ò Ó· ËÒÚÓ˜ÌË͇ı ÓÔ‡ÒÌÓÒÚË, ÎË·Ó Ó· ÓÔ‡ÒÌ˚ı ‰ÂÈÒÚ‚Ëflı,
ÇçàåÄçàÖ
ÍÓÚÓ˚ ÏÓ„ÛÚ ÒÚ‡Ú¸ Ô˘ËÌÓÈ Ú‡‚Ï˚ ËÎË ÔË‚ÂÒÚË Í Ï‡Ú¡θÌÓÏÛ Û˘Â·Û.
éëíéêéÜçé
• ç ‚Íβ˜‡Ú¸ ‚ ÒÂÚ¸, ÂÒÎË ÔÂÂÍβ˜‡ÚÂθ ÛÔ‡‚ÎÂÌËfl
• ç ÔÓθÁÛÈÚÂÒ¸ Ô˚ÎÂÒÓÒÓÏ Ò ÔÓ‚ÂʉÂÌÌ˚Ï ËÎË
̇ıÓ‰ËÚÒfl ‚ ÔÓÎÓÊÂÌËË Çäã.
ÌÂËÒÔ‡‚Ì˚Ï ÒÂÚ‚˚Ï ¯ÌÛÓÏ ËÎË ‚ËÎÍÓÈ.
ùÚÓ ÏÓÊÂÚ ÔË‚ÂÒÚË Í Ú‡‚Ï ËÎË ÔÓ‚ÂʉÂÌ˲ ÔË·Ó‡.
ùÚÓ ÏÓÊÂÚ ÒÚ‡Ú¸ Ô˘ËÌÓÈ Ú‡‚Ï˚. ÇÓ ËÁ·ÂʇÌË ÒÓÁ‰‡ÌËfl
• ç ÔÓ‰ÔÛÒ͇ÈÚÂ Í ÔË·ÓÛ ‰ÂÚÂÈ, ‡ ÔË ÒχÚ˚‚‡ÌËË
ÓÔ‡ÒÌ˚ı ÒËÚÛ‡ˆËÈ, Ó·‡˘‡ÈÚÂÒ¸ Í Ô‰ÒÚ‡‚ËÚÂβ ÔÓ
¯ÌÛ‡, ‚Ó ËÁ·ÂʇÌË ڇ‚Ï˚, Ó·ÂÒÔ˜¸ÚÂ Â„Ó Ò‚Ó·Ó‰ÌÓÂ
ÚÂıÌ˘ÂÒÍÓÏÛ Ó·ÒÎÛÊË‚‡Ì˲ ÍÓÏÔ‡ÌËË LG Electronics.
‰‚ËÊÂÌËÂ.
• èÓÒΠÔÓÔ‡‰‡ÌËfl Ô˚ÎÂÒÓÒ‡ ‚ ‚Ó‰Û Ì ÔÓθÁÛÈÚÂÒ¸ ËÏ ‰Ó
èË ÒχÚ˚‚‡ÌËË ¯ÌÛ ‰‚ËÊÂÚÒfl ·˚ÒÚÓ.
Ôӂ‰ÂÌËfl ÂÏÓÌÚ‡.
• è‰ Ôӂ‰ÂÌËÂÏ Ó·ÒÎÛÊË‚‡ÌËfl, ˜ËÒÚÍË ÔË·Ó‡ ËÎË ‚
ùÚÓ ÏÓÊÂÚ ÒÚ‡Ú¸ Ô˘ËÌÓÈ Ú‡‚Ï˚ ËÎË ÔÓ‚ÂʉÂÌËfl
ÒÎÛ˜‡Â, ÂÒÎË ÔË·Ó Ì ËÒÔÓθÁÛÂÚÒfl, ÓÚÍβ˜‡ÈÚ ÔË·Ó
ÔË·Ó‡. Ç Ú‡ÍËı ÒÎÛ˜‡flı, ‚Ó ËÁ·ÂʇÌË ÒÓÁ‰‡ÌËfl ÓÔ‡ÒÌ˚ı
ÓÚ ÒÂÚË.
ÒËÚÛ‡ˆËÈ, Ó·‡˘‡ÈÚÂÒ¸ Í Ô‰ÒÚ‡‚ËÚÂβ ÔÓ ÚÂıÌ˘ÂÒÍÓÏÛ
çÂÒӷβ‰ÂÌË ˝ÚÓ„Ó Û͇Á‡ÌËfl ÏÓÊÂÚ ÔË‚ÂÒÚË Í ÔÓ‡ÊÂÌ˲
Ó·ÒÎÛÊË‚‡Ì˲ ÍÓÏÔ‡ÌËË LG Electronics.
˝ÎÂÍÚ˘ÂÒÍËÏ ÚÓÍÓÏ ËÎË Ú‡‚ÏÂ.
• ç ÔÓ‰ÓÎʇÈÚ ˜ËÒÚÍÛ ÔË Ì‡Î˘ËË Í‡ÍËı-ÎË·Ó
• ç ÒӷˇÈÚ ÔË·ÓÓÏ Í‡ÍË -ÎË·Ó „Ófl˘Ë ËÎË
‰ÂÙÂÍÚÓ‚, ÓÚÒÛÚÒÚ‚Û˛˘Ëı ‰ÂÚ‡ÎÂÈ ËÎË ÔÓ‚ÂʉÂÌËflı.
‰˚Ïfl˘ËÂÒfl Ô‰ÏÂÚ˚, ̇ÔËÏ ÒË„‡ÂÚ˚ ËÎË „Ófl˜ËÈ
ùÚÓ ÏÓÊÂÚ ÒÚ‡Ú¸ Ô˘ËÌÓÈ Ú‡‚Ï˚ ËÎË ÔÓ‚ÂʉÂÌËfl
ÔÂÔÂÎ.
ÔË·Ó‡. Ç Ú‡ÍËı ÒÎÛ˜‡flı, ‚Ó ËÁ·ÂʇÌË ÒÓÁ‰‡ÌËfl ÓÔ‡ÒÌ˚ı
Ç ÂÁÛθڇÚ ˝ÚÓ ÏÓÊÂÚ ÔË‚ÂÒÚË Í ÒÏÂÚÂθÌÓÏÛ ËÒıÓ‰Û,
ÒËÚÛ‡ˆËÈ, Ó·‡˘‡ÈÚÂÒ¸ Í Ô‰ÒÚ‡‚ËÚÂβ ÔÓ ÚÂıÌ˘ÂÒÍÓÏÛ
‚ÓÁ„Ó‡Ì˲ ËÎË ÔÓ‡ÊÂÌ˲ ˝ÎÂÍÚ˘ÂÒÍËÏ ÚÓÍÓÏ.
Ó·ÒÎÛÊË‚‡Ì˲ ÍÓÏÔ‡ÌËË LG Electronics.
• ç ÔÓ‚Ó‰ËÚÂ Ò·Ó „Ó˛˜Ëı ËÎË ‚Á˚‚˜‡Ú˚ı ‚¢ÂÒÚ‚,
• ë ‰‡ÌÌ˚Ï Ô˚ÎÂÒÓÒÓÏ ÌÂθÁfl ËÒÔÓθÁÓ‚‡Ú¸ Û‰ÎËÌËÚÂθ.
̇ÔËÏ ·ÂÌÁË̇, ·ÂÌÁÓ·, ‡Á·‡‚ËÚÂÎfl, ÔÓԇ̇
ùÚÓ ÏÓÊÂÚ ÔË‚ÂÒÚË Í ÓÔ‡ÒÌÓÒÚË ‚ÓÁ„Ó‡ÌËfl ËÎË
(ÊˉÍÓ„Ó ËÎË „‡ÁÓÓ·‡ÁÌÓ„Ó).
ÔÓ‚ÂʉÂÌ˲ ÔË·Ó‡.
àÒÔ‡ÂÌËfl Ú‡ÍËı ‚¢ÂÒÚ‚ ÏÓ„ÛÚ ÒÚ‡Ú¸ ËÒÚÓ˜ÌËÍÓÏ
‚ÓÁ„Ó‡ÌËfl ËÎË ‚Á˚‚‡. çÂÒӷβ‰ÂÌË ˝ÚÓ„Ó Û͇Á‡ÌËfl
• ÇÍβ˜‡Ú¸ ÚÓθÍÓ ‚ ÒÂÚ¸ Ò ‰ÓÎÊÌ˚Ï Ì‡ÔflÊÂÌËÂÏ.
ÏÓÊÂÚ ÒÚ‡Ú¸ Ô˘ËÌÓÈ Ú‡‚Ï˚ ËÎË ÒÏÂÚÂθÌÓ„Ó ËÒıÓ‰‡.
ÇÍβ˜ÂÌË ‚ ÒÂÚ¸ Ò ÌÂ̇‰ÎÂʇ˘ËÏ Ì‡ÔflÊÂÌËÂÏ ÏÓÊÂÚ
ÔË‚ÂÒÚË Í ÔÓÎÓÏÍ ˝ÎÂÍÚÓ‰‚Ë„‡ÚÂÎfl Ë, ‚ÓÁÏÓÊÌÓ, Ú‡‚ÏÂ
• ç ·ÂËÚÂÒ¸ Á‡ ‚ËÎÍÛ ¯ÌÛ‡ ËÎË Ô˚ÎÂÒÓÒ ÏÓÍ˚ÏË
ÔÓθÁÓ‚‡ÚÂÎfl. ÑÓÎÊÌÓ Á̇˜ÂÌË ̇ÔflÊÂÌËfl ÔËÚ‡ÌËfl
Û͇ÏË.
Ô˂‰ÂÌÓ Ì‡ ‰Ìˢ Ô˚ÎÂÒÓÒ‡.
ùÚÓ ÏÓÊÂÚ ÒÚ‡Ú¸ Ô˘ËÌÓÈ ÒÏÂÚÂθÌÓ„Ó ËÒıÓ‰‡ ËÎË
ÔË‚ÂÒÚË Í ÔÓ‡ÊÂÌ˲ ˝ÎÂÍÚ˘ÂÒÍËÏ ÚÓÍÓÏ.
• è‰ ÓÚÍβ˜ÂÌËÂÏ ÓÚ ÒÂÚË, ‚˚Íβ˜ËÚ ‚Ò ˝ÎÂÏÂÌÚ˚
• ç ËÁ‚ÎÂ͇ÈÚ ‚ËÎÍÛ ËÁ ÓÁÂÚÍË Á‡ ÒÂÚ‚ÓÈ ¯ÌÛ.
ÛÔ‡‚ÎÂÌËfl.
ùÚÓ ÏÓÊÂÚ ÔË‚ÂÒÚË Í ÔÓ‚ÂʉÂÌ˲ ÔË·Ó‡, ÔÓ‡ÊÂÌ˲
çÂÒӷβ‰ÂÌË ˝ÚÓ„Ó Û͇Á‡ÌËfl ÏÓÊÂÚ ÔË‚ÂÒÚË Í ÔÓ‡ÊÂÌ˲
˝ÎÂÍÚ˘ÂÒÍËÏ ÚÓÍÓÏ. óÚÓ·˚ ‚˚ÌÛÚ¸ ‚ËÎÍÛ ËÁ ÓÁÂÚÍË,
˝ÎÂÍÚ˘ÂÒÍËÏ ÚÓÍÓÏ ËÎË Ú‡‚ÏÂ.
‰ÂÊËÚÂÒ¸ Á‡ ‚ËÎÍÛ, ‡ Ì Á‡ ¯ÌÛ.
• ç ‰ÂÙÓÏËÛÈÚ ‚ËÎÍÛ Í‡ÍËÏ-ÎË·Ó Ó·‡ÁÓÏ.
• ÑÂÊËÚ ‚ÓÎÓÒ˚, Ò‚Ó·Ó‰ÌÛ˛ Ó‰ÂʉÛ, ԇθˆ˚ Ë ‚Ò ˜‡ÒÚË
çÂÒӷβ‰ÂÌË ˝ÚÓ„Ó Û͇Á‡ÌËfl ÏÓÊÂÚ ÔË‚ÂÒÚË Í ÔÓ‡ÊÂÌ˲
Ú· ̇ ‡ÒÒÚÓflÌËË ÓÚ ÓÚ‚ÂÒÚËÈ Ë ‰‚ËÊÛ˘ËıÒfl ‰ÂÚ‡ÎÂÈ.
˝ÎÂÍÚ˘ÂÒÍËÏ ÚÓÍÓÏ, Ú‡‚Ï ËÎË ÔÓ‚ÂʉÂÌ˲ ÔË·Ó‡.
çÂÒӷβ‰ÂÌË ˝ÚÓ„Ó Û͇Á‡ÌËfl ÏÓÊÂÚ ÔË‚ÂÒÚË Í ÔÓ‡ÊÂÌ˲
ÑÂÙÓχˆËfl ‚ËÎÍË ÏÓÊÂÚ ÒÚ‡Ú¸ Ô˘ËÌÓÈ ÒÏÂÚË. ÖÒÎË
˝ÎÂÍÚ˘ÂÒÍËÏ ÚÓÍÓÏ ËÎË Ú‡‚ÏÂ.
‚ËÎ͇ Ì ÔÓ‰ıÓ‰ËÚ, Ó·‡ÚËÚÂÒ¸ Í Í‚‡ÎËÙˈËÓ‚‡ÌÌÓÏÛ
• ç ÔÂÂÌÓÒËÚ¸ Ë Ì ÔÂÂÏ¢‡Ú¸ ÔË·Ó Á‡ ¯ÌÛ, ÌÂ
˝ÎÂÍÚËÍÛ ‰Îfl ÛÒÚ‡ÌÓ‚ÍË ÒÓÓÚ‚ÂÚÒÚ‚Û˛˘ÂÈ ÓÁÂÚÍË.
ËÒÔÓθÁÓ‚‡Ú¸ ¯ÌÛ ‚ ͇˜ÂÒÚ‚Â Û˜ÍË ‰Îfl ÔÂÂÌÓÒÍË, ÌÂ
• êÂÏÓÌÚ ˝ÎÂÍÚÓÔË·ÓÓ‚ ‰ÓÎÊÌ˚ ‚˚ÔÓÎÌflÚ¸ ÚÓθÍÓ
Á‡˘ÂÏÎflÚ¸ ¯ÌÛ ‰‚¸ÏË, Ì ÚflÌÛÚ¸ ¯ÌÛ ˜ÂÂÁ ÓÒÚ˚Â
Í‚‡ÎËÙˈËÓ‚‡ÌÌ˚ ËÌÊÂÌÂ˚ ÔÓ ÚÂıÌ˘ÂÒÍÓÏÛ
ÍÓÏÍË ËÎË Û„Î˚. ç ÒÚ‡‚¸Ú Ô˚ÎÂÒÓÒ Ì‡ ¯ÌÛ. ÑÂÊËÚÂ
Ó·ÒÎÛÊË‚‡Ì˲.
¯ÌÛ ‚‰‡ÎË ÓÚ Ì‡„ÂÚ˚ı ÔÓ‚ÂıÌÓÒÚÂÈ.
çÂÔ‡‚ËθÌÓ ‚˚ÔÓÎÌÂÌÌ˚È ÂÏÓÌÚ ÏÓÊÂÚ ÔË‚ÂÒÚË Í
çÂÒӷβ‰ÂÌË ˝ÚÓ„Ó Û͇Á‡ÌËfl ÏÓÊÂÚ ÔË‚ÂÒÚË Í ÔÓ‡ÊÂÌ˲
Ò¸ÂÁÌ˚Ï ÓÔ‡ÒÌÓÒÚflÏ ‰Îfl ÔÓθÁÓ‚‡ÚÂÎfl.
˝ÎÂÍÚ˘ÂÒÍËÏ ÚÓÍÓÏ, Ú‡‚ÏÂ, ‚ÓÁ„Ó‡Ì˲ ËÎË ÔÓ‚ÂʉÂÌ˲
• ç ÔÓÏ¢‡ÈÚ ԇθˆ˚ fl‰ÓÏ Ò ¯ÂÒÚÂÌÂÈ.
ÔË·Ó‡.
çÂÒӷβ‰ÂÌË ˝ÚÓ„Ó Û͇Á‡ÌËfl ÏÓÊÂÚ ÔË‚ÂÒÚË Í Ú‡‚Ï ËÎË
• óÂÂÁ ¯Î‡Ì„ ÔË·Ó‡ ÔÓıÓ‰flÚ ˝ÎÂÍÚ˘ÂÒÍË ÔÓ‚Ó‰‡.
ÔÓÎÓÏÍ ¯ÂÒÚÂÌË.
ç ÔÓθÁÛÈÚÂÒ¸ ÔÓ‚ÂʉÂÌÌ˚Ï, ‡ÁÂÁ‡ÌÌ˚Ï ËÎË
ÔÓÍÓÎÓÚ˚Ï ¯Î‡Ì„ÓÏ.
çÂÒӷβ‰ÂÌË ˝ÚÓ„Ó Û͇Á‡ÌËfl ÏÓÊÂÚ ÔË‚ÂÒÚË Í ÔÓ‡ÊÂÌ˲
˝ÎÂÍÚ˘ÂÒÍËÏ ÚÓÍÓÏ ËÎË ÒÏÂÚË.
• ç ‰ÓÔÛÒ͇ÈÚ ËÒÔÓθÁÓ‚‡ÌË ÔË·Ó‡ ‚ ͇˜ÂÒÚ‚Â
Ë„Û¯ÍË. ÖÒÎË ÔË·ÓÓÏ ÔÓθÁÛ˛ÚÒfl ‰ÂÚË, ÎË·Ó ÂÒÎË ÓÌË
̇ıÓ‰flÚÒfl fl‰ÓÏ, ·Û‰¸Ú Ô‰ÂθÌÓ ‚ÌËχÚÂθÌ˚.
ùÚÓ ÏÓÊÂÚ ÔË‚ÂÒÚË Í Ú‡‚Ï ËÎË ÔÓ‚ÂʉÂÌ˲ ÔË·Ó‡.
6
˚˜‡„
ÇÇÄÄÜÜççõõÖÖ èèêêÄÄÇÇààããÄÄ ííÖÖïïççààääàà ÅÅÖÖááééèèÄÄëëççééëëííàà
ÇçàåÄçàÖ
• ç ‚ÒÚ‡‚ÎflÈÚ ÔÓÒÚÓÓÌÌË Ô‰ÏÂÚ˚ ‚
• Ç ÂÊËÏ ˜ËÒÚÍË "MIN" ‚˚ ‰ÓÎÊÌ˚ ËÒÔÓθÁÓ‚‡Ú¸ ̇҇‰ÍË.
ÌÂÔ‰̇Á̇˜ÂÌÌ˚ ‰Îfl ˝ÚÓ„Ó ÓÚ‚ÂÒÚËfl
çÂÒӷβ‰ÂÌË ˝ÚÓ„Ó Û͇Á‡ÌËfl ÏÓÊÂÚ ÔË‚ÂÒÚË Í
çÂÒӷβ‰ÂÌË ˝ÚÓ„Ó Û͇Á‡ÌËfl ÏÓÊÂÚ ÔË‚ÂÒÚË Í
ÔÓ‚ÂʉÂÌ˲ ÔË·Ó‡.
ÔÓ‚ÂʉÂÌ˲ ÔË·Ó‡.
•
ç ·ÂËÚÂÒ¸ Á‡ Û˜ÍÛ Ô˚ÎÂÒ·ÓÌË͇ ÔË ÔÂÂÏ¢ÂÌËË Ô˚ÎÂÒÓÒ‡.
• ç ÔÓθÁÓ‚‡Ú¸Òfl ÔË·ÓÓÏ Ò ·ÎÓÍËÓ‚‡ÌÌ˚ÏË ÓÚ‚ÂÒÚËflÏË:
äÓÔÛÒ Ô˚ÎÂÒÓÒ‡ ÏÓÊÂÚ ÛÔ‡ÒÚ¸, ÔË ˝ÚÓÏ Ô˚ÎÂÒ·ÓÌËÍ
‰Âʇڸ ÓÚ‚ÂÒÚËfl Ò‚Ó·Ó‰Ì˚ÏË ÓÚ „flÁË, ÍÓÏÍÓ‚ Ô˚ÎË,
ÏÓÊÂÚ ÓÚ‰ÂÎËÚ¸Òfl ÓÚ ÍÓÔÛÒ‡. ùÚÓ ÏÓÊÂÚ ÔË‚ÂÒÚË Í Ú‡‚ÏÂ
‚ÓÎÓÒ Ë ‚Ò„Ó, ˜ÚÓ ÏÓÊÂÚ ÛÏÂ̸¯ËÚ¸ ÔÓÚÓÍ ‚ÓÁ‰Ûı‡.
ËÎË ÔÓ‚ÂʉÂÌ˲ ÔË·Ó‡. èË ÔÂÂÏ¢ÂÌËË Ô˚ÎÂÒÓÒ‡
çÂÒӷβ‰ÂÌË ˝ÚÓ„Ó Û͇Á‡ÌËfl ÏÓÊÂÚ ÔË‚ÂÒÚË Í
·ÂËÚÂÒ¸ ÚÓθÍÓ Á‡ Û˜ÍÛ ‰Îfl ÔÂÂÌÓÒÍË.
ÔÓ‚ÂʉÂÌ˲ ÔË·Ó‡.
• ÖÒÎË ÔÓÒΠӘËÒÚÍË ÍÓÌÚÂÈ̇ ‰Îfl Ò·Ó‡ Ô˚ÎË
• ç ÔÓθÁÛÈÚÂÒ¸ Ô˚ÎÂÒÓÒÓÏ ·ÂÁ ÍÓÌÚÂÈ̇ ‰Îfl Ò·Ó‡
Á‡„Ó‡ÂÚÒfl ËÎË ÏË„‡ÂÚ Ë̉Ë͇ÚÓ (͇Ò̇fl ·ÏÔӘ͇),
Ô˚ÎË Ë/ËÎË ÛÒÚ‡ÌÓ‚ÎÂÌÌ˚ı ÙËθÚÓ‚.
ÔÓ˜ËÒÚËÚ ‚ÓÁ‰Û¯Ì˚È ÙËθÚ.
çÂÒӷβ‰ÂÌË ˝ÚÓ„Ó Û͇Á‡ÌËfl ÏÓÊÂÚ ÔË‚ÂÒÚË Í
çÂÒӷβ‰ÂÌË ˝ÚÓ„Ó Û͇Á‡ÌËfl ÏÓÊÂÚ ÔË‚ÂÒÚË Í
ÔÓ‚ÂʉÂÌ˲ ÔË·Ó‡.
ÔÓ‚ÂʉÂÌ˲ ÔË·Ó‡.
• ÇÒ„‰‡ ÔÓ˜Ë˘‡ÈÚ Ô˚ÎÂÒ·ÓÌËÍ ÔÓÒΠ۷ÓÍË
• èӂ¸ÚÂ, ˜ÚÓ·˚ ÙËÎ¸Ú (‚˚ıÓ‰ÌÓÈ ÙËθÚ, ‚ÓÁ‰Û¯Ì˚È
Ò‰ÒÚ‚‡ÏË ‰Îfl ˜ËÒÚÍË ÍÓ‚Ó‚ ËÎË ÓÒ‚ÂÊËÚÂÎfl, ÔÓÓ¯ÍÓ‚
ÙËθÚ, Á‡˘ËÚÌ˚È ÙËÎ¸Ú ˝ÎÂÍÚÓ‰‚Ë„‡ÚÂÎfl) ÔÓÎÌÓÒÚ¸˛
ËÎË ÏÂÎÍÓÈ Ô˚ÎË.
‚˚ÒÓı Ô‰ ÔÓ‚ÚÓÌÓÈ ÛÒÚ‡ÌÓ‚ÍÓÈ ‚ ÔË·Ó.
ùÚË ‚¢ÂÒÚ‚‡ Á‡ÒÓfl˛Ú ÙËÎ¸Ú Ë ÒÓ͇˘‡˛Ú ÔÓÚÓÍ ‚ÓÁ‰Ûı‡,
çÂÒӷβ‰ÂÌË ˝ÚÓ„Ó Û͇Á‡ÌËfl ÏÓÊÂÚ ÔË‚ÂÒÚË Í
‡ Ú‡ÍÊ ÒÔÓÒÓ·Ì˚ ÔË‚ÂÒÚË Í ÔÓÎÓÏÍ Ô˚ÎÂÒÓÒ‡. ÖÒÎË ÌÂ
ÔÓ‚ÂʉÂÌ˲ ÔË·Ó‡.
˜ËÒÚËÚ¸ Ô˚ÎÂÒ·ÓÌËÍ, ÚÓ ˝ÚÓ ÏÓÊÂÚ ÔË‚ÂÒÚË Í
• ç ÒÛ¯ËÚ ÙËÎ¸Ú ‚ ‰ÛıÓ‚Í ËÎË ÏËÍÓ‚ÓÎÌÓ‚ÓÈ Ô˜Ë.
ÌÂËÒÔ‡‚ËÏÓÈ ÔÓÎÓÏÍ Ô˚ÎÂÒÓÒ‡.
çÂÒӷβ‰ÂÌË ˝ÚÓ„Ó Û͇Á‡ÌËfl ÏÓÊÂÚ ÔË‚ÂÒÚË Í ËÒÍÛ
• ç ËÒÔÓθÁÛÈÚ Ô˚ÎÂÒÓÒ ‰Îfl Ò·Ó‡ ÓÒÚ˚ı, ڂ‰˚ı
‚ÓÁ„Ó‡ÌËfl.
Ô‰ÏÂÚÓ‚, ÏÂÎÍËı Ë„Û¯ÂÍ, ·Û·‚ÓÍ, ÒÍÂÔÓÍ Ë Ú.‰.
• ç ÒÛ¯ËÚ ÙËÎ¸Ú ‚ ÒÛ¯ËÎÍ ‰Îfl Ó‰Âʉ˚.
éÌË ÏÓ„ÛÚ Ôӂ‰ËÚ¸ Ô˚ÎÂÒÓÒ ËÎË ÍÓÌÚÂÈÌ ‰Îfl Ò·Ó‡ Ô˚ÎË.
çÂÒӷβ‰ÂÌË ˝ÚÓ„Ó Û͇Á‡ÌËfl ÏÓÊÂÚ ÔË‚ÂÒÚË Í ËÒÍÛ ‚ÓÁ„Ó‡ÌËfl.
• ï‡ÌËÚ Ô˚ÎÂÒÓÒ ‚ ÔÓÏ¢ÂÌËË.
• ç ÒÛ¯ËÚ¸ fl‰ÓÏ Ò ÓÚÍ˚Ú˚Ï Ô·ÏÂÌÂÏ.
ÇÓ ËÁ·ÂʇÌË ÒÎÛ˜‡ÈÌÓ„Ó ‚Íβ˜ÂÌËfl, ۷ˇÈÚ Ô˚ÎÂÒÓÒ
çÂÒӷβ‰ÂÌË ˝ÚÓ„Ó Û͇Á‡ÌËfl ÏÓÊÂÚ ÔË‚ÂÒÚË Í ËÒÍÛ
ÔÓÒΠËÒÔÓθÁÓ‚‡ÌËfl.
‚ÓÁ„Ó‡ÌËfl.
• è˚ÎÂÒÓÒ Ì Ô‰̇Á̇˜ÂÌ ‰Îfl ÚÓ„Ó, ˜ÚÓ·˚ ËÏ
• ç ҉‚Ë„‡ÈÚ ˚˜‡„ Ô˚ÎÂÒÓÒ‡.
ÔÓθÁÓ‚‡ÎËÒ¸ ‰ÂÚË ·ÂÁ ̇·Î˛‰ÂÌËfl.
ÖÒÎË ˚˜‡„ ÔÓ‚ÂʉÂÌ, Ô˚ÎÂÒÓÒ Ì ·Û‰ÂÚ ‡·ÓÚ‡Ú¸ ‰ÓÎÊÌ˚Ï
çÂÒӷβ‰ÂÌË ˝ÚÓ„Ó Û͇Á‡ÌËfl ÏÓÊÂÚ ÔË‚ÂÒÚË Í Ú‡‚Ï ËÎË
Ó·‡ÁÓÏ, ÔË ˝ÚÓÏ ÏÓÊÂÚ ÏË„‡Ú¸ ͇ÒÌ˚È Ë̉Ë͇ÚÓ Ë
ÔÓ‚ÂʉÂÌ˲ ÔË·Ó‡.
Á‚Û˜‡Ú¸ Ò˄̇ΠÚ‚ӄË, ÌÂÒÏÓÚfl ̇ ÚÓ, ˜ÚÓ ÍÓÌÚÂÈÌ ‰Îfl
• àÒÔÓθÁÛÈÚ ÚÓθÍÓ ‰ÂÚ‡ÎË ËÁ„ÓÚÓ‚ÎÂÌÌ˚ ËÎË
Ò·Ó‡ Ô˚ÎË Ì Á‡ÔÓÎÌÂÌ. Ç ˝ÚÓÏ ÒÎÛ˜‡Â, Ó·‡ÚËÚÂÒ¸ Í
ÂÍÓÏẨӂ‡ÌÌ˚ Ô‰ÒÚ‡‚ËÚÂÎÂÏ ÔÓ ÚÂıÌ˘ÂÒÍÓÏÛ
ÒÔˆˇÎËÒÚÛ Ò‚ËÒÌÓ„Ó ˆÂÌÚ‡ ÍÓÏÔ‡ÌËË LG Electronics.
Ó·ÒÎÛÊË‚‡Ì˲ LG Electronics.
çÂÒӷβ‰ÂÌË ˝ÚÓ„Ó Û͇Á‡ÌËfl ÏÓÊÂÚ ÔË‚ÂÒÚË Í
ÔÓ‚ÂʉÂÌ˲ ÔË·Ó‡.
•
èÓθÁÛÈÚÂÒ¸ ÔË·ÓÓÏ ÚÓθÍÓ ‚ ÒÓÓÚ‚ÂÚÒÚ‚ËË Ò
ËÌÒÚÛ͈ËflÏË, Ô˂‰ÂÌÌ˚ÏË ‚ ̇ÒÚÓfl˘ÂÏ ÛÍÓ‚Ó‰ÒÚ‚Â.
àÒÔÓθÁÛÈÚ ÔË·Ó ÚÓθÍÓ Ò ÔËÒÔÓÒÓ·ÎÂÌËflÏË Ë Ì‡Ò‡‰Í‡ÏË
ÂÍÓÏẨӂ‡ÌÌ˚ÏË ËÎË Ó‰Ó·ÂÌÌ˚ÏË LG Electronics.
çÂÒӷβ‰ÂÌË ˝ÚÓ„Ó Û͇Á‡ÌËfl ÏÓÊÂÚ ÔË‚ÂÒÚË Í Ú‡‚Ï ËÎË
ÔÓ‚ÂʉÂÌ˲ ÔË·Ó‡.
• ÇÓ ËÁ·ÂʇÌË ڇ‚Ï˚ Ë Ô‰ÓÚ‚‡˘ÂÌËfl Ô‡‰ÂÌËfl
χ¯ËÌ˚ ÔË ˜ËÒÚÍ ÎÂÒÚÌˈ, ‚Ò„‰‡ ÒÚ‡‚¸Ú ÔË·Ó Û
ÔÓ‰ÌÓÊËfl ÎÂÒÚÌˈ˚.
çÂÒӷβ‰ÂÌË ˝ÚÓ„Ó Û͇Á‡ÌËfl ÏÓÊÂÚ ÔË‚ÂÒÚË Í Ú‡‚Ï ËÎË
ÔÓ‚ÂʉÂÌ˲ ÔË·Ó‡.
ìÒÚÓÈÒÚ‚Ó ÚÂÏ˘ÂÒÍÓÈ Á‡˘ËÚ˚ :
чÌÌ˚È Ô˚ÎÂÒÓÒ ÓÒ̇˘ÂÌ ÒÔˆˇθÌ˚Ï ÚÂÏÓÒÚ‡ÚÓÏ, ÍÓÚÓ˚È Á‡˘Ë˘‡ÂÚ Ô˚ÎÂÒÓÒ ÓÚ Ô„‚‡
˝ÎÂÍÚÓ‰‚Ë„‡ÚÂÎfl. ÖÒÎË Ô˚ÎÂÒÓÒ ‚ÌÂÁ‡ÔÌÓ ÓÚÍβ˜‡ÂÚÒfl, ‚˚Íβ˜ËÚÂ Â„Ó Ë ÓÚÍβ˜ËÚ ÓÚ ÒÂÚË.
èӂ¸Ú Ô˚ÎÂÒÓÒ Ì‡ ̇΢ˠËÒÚÓ˜ÌËÍÓ‚ Ô„‚‡, ̇ÔËÏÂ, ˝ÚÓ ÏÓÊÂÚ ÔÓËÁÓÈÚË ÔË ÔÂÂÔÓÎÌÂÌËË
·ÛÌ͇, Á‡ÒÓÂÌËË ¯Î‡Ì„‡ ËÎË ÙËθڇ. Ç ˝ÚÓÏ ÒÎÛ˜‡Â ÛÒÚ‡ÌËÚ Á‡ÒÓ˚ Ë ÔÓ‰ÓʉËÚ 30 ÏËÌÛÚ ‰Ó
ÔÓ‚ÚÓÌÓ„Ó Á‡ÔÛÒ͇ Ô˚ÎÂÒÓÒ‡. óÂÂÁ 30 ÏËÌÛÚ ‚Íβ˜ËÚ Ô˚ÎÂÒÓÒ ‚ ÒÂÚ¸ Ë ÔÓ‚ÂÌËÚ ‚˚Íβ˜‡ÚÂθ.
ÖÒÎË Ô˚ÎÂÒÓÒ Ì ‚Íβ˜‡ÂÚÒfl, Ó·‡ÚËÚÂÒ¸ Í Í‚‡ÎËÙˈËÓ‚‡ÌÌÓÏÛ ˝ÎÂÍÚËÍÛ.
7
8
Hose Handle
ê͇ۘ ¯Î‡Ì„‡
Spring latch
ê„ÛÎflÚÓ ‰ÎËÌ˚
ÚÂÎÂÒÍÓÔ˘ÂÒÍÓÈ ÚÛ·ÍË
Telescopic pipe
íÂÎÂÒÍÓÔ˘ÂÒ͇fl Ú۷͇
(depending on model)
(depending on model)
(depending on model)
(depending on model)
(depending on model)
(Ì ‚Ó ‚ÒÂı ÏÓ‰ÂÎflı)
(Ì ‚Ó ‚ÒÂı ÏÓ‰ÂÎflı)
(Ì ‚Ó ‚ÒÂı ÏÓ‰ÂÎflı)
(Ì ‚Ó ‚ÒÂı ÏÓ‰ÂÎflı)
(Ì ‚Ó ‚ÒÂı ÏÓ‰ÂÎflı)
How to use Assembling vacuum cleaner
ä‡Í ÔÓθÁÓ‚‡Ú¸Òfl ë·Ó͇ Ô˚ÎÂÒÓÒ‡
Carpet and floor nozzle
Telescopic pipe
ç‡Ò‡‰Í‡ ‰Îfl ˜ËÒÚÍË ÔÓ· Ë ÍÓ‚Ó‚
íÂÎÂÒÍÓÔ˘ÂÒ͇fl Ú۷͇
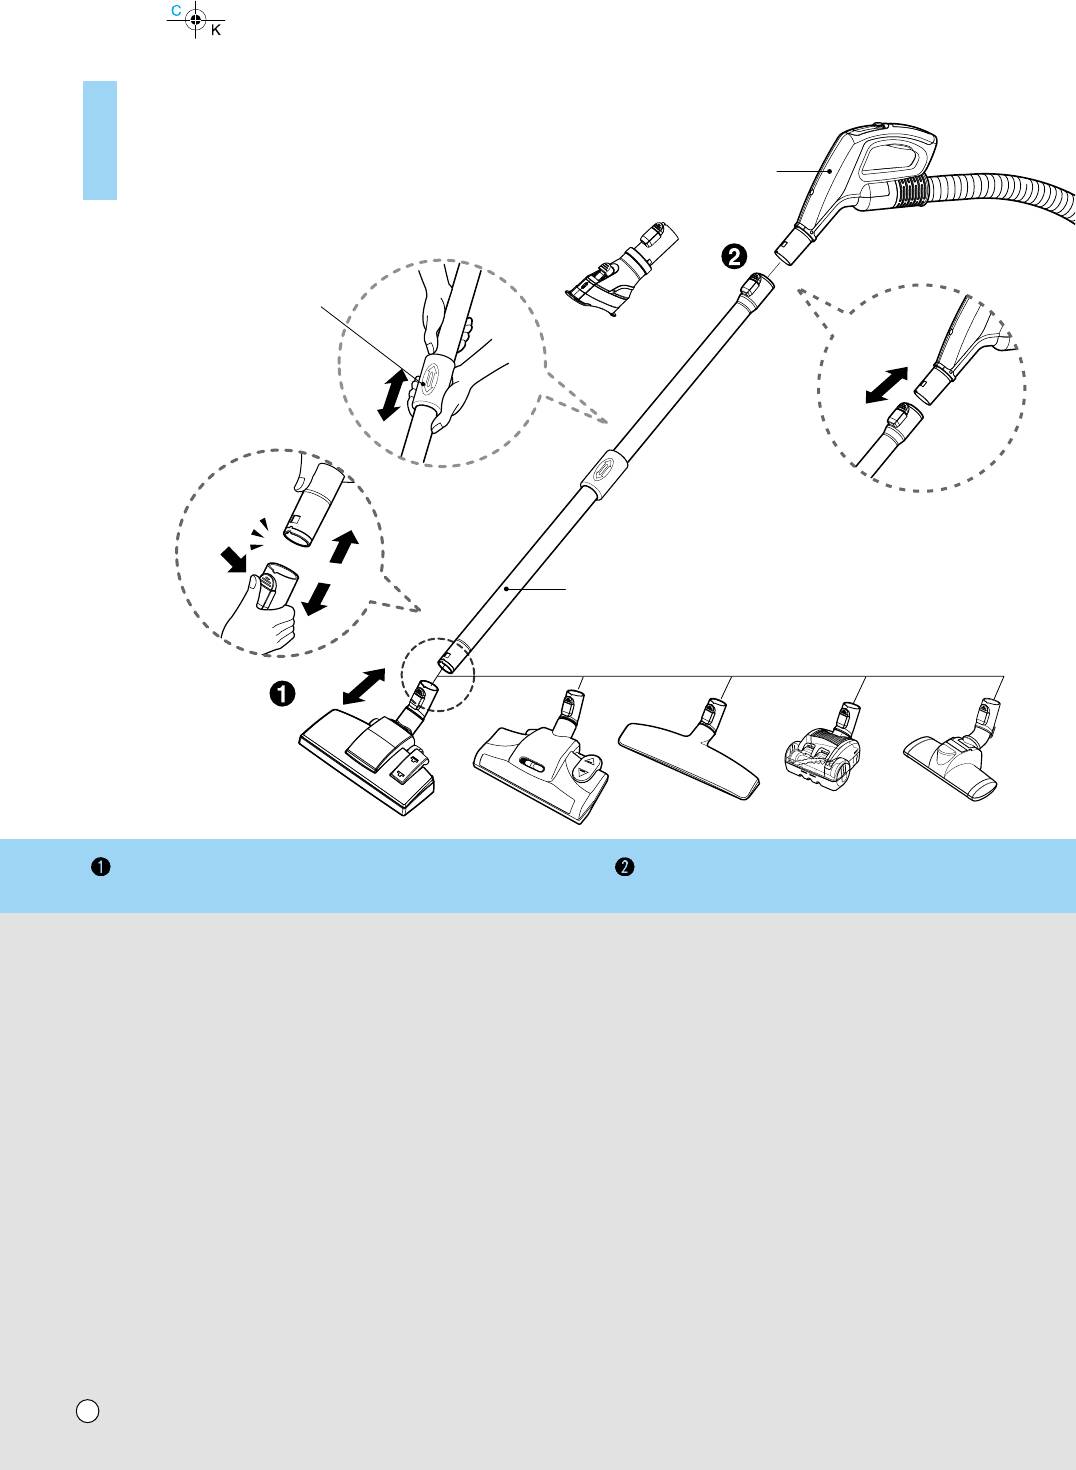
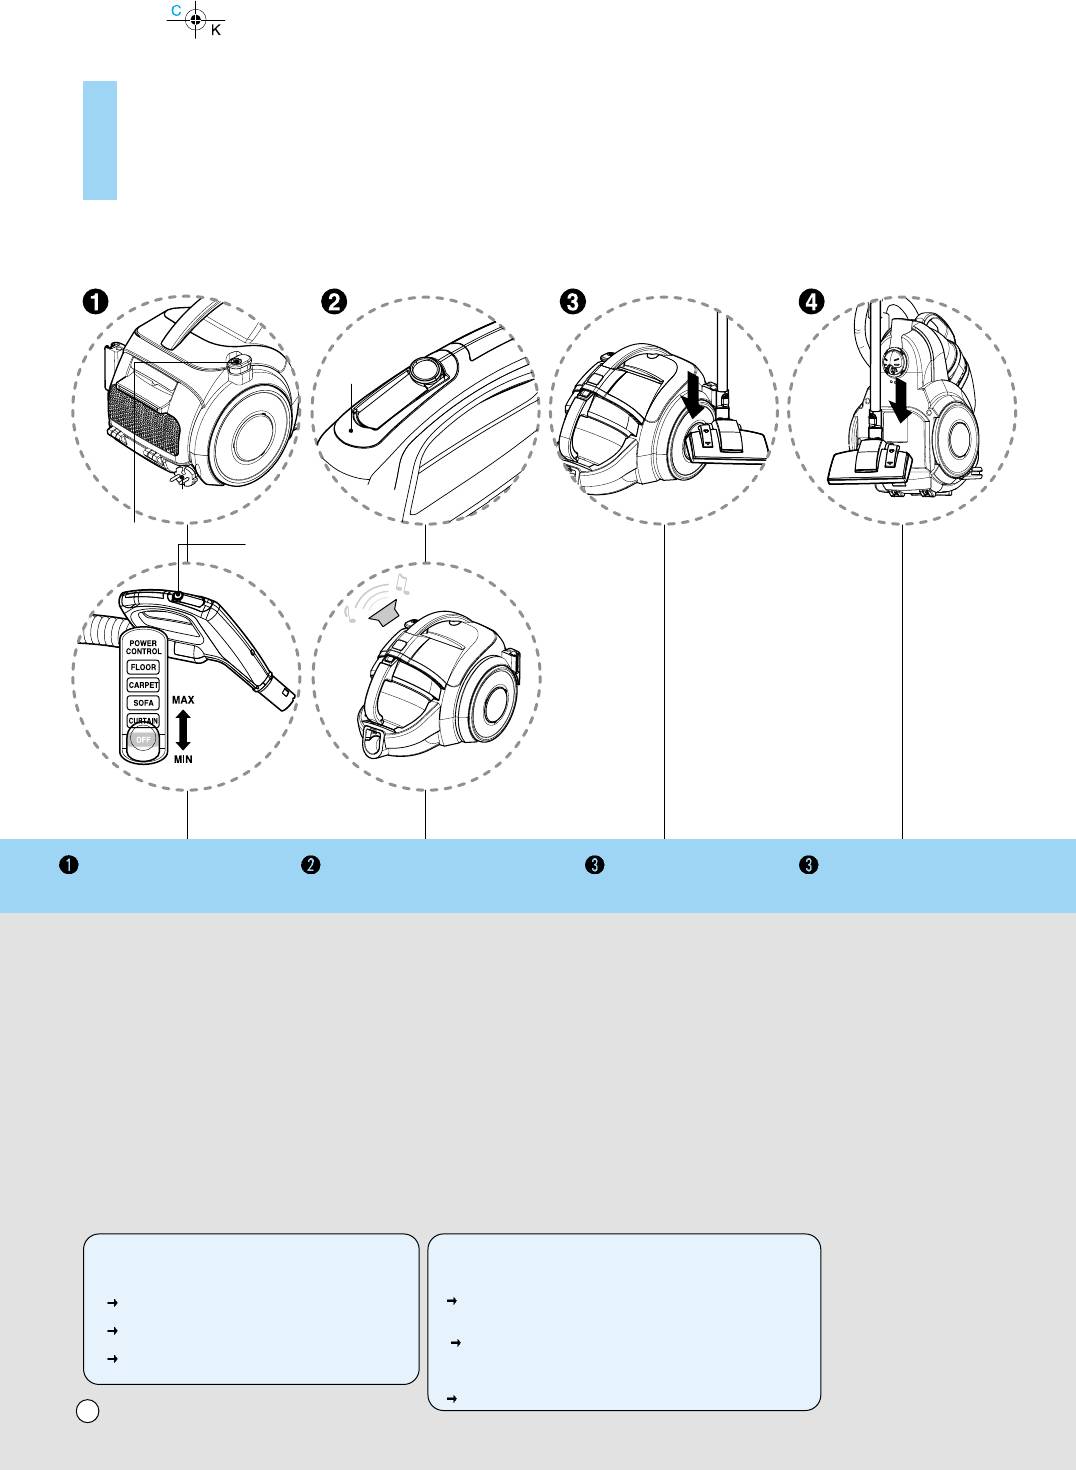
Push the nozzle into the telescopic pipe.
• Push telescopic pipe firmly into hose handle.
• Grasp the spring latch to expand.
• Pull out the pipe to desired length.
ëÓ‰ËÌËÚ ̇҇‰ÍÛ Ë ÚÂÎÂÒÍÓÔ˘ÂÒÍÛ˛ ÚÛ·ÍÛ.
• èÎÓÚÌÓ ÒÓ‰ËÌËÚ ÚÂÎÂÒÍÓÔ˘ÂÒÍÛ˛ ÚÛ·ÍÛ Ë
Û˜ÍÛ ¯Î‡Ì„‡.
• ÇÓÁ¸ÏËÚÂÒ¸ Á‡ „ÛÎflÚÓ ‰ÎËÌ˚ ÚÛ·ÍË,
˜ÚÓ·˚ ‚˚ÚflÌÛÚ¸ ÚÛ·ÍÛ
• Ç˚ÚflÌËÚ ÚÛ·ÍÛ Ì‡ Ê·ÂÏÛ˛ ‰ÎËÌÛ.
Click!
ôÂΘÓÍ!
Button
äÌÓÔ͇
Fitting pipe
ëÓ‰ËÌËÚÂθÌ˚È Ô‡ÚÛ·ÓÍ
Flexible Hose
ÉË·ÍËÈ ¯Î‡Ì„
Attachment Point
íӘ͇ ÍÂÔÎÂÌËfl
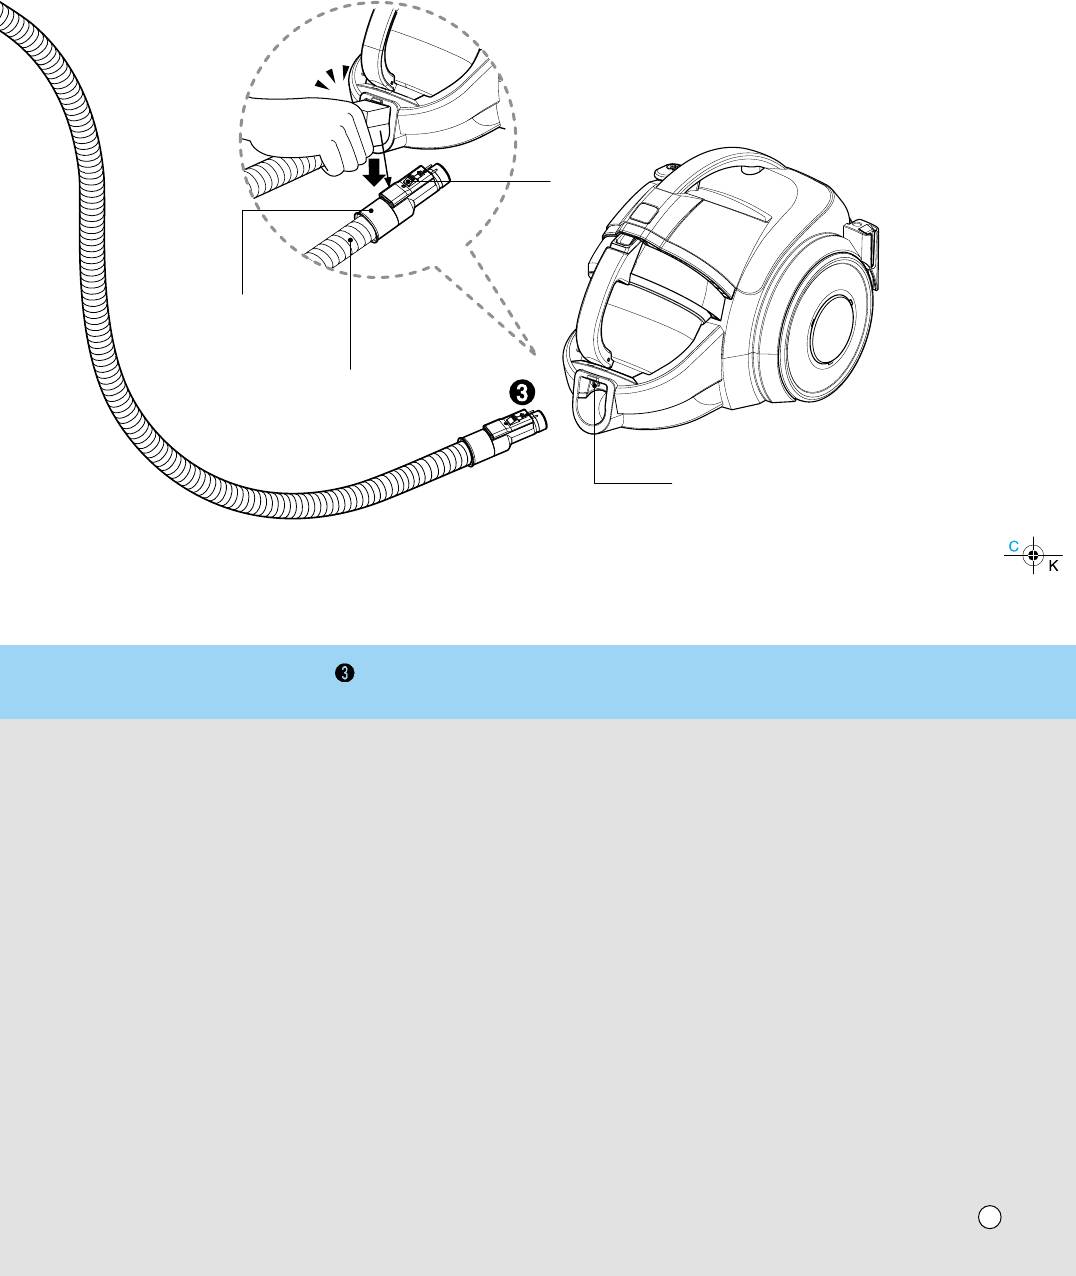
Connecting the hose to the vacuum cleaner
èÓ‰ÒÓ‰ËÌÂÌË ¯Î‡Ì„‡ Í Ô˚ÎÂÒÓÒÛ
Push the fitting pipe on the flexible hose
into the attachment point on the vacuum cleaner.
To remove the flexible hose from the vacuum
cleaner, press the button situated on the fitting pipe,
then pull the fitting pipe out of the vacuum cleaner.
ÇÒÚ‡‚¸Ú ¯Î‡Ì„ ‚ ÒÔˆˇθÌÓ ÓÚ‚ÂÒÚË ̇ ÍÓÔÛÒÂ
Ô˚ÎÂÒÓÒ‡. ̇ÊÏËÚ ̇ ÍÌÓÔÍÛ, ‡ÒÔÓÎÓÊÂÌÌÛ˛ ̇ Û˜ÍÂ
¯Î‡Ì„‡, ‡ Á‡ÚÂÏ ËÁ‚ÎÂÍËÚ ¯Î‡Ì„ ËÁ Ô˚ÎÂÒÓÒ‡.
9
Carpet
Indicator
äÓ‚Â
à̉Ë͇ÚÓ
Plug,
Floor
òÚÂÔÒÂθ̇fl ‚ËÎ͇
èÓÎ
Cord reel button
äÌÓÔ͇ ÒχÚ˚‚‡ÌËfl
Control knob
¯ÌÛ‡
ê͇ۘ ÛÔ‡‚ÎÂÌË
fl
How to use
Operating vacuum cleaner
ä‡Í ÔÓθÁÓ‚‡Ú¸Òfl ùÍÒÔÎÛ‡Ú‡ˆËfl Ô˚ÎÂÒÓÒ‡
How to operate
Indicator and alarm sound
Park mode
Storage
ä‡Í ÔÓθÁÓ‚‡Ú¸Òfl
à̉Ë͇ÚÓ Ë Ò˄̇ΠÚ‚ӄË
êÂÊËÏ Ô‡ÍÓ‚ÍË
ï‡ÌÂÌËÂ
•
Pull out the power cord to the desired
• The indicator light of the hose handle
• To store during vacuuming, for
• When you have switched off
length and plug into the socket.
is on and alarm will sound when dust
example to move a small piece
and unplugged the vacuum
• Place the control knob of the hose
tank is full.
of furniture or a rug, use park
cleaner, press the cord reel
handle to the required position.
After about 1 min 30 sec, vacuum
mode to support the flexible
button to automatically
• To turn off, slide control knob to
cleaner will turn itself off and alarm
hose and nozzle.
rewind the cord.
OFF position.
will sound.
- Slide the hook on the nozzle
• You can store your vacuum
• Press the cord reel button to
Empty the dust tank and reuse the
into the slot on the side of
cleaner in a vertical position
rewind the power cord after use.
vacuum cleaner
vacuum cleaner.
by sliding the hook on the
nozzle into the slot on the
• Ç˚ÚflÌËÚ ÒÂÚ‚ÓÈ ¯ÌÛ Ì‡
• à̉Ë͇ÚÓ Ì‡ ۘ͠¯Î‡Ì„‡
• óÚÓ·˚ ÔÓÏÂÒÚËÚ¸ Ô˚ÎÂÒÓÒ
underside of the vacuum
Ê·ÂÏÛ˛ ‰ÎËÌÛ Ë ‚ÒÚ‡‚¸ÚÂ
Á‡„Ó‡ÂÚÒfl Ë Á‚Û˜ËÚ Ò˄̇ΠÚ‚ӄË,
̇ ı‡ÌÂÌË ÔÓÒΠ۷ÓÍË,
cleaner.
‚ËÎÍÛ ‚ ÓÁÂÚÍÛ.
ÍÓ„‰‡ ÍÓÌÚÂÈÌ ‰Îfl Ò·Ó‡ Ô˚ÎË
ËÒÔÓθÁÛÈÚ ÂÊËÏ
• èÂÂÏÂÒÚËÚ ÔÓÎÁÛÌÓÍ Ì‡ Û˜ÍÂ
Á‡ÔÓÎÌÂÌ. èËÏÂÌÓ ˜ÂÂÁ 1 ÏËÌ 30
Ô‡ÍÓ‚ÍË, ÍÓÚÓ‡fl
• èÓÒΠÚÓ„Ó, Í‡Í ‚˚
¯Î‡Ì„‡ ‚ Ê·ÂÏÓ ÔÓÎÓÊÂÌËÂ.
ÒÂÍÛ̉, Ô˚ÎÂÒÓÒ ÓÚÍβ˜ËÚÒfl Ë
ÔÓÁ‚ÓÎflÂÚ Û‰ÂÊË‚‡Ú¸
‚˚Íβ˜ËÚ Ô˚ÎÂÒÓÒ Ë
• óÚÓ·˚ ‚˚Íβ˜ËÚ¸ Ô˚ÎÂÒÓÒ,
Á‡Á‚Û˜ËÚ Ò˄̇Î. é˜ËÒÚËÚÂ
„Ë·ÍËÈ ¯Î‡Ì„ Ë Ì‡Ò‡‰ÍÛ.
‚˚ÌÂÚÂ ‚ËÎÍÛ ËÁ ÓÁÂÚÍË,
ÔÂÏÂÒÚËÚ ÔÓÎÁÛÌÓÍ Ì‡ Û˜ÍÂ
ÍÓÌÚÂÈÌ ‰Îfl Ò·Ó‡ Ô˚ÎË Ë
- ÇÒÚ‡‚¸ÚÂ Í˛Í Ì‡Ò‡‰ÍË ‚
̇ÊÏËÚ ̇ ÍÌÓÔÍÛ
‚ ÔÓÎÓÊÂÌËÂ Çõäã.
‚Íβ˜ËÚ Ô˚ÎÂÒÓÒ.
Ô‡Á, ‡ÒÔÓÎÓÊÂÌÌ˚È Ì‡
ÒχÚ˚‚‡ÌËfl ¯ÌÛ‡, ˜ÚÓ·˚
·ÓÍÓ‚ÓÈ ˜‡ÒÚË Ô˚ÎÂÒÓÒ‡.
‡‚ÚÓχÚ˘ÂÒÍË ÒÏÓÚ‡Ú¸
¯ÌÛ.
NOTICE
èêàåÖóÄçàÖ
• Ç˚ ÏÓÊÂÚ ı‡ÌËÚ¸
When indicator light flashes and alarm sounds :
äÓ„‰‡ ÏË„‡ÂÚ Ë̉Ë͇ÚÓ Ë Á‚Û˜ËÚ Ò˄̇ΠÚÂ‚Ó„Ë :
Ô˚ÎÂÒÓÒ ‚ ‚ÂÚË͇θÌÓÏ
1. Dust tank is full
1. è˚ÎÂÒ·ÓÌËÍ Á‡ÔÓÎÌÂÌ
ÔÓÎÓÊÂÌËË , ‚ÒÚ‡‚Ë‚ ͲÍ
slide handle knob to OFF position and empty dust tank
ÔÂÂÏÂÒÚËÚ ÔÓÎÁÛÌÓÍ Ì‡ ۘ͠‚ ÔÓÎÓÊÂÌË Çõäã Ë Ó˜ËÒÚËÚÂ
̇҇‰ÍË ‚ Ô‡Á ̇ ‰ÌˢÂ
2. Power is on without dust tank
ÍÓÌÚÂÈÌ ‰Îfl Ò·Ó‡ Ô˚ÎË.
Ô˚ÎÂÒÓÒ‡.
slide handle knob to OFF position and reattach dust tank
2. ÇÍβ˜ÂÌÓ ÔËÚ‡ÌË ·ÂÁ ÛÒÚ‡ÌÓ‚ÎÂÌÌÓ„Ó Ô˚ÎÂÒ·ÓÌË͇,
3. Rotating plate in the dust tank is restricted because of obstruction
ÔÂÂÏÂÒÚËÚ ÔÓÎÁÛÌÓÍ Ì‡ ۘ͠‚ ÔÓÎÓÊÂÌË Çõäã Ë ÛÒÚ‡ÌÓ‚ËÚÂ
slide handle knob to OFF position and remove obstruction
Ô˚ÎÂÒ·ÓÌËÍ.
3. èÓ‚ÓÓÚ Ô·ÒÚËÌ˚ Ô˚ÎÂÒ·ÓÌË͇ Ë Ó„‡Ì˘ÂÌ ËÁ - Á‡ ̇΢Ëfl
ÔÂÔflÚÒÚ‚Ëfl.
ÔÂÂÏÂÒÚËÚ ÔÓÎÁÛÌÓÍ Ì‡ ۘ͠‚ ÔÓÎÓÊÂÌË Çõäã Ë Û‰‡ÎËÚ ÔÂÔflÚÒÚ‚ËÂ.
10
How to Use Using carpet and floor nozzle
àÒÔÓθÁÓ‚‡ÌË ËÁ‰ÂÎËfl
àÒÔÓθÁÓ‚‡ÌË ̇҇‰ÍË ‰Îfl ˜ËÒÚÍË ÔÓ· Ë ÍÓ‚Ó‚
Carpet
Carpet
äÓ‚Â
äÓ‚Â
Pedal
艇θ
-
Floor
Floor
èÓÎ
èÓÎ
Carpet and floor nozzle (depend on model)
Hard Floor Nozzle (depend on model)
ç‡Ò‡‰Í‡ ‰Îfl ˜ËÒÚÍË ÔÓ· Ë ÍÓ‚Ó‚ (Ì ‚Ó ‚ÒÂı ÏÓ‰ÂÎflı)
ç‡Ò‡‰Í‡ ‰Îfl Ú‚fi‰˚ı ÔÓÍ˚
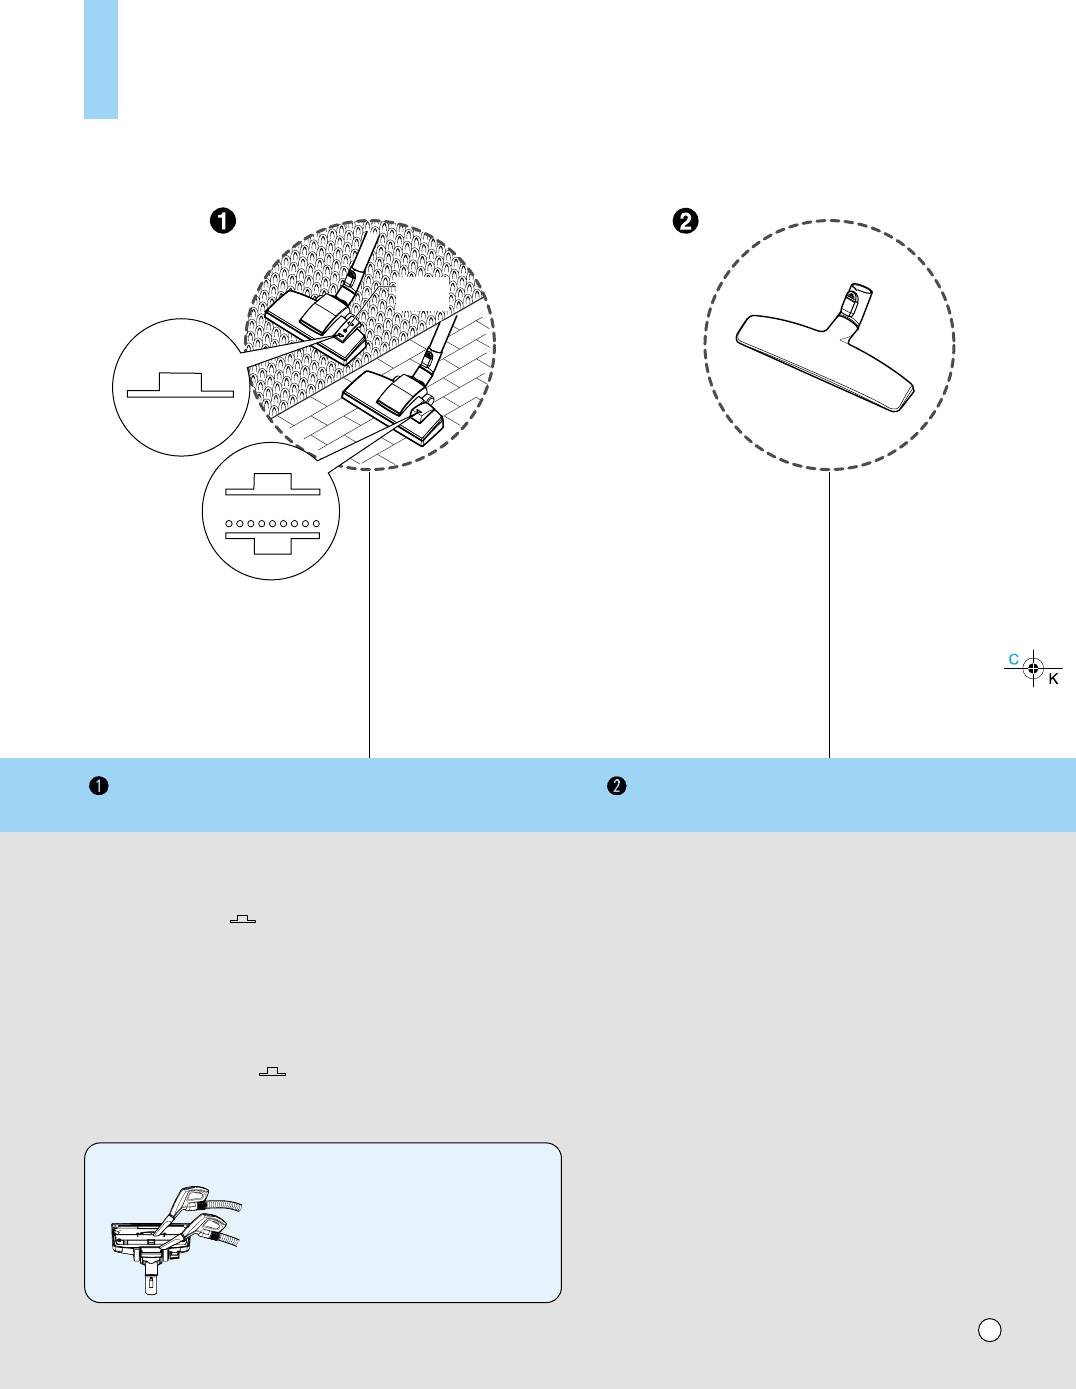
• The 2 position nozzle
• Efficient cleaning of hard floors
This is equipped with a pedal which allows you to
(wood, linoleum, etc)
alter its position according to the type of floor to be cleaned.
• Carpet or rug position
press the pedal ( ) to lower brush.
• Hard floor position(tiles, parquets floor)
Both pedal position are suitable.
• ç‡Ò‡‰Í‡, ÍÓÚÓ‡fl ÏÓÊÂÚ ‡·ÓÚ‡Ú¸ ‚ 2-ı ÔÓÎÓÊÂÌËflı.
•
ùÙÙÂÍÚ˂̇fl Û·Ó͇ ڂ‰˚ı ÔÓÍ˚ÚËÈ (‰Â‚Ó,
ùÚ‡ ̇҇‰Í‡ ÓÒ̇˘Â̇ Ô‰‡Î¸˛, ÍÓÚÓ‡fl ÔÓÁ‚ÓÎflÂÚ ‚‡Ï ÏÂÌflÚ¸
ÎËÌÓÎÂÛÏ, Ë Ú.‰.)
ÔÓÎÓÊÂÌË ‚ Á‡‚ËÒËÏÓÒÚË ÓÚ ÚËÔ‡ ۷ˇÂÏÓ„Ó ÔÓ·.
• ÑÎfl ˜ËÒÚÍË ÍÓ‚‡ ËÎË ÍÓ‚Ë͇,
̇ÊÏËÚ ̇ Ô‰‡Î¸ ( ), ˜ÚÓ·˚ ÓÔÛÒÚËÚ¸ ˘ÂÚÍÛ.
• èÓÎÓÊÂÌË ‰Îfl ˜ËÒÚÍË ÊÂÒÚÍÓ„Ó ÔÓ· (ÔÎËÚÍË, Ô‡ÍÂÚÌÓ„Ó ÔÓ·).
óËÒÚÍÛ ÏÓÊÌÓ ÔÓ‚Ó‰ËÚ¸ ‚ β·ÓÏ ÔÓÎÓÊÂÌËË Ô‰‡ÎË.
Cleaning carpet and floor nozzle
óËÒÚ͇ ̇҇‰ÍË ‰Îfl ÔÓ· Ë ÍÓ‚Ó‚‡
• Clean the hole and brush of the nozzle.
• èÓ˜ËÒÚËÚ ÓÚ‚ÂÒÚË ‚ ̇҇‰ÍÂ Ë ˘ÂÚÍÛ.
11
11
Carpet
Carpet
äÓ‚Â
äÓ‚Â
Pedal
艇θ
Floor
Floor
èÓÎ
èÓÎ
How to Use Using All Floor nozzle and mini turbine nozzle
àÒÔÓθÁÓ‚‡ÌË ËÁ‰ÂÎËfl
àÒÔÓθÁÓ‚‡ÌË ̇҇‰ÍË ‰Îfl ˜ËÒÚÍË ‚ÒÂı ÔÓÎÓ‚ Ë ÏËÌË-ÚÛ·Ó Ì‡Ò‡‰Í
All Floor nozzle (depend on model)
Mini turbine nozzle (depend on model)
ç‡Ò‡‰Í‡ ‰Îfl ˜ËÒÚÍË ÔÓÎÓ‚ ‚ÒÂı ÚËÔÓ‚ (Ì ‚Ó ‚ÒÂı ÏÓ‰ÂÎflı)
åËÌË-ÚÛ·Ó Ì‡Ò‡‰Í‡È (Ì ‚Ó ‚ÒÂı ÏÓ‰ÂÎflı)
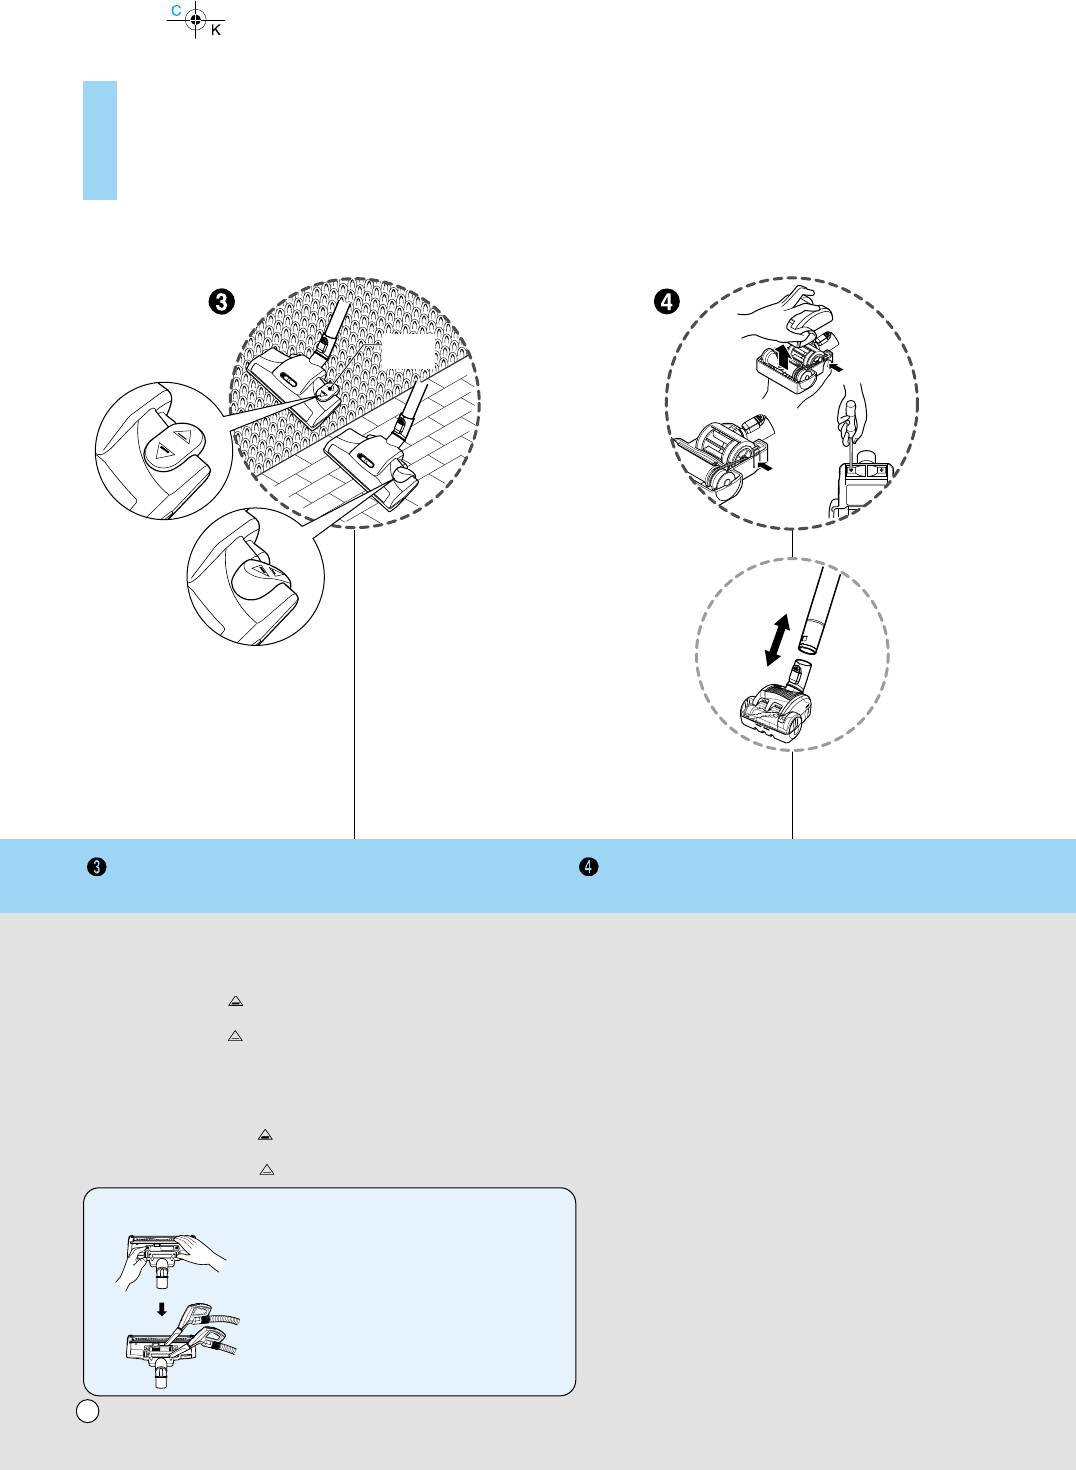
• The 2 position nozzle
• Mini turbine is used for stairs and other hard to reach places.
This is equipped with a pedal which allows you to alter
• To clean the mini turbine nozzle, remove the nozzle cover :
its position according to the type of floor to be cleaned.
Remove 2 screws on the bottom and take mini turbine nozzle
• Carpet or rug position
cover off as shown.
Press the pedal ( ), then brush is will rotate
• Frequently clean and remove hair, string, and lint build-up in
• Hard floor position
the brush area. Failure to do so could damage to mini turbine
Press the pedal ( ), then brush will stop rotating
nozzle.
• ç‡Ò‡‰Í‡, ÍÓÚÓ‡fl ÏÓÊÂÚ ‡·ÓÚ‡Ú¸ ‚ 2-ı ÔÓÎÓÊÂÌËflı,
• åËÌË-ÚÛ·Ó Ì‡Ò‡‰Í‡ ËÒÔÓθÁÛÂÚÒfl ‰Îfl ˜ËÒÚÍË ÎÂÒÚÌˈ Ë
ÓÒ̇˘Â̇ Ô‰‡Î¸˛, ÍÓÚÓ‡fl ÔÓÁ‚ÓÎflÂÚ ‚‡Ï ÏÂÌflÚ¸ ÔÓÎÓÊÂÌË ‚
‰Û„Ëı ÚÛ‰ÌÓ‰ÓÒÚÛÔÌ˚ı ÏÂÒÚ.
Á‡‚ËÒËÏÓÒÚË ÓÚ ÚËÔ‡ ۷ˇÂÏÓ„Ó ÔÓ·.
• óÚÓ·˚ ‚˚˜ËÒÚËÚ¸ ÏËÌË-ÚÛ·Ó Ì‡Ò‡‰ÍÛ, ÒÌËÏËÚ ÍÓÊÛı
• èÓÎÓÊÂÌË ‰Îfl ˜ËÒÚÍË ÍÓ‚‡ ËÎË ÍÓ‚Ë͇,
̇҇‰ÍË. Ç˚‚ÂÌËÚ 2 ‚ËÌÚ‡ ̇ ‰ÌË˘Â Ë ÒÌËÏËÚ ÍÓÊÛı
̇ÊÏËÚ ̇ Ô‰‡Î¸ ( ), ÔÓÒΠ˜Â„Ó ˘ÂÚ͇ ·Û‰ÂÚ ‚‡˘‡Ú¸Òfl.
̇҇‰ÍË Ò ÏËÌË-ÚÛ·ËÌÓÈ, Í‡Í ÔÓ͇Á‡ÌÓ Ì‡ ËÒÛÌÍÂ.
• èÓÎÓÊÂÌË ‰Îfl ˜ËÒÚÍË ÊÂÒÚÍÓ„Ó ÔÓ·.
• ó‡˘Â ˜ËÒÚËÚÂ Ë Û‰‡ÎflÈÚ ‚ÓÎÓÒ˚, ÌËÚË Ë ÔÛı,
ç‡ÊÏËÚ ̇ Ô‰‡Î¸ ( ), ÔÓÒΠ˜Â„Ó ˘ÂÚ͇ ÔÂ͇ÚËÚ ‚‡˘‡Ú¸Òfl.
Ò͇ÔÎË‚‡˛˘ËÂÒfl ‚ ӷ·ÒÚË ˘ÂÚÍË. çÂÒӷβ‰ÂÌË ˝ÚÓ„Ó
Û͇Á‡ÌËfl ÏÓÊÂÚ ÔË‚ÂÒÚË Í ÔÓ‚ÂʉÂÌ˲ ÏËÌË-ÚÛ·Ó
Cleaning All Floor nozzle
̇҇‰ÍË.
ç‡Ò‡‰Í‡ ‰Îfl ˜ËÒÚÍË ÔÓÎÓ‚ ‚ÒÂı ÚËÔÓ‚
• Open the cover by pulling the hook.
• éÚÍÓÈÚ ÍÓÊÛı, ÔÓÚflÌÛ‚ Á‡ ͲÍ.
• Clean the hole and brush of the nozzle.
• èÓ˜ËÒÚËÚ ÓÚ‚ÂÒÚËÂ Ë ˘ÂÚÍÛ
̇҇‰ÍË.
12
How to Use Using accessory nozzles
àÒÔÓθÁÓ‚‡ÌË ËÁ‰ÂÎËfl àÒÔÓθÁÓ‚‡ÌË ‰ÓÔÓÎÌËÚÂθÌ˚ı ̇҇‰ÓÍ
Upholstery nozzle
Dusting brush
Crevice tool
ç‡Ò‡‰Í‡ ‰Îfl ˜ËÒÚÍË Ó·Ë‚ÍË
è˚΂‡fl ˘ÂÚ͇
ôÂ΂‡fl ̇҇‰Í‡
Carpet
äÓ‚Â
Floor
èÓÎ
Upholstery Nozzle
Dusting Brush
Crevice Tool
ç‡Ò‡‰Í‡ ‰Îfl ˜ËÒÚÍË Ó·Ë‚ÍË
è˚΂‡fl ˘ÂÚ͇
ôÂ΂‡fl ̇҇‰Í‡
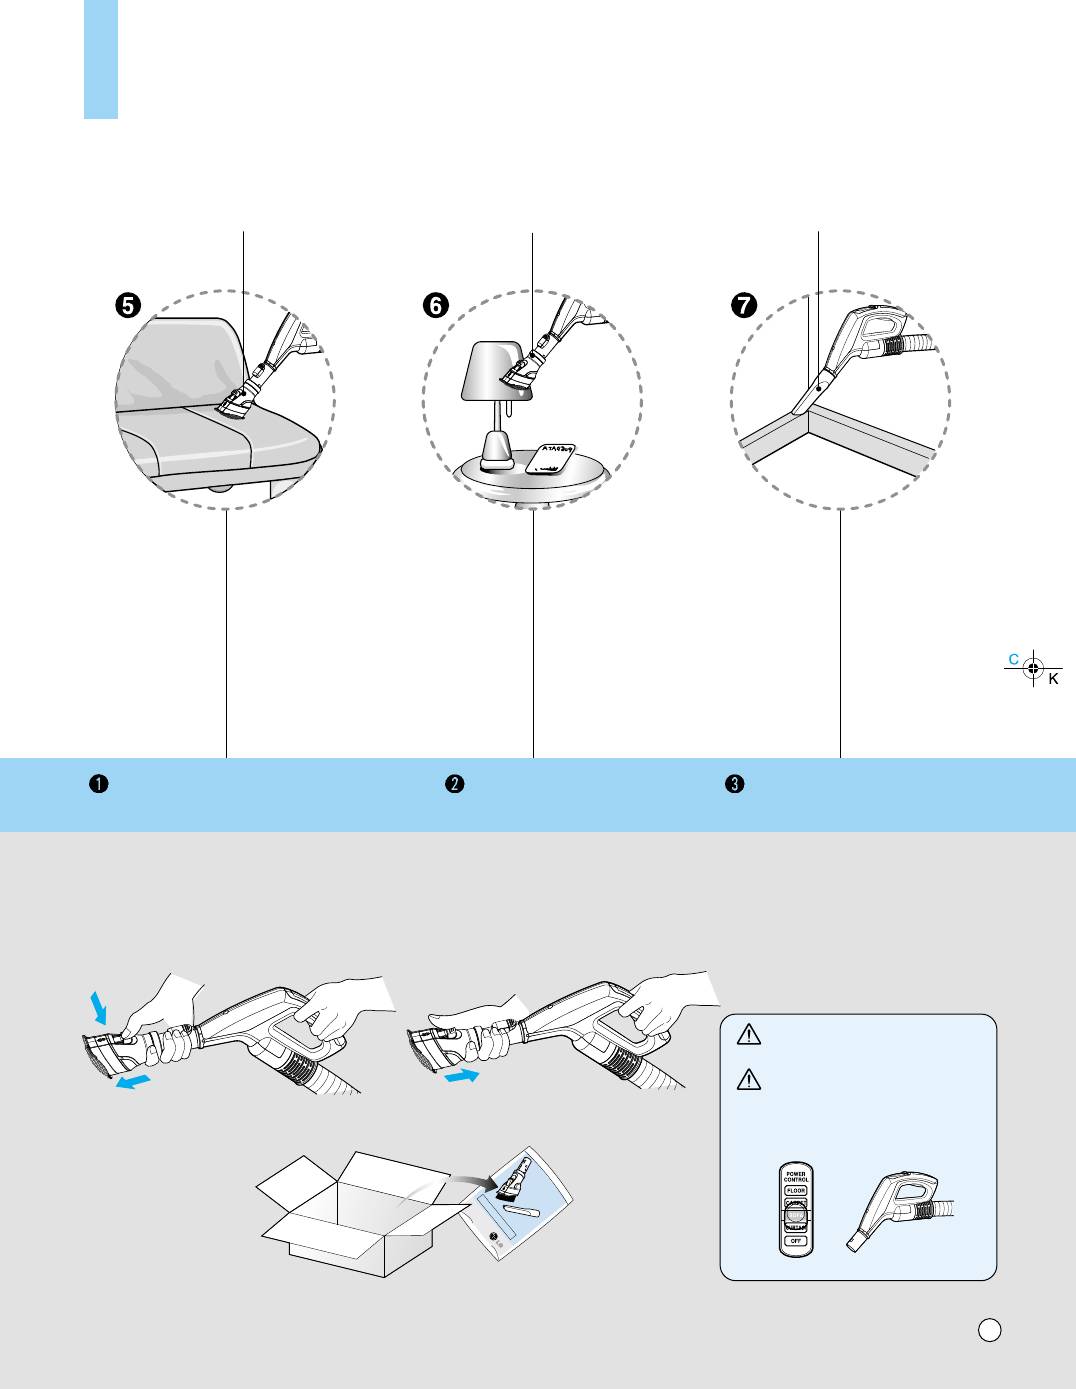
Upholstery Nozzle is for vacuuming upholstery,
Dusting Brush is for vacuuming pic-
Crevice Tool is for vacuuming in those
mattresses, etc.
ture frames, furniture frames, books
normally hard-to-reach places such as
and other irregular surfaces.
reaching cobwebs, or between the
cushions of a sofa.
ç‡Ò‡‰Í‡ ‰Îfl ˜ËÒÚÍË Ó·Ë‚ÍË ÔËÏÂÌflÂÚÒfl
è˚΂‡fl ˘ÂÚ͇ ÔËÏÂÌflÂÚÒfl ‰Îfl
‰Îfl ˜ËÒÚÍË Ó·Ë‚ÍË, χڇÒÓ‚ Ë Ú. ‰.
˜ËÒÚÍË ‡Ï ͇ÚËÌ, ͇͇ÒÓ‚
ôÂ΂‡fl ̇҇‰Í‡ ÔËÏÂÌflÂÚÒfl ‰Îfl
Ï·ÂÎË, ÍÌË„ Ë ‰Û„Ëı ÌÂÓ‚Ì˚ı
˜ËÒÚÍË ‚ ÚÛ‰ÌÓ‰ÓÒÚÛÔÌ˚ı ÏÂÒÚ‡ı,
Push the button
ÔÓ‚ÂıÌÓÒÚÂÈ.
Ú‡ÍËı Í‡Í ÏÂÒÚ‡ ÒÍÓÔÎÂÌËfl Ô‡ÛÚËÌ˚
ç‡ÊÏËÚ ̇ ÍÌÓÔÍÛ
Pull the cover
ËÎË ÏÂÊ‰Û ÔӉۯ͇ÏË ‰Ë‚‡ÌÓ‚.
ç‡ÚflÌÛÚ¸ ÍÓÊÛı
NOTICE
Use accessory in the sofa mode
èêÖÑìèêÖÜÑÖçàÖ
àÒÔÓθÁÛÈÚ ̇҇‰ÍÛ ‚ ÂÊËÏ ˜ËÒÚÍË
< Upholstery nozzle mode >
< Dusting brush mode >
‰Ë‚‡Ì‡.
< êÂÊËÏ ˜ËÒÚÍË Ó·Ë‚ÍË >
< ôÂÚ͇ ‰Îfl Û·ÓÍË Ô˚ÎË >
• BOX •
• äéêéÅäÄ •
• Accessory nozzles include in the "PE BAG" with owner's manual.
• ÑÓÔÓÎÌËÚÂθÌ˚ ̇҇‰ÍË Ì‡ıÓ‰flÚÒfl ‚ ÔÓÎË˝ÚËÎÂÌÓ‚ÓÏ Ô‡ÍÂÚÂ
‚ÏÂÒÚÂ Ò ÛÍÓ‚Ó‰ÒÚ‚ÓÏ ÔÓθÁÓ‚‡ÚÂÎfl.
13
How to use Using the Sani punch nozzle
ä‡Í ÔÓθÁÓ‚‡Ú¸Òfl
àÒÔÓθÁÓ‚‡ÌË ̇҇‰ÍË ‰Îfl Ïfl„ÍÓÈ Ï·ÂÎË Ë ÔÓÒÚÂθÌ˚ı ÔË̇‰ÎÂÊÌÓÒÚÂÈ
Features
How to use
ÇÓÁÏÓÊÌÓÒÚË
àÒÔÓθÁÓ‚‡ÌË Ô˚ÎÂÒÓÒ‡
This nozzle picks up even dust inside through beating.
Follow the directions below for proper use.
The bottom part can be separated to be cleaned.
ÑÎfl ÌÓχθÌÓÈ ‡·ÓÚ˚ ̇҇‰ÍË ÔˉÂÊË‚‡ÈÚÂÒ¸ ÒÎÂ‰Û˛˘Ëı
Since the bottom does not stick to the surface, vacuuming is easy.
ËÌÒÚÛ͈ËÈ.
ç‡Ò‡‰Í‡ Û‰‡ÎflÂÚ Ô˚θ ÒÓ ‚ÒÂÈ ÔÓ‚ÂıÌÓÒÚË ·Î‡„Ó‰‡fl ˝ÙÙÂÍÚÛ
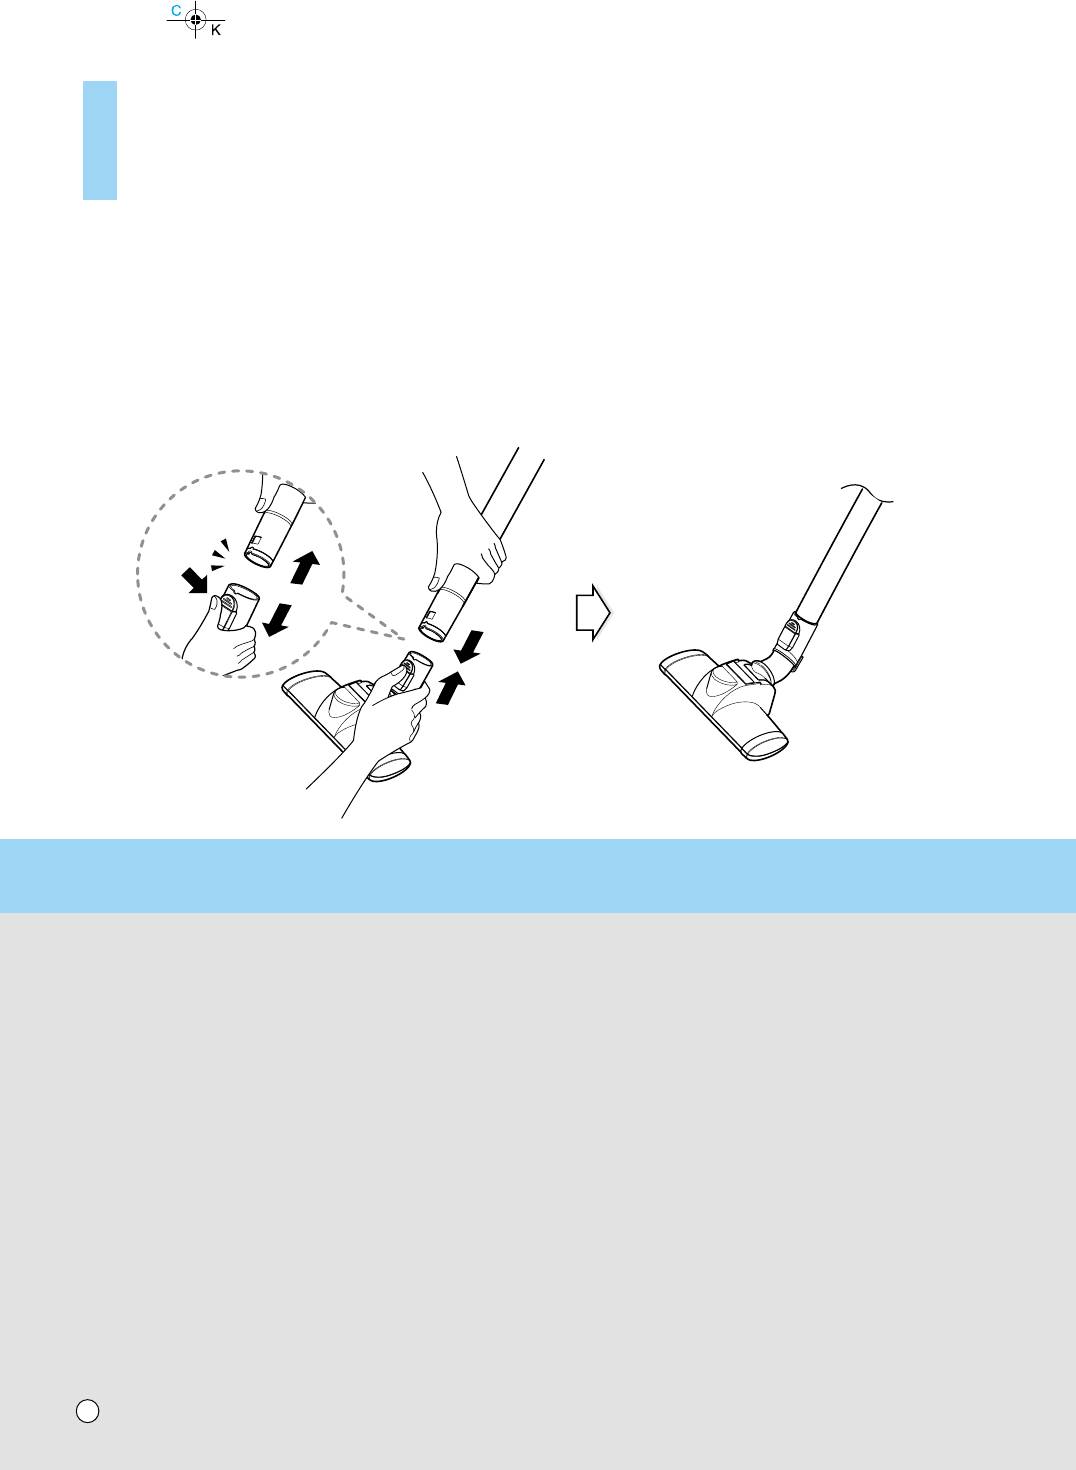
Assembly
‚˚·Ë‚‡ÌËfl. çËÊÌflfl ˜‡ÒÚ¸ ̇҇‰ÍË Ò‚Ó·Ó‰ÌÓ Á‡ÍÂÔÎÂ̇ ‰Îfl
Connect the nozzle to the telescopic tube.
ӷ΄˜ÂÌËfl ˜ËÒÚÍË.
ë·Ó͇
óËÒÚ͇ ÔÓÒÚÂθÌ˚ı ÔË̇‰ÎÂÊÌÂÒÚÂÈ Ì ‚˚Á˚‚‡ÂÚ Á‡ÚÛ‰ÌÂÌËÈ, Ú‡Í
èËÒÓ‰ËÌËÚ ̇҇‰ÍÛ Í ÚÂÎÂÒÍÓÔ˘ÂÒÍÓÈ ÚÛ·ÍÂ
Í‡Í ÌËÊÌflfl ˜‡ÒÚ¸ ̇҇‰ÍË Ì ÔËÎËÔ‡ÂÚ Í ÔÓ‚ÂıÌÓÒÚË.
Sani punch nozzle
ç‡Ò‡‰Í‡ ‰Îfl Ïfl„ÍÓÈ Ï·ÂÎË Ë ÔÓÒÚÂθÌ˚ı ÔË̇‰ÎÂÊÌÓÒÚÂÈ
Set the suction power control switch to MAX POWER before vacuuming.
Depending on the type of bedding, handling may be awkward or it may cause a lot of noise.
If this is the case, adjust the suction power control switch to a lower setting.
è‰ ‡·ÓÚÓÈ ÛÒÚ‡ÌÓ‚ËÚ ÔÓÎÁÛÌÓÍ Ì‡ ۘ͠Ô˚ÎÂÒÓÒ‡ ‚ ÔÓÎÓÊÂÌË MAX POWER.
Ç Á‡‚ËÒËÏÓÒÚË ÓÚ ÚËÔ‡ ÔÓÒÚÂθÌ˚ı ÔË̇‰ÎÂÊÌÓÒÚÂÈ Ó·‡·ÓÚ͇ ÏÓÊÂÚ Ó͇Á‡Ú¸Òfl ÌÂÛ‰Ó·ÌÓÈ ËÎË ÒÎ˯ÍÓÏ ¯ÛÏÌÓÈ.
Ç ˝ÚÓÏ ÒÎÛ˜‡Â ÛÒÚ‡ÌÓ‚ËÚ ÔÓÎÁÛÌÓÍ Ì‡ ÔÓÌËÊÂÌÌÛ˛ ÏÓ˘ÌÓÒÚ¸.
14
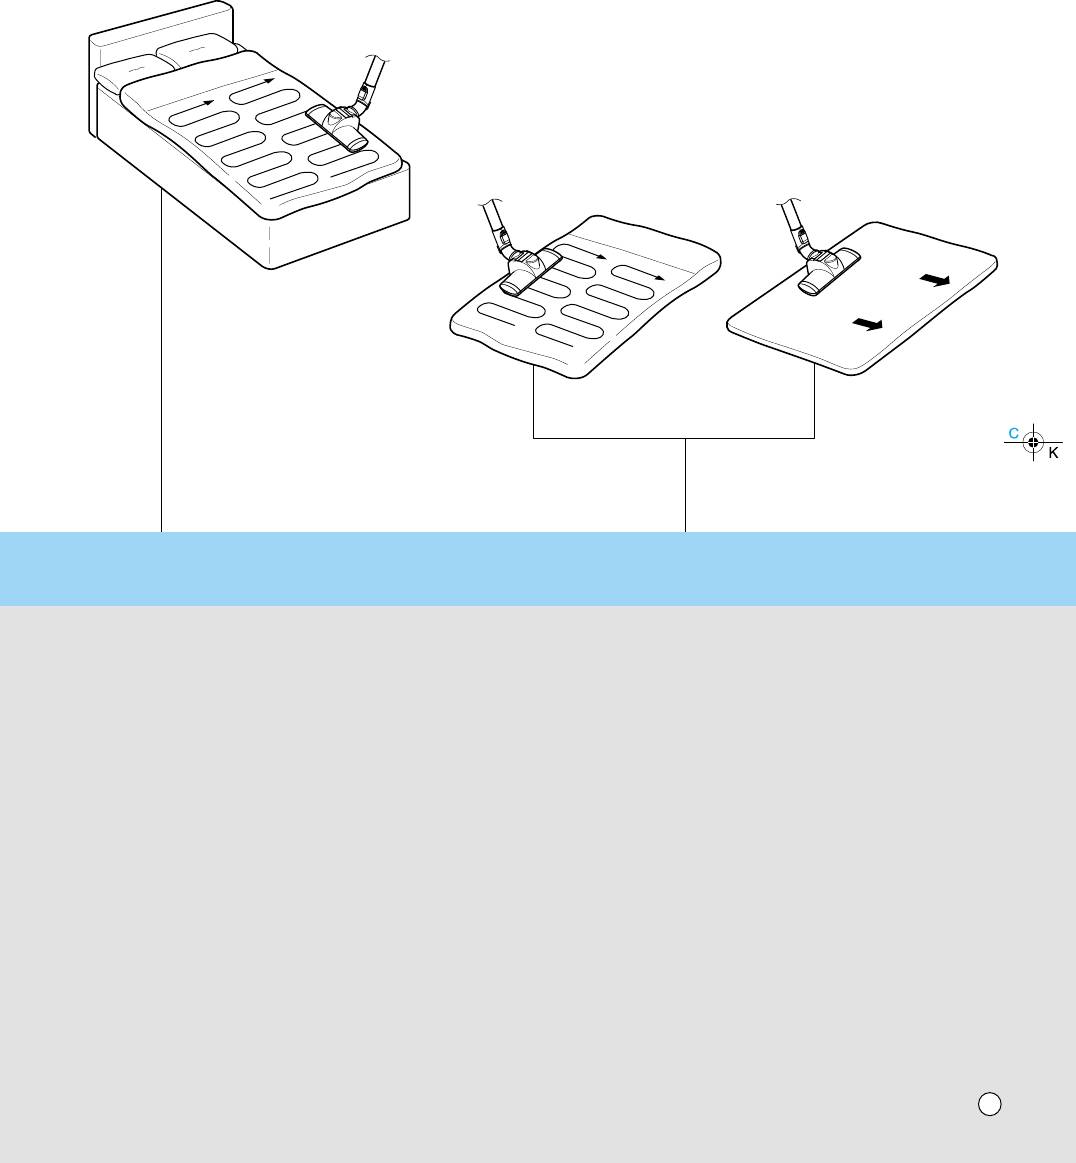
This Sani Punch nozzle is for effective cleaning of beds and blankets to remove mites and dust.
ç‡Ò‡‰Í‡ Ô‰̇Á̇˜Â̇ ‰Îfl ˜ËÒÚÍË ÔÓÒÚÂÎË, Ó‰ÂflÎ Ë Ó·Ë‚ÍË Ï·ÂÎË ÓÚ Ô˚΂˚ı Í΢ÂÈ Ë Ô˚ÎË.
Effective cleaning
ùÙÙÂÍÚ˂̇fl ˜ËÒÚ͇
Bed & blanket
äÓ‚‡ÚË Ë Ó‰Âfl·
Bulky & heavy blanket
Light blanket & sheet
íÓÎÒÚ˚Â Ë ÚflÊÂÎ˚ ӉÂfl·
íÓÌÍË ӉÂfl· Ë ÔÓÒÚ˚ÌË
When using on the bed
When using on the floor
óËÒÚ͇ ̇ ÍÓ‚‡ÚË
óËÒÚ͇ ̇ ÔÓÎÛ
Lay out the blanket
It is easier to clean a light blanket or sheet
and vacuum it on the bed
by pushing the nozzle in the direction of the arrow.
To increase cleaning efficiency for light blankets,
lay on top of a bulky blanket and then clean.
ê‡ÁÎÓÊËÚ ӉÂflÎÓ Ë ÔÓÔ˚ÎÂÒÓÒ¸ÚÂ
ã„ÍË ӉÂfl· ËÎË ÔÓÒÚ˚ÌË Î„˜Â ˜ËÒÚËÚ¸, ‰‚Ë„‡fl
Â„Ó Ì‡ ÍÓ‚‡ÚË.
̇҇‰ÍÛ ‚ ̇ԇ‚ÎÂÌËË ÒÚÂÎÓÍ(ÒÏ. ËÒÛÌÓÍ ‚˚¯Â).
ÑÎfl ·ÓΠ·˚ÒÚÓÈ Ë ˝ÙÙÂÍÚË‚ÌÓÈ ˜ËÒÚÍË Î„ÍÓ„Ó
Ó‰Âfl· Ô‰ ˜ËÒÚÍÓÈ ‡ÒÒÚÂÎËÚÂ Â„Ó Ì‡ ‰Û„ÓÏ, ·ÓÎÂÂ
ÚÓÎÒÚÓÏ.
15
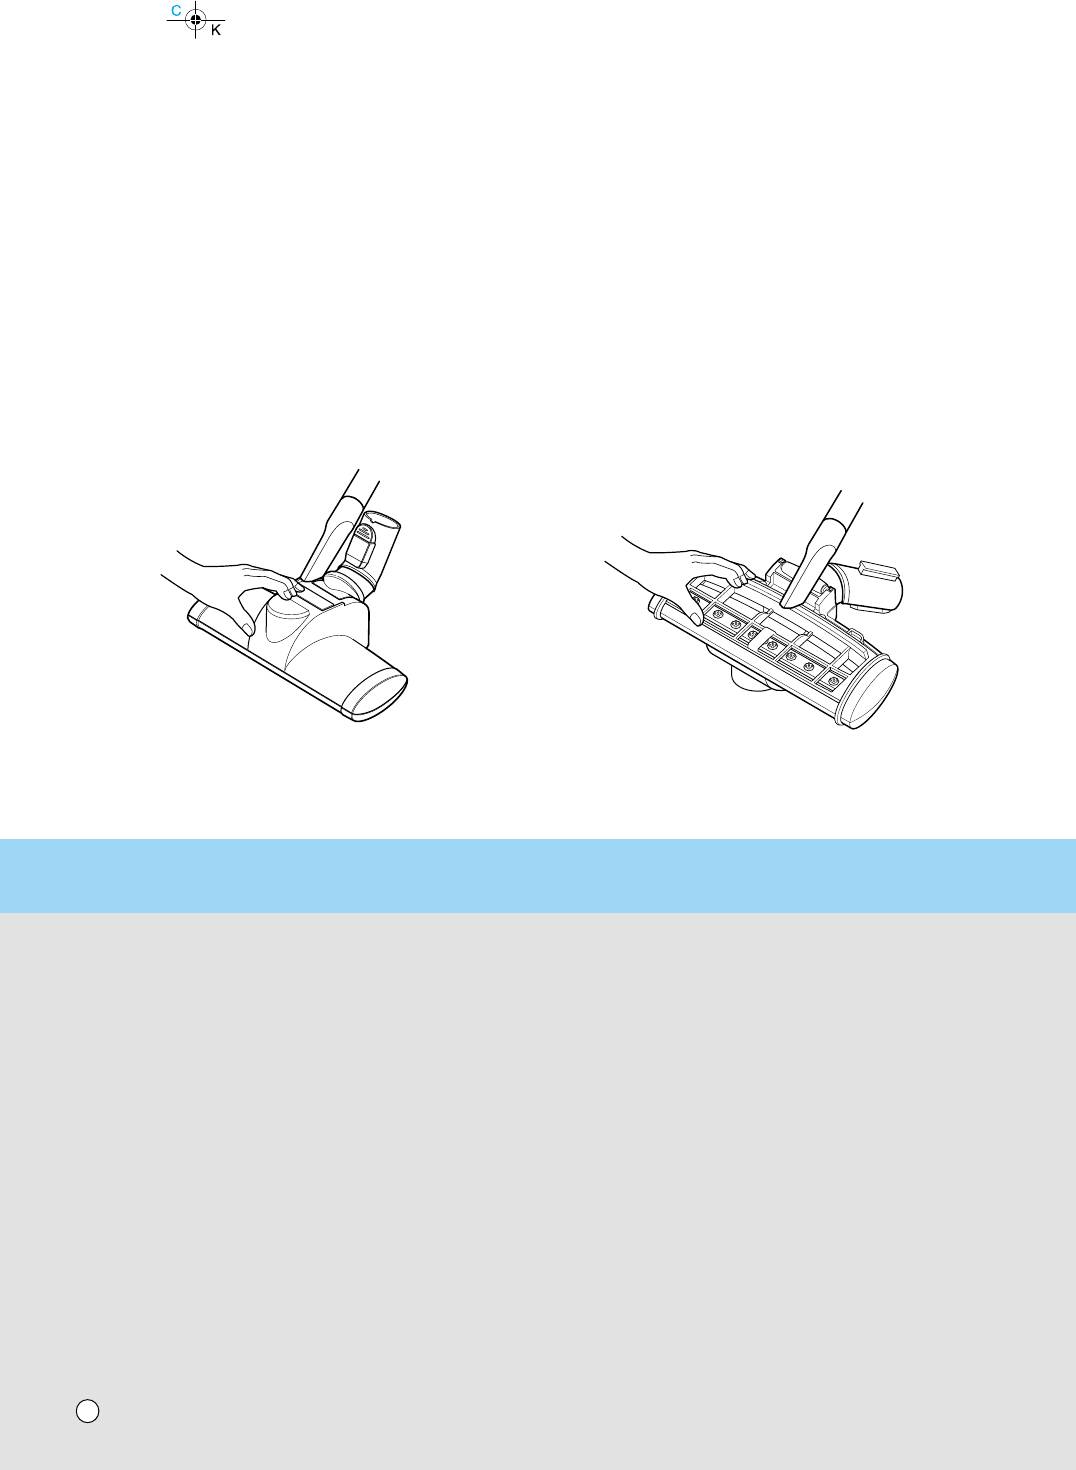
For simple cleaning of the vacuum nozzle, detach the Sani Punch nozzle from the telescopic tube and attach the crevice tool
to vacuum dust.
óÚÓ·˚ ·˚ÒÚÓ Ó˜ËÒÚËÚ¸ ̇҇‰ÍÛ SaniPunch, Ô‚ÂÌËÚ ÂÂ Ë Ò ÔÓÏÓ˘¸˛ ˘Â΂ÓÈ Ì‡Ò‡‰ÍË Ú˘‡ÚÂθÌÓ ÔÓ˜ËÒÚËÚÂ.
Top
Bottom
Çˉ Ò‚ÂıÛ
Çˉ ÒÌËÁÛ
Since the vibrator inside is composed of precision parts, never disassemble the body.
Be careful not to let foreign objects clog the air suction part on top of the vacuum nozzle.
Since removal of the punch bar may cause performance problems, do not warp or remove it.
Attach the bottom plate properly before using. Without this bottom plate, it may not function.
í‡Í Í‡Í ‚Ë·‡ÚÓ ÒÓÒÚÓËÚ ËÁ ÚÓ˜ÌÓ Ô˄̇ÌÌ˚ı ‰ÂÚ‡ÎÂÈ, ÌË ‚ ÍÓÂÏ ÒÎÛ˜‡Â ̇ ‡Á·Ë‡ÈÚ ̇҇‰ÍÛ.
ç ‰ÓÔÛÒ͇ÈÚÂ, ˜ÚÓ·˚ ÔÓÒÚÓÓÌÌË Ô‰ÏÂÚ˚ ϯ‡ÎË ‰‚ËÊÂÌ˲ ‚ÓÁ‰Ûı‡ ˜ÂÂÁ ‚ÂıÌ˛˛ ˜‡ÒÚ¸ ̇҇‰ÍË.
ç ҄˷‡ÈÚÂ Ë Ì ÒÌËχÈÚ ‚˚·Ë‚‡˛˘ËÈ ˝ÎÂÏÂÌÚ, Ú‡Í Í‡Í ˝ÚÓ ÏÓÊÂÚ ÔË‚ÂÒÚË Í Ò·ÓflÏ ‚ ‡·ÓÚÂ.
ÅÂÁ ÌËÊÌÂÈ Ô·ÒÚËÌ˚ ̇҇‰Í‡ Ì ·Û‰ÂÚ ‡·ÓÚ‡Ú¸.
Since this vacuum nozzle has been made exclusively for cleaning beds, blankets and upholstery, use it only for these cleaning purposes.
(Using it to clean the floor may result soiling it or a drop in performance, do not use it for such purposes.)
ùÚ‡ ̇҇‰Í‡ ÒÎÛÊËÚ ‰Îfl ˜ËÒÚÍË ÔÓÒÚÂÎË, Ó‰ÂflÎ Ë Ï·ÂθÌÓÈ Ó·Ë‚ÍË. èËÏÂÌflÈڠ ÚÓθÍÓ ‰Îfl ˜ËÒÚÍË ˝ÚËı ÔÓ‚ÂıÌÓÒÚÂÈ.
(óËÒÚ͇ ÔÓ· ˝ÚÓÈ Ì‡Ò‡‰ÍÓÈ ÏÓÊÂÚ ÔË‚ÂÒÚË Í Âfi Á‡ÒÓÂÌ˲ ËÎË ÒÌËÊÂÌ˲ ÁÙÙÂÍÚË‚ÌÓÒÚË Ì‡Ò‡‰ÍË
— Ì ÔËÏÂÌflÈڠ ̠ÔÓ Ì‡Á̇˜Â˲. )
16
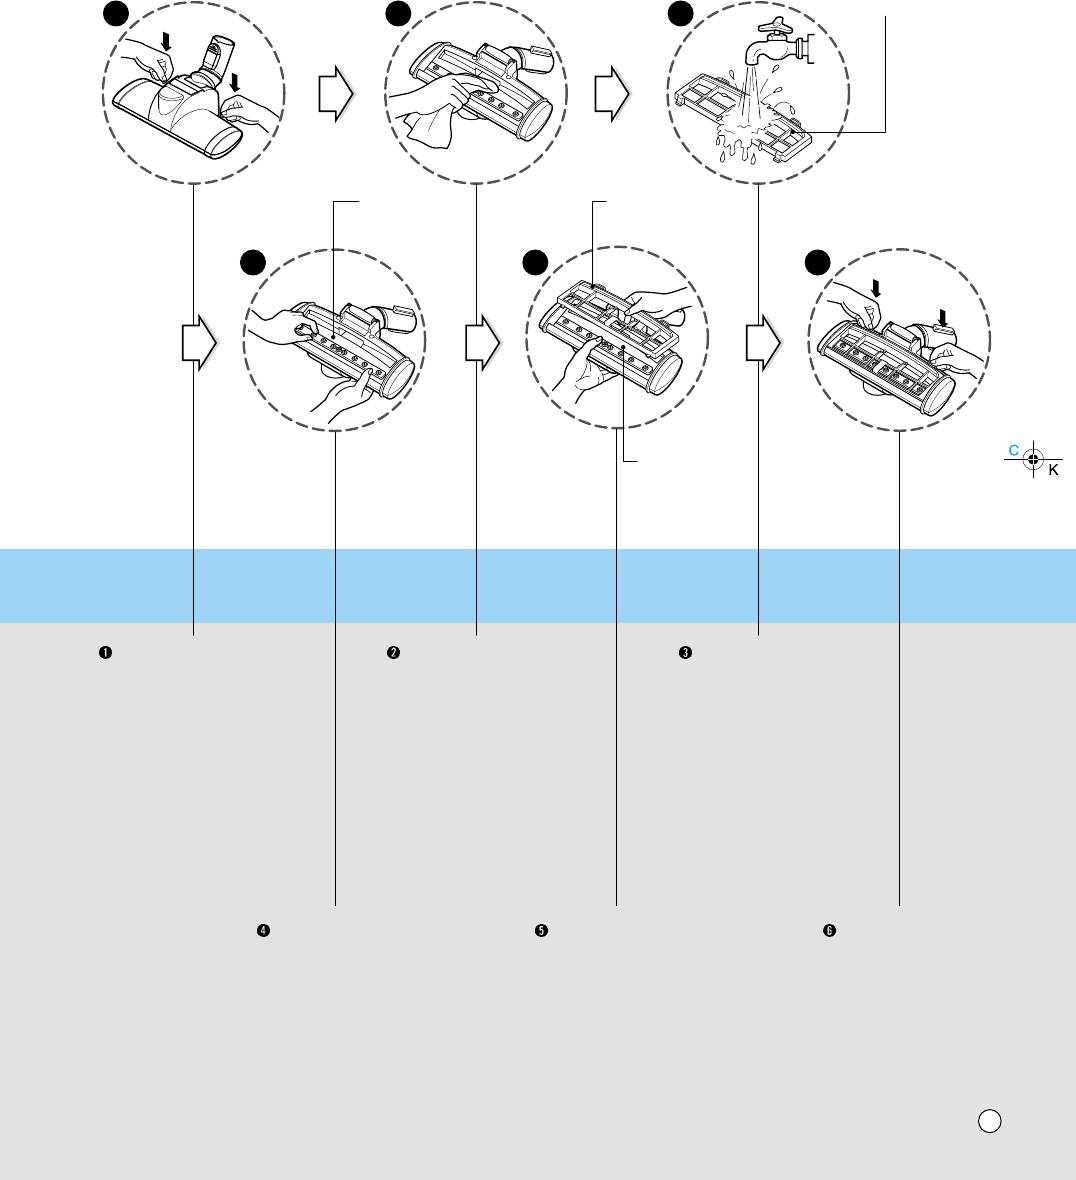
Follow the instruction below for through washing.
(Do not soak the entire body of the vacuum nozzle in water, it may cause the vibrator to malfunction)
èË Ï˚ڸ ̇҇‰ÍË Òӷ≇ÈÚ ÒÎÂ‰Û˛˘Ë ËÌÒÚÛ͈ËË.
(ç ÔÓ„ÛʇÈÚ ̇҇‰ÍÛ ‚ ‚Ó‰Û ˆÂÎËÍÓÏ, ˝ÚÓ ÏÓÊÂÚ Ôӂ‰ËÚ¸ ‚Ë·‡ÚÓ.)
Bottom plate
çËÊÌflfl Ô·ÒÚË̇
1 2 3
Punch bar
Bottom plate
Ç˚·Ë‚‡˛˘ËÈ
çËÊÌflfl Ô·ÒÚË̇
˝ÎÂÏÂÌÚ
4 5 6
Punch bar
Ç˚·Ë‚‡˛˘ËÈ
˝ÎÂÏÂÌÚ
Press the button on the
Wipe all the soiled parts
Wash the removed bot-
rear side of the vacuum
of the vacuum nozzle
tom plate with water and
nozzle to separate the
body with a cloth.
dry it.
bottom plate.
ç‡ÊÏËÚ ÍÌÓÔÍÛ Ì‡
èÓÚËÚÂ ‚ÒÂ
Á‡‰ÌÂÈ ˜‡ÒÚË Ì‡Ò‡‰ÍË
Á‡„flÁÌÂÌÌ˚ ˜‡ÒÚË
èÓÏÓÈÚ ÌËÊÌ˛˛
˜ÚÓ·˚ ÓÚÒÓ‰ËÌËÚ¸
̇҇‰ÍË ÚflÔÍÓÈ.
Ô·ÒÚËÌÛ ‚Ó‰ÓÈ Ë
ÌËÊÌ˛˛ Ô·ÒÚËÌÛ.
ÔÓÒÛ¯ËÚ ÂÂ.
Straighten the punch bar
Insert the attachment
Push down the tabs
on the lower section.
projections on bottom
to secure.
plate to the vacuum
nozzle grooves.
ìÒÚ‡ÌÓ‚ËÚÂ
ÇÒÚ‡‚¸ÚÂ
á‡ÍÂÔËÚ ÌËÊÌ˛˛
‚˚·Ë‚‡˛˘ËÈ ˝ÎÂÏÂÌÚ ‚
‚˚ÒÚÛÔ‡˛˘Û˛ ˜‡ÒÚ¸
Ô·ÒÚËÌÛ, ̇ʇ‚ ̇
ÌËÊÌÂÂ ÔÓÎÓÊÂÌËÂ.
ÌËÊÌÂÈ Ô·ÒÚËÌ˚ ‚
‚˚ÒÚÛÔ˚ ‰Ó ÛÔÓ‡.
Ô‡Á.
17
Indicator
Tank separation lever
à̉Ë͇ÚÓ
ÍÌÓÔ͇ ÒÌflÚËfl Ô˚ÎÂÒ·ÓÌË͇
Pull out
Ç˚ÌÛÚ¸
Tank handle
͇ۘ Ô˚ÎÂÒ·ÓÌË͇
Dust tank cap
ä˚¯Í‡ Ô˚ÎÂÒ·ÓÌË͇
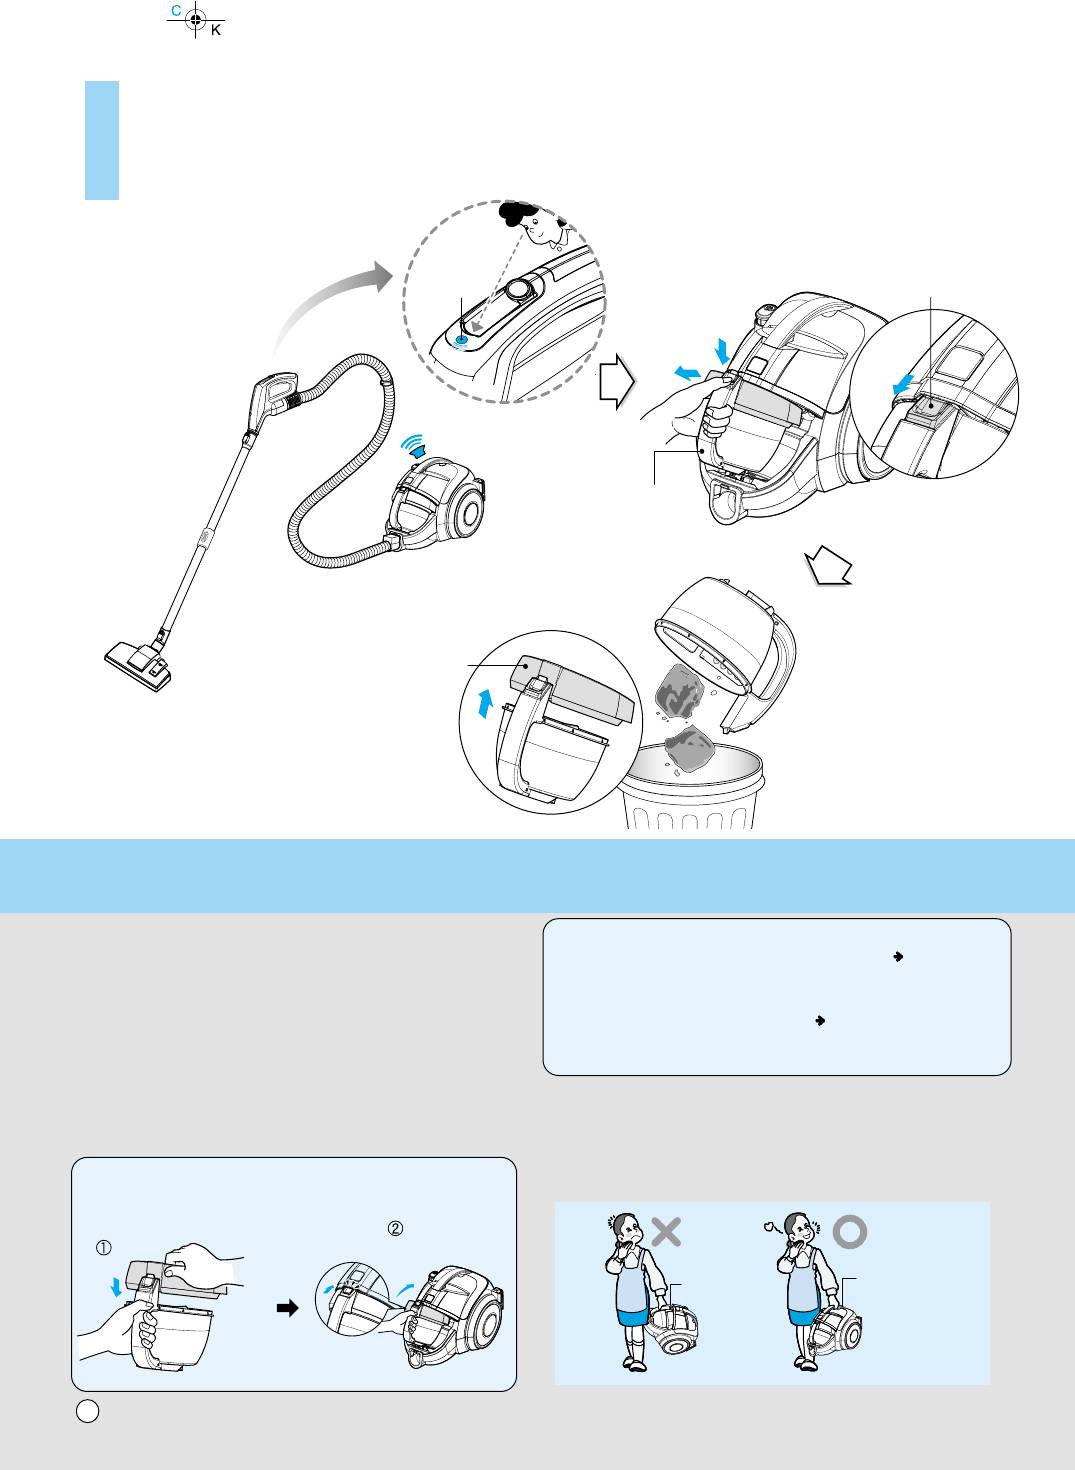
How to use Emptying dust tank
ä‡Í ÔÓθÁÓ‚‡Ú¸Òfl é˜ËÒÚ͇ ÍÓÌÚÂÈ̇ ÓÚ Ô˚ÎË
The dust tank needs emptying when indicator light is on.
NOTICE, èêàåÖóÄçàÖ
• Turn off the vacuum cleaner and unplug it.
• If suction power decreases after empting dust tank, clean dust tank next page
• Grasp the handle of the tank and then press the tank separation lever.
• Since dust tank is full, indicator continues to flash for 1 minute and suction power will
• Pull out the dust tank.
decrease for a while, then vacuum cleaner will turn itself off.
• Empty the tank and then assemble the dust tank as below
• ÖÒÎË ÔÓÒΠÓÔÛÒÚÓ¯ÂÌËfl Ô˚ÎÂÒ·ÓÌË͇ ÏÓ˘ÌÓÒÚ¸ ‚Ò‡Ò˚‚‡ÌËfl Ûԇ·, ÔÓ˜ËÒÚËÚÂ
ÍÓÌÚÂÈÌÂ Í‡Í Û͇Á‡ÌÓ Ì‡ ÒÎÂ‰Û˛˘ÂÈ ÒÚ‡ÌˈÂ.
ëÎÂ‰Û˛˘‡fl ÒÚ‡Ìˈ‡
äÓ„‰‡ Á‡„Ó‡ÂÚÒfl Ë̉Ë͇ÚÓ ÌÂÓ·ıÓ‰ËÏÓ Ó˜ËÒÚËÚ¸ Ô˚ÎÂÒ·ÓÌËÍ.
• èÓÒÍÓθÍÛ Ô˚ÎÂÒ·ÓÌËÍ Á‡ÔÓÎÌÂÌ, Ë̉Ë͇ÚÓ ÔÓ‰ÓÎʇÂÚ ÏË„‡Ú¸
‚ Ú˜ÂÌË 1 ÏËÌÛÚ ˚ Ë Ì‡ ÌÂÍÓÚÓÓ ‚ÂÏfl ÏÓ˘ÌÓÒÚ¸ ‚Ò‡Ò˚‚‡ÌËfl Ô‡‰‡ÂÚ,
• Ç˚Íβ˜ËÚ Ô˚ÎÂÒÓÒ Ë ‚˚̸Ú ‚ËÎÍÛ ËÁ ÓÁÂÚÍË.
Á‡ÚÂÏ Ô˚ÎÂÒÓÒ ‚˚Íβ˜ËÚÒfl ‡‚ÚÓχÚ˘ÂÒÍË.
• ÇÓÁ¸ÏËÚÂÒ¸ Á‡ Û˜ÍÛ Ô˚ÎÂÒ·ÓÌË͇, ‡ Á‡ÚÂÏ Ì‡ÊÏËÚ ̇ ÍÌÓÔÍÛ
ÒÌflÚËfl Ô˚ÎÂÒ·ÓÌË͇.
Moving the vacuum cleaner
• àÁ‚ÎÂÍËÚ Ô˚ÎÂÒ·ÓÌËÍ.
• Don't grasp the tank handle when you are moving the vacuum cleaner.
• é˜ËÒÚËÚ Ô˚ÎÂÒ·ÓÌËÍ, ‡ Á‡ÚÂÏ ‚ÒÚ‡‚¸ÚÂ, Í‡Í ÔÓ͇Á‡ÌÓ ÌËÊÂ.
The vacuum cleaner's body may fall when separating tank and body.
You should grasp the carrier handle when you are moving the vacuum cleaner.
èÂÂÌÓÒ͇ Ô˚ÎÂÒÓÒ‡
• He ·ÂËÚÂÒ¸ Á‡ Û˜ÍÛ Ô˚ÎÂÒ·ÓÌË͇ ÔË ÔÂÂÏ¢ÂÌËË Ô˚ÎÂÒÓÒ‡.
Assembling dust tank
äÓÔÛÒ Ô˚ÎÂÒÓÒ‡ ÏÓÊÂÚ ÛÔ‡ÒÚ¸, ÔË ˝ÚÓÏ Ô˚ÎÂÒ·ÓÌËÍ ÏÓÊÂÚ ÓÚ‰ÂÎËÚ¸Òfl ÓÚ
ÍÓÔÛÒ‡. èË ÔÂÂÌÓÒÍ Ô˚ÎÂÒÓÒ‡ ·ÂËÚÂÒ¸ ÚÓθÍÓ Á‡ Û˜ÍÛ ‰Îfl ÔÂÂÌÓÒÍË.
ìÒÚ‡Ìӂ͇ Ô˚ÎÂÒ·ÓÌË͇
18
Carrier handle
Tank handle
ê͇ۘ ‰Îfl ÔÂÂÌÓÒÍË
͇ۘ Ô˚ÎÂÒ·ÓÌË͇
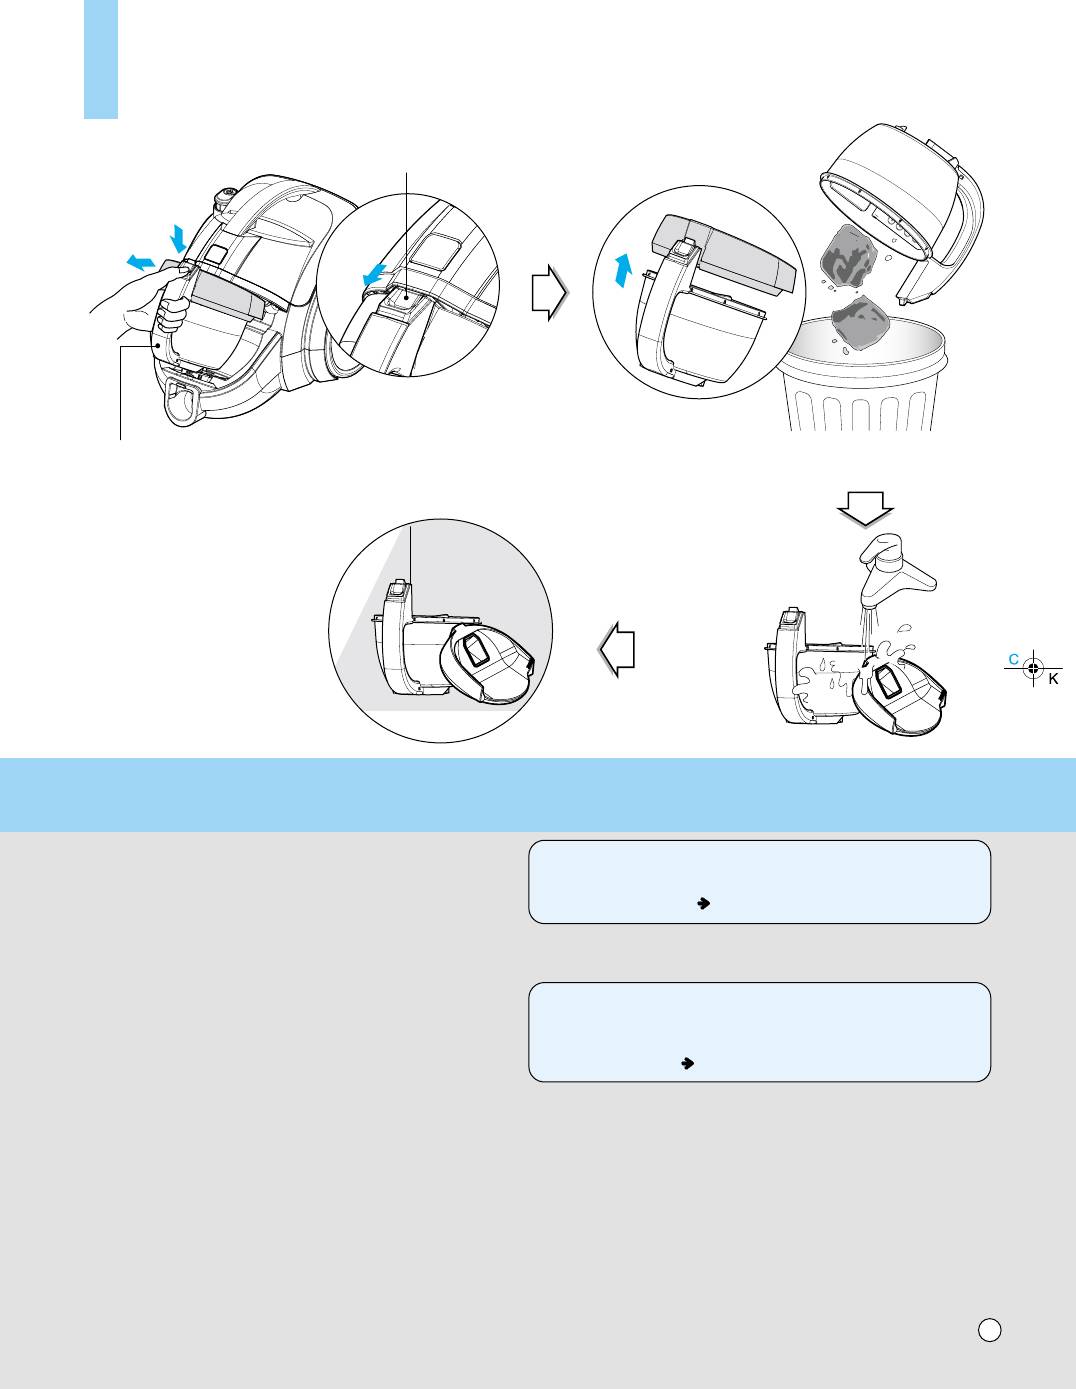
How to use Cleaning dust tank
ä‡Í ÔÓθÁÓ‚‡Ú¸Òfl óËÒÚ͇ Ô˚ÎÂÒ·ÓÌË͇
Tank separation lever
ÍÌÓÔ͇ ÒÌflÚËfl Ô˚ÎÂÒ·ÓÌË͇
Pull out
Ç˚ÌÛÚ¸
Tank handle
͇ۘ Ô˚ÎÂÒ·ÓÌË͇
• Press tank separation button and pull out dust tank.
• Raise dust tank cap
NOTICE
• Dry fully in shade so that moisture is entirely removed.
If suction power decreases after cleaning dust tank, clean air filter
and motor safety filter. Next page
• ç‡ÊÏËÚ ̇ ÍÌÓÔÍÛ ÒÌflÚËfl Ô˚ÎÂÒ·ÓÌË͇ Ë ËÁ‚ÎÂÍËÚÂ
Ô˚ÎÂÒ·ÓÌËÍ.
èêàåÖóÄçàÖ
• èÓ‰ÌËÏËÚ Í˚¯ÍÛ Ô˚ÎÂÒ·ÓÌË͇
ÖÒÎË ÏÓ˘ÌÓÒÚ¸ ‚Ò‡Ò˚‚‡ÌËfl Ûԇ· ÔÓÒΠ˜ËÒÚÍË Ô˚ÎÂÒ·ÓÌË͇,
• Ç˚ÒÛ¯ËÚ ˝ÚË ‰ÂÚ‡ÎË ‚ ÚÂÌË ‰Ó ÔÓÎÌÓ„Ó ÛÒÚ‡ÌÂÌËfl ‚·„Ë.
ÔÓ˜ËÒÚËÚ ‚ÓÁ‰Û¯Ì˚È ÙËÎ¸Ú Ë Á‡˘ËÚÌ˚È ÙËθÚ
˝ÎÂÍÚÓ‰‚Ë„‡ÚÂÎfl. ëÎÂ‰Û˛˘‡fl ÒÚ‡Ìˈ‡
19
20
Dust Seperator
è˚ÎÂÒ·ÓÌËÍ
Pre-filter cover
Guide cover
ä˚¯Í‡ Ô‰‚‡ËÚÂθÌÓ„Ó ÙËθڇ
ä˚¯Í‡ ÒÂÔ‡‡ÚÓ‡
Air filter
ÇÓÁ‰Û¯Ì˚È ÙËθÚ
Motor safety filter
ᇢËÚÌ˚È ÙËθÚ
˝ÎÂÍÚÓ‰‚Ë„‡ÚÂÎfl
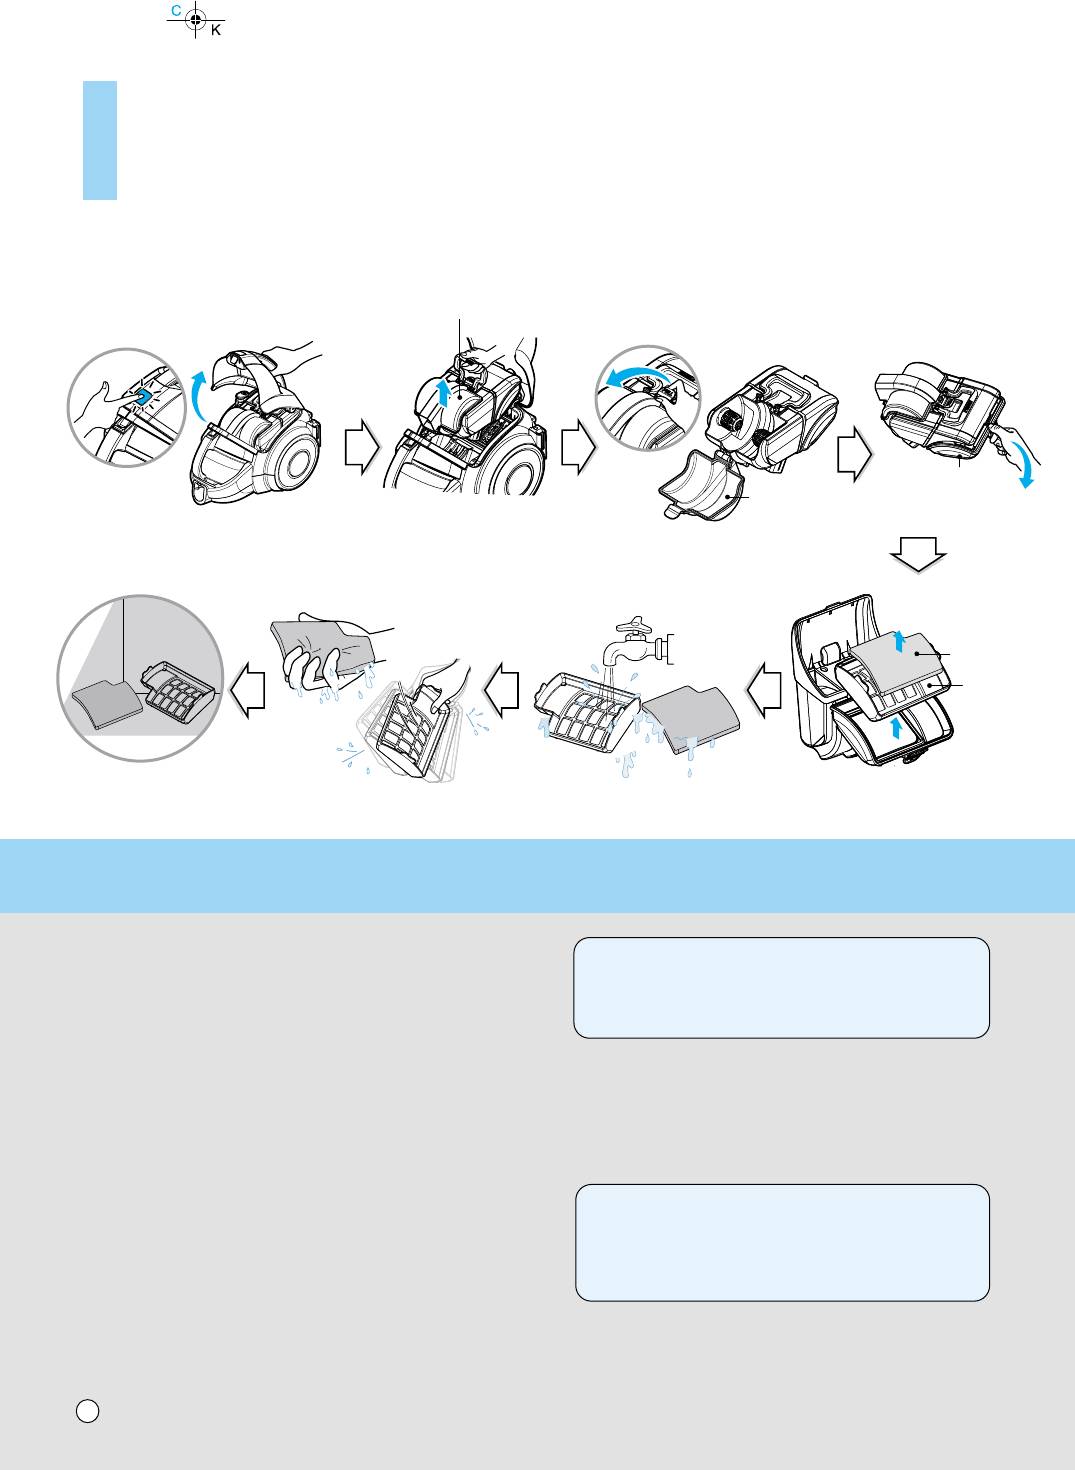
How to use Cleaning air filter and motor safety filter
ä‡Í ÔÓθÁÓ‚‡Ú¸Òfl
óËÒÚ͇ ‚ÓÁ‰Û¯ÌÓ„Ó ÙËθڇ Ë Á‡˘ËÚÌÓ„Ó ÙËθڇ ˝ÎÂÍÚÓ‰‚Ë„‡ÚÂÎfl
If suction power is decreased after cleaning dust tank or indicator light is on, clean air
filter and motor safety filter.
NOTICE
Air filter and motor safety filter are located at the up of vacuum cleaner in the above
If filters are damaged, do not use them.
figure.
In this cases, contact LG Electronics Service Agent.
• Open the Vacuum cleaner cover by pushing the button.
• Grasp the handle of the dust seperator and take out it.
Wash filters at least every 3-6 months.
• Open the guide cover by pulling the guide cover lever and remove dust.
• Open the pre filter cover by pulling the pre filter cover lever and take out pre filter assem-
bly.
• Wash air filter and motor safety filter with water.
• Do not wash filters with hot water.
• Dry fully in shade so that moisture is entirely removed.
• Air filter and motor safety filter should be cleaned in the above case.
ÖÒÎË ÒË· ‚Ò‡Ò˚‚‡ÌËfl ÛÏÂ̸¯Ë·Ҹ ÔÓÒΠӘËÒÚÍË Ô˚ÎÂÒ·ÓÌË͇ ËÎË Ò‚ÂÚÓ‚ÓÈ
Ë̉Ë͇ÚÓ ‡ÍÚË‚ÂÌ, ÔÓ˜ËÒÚËÚ ‚ÓÁ‰Û¯Ì˚È ÙËÎ¸Ú Ë Ô‰ÏÓÚÓÌ˚È ÙËθÚ.
ÇÓÁ‰Û¯Ì˚È ÙËÎ¸Ú Ë Ô‰ÏÓÚÓÌ˚È ÙËÎ¸Ú ‡ÒÔÓÎÓÊÂÌ˚ Ò‚ÂıÛ ·ÎÓ͇
‚‡ÍÛÛÏÌÓÈ Ó˜ËÒÚÍË, Í‡Í ÔÓ͇Á‡ÌÓ Ì‡ ‡ÒÔÓÎÓÊÂÌÌÓÈ ‚˚¯Â ËÎβÒÚ‡ˆËË.
èêàåÖóÄçàÖ
• éÚÍÓÈÚ Í˚¯ÍÛ ÙËθڇˆËÓÌÌÓÈ ÒËÒÚÂÏ˚, ̇ʇ‚ ̇ ÍÌÓÔÍÛ.
• ÇÁfl‚¯ËÒ¸ Á‡ Û˜ÍÛ, ‚˚Ú‡˘ËÚ ÒËÒÚÂÏÛ ÍÓÔÛÒ‡
ÖÒÎË ÙËθÚ˚ ÔÓ‚ÂʉÂÌ˚, Ì ÔÓθÁÛÈÚÂÒ¸ ËÏË.
• éÚÍÓÈÚ Í˚¯ÍÛ ÒÂÔ‡‡ÚÓ‡, ÔÓ‰ÚÓÎÍÌÛ‚ ˚˜‡„ Ë Ó˜ËÒÚËÚ ÛÒÚÓÈÒÚ‚Ó ÓÚ
Ç ˝ÚÓÏ ÒÎÛ˜‡Â, Ó·‡ÚËÚÂÒ¸ Í Ô‰ÒÚ‡‚ËÚÂβ ÔÓ
Ô˚ÎË.
ÚÂıÌ˘ÂÒÍÓÏÛ Ó·ÒÎÛÊË‚‡Ì˲ ÍÓÏÔ‡ÌËË LG Electronics.
• éÚÍÓÈÚ Í˚¯ÍÛ ÙËθڇ Ë ‚˚Ú‡˘ËÚ ÒËÒÚÂÏÛ ÙËθÚÓ‚ ̇ÛÊÛ
îËθÚ˚ ÌÂÓ·ıÓ‰ËÏÓ Ï˚Ú¸ ˜ÂÂÁ ͇ʉ˚ 3-6 ÏÂÒflˆÂ‚.
• èÓÏÓÈÚ ‚ÓÁ‰Û¯Ì˚È ÙËÎ¸Ú Ë Ô‰ÏÓÚÓÌ˚È ÙËÎ¸Ú ‚Ó‰ÓÈ
• á‡Ô¢ÂÌÓ Ï˚Ú¸ ÙËθÚ˚ „Ófl˜ÂÈ ‚Ó‰ÓÈ
• èÓÎÌÓÒÚ¸˛ ‚˚ÒÛ¯ËÚ ‚ ÚÂÌË Ë Û·Â‰ËÚÂÒ¸ ˜ÚÓ ÊˉÍÓÒÚ¸ ÔÓÎÌÓÒÚ¸˛ Û‰‡ÎÂ̇
• ÇÓÁ‰Û¯Ì˚È ÙËÎ¸Ú Ë Ô‰ÏÓÚÓÌ˚È ÙËÎ¸Ú ‰ÓÎÊÌ˚ ·˚Ú¸ Ó˜Ë˘ÂÌ˚ ̇ıÓ‰flÒ¸
‚ÌÂ ÍÓÔÛÒ‡.
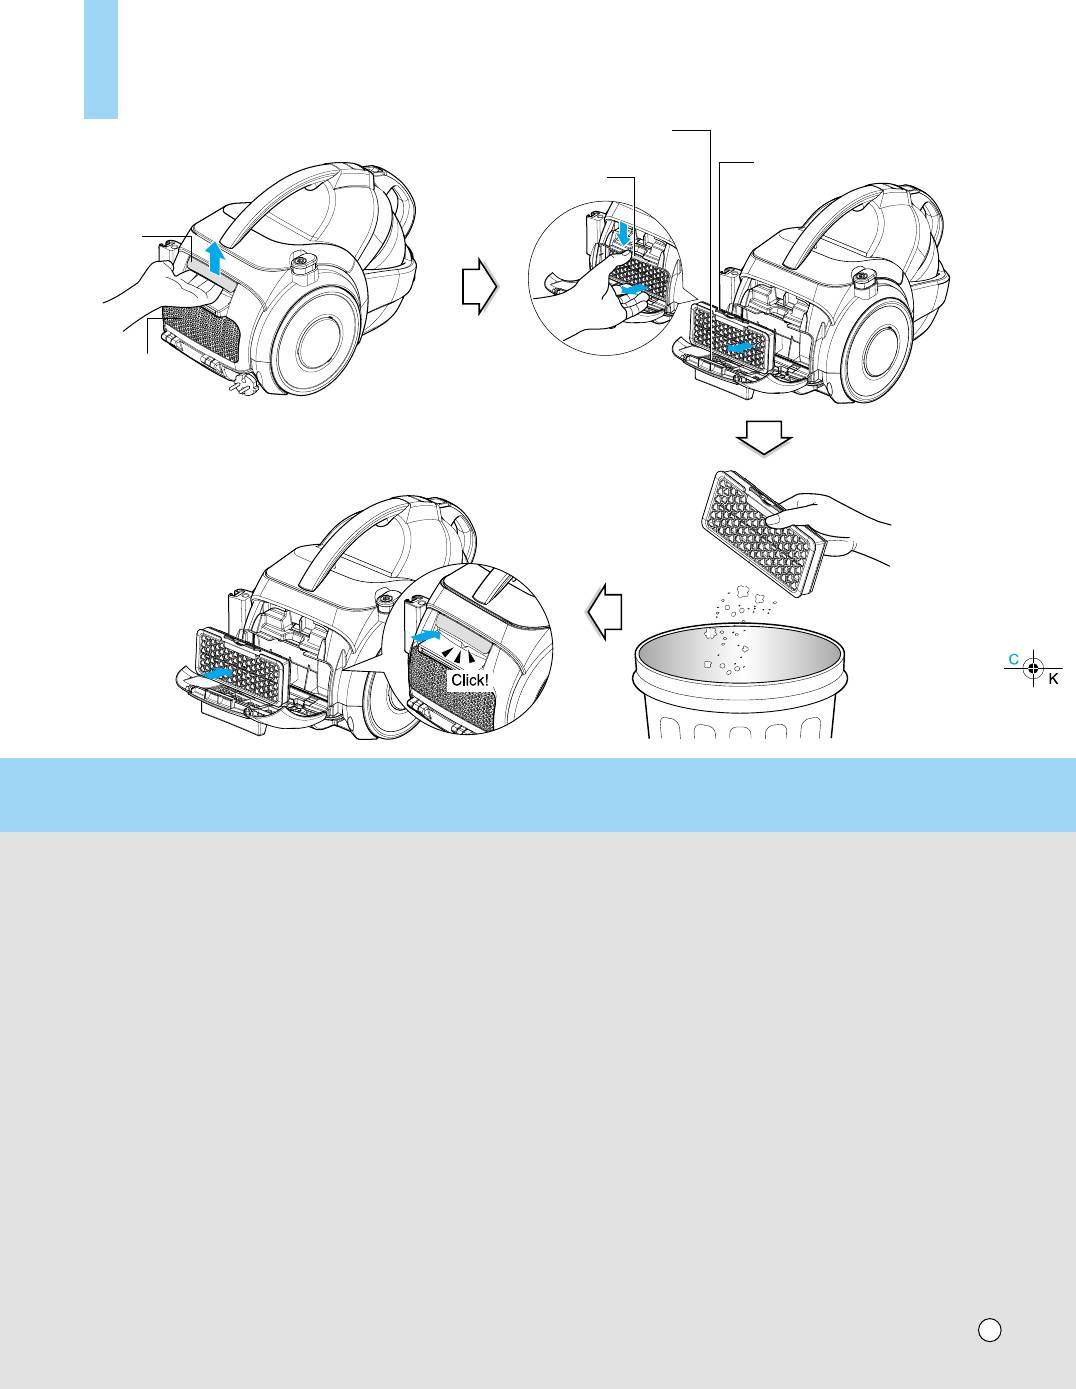
How to use Cleaning exhaust filter
ä‡Í ÔÓθÁÓ‚‡Ú¸Òfl óËÒÚ͇ ‚˚ıÓ‰ÌÓ„Ó ÙËθڇ
Exhaust filter cover
äÓÊÛı ‚˚ıÓ‰ÌÓ„Ó ÙËθڇ
Exhaust filter
Button
Ç˚ıÓ‰ÌÓÈ ÙËθÚ
äÌÓÔ͇
Lever
ê˚˜‡„
Exhaust filter cover
äÓÊÛı ‚˚ıÓ‰ÌÓ„Ó ÙËθڇ
• The exhaust filter is a reuseable.
• To clean the exhaust filter, remove the Exhaust filter cover on the body by pulling
out it.
• Separate the exhaust filter.
• Dust off filter.(Do not wash filter with water.)
• The exhaust filter should be cleaned at least a year.
Exhaust filter cover assembling
• Fit exhaust filter cover lugs to the grooves of vacuum cleaner body.
• Join it the body.
• Ç˚ıÓ‰ÌÓÈ ÙËÎ¸Ú ÔË„Ó‰ÂÌ Í ÏÌÓ„Ó‡ÁÓ‚ÓÏÛ ËÒÔÓθÁÓ‚‡Ì˲.
• óÚÓ·˚ Ó˜ËÒÚËÚ¸ ‚˚ıÓ‰ÌÓÈ ÙËθÚ, ÒÌËÏËÚÂ Â„Ó Í˚¯ÍÛ Ì‡ ÍÓÔÛÒÂ
• éÚ‰ÂÎËÚ ‚˚ıÓ‰ÌÓÈ ÙËθÚ
• é˜ËÒÚËÚÂ Â„Ó ÓÚ Ô˚ÎË. ( ÏÓÈÚ ÙËÎ¸Ú ‚Ó‰ÓÈ.)
• Ç˚ıÓ‰ÌÓÈ ÙËÎ¸Ú ÒΉÛÂÚ ˜ËÒÚËÚ¸ ‚ Ò‰ÌÂÏ 1 ‡Á ‚ „Ó‰Û
ìÒÚ‡Ìӂ͇ Í˚¯ÍË ‚˚ıÓ‰ÌÓ„Ó ÙËθڇ
• ÛÒÚ‡ÌÓ‚ËÚ ‚˚ÒÚÛÔ˚ Í˚¯ÍË ‚˚ıÓ‰ÌÓ„Ó ÙËθڇ ‚ ÔÓÂÁË Ô˚ÎÂÒÓÒ‡.
• ÔËÒÓ‰ËÌËÚ ÂÂ Í ÍÓÔÛÒÛ
21
What to do if your vacuum cleaner does not work
óÚÓ ‰Â·ڸ, ÂÒÎË ‚‡¯ Ô˚ÎÂÒÓÒ Ì ‡·ÓÚ‡ÂÚ
Check that the vacuum cleaner is plugged in correctly and that the electrical socket is working.
èӂ¸Ú ԇ‚ËθÌÓÒÚ¸ ‚Íβ˜ÂÌËfl Ô˚ÎÂÒÓÒ‡ ‚ ÒÂÚ¸ Ë ‡·ÓÚÓÒÔÓÒÓ·ÌÓÒÚ¸ ˝ÎÂÍÚ˘ÂÒÍÓÈ ÓÁÂÚÍË.
What to do when suction performance decreases
óÚÓ ‰Â·ڸ, ÍÓ„‰‡ ÒÌËʇÂÚÒfl ÏÓ˘ÌÓÒÚ¸ ‚Ò‡Ò˚‚‡ÌËfl
• Turn off the vacuum cleaner and unplug it.
• Check the telescopic pipe, flexible hose and cleaning tool for blockages or obstructions.
• Check that the dust tank is not full. Empty if necessary.
• Check that the exhaust filter is not clogged. Clean the exhaust filter if necessary.
• Check that the air filter is not clogged. Clean the air filter if necessary.
• Ç˚Íβ˜ËÚ Ô˚ÎÂÒÓÒ Ë ‚˚̸Ú ‚ËÎÍÛ ËÁ ÓÁÂÚÍË.
• èӂ¸Ú ÚÂÎÂÒÍÓÔ˘ÂÒÍÛ˛ ÚÛ·ÍÛ, „Ë·ÍËÈ ¯Î‡Ì„ Ë ˜ËÒÚfl˘Û˛ ̇҇‰ÍÛ Ì‡ ̇΢ˠÁ‡ÒÓÓ‚.
• èӂ¸ÚÂ, ˜ÚÓ·˚ Ô˚ÎÂÒ·ÓÌËÍ Ì ·˚Î Á‡ÔÓÎÌÂÌ. èË ÌÂÓ·ıÓ‰ËÏÓÒÚË Ó˜ËÒÚËÚ Ô˚ÎÂÒ·ÓÌËÍ.
• èӂ¸ÚÂ, ˜ÚÓ·˚ Ì ·˚Î Á‡ÒÓÂÌ ‚˚ıÓ‰ÌÓÈ ÙËθÚ. èË ÌÂÓ·ıÓ‰ËÏÓÒÚË ÔÓ˜ËÒÚËÚ ‚˚ıÓ‰ÌÓÈ ÙËθÚ.
• èӂ¸ÚÂ, ˜ÚÓ·˚ Ì ·˚Î Á‡ÒÓÂÌ ‚ÓÁ‰Û¯Ì˚È ÙËθÚ. èË ÌÂÓ·ıÓ‰ËÏÓÒÚË ÔÓ˜ËÒÚËÚ ‚ÓÁ‰Û¯Ì˚È ÙËθÚ.
Disposal of your old appliance
1. When this crossed-out wheeled bin symbol is attached to a product it means the product is covered by the European
Directive 2002/96/EC.
2. All electrical and electronic products should be disposed of separately from the municipal waste stream via designated
collection facilities appointed by the government or the local authorities.
3.The correct disposal of your old appliance will help prevent potential negative consequences for the environment and
human health.
4. For more detailed information about disposal of your old appliance, please contact your city office, waste disposal
service or the shop where you purchased the product.
ìÚËÎËÁ‡ˆËfl ÒÚ‡Ó„Ó ËÁ‰ÂÎËfl
1. ÖÒÎË Ì‡ ËÁ‰ÂÎËË ÂÒÚ¸ ÒËÏ‚ÓÎ Ò ËÁÓ·‡ÊÂÌËÂÏ Ô˜ÂÍÌÛÚÓ„Ó ÏÛÒÓÌÓ„Ó ·‡Í‡ ̇ ÍÓÎÂÒ‡ı, ÚÓ ˝ÚÓ ÓÁ̇˜‡ÂÚ,
˜ÚÓ ËÁ‰ÂÎË ÒÓÓÚ‚ÂÚÒÚ‚ÛÂÚ Ú·ӂ‡ÌËflÏ ÑËÂÍÚË‚˚ 2002/96/Öë.
2. ÇÒ ˝ÎÂÍÚ˘ÂÒÍËÂ Ë ˝ÎÂÍÚÓÌÌ˚ ÔË·Ó˚ ÔÓ‰ÎÂÊ‡Ú ÛÚËÎËÁ‡ˆËË ÓÚ‰ÂθÌÓ ÓÚ ·˚ÚÓ‚˚ı ÓÚıÓ‰Ó‚ ˜ÂÂÁ
ÒÔˆˇθÌ˚ ÔÛÌÍÚ˚, ̇Á̇˜ÂÌÌ˚ ԇ‚ËÚÂθÒÚ‚ÓÏ ËÎË ÏÂÒÚÌ˚ÏË ‚·ÒÚflÏË.
3. 臂Ëθ̇fl ÛÚËÎËÁ‡ˆËfl ÒÚ‡Ó„Ó ÔË·Ó‡ ÔÓÏÓÊÂÚ Ô‰ÓÚ‚‡ÚËÚ¸ ÔÓÚÂ̈ˇθÌ˚ Ì„‡ÚË‚Ì˚ ÔÓÒΉÒÚ‚Ëfl
‰Îfl ÓÍÛʇ˛˘ÂÈ Ò‰˚ Ë Á‰ÓÓ‚¸fl ˜ÂÎÓ‚Â͇.
4. ᇠ·ÓΠÔÓ‰Ó·ÌÓÈ ËÌÙÓχˆËÂÈ Ó· ÛÚËÎËÁ‡ˆËË ‚‡¯Â„Ó ÒÚ‡Ó„Ó ÔË·Ó‡, ÔÓʇÎÛÈÒÚ‡ Ó·‡ÚËÚÂÒ¸ ‚
„ÓÓ‰ÒÍÛ˛ ÒÎÛÊ·Û, ÒÎÛÊ·Û ÔÓ ÛÚËÎËÁ‡ˆËË ËÎË Ï‡„‡ÁËÌ, „‰Â ‚˚ ÔËÓ·ÂÎË ‰‡ÌÌÓ ËÁ‰ÂÎËÂ.
22

Note
èËϘ‡ÌËÂ
23

OWNER'S MANUAL
êìäéÇéÑëíÇé èéãúáéÇÄíÖãü
P/No.: MFL51190605
Made in KOREA


