LG V-C60161ND: инструкция
Раздел: Бытовая техника
Тип: Пылесос С Контейнером Для Пыли
Характеристики, спецификации
Инструкция к Пылесосу С Контейнером Для Пыли LG V-C60161ND

Model
CYKING-MINI
Language
English+RUSSIAN
Page
24 PAGE
Color(cover/body)
2/2
Material Size(W*H)
Weight
100G
190*260
Date
2009.12.29
Designer
Y.F
Part No. Description
MFL32930853
MANUAL,OWNERS
Chage Record
No. Date
Change content
ECO No.
Designer
Confirm
1
2
3
4
5
6
7
8
9
êìäéÇéÑëíÇé èé ùäëèãìÄíÄñàà
VC60***N*/H*
è˚ÎÂÒÓÒ Ò ‚ÒÚÓÂÌÌ˚Ï ÍÓÌÚÂÈÌÂÓÏ ‰Îfl Ô˚ÎË

2
4-7
8
8
10
12
13
14
15
16
17
17
19

IMPORTANT SAFETY INSTRUCTIONS
Read and follow all instructions before using your vacuum cleaner to prevent the risk of fire,electric shock, personal injury,or
damage when using the vacuum cleaner.This guide do not cover all possible conditions that may occur.Always contact your
service agent or manufacturer about problems that you do not understand. This appliance complies with the following EC
Directives:-2006/95/EC Low Voltage Directive-2004/108/EC EMC Directive
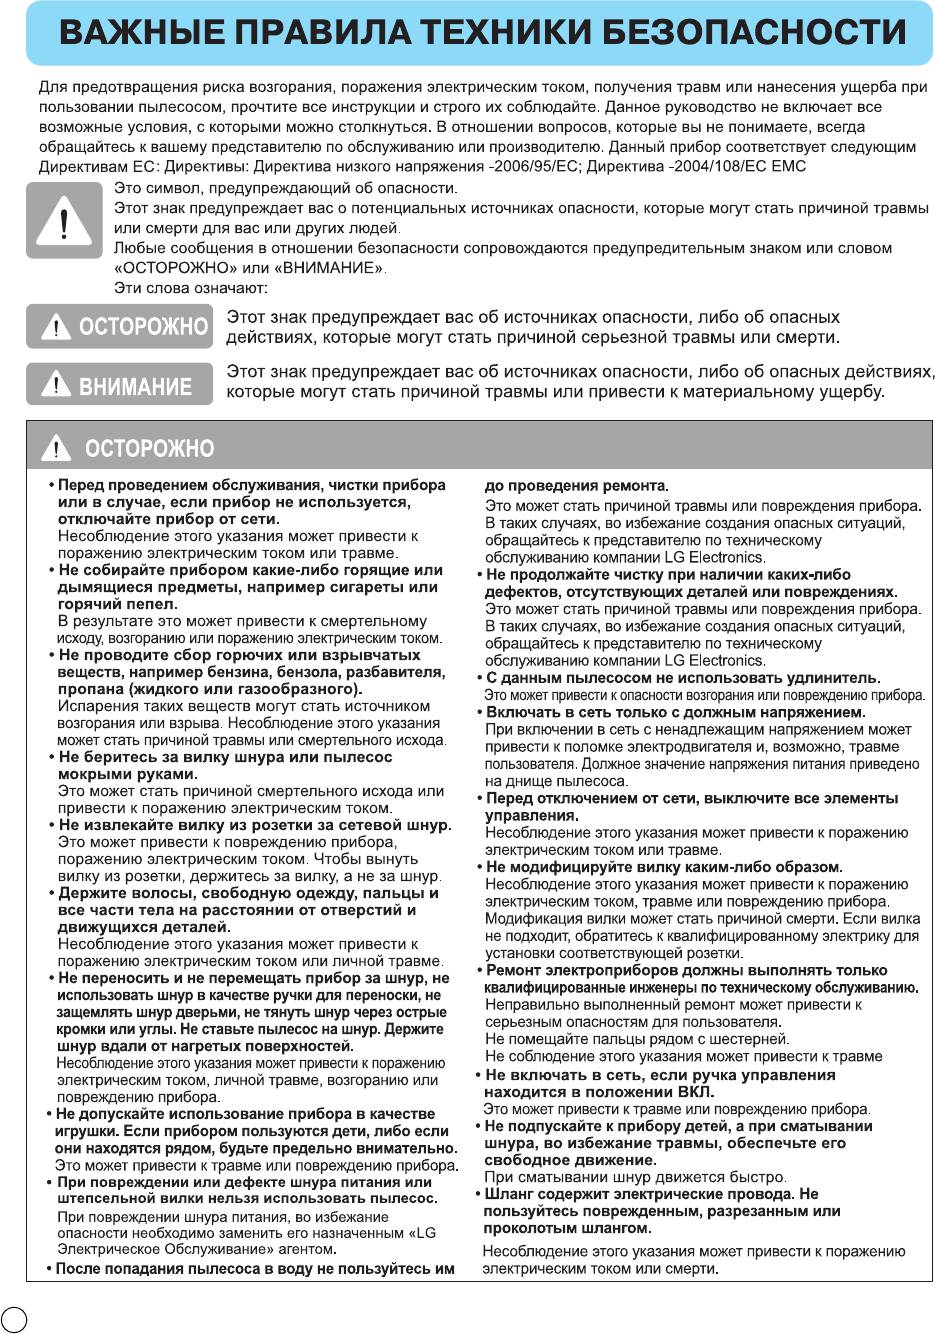
This is the safety alert symbol.
This symbol alerts you to potential hazards that can kill or hurt you and others.
All safety messages will follow the safety alert symbol and either the word “WARNING” or “CAUTION.”
These words mean:
This symbol will alert you to hazards or unsafe practices which could cause serious
WARNING
bodily harm or death.
This symbol will alert you to hazards or unsafe practices which could
CAUTION
cause bodily injury or property damage.
WARNING
•
Disconnect electrical supply before servicing or
•
Do not use vacuum cleaner if it has been under water.
cleaning the unit or when cleaner is not in use.
Personal injury or product damage could result. In these
Failure to do so could result in electrical shock or personal
cases, contact LG Electronics Service Agent to avoid hazard.
injury.
•
Do not continue to vacuum if any parts appear
•
Do not use vacuum cleaner to pick up anything that
missing or damaged.
is burning or smoking such as cigarettes, or hot
Personal injury or product damage could result. In these
ashes.
cases, contact LG Electronics Service Agent to avoid hazard.
Doing so could result in death, fire or electrical shock.
•
Do not use an extension cord with this vacuum
•
Do not vacuum flammable or explosive substances
cleaner
such as gasoline, benzene, thinners, propane
Fire hazard or product damage could result.
(liquids or gases).
•
Using proper voltage.
The fumes from these substances can create a fire hazard
Using improper voltage may result in damage to the motor
or explosion. Doing so could result in death or personal
and possible injury to the user. Proper voltage is listed on
injury.
the bottom of vacuum cleaner.
•
Do not handle plug or vacuum cleaner with wet
•
Turn off all controls before unplugging.
hands.
Failure to do so could result in electrical shock or personal injury.
Doing so could result in death or electrical shock.
•
Do not change the plug in any way.
•
Do not unplug by pulling on cord.
Failure to do so could result in electrical shock or personal
Doing so could result in product damage or electrical shock.
injury or product damage. Doing so result in death. If plug
To unplug, grasp the plug, not the cord.
does not fit, contact a qualified electrician to install the
proper outlet.
•
Keep hair, loose clothing, fingers, and all parts of
the body away from openings and moving parts.
•
Repairs to electrical appliances may only be
Failure to do so could result in electrical shock or personal
performed by qualified service engineers.
injury.
Improper repairs may lead to serious hazards for the user.
•
Do not plug in if control knob is not in OFF position.
•
Do not pull or carry by cord, use cord as a handle,
Personal injury or product damage could result.
close a door on cord, or pull cord around sharp
edges or corners. Do not run vacuum cleaner over
(Depending on model)
cord. Keep cord away from heated surfaces.
•
Keep children away and beware of obstructions
Failure to do so could result in electrical shock or personal
when rewinding the cord to prevent personal injury
injury or fire or product damage.
The cord moves rapidly when rewinding.(Depending on model)
•
Do not allow to be used as toy. Close attention is
•
The hose contains electrical wires. Do not use it if it
necessary when used by or near children.
is damaged, cut or punctured.
Personal injury or product damage could result.
Failure to do so could result in death,or electrical shock.
(Depending on model)
•
Do not use the vacuum cleaner if the power cord or
plug is damaged or faulty.
If the power cord is damaged, it must be replaced by an
approved LG Electronics Service Agent to avoid a hazard.
4

IMPORTANT SAFETY INSTRUCTIONS
CAUTION
• Do not put any objects into openings.
the bottom of stairs.
Failure to do so could result in product damage.
Failure to do so could result in personal injury or product
damage.
• Do not use with any opening blocked: keep free of
dust, lint, hair, and anything that may reduce air
• Use accessory nozzles in sofa mode.
flow.
Failure to do so could result in product damage.
Failure to do so could result in product damage.
• Make sure the filters (exhaust filter and motor safety
• Do not use vacuum cleaner without dust tank and/or
filter) are completely dry before replacing in the
filters in place.
machine.
Failure to do so could result in product damage.
Failure to do so could result in product damage.
• Do not use vacuum cleaner to pick up sharp hard
• Do not dry the filter in an oven or microwave.
objects, small toys, pins, paper clips, etc.
Failure to do so could result in fire hazard.
They may damage the cleaner or dust bin.
• Do not dry the filter in a clothes dryer.
• Store the vacuum cleaner indoors.
Failure to do so could result in fire hazard.
Put the vacuum cleaner away after use to prevent tripping
• Do not dry near an open flame.
over it.
Failure to do so could result in fire hazard.
• This appliance is not intended for use by persons
• Always clean the dust bin after vacuuming carpet
(including children) with reduced physical, sensory or
cleaners or fresheners, powders and fine dust.
mental capabilities, or lack of experience and
These products clog the filters,reduce airflow and can cause
knowledge, unless they have been given supervision
damage to the cleaner. Failure to clean the dust bin could
or instruction concerning use of the appliance by a
cause permanent damage to the cleaner.
person responsible for their safety.
(Depending on model)
Children should be supervised to ensure that they do not
play with the appliance.
• Don ’t grasp the tank handle when you are moving
the vacuum cleaner.
• Only use parts produced or recommended by LG
’
The vacuum cleaner s body may fall when separating tank
Electronics Service Agents.
and body. Personal injury or product damage could result.
Failure to do so could result in product damage.
You should grasp the carrier handle when you are
• Use only as described in this manual. Use only with
moving the vacuum cleaner.(Depending on model)
LG recommended or approved attachments and
•
If after emptying the dust tank the indicator light is
accessories.
on(red), clean the dust tank.
Failure to do so could result in personal injury or product
Failure to do so could result in product damage.
damage.
(Depending on model)
• To avoid personal injury and to prevent the machine
from falling when cleaning stairs, always place it at
Thermal protector :
This vacuum cleaner has a special thermostat that protects the vacuum cleaner in case of motor
overheating. If the vacuum cleaner suddenly shuts off, turn off the switch and unplug the vacuum cleaner.
Check the vacuum cleaner for possible source of overheating such as a full dust tank, a blocked hose or
clogged filter. If these conditions are found, fix them and wait at least 30 minutes before attempting to use
the vacuum cleaner. After the 30 minute period, plug the vacuum cleaner back in and turn on the switch.
If the vacuum cleaner still does not run, contact a qualified LG authorised Service Agent.
5
6
7
How to Use
Assembling Cleaner
àÒÔÓθÁÓ‚‡ÌË Ô˚ÎÂÒÓÒ‡
ë·Ó͇ Ô˚ÎÂÒÓÒ‡
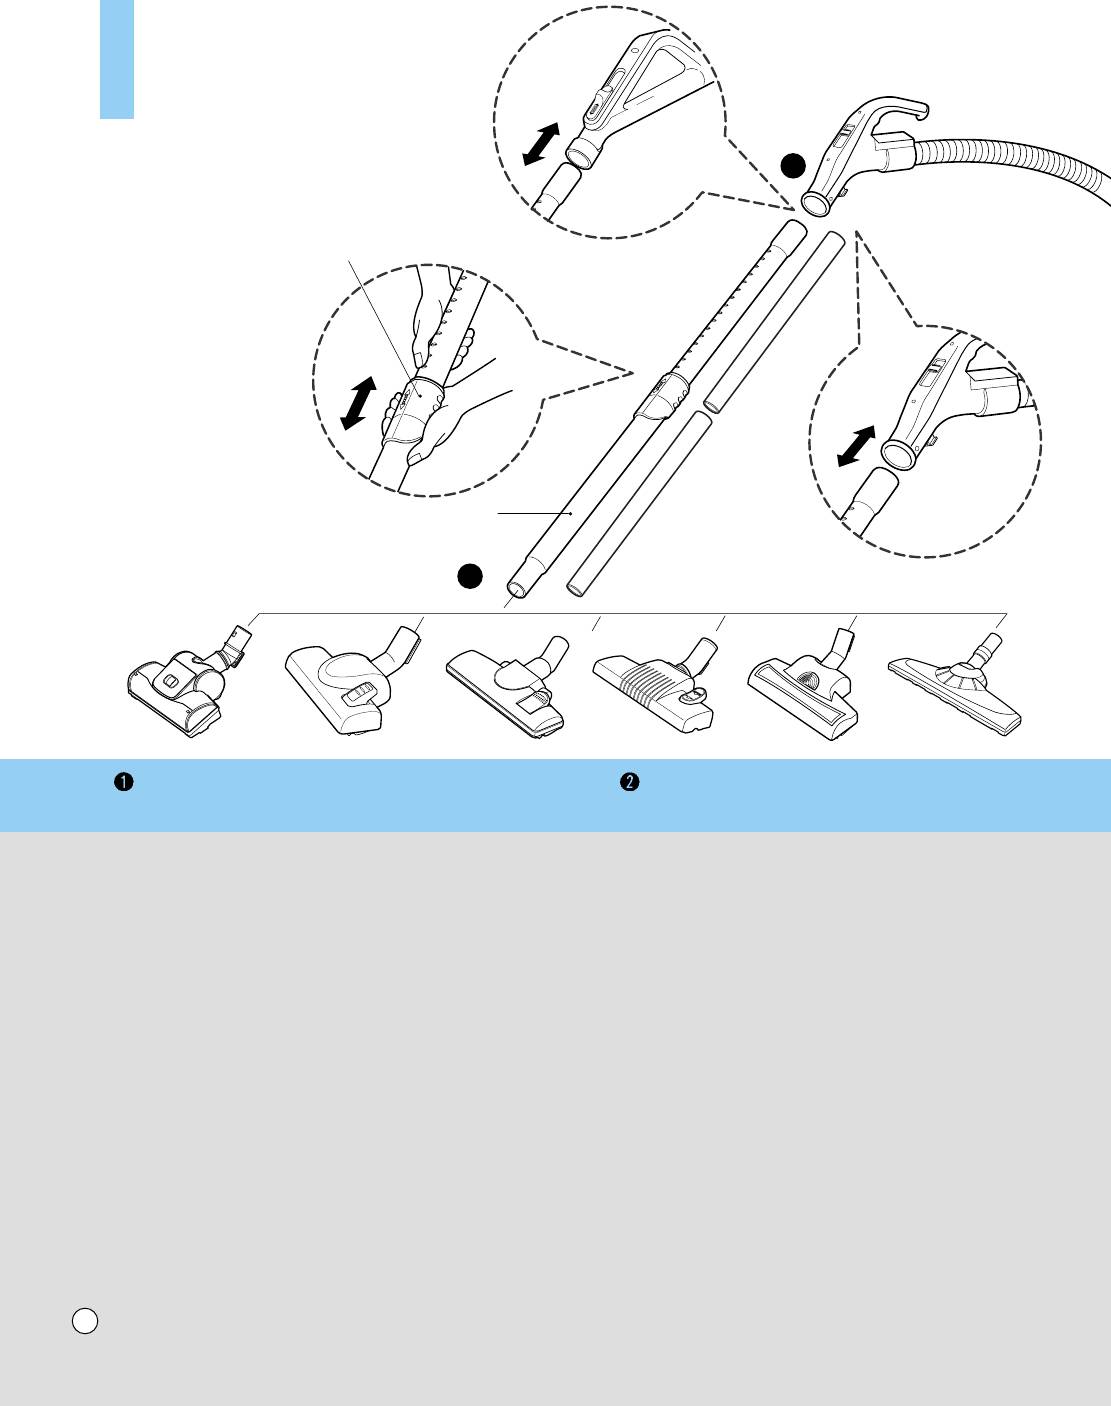
Fit the large cleaning head into the end of the tube.
ìÍÂÔËÚ ·Óθ¯Û˛ ˘ÂÚÍÛ Ì‡ ÍÓ̈ ÚÛ·ÍË.
2
Spring latch
èÛÊËÌ̇fl Á‡˘ÂÎ͇
Telescopic tube
ê‡Á‰‚ËÊ̇fl Ú۷͇
1
The 2 position head,Turbine Brush(depending on model)
Telescopic tube (depending on model)
Ñ‚ÛıÔÓÁˈËÓÌ̇fl ̇҇‰Í‡,
íÛ·Ó˘ÂÚ͇
(Ì ‚Ó ‚ÒÂı ÏÓ‰ÂÎflı)
ê‡Á‰‚ËÊ̇fl Ú۷͇ (Ì ‚Ó ‚ÒÂı ÏÓ‰ÂÎflı)
Push telescopic tube into
• Press the spring latch to release.
nozzle outlet.
• Pull out the tube to the desired length.
• Release spring latch to lock the tube in position.
• Push telescopic tube into hose handle firmly.
(depending on model)
ÇÒÚ‡‚¸Ú ‡Á‰‚ËÊÌÛ˛ ÚÛ·ÍÛ ‚ ‚˚ıÓ‰ÌÓÂ
• éÚÔÛÒÚËÚ ÔÛÊËÌÌÛ˛ Á‡˘ÂÎÍÛ.
ÓÚ‚ÂÒÚËÂ.
• Ç˚ÚflÌËÚ ÚÛ·ÍÛ ‰Ó ÌÛÊÌÓÈ ‰ÎËÌ˚.
• éÚÔÛÒÚËÚ ÔÛÊËÌÌÛ˛ Á‡˘ÂÎÍÛ ˜ÚÓ·˚
Á‡ÙËÍÒËÓ‚‡Ú¸ ÚÛ·ÍÛ ‚ ÌÛÊÌÓÏ ÔÓÎÓÊÂÌËË.
• 燉ÂÊÌÓ ‚ÒÚ‡‚¸Ú ‡Á‰‚ËÊÌÛ˛ ÚÛ·ÍÛ ‚
̇ÍÓ̘ÌËÍ ¯Î‡Ì„‡.
(Ì ‚Ó ‚ÒÂı ÏÓ‰ÂÎflı)
8

Head
ç‡Ò‡‰Í‡
Flexible Hose
ÉË·ÍËÈ ¯Î‡Ì„
(depending on model)
(Ì ‚Ó ‚ÒÂı ÏÓ‰ÂÎflı)
(depending on model)
Attachment Point
(Ì ‚Ó ‚ÒÂı ÏÓ‰ÂÎflı)
ÇıÓ‰ÌÓ ÓÚ‚ÂÒÚËÂ
Button
äÌÓÔ͇
3
Connecting the flexible hose
èËÒÓ‰ËÌÂÌË „Ë·ÍÓ„Ó ¯Î‡Ì„‡
• Push the end of the head on the flexible hose
into the attachment point on the vacuum cleaner.
CAUTION
• To remove the flexible hose from the vacuum
• Suction power may be weakened when insignificant dusts
cleaner, press on the button situated on the head,
are sucked. In this case, clean the filter.
then pull the head out of the vacuum cleaner.
• Make the dust box empty if dusts are filled to the maximum
degree and then clean the filter when it becomes 5 times.
• ÇÒÚ‡‚¸Ú ̇ÍÓ̘ÌËÍ „Ë·ÍÓ„Ó ¯Î‡Ì„‡ ‚Ó
‚ıÓ‰ÌÓ ÓÚ‚ÂÒÚË Ô˚ÎÂÒÓÒ‡.
ÇçàåÄçàÖ
• óÚÓ·˚ ÓÚÒÓ‰ËÌËÚ¸ ¯Î‡Ì„ ÓÚ Ô˚ÎÂÒÓÒ‡,
• åÓ˘ÌÓÒÚ¸ ‚Ò‡Ò˚‚‡‚ÌËfl ÏÓÊÂÚ ÛÏÂ̸¯ËÚ¸Òfl ÔË
̇ÊÏËÚ ÍÌÓÔÍÛ Ì‡ ̇ÍÓ̘ÌËÍÂ Ë ‚˚ÚflÌËÚÂ
‚Ò‡Ò˚‚‡ÌËË ÏÂÎÍÓÈ Ô˚ÎË. Ç ˝ÚÓÏ ÒÎÛ˜‡Â Ó˜ËÒÚËÚ ÙËθÚ.
Â„Ó ËÁ ÓÚ‚ÂÒÚËfl Ô˚ÎÂÒÓÒ‡.
• éÒ‚Ó·Ó‰ËÚ Ô˚ÎÂÒ·ÓÌËÍ, ÂÒÎË ÓÌ Ï‡ÍÒËχθÌÓ Ì‡ÔÓÎÌÂÌ
Ô˚θ˛, Ë Ó˜ËÒÚËÚ ÙËÎ¸Ú ÔÓÒΠÔflÚË Ú‡ÍËı ‡Á.
9
How to Use
Using the cleaning head and Accessory Nozzles
àÒÔÓθÁÓ‚‡ÌË Ô˚ÎÂÒÓÒ‡ àÒÔÓθÁÓ‚‡ÌË ˘ÂÚÍË Ë ‰ÓÔÓÎÌËÚÂθÌ˚ı ̇҇‰ÓÍ
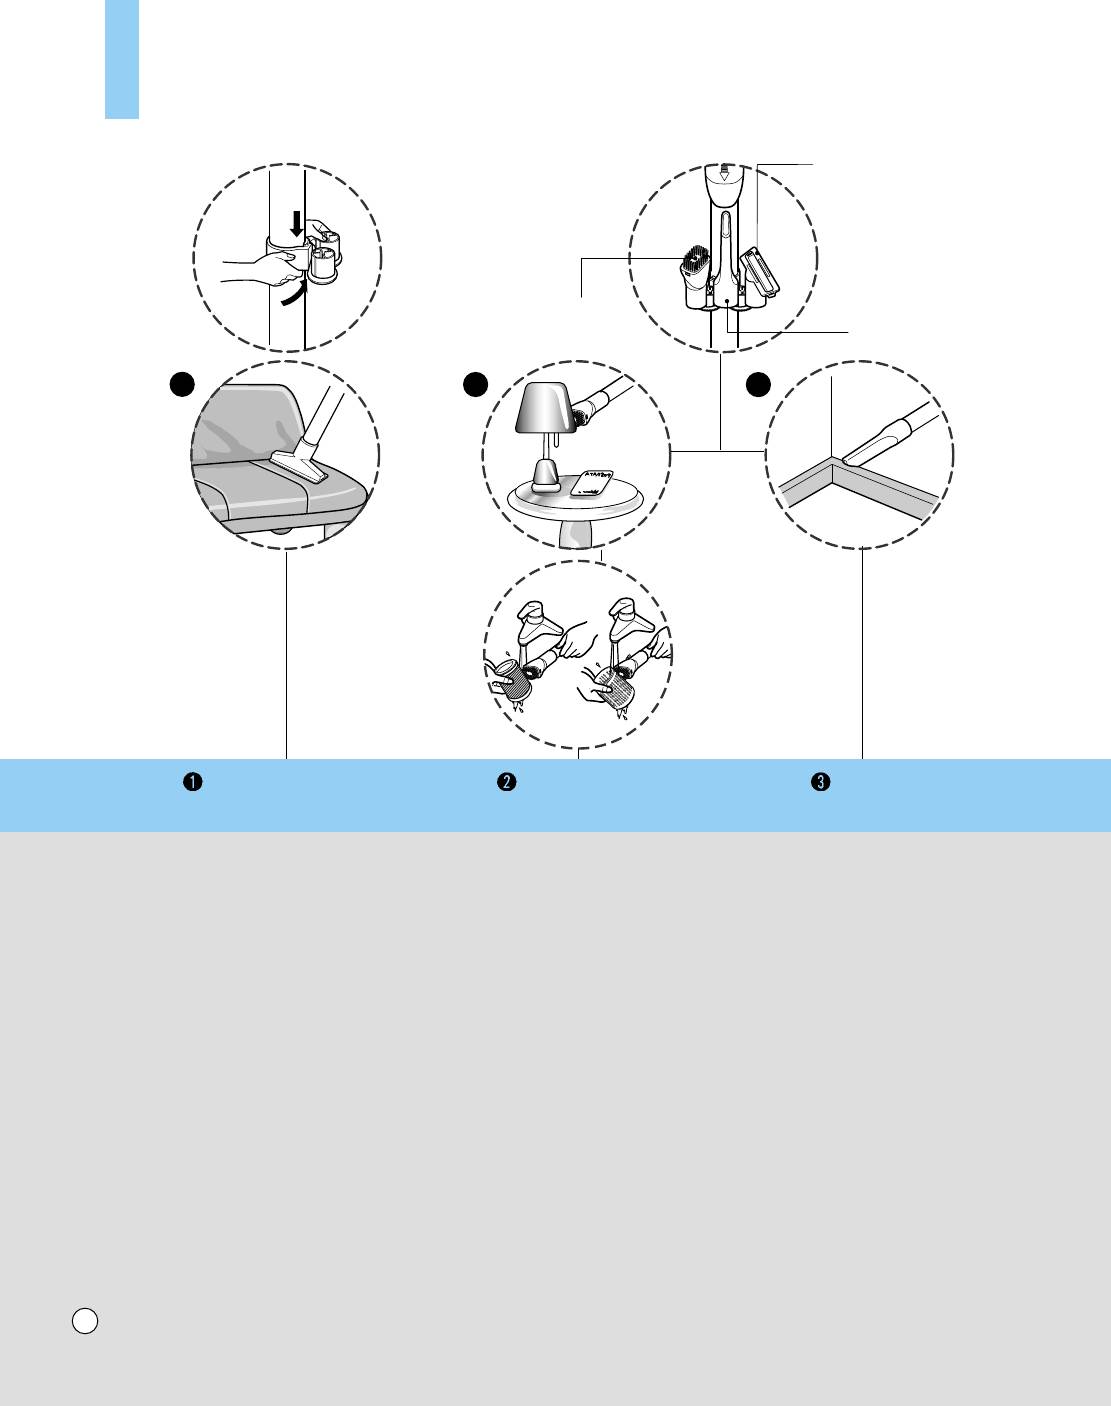
Tear the vinyl bag and pull out accessories. Attach the accessory holder onto the telescopic tube.
And then, fit the Dusting Brush, Crevice Tool and Upholstery Nozzle onto the accessory holder. Fit the accessory onto the end of the tube.
ÇÒÍÓÈÚ ÔÓÎË˝ÚËÎÂÌÓ‚˚È Ô‡ÍÂÚ Ë ‚˚̸Ú ̇҇‰ÍË. èËÒÓ‰ËÌËÚ ‰ÂʇÚÂθ ̇҇‰ÓÍ Í ‡Á‰‚ËÊÌÓÈ ÚÛ·Â á‡ÚÂÏ Á‡ÎÂÔËÚ ˘ÂÚÍÛ ‰Îfl Ô˚ÎË, ̇҇‰ÍÛ ‰Îfl
˘ÂÎÂÈ Ë ˘ÂÚÍÛ ‰Îfl ˜ËÒÚÍË Ó·Ë‚ÍË. ìÍÂÔËÚ ˘ÂÚÍÛ Ì‡ ÍÓ̈ ÚÛ·ÍË.
Upholstery nozzle
ôÂÚ͇ ‰Îfl ˜ËÒÚÍË
Ó·Ë‚ÍË Ï·ÂÎË
Dusting brush
ôÂÚ͇ ‰Îfl Ô˚ÎË
Crevice tool
ç‡Ò‡‰Í‡ ‰Îfl ˘ÂÎÂÈ
1
2
3
Upholstery Nozzle
Dusting Brush
Crevice Tool
ôÂÚ͇ ‰Îfl ˜ËÒÚÍË Ó·Ë‚ÍË Ï·ÂÎË
ôÂÚ͇ ‰Îfl Ô˚ÎË
ç‡Ò‡‰Í‡ ‰Îfl ˘ÂÎÂÈ
Upholstery Nozzle is for vacuuming
Dusting Brush is for vacuuming
Crevice Tool is for
upholstery, mattresses, etc.
picture frames, furniture frames,
vacuuming in those
The thread collectors help to pick up
books and other irregular surfaces.
normally hard-to-reach
the threads and fluff.
Dusting Brush is also used for
places such as
cleaning Filters.
reaching cobwebs, or
between the cushions
of a sofa.
ôÂÚ͇ Ô‰̇Á̇˜Â̇ ‰Îfl ˜ËÒÚÍË
ôÂÚ͇ ‰Îfl Ô˚ÎË Ô‰̇Á̇˜Â̇
ôÂÚ͇ ‰Îfl ˘ÂÎÂÈ
Ó·Ë‚ÍË, χڇÒÓ‚ Ë Ú. Ô.
‰Îfl ˜ËÒÚÍË ‡Ï ͇ÚËÌ,
Ô‰̇Á̇˜Â̇ ‰Îfl
ë·ÓÌËÍË ‚ÓÒ‡ Û‰Ó·Ì˚ ‰Îfl
Ó·‡ÏÎÂÌËÈ Ï·ÂÎË, ÍÌË„ Ë
Û·ÓÍË ‚
Û·ÓÍË ÌËÚÓÍ Ë ‚ÓÒËÌÓÍ.
‰Û„Ëı ÌÂÓ‚Ì˚ı Ô‰ÏÂÚÓ‚.
ÚÛ‰ÌÓ‰ÓÒÚÛÔÌ˚ı
ÑÎfl ˜ËÒÚÍË ÙËθÚÔÓ‚ ÏÓÊÌÓ
ÏÂÒÚ‡ı, ̇ÔËÏÂ,
Ú‡ÍÊ ËÒÔÓθÁÓ‚‡Ú¸ ÒÔˆˇθÌÛ˛
Ô‡ÛÚËÌ˚ ‚ ۄ·ı ËÎË
˘ÂÚÍÛ ‰Îfl Û‰‡ÎÂÌËfl Ô˚ÎË.
ÔÓ‰ ‰Ë‚‡ÌÓÏ.
10
6
3 4 5 6 7 81 2
(depending on model)
(depending on model)
(depending on model)
(depending on model)
(depending on model)
(Ì ‚Ó ‚ÒÂı ÏÓ‰ÂÎflı)
(Ì ‚Ó ‚ÒÂı ÏÓ‰ÂÎflı)
(Ì ‚Ó ‚ÒÂı ÏÓ‰ÂÎflı)
(Ì ‚Ó ‚ÒÂı ÏÓ‰ÂÎflı)
(Ì ‚Ó ‚ÒÂı ÏÓ‰ÂÎflı)
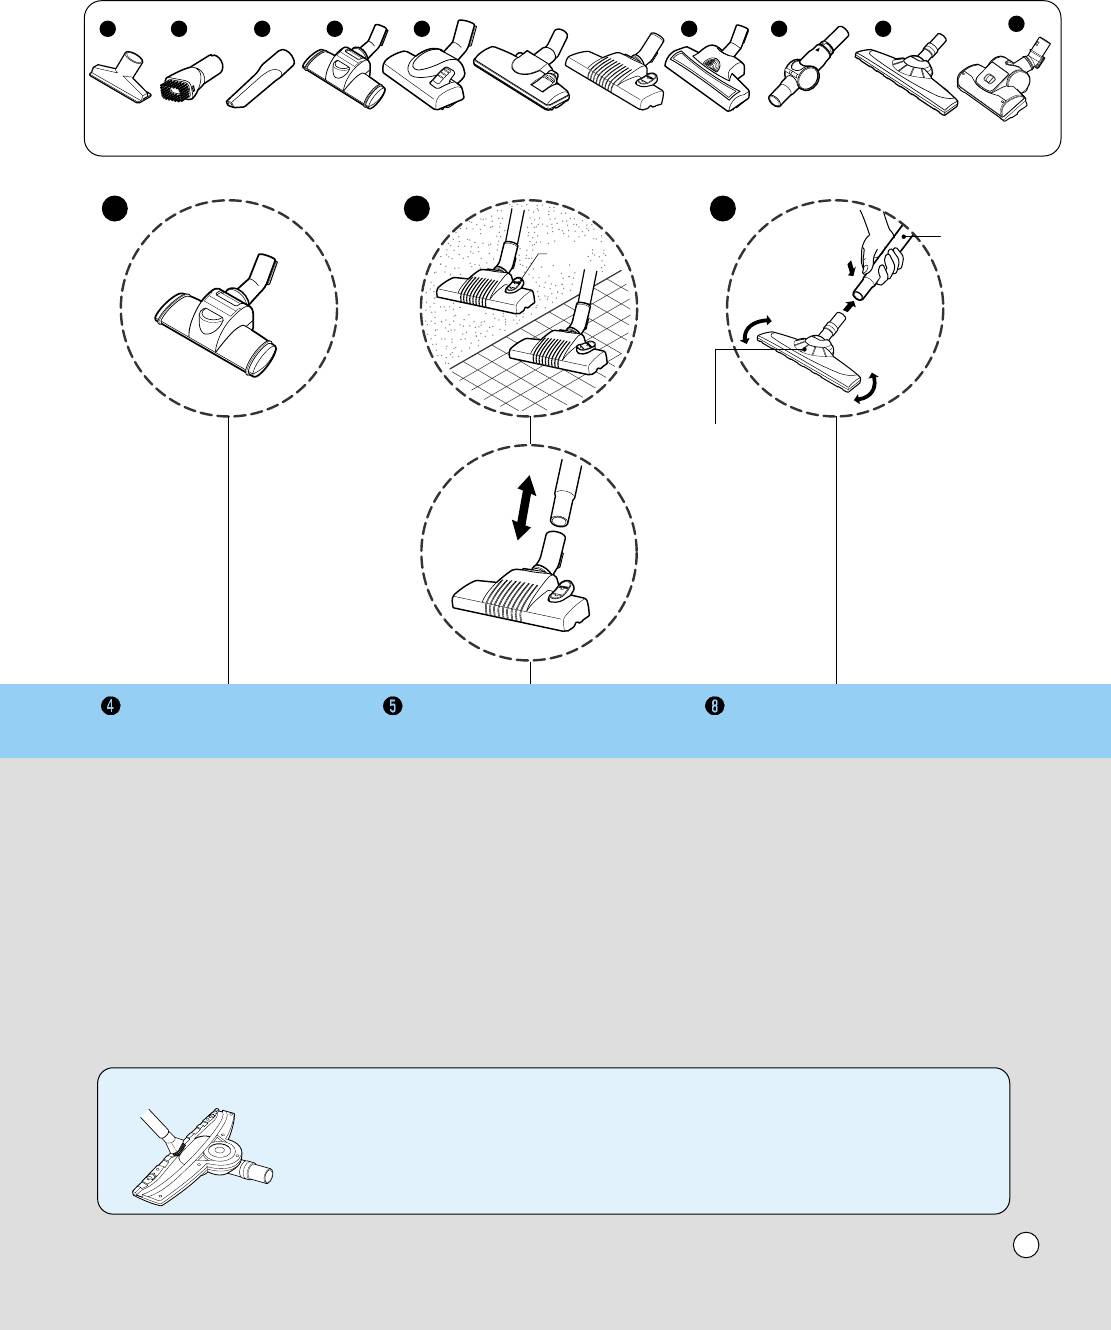
4 5 8
Pedal
Extension Pipe for
艇θ
Length Adjustment
ì ‰ÎËÌËÚÂθ̇fl Ú۷͇
‰Îfl „ÛÎËÓ‚ÍË ‰ÎËÌ˚
Suction Hole for
Device Protection
ÇÒ‡Ò˚‚‡˛˘ÂÂ
ÓÚ‚ÂÒÚËÂ
‰Îfl Á‡˘ËÚ˚
ÛÒÚÓÈÒÚ‚‡
Sani punch nozzle (depending on model)
The 2 position head (depending on model)
Suction Hole for Device Protection
ç‡Ò‡‰Í‡ Sani punch(Ì ‚Ó ‚ÒÂı ÏÓ‰ÂÎflı)
Ñ‚ÛıÔÓÁˈËÓÌ̇fl ̇҇‰Í‡(Ì ‚Ó ‚ÒÂı ÏÓ‰ÂÎflı)
ÇÒ‡Ò˚‚‡˛˘Â ÓÚ‚ÂÒÚË ‰Îfl Á‡˘ËÚ˚ ÛÒÚÓÈÒÚ‚‡
Refer to Page 13~16
• The 2 position cleaning head equipped with
You can perform cleaning at any place
a pedal which allows you to alter its position
like corner or crevice since revolution
according to the type of floor to be cleaned.
of the suction hole is free.
• Hard floor position (tiles, parquets floor)
Press the pedal to lower brush.
• Carpet or rug position
ëÏ. ÒÚ. 13-16
Press the pedal to lift the brush up.
Ç˚ ÏÓÊÂÚ ÓÒÛ˘ÂÒÚ‚ÎflÚ¸ ˜ËÒÚÍÛ ‚
β·ÓÏ ÏÂÒÚÂ, ̇ÔËÏÂ, ‚ ۄ·ı ËÎË
• Ñ‚ÛıÔÓÁˈËÓÌ̇fl ̇҇‰Í‡ Ò̇·ÊÂ̇ Ô‰‡Î¸˛,
ÚÛ‰ÌÓ‰ÓÒÚÛÔÌ˚ı ÏÂÒÚ‡ı, Ú.Í.
ÍÓÚÓ‡fl ÔÓÁ‚ÓÎflÂÚ ÏÂÌflÚ¸ ÔÓÎÓÊÂÌË ˘ÂÚÍË ‚
‚Ò‡Ò˚‚‡˛˘‡fl ̇҇‰Í‡ Ò‚Ó·Ó‰ÌÓ
Á‡‚ËÒËÏÓÒÚË ÓÚ ÚËÔ‡ ÔÓ·.
‚‡˘‡ÂÚÒfl.
• ÑÎfl ڂ‰˚ı ÔÓÍ˚ÚËÈ (ÔÎËÚÍË, Ô‡ÍÂÚ‡)
ç‡ÊÏËÚ ̇ Ô‰‡Î¸ ˜ÚÓ·˚ ‚˚‰‚ËÌÛÚ¸ ˘ÂÚÍÛ.
• èÓÎÓÊÂÌË ‰Îfl ˜ËÒÚÍË ÍÓ‚Ó‚ ËÎË Ó‰ÂflÎ
ç‡ÊÏËÚ ̇ Ô‰‡Î¸ ˜ÚÓ·˚ ÔÓ‰ÌflÚ¸ ˘ÂÚÍÛ.
1. Remove dusts accumulated where the floor surface of the suction hole for device protection is dirty.
How to Clean
2. Cleaning of the whole suction hole with water may cause failure of product performance.
Wipe it out with a dry cloth.
1. 쉇ÎËÚ ÒÍÓÔË‚¯Û˛Òfl Ô˚θ, ÍÓ„‰‡ ‡·Ó˜‡fl ÔÓ‚ÂıÌÓÒÚ¸ ‚Ò‡Ò˚‚‡˛˘ÂÈ Ì‡Ò‡‰ÍË ‰Îfl Á‡˘ËÚ˚ ËÁ‰ÂÎËfl
Á‡„flÁÌËÚÒfl.
2. Ç·Ê̇fl ˜ËÒÚ͇ ‚ÒÂÈ ‚Ò‡Ò˚‚‡˛˘ÂÈ Ì‡Ò‡‰ÍË ÏÓÊÂÚ ÔË‚ÂÒÚË Í ‚˚ıÓ‰Û ËÁ‰ÂÎËfl ËÁ ÒÚÓfl. í˘‡ÚÂθÌÓ
‚˚ÚËڠ ÒÛıÓÈ Ú̸͇˛.
11
How to Use
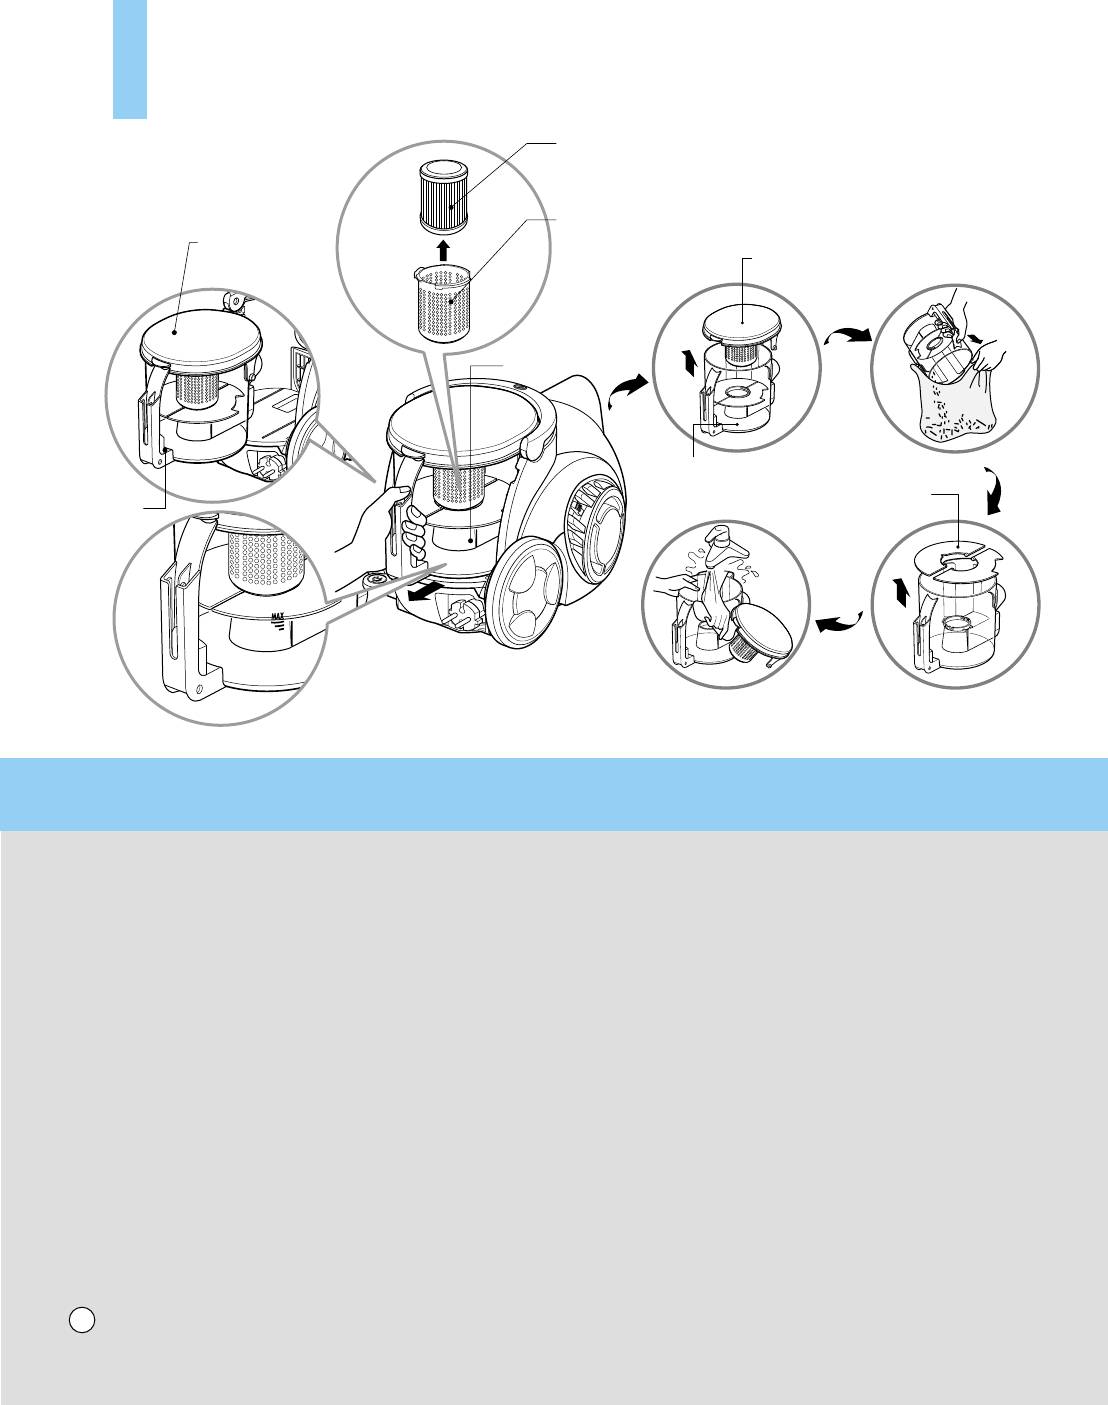
Emptying the dust chamber
àÒÔÓθÁÓ‚‡ÌË Ô˚ÎÂÒÓÒ‡ éÒ‚Ó·ÓʉÂÌË ÍÓÌÚÂÈ̇ ‰Îfl Ô˚ÎË
Pleat-shaped internal filter
ÇÌÛÚÂÌÌËÈ ÙËÎ¸Ú Ò ËÙÎÂÌÓÈ ÔÓ‚ÂıÌÓÒÚ¸˛
Circle-shaped external filter
äÛ„Î˚È ‚̯ÌËÈ ÙËÎÚ
Dust chamber cap
ä˚¯Í‡ ÍÓÌÚÂÈ̇
Dust chamber cap
‰Îfl Ô˚ÎË
ä˚¯Í‡ ÍÓÌÚÂÈ̇ ‰Îfl Ô˚ÎË
Dust chamber
äÓÌÚÂÈÌ ‰Îfl Ô˚ÎË
Dust chamber
äÓÌÚÂÈÌ ‰Îfl Ô˚ÎË
Plate
Button
è·ÒÚË̇
äÌÓÔ͇
Suction power may be weakened when insignificant dusts
• Open the dust chamber cap.
are sucked. In this case, clean the filter.
• Remove two plates from the dust chamber.
• Turn off the vacuum cleaner and unplug it.
• Wash both parts with softcloth. Gently rinse both parts
• Your vacuum cleaner is equipped with both a dust chamber
under cold running water.
and a motor filters.
Press the button and pull the dust chamber forward.
Remove the dust chamber cap.
• éÚÍÓÈÚ Í˚¯ÍÛ ÍÓÌÚÂÈ̇ ‰Îfl Ô˚ÎË.
Clean the pleat-shaped and the clrcle-shaped filters.
• ëÌËÏËÚ ‰‚ Ô·cÚËÌ˚ Ò ÍÓÌÚÂÈ̇ ‰Îfl Ô˚ÎË.
• To reinstall the dust chamber, replace the dust chamber cap
• èÓÚËÚÂ Í‡Ê‰Û˛ ‰Âڇθ Ïfl„ÍÓÈ Ò‡ÎÙÂÚÍÓÈ.
and push the dust chamber into the tank mount as far as it will
éÒÚÓÓÊÌÓ ÔÓÏÓÈÚ ӷ ˜‡ÒÚË ÔÓ‰ ÒÚÛÂÈ
go.
ıÓÎÓ‰ÌÓÈ ‚Ó‰˚.
äÓÌÚÂÈÌ ‰Îfl Ô˚ÎË ÌÂÓ·ıÓ‰ËÏÓ ÓÒ‚Ó·Óʉ‡Ú¸, ÍÓ„‰‡
Ô˚θ Á‡ÔÓÎÌËÚ Â„Ó ‰Ó ÓÚÏÂÚÍË MAX.
• Ç˚Íβ˜ËÚ Ô˚ÎÂÒÓÒ Ë ‚˚̸ÚÂ Â„Ó ‚ËÎÍÛ ËÁ ÓÁÂÚÍË.
• ÇÓ¯ Ô˚ÎÂÒÓÒ Ò̇·ÊÂÌ ÍÓÌÚÂÈÌÂÓÏ ‰Îfl Ô˚ÎË Ë ÙËθÚÓÏ
ÏÓÚÓ‡.
ç‡ÊÏËÚ ÍÌÓÔÍÛ Ì‡ Í˚¯ÍÂ Ë ÔÓÚflÌËÚ ÍÓÌÚÂÈÌ ‰Îfl
Ô˚ÎË Ì‡ Ò·fl.
ëÌËÏÚ Í˚¯ÍÛ Ò ÍÓÌÚÂÈ̇ Ë ÓÒ‚Ó·Ó‰ËÚ „Ó.
• óÚÓ·˚ ÛÒÚ‡ÌÓ‚ËÚ¸ ÍÓÌÚÂÈÌ ‰Îfl Ô˚ÎË Á‡‰‚ËÌÚ¸Â
ÍÓÌÚÂÈÌ ‚ ‰ÂʇÚÂθ ‰Ó ÛÔÓ‡.
12
How to Use
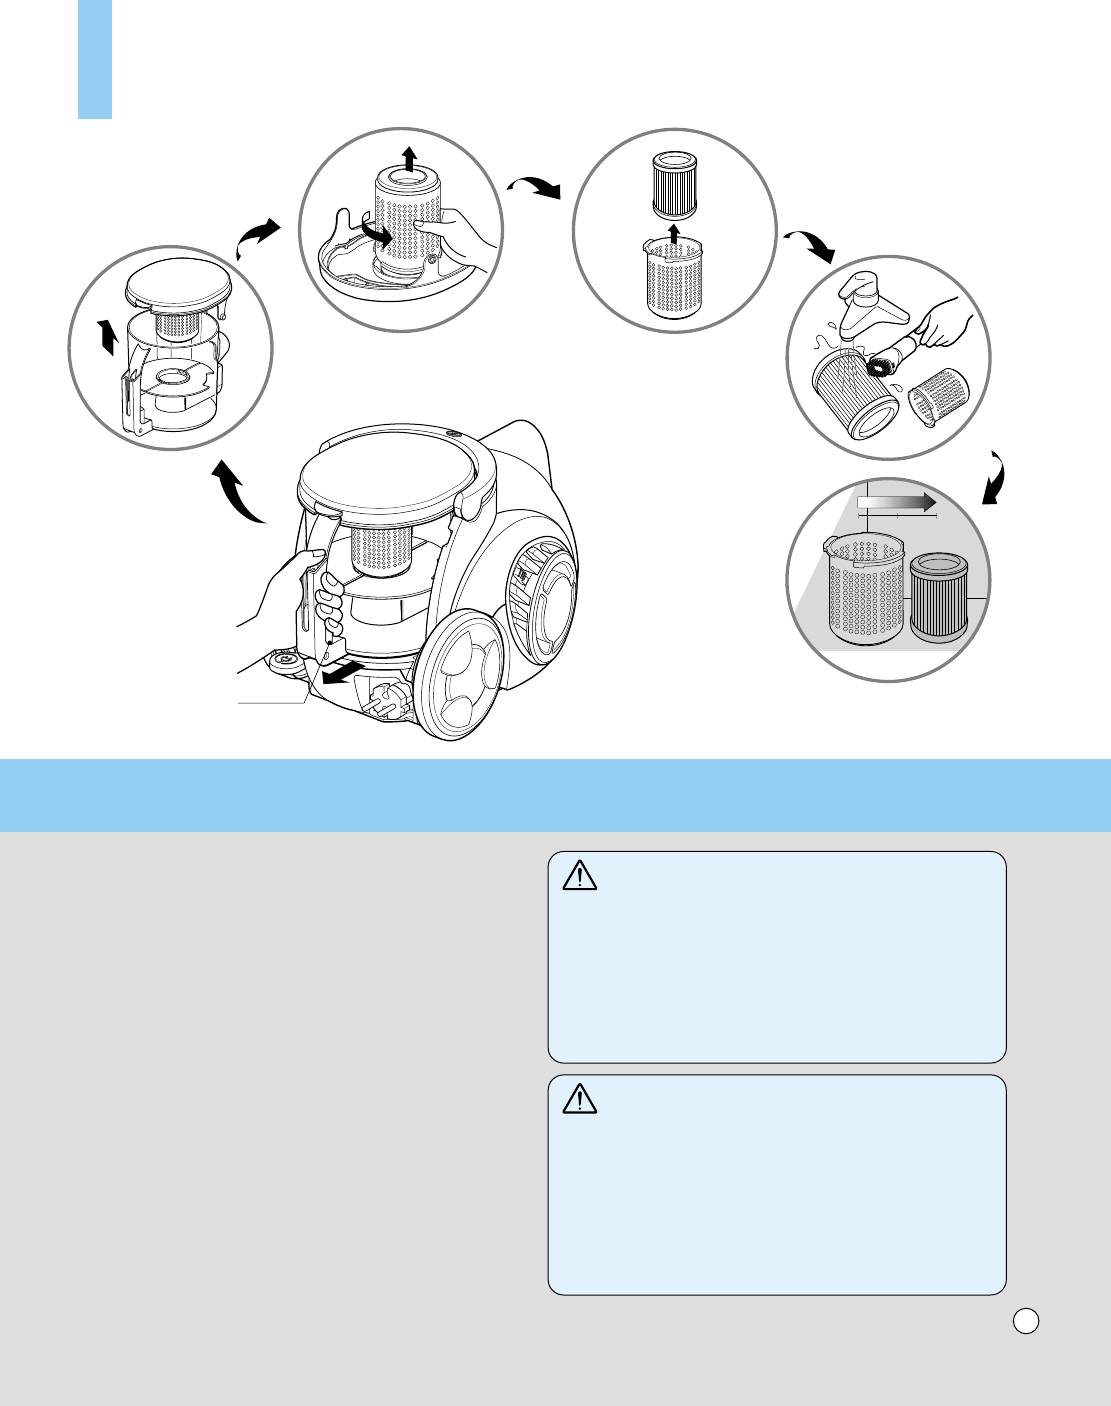
Cleaning the Filter
àÒÔÓθÁÓ‚‡ÌË Ô˚ÎÂÒÓÒ‡
é˜ËÒÚ͇ ÙËθڇ ÏÓÚÓ‡/Ç˚ÔÛÒÍÌÓ„Ó ÙËθڇ
0 12 24Hrs
Button
äÌÓÔ͇
The reusable filters are situated under the dust chamber cap and
you can use it permanently.
WARNING!
• Press the button and pull the dust chamber forward.
Gently rinse both parts separately under a cold running water until the water
• Open the dust chamber cap.
runs clear. Do not use detergent or a washing machine or dishwasher.
• Remove the filters by rotating it counter-clockwise.
Shake off excess water from the filter.
• Clean the filters with the dusting brush under cold running
Do not tumble/spindry, microwave or place in oven or on direct heat.
water.
Ensure the filter is completely dry.
• Allow the filters to dry in a shaded location for a day.
Re-assemble and place it back in your machine, filter frame.
• Make the dust chamber empty if dusts are filled to the maximum
If the filter is damaged, do not place them in the machine.
degree and then clean the filter.
Please call the Helpline.
Do not use the net-shaped filter seperately.
îËÎ¸Ú ÏÓÚÓ‡ ‡ÒÔÓÎÓÊÂÌ ÔÓ‰ ÍÓÌÚÂÈÌÂÓÏ ‰Îfl Ô˚ÎË Ë
ÇçàåÄçàÖ!
ÏÓÊÂÚ ËÒÔÓθÁÓ‚‡Ú¸Òfl ·ÂÁ Á‡ÏÂÌ˚.
• ç‡ÊÏËÚ ÍÌÓÔÍÛ Ì‡ Í˚¯ÍÂ Ë ÔÓÚflÌËÚ ÍÓÌÚÂÈÌ ‰Îfl Ô˚ÎË
ÄÍÍÛ‡ÚÌÓ ÔÓÏ˚‚‡ÈÚÂ Í‡Ê‰Û˛ ‰Âڇθ ‚ ÓÚ‰ÂθÌÓÒÚË ÔÓ‰ ÒÚÛÂÈ ıÓÎÓ‰ÌÓÈ
‚Ó‰˚ ‰Ó ÚÂı ÔÓ, ÔÓ͇ Ì ÔÓÚ˜ÂÚ ˜ËÒÚ‡fl ‚Ó‰‡. ç ÔÓθÁÛÈÚÂÒ¸ ÏÓ˛˘ËÏË
̇ Ò·fl.
Ò‰ÒÚ‚‡ÏË, Ì ÏÓÈÚ ÙËÎ¸Ú ËÎË ÔÓÍ·‰ÍÛ ‚ ÒÚˇθÌÓÈ ËÎË
• éÚÍÓÈÚ Í˚¯ÍÛ ÍÓÌÚÂÈ̇ ‰Îfl Ô˚ÎË.
ÔÓÒÛ‰ÓÏÓ˜ÌÓÈ Ï‡¯ËÌÂ. ÇÒÚflıÌËÚ ÙËθÚ, ˜ÚÓ·˚ Û‰‡ÎËÚ¸ ‚Ó‰Û.
• ëÌËÏËÚ ÙËÎ¸Ú Ò ÏÓÚÓ‡, ÔÓ‚ÂÌÛ‚ Â„Ó ÔÓÚË‚ ˜‡ÒÓ‚ÓÈ
ç ÒÛ¯ËÚÂ Â„Ó ÌË ‚ ÒÚˇθÌÓÈ Ï‡¯ËÌ ÔË ÔÓÏÓ˘Ë ˆÂÌÚËÙÛ„Ë, ÌË ‚
ÒÚÂÎÍË.
ÏËÍÓ‚ÓÎÌ‚ÓÈ Ô˜Ë, ÌË ÔË ÔÓÏÓ˘Ë ÌÂÔÓÒ‰ÒÚ‚ÂÌÌÓ„Ó Ì‡„‚‡.
• èÓÏÓÈÚ ÙËÎ¸Ú ÍËÒÚ¸˛ ÔÓ‰ ıÓÎÓ‰ÌÓÈ ‚Ó‰ÓÈ, ͇Í
ì·Â‰ËÚÂÒ¸, ˜ÚÓ ÙËÎ¸Ú Òӂ¯ÂÌÌÓ ÔÓÒÓı. ëÓ·ÂËÚÂ Â„Ó Ë ÛÒÚ‡ÌÓ‚ËÚ ‚
ÔÓ͇Á‡ÌÓ Ì‡ ËÒÛÌÍÂ.
Ô˚ÎÂÒÓÒ, ÒΉÛfl ËÌÒÚÛ͈ËË Ì‡ ÍÓÔÛÒ ÙËθڇ. Ç ÒÎÛ˜‡Â ÔÓ‚ÂʉÂÌËfl
• Ç˚ÒÛ¯ËÚ ‰ÓÒÛı‡ ‚ ÚÂÌË ‚ Ú˜ÂÌË ‰Ìfl.
ÙËθڇ Ì ÛÒڇ̇‚ÎË‚‡ÈÚÂ Â„Ó ‚ Ô˚ÎÂÒÓÒ. èÓÁ‚ÓÌËÚ ‚ ÒÎÛÊ·Û
• éÒ‚Ó·Ó‰ËÚ Ô˚ÎÂÒ·ÓÌËÍ, ÂÒÎË ÓÌ Ï‡ÍÒËχθÌÓ Ì‡ÔÓÎÌÂÌ
ÔÓ‰‰ÂÊÍË.
Ô˚θ˛, Ë Ó˜ËÒÚËÚ ÙËÎ¸Ú ÔÓÔÒΠÔflÚË Ú‡ÍËı ‡Á.
13
How to Use
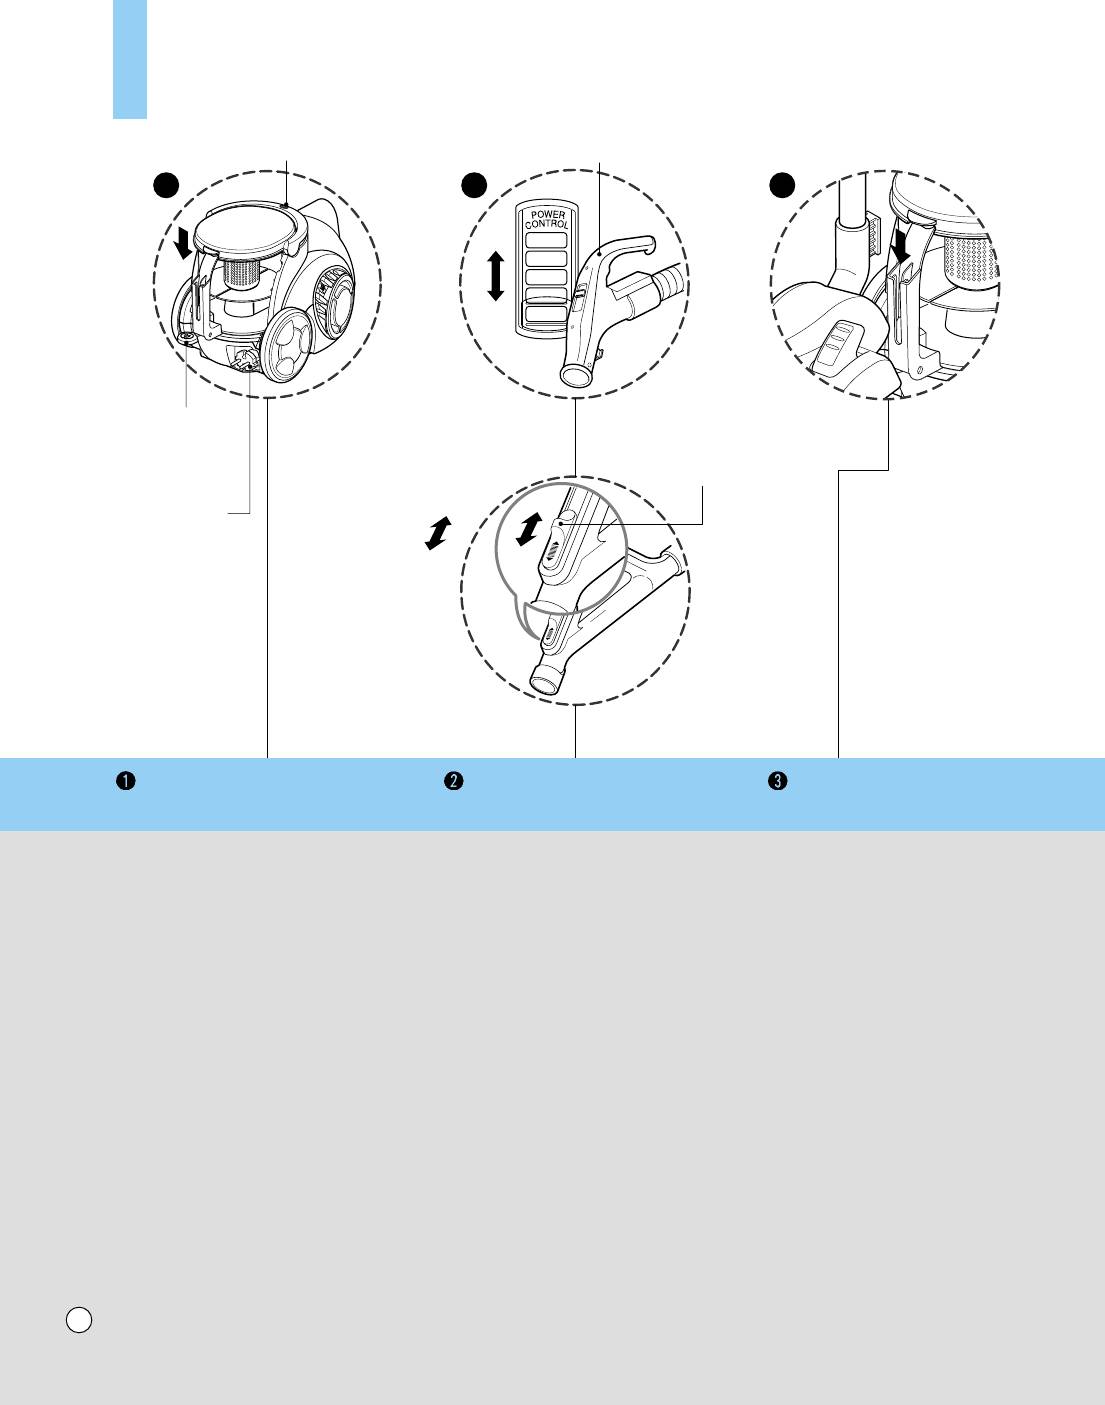
Operating the cleaner.
àÒÔÓθÁÓ‚‡ÌË Ô˚ÎÂÒÓÒ‡ ꇷÓÚ‡
Switch button
Suction control switch
äÌÓÔ͇ ‚˚Íβ˜‡ÚÂÎfl
ê„ÛÎflÚÓ ÏÓ˘ÌÓÒÚË
1 2
3
MAX
FLOOR
CARPET
SOFA
CURTAIN
MIN
OFF
Cord reel button
äÌÓÔ͇Ò
χÚ˚‚‡ÌËfl
Regulator
¯ÌÛ‡
ê„ÛÎflÚÓ
Open
éÚÍ˚Ú¸
Plug
ÇËÎ͇
á‡Í˚Ú¸
Close
How to Plug in and Use
Adjusting the Suction level(depending on model)
Park System
ÇÍβ˜ÂÌËÂ Ë ËÒÔÓθÁÓ‚‡ÌË Ô˚ÎÂÒÓÒ‡
ê„ÛÎËӂ͇ ÏÓ˘ÌÓÒÚË
(Ì ‚Ó ‚ÒÂı ÏÓ‰ÂÎflı)
ìÒÚÓÈÒÚ‚Ó «è‡ÍÓ‚ÍË»
• Pull out the power cord to the desired length
• Adjust suction with the suction
• To store after vacuuming and pause
and plug into the socket.
control switch in the hose handle.
while vacuuming.
• Push the suction control switch of the hose
(depending on model)
• For deposit after vacuuming, for
handle in the direction of the position what you
• The flexible hose handle has
example to move a small piece of
want. (depending on model)
a manual air flow regulator which
furniture or a rug, use the Park system
• To stop it, push down the suction control switch
allows you to adjust the suction level briefly.
to support the flexible hose and
in the direction of OFF.
(depending on model)
cleaning head.
(depending on model)
- Slide the hook on the large cleaning
• Press switch button to start the vacuum cleaner.
head into the slot on the rear of the
(depending on model)
dust chamber.
• To stop it, press the switch button again.
(depending on model)
• Press the cord reel button to retract the power
cord after use.
• Ç˚ÚflÌËÚ ÒÂÚ‚ÓÈ ¯ÌÛ Ì‡ Ú·ÛÂÏÛ˛ ‰ÎËÌÛ
• éÚ„ÛÎËÛÈÚ ÏÓ˘ÌÓÒÚ¸
• ï‡ÌÂÌË ÔÓÒΠ‡·ÓÚ˚ Ë ‚Ó ‚ÂÏfl
Ë ‚Íβ˜ËÚÂ Â„Ó ‚ ÓÁÂÚÍÛ.
ÔÂÂÍβ˜‡ÚÂÎÂÏ Ì‡ ۘ͠¯Î‡Ì„‡.
ÓÒÚ‡ÌÓ‚ÍË ‡·ÓÚ˚.
• èÂÂÏÂÒÚËÚ „ÛÎflÚÓ ÏÓ˘ÌÓÒÚË
(Ì ‚Ó ‚ÒÂı ÏÓ‰ÂÎflı)
• ÇÓ ‚ÂÏfl ÍÓÓÚÍËı ÔÂÂ˚‚Ó‚ ‚
‚Ò‡Ò˚‚‡ÌËfl ̇ ÛÍÓflÚÍ ‚ ÌÛÊÌÓÂ
• Ç ÛÍÓflÚÍ „Ë·ÍÓ„Ó ¯Î‡Ì„‡ ËÏÂÂÚÒfl
Û·ÓÍÂ, ̇ÔËÏÂ, ÔÓ͇ ‚˚
ÔÓÎÓÊÂÌËÂ. (Ì ‚Ó ‚ÒÂı ÏÓ‰ÂÎflı)
Û˜ÌÓÈ Â„ÛÎflÚÓ ÔÓÚÓ͇ ‚ÓÁ‰Ûı‡,
Ô‰‚Ë„‡ÂÚ ÒÚÛÎ ËÎË ÍÓ‚ËÍ,
• ÑÎfl ÓÒÚ‡ÌÓ‚ÍË ÔÂÂÏÂÒÚËÚ „ÛflÚÓ
ÍÓÚÓ˚È ÔÓÁ‚ÓÎflÂÚ Í‡ÚÍÓ‚ÂÏÂÌÌÓ
ËÒÔÓθÁÛÈÚ ÛÒÚÓÈÒÚ‚Ó
ÏÓ˘ÌÓÒÚË ‚Ò‡Ò˚‚‡ÌËfl ‚ ÔÓÎÓÊÂÌË Çõäã.
ÒÌËʇڸ ÒËÎÛ ‚Ò‡Ò˚‚‡ÌËfl.
«Ô‡ÍÓ‚ÍË», ˜ÚÓ·˚ Á‡ÍÂÔËÚ¸
(Ì ‚Ó ‚ÒÂı ÏÓ‰ÂÎflı)
(Ì ‚Ó ‚ÒÂı ÏÓ‰ÂÎflı)
„Ë·ÍËÈ ¯Î‡Ì„ Ë ˜ËÒÚfl˘Û˛ „ÓÎÓ‚ÍÛ.
• ÇÍβ˜ËÚ Ô˚ÎÂÒÓÒ, ̇ʇ‚ Â„Ó ‚˚Íβ˜‡ÚÂθ.
- ÇÒÚ‡‚¸Ú ‚˚ÒÚÛÔ, ̇ıÓ‰fl˘ËÈÒfl ̇
(Ì ‚Ó ‚ÒÂı ÏÓ‰ÂÎflı)
·Óθ¯ÓÈ ˜ËÒÚfl˘ÂÈ Ì‡Ò‡‰ÍÂ, ‚ Ô‡Á
• ÑÎfl ‚˚Íβ˜ÂÌËfl Ô˚ÎÂÒÓÒ‡ ̇ÊÏËÚ ÍÌÓÔÍÛ
̇ Á‡‰ÌÂÈ ÒÚÂÌÍ ÍÓÌÚÂÈ̇ ‰Îfl
¢ ‡Á. (Ì ‚Ó ‚ÒÂı ÏÓ‰ÂÎflı)
Ô˚ÎË.
• çÓÊÏËÚ ÍÌÓÔÍÛ Í‡ÚÛ¯ÍË Ò ÔÓ‚Ó‰ÓÏ ˜ÚÓ·˚
Û·‡Ú¸ Â„Ó ÔÓ ÓÍÓ̘‡Ì˲ ‡·ÓÚ˚.
14
How to Use
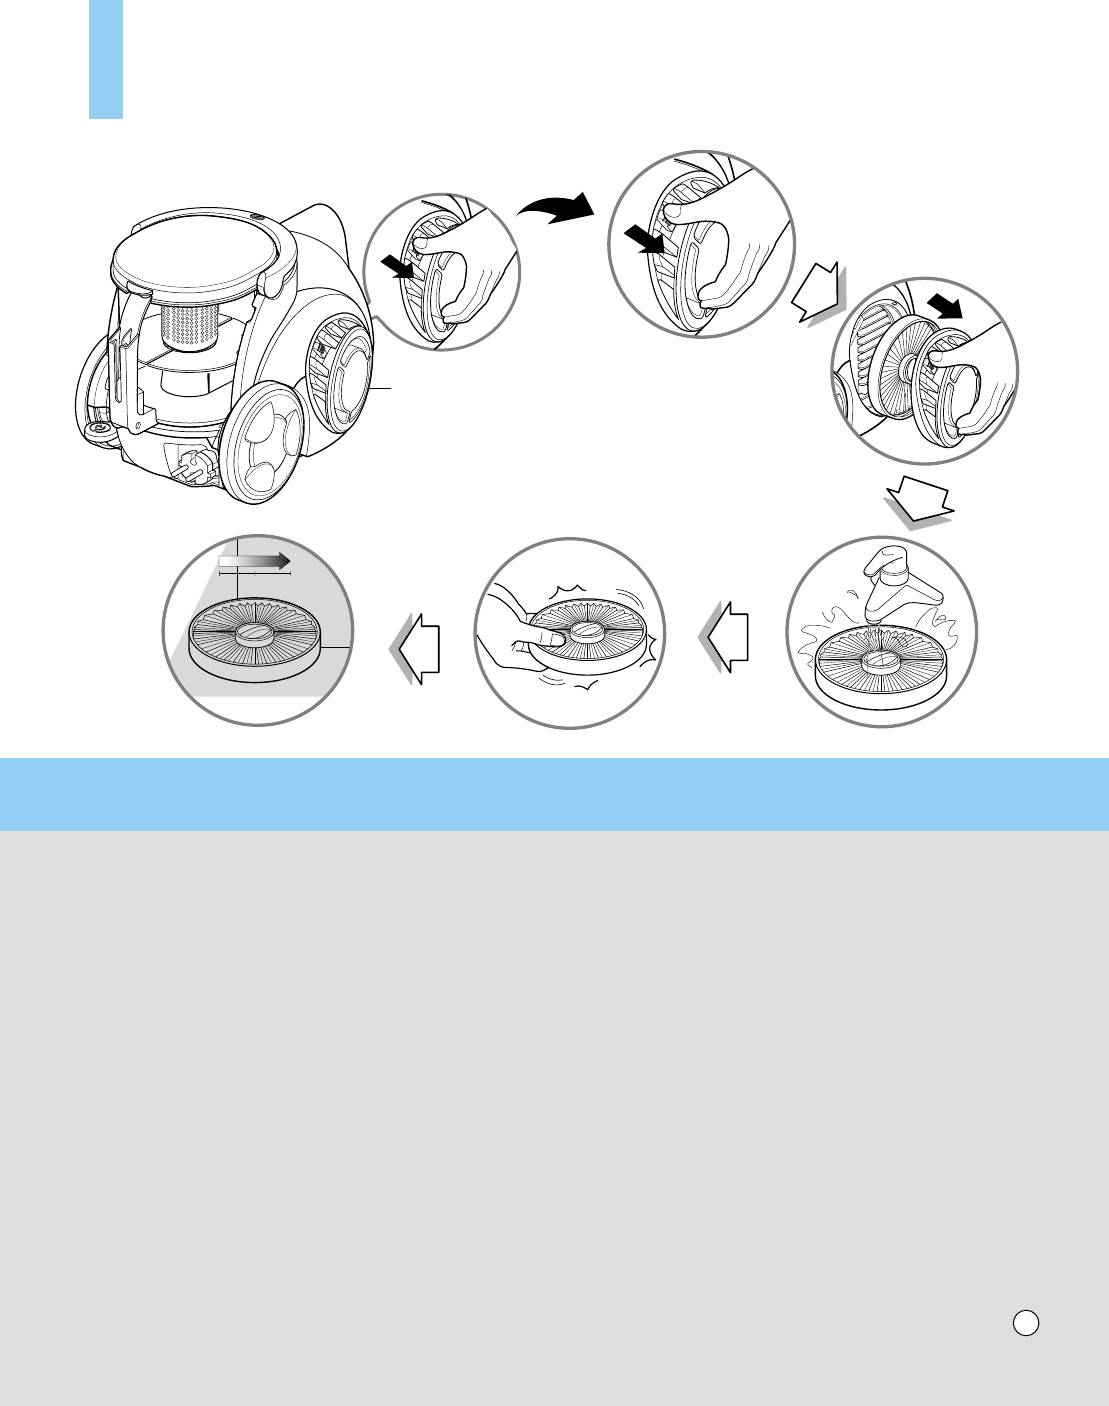
Cleaning the Exhaust Filter
àÒÔÓθÁÓ‚‡ÌË Ô˚ÎÂÒÓÒ‡ é˜ËÒÚ͇ ‚˚ÔÛÒÍÌÓ„Ó ÙËθڇ
Filter cover
ä˚¯Í‡ ÙËθڇ
0 12 24Hrs
• The exhaust filter is a washable and reusable HEPA filter.
• To change the exhaust filter, remove the filter cover on the body by release hook.
• Pull out the exhaust filter.
• Clean it with cold, running water.
Do Not use the brush
- Using the brush will cause permanent damage and allow dust to bypass the filter.
• Allow exhaust filter to dry in a shaded location for a dry.
• The exhaust filter should be cleaned at least once a year.
• Ç Í‡˜ÂÒÚ‚Â ‚˚ıÓ‰ÌÓ„Ó ÙËθڇ ËÒÔÓθÁÛÂÚÒfl ÏÌÓ„Ó‡ÁÓ‚˚È ÏÓ˛˘ËÈÒfl ÙËÎ¸Ú HEPA
• óÚÓ·˚ ‚˚ÌÛÚ¸ ÙËÎ¸Ú ÒÌËÏËÚ Í˚¯ÍÛ ÍÓÔÛÒ‡ ÙËθڇ, Ó҂ӷӉ˂ Ͳ˜ÓÍ.
• Ç˚̸Ú ‚˚ÔÛÒÍÌÓÈ ÙËθÚ.
• èÓÏÓÈÚÂ Â„Ó ıÓÎÓ‰ÌÓÈ ÔÓÚÓ˜ÌÓÈ ‚Ó‰ÓÈ.
çÖ ËÒÔÓθÁÛÈÚ ÍËÒÚ¸
- ùÚÓ Ì‡‚Ò„‰‡ ËÒÔÓÚËÚ ÙËθÚ, ҉·‚ Â„Ó ÔÓÌˈ‡ÂÏ˚Ï ‰Îfl Ô˚ÎË.
• Ç˚ÒÛ¯ËÚ ‰ÓÒÛı‡ ‚ ÚÂÌË ‚ Ú˜ÂÌË ‰Ìfl.
• Ç˚ÔÛÒÍÌÓÈ ÙËÎ¸Ú ÌÂÓ·ıÓ‰ËÏÓ ÏÂÌflÚ¸ Í‡Í ÏËÌËÏÛÏ Ó‰ËÌ ‡Á ‚ „Ó‰.
15
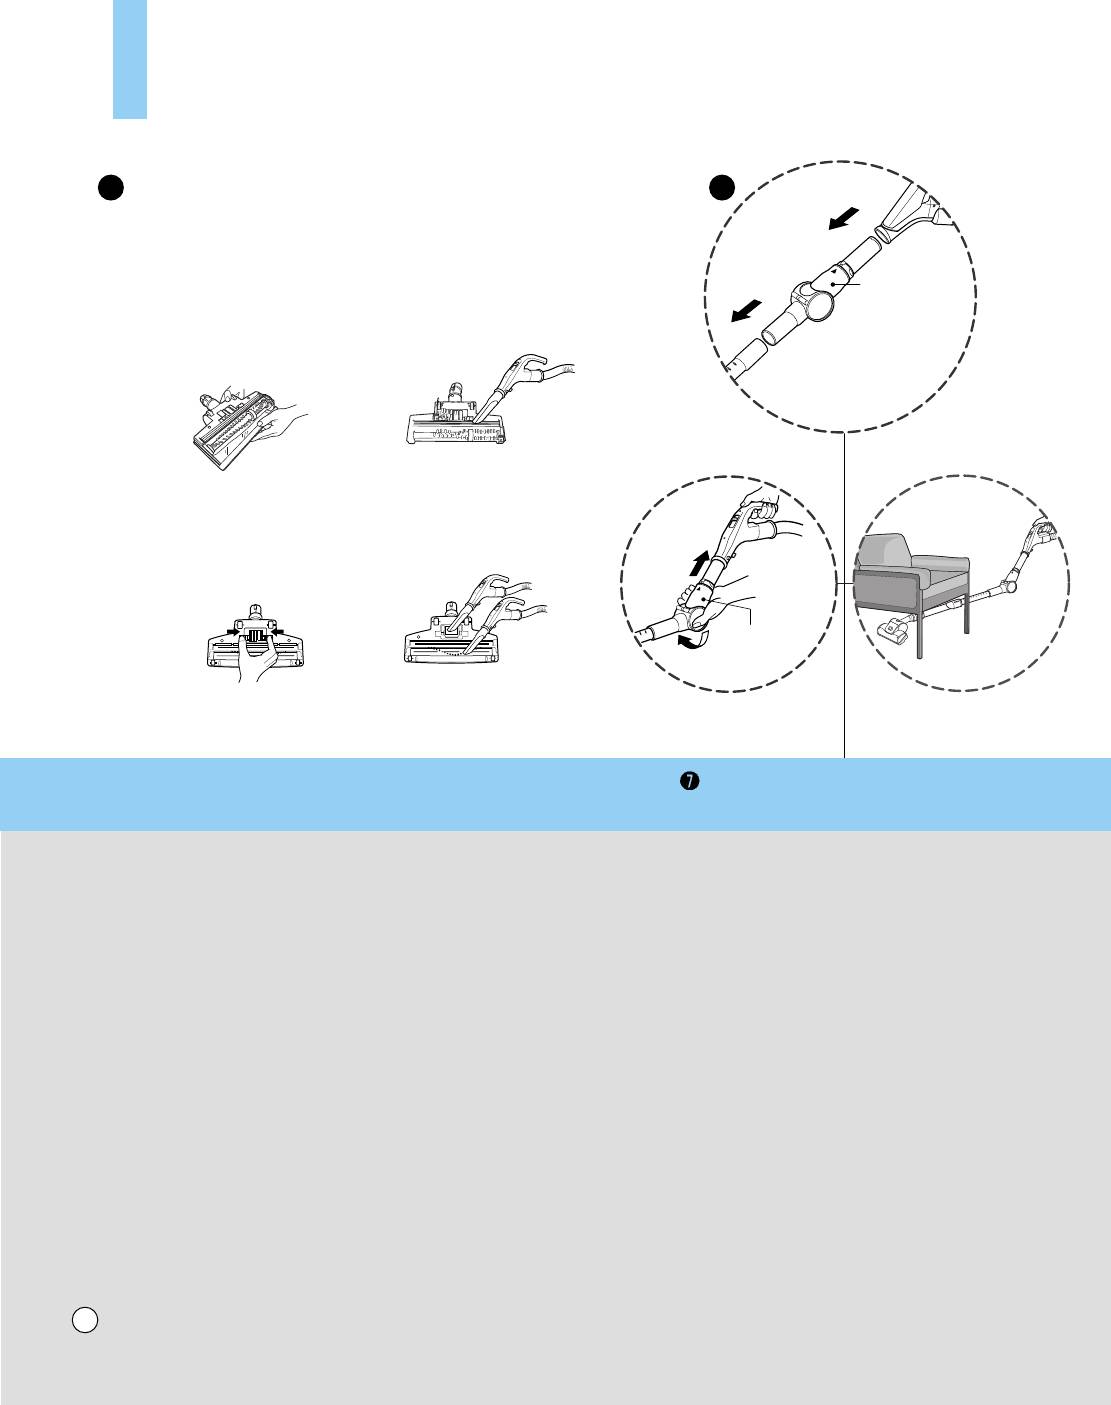
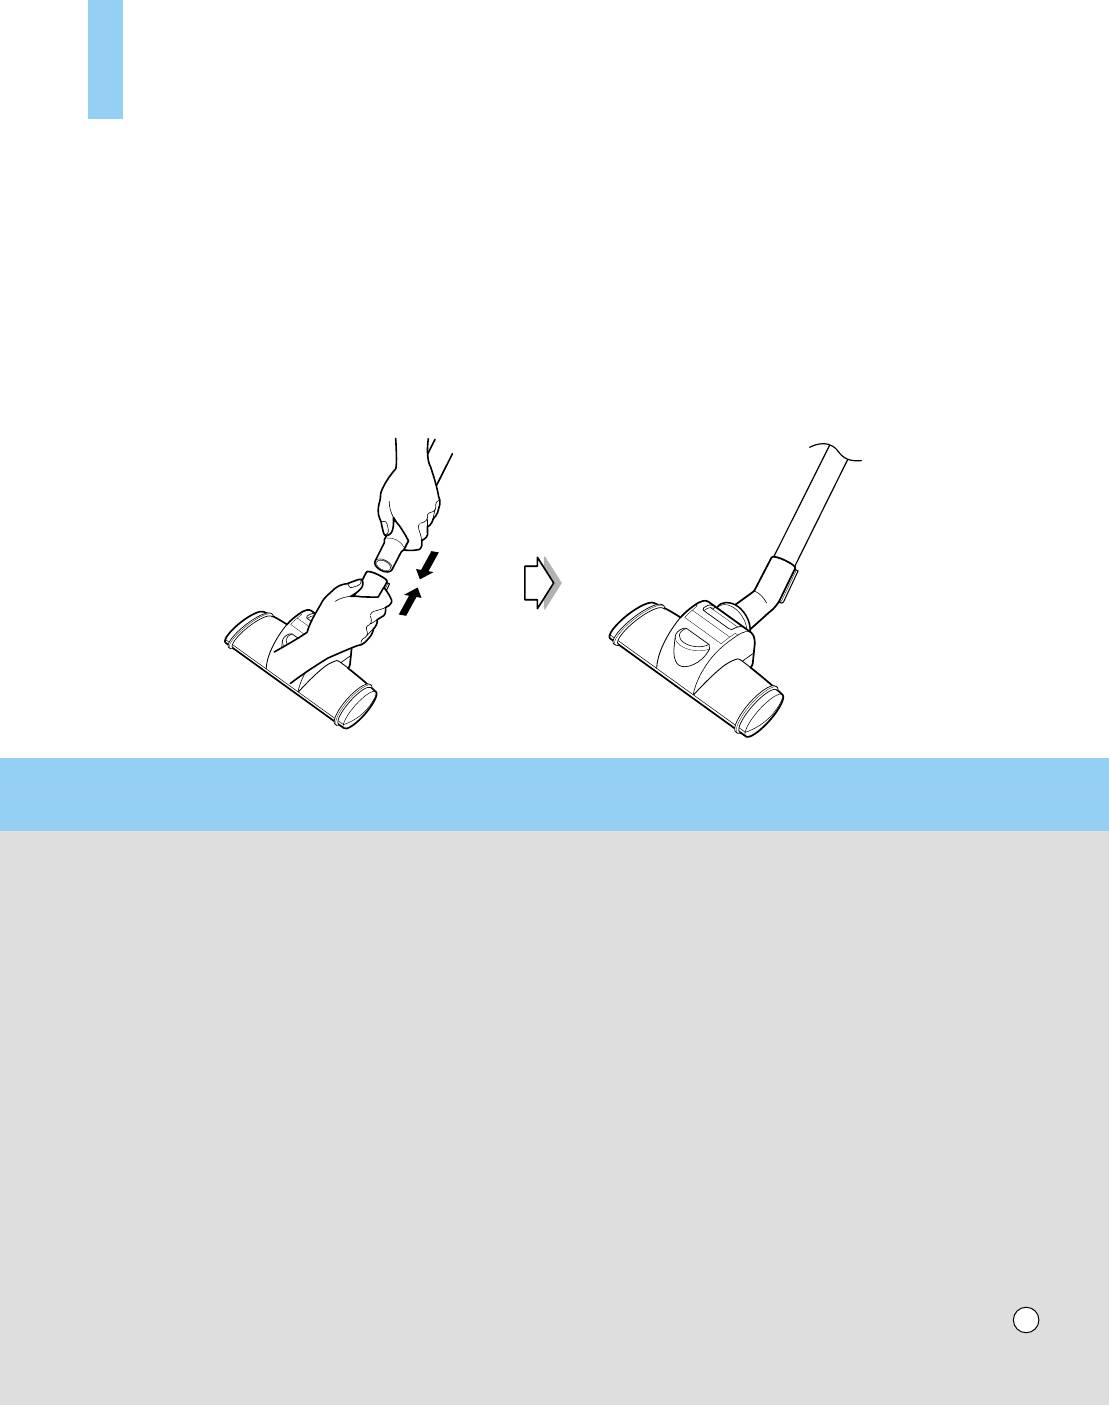
How to use elbow tube, turbine brush
(depending on model)
àÒÔÓθÁÓ‚‡ÌË Ô˚ÎÂÒÓÒ‡ (Ì ‚Ó ‚ÒÂı ÏÓ‰ÂÎflı)
USER'S GUIDE FOR TURBINE NOZZLE
76
(Очистка Мощна
я
туpбощетка)
Spring
latch
Open
Top
èÛÊËÌ̇fl
Á‡˘ÂÎ͇
(Откpойте)
(Вид свеpху)
(depending on model)
(Ì ‚Ó ‚ÒÂı ÏÓ‰ÂÎflı)
Open
Bottom
(Откpойте)
(Вид снизу)
Spring latch
èÛÊËÌ̇fl
Á‡˘ÂÎ͇
Elbow tube
ò‡ÌË̇fl Ú۷͇
Elbow tube is for cleaning under the sofa,
table and bed easily.
• Connect the elbow tube to the flexible
hose and, connect the telescopic tube to
the elbow tube. (You can also connect the
telescopic tube to the flexible hose without
the elbow tube.)
• If you pull the spring latch, the elbow tube
is bended.
• If you stretch the elbow tube, it is returned
to its position.
ò‡ÌË̇fl Ú۷͇ ÔÓÁ‚ÓÎËÚ ‚‡Ï ΄ÍÓ
Û·‡Ú¸Òfl ÔÓ‰ ‰Ë‚‡ÌÓÏ, ÒÚÓÎÓÏ ËÎË
ÍÓ‚‡Ú¸˛.
• èËÒÓ‰ËÌËÚ ¯‡ÌËÌÛ˛ ÚÛ·ÍÛ Í
„Ë·ÍÓÏÛ, ‡ Á‡ÚÂÏ ‚ÒÚ‡‚¸Ú ‚ ÌÂfi
‡Á‰‚ËÊÌÛ˛ ÚÛ·ÍÛ. (í‡ÍÊ ÏÓÊÌÓ
ÒÓ‰ËÌËÚ¸ ‡Á‰‚ËÊÌÛ˛ ÚÛ·Û Ò „Ë·ÍËÏ
¯Î‡Ì„ÓÏ Ì‡ÔflÏÛ˛, ·ÂÁ ¯‡ÌËÌÓÈ
ÚÛ·ÍË.)
• éÚÔÛÒÚËÚ ÔÛÊËÌÌÛ˛ Á‡˘ÂÎÍÛ ˜ÚÓ·˚
Á‡ÙËÍÒËÓ‚‡Ú¸ ÚÛ·ÍÛ ‚ ÌÛÊÌÓÏ
ÔÓÎÓÊÂÌËË.
• ê‡ÒÚflÌËÚ ¯‡ÌËÌÛ˛ ÚÛ·ÍÛ Ë Ó̇
‚ÂÌÂÚÒfl ‚ ÔÂÊÌÂÂ ÔÓÎÊÂÌËÂ.
16
3828Fi2859G
User's guide for sani punch vacuum nozzle
(depending on model)
àÌÒÚÛ͈Ëfl ÔÓ ˝ÍÒÔÎÛ‡Ú‡ˆËË Ì‡Ò‡‰ÍË Sani Punch
(Ì ‚Ó ‚ÒÂı ÏÓ‰ÂÎflı)
Features
How to use
ÇÓÁÏÓÊÌÓÒÚË
àÒÔÓθÁÓ‚‡ÌË Ô˚ÎÂÒÓÒ‡
This nozzle picks up even dust inside through beating.
Follow the directions below for proper use.
The bottom part can be separated to be cleaned.
ÑÎfl ÌÓχθÌÓÈ ‡·ÓÚ˚ ̇҇‰ÍË ÔˉÂÊË‚‡ÈÚÂÒ¸ ÒÎÂ‰Û˛˘Ëı ËÌÒÚÛ͈ËÈ.
Since the bottom does not stick to the surface, vacuuming is easy.
ç‡Ò‡‰Í‡ Û‰‡ÎflÂÚ Ô˚θ ÒÓ ‚ÒÂÈ ÔÓ‚ÂıÌÓÒÚË ·Î‡„Ó‰‡fl ˝ÙÙÂÍÚÛ
Assembly
‚˚·Ë‚‡ÌËfl.
Connect the nozzle to the telescopic tube.
çËÊÌflfl ˜‡ÒÚ¸ ÓÚÒÓ‰ËÌflÂÚÒfl ‰Îfl ӷ΄˜ÂÌËfl ˜ËÒÚÍË.
óËÒÚ͇ ÔÓÒÚÂθÌ˚ı ÔË̇‰ÎÂÊÌÂÒÚÂÈ Ì ‚˚Á˚‚‡ÂÚ Á‡ÚÛ‰ÌÂÌËÈ,
ë·Ó͇
Ú‡Í Í‡Í ÌËÊÌflfl ˜‡ÒÚ¸ ̇҇‰ÍË Ì ÔËÎËÔ‡ÂÚ Í ÔÓ‚ÂıÌÓÒÚË.
èËÒÓ‰ËÌËÚ ̇҇‰ÍÛ Í ‡Á‰‚ËÊÌÓÈ ÚÛ·ÍÂ
Use
àÒÔÓθÁÓ‚‡ÌËÂ
Set the suction power control switch to MAX POWER before vacuuming.
Depending on the type of bedding, handling may be awkward or it may cause a lot of noise.
If this is the case, adjust the suction power control switch to a lower setting.
è‰ ‡·ÓÚÓfl ÛÒÚ‡ÌÓ‚ËÚ ÔÂÂÍβ˜‡ÚÂθ ÂÊËχ ˜ËÒÚÍË ‚ ÔÓÎÓÊÂÌË MAX POWER.
Ç Á‡‚ËÒËÏÓÒÚË ÓÚ ÚËÔ‡ ÔÓÒÚÂθÌ˚ı ÔË̇‰ÎÂÊÌÓÒÚÂÈ Ó·‡·ÓÚ͇ ÏÓÊÂÚ
Ó͇Á‡Ú¸Òfl ÌÂÛ‰Ó·ÌÓÈ ËÎË ÒÎ˯ÍÓÏ ¯ÛÏÌÓÈ.
Ç ˝ÚÓÏ ÒÎÛ˜‡Â ÛÒÚ‡ÌÓ‚ËÚ ÔÂÂÍβ˜‡ÚÂθ ̇ ÔÓÌËÊÂÌÌÛ˛ ÏÓ˘ÌÓÒÚ¸.
If the punch bar does not move, lift the nozzle slightly off the surface.
If it does not move, even after doing this, check if the suction power is too low or if the nozzle base is clogged with a foreign object.
ÖÒÎË ‚˚·Ë‚‡˛˘ËÈ ˝ÎÂÏÂÌÚ ÔÂÂÒڇΠ‰‚Ë„‡Ú¸Òfl, ÌÂÏÌÓ„Ó ÔËÔÓ‰ÌËÏËÚÂ Ë ÓÔÛÒÚËÚ ̇҇‰ÍÛ.
EÒÎË ÓÌ ‚Ò ‡‚ÌÓ Ì ‡·ÓÚ‡ÂÚ, ‚ÓÁÏÓÊÌÓ, ‚˚·‡Ì ÒÎ˯ÍÓÏ Ò··˚È ÛÓ‚Â̸ ÏÓ˘ÌÓÒÚË ËÎË ÍÓÔÛÒ Ì‡Ò‡‰ÍË
Á‡·ÎÓÍËÓ‚‡Ì ÔÓÒÚÓÓÌÌËÏ Ô‰ÏÂÚÓÏ.
17
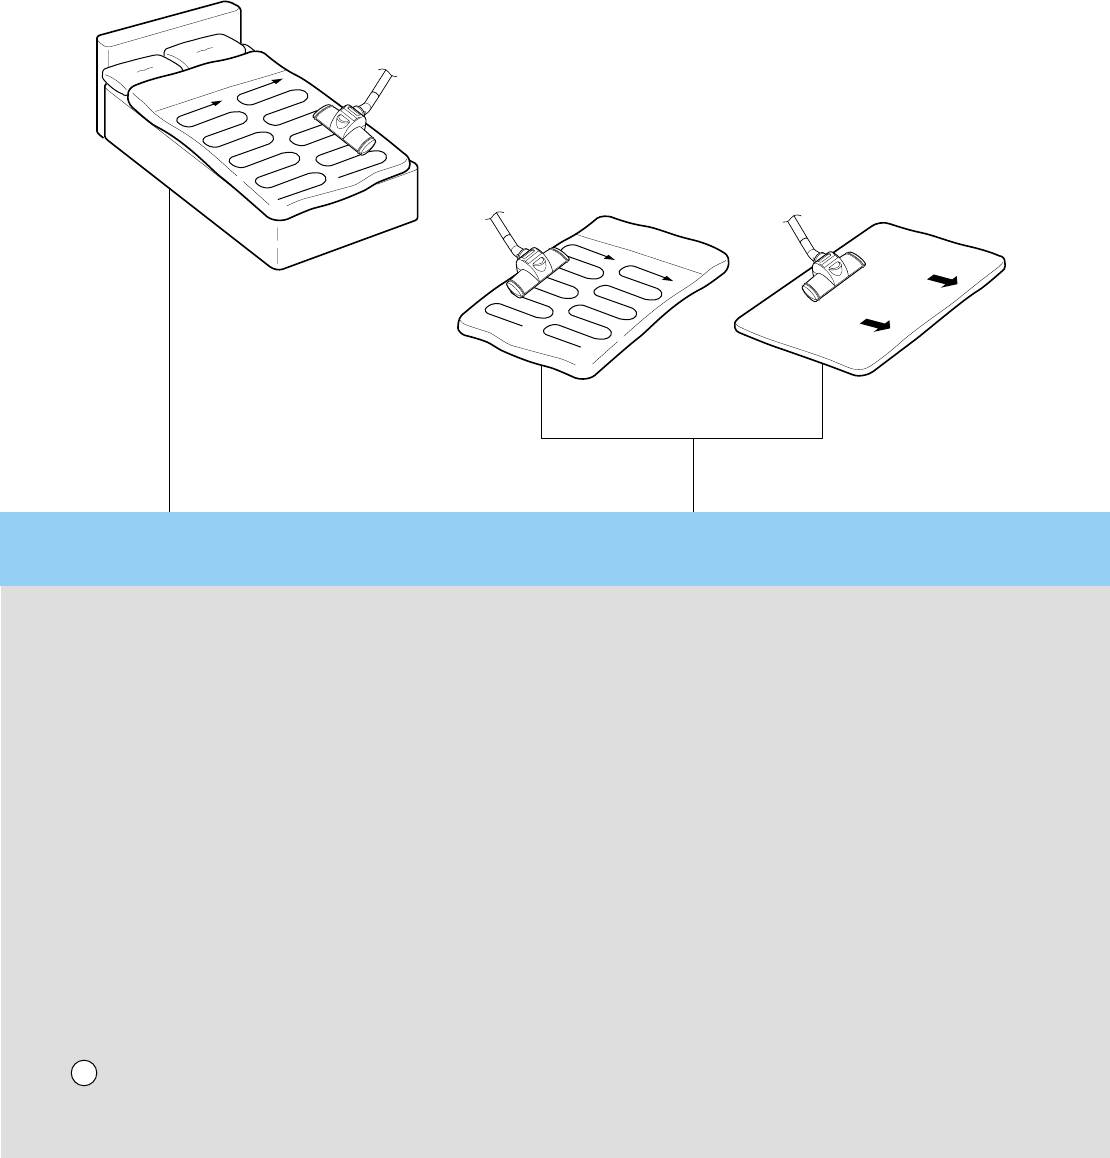
This Sani Punch nozzle is for effective cleaning of beds and blankets to remove mites and dust.
ç‡Ò‡‰Í‡ Ô‰̇Á̇˜Â̇ ‰Îfl ˜ËÒÚÍË ÔÓÒÚÂÎË, Ó‰ÂflÎ Ë Ó·Ë‚ÍË Ï·ÂÎË ÓÚ Í΢ÂÈ Ë Ô˚ÎË.
Effective cleaning
ùÙÙÂÍÚ˂̇fl ˜ËÒÚ͇
Bed & blanket
äÓ‚‡ÚË Ë Ó‰Âfl·
Bulky & heavy blanket
Light blanket & sheet
íÓÎÒÚ˚Â Ë ÚflÊÂÎ˚ ӉÂfl·
íÓÌÍË ӉÂfl· Ë ÔÓÒÚ˚ÌË
When using on the bed
When using on the floor
óËÒÚ͇ ̇ ÍÓ‚‡ÚË
óËÒÚ͇ ̇ ÔÓÎÛ
Lay out the blanket
It is easier to clean a light blanket or sheet
and vacuum it on the bed
by pushing the nozzle in the direction of the arrow.
To increase cleaning efficiency for light blankets,
lay on top of a bulky blanket and then clean.
ê‡ÁÎÓÊËÚ ӉÂflÎÓ Ë
ã„ÍË ӉÂfl· ËÎË ÔÓÒÚ˚ÌË Î„˜Â ˜ËÒÚËÚ¸,
ÔÓÔ˚ÎÂÒÓÒ¸ÚÂ Â„Ó Ì‡ ÍÓ‚‡ÚË.
‰‚Ë„‡fl ̇҇‰ÍÛ ‚ ̇ԇ‚ÎÂÌËË ÒÚÂÎÓÍ.
ÑÎfl Û‚Â΢ÂÌËfl ˝ÙÙÂÍÚË‚ÌÓÒÚË ˜ËÒÚÍË Î„ÍÓ„Ó
Ó‰Âfl· Ô‰ ˜ËÒÚÍÓÈ ‡ÒÒÚÂÎËÚÂ Â„Ó Ì‡ ‰Û„ÓÏ,
·ÓÎÂÂ ÚÓÎÒÚÓÏ.
18
3828Fi2859G
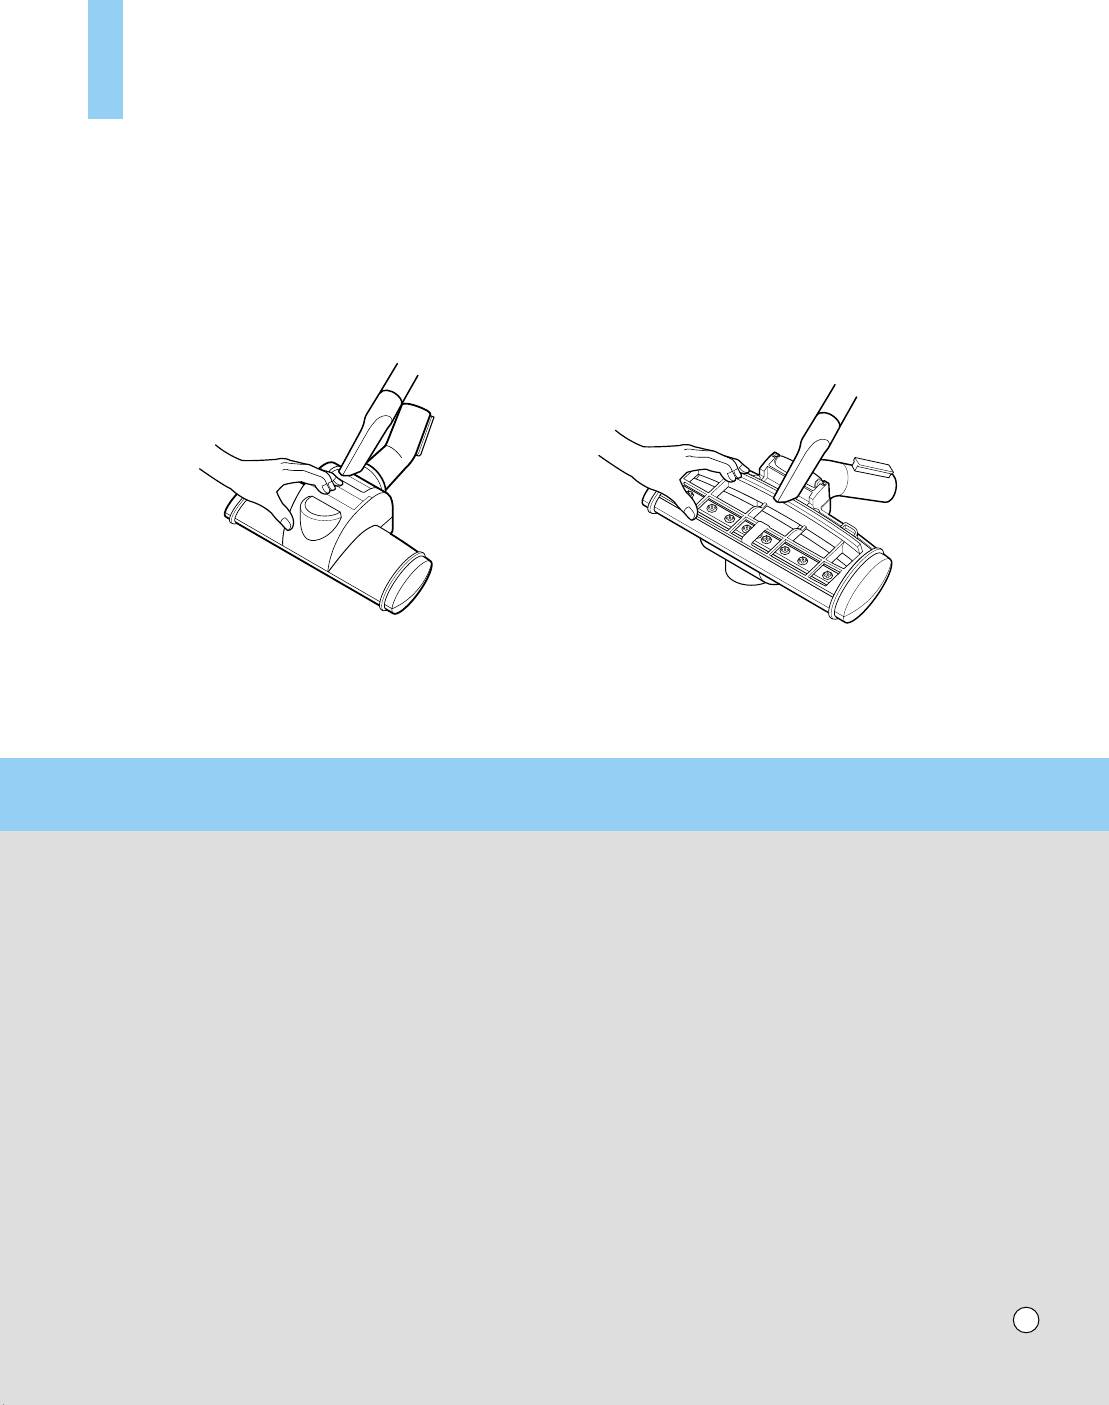
User's guide for sani punch vacuum nozzle Cleaning Vacuum Nozzle for Bedding
(depending on model)
àÌÒÚÛ͈Ëfl ÔÓ ˝ÍÒÔÎÛ‡Ú‡ˆËË Ì‡Ò‡‰ÍË Sani Punch óËÒÚ͇ ̇҇‰ÍË ‰Îfl ÔÓÒÚÂθÌ˚ı ÔË̇‰ÎÂÊÌÓÒÚÂÈ
(Ì ‚Ó ‚ÒÂı ÏÓ‰ÂÎflı)
For simple cleaning of the vacuum nozzle, detach the Sani Punch nozzle from the telescopic tube
and attach the crevice tool to vacuum dust.
ÑÎfl ·˚ÒÚÓÈ ˜ËÒÚÍË ÒÌËÏËÚ ̇҇‰ÍÛ Sani Punch Ò ‡Á‰‚ËÊÌÓÈ ÚÛ·ÍË Ë Ì‡‰Â̸Ú ̇҇‰ÍÛ ‰Îfl ˘ÂÎÂÈ Ì‡ Ô˚ÎÂÒÓÒ.
Top
Bottom
Çˉ Ò‚ÂıÛ
Çˉ ÒÌËÁÛ
Since the vibrator inside is composed of precision parts, never disassemble the body.
Be careful not to let foreign objects clog the air suction part on top of the vacuum nozzle.
Since removal of the punch bar may cause performance problems, do not warp or remove it.
Attach the bottom plate properly before using. Without this bottom plate, it may not function.
í‡Í Í‡Í ‚Ë·‡ÚÓ ÒÓÒÚÓËÚ ËÁ ÚÓ˜ÌÓ Ô˄̇ÌÌ˚ı ‰ÂÚ‡ÎÂÈ, ÌË ‚ ÍÓÂÏ ÒÎÛ˜‡Â ̇ ‡Á·Ë‡ÈÚ ̇҇‰ÍÛ.
ç ‰ÓÔÛÒ͇ÈÚÂ, ˜ÚÓ·˚ ÔÓÒÚÓÓÌÌË Ô‰ÏÂÚ˚ ϯ‡ÎË ‰‚ËÊÂÌ˲ ‚ÓÁ‰Ûı‡ ˜ÂÂÁ ‚ÂıÌ˛˛ ˜‡ÒÚ¸ ̇҇‰ÍË.
ç ҄˷‡ÈÚÂ Ë Ì ÒÌËχÈÚ ‚˚·Ë‚‡˛˘ËÈ ˝ÎÂÏÂÌÚ, Ú‡Í Í‡Í ˝ÚÓ ÏÓÊÂÚ ÔË‚ÂÒÚË Í Ò·ÓflÏ ‚ ‡·ÓÚÂ.
è‰ ËÒÔÓθÁÓ‚‡ÌËÂÏ Ì‡Ò‡‰ÍË ÔËÒÓ‰ËÌflÈÚ ÌËÊÌ˛˛ Ô·ÒÚËÌÛ. ÅÂÁ ÌËÊÌÂÈ Ô·ÒÚËÌ˚ ̇҇‰Í‡ Ì ·Û‰ÂÚ ‡·ÓÚ‡Ú¸.
Since this vacuum nozzle has been made exclusively for cleaning beds, blankets and upholstery,
use it only for these cleaning purposes.
(Using it to clean the floor may result soiling it or a drop in performance, do not use it for such purposes.)
ùÚ‡ ̇҇‰Í‡ ÒÎÛÊËÚ ‰Îfl ˜ËÒÚÍË ÔÓÒÚÂÎË, Ó‰ÂflÎ Ë Ï·ÂθÌÓÈ Ó·Ë‚ÍË. èËÏÂÌflÈڠ ÚÓθÍÓ ‰Îfl ˜ËÒÚÍË ˝ÚËı
ÔÓ‚ÂıÌÓÒÚÂÈ.
(óËÒÚ͇ ÔÓ· ˝ÚÓÈ Ì‡Ò‡‰ÍÓÈ ÏÓÊÂÚ ÔË‚ÂÒÚË Í Âfi Á‡ÒÓÂÌ˲ ËÎË ÒÌËÊÂÌ˲ ÁÙÙÂÍÚË‚ÌÓÒÚË Ì‡Ò‡‰ÍË — ÌÂ
ÔËÏÂÌflÈڠ ̠ÔÓ Ì‡Á̇˜Â˲. )
19
3828Fi2859G
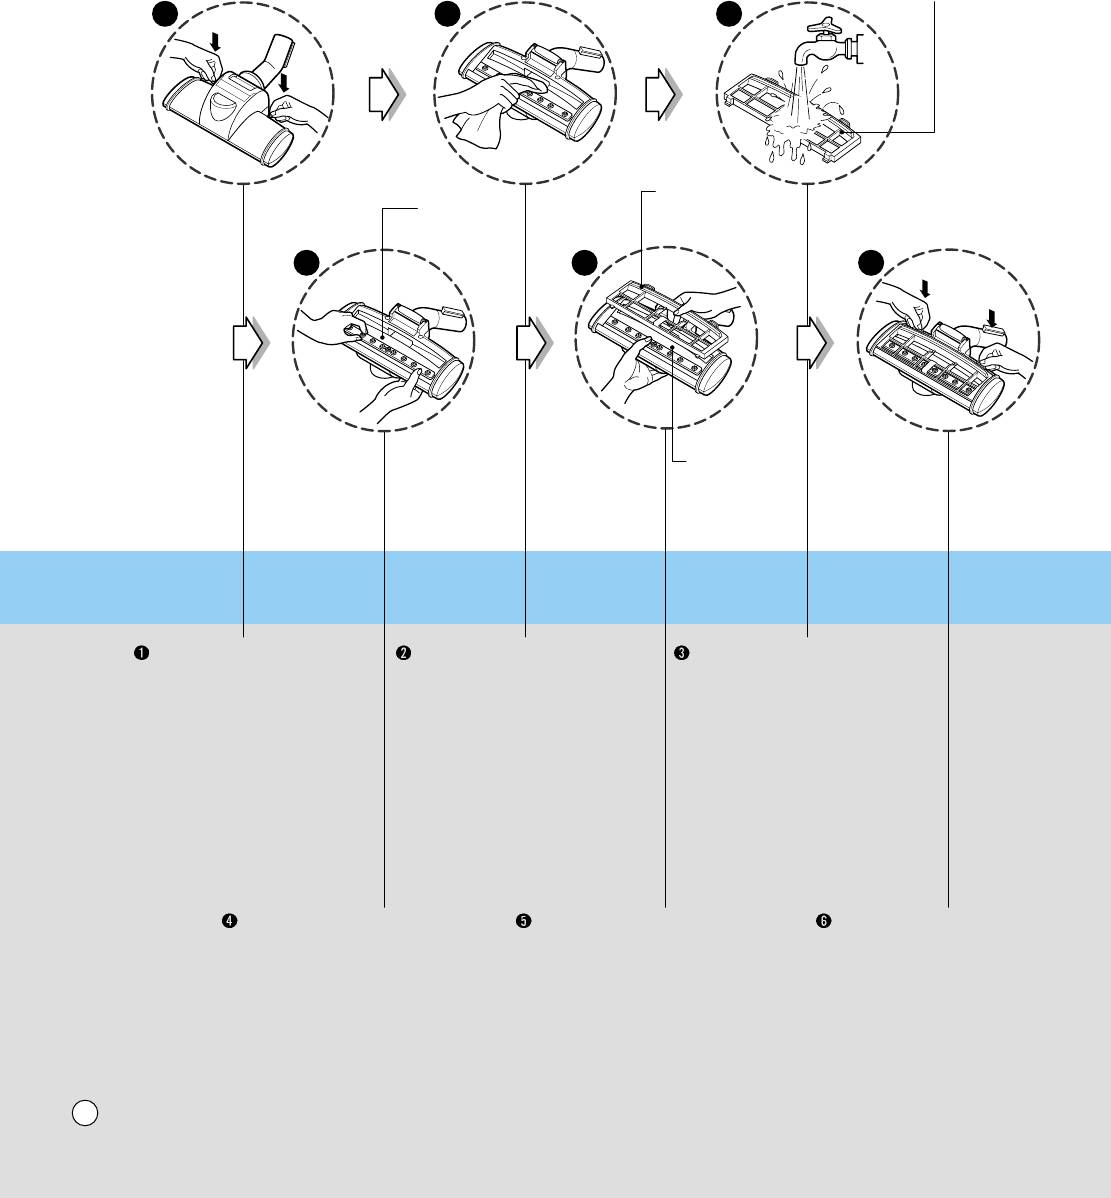
Follow the instruction below for through washing.
(Do not soak the entire body of the vacuum nozzle in water, it may cause the vibrator to malfunction)
èË Ï˚ڸ ̇҇‰ÍË Òӷ≇ÈÚ ÒÎÂ‰Û˛˘Ë ËÌÒÚÛ͈ËË.
(ç ÔÓ„ÛʇÈÚ ̇҇‰ÍÛ ‚ ‚Ó‰Û ˆÂÎËÍÓÏ, ˝ÚÓ ÏÓÊÂÚ Ôӂ‰ËÚ¸ ‚Ë·‡ÚÓ.)
Bottom plate
çËÊÌflfl Ô·ÒÚË̇
1 2 3
Bottom plate
Punch bar
çËÊÌflfl Ô·ÒÚË̇
Ç˚·Ë‚‡˛˘ËÈ
˝ÎÂÏÂÌÚ
5 64
Punch bar
Ç˚·Ë‚‡˛˘ËÈ
˝ÎÂÏÂÌÚ
Press the button on the
Wipe all the soiled parts
Wash the removed bottom
rear side of the vacuum
of the vacuum nozzle
plate with water and dry it.
nozzle to separate the
body with a cloth.
bottom plate.
ç‡ÊÏËÚ ÍÌÓÔÍÛ Ì‡
èÓÚËÚÂ ‚ÒÂ
èÓÏÓÈÚ ÌËÊÌ˛˛
Á‡‰ÌÂÈ ˜‡ÒÚË Ì‡Ò‡‰ÍË
Á‡„flÁÌÂÌÌ˚ ˜‡ÒÚË
Ô·ÒÚËÌÛ ‚Ó‰ÓÈ Ë
˜ÚÓ·˚ ÓÚÒÓ‰ËÌËÚ¸
̇҇‰ÍË ÚflÔÍÓÈ.
ÔÓÒÛ¯ËÚ ÂÂ.
ÌËÊÌ˛˛ Ô·ÒÚËÌÛ.
Straighten the punch bar
Insert the attachment
Push down the tabs
on the lower section.
projections on bottom
to secure.
plate to the vacuum nozzle
grooves.
ìÒÚ‡ÌÓ‚ËÚ ‚˚·Ë‚‡˛˘ËÈ
ÇÒÚ‡‚¸Ú ‚˚ÒÚÛÔ‡˛˘Û˛
á‡ÍÂÔËÚ ÌËÊÌ˛˛
˝ÎÂÏÂÌÚ ‚ ÌËÊÌÂÂ
˜‡ÒÚ¸ ÌËÊÌÂÈ Ô·ÒÚËÌ˚ ‚
Ô·ÒÚËÌÛ, ̇ʇ‚ ̇
ÔÓÎÓÊÂÌËÂ.
Ô‡Á.
‚˚ÒÚÛÔ˚ ‰Ó ÛÔÓ‡.
20
3828Fi2859G

What to Do if Your Vacuum Cleaner Does Not Work
óÚÓ ‰Â·ڸ, ÂÒÎË Ô˚ÎÂÒÓÒ Ì ‡·ÓÚ‡ÂÚ
Check that the vacuum cleaner is correctly plugged in correctly and that the electrical socket is working.
èӂ¸Ú ԇ‚ËθÌÓÒÚ¸ ÔÓ‰Íβ˜ÂÌËfl Ô˚ÎÂÒÓÒ‡ Í ÒÂÚË Ë ËÒÔ‡‚ÌÓÒÚ¸ ÓÁÂÚÍË.
What to Do When Suction Performance Decreases
óÚÓ ‰Â·ڸ, ÂÒÎË ÒÌËÊÂ̇ ÒË· ‚Ò‡Ò˚‚‡ÌËfl
• Turn off the vacuum cleaner and unplug it.
• Check the telecsopic tube, flexible hose and cleaning tool for blockages or obstructions.
• Check that the dust chamber is not full. Empty if necessary.
• Check that the exhaust filter is not blocked. Clean the exhaust filter, if necessary.
• Ç˚Íβ˜ËÚ Ô˚ÎÂÒÓÒ Ë ‚˚̸ÚÂ Â„Ó ‚ËÎÍÛ ËÁ ÓÁÂÚÓË.
• èӂ¸ÚÂ, Ì Á‡·ËÚ‡ ÎË ÏÛÒÓÓÏ ÚÂÎÂÒÍÓÔ˘ÂÒ͇fl Ú۷͇, „Ë·ÍËÈ ¯Î‡Ì„ Ë ˜ËÒÚfl˘‡fl ̇҇‰Í‡.
• èӂ¸ÚÂ, Ì ÔÂÂÔÓÎÌËÎÒfl ÎË ÍÓÌÚÂÈÌ ‰Îfl Ô˚ÎË. èË ÌÂÓ·ıÓ‰ËÏÓÒÚË ÓÒ‚Ó·Ó‰ËÚ „Ó.
• èӂ¸ÚÂ, Ì Á‡·ËÚ ÎË ÙËÎ¸Ú ÏÓÚÓ‡. èË ÌÂÓ·ıÓ‰ËÏÓÒÚË ÔÓËÁ‚‰ËÚ ˜ËÒÚÍÛ ‚˚ıÓ‰ÌÓ„Ó ÙËθڇ.
21
3828Fi2859G
Disposal of your old appliance
1. When this crossed-out wheeled bin symbol is attached to a product it means the product is covered by the European Directive
2002/96/EC.
2. All electrical and electronic products should be disposed of separately from the municipal waste stream via designated collection
facilities appointed by the government or the local authorities.
3. The correct disposal of your old appliance will help prevent potential negative consequences for the environment and human health.
4. For more detailed information about disposal of your old appliance, please contact your city office, waste disposal service or the
shop where you purchased the product.
ìÚËÎËÁ‡ˆËfl ÒÚ‡Ó„Ó Ó·ÓÛ‰Ó‚‡ÌËfl
1. ëËÏ‚ÓΠ̇ ÛÒÚÓÈÒÚ‚Â, ËÁÓ·‡Ê‡˛˘ËÈ Ô˜ÂÍÌÛÚÓ ÏÛÒÓÌÓ ‚Â‰Ó Ì‡ ÍÓÎÂÒ‡ı, ÓÁ̇˜‡ÂÚ, ˜ÚÓ Ì‡ ËÁ‰ÂÎËÂ
‡ÒÔÓÒÚ‡ÌflÂÚÒfl ÑËÂÍÚË‚‡ 2002/96/EC.
2. ùÎÂÍÚ˘ÂÒÍËÂ Ë ˝ÎÂÍÚÓÌÌ˚ ÛÒÚÓÈÒÚ‚‡ ‰ÓÎÊÌ˚ ÛÚËÎËÁÓ‚˚‚‡Ú¸Òfl Ì ‚ÏÂÒÚÂ Ò ·˚ÚÓ‚˚Ï ÏÛÒÓÓÏ, ‡ ˜ÂÂÁ ÒÔˆˇθÌ˚Â
ÏÂÒÚ‡, Û͇Á‡ÌÌ˚ ԇ‚ËÚÂθÒÚ‚ÂÌÌ˚ÏË ËÎË ÏÂÒÚÌ˚ÏË Ó„‡Ì‡ÏË ‚·ÒÚË.
3. 臂Ëθ̇fl ÛÚËÎËÁ‡ˆËfl ÒÚ‡Ó„Ó Ó·ÓÛ‰Ó‚‡ÌËfl ÔÓÏÓÊÂÚ Ô‰ÓÚ‚‡ÚËÚ¸ ÔÓÚÂ̈ˇθÌÓ ‚‰ÌÓ ‚ÓÁ‰ÂÈÒÚ‚Ë ̇
ÓÍÛʇ˛˘Û˛ ÒÂ‰Û Ë Á‰ÓÓ‚¸Â ˜ÂÎÓ‚Â͇.
4. ÑÎfl ÔÓÎÛ˜ÂÌËfl ·ÓΠÔÓ‰Ó·Ì˚ı ҂‰ÂÌËÈ Ó ÒÚ‡ÓÏ Ó·ÓÛ‰Ó‚‡ÌËË Ó·‡ÚËÚÂÒ¸ ‚ ‡‰ÏËÌËÒÚ‡ˆË˛ „ÓÓ‰‡, ÒÎÛÊ·Û,
Á‡ÌËχ˛˘Û˛Òfl ÛÚËÎËÁ‡ˆËÂÈ ËÎË ‚ χ„‡ÁËÌ, „‰Â ·˚Î ÔËÓ·ÂÚÂÌ ÔÓ‰ÛÍÚ.
22

23

http://www.lg.ru/
P/No.: MFL32930853
3828Fi2859G


