LG PQNFB17C0: инструкция
Раздел: Аксессуары для аудио
Тип:
Инструкция к LG PQNFB17C0

ENGLISH
ITALIANO
ESPAÑOL
FRANCAIS
DEUTSCH
PORTUGUESE
QUICK GUIDE
РУССКИЙ ЯЗЫК
• Make sure to read the cautions for safety before installation and use, and use
TÜRKÇE
it correctly.
• It is intended to keep protect the safety of the installer and user and to
prevent the property damage, etc.
• After reading the user manual, please keep it at a place where user can
POLSKI
access any time.
• For more information, please read the manual in the CD.
TYPE : BACnet Gateway(ACP BACnet)
MODEL : PQNFB17C0, PQNFB17C1
www.lg.com
P/NO : MFL67709509
TIPS FOR SAVING ENERGY
2
ENGLISH
TIPS FOR SAVING ENERGY
Here are some tips that will help you minimize the power consumption when you use the air
conditioner. You can use your air conditioner more efficiently by referring to the instructions
below:
• Do not cool excessively indoors. This may be harmful for your health and may consume more
electricity.
• Block sunlight with blinds or curtains while you are operating the air conditioner.
• Keep doors or windows closed tightly while you are operating the air conditioner.
• Adjust the direction of the air flow vertically or horizontally to circulate indoor air.
• Speed up the fan to cool or warm indoor air quickly, in a short period of time.
• Open windows regularly for ventilation as the indoor air quality may deteriorate if the air condi-
tioner is used for many hours.
• Clean the air filter once every 2 weeks. Dust and impurities collected in the air filter may block the
air flow or weaken the cooling / dehumidifying functions.
!
NOTE
• The product images and descriptions included in this manual are stated based on ACP
BACnet Free volt(Model Name: PQNFB17C0)
ACP BACnet Free volt (PQNFB17C0)
ACP BACnet 24V (PQNFB17C1)
For your records
Staple your receipt to this page in case you need it to prove the date of purchase or for warranty
purposes. Write the model number and the serial number here:
Model number :
Serial number :
You can find them on a label on the side of each unit.
Dealer’s name :
Date of purchase :
ver 1.0.0

IMPORTANT SAFETY INSTRUCTIONS
3
ENGLISH
IMPORTANT SAFETY INSTRUCTIONS
READ ALL INSTRUCTIONS BEFORE USING THE APPLIANCE.
Always comply with the following precautions to avoid dangerous situations and ensure peak perform-
ance of your product
!
WARNING
It can result in serious injury or death when the directions are ignored
!
CAUTION
It can result in minor injury or product damage when the directions are ignored
!
WARNING
• Installation or repairs made by unqualified persons can result in hazards to you and others.
• Installation MUST conform with local building codes or, in the absence of local codes, with the Na-
tion Electrical Code NFPA 70/ANSI C1-1003 or current edition and Canadian Electrical Code Part1
CSA C.22.1.
• The information contained in the manual is intended for use by a qualified service technician famil-
iar with safety procedures and equipped with the proper tools and test instruments.
• Failure to carefully read and follow all instructions in this manual can result in equipment malfunc-
tion, property damage, personal injury and/or death.
Installation
• Any question about the product installation should be asked to the service center or the professional in-
stallation agency.
- It may cause fire, electric shock, explosion or injury.
• Consult the service center or the professional installation agency about reinstalling the installed product.
- It may cause fire, electric shock, explosion or injury.
• Please use the standardized parts.
- It may cause fire, electric shock, explosion, injury, or failure.
• Do not keep or use combustible gas or inflammable material near the product.
- IT may cause fire or electric shock.
• Do not disassemble, repair or modify the product at random.
- It may cause failure of the product.
• Do not install where raindrop can fall.
- It may cause failure of the product.
• Do not install the product at wet place.
- It may cause failure of the product.
• Provided product and adaptor shall only be installed and used inside a building.
- It may cause fire or failure of the product.
*Do not install or use outside.
• Install stably in a place that can endure the weight of the ACP BACnet.
- If the installation place is not strong enough, the ACP BACnet may fall and damaged.
• Make sure to enquire to the specialty store of the product purchase or service center for electric works.
- It may cause fire or electric shock.
• Do not damage the power cord or bend it by force.
- It may cause fire or electric shock.
• You need to use a safely insulated power supply which follows IEC61558-2-6 and NEC Class2
- If you do not follow, It may cause fire, electric shock, explosion or injury.

SAFETY PRECAUTIONS
4
ENGLISH
• Do not connetion 220V power to 24V products
- If you do not follow, It may cause fire, electric shock, explosion or injury.
• Do not connect power cord to the control signal connector.
- It may cause fire or explosion.
Operation
• Do not change or extend the power cord with your own discretion.
- It may cause fire or electric shock
• Do not place any heating device near the product.
- It may cause fire.
• Do not use any heating device near the power cord.
- It may cause fire or electric shock.
• Do not let water flow into the product.
- It may cause electric shock or failure.
• Do not put heavy weight on the power cord.
- It may cause fire or electric shock.
• Do not put heavy weight on the product.
- It may cause the failure of the product.
• If the product is flooded, consult the service center or the professional installation agency.
- It may cause fire or electric shock.
• Let the children or the old and the weak be controlled by the guardian to use.
- It may cause accident or failure.
• Do not give any shock to the product.
- Any shock to the product may cause failure.
• Grab the head of the plug of the power cord to pull when disconnecting the plug, and do not touch the
plug with wet hands.
- It may cause fire or to deform the product.
• Do not use the product in certain environments as follows.
- If the product is used in a place with oil, steam, or sulfuric acid gas, performance may be degraded or
product may be damaged.
• Do not press the switch or button with sharp objects.
- It may cause electric shock or failure of the product.
• Please check the operation temperature.
- If the product is used in an environment with the temperature exceeding the operation boundary, it may
cause a severe damage.
Please check the usage temperature boundary in the manual. If there is no specified temperature,
please use the product within the boundary of 0~40°C.
• Do not put a container, etc. with water on the product.
- It may cause fire or electric shock.
• Do not touch the switch with wet hand.
- It may cause electric shock or failure of the product.
• Please read installation and user manual for connection with PC or peripheral devices.
- It may cause fire or failure of the product.
• If a warning window appears on PC, product stops, or it does not work, immediately stop the usage.
- It may cause fire or failure of the product.
!
CAUTION
Operation
• Do not use strong detergent such as solvent, but a soft cloth.
- It may cause fire or to deform the product.
• Please check the rated capacity of the power.
- It may cause fire or failure of the product.

Installing ACP BACnet
5
ENGLISH
Installing ACP BACnet
Installing ACP BACnet
This chapter describes how to install the ACP BACnet to use.
In order to use the ACP BACnet, the installation should be performed by the following order.
STEP 1. Check the cautions during the ACP BACnet installation
Before installing the ACP BACnet, check the cautions.
STEP 2. Study the cable connections diagram of the entire system
Study the cable connection diagram of the site where the ACP BACnet is installed.
STEP 3. Set the indoor unit address
Set the address of the ACP BACnet not to be overlapped with the connect-
ing indoor unit.
STEP 4. Set PI485 and connect cables
Set DIP switch of PI485 correctly, and connect RS-485 communication
cable.
STEP 5. Install ACP BACnet and connect cables
Install the ACP BACnet, and set network and other settings.
STEP 6. Set ACP BACnet network address
Set the network address to be able to access the ACP BACnet through internet.
STEP 7. Set ACP BACnet functions
Set language, peak/demand, whether to use schedule, whether to use
power display, etc.
STEP 8. Set Web GUI access environment
Set the access environment in Web GUI, which is the operation program of
the ACP-BAC.
STEP 9. Input indoor unit and ventilator information
Set the access environment in Web GUI, which is the operation program of
the ACP BACnet.
STEP 10. Verify and check ACP BACnet installation
Verify and check whether the ACP BACnet is properly installed.
!
CAUTION
Installing the ACP BACnet
•
The ACP BACnet installation work needs the professional technique. Therefore, the installa-
tion described in this chapter should be performed by the certified installation professional.
• Consult the service center or the professional installation agency certified by us about
any question or request related to the installation.

Installing ACP BACnet
6
ENGLISH
Check points during the ACP BACnet installation
- The number of PI485 connected to one RS-485 communication line
ACP BACnet provides 4 RS-485 ports for indoor unit connection. (CH 1~4)
Up to 16 PI485 for outdoor unit can be connected to one RS-485 port, and up to 31 PI485 for
SINGLE/ventilation can be connected.
- The number of the indoor units that can be connected to one ACP BACnet
One ACP BACnet can be connected up to 256 indoor units. To one RS-485 port, all of 256 in-
door units, which is the maximum number that can be connected to the ACP BACnet, may be
connected.
But, to improve the communication performance of RS-485, it is recommended to be divided
and connected to 4 ports.
- RS-485 communication cable connection
There is a polarity in RS-485 communication cable connection, so be careful not to reverse the
connection of the two cables.
Do not let the length of RS-485 communication cable exceed total of 1 Km.
RS-485 communication cable must be connected with BUS type.
- IP address of the ACP BACnet
IP address of the ACP BACnet, address of Gateway, and Net mask must be requested to the
person in charge of the network of the corresponding site.
!
CAUTION
RS-485 Connection of the ventilation equipment
• To connect ventilation equipment, it is recommended to use the ports other than RS-
485 communication ports which are connected to air conditioners.
Setting the indoor unit address
By considering the entire installation configuration connecting to one ACP BACnet, set the ad-
dress to each indoor unit not to be overlapped. 00~FF in hexadecimal can be set to the indoor
unit address.
!
NOTE
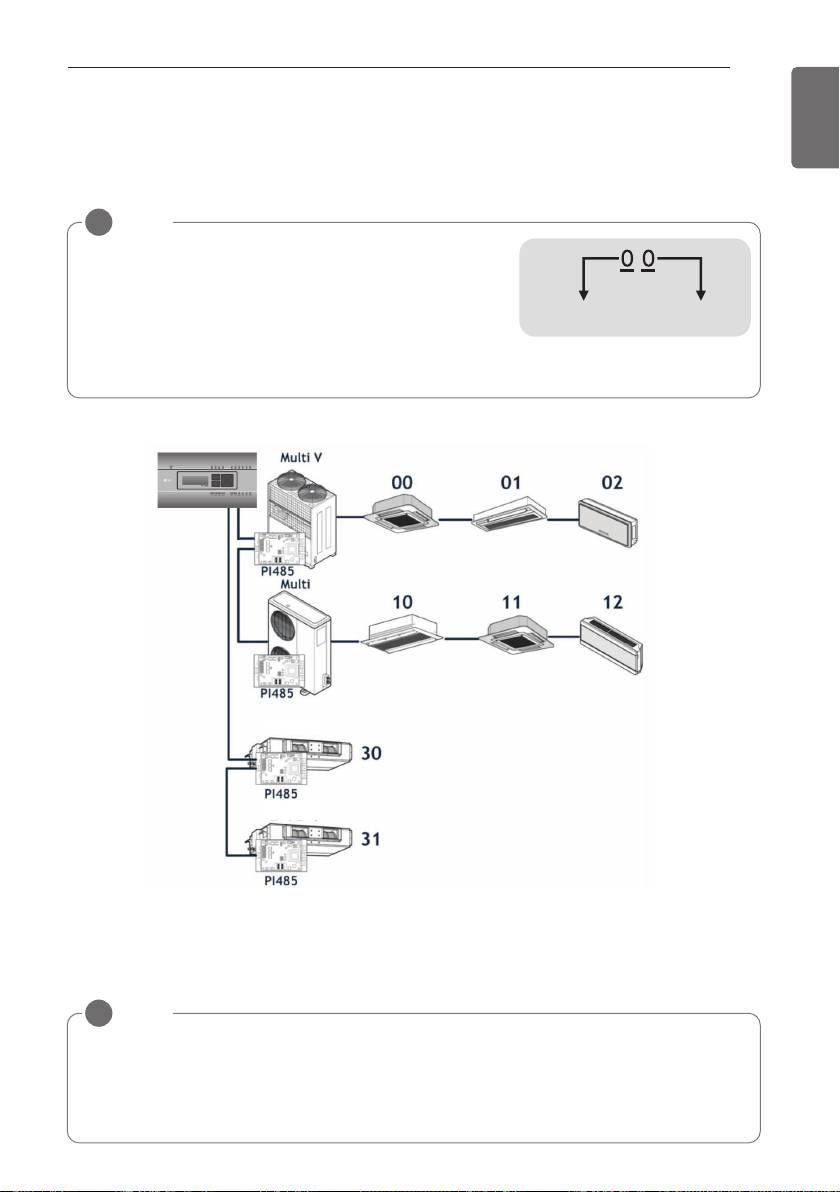
Assigning indoor and outdoor unit number
• If the outdoor unit product is Multi V, it is recommended
to assign the address by setting the first digit of the
address as the number of the outdoor unit, and classify-
ing the second digit as the number or the indoor unit, for
easy composition and classification of the system.
The following example sets the address to the indoor unit.
When the ACP BACnet is interconnected with the AC Manager, the ventilator can be installed to-
gether and controlled.
The above figure shows the example that sets the addresses of 30 and 31 to the ventilators and
connects to the ACP BACnet.
Outdoor unit
Indoor unit
(group) number
number
ventilator
ventilator
Installing ACP BACnet
7
ENGLISH
!
NOTE
How to set the central control address of the indoor unit
• The central control address setting method may be different for each indoor unit product or
remote control type, so set the address by referring to the manual of the indoor unit prod-
uct or wired remote controller.
Installing ACP BACnet
8
ENGLISH
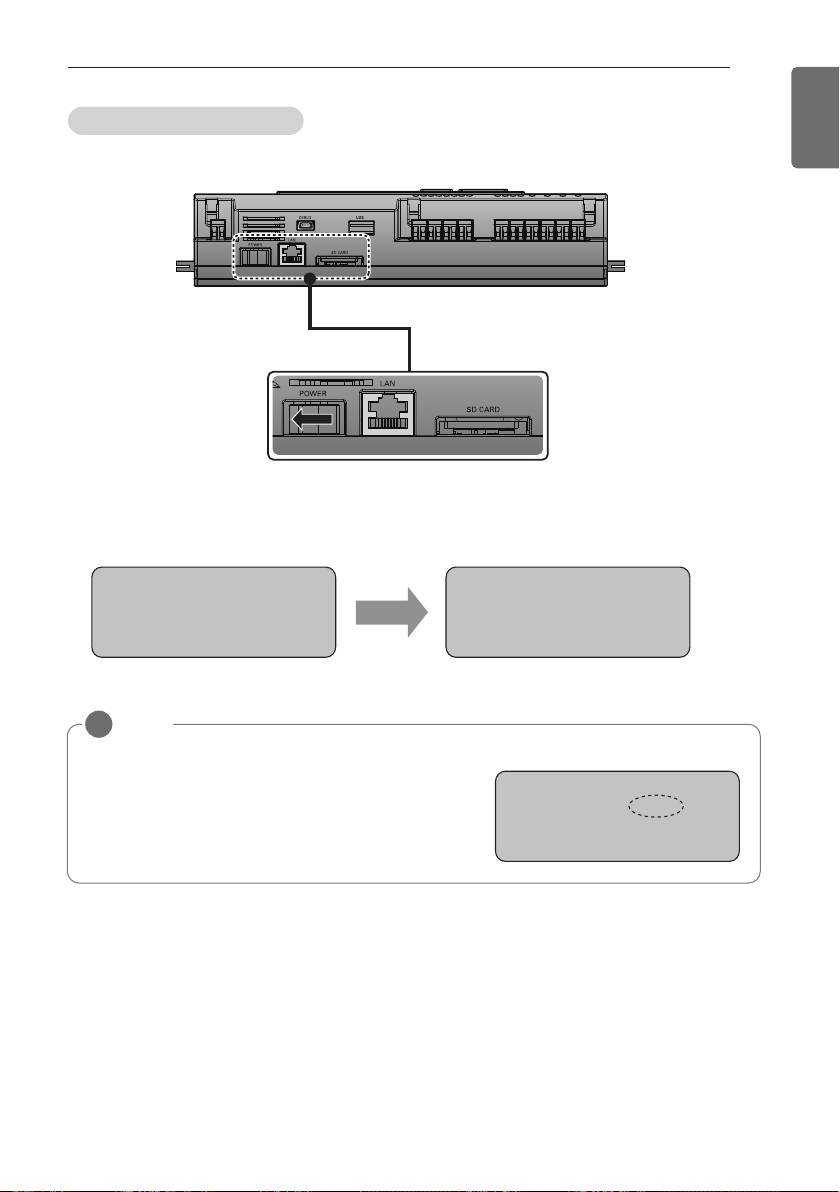
Installing ACP BACnet and connecting cables
After setting PI485, the ACP BACnet shall be installed in an adequate place, and RS-485 cable
shall be connected for the communication with PI485.
And, Ethernet cable (LAN cable) shall be connected for the connection with internet or AC Man-
ager.
To fix the ACP BACnet, the following 2 methods may be used.
Install in DIN RAIL or fix to the wall considering the environment of the site.
PQNFB17C0
Power
LAN cable RS-485 cable
!
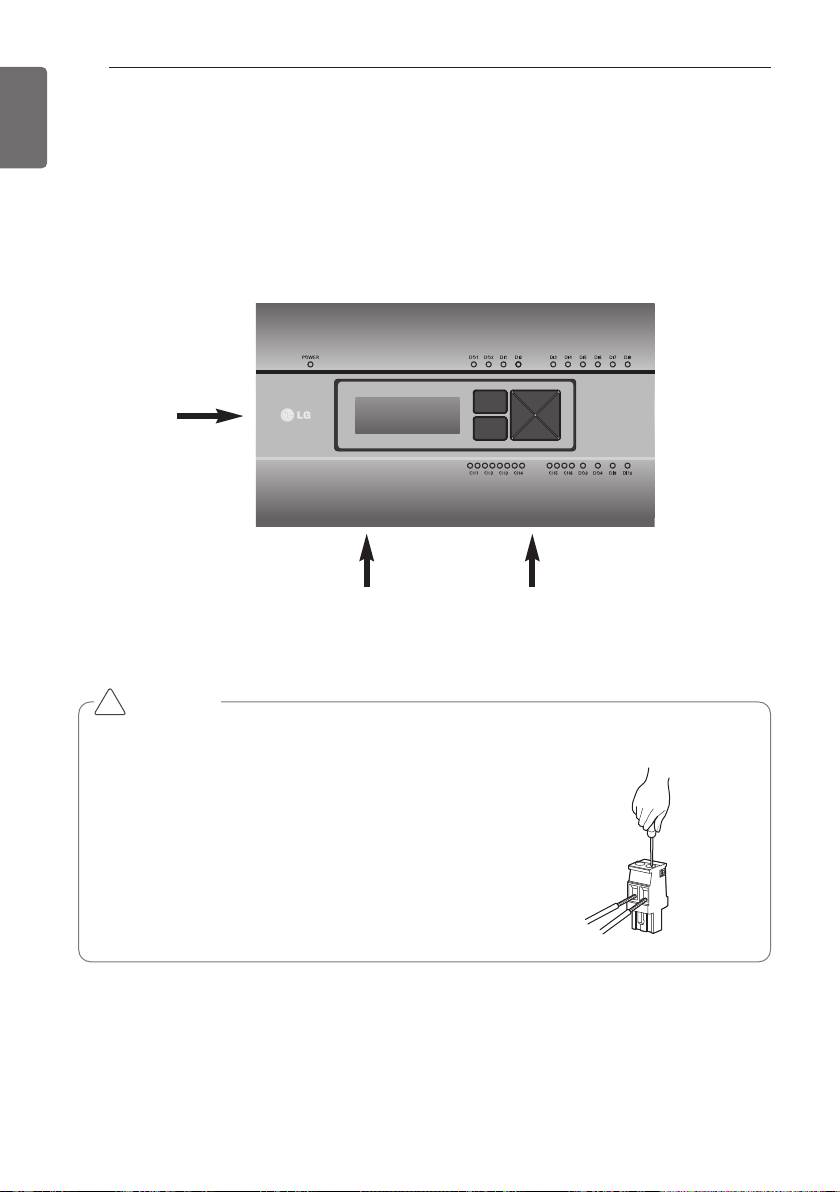
CAUTION
If four times the power connector for the connection, as shown by using the right connec-
tion, but please note that an electric shock.
Use the designated parts must be connected to a power source.
※ Connector manufacturers: PHOENIX CONTACT
PartNo: MVSTBR 2,5 / 2-ST-5, 08 2P 5.00MM
Installing ACP BACnet
9
ENGLISH
Fixing the ACP BACnet to the wall
ACP BACnet can be installed by fixing to the wall. To install the ACP BACnet in an adequate
place, proceed according to the following explanation. It explains here on how to install the ACP
BACnet with the example of installing the ACP BACnet on the wall.
- Decide the space to install the ACP BACnet.
Before installing the ACP BACnet, check if it is the adequate place to connect the ACP BACnet
with the power, RS-485, and LAN cable.
- Fix to the wall using the driver. It can be fixed as in the following figure according to the loca-
tion to install.
PQNFB17C0
Connecting RS-485 cable to the ACP BACnet
After fixing the ACP BACnet in the installation place, RS-485 cable that was connected to PI485
shall be connected to the ACP BACnet. To connect RS-485 cable to the ACP BACnet, proceed
as the following order.
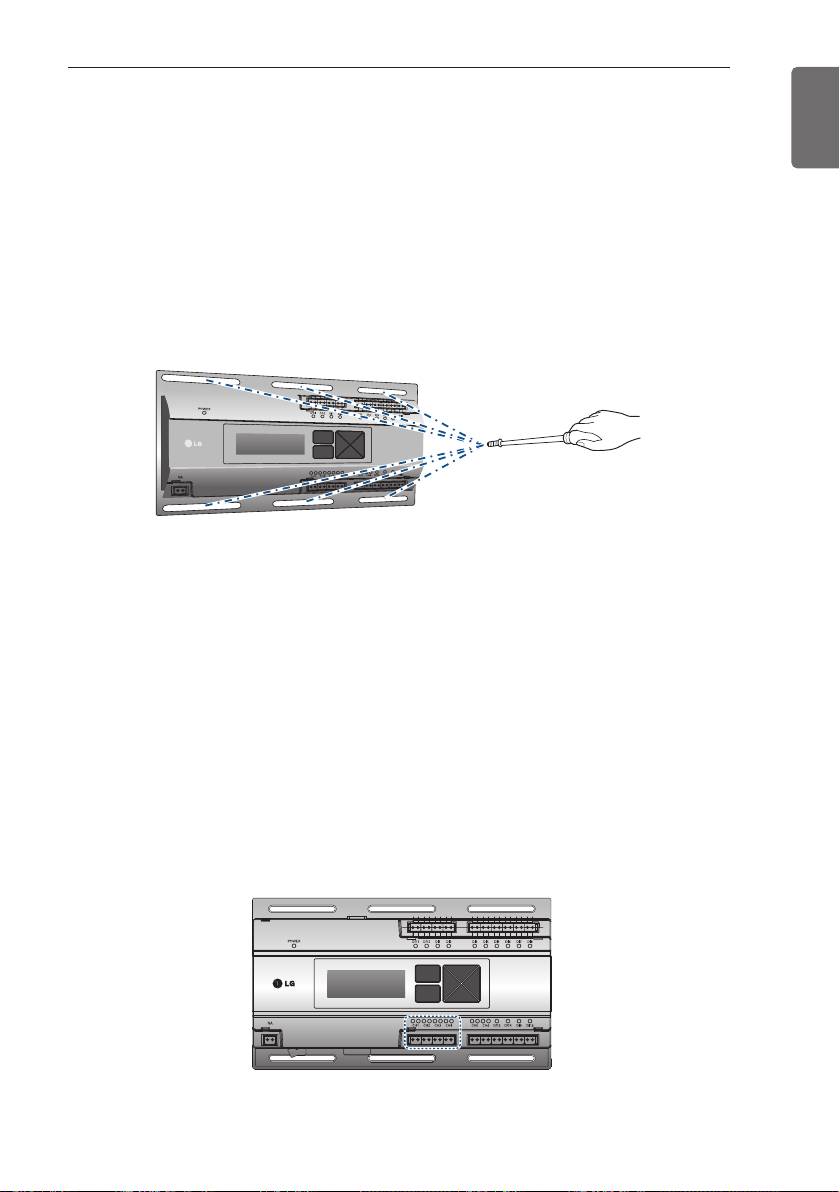
- First, among the connectors that can be connected to the ACP BACnet, connect the end of RS-
485 cable connected to BUS-A of PI485 to Tx part. Next, connect the end of RS-485 cable con-
nected to BUS-B of PI485 to Rx part.
- RS-485 cable that was connected to PI485 shall be connected to CH port (RS-485 port) of the
ACP BACnet.
Plug the connector connecting RS-485 cable into one of CH1 ~ CH4 ports.
There are 1~6 CH ports, and it must be plugged into one of 1~4 ports for use.
PQNFB17C0
Installing ACP BACnet
Setting the ACP BACnet network address
After connecting the ACP BACnet to various devices via the cable, the network environment of
the ACP BACnet should be set by driving the ACP BACnet. The following information should be
set for using the ACP BACnet.
- IP address of the ACP BACnet
- Gateway address
- Net mask
!
CAUTION
Setting the network environment information
• If the above information is not entered, the communication error may be occurred or it
may be impossible to control by the ACP BACnet. So, be careful to correctly input.
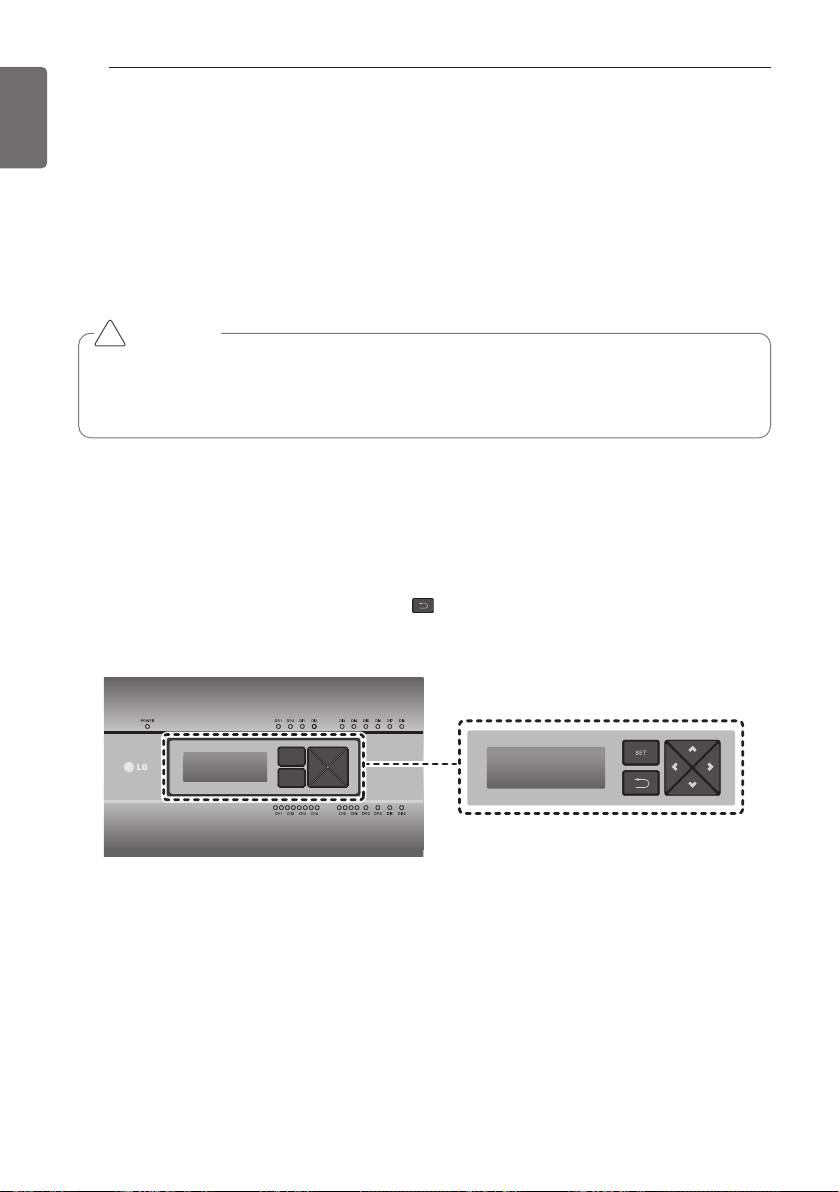
Before configuring the ACP BACnet environment
The network environment of the ACP BACnet can be set by the LCD and the buttons at the front
side of the ACP BACnet.
The current ACP BACnet information and the menu are displayed on the LCD, and the menu can
be changed and selected by pressing SET and button and Up/Down/Left/Right (▲, ▼, ◀, ▶)
buttons.
PQNFB17C0
PQNFB17C0
10
ENGLISH
Installing ACP BACnet
Turning on the ACP BACnet
Turn on the ACP BACnet to set the network environment of the ACP BACnet.
When the power switch is turned on, the ACP BACnet booting screen is displayed on the LCD as
shown at the following figure, and when booting is completed, the initial ACP BACnet screen is
displayed.
4/*)+VM\
4/-TMK\ZWVQK[
;?^MZ
?IQ\NWZJWW\QVOŊ
18!
/?!
!
NOTE
Software version
• The software version of the current ACP BACnet is
displayed at the initial ACP BACnet screen.
Also, the software version may be different accord-
ing to the manufacturing date of the ACP BACnet.
4/*)+VM\
;?^MZ
18!
/?!
11
ENGLISH
Installing ACP BACnet
12
ENGLISH
Class A device
!
NOTE
This equipment has been tested and found to comply with the limits for a Class A digital de-
vice, pursuant to part 15 of the FCC Rules.
These limits are designed to pro-vide reasonable protection against harmful interference
when the equipment is operated in a commercial environment.
This equipment generates, uses, and can radiate radio frequency energy and, if not installed
and used in accordance with the instruction manual, may cause harmful interference to radio
communications. Operation of this equipment in a residential area is likely to cause harmful
interference in which case the user will be required to correct the interference at his own ex-
pense.
!
CAUTION
Changes or modifications not expressly approved by the manufacturer responsible for
compliance could void the user’s authority to operate the equipment.
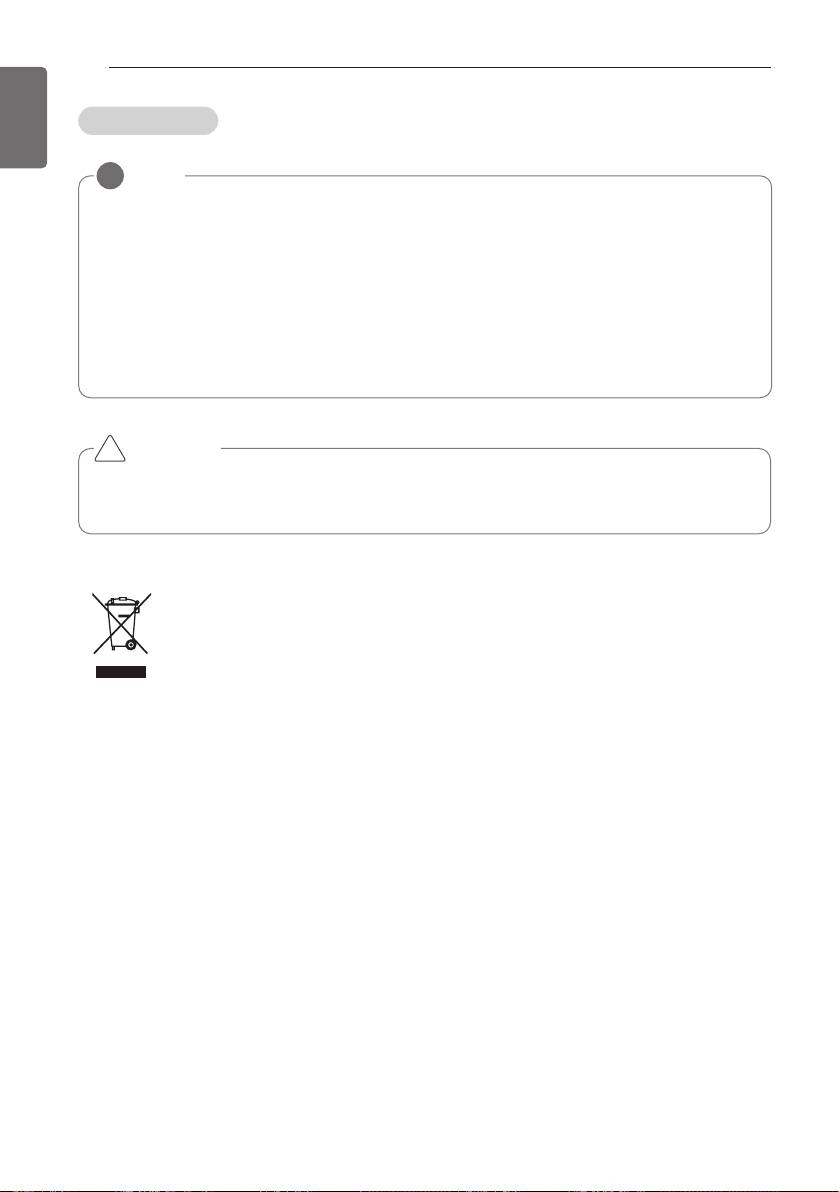
Disposal of your old appliance
1 When this crossed-out wheeled bin symbol is attached to a product it means `the
product is covered by the European Directive 2002/96/EC.
2 All electrical and electronic products should be disposed of separately from the
municipal waste stream via designated collection facilities appointed by the gov-
ernment or the local authorities.
3 The correct disposal of your old appliance will help prevent potential negative con-
sequences for the environment and human health.
4 For more detailed information about disposal of your old appliance, please contact
your city office, waste disposal service or the shop where you purchased the
product.
