LG T5100: T5100 features
T5100 features: LG T5100
T5100 features
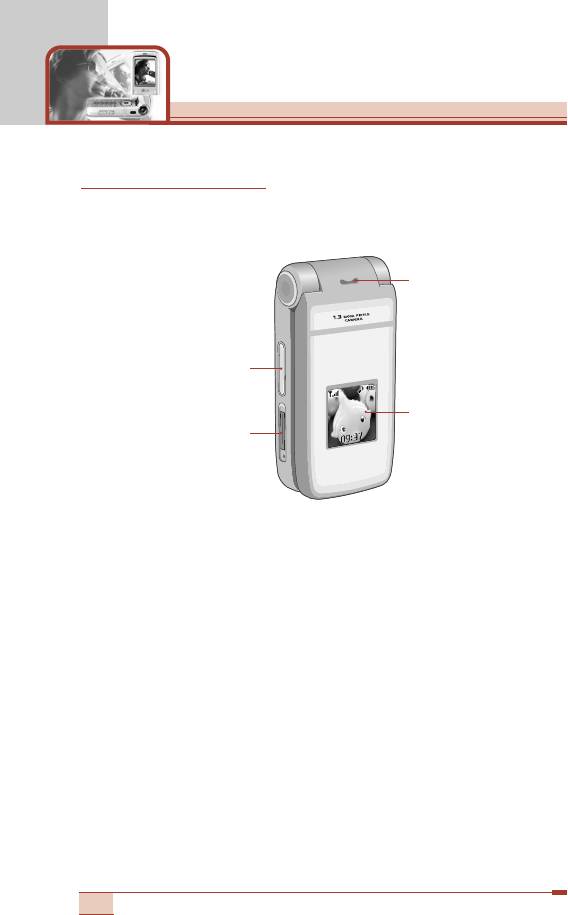
Parts of the phone
Front view
3. Speaker
1. Up/down side keys
4. Sub LCD
2. Charger connector
1. Up/down side keys
- Press and hold down this key to display the current time on the
sub LCD.
- Controls the volume of keypad tone in standby mode with the
clamshell open.
- Controls the earpiece volume during a phone call.
- Use these keys to zoom in/out in the camera preview mode.
- Controls the volume during the playback of the video clips,
MP3, or games.
2. Charger connector: Connect the mains adapter here for
charging. Also connect the USB cable here to use the PC sync
program.
3. Speaker
4. Sub LCD
12

Rear view
1. Flash
2. Camera lens
3. Battery cover
4. Battery latch
1. Flash
2. Camera lens
Note
• If there is dirt on the camera lens, it could affect the
image quality.
3. Battery cover
4. Battery latch: Press this to open the battery cover.
13
T5100 features
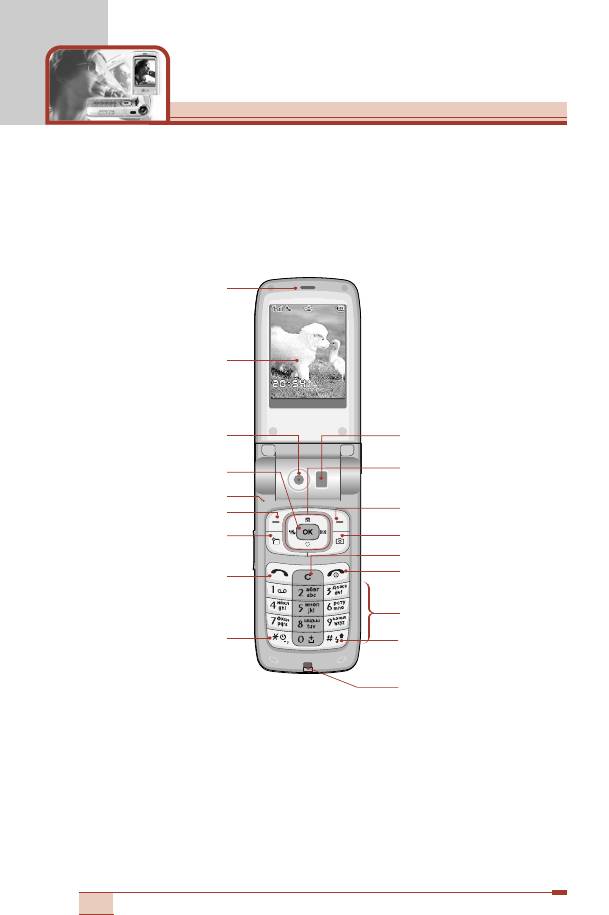
Open view
14
Fri 28 MaFri 28 May
MenMenu NamesNames
1. Earpiece
2. LCD screen
3. Camera lens
10. Flash
4. Confirm/Internet key
11. Navigation keys
5. Microphone
12. Right soft key
6. Left soft key
7. Scheduler key
13. Camera key
14. Clear key
8. Send key
15. End/Power key
16. Alphanumeric keys
9. Special function key
17. Special function key
18. Holes for a
carrying strap

1. Earpiece
2. LCD screen: Displays phone status icons, menu items, Web
information, pictures and more in full colour.
3. Camera lens
4. Confirm/Internet key: Selects menu options and confirms
actions.
* In standby mode, holding this key down connects to the
Internet.
5. Microphone: Can be muted during a call for privacy.
(See page 35.)
6. 12. Left soft key / Right soft key:
Each of these keys performs
the function indicated by the text on the screen immediately
above it.
7. Scheduler key: A shortcut key to the Scheduler menu.
8. Send key: Dials a phone number and answers incoming calls.
You can also quickly access the latest incoming, outgoing and
missed calls by pressing the key in standby mode.
9. Special function key (*)
• In standby mode, press and hold down this key to make a call
by voice dialling.
• Self-timer: In camera shot mode, press this key to activate/
deactivate the self-timer. You can set the desired delay time
using Timer mode menu [Menu 6-6-4]. (See page 85.)
10.
Flash: In preview mode, you can turn the flash on/off by pressing
#. And you can set the desired flash mode using the Flash mode
menu [Menu 6-6-5]. (See page 85.)
11. Navigation keys: Use to scroll through menus and move the
cursor. You can also use these keys for quick access to the
following functions.
• Up navigation key: By pressing this key in standby mode, you
can search the phonebook by name.
• Down navigation key: A shortcut key to the Favorite menu.
15

T5100 features
• Left navigation key: A shortcut key to the Profiles menu.
• Right navigation key: A shortcut key to the message inbox.
13. Camera key: Use for camera feature.
• In standby mode, press this key once to go to the Camera
menu. Long press of this key directly opens the viewfinder.
Then use this key to take a shot.
14. Clear key: Deletes a character by each press. Hold the key
down to clear all input. Also use this key to go back to the
previous screen.
15. End/Power key:
Used to end a call or reject a call and also to go
back to standby mode. Hold this key down to turn the phone on/off.
16. Alphanumeric keys: Enter numbers, letters and some special
characters.
17. Special function key (#)
• Press and hold down to enter a pause while keying in a phone
number.
• Flash: In camera shot mode, with this key you can turn the flash
on/off.
18. Holes for a carrying strap
16
17
Men
Back
Menu
Men
u Bac
Bac
k Men
Men
u Bac
Bac
k
M
e
n
Men
c
a
u B
Bac
k
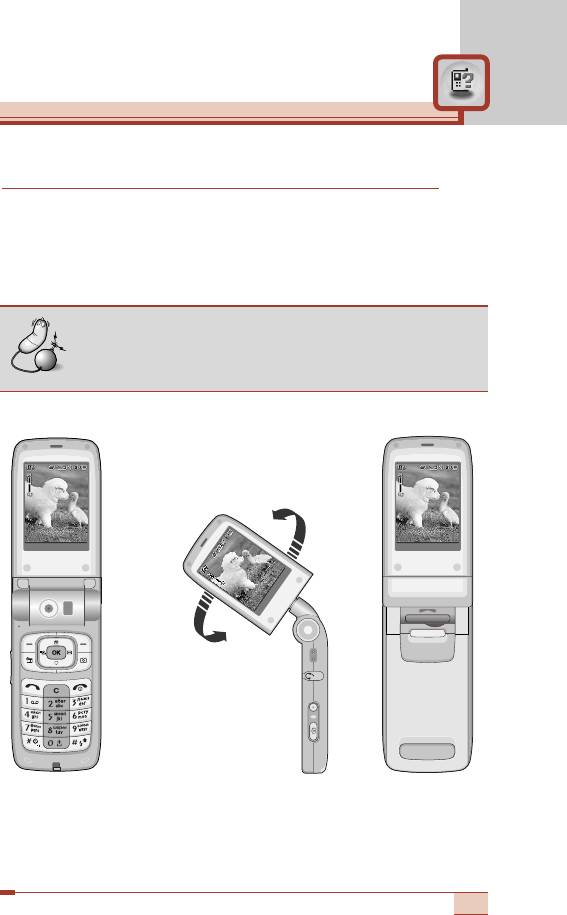
1.3 Mega pixel digital camera with DSC look
The flexible LCD screen rotates ANTICLOCKWISE up to 180
degrees. It functions as a viewfinder, and enables you to take
pictures with ease and pizzazz. When the clamshell is turned 180
degrees, you can use the main LCD screen as an external one.
It’s almost a digital camera.
Note
• Do not rotate the LCD screen by force. Do not try to
rotate the LCD screen clockwise.
This state enables you to
take self-shots.
T5100 features
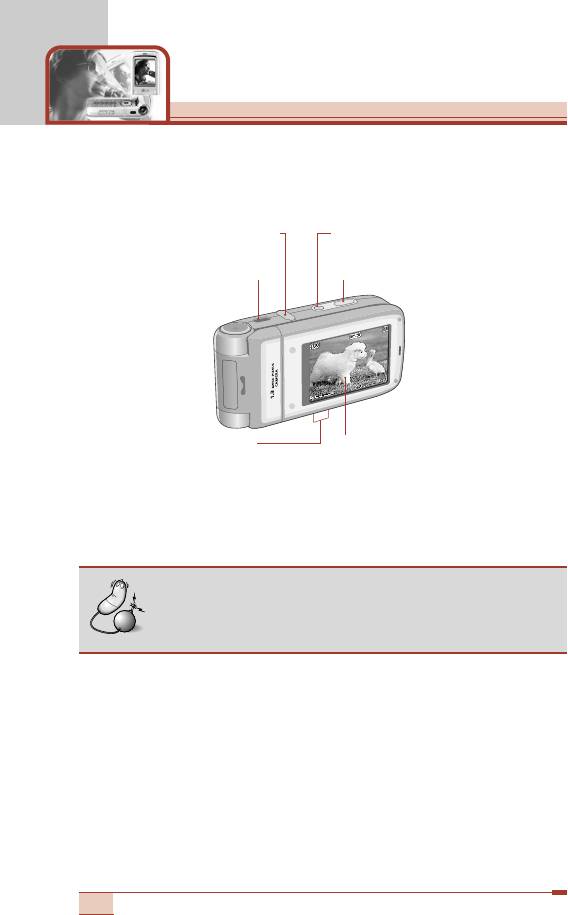
After turning the clamshell 180 degrees, and in the clamshell closed
state, you can use the phone as a digital camera.
➋ Headset jack
➌ Camera setting menu key
➊ Infrared port
➍ Side camera key
➏ Up/down side keys
➎ Main LCD
➊ Infrared port
➋ Headset jack
➌ Camera setting menu / confirm key: In the preview mode,
opens the camera setting menus and confirms the choice.
Note
• You can also play the MP3 files by long press of this
key, when the clamshell is closed.
➍ Side camera key: Press and hold down this key to open the
camera module. And press this key to take a shot.
➎ Main LCD: When you take a picture, functions as the viewfinder.
➏ Up/down side keys: Use to move the cursor to the left or right.
And you can zoom in/out using these keys.
Taking pictures in the clamshell closed state
1. Turn the clamshell 180 degrees to make the main LCD outside.
2. Press and hold down the side camera key (
➍
) for over 2
seconds. It opens camera module and the preview screen opens.
18
Note
• In the preview mode, no key operation for 1 minute
will close the camera module and go back to
standby mode.
3. Focus on the subject to capture, then press the side camera key
(
➍
). The captured image is automatically saved in My photo
gallery [Menu 6-4]. (Refer to page 81 regarding My photo
gallery.)
4. Before taking a shot, you can set the following options by
pressing the camera setting menu key (
➌
).
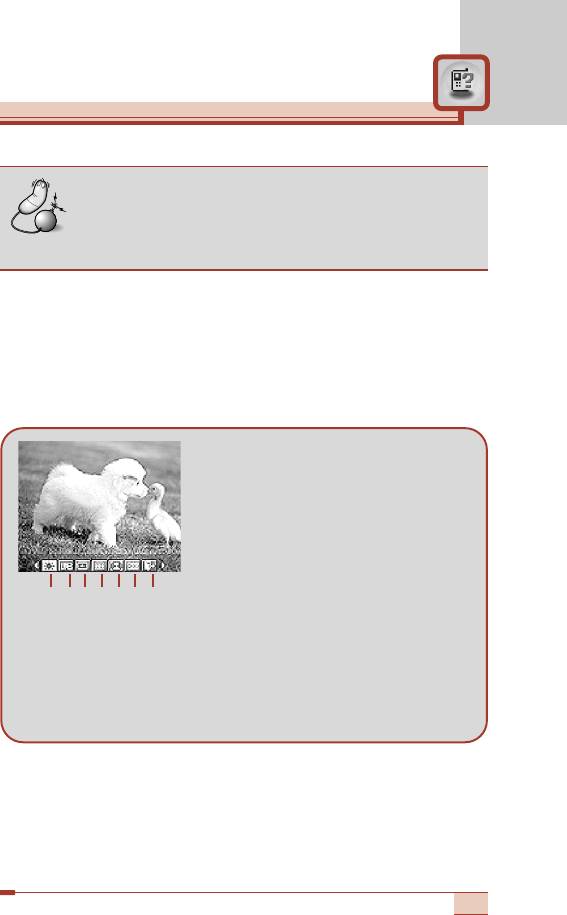
➀ Brightness: 6 grades are
available.
➁ White Balance: 5 settings are
available: Auto, Daylight,
Incandescent, Cloudy, and
Flourescent.
➂ Resolution: Select the desired
resolution. Refer to page 79.
➃ Color Mode: 5 settings are available: Color, Mono, Sepia,
Blue, and Negative.
➄ Shot Mode:
Select between Single shot and Multiple shot.
➅ Photo gallery: After taking a shot, you can use this to check
out the captured image.
➆ Exit: Select this to exit from the setting menu.
To move between setting menus, use up/down side keys (
➏
).
After highlighting a menu, press the camera setting menu key (
➌
)
to open the menu.
Select the desired value using the up/down side keys (
➏
) and
press the camera setting menu key (
➌
) to confirm it.
19
Brightness
➀
➁
➂
➃
➄
➅
➆
T5100 features
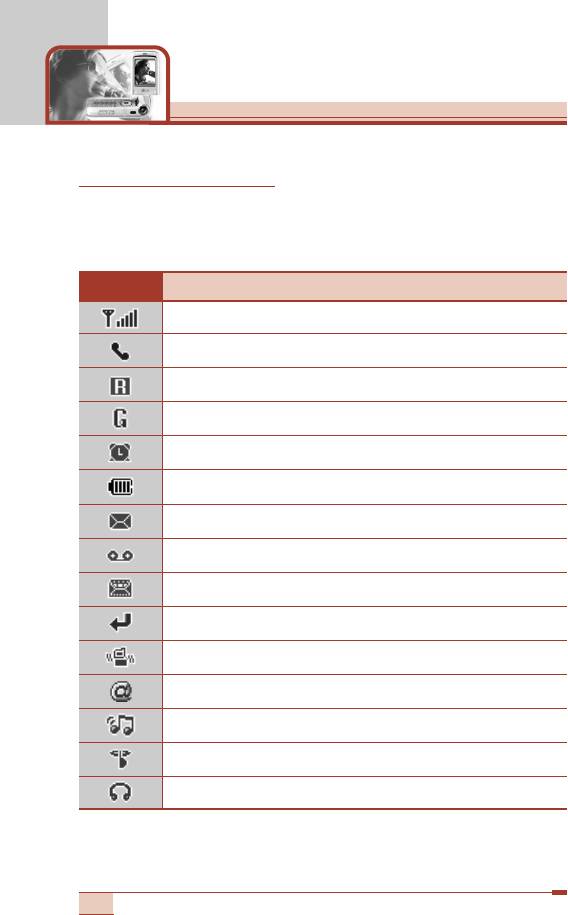
Display information
The table below describes various display indicators or icons that
appear on the phone’s display screen.
On-Screen Icons
Icon Description
Indicates the strength of the network signal.
Indicates a call is in progress.
Indicates that you are roaming on another network.
Indicates that GPRS service is available.
Indicates the alarm has been set and is on.
Indicates the status of the battery charge.
Indicates the receipt of a text message.
Indicates the receipt of a voice message.
Indicates the receipt of a MMS message.
Indicates that Call divert function is activated.
Indicates that the vibration ringer has been set.
Indicates the receipt of an e-mail message.
Indicates the Loud profile is activated.
Indicates the Silent profile is activated.
Indicates the Headset profile is activated.
20
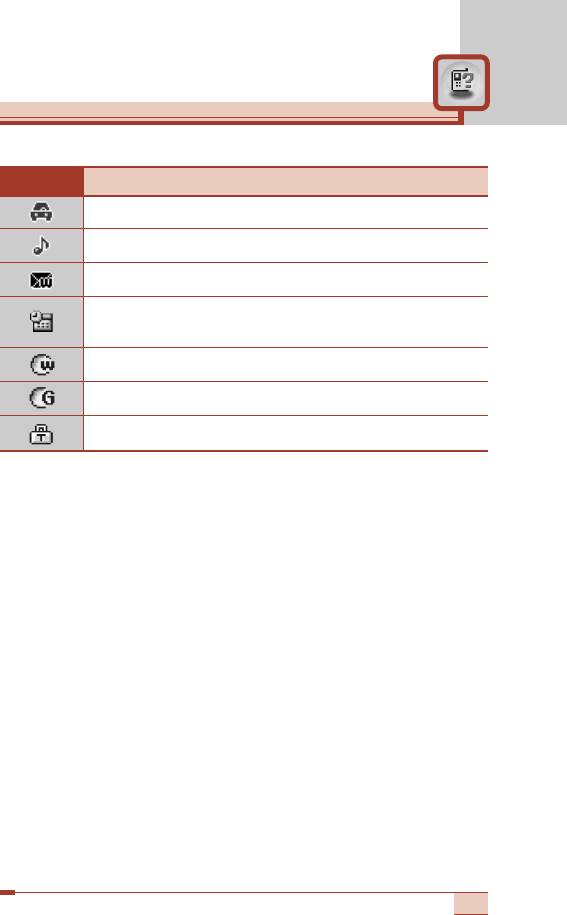
Icon Description
Indicates the Car profile is activated.
Indicates the General profile is activated.
Indicates that you can use the push message service.
Indicates that you have a schedule for the selected
day in the schedule menu.
Indicates that the phone is accessing the WAP.
Indicates that you are using GPRS.
Indicates that you entered the security page.
21
Оглавление
- íÂıÌË͇ ·ÂÁÓÔ‡ÒÌÓÒÚË
- é„·‚ÎÂÌËÂ
- îÛÌ͈ËË T5100
- èÓ‰„ÓÚӂ͇ Í Ì‡˜‡ÎÛ ‡·ÓÚ˚
- [
- éÒÌÓ‚Ì˚ ÙÛÌ͈ËË
- ëÚÛÍÚÛ‡ ÏÂÌ˛
- Ç˚·Ó ÙÛÌ͈ËÈ Ë ÓÔˆËÈ
- èÓÙËÎË [åÂÌ˛ 1]
- ëÔËÒÓÍ Á‚ÓÌÍÓ‚ [åÂÌ˛ 2]
- ê‡Á‚ΘÂÌËfl Ë Ò‚ËÒ [åÂÌ˛ 3]
- 鄇̇ÈÁ [åÂÌ˛ 4]
- ëÓÓ·˘ÂÌËfl [åÂÌ˛ 5]
- ä‡Ï‡ [åÂÌ˛ 6]
- åÛθÚËωˇ [åÂÌ˛ 7]
- èÓ‰‰ÂÊË‚‡ÂÏ˚ ÛÒÎÛ„Ë [åÂÌ˛ 8]
- ìÒÚ‡ÌÓ‚ÍË [åÂÌ˛ 9]
- ÇÓÔÓÒ˚ Ë ÓÚ‚ÂÚ˚
- ÇÓÔÓÒ˚ Ë ÓÚ‚ÂÚ˚
- ÄÍÒÂÒÒÛ‡˚
- íÂıÌ˘ÂÒÍË ı‡‡ÍÚÂËÒÚËÍË
- è‡ÏflÚ͇
- Guidelines for safe and efficient use
- Table of contents
- T5100 features
- Getting started
- General functions
- [
- General functions
- Menu Tree
- Selecting functions and options
- Profiles [Menu 1]
- Call register [Menu 2]
- Tools [Menu 3]
- Organiser [Menu 4]
- Messages [Menu 5]
- Camera [Menu 6]
- Multimedia [Menu 7]
- Service [Menu 8]
- Settings [Menu 9]
- Q&A
- Q&A
- Accessories
- Technical data
- Memo

