Karcher Autolaveuse B 90 R Confort Bp Pack: Operation
Operation: Karcher Autolaveuse B 90 R Confort Bp Pack

-
3
Place the boards on the edge of the pal-
let. Place the boards in such a way that
they lie in front of the four wheels of the
machine. Fasten the boards with
screws.
Slide the four support beams included
in the packaging under the ramp.
Remove the wooden bars in front of the
wheels.
Figure 5, see cover page
Pull the brake lever and push the appli-
ance down the ramp with the level
pulled.
or
Release emergency-stop button by
turning.
Set main switch to "1".
Press the drive direction switch and
slowly move the machine down from
the ramp.
Set main switch back to "0".
The procedure for changing the cleaning
head is described in the chapter "Mainte-
nance Tasks".
Note
On some models, the cleaning head is al-
ready installed.
The installation of the brushes is described
in the chapter "Maintenance Tasks".
Figure 6, see cover page
Insert the vacuum bar into the vacuum
bar suspension in such a manner that
the profiled sheet is positioned above
the suspension.
Tighten the wing nuts.
Insert the suction hose.
Danger
Risk of injuries. Never use the unit without
protective roof in areas where the opera-
tors can be hit by dropping objects.
Note
Press emergency-stop switch to immedi-
ately switch off all functions of the machine.
Danger
Danger of accident. The immobilizing brake
must always be checked first on an even
surface before starting the machine.
Take the seating position.
Release emergency-stop button by
turning.
Set main switch to “1”.
Select a direction of travel.
Gently depress drive pedal.
The brake must get released and you
must be able to hear it (the control lamp
for immobilizing brake on the console
switches off). The machine must roll
slightly on a plane surface. When the
pedal is released, the brake falls in in an
audible manner. Switch off the ma-
chine and call the aftersales service if
the above-mentioned events do not oc-
cur.
Danger
Danger of accident. If the machine does not
brake, then proceed as follows:
If the device does not come to a halt on
a ramp with a gradient of 2% when you
release the drive pedal, then the emer-
gency-stop button may be pressed for
safety reasons only if the mechanical
functioning of the immobilizing brake
has been checked properly before com-
missioning the device.
Switch off the machine only after it
comes to a complete halt (on an even
surface) and call up the aftersales serv-
ice!
Further, follow all warning instructions
for braking.
Danger
Danger of tipping if gradient is too high.
The gradient in the direction of travel
should not exceed 10%.
Danger of tipping when driving round
bends at high speed.
Danger of slipping on wet floors.
Drive slowly when cornering.
Danger of tipping on unstable ground.
Only use the machine on sound surfac-
es.
Danger of tipping with excessive sideways
tilt.
The gradient perpendicular to the direc-
tion of travel should not exceed 10%.
Release emergency-stop button by
turning.
Sit on the seat and set main switch to
"1".
Set the drive direction using the drive
direction button at the operator console.
Determine the driving speed by press-
ing the drive pedal.
Stop the machine: Release the drive
pedal.
Note
The drive direction can also be changed
during the drive. Thus, very blunt edges
can be polished by moving forward and
backward a few times.
When switching on the display, the follow-
ing messages will appear in sequence:
–
„ < SELFTEST >“: The control conducts
a self-test.
–
„Water E-----F“ (model Adv): Water lev-
el in the fresh water tank (lasts for 6
seconds).
„OpHrs xxxxxhxxm+“ (Classic model):
Operating hours (lasts for 6 seconds)
–
"Battery: E-----F“: Charging status of
battery.
In case of overloading, the drive motor au-
tomatically switches off after a certain peri-
od. A fault message is displayed on the
console. The concerned unit gets switched
off if the controls get overheated.
Allow machine to cool down at least for
15 minutes.
Turn the main switch to "0" and turn it
back to "1".
몇
Warning
Risk of damage. Only use the recommend-
ed detergents. With respect to different de-
tergents the operator bears the increased
risk regarding the operational safety and
danger of accident.
Only use detergents that are free from sol-
vents, hydrochloric acid and hydrofluoric
acid.
Follow the safety instructions for using de-
tergents.
Note
Do not use highly foaming detergents.
Recommended detergents:
Open the cover of the fresh water reser-
voir.
Fill fresh water (max. 60 °C) until 15 mm
below the upper edge of the tank.
Pour in detergent.
Note
If detergent is added to the cleaning deter-
gent tank first, followed by water, there
could be a lot of foam.
Close the cover of the fresh water res-
ervoir.
Note
Fill up the fresh water tank completely be-
fore starting up the machine to ventilate the
water supply system.
Install cleaning head
Installing the Brushes
Installing the Vacuum Bar
Operation
Check immobilizing brake
Driving
Driving
Display
Overload
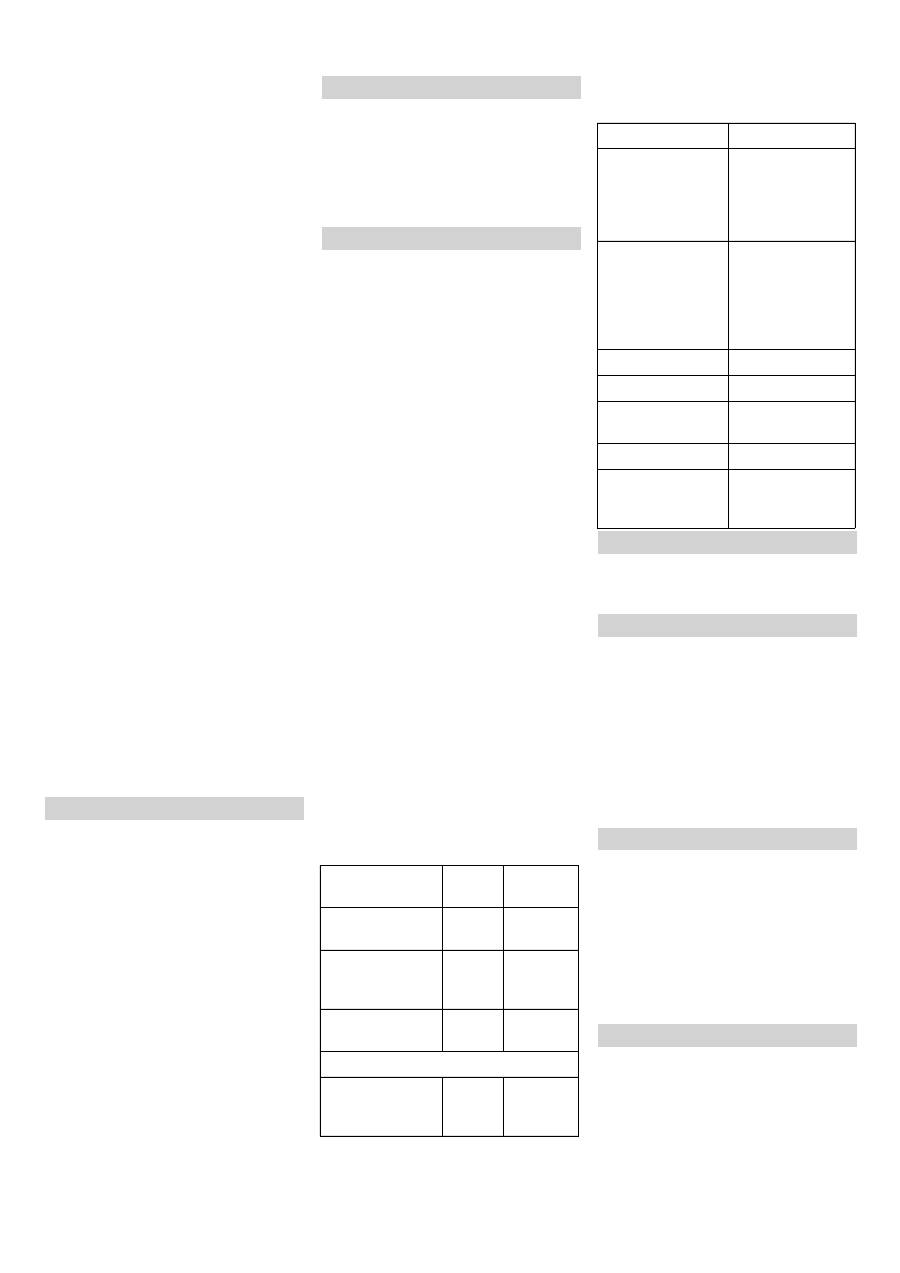
Filling in detergents
Detergent
Application
Detergent
Routine cleaning of all wa-
ter resistant floors
RM 746
RM 780
Routine cleaning of glossy
surfaces (e.g. granite)
RM 755 es
Routine cleaning and ba-
sic cleaning of industrial
floors
RM 69 ASF
Routine cleaning and ba-
sic cleaning of fine stone-
ware tiles
RM 753
Routine cleaning of tiles in
sanitary areas
RM 751
Cleaning and disinfection
in sanitary areas
RM 732
Removal of coating from
all alkali-resistant floors
(e.g. PVC)
RM 752
Removal of coating from li-
noleum floors
RM 754
Fresh water
17 EN
-
4
Connect the water hose to the connec-
tion neck on the filling system.
Open the water supply.
Once the maximum fill level is reached,
the built-in floater valve will stop the wa-
ter inflow.
Shut off water supply.
Remove the water hose.
Detergent is added to the fresh water on
the way to the cleaning head with the help
of a dosaging device.
Place the detergent bottle into the de-
vice.
Close the bottle lid.
Insert the suction hose of the dosaging
equipment into the bottle.
Note
The metering device can be used to add
3% of detergent at maximum. In case of a
higher dose the detergent must be poured
into the fresh water tank.
Caution
Danger of plug-up by dried detergent when
the detergent is added to a fresh water tank
made by Dose. The flow meter of the dos-
ing equipment can stick on account of dry-
ing detergent and hamper the functioning
of the dosing equipment. Always rinse at
the end the fresh water tank and the appli-
ance with clear water. To rinse, open the
regulating knob fully, set the detergent me-
tering setting to 0% and set the cleaning
program with water at the programme se-
lection switch.
Note
The appliance is equipped with a fresh wa-
ter level display. If the fresh water tank is
empty, then the function of adding deter-
gent gets deactivated. The cleaning head
continues to work without the addition of
any liquid.
Figure 7, see cover page
1
Driving
Driving to the Place of Use.
2 Scrubbing suction
Wet clean the floor and vacuum up dirt
water.
3 Wet scrubbing
Wet clean the floor and allow the deter-
gent to react.
4 Vacuuming
Suck in the dirt fleet.
5 Polishing
Polishing the floor without the applica-
tion of liquid.
6 Scrub the floor without applying water
(vacuum polishing)
Polish the floor without applying any flu-
id and suck in the polishing dust.
Note
Depending on the programme, the vacuum
bar and the cleaning head must be lowered
using the respective controls in order to ex-
ecute the selected programme.
Use the Info button to select the menu
items and do the settings.
–
Turning the button to the right/left
scrolls through the menus forward/
backward.
–
The selected setting gets accepted by
pressing the button.
You can make the settings for the different
cleaning programs in the operator menu.
Different parameters can be set based on
the cleaning program. The settings are
done using the Info button.
Release emergency-stop button by
turning.
Sit on the seat and set main switch to
"1".
The display shows the battery charging
status and the fresh water level.
Select cleaning program.
Call the operator menu by turning the
info button.
Select the desired parameter by turning
the Info button.
Press Info button - the set value blinks.
Reset the parameter by turning the info
button.
Accept modified setting by pressing the
Info button or wait till the set value is ac-
cepted automatically.
Note
If the selected parameter does not change
within 10 seconds, then the display goes
back to displaying the battery charging sta-
tus and the fresh water level.
The same cleaning parameter can have in-
dividual settings for each cleaning pro-
gram.
All settings are saved even in the power-
less state of the machine.
Turn the info button until "Information-
menu" is displayed.
Retrieve the info menu by pressing the
info button.
The following information can be displayed
by turning the info button:
Set the water quantity at the regulation
knob according to the dirt level and the
type of flooring.
Press down the rear surface of the ped-
al to raise/lower the cleaning head, re-
lease and let the pedal move upwards.
The brush drive will start as soon as the
cleaning head is lowered.
Press down the front surface of the ped-
al to raise/lower the cleaning head and
lock it.
Pull the lever up to raise/lower the vac-
uum bar, press toward the outside and
lower.
The suction process will start as soon
as the level is moved down.
Pull the lever to raise and lower the vac-
uum bar up and lock.
To improve the vacuuming result on tiled
floors the vacuum bar can be turned to an
oblique position of up to 5°.
Figure 8, see cover page
Release the wing nuts.
Turn the vacuum bar.
Tighten the wing nuts.
Filling system (optional)
Metering system (only Dose model)
Cleaning Programs
Info button (only Adv. model)
Settings (only Adv. model)
Operator menu
Adjustable parameters
Adjustable pa-
rameters
min:ste
p:max
Remark
Cleanspeed (max.
cleaning speed)
1:1:6
1=1km/h,
6=6km/h
FACT (brush
speed)
–
Power
Whisper
Fine
Vacuum (suction
performance)
–
Low
High
Only with Dose model
Chemical/Agent
(detergent meter-
ing)
0,5%:0,
5%:3%
–
Info menu
Display
Significance
Ophrs xxxxxhxxm+
Operating hour
counter
When the counter
is running, "+" will
be displayed
Water E-----F
Water level in fresh
water tank
"C" blinks while the
metering pump is
operating (only
Dose model)
Speed: xkm/h
Current speed
Alfred/Kärcher
Manufacturer
B90R Dxx
Appliance descrip-
tion
Prog.Vers. x.x
Softwareversion
Exit Inform.menu
Exit the info menu
by pressing the
info button.
Setting the water quantity
Raise/lower the cleaning head
Lower
Raise
Raise/lower the vacuum bar
Lower
Raise
Setting the Vacuum Bar
Oblique position
18 EN
Оглавление
- Deutsch
- Vor Inbetriebnahme
- Betrieb
- Transport
- Hilfe bei Störungen
- Technische Daten
- Zubehör und Ersatzteile Garantie EG-Konformitätserklärung
- English
- Before Startup
- Operation
- Transport
- Troubleshooting
- Technical specifications
- Accessories and Spare Parts Warranty EC Declaration of Conformity
- Français
- Avant la mise en service
- Fonctionnement
- Transport
- Assistance en cas de panne
- Caractéristiques techniques
- Accessoires et pièces de re- change Garantie Déclaration de conformité CE
- Italiano
- Prima della messa in funzio- ne
- Funzionamento
- Trasporto
- Guida alla risoluzione dei guasti
- Dati tecnici
- Accessori e ricambi Garanzia Dichiarazione di conformità CE
- Nederlands
- Voor de inbedrijfstelling
- Werking
- Transport
- Hulp bij storingen
- Technische gegevens
- Toebehoren en reserveonder- delen Garantie EG-conformiteitsverklaring
- Español
- Antes de la puesta en marcha
- Funcionamiento
- Transporte
- Ayuda en caso de avería
- Datos técnicos
- Accesorios y piezas de re- puesto Garantía Declaración de conformidad CE
- Português
- Antes de colocar em funcio- namento
- Funcionamento
- Transporte
- Conservação e manutenção
- Ajuda em caso de avarias
- Dados técnicos
- Acessórios e peças sobres- salentesGarantia Declaração de conformidade CE
- Dansk
- Inden ibrugtagning
- Drift
- Transport
- Hjælp ved fejl
- Tekniske data
- Tilbehør og reservedele Garanti EU-overensstemmelseser- klæring
- Norsk
- Før den tas i bruk
- Drift
- Transport
- Feilretting
- Tekniske data
- Tilbehør og reservedeler Garanti EU-samsvarserklæring
- Svenska
- Före ibruktagande
- Drift
- Transport
- Åtgärder vid störningar
- Tekniska data
- Tillbehör och reservdelar Garanti Försäkran om EU-överens- stämmelse
- Suomi
- Ennen käyttöönottoa
- Käyttö
- Kuljetus
- Häiriöapu
- Tekniset tiedot
- Varusteet ja varaosat Takuu EU-standardinmukaisuusto- distus
- Πίνακας περιεχομένων
- Πριν τη θέση σε λειτουργία
- Λειτουργία
- Μεταφορά
- Αντιμετώπιση βλαβών
- Τεχνικά χαρακτηριστικά
- Εξαρτήματα και ανταλλακτικά Εγγύηση Δήλωση Συμμόρφωσης των Ε . Κ .
- Türkçe
- Cihaz ı çal ı ş t ı rmaya ba ş lama- dan önce
- Çal ı ş t ı rma
- Ta ş ı ma
- Ar ı zalarda yard ı m
- Teknik Bilgiler
- Aksesuarlar ve yedek parça- lar Garanti AB uygunluk bildirisi
- Оглавление
- Перед началом работы
- Эксплуатация
- Транспортировка
- Помощь в случае непола - док
- Технические данные
- Принадлежности и запас - ные детали Гарантия Заявление о соответствии ЕС
- Magyar
- Üzembevétel el ő tt
- Üzem
- Szállítás
- Segítség üzemzavar esetén
- M ű szaki adatok
- Tartozékok és alkatrészek Garancia EK konformitási nyiltakozat
- eština
- P ř ed uvedením do provozu
- Provoz
- P ř eprava
- Pomoc p ř i poruchách
- Technické údaje
- P ř íslušenství a náhradní díly Záruka Prohlášení o shod ě pro ES
- Slovenšina
- Pred zagonom
- Obratovanje
- Transport
- Pomo č pri motnjah
- Tehni č ni podatki
- Pribor in nadomestni deli Garancija ES-izjava o skladnosti
- Polski
- Przed pierwszym uruchomie- niem
- Dzia ł anie
- Transport
- Czyszczenie i konserwacja
- Usuwanie usterek
- Dane techniczne
- Wyposa ż enie dodatkowe i cz ęś ci zamienne Gwarancja Deklaracja zgodno ś ci UE
- Românete
- Înainte de punerea în func ţ iu- ne
- Func ţ ionarea
- Transportul
- Remedierea defec ţ iunilor
- Date tehnice
- Accesorii ş i piese de schimb Garan ţ ie Declara ţ ie de conformitate CE
- Slovenina
- Pred uvedením do prevádzky
- Prevádzka
- Preprava
- Pomoc pri poruchách
- Technické údaje
- Príslušenstvo a náhradné die- ly Záruka Vyhlásenie o zhode s norma- mi EÚ
- Hrvatski
- Prije prve uporabe
- U radu
- Transport
- Otklanjanje smetnji
- Tehni č ki podaci
- Pribor i pri č uvni dijelovi Jamstvo EZ izjava o uskla đ enosti
- Srpski
- Pre upotrebe
- Rad
- Transport
- Otklanjanje smetnji
- Tehni č ki podaci
- Pribor i rezervni delovi Garancija Izjava o uskla đ enosti sa propisima EZ
- Съдържание
- Преди пускане в експлоата - ция
- Експлоатация
- Транспорт
- Помощ при неизправности
- Технически данни
- Принадлежности и резерв - ни части Гаранция Декларация за съответ - ствие на ЕО
- Eesti
- Enne seadme kasutuselevõttu
- Käitamine
- Transport
- Abi häirete korral
- Tehnilised andmed
- Lisavarustus ja varuosad Garantii EÜ vastavusdeklaratsioon
- Latviešu
- Pirms ekspluat ā cijas uzs ā k- šanas
- Darb ī ba
- Apar ā ta p ā rvietošana
- Pal ī dz ī ba darb ī bas trauc ē ju- mu gad ī jum ā
- Tehniskie dati
- Piederumi un rezerves da ļ as Garantija EK Atbilst ī bas deklar ā cija
- Lietuviškai
- Prieš pradedant naudoti
- Naudojimas
- Transportavimas
- Pagalba gedim ų atveju
- Techniniai duomenys
- Priedai ir atsargin ė s dalys Garantija EB atitikties deklaracija
- Зміст
- Перед початком роботи
- Експлуатація
- Транспортування
- Допомога у випадку неполадок
- Технічні характеристики
- Приладдя й запасні деталі Гарантія Заява при відповідність Європейського співтовариства
