Karcher Autolaveuse B 90 R Confort Bp Pack: Before Startup
Before Startup: Karcher Autolaveuse B 90 R Confort Bp Pack
-
2
Danger
Danger of explosion. Do not put tools or
similar on the battery, i.e. on the terminal
poles and cell connectors.
Risk of injury. Ensure that wounds never
come into contact with lead. Always clean
your hands after having worked with batter-
ies.
The "Pack" model contains built-in batter-
ies.
Swivel the seat to the front.
Figure 3, see cover page
Insert batteries.
Note
The two recommended battery types are
stored in different ways inside the appli-
ance.
Caution
Risk of damage. Ensure correct polarity.
Lubricate the battery pole with pole
grease.
Connect pole using the enclosed con-
necting cable.
Connect the connection cable to the
free battery poles (+) and (-).
Insert battery plug.
Raise the safety support und and swivel
seat to the bottom.
Caution
Risk of damage due to full discharge!
Charge the batteries before commissioning
the appliance.
Note
The device is equipped with a safety mech-
anism to prevent total discharge, i.e. when
the permissible minimum capacity is
reached, then the machine can only be
driven and existing lamps can be switched
on. In such a case, the battery monitoring
symbol on the control console glows red.
Drive the appliance directly to the
charging station; avoid any steep gradi-
ents in the process.
Note
While using other batteries (for e.g. batter-
ies from other manufacturers) the total dis-
charge protection level must be reset by
the Kärcher aftersales service according to
the respective battery.
Danger
Risk of electric shock. Observe supply net-
work and fuse protection - see "Charger".
Only use the charger in dry rooms with suf-
ficient ventilation!
Note
Average charging time is approx. 10 - 12
hours.
The recommended chargers (matching the
batteries used) are regulated electronically
and will automatically switch off the charg-
ing process.
Danger
Danger of explosion. Wet batteries can
only be charged with the seat tilted up.
Tilt the seat upward.
Take the power cord out of its holder
and insert the plug into the socket.
The display will show the charging sta-
tus of the batteries.
Note
All cleaning and drive functions are blocked
during the charging process. The functions
are blocked until a minimum of 90 minutes
has elapsed and the power plug has been
pulled.
After the charging process, pull the
power plug and insert into the holder on
the appliance.
Tilt the seat upward.
Remove battery plug and join it to the
charging cable.
Connect the charger to the mains and
turn it on.
Switch off the charger and remove the
plug from the socket after you have fin-
ished charging.
Pull the battery cable from the charger
cable and connect it to the machine.
Add distilled water one hour before the
charging process comes to an end; fol-
low the correct acid level. There are
corresponding indicators on the battery.
At the end of the charging process, all
cells must gas.
Danger
Danger of chemical burns. Filling water in
while the battery is discharged can lead to
acid leaks!
Wear goggles when handling battery acid
and adhere to instructions to prevent inju-
ries and damage to clothing.
Flush any acid drops on the skin or clothes
immediately with plenty of water.
Caution
Use only distilled or desalinated water (EN
50272-T3) for filling the battery.
Do not add any substances (so-called per-
formance improving agents), else warranty
claims will not be entertained.
Turn main key to "0" and remove it.
Swivel the seat to the front.
Pull out the battery plug.
Clamp off the minus pole of the battery.
Clamp off the remaining cables from the
battery.
Remove the batteries.
Dispose of the used batteries according
to the local provisions.
Note
Press the emergency-stop button to imme-
diately deactivate all functions and turn the
key switch to the "0" position.
Four floor boards of the pallet are fas-
tened with screws. Unscrew these
boards.
Figure 4, see cover page
Before Startup
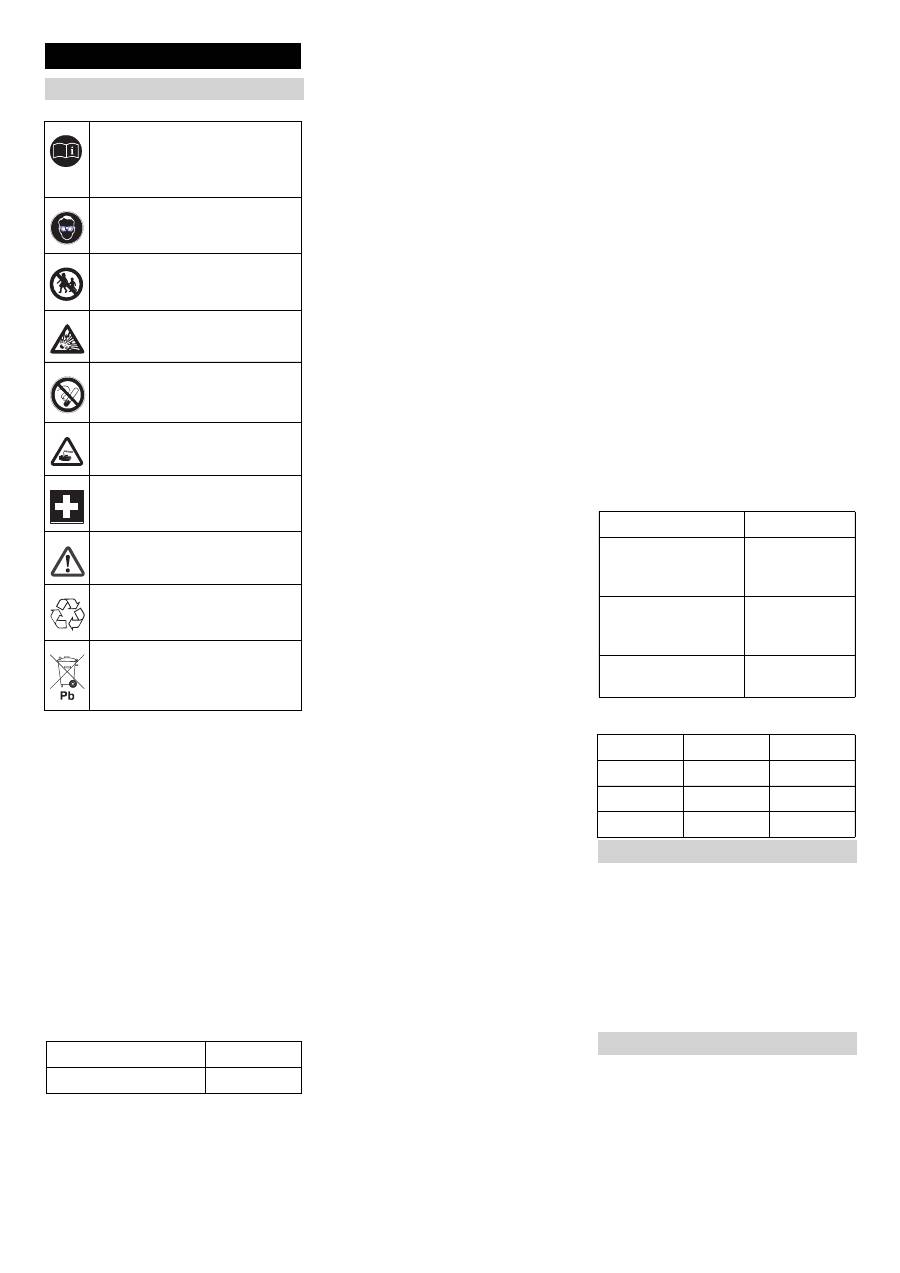
Batteries
Observe the directions on the bat-
tery, in the instructions for use
and in the vehicle operating in-
structions
Wear eye protection
Keep children away from acid and
batteries
Danger of explosion
Fire, sparks, naked flames and
smoking must be strictly avoided
Danger of chemical burns
First aid
Warning note
Disposal
Do not throw the battery into the
regular waste
Insert batteries and connect
Layout A (Fig. 3A)
180 Ah
Layout B (Fig. 3B)
240 Ah
Charge the batteries
"Pack" model
Model without integrated charger
Low maintenance batteries (wet batter-
ies)
Recommended batteries, chargers
Order No.
Battery pack, 180 Ah,
maintenance-free
(4 batteries)
6.654-124.0
Battery pack, 240 Ah,
maintenance-free
(4 batteries)
6.654-119.0
Charger for mainte-
nance-free batteries
6.654-125.0
Maximum battery dimensions
Layout
a
b
Length
244 mm
312 mm
Width
190 mm
182 mm
Height
275 mm
365mm
Removing the batteries
Unloading
16 EN
Оглавление
- Deutsch
- Vor Inbetriebnahme
- Betrieb
- Transport
- Hilfe bei Störungen
- Technische Daten
- Zubehör und Ersatzteile Garantie EG-Konformitätserklärung
- English
- Before Startup
- Operation
- Transport
- Troubleshooting
- Technical specifications
- Accessories and Spare Parts Warranty EC Declaration of Conformity
- Français
- Avant la mise en service
- Fonctionnement
- Transport
- Assistance en cas de panne
- Caractéristiques techniques
- Accessoires et pièces de re- change Garantie Déclaration de conformité CE
- Italiano
- Prima della messa in funzio- ne
- Funzionamento
- Trasporto
- Guida alla risoluzione dei guasti
- Dati tecnici
- Accessori e ricambi Garanzia Dichiarazione di conformità CE
- Nederlands
- Voor de inbedrijfstelling
- Werking
- Transport
- Hulp bij storingen
- Technische gegevens
- Toebehoren en reserveonder- delen Garantie EG-conformiteitsverklaring
- Español
- Antes de la puesta en marcha
- Funcionamiento
- Transporte
- Ayuda en caso de avería
- Datos técnicos
- Accesorios y piezas de re- puesto Garantía Declaración de conformidad CE
- Português
- Antes de colocar em funcio- namento
- Funcionamento
- Transporte
- Conservação e manutenção
- Ajuda em caso de avarias
- Dados técnicos
- Acessórios e peças sobres- salentesGarantia Declaração de conformidade CE
- Dansk
- Inden ibrugtagning
- Drift
- Transport
- Hjælp ved fejl
- Tekniske data
- Tilbehør og reservedele Garanti EU-overensstemmelseser- klæring
- Norsk
- Før den tas i bruk
- Drift
- Transport
- Feilretting
- Tekniske data
- Tilbehør og reservedeler Garanti EU-samsvarserklæring
- Svenska
- Före ibruktagande
- Drift
- Transport
- Åtgärder vid störningar
- Tekniska data
- Tillbehör och reservdelar Garanti Försäkran om EU-överens- stämmelse
- Suomi
- Ennen käyttöönottoa
- Käyttö
- Kuljetus
- Häiriöapu
- Tekniset tiedot
- Varusteet ja varaosat Takuu EU-standardinmukaisuusto- distus
- Πίνακας περιεχομένων
- Πριν τη θέση σε λειτουργία
- Λειτουργία
- Μεταφορά
- Αντιμετώπιση βλαβών
- Τεχνικά χαρακτηριστικά
- Εξαρτήματα και ανταλλακτικά Εγγύηση Δήλωση Συμμόρφωσης των Ε . Κ .
- Türkçe
- Cihaz ı çal ı ş t ı rmaya ba ş lama- dan önce
- Çal ı ş t ı rma
- Ta ş ı ma
- Ar ı zalarda yard ı m
- Teknik Bilgiler
- Aksesuarlar ve yedek parça- lar Garanti AB uygunluk bildirisi
- Оглавление
- Перед началом работы
- Эксплуатация
- Транспортировка
- Помощь в случае непола - док
- Технические данные
- Принадлежности и запас - ные детали Гарантия Заявление о соответствии ЕС
- Magyar
- Üzembevétel el ő tt
- Üzem
- Szállítás
- Segítség üzemzavar esetén
- M ű szaki adatok
- Tartozékok és alkatrészek Garancia EK konformitási nyiltakozat
- eština
- P ř ed uvedením do provozu
- Provoz
- P ř eprava
- Pomoc p ř i poruchách
- Technické údaje
- P ř íslušenství a náhradní díly Záruka Prohlášení o shod ě pro ES
- Slovenšina
- Pred zagonom
- Obratovanje
- Transport
- Pomo č pri motnjah
- Tehni č ni podatki
- Pribor in nadomestni deli Garancija ES-izjava o skladnosti
- Polski
- Przed pierwszym uruchomie- niem
- Dzia ł anie
- Transport
- Czyszczenie i konserwacja
- Usuwanie usterek
- Dane techniczne
- Wyposa ż enie dodatkowe i cz ęś ci zamienne Gwarancja Deklaracja zgodno ś ci UE
- Românete
- Înainte de punerea în func ţ iu- ne
- Func ţ ionarea
- Transportul
- Remedierea defec ţ iunilor
- Date tehnice
- Accesorii ş i piese de schimb Garan ţ ie Declara ţ ie de conformitate CE
- Slovenina
- Pred uvedením do prevádzky
- Prevádzka
- Preprava
- Pomoc pri poruchách
- Technické údaje
- Príslušenstvo a náhradné die- ly Záruka Vyhlásenie o zhode s norma- mi EÚ
- Hrvatski
- Prije prve uporabe
- U radu
- Transport
- Otklanjanje smetnji
- Tehni č ki podaci
- Pribor i pri č uvni dijelovi Jamstvo EZ izjava o uskla đ enosti
- Srpski
- Pre upotrebe
- Rad
- Transport
- Otklanjanje smetnji
- Tehni č ki podaci
- Pribor i rezervni delovi Garancija Izjava o uskla đ enosti sa propisima EZ
- Съдържание
- Преди пускане в експлоата - ция
- Експлоатация
- Транспорт
- Помощ при неизправности
- Технически данни
- Принадлежности и резерв - ни части Гаранция Декларация за съответ - ствие на ЕО
- Eesti
- Enne seadme kasutuselevõttu
- Käitamine
- Transport
- Abi häirete korral
- Tehnilised andmed
- Lisavarustus ja varuosad Garantii EÜ vastavusdeklaratsioon
- Latviešu
- Pirms ekspluat ā cijas uzs ā k- šanas
- Darb ī ba
- Apar ā ta p ā rvietošana
- Pal ī dz ī ba darb ī bas trauc ē ju- mu gad ī jum ā
- Tehniskie dati
- Piederumi un rezerves da ļ as Garantija EK Atbilst ī bas deklar ā cija
- Lietuviškai
- Prieš pradedant naudoti
- Naudojimas
- Transportavimas
- Pagalba gedim ų atveju
- Techniniai duomenys
- Priedai ir atsargin ė s dalys Garantija EB atitikties deklaracija
- Зміст
- Перед початком роботи
- Експлуатація
- Транспортування
- Допомога у випадку неполадок
- Технічні характеристики
- Приладдя й запасні деталі Гарантія Заява при відповідність Європейського співтовариства
