LG KG810: Messages
Messages: LG KG810

Messages
New message Menu 5.1
Messages
This menu includes functions related to SMS (Short Message Service), MMS
(Multimedia Message Service), Email, voice mail, as well as the network’s service
messages.
Write text message (Menu 5.1.1)
You can write and edit text message, checking the number of message pages.
1. Enter the New messages menu by pressing the left soft key [Select].
2. If you want to write a new message, select Write text message.
3. To make text input easier, use T9.
4. After you complete the message, to select the required option, press the left soft
key [Options].
Options
]
Send: Sends text messages.
1. Enter numbers of recipient.
2. Press key to add more recipients.
3. You can add phone numbers in the address book.
4. Once the numbers have been entered, press the left soft key to send the
message. All messages will automatically be saved in the outbox folder, even after a
sending failure.
61

Messages
Insert
Messages
]
Symbol: You can add special characters.
]
Picture: You can insert the Default graphics or graphics in My pictures that are
available for short messages.
]
Animation: You can send the message with moving image.
]
Sound: You can insert sounds that are available for short messages.
]
Text template: You can use Text templates already set in the phone.
]
Contact: You can add phone numbers or e-mail addresses in the address book.
]
Business card: You can add your Business card to the message.
Save to draft: Stores messages in the Drafts folder.
Clear text: You can delete the text on writing the message.
Set T9: Select the desired language for T9 input mode. You can also deactivate the
T9 input mode by selecting ‘T9 off’.
Cancel: If you press Exit whilst writing a message, you will be taken back to the
message menu. Also the written message will not have been saved.
Note
]
This phone supports EMS release 5, so is available to send colour pictures, sounds, text styles,
etc.. If the other parties handsets do not support such options, the pictures, sounds or texts
sent may not be displayed correctly on their phones.
62

Write multimedia message (Menu 5.1.2)
Messages
A multimedia message can contain text, images, and/or sound clips. This feature can
be used only if it is supported by your network operator or service provider. Only
devices that offer compatible multimedia message or e-mail features can receive and
send multimedia messages.
1. Enter the New message menu by pressing the left soft key [Select].
2. If you want to write a new message, select Write multimedia message.
3. You can create a new message or choose one of the multimedia message
templates already made.
Maximum available file size, that can be inserted to MMS-message, is 100 kb.
Options
]
Send: You can send multimedia messages to multiple recipients, as well as save it to
send at a later time.
]
Insert: You can send the message with a symbol, videos, images, sounds and so on.
Note
]
All messages will be automatically saved in the outbox folder, even after a sending failure.
]
Preview: You can preview multimedia messages you have created.
]
Save: You can save multimedia messages To drafts or As template.
]
Add slide: You can add a slide before or after current slide.
63

Messages
]
Move to slide: You can move to previous or next slide.
Messages
]
Delete slide: You can delete current slides.
]
Set timer: You can set a timer for slide, text, picture and sound.
]
Add T9 dictionary: You can add your own words. This menu will only be shown
when the edit mode has been set to T9ABC/T9Abc/T9abc.
]
Set T9: Select the desired language for T9 input mode. You can also deactivate
T9 input mode by selecting ‘T9 off’.
]
Cancel: Will take you back to the Message menu.
Note
]
When creating a multimedia message, if you upload a picture (50K) you may find that whilst
the picture is loading you will not be able to carry out any other actions until the picture has
competed loading.
Write email message (Menu 5.1.3)
To send/receive an email, you should set up the email account. See Email on page
56 first.
1. You can input up to 12 email addresses in the To and Cc field.
Tip: To input "@", press the and select "@".
2. Key in the subject of the mail and press OK.
3. After writing an email message, press the left soft key [Options]. You can
access the following option menus.
64

]
Send: Sends the email message.
Messages
]
Edit recipients: You can edit recipients.
]
Edit subject: You can edit the subject.
]
Save to drafts: Select this to save the message in Drafts.
]
T9 dictionary: Select the language for T9 input mode. You can also deactivate the
T9 input mode by selecting 'T9 off'.
]
Exit: If you select Exit whilst writing a message, you will be taken back to the
message menu. Also the written message will not have been saved.
4. You can attach files by pressing the right soft key [Attach].
Note
]
1) Email account
- Max. number of accounts: 3
2) Number of messages
- Inbox: 20 (for each account)
- Draft: 5 (common)
- Outbox: 5 (common)
- Sent: 10 (common)
3) Size limit
- Sending message: Max 2000 characters
Max 200K bytes for total attachments
Max 5 attachments
- Receiving message: Max message size 30K bytes (Message body + attachments)
65
Messages
Messages
Inbox Menu 5.2
You will be alerted when you have received a message. They will be stored in the
Inbox.
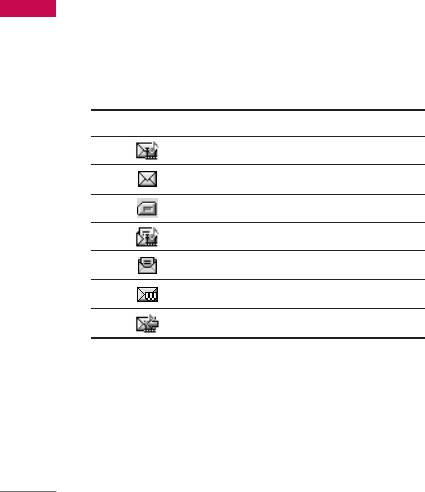
In the Inbox, you can identify each message by icons. For detail, see the icon directive.
Icon Icon directive
Multimedia message
Text message
SIM message
Read multimedia message
Read text message
Push message
Notified multimedia message
If the phone shows ‘No space for SIM message’, you only have to delete the SIM
messages from the Inbox. If the phone displays ‘No space for message’, you will then
need to delete messages, media or applications to free up space.
* SIM message
SIM message means that the message is exceptionally stored in the SIM card. You
can move this message to the phone.
66

When you are notified that you have received a multimedia message, you have to
Messages
wait for the message to be downloaded before you can view it.
To read a message, select one of the messages by pressing the left soft key .
]
View: You can view the received messages.
]
Delete: You can delete the current message.
]
Reply: You can reply to the sender.
]
Forward: You can forward the selected message to another party.
]
Return call: You can call back the sender.
]
Information: You can view information about received messages; Sender’s address,
Subject (only for Multimedia message), Message date & time, Message type,
Message size.
]
Delete all: You can delete all messages.
Mailbox Menu 5.3
When you access this menu, you can either connect to your remote mailbox to
retrieve your new email messages, or you can view the previously retrieved email
messages without logging in to the email server.
You can check the saved emails, drafts, outbox, and sent emails. In the Inbox, up to
40 emails are stored.
67
Messages
Messages
Draft Menu 5.4
Using this menu, you can preset up to five multimedia messages that you use most
frequently. This menu shows the preset multimedia message list.
The following options are available.
]
View: You can see the multimedia messages.
]
Edit: Allows you to modify the chosen message.
]
Delete: Deletes the message you choose.
]
Information: To view the information of the message.
]
Delete all: Deletes all of the messages in the folder.
Outbox Menu 5.5
This menu allows you to view the messages which are currently sending or messages
that have failed sending previously.
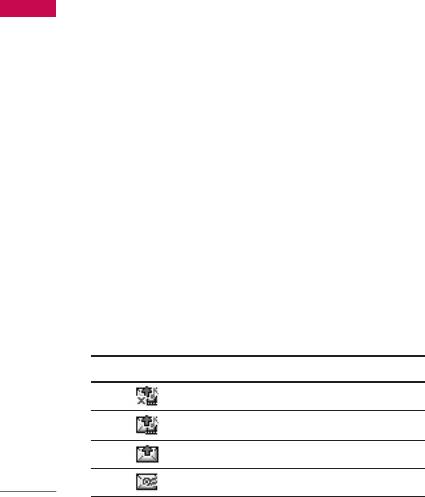
Icon Icon directive
MMS Unsent
MMS delivery confirmed
SMS Unsent
SMS delivery confirmed
68

]
View: You can view the message.
Messages
]
Forward: You can forward the selected message to another party.
]
Delete: You can delete the message.
]
Information: You can check the information of each message.
]
Delete all: You can delete all the messages in the outbox.
Sent Menu 5.6
This menu allows you to view the messages which are already sent. You can check
the time and the contents of message.
Listen to voicemail Menu 5.7
Once this menu has been selected, simply press the left soft key [OK] to listen to
voice mail. You can also hold down the key in standby mode to listen to voice
mail.
Note
]
When you receive a voice mail, your phone will display an icon and you will hear an alert.
Please check with your network provider for details of their service in order to configure the
handset correctly.
69

Messages
Messages
Info service Menu 5.8
(Dependent to network and subscription)
Info service messages are text messages delivered by the network to your handset.
They provide general information such as weather reports, traffic news, taxis,
pharmacies, and stock prices. When you receive an info service message, you will see
a popup message show you that or the info service message is directly displayed. To
view the message again follow the sequence shown below;
Receive (Menu 5.8.1)
1. When you have received an info service message and select Read to view the
message, it will be displayed on the screen. You can read another message by
scrolling , or [Next].
2. The message will be shown until another message is selected.
Inbox (Menu 5.8.2)
You can view all info messages from network.
Topics (Menu 5.8.3)
(Dependent to network and subscription)
]
Add new: You can add Info service message numbers in the Phone memory with its
nickname.
70

]
View list: You can see Info service message numbers which you have added. If you
Messages
press [Options], you can edit and delete info message categories which you
have added.
]
Active list: You can select info service message numbers in the active list. if you
activate an info service number, you can receive messages sent from the number.
Alert (Menu 5.8.4)
You can set the alert tone if you receive the info message. If you select Yes, you can
sound the alert tone when you receive the info message.
Auto display (Menu 5.8.5)
You can set whether info message is displayed on the screen automatically or not as
soon as you receive it.
Language (Menu 5.8.6)
You can set the language of info message.
Templates Menu 5.9
Tex t (Menu 5.9.1)
You have 6 text templates as below;
- Please call me back.
71

Messages
- I'm late. I will be there at
Messages
- Where are you now?
- I am on the way.
- Top urgent. Please contact.
- I love you.
Multimedia (Menu 5.9.2)
After you have saved a new template, you can use the following options.
]
View: You can see multimedia templates.
]
Delete: You can delete multimedia templates.
]
Add new: Allows you to add new multimedia templates.
]
Write messages: You can write and send multimedia messages.
]
Edit: You can edit multimedia templates.
]
Delete all: Allows you to delete all multimedia messages.
Business card (Menu 5.9.3)
You can create your own business card.
72

Settings Menu 5.0
Messages
Text message (Menu 5.0.1)
Text, Voice, Fax, Paging, X.400, E-mail, ERMES
Usually, the type of message is set to Text. You can convert your text into alternative
formats. Contact your service provider for the availability of this function.
]
Validity period: This network service allows you to set how long your text messages
will be stored at the message centre.
]
Delivery reports: If you set to Yes, you can check whether your message is sent
successfully.
]
Reply with same service centre: When a message is sent, it allows the recipients to
reply and charge the cost of the reply to your telephone bill.
]
SMS centre: If you want to send the text message, you can receive the address of
SMS centre through this menu.
]
Subject: You can insert the subject.
]
Bearer setting: You can set the bearer setting such as GSM, GPRS.
MMS message (Menu 5.0.2)
]
Priority: You can set the priority of the message you choose.
]
Validity period: This network service allows you to set how long your text messages
73

Messages
will be stored at the message centre.
Messages
]
Subject: You can enter multimedia messages subject when this menu is on.
]
Delivery reports: If it is set to Yes in this menu, you can check whether your
message is sent successfully.
]
Auto retrieve: If you select On, you receive multimedia messages automatically. If
you select Off, you receive only notification message in the inbox and then you
can check this notification. If you select Home network only, you receive
multimedia messages depends on Homenetwork.
]
Network settings: If you select multimedia message server, you can set URL for
multimedia message server.
]
Permitted message types
Personal: Personal message.
Advertisements: Commercial message.
Information: Necessary information.
]
Slide duration: You can set the duration of slide of multimedia message.
]
Read receipts: You can receive the report whether the receiver received the
message or not.
Email (Menu 5.0.3)
This menu allows you to edit, delete or add an email account.
74

]
Email accounts
Messages
You can set up to 3 email accounts by selecting Add new.
Using the Edit menu, you can set the following values.
]
Insert Business Card: Select Ye s to attach your Business Card to your email
messages.
]
Network profile
Voice mail centre (Menu 5.0.4)
You can receive the voicemail if your network service provider supports this feature.
When a new voicemail has arrived, the symbol will be displayed on the screen. Please
check with your network service provider for details of their service in order to
configure the phone accordingly.
Download messages (Menu 5.0.5)
]
Receive
Ye s : If you select this menu, your phone will receive Info service messages.
No: If you select this menu, your phone will receive Info service messages any
more.
Memory status Menu 5.
*
You can check the status of memory: Text, Multimedia, Email
75
Оглавление
- é„·‚ÎÂÌËÂ
- ǂ‰ÂÌËÂ
- ÑÎfl LJ¯ÂÈ ·ÂÁÓÔ‡ÒÌÓÒÚË
- êÂÍÓÏẨ‡ˆËË ‰Îfl ·ÂÁÓÔ‡ÒÌÓ„Ó Ë ˝ÙÙÂÍÚË‚ÌÓ„Ó ËÒÔÓθÁÓ‚‡ÌËfl
- îÛÌ͈ËË KG810
- èÓ‰„ÓÚӂ͇ Í Ì‡˜‡ÎÛ ‡·ÓÚ˚
- éÒÌÓ‚Ì˚ ÙÛÌ͈ËË
- Ç˚·Ó ÙÛÌ͈ËÈ Ë ÓÔˆËÈ
- åÂÌ˛ ‚Ó ‚ÂÏfl ‡Á„Ó‚Ó‡
- CxeÏa ÏeÌ˛
- èÓÙËÎË
- Ç˚ÁÓ‚˚
- àÌÒÚÛÏÂÌÚ˚
- 鄇̇ÈÁÂ
- ëÓÓ·˘ÂÌËfl
- åÛθÚËωˇ
- é·ÓÁ‚‡ÚÂθ
- ᇄÛÁÍË
- ç‡ÒÚÓÈÍË
- ÄÍÒÂÒÒÛ‡˚
- íÂıÌ˘ÂÒÍË ı‡‡ÍÚÂËÒÚËÍË
- Contents
- Introduction
- For Your Safety
- Guidelines for safe and efficient use
- KG810 Features
- Installation
- General functions
- Selecting functions and options
- In-Call Menu
- Menu tree
- Profiles
- Call register
- Tools
- Organiser
- Messages
- Multimedia
- Browser
- My stuff
- Settings
- Accessories
- Technical Data
