LG KG300: Multimedia
Multimedia: LG KG300

Multimedia
Under this menu, there are a couple of applications for
Applications [Menu 4-1-2]
user’s Multimedia purpose.
KG300 is designed to support Java application. There
is one default Java game, and you are allowed to
Games & Apps [Menu 4-1]
download and install more Java games or applications
from either WAP or local (saved in My stuffs folder).
Games [Menu 4-1-1]
First time use
KG300 builds in 3 creative games (Fruits Go!!, Bunny
There is a default Java game in KG300.
|
Golf & Thunder of Wizard) for this product. You may use
navigation key to select the games you would like to
1. Goto Games & Apps menu and select Applications to
Multimedia
play. Then press OK to select the game. After entering
play Java games.
the game, you may use the option menu to start game
2. Select the name of game and press Options to launch
/ check ranking / read game guide / exit the game from
the game, adjust the setting or view the information
the menu option. You can also adjust the game setting
of Java game.
at very beginning when you enter the game menu.
User can also download Java application from WAP.
• Start game: Start to play the game
1. After downloading the application from WAP, select
• Game help: Show the play rule for the game
Application to function.
• Game Settings
2. Select one of java application downloaded from WAP
– Background Music
and press Options to launch, update the application,
– Sound Effect
adjust the setting, view the information, or delete the
– Vibration
application.
28

User can save Java games or application to My stuff
– Network access: allows you to decide when to
folder.
connect the network
1. Save the Java applications (both .jad & .jar) files to
– Auto invocation: allows you to decide whether
My stuff.
automatically launched by push SMS.
2. Install these two files by pressing Options
.
– Messaging: allows you to decide how to receive/send
message.
3. After installing, the saved java games or application
will be shown under Games & Apps menu.
– Recording: allows you to decide how to record audio
4. Select one of Java applications and press Options
4. Information: Allows you to check and read the
| Multimedia
to launch, adjust the setting, view the information, or
information of Java games and application including:
delete it.
name of application, memory size, application
version, name of vendor and authorized source.
! Note
5. Delete: Allows you to delete Java games and
Java MIDlet suit must contain .jad and .jar file format in
application downloaded from WAP or saved from
order to function application or play Java games normally.
local.
Options of Application includes:
! Note
1. Launch: Allows you to launch the Java game or
Default Java game of this handset can not be deleted.
application you have selected.
2. Update: Allows you to update the Java game to the
Settings [Menu 4-1-3]
latest version.
1. Network profiles: Please refer to Browser ➝ WAP ➝
3. Setting: Allows you to define the permission level
Settings ➝ Edit profile for detail introduction.
when using Java applications. Permission levels are
“Allow”, “Prompt always”, and “Never”. There are
four different permission can be configured when you
are using Java application including:
29

Multimedia
2. Memory status: Indicates the total memory, used and
To start using Camera [Menu 4-2-1]
free memory.
1. In Multimedia menu, select Camera and press OK.
3. Information: Provides information of Java, CLDC and
2. Press Options to personalize your camera setting
MIDP version.
otherwise you might take the picture by pressing
S
Talk key or pressing q quick key (right down side key).
Camera [Menu 4-2]
3. To zoom screen in /and out, please press volume
You can use this phone in taking photos with the
key(right up 2 side keys).
|
phone’s built-in camera and adjust its settings. Your
! Note
Multimedia
phone supports horizontal OSD type operation style
The photo will be saved in the folder called Photo of My
and only supports vertical type in 240x320 image size.
stuff menu. You can also view the picture from by selecting
The camera lens is on the back of the phone, and the
Album from options list and you will jump to Image viewer.
display of the phone works as a viewfinder. If there’s
not enough memory for camera, you need to delete old
To setup the Camera [Menu 4-2-2]
photos to free some spaces for new photos or you can
choose to save photos in memory card. The status of
1. On the preview mode, you can press “Options”. All
your video camera setting will be displayed on the top
options will be displayed in the bottom of screen, and
of preview mode.
you can adjust the setting through the preview mode
directly and your setting will be displayed on the top
! Note
of screen.
Do not use this feature when it violates local laws.
30
2. Using Navigation key up and down to select different
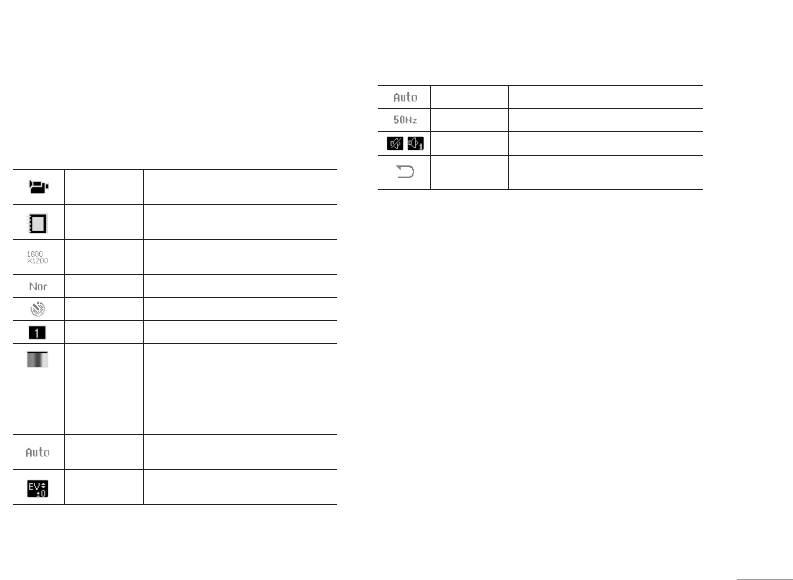
Scene Mode Auto / Night
camera settings and right & left to select your
Bonding 50 / 60 Hz
preference.
Sound Sound off /Sound 1/Sound 2/Sound 3
The options list including:
Restore
You can restore the factory setting by
Video Camera
You can jump to video camera mode
Settings
selecting this option.
mode
by pressing OK
Album mode You can review pictures you have
taken by pressing OK
Image Viewer [Menu 4-3]
| Multimedia
Image Size 240x320, 320x240, 640x480,
800x600,1600x1200
All images from EMS, MMS, WAP and camera could
be reviewed from here and storage is located in either
Quality Normal / Low / High
phone or memory card. You may choose to view your
Delay Timer Timer Off / 5, 10, 15 sec.
images in List or Matrix Style.
Continue Shot 1 Shot / 3 Shot / 5 Shot / 9 Shot
Your phone provides the following selections for your
Effect Setting Effect off / Grayscale / Sepia /
option:
Sepia Green / Sepia Blue /
Color Invert / Gray Invert /
• View: Allows you to view the pictures saved in the
Blackboard / Whiteboard /
My stuff.
Copper Carving / Blue Carving /
Embossment / Contrast & Sketch
• Browse style: Allows you to select the style when you
browse pictures.
White
Auto WB / Daylight / Tungsten /
Balance
Fluorescent / Cloud / Incandescence
• Forward: Allows you to forward your pictures as
EV
EV-4 / EV-3 / EV-2 / EV-1 / EV 0 / EV+1 /
wallpaper, screen saver, power on/off display, contact
EV+2 / EV+3 / EV+4
ID or send to others via MMS or Bluetooth.
31

Multimedia
• Rename: Allows you to rename the file.
To start using Video recorder [Menu 4-4-1]
• Delete: Allows you to delete the pictures in the
1. In Multimedia menu, select Video recorder and press
My stuff.
OK.
• Delete all files: Allows you to delete all pictures in
2. Press Options to personalize your camera setting
once.
otherwise you might take the picture by pressing
S
• Sort: Allows you to sort your photos by name, type,
Talk key or q quick key (right down side key).
time, or size.
3. You can also press
S Talk or q camera quick
|
• Storage: Allows you to choose to store your pictures
key and < LSK to resume the recording. When
Multimedia
either in phone or memory card.
you may press > RSK to stop recording, then
the clip will be saved in the video folder of My stuff
! Note
automatically. After recording, the clip will be saved
For sending picture via MMS, Maximum size of the
as your setting.
attachment can’t be more than 300KB. However, the
maximum size of sending MMS will be determined by your
4. You may review your video clips from video player.
service provider.
! Note
You can also quickly access the camera function through
Video recorder [Menu 4-4]
right down side key.
You can record the video clip through build-in camera.
! Note
The status of your video recorder setting will be
The video clip will be saved in Video player menu and Video
displayed on the top of preview mode.
folder in My stuff. You can also view the picture from Album
from options list.
32
! Note
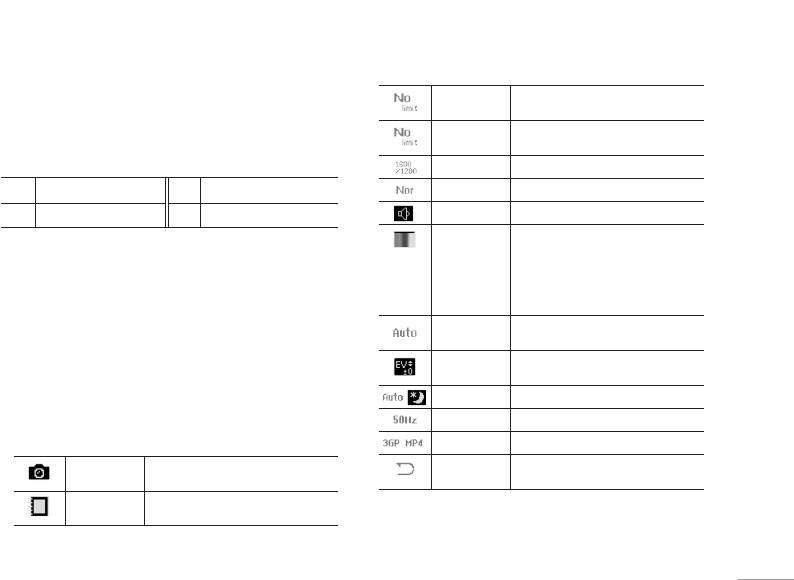
Playlist mode You can review video clips you have
Volume Side key (right up 2 side keys) will be functioned as
taken by pressing OK.
zoom screen in/ and out.
Rec Time
No Time limit / 15 sec / 30 sec / 60 sec
Limit.
Key definition
File Size Limit No time limit / 95KB / 195KB / 295KB
<
Back / Stop
S
Record/Pause/Resume
Video Quality High / Normal / Low / Fine
>
Options/Pause/Resume
q
Record/Pause/Resume
Record Audio Audio on / Audio off
Effect Setting Effect off / Grayscale / Sepia /
| Multimedia
Sepia Green / Sepia Blue /
To setup the Video recorder [Menu 4-4-2]
Color Invert / Gray Invert /
1. On the preview mode, you can press “Options”.
Blackboard / Whiteboard /
Copper Carving / Blue Carving /
All options will be displayed in the bottom of screen,
Embossment / Contrast / Sketch
and you can adjust the setting through the preview
White
Auto WB / Daylight / Tungsten /
mode directly and your setting will be displayed on
Balance
Fluorescent / Cloud / Incandescence
the top of screen.
EV
EV-4 / EV-3 / EV-2 / EV-1 / EV 0 / EV+1 /
2. Using N avigation key up and down select different
EV+2 / EV+3 / EV+4
camera settings and right & left to select your
Night Mode Auto / Night
preference.
Banding 50 / 60 Hz
The options list including:
Format 3GP / MP4
Camera mode You can jump to camera mode by
Restore
You can restore the factory setting by
pressing OK.
Settings
selecting this option.
Album mode You can review video clips you have
taken by pressing OK.
33

Multimedia
Video player [Menu 4-5]
• Delete all files: Allows you to delete all video files
saved in video My stuff
.
This folder saves videos that are saved from phone or
downloaded from PC. This phone supports .3GP and
• Sort: Allows you to sort the video clips by name, type,
.MP4 form with 176x144 video size.
time, or size.
• Storage: Allows you to check the video’s memory and
To play the video [Menu 4-5-1]
format and play the video clip either from phone or
1. In Multimedia menu, choose Video player, select the
memory card.
|
file you wish to play.
Multimedia
2. After selecting a certain video clip, press Options
Voice recorder [Menu 4-6]
and Play.
Voice recorder is a simple sound recording tool
Your phone provides the following selections for your
provided functionalities for you to manage voice files.
option:
• Play: Allows you to play and view the video content.
To start recording [Menu 4-6-1]
• Forward: Allows you to forward the video to screen
1. In Multimedia menu, choose Voice recorder, press
saver, power on display or power off display. You can
OK.
also forward the video clip to contacts as the caller
2. Press Options and select
Record and choose OK to
ID or share with friend via MMS (as attachment) or
start it.
Bluetooth.
! Note
• Rename: Allows you to rename the video file.
Recording, you may pause or stop the voice recording
• Delete: Allows you to delete the video file saved in the
anytime by pressing soft keys.
My stuff
.
34
! Note
To start composing [Menu 4-7-1]
After recording, the file is saved as AMR/WAV format.
1. In Multimedia menu, choose Melody composer,
press Add to start composing.
Your phone provides the following selections for your
option:
2. You can start to compose your ring tone.
• Record: Allows you to record the sound during your
3. After finishing to compose, the melody will be saved
phone call or other situation.
as IMY format.
• Play: Allows you to play the recorded file.
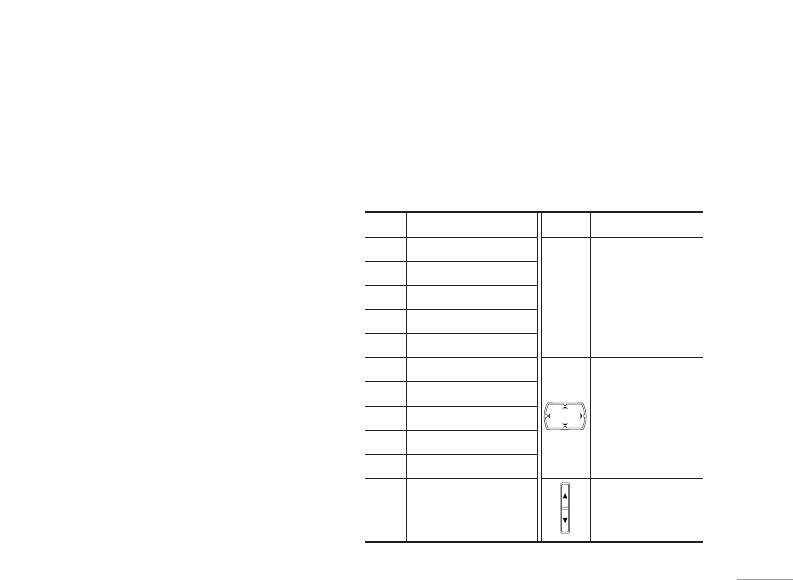
Key Function Key Function
| Multimedia
• Append: Allows you to record in the same file.
1
Do
Change the beat
• Rename: Allows you to recorded file.
2
Re
length of current
musical note also
• Delete: Allows you to delete the file saved in the voice
3
Mi
*
change current
recorder.
4
Fa
note between
• Delete all: Allows you to delete all content saved in
5
Sol
backlight and LED
this folder.
6
La
• Settings: Allows you to choose your storage and file
Navigation key
format.
7
Si
down to flat one
octave of musical
• Forward: Allows you to forward the file to user profile
8
Vibration note
note. Also, you can
or share to friends via MMS or Bluetooth.
9
Backlight/LED note
disable vibration,
0
Rest
backlight and LED.
Melody composer [Menu 4-7]
Switch current
You might change
This function allows you to compose a ring signal or
#
musical note to sharp,
instrument through
melody.
normal or flat stats
volume keys.
35

Multimedia
4. During composing the melody, you may personalize
• Forward: Allows you forward the melody to user
the melody.
profile as ring tone or to share with friends by
Your phone provides the following selections for your
multimedia message, text message or Bluetooth.
option:
• Play: Allows you to listen the melody you have made.
FM radio [Menu 4-8]
• Play speed: Allows you to adjust the three different
This feature allows you to listen to your favourite radio
play speed.
station anytime.
|
• Select instrument: Allows you to select your favor
• Channel list: Allows you to bookmark 9 radio stations
Multimedia
instrument.
by entering the channel name and frequency.
• Save: Allows you to save the melody
• Manual input: Allows you key in the radio station
frequency manually.
Your phone provides the following selections for your
option when you have saved several melodies.
• Preset auto search: Allows you to auto search the
radio station without pressing forward or backward
• Play: Allows you to listen the melody you have made.
key all the time.
• Edit: Allows you to edit the selected melody.
• Settings: Allows you to change the skin of FM radio. It
• Add: Allows you to add more ring tone in the selected
will also allow you to select FM recording format. You
melody.
could select record format as AMR or WAV and turn
• Rename: Allows you to rename a file.
on/ off Background play function.
• Delete: Allows you to delete selected melody in this
• Loud speaker: Allows you to speaker out the radio
folder.
program.
• Delete all files: Allows you to delete all content saved
• Record: Allows you to record your favor program.
in this folder.
36

• Append: Allows you to resume the file you have
recorded and continue to record at the same file.
• File list: Allows you to listen the radio program you
have recorded.
! Note
You have to plug-in the earphone in order to use the FM
radio.
| Multimedia
Schedule FM record [Menu 4-9]
This phone allows you to pre-schedule programs from
FM radio. You are able to record 4 programs according
to your personal setting.
The option of settings including: to turn on/off recording,
to set up time period of pre-scheduling, to record Days/
Weekly/Monthly/Once/Everyday, to set up channel by
listing or manually and to set up file format and storage.
! Note
You must inset headset as the antenna when setting to
pre-schedule radio channel.
37
Оглавление
- Оглавление
- Общая информация
- Ваш телефон
- Подготовка
- Функции вызова
- Язык
- Схема меню
- Проигрыватель
- Вызовы
- Органайзер
- Мультимедиа
- Сообщения
- Мои папки
- Профили
- Контакты
- Инструменты
- Браузер
- Соединения
- Настройки
- Поиск неисправностей
- Вызов экстренных служб
- Аксессуары
- Технические характеристики
- Contents
- General information
- Your phone
- Getting Started
- Call functions
- Input method
- Listing of Functions
- Music player
- Call history
- Organiser
- Multimedia
- Messaging
- My stuff
- Profiles
- Contacts
- Tools
- Browser
- Connectivity
- Settings
- Troubleshooting
- Emergency calls
- Accessories
- Technical data
