LG L342i – страница 8
Инструкция к Сотовому Телефону LG L342i

Settings [Menu 7]
Phone lock [Menu 7-5-2]
• All incoming
You can use security code to avoid unauthorized use
The barring service for all incoming calls
of the phone. Whenever you switch on the phone, the
• Incoming when roaming
phone will request security code if you set phone lock
The barring service for all incoming calls when
to On. If you set phone lock to Automatic, your phone
roaming.
will request security code only when you change your
• Cancel all
SIM card.
You can cancel all barring services.
Call barring [Menu 7-5-3]
• Change password
You can change the password for Call Barring
The Call barring service prevents your phone from
Service.
making or receiving certain category of calls. This
function requires the call barring password. You can
Each call barring menu has following
view the following submenus.
submenus:
• All outgoing
• Activate
The barring service for all outgoing calls.
Allows to request the network to set call restriction
• International
on.
The barring service for all outgoing international
• Cancel
calls.
Set the selected call restriction off.
• International when roaming
• View status
The barring service for all international outgoing calls
View the status whether the calls are barred or not.
except home network.
58 L342i User guide

Settings [Menu 7]
Fixed dial number [Menu 7-5-4] (SIM dependent)
Network settings [Menu 7-6]
You can restrict your outgoing calls to selected phone
You can select a network which will be registered
numbers. The numbers are protected by your PIN2
either automatically or manually. Usually, the network
code.
selection is set to Automatic.
• Activate
Automatic [Menu 7-6-1]
You can restrict your outgoing calls to selected
If you select Automatic mode, the phone will
phone numbers.
automatically search for and select a network for you.
• Cancel
You can cancel fixed dialling function.
Manual [Menu 7-6-2]
• Number list
The phone will find the list of available networks and
You can view the number list saved as Fixed dial
show you them. Then you can select the network
number.
which you want to use if this network has a roaming
agreement with your home network operator. The
Change codes [Menu 7-5-5]
phone let you select another network if the phone fails
PIN is an abbreviation of Personal Identification
to access the selected network.
Number to prevent use by unauthorized person. You
can change the access codes: PIN code,PIN2 code,
Preferred [Menu 7-6-3]
Security code.
You can set a list of preferred networks and the phone
1. If you want to change the Security code/PIN2 code
attempts to register with first, before attempting to
input your original code, and then press OK].
register to any other networks. This list is set from the
phone’s predefined list of known networks.
2. Input new Security code/PIN2 code and verify them.
L342i User guide 59

Settings [Menu 7]
Reset settings [Menu 7-7]
You can initialize all factory defaults. You need
Security code to activate this function.
60 L342i User guide
i-mode [Menu 8]
i-mode [Menu 8-1]
from a list.
You can access i-mode sites and services and also to
Reload: Updates the data on the currently displayed
send and receive i-mode messages.
page.
With the standby screen displayed, press or ,
Page info: Displays URL of the current page.
and .
Compose mail: Dispalys the Compose mail screen
The i-mode menu screen will be displayed.
where you can compose, save and send mail.
i-Menu [Menu 8-1-1]
Mail [Menu 8-1-2]
You can access i-mode and press menu key to select
This menu enables you to use the mail facility.
the required option as belows.
Compose mail [Menu 8-1-2-1]
Add bookmark: Bookmarks the current page.
You can create a new e-mail.
Bookmarks: Displays Bookmark list. This option is
1. Enter the e-mail address of whoever you want to
displayed only when one or more Bookmark is
send the message to.
registered.
2. Scroll down and enter a subject for the e-mail.
Save image: Saves an image on the current page.
3. Scroll down and write your message.
Save page: Saves the current page.
4. Scroll down and press to add picture or sound.
Save selection: Saves the selection you choose.
5. Select Send or Save by pressing .
Certificate info: Displays the server certificate of the
current page.
Go to webpage: Enables you to enter URL or select one
L342i User guide 61

i-mode [Menu 8]
Compose MMS [Menu 8-1-2-2]
Inbox [Menu 8-1-2-3]
You can create an MMS.
This option enables you to read and process your
1. Enter the e-mail address of whoever you want to
incoming mail/MMS, as follows:
send the message to.
Reading mail/MMS
2. Scroll down and enter a subject.
• With the Inbox mail list displayed, use the
3. Scroll down to highlight SMIL and press to
and keys to highlight the required message, then
display SMIL Compose menu screen.
press to read it.
Press the appropriate key for the required option as
• Use the and keys to scroll the mail/MMS.
belows.
• Use the and keys to view the previous or
Add text: Add new text data to the SMIL.
next mail/MMS respectively.
Add image: Adds image to the SMIL.
• When you have finished reading your mail/MMS,
Add audio: Adds sound to the SMIL.
press to return to the Inbox mail list, or
press to return to the standby screen.
Preview: Shows the created SMIL.
Note
Background colour: Changes the background colour
When the Inbox reaches its maximum limit, a new mail/MMS
of the SMIL.
will overwrite an old, read mail/MMS.
Options: Sets the slide playback time.
• mail/MMS icon
4. Select Send or Save by pressing .
Retrieving message
(blue)Unread message
(F:pink)Messages in mobile termina (Server full)
62 L342i User guide
i-mode [Menu 8]
(F:green)Messages in mail server (Mobile
Delete all: Deletes all the mails.
terminal full)
Title sort: Sorts the received mails by title.
Message in server (iMail)
Address sort: Sorts the received mails by address.
Message in server (iMMS)
Date sort: Sorts the received mails by date.
(pink)Message in server (iMail/iMMS)
• With a mail displayed, you can press the to
Processing mail/MMS
access the Inbox detail menu:
• With the Inbox mail list displayed, use the and
Sent mail [Menu 8-1-2-4]
keys to highlight the required mail/MMS and
This option enables you to read and process the
press . The Inbox filter/deletion menu will be
mails/MMS you have sent and saved.
displayed.
Reading Sent mail/MMS
• Press the appropriate key to select the required
• With the sent mail list displayed, use the and
option.
keys to highlight the required mail/MMS and
Show all: Displays all the received mails.
then press to read it.
Show unread: Displays only the unread mails.
• Use the and keys to scroll through the
Show read: Displays only the read mails.
mail/MMS.
Show protected: Displays only the protected mails.
• Use the and keys to view the previous or
Delete one: Deletes the currently selected mail.
next mail/MMS respectively.
Delete read mail: Deletes all the read mails except
protected mails.
L342i User guide 63

i-mode [Menu 8]
Processing Sent mail/MMS
Deleting a Draft mail/MMS
• With the sent mail list displayed, use the and
• With the Draft mail list displayed, use the and
keys to highlight the required mail/MMS then
keys to highlight the required mail/MMS, then
press . The Sent mail filter/deletion menu will be
press to display the deletion menu.
displayed.
• Press the appropriate key for the required option.
• Press the appropriate key for the required option.
Delete one: Deletes the selected mail/MMS.
Title sort: Sorts the sent mails/MMS by title.
Delete all: Deletes all the mails/MMS.
Address sort: Sorts the sent mails/MMS by address.
Check new mail [Menu 8-1-2-6]
Date sort: Sorts the sent mails/MMS by date.
This option gives you access to unread received
Delete one: Deletes the selected mail/MMS.
mail/MMS stocked in the server.
Delete all: Deletes all the mails/MMS.
• Press the appropriate key for the required option
(ALL, iMail and MMS).
Draft [Menu 8-1-2-5]
• The new mail/MMS will be checked and the result
This option enables you to delete or process
will be displayed.
mails/MMS you have created and saved but not sent.
Mail settings [Menu 8-1-2-7]
Editing a Draft mail/MMS
This option gives you access to the Mail settings
• With the Draft screen displayed, you can use the
menu.
and keys to highlight the required
mail/MMS, then press to edit it (see "Compose
mail") .
64 L342i User guide
i-mode [Menu 8]
Edit header [Menu 8-1-2-7-1]
• Key in the signature text required and press .
This option enables you to edit the text that can be
• Use the key to highlight OK and press .
added to the start of mail. You can also decide to auto
The signature text will be stored.
attach this text to the start of all mails.
Reply marker [Menu 8-1-2-7-3]
• Press to set the Auto attach On or Off (a √ in the
This option enables you to edit the symbol that marks
box means Auto attach is turned on).
reply text.
• Use the key to highlight the header text box,
• Press to display the Replay marker screen.
then press to display the Header screen.
• Key in the reply marker symbol required and
• Key in the header text required and press .
press .
• Use the key to highlight OK and press .
• Use the key to highlight OK and press .
The header text will be stored.
The reply marker will be stored.
Edit signature [Menu 8-1-2-7-2]
Auto play [Menu 8-1-2-7-4]
This option enables you to edit the text that can be
This option enables you to playback Mail attachment
added to the end of mail. You can also decide to auto
and MMS automatically.
attach this text to the end of all mail.
• Use the and keys to select the required
• Press to set the Auto attach to On or Off (a √ in
setting and press (a √ in the box means Auto
the box means Auto attach is turned on).
play is turned on).
• Use the key to highlight the Signature text box,
• Use the key to highlight OK and press . The
then press to display the Signature screen.
settings will be stored.
L342i User guide 65
i-mode [Menu 8]
Auto reception [Menu 8-1-2-7-5]
• Use the and keys to highlight the circle
This option enables you to set whether or not to
next to the required setting and press .
automatically receive mail.
• Use the key to highlight OK and press .
• Use the and keys to select the required
The settings will be stored.
setting and press (a √ in the box means Auto
Check settings [Menu 8-1-2-7-8]
reception is turned on).
This option displays all the options from this menu with
• Use the key to highlight OK and press .
their current settings.
The settings will be stored.
Back [Menu 8-1-2-7-0]
Receive attachment [Menu 8-1-2-7-6]
This option returns you to the mail menu.
This option enables you to receive attached Image and
Back [Menu 8-1-2-0]
MIDI files.
This option returns you to the i-mode menu.
• Use the and keys to select the required
setting and press (a √ in the box means
Java application [Menu 8-1-3]
Receiving attachment is turned on).
Scroll to an application and select options.
• Use the key to highlight OK and press .
• Properties: Displays all the information of the
The settings will be stored.
highlighted application.
Attachment data [Menu 8-1-2-7-7]
• Upgrade: Connect to the server and download the
This options enables you to receive attached i-mode
new version of the highlighted application.
melody (MFI) file.
• Delete: Delete the highlighted application.
66 L342i User guide
i-mode [Menu 8]
• Network Connection: Sets whether to enable the
Open: Displays the highlighted bookmarked page.
highlighted application to connect to the network
Copy address: Copies the highlighted bookmarked
when it runs.
address so it can be edited.
• Auto Start Setting: Sets whether to have the
Edit title: Edits the title of the highlighted Bookmark.
highlighted application launch automatically.
Create message: Choose your massage type and
SMS [Menu 8-1-4]
enter the Create message screen. To the mail text,
URL of the highlighted Bookmark is inserted.
With the i-mode menu screen displayed, press to
display the Message menu screen (see [Menu 5]
Delete one: Deletes the highlighted Bookmark.
Messages).
Delete all: Deletes all the Bookmarks.
If you press to leave this menu, the i-mode menu
Go to webpage [Menu 8-1-6]
screen will be re-displayed.
This option enables you to enter a specific web page
Bookmarks [Menu 8-1-5]
address (URL) or select one from the history list,
This option will display a list of bookmarked web
allowing you to visit a particular web page.
pages. These bookmarks can be copied, edited,
• With the i-mode menu screen displayed, press
deleted or used to open the original web page as
to display the Go to webpage screen.
belows:
Enter address [Menu 8-1-6-1]
• Use the and keys to highlight a bookmark
• Press .
then press . The Bookmarks Options menu
The Enter address screen will be displayed.
screen will be displayed.
• Use the and keys to highlight the address
• Press the appropriate key for the required option.
L342i User guide 67
i-mode [Menu 8]
field and press . The Enter address screen will
The Saved pages screen will be displayed.
be displayed.
• Use the and keys to highlight the required
• Key in the required URL then press .
saved page and press . The following options
will be available:
• Use the key to highlight OK and press .
The page at the selected URL address will be
Open: Opens the saved page.
displayed.
Edit title: Enables you to edit the title of the saved
Address history [Menu 8-1-6-2]
page.
• Press .
Protect On/Off: If the screen memo is unprotected, it
The Enter address screen will be displayed.
will be protected, and if it is protected, it will be
unprotected.
• Use the and keys to highlight the required
URL address and press . The Enter address
Delete one: Deletes the selected saved page.
screen will be displayed.
Delete all: Deletes all saved pages.
• Use the key to highlight OK and press .
• With a saved page displayed, press .
The page at the selected URL address will be
The following options will be available:
displayed.
Save image: Saves an image on the saved page.
Back [Menu 8-1-6-0]
Edit title: Enables you to edit the title of the saved
This option returns you to the i-mode menu.
page.
Saved pages [Menu 8-1-7]
Certificate info: Displays the server certificate of the
current page. This option is displayed only when the
• With the i-mode menu screen displayed, press
current page is SSL page.
68 L342i User guide
i-mode [Menu 8]
Page info: Display the saved page’s URL address.
Wrap text [Menu 8-1-8-3]
Protect On/Off: If the screen memo is unprotected, it
This option enables you to decide if your phone will
will be protected. If it is protected, it will be
display text as it is on the web page or wrap it to fit
unprotected.
your phone’s screen.
Delete: Deletes the displayed saved page.
Certificates [Menu 8-1-8-4]
• Press and use the and keys to
Settings [Menu 8-1-8]
highlight the required certificate, then press .
This menu enables you to set up the way your phone
Displaying the Certificate info
uses and displays web pages.
• Press . The Certificate information will be
• With the standby screen displayed, press
displayed.
then . The i-mode user settings menu screen will
be displayed.
Setting the Certificate
Set time out [Menu 8-1-8-1]
• Press to switch the selected certificate to
Valid/Invalid.
This option enables you to set the time after which the
connection will be broken if there has been no activity
Send terminal info [Menu 8-1-8-5]
(60 seconds/90 seconds/ Disabled).
• Press to display the Send terminal info screen.
Load images [Menu 8-1-8-2]
• Use the and keys to highlight the circle
This option enables you to decide if your phone will
next to the required setting, then press to select
load images contained on a web page.
it.
• Use the key to highlight OK and press .
L342i User guide 69

i-mode [Menu 8]
Home page [Menu 8-1-8-6]
• Clear profile
This setting allows you to enter the address (URL) of a
You can delete the profile you want except defualt
site you want to use as homepage.
profiles.
Check settings [Menu 8-1-8-7]
Note
If you want to change your profile, you need Security Code.
This option displays all the options from this menu with
their current settings.
i-mode lock [Menu 8-3]
Back [Menu 8-1-8-0]
If you choose to turn the i-mode lock on, you will not
This option returns you to the i-mode menu.
be able to connect to any i-mode services or send or
receive mail/MMS/Java™ Applications.
Profiles [Menu 8-2]
Reset profiles all [Menu 8-4]
You need Security code to activate this function.
This menu enables you to reset profiles to return to
• Activate
original settings.
You can activate the profile you want.
• Settings
i-mode version [Menu 8-5]
You can edit and change settings of the selected
This menu enables you to see the i-mode version.
profile with following submenus;
Portal server, Proxy settings, Mail settings and Access
point settings.
• Rename
You can edit the profile name.
70 L342i User guide

Multimedia [Menu 9]
Enables you to view the downloaded pictures and
Games & more [Menu 9-4]
sounds. They can be set as Wallpaper or Ring tone. You
Doja game [Menu 9-4-1]
can view, listen, delete or rename downloaded data.
To start the game, connect to the network when
My album [Menu 9-1]
"connection network?" is displayed in the screen.
You can view and send a picture.
Pre-installed game(s) and downloaded games are
available with the Programs.
My pictures [Menu 9-2]
The left soft key [Options] will bring up the following
Backlight option [Menu 9-4-2]
options.
This function allows you to switch the backlight setting
• Set as wallpaper : Currently selected Picture can be
during Java™‚ application (program) operation
set as a Wallpaper.
between your phone’s backlight setting and the
• Write multimedia message/Write Mail : Downloaded
application’s backlight setting.
Picture can be sent via MMS/Mail.
• Press [System follow] to activate your phone’s
backlight setting.
My sounds [Menu 9-3]
The left soft key [Options] will bring up the following
• Press [Doja follow] to activate the application’s
options.
backlight setting.
• Set as ringtone : This sets the Ring Tone with
currently selected Sound.
• Multimedia message/Write Mail : Melody Sound can
be sent via MMS/Mail.
L342i User guide 71
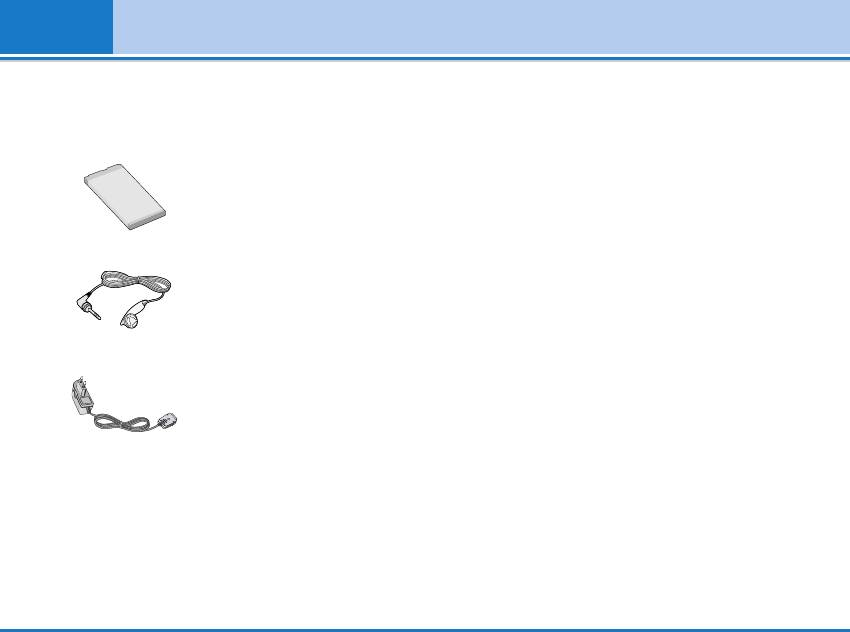
Accessories
There are various accessories for your mobile phone.
Note
You can select these options according to your
Always use genuine LG accessories.
personal communication requirements.
Failure to do this may invalidate your warranty.
Standard Battery
Accessories may be different in different regions;
please check with our regional service company or
agent for further enquires.
Portable Handsfree
This connects to your phone,
allowing handsfree operation.
Travel Adapter
This charger allows you to
charge the battery while away
from home or your office.
72 L342i User guide

Care and Maintenance
When using this unit, basic safety precautions as
• Do not tap the screen with a sharp object; otherwise,
below should be always followed.
it may damage the phone.
• Do not disassemble this unit. (Take it to a qualified
• Do not expose the phone to liquid or moisture.
service technician when repair work is required.)
• Use the accessories like an earphone cautiously. Do
• Keep the unit away from electrical appliances such
not touch the antenna unnecessarily.
as a TV, radio or Personal Computer.
• The unit should be situated away from heat sources
such as radiators or cookers.
• Do not drop.
• Do not subject this unit to mechanical vibration or
shock.
• The coating of the phone may be damaged if covered
with wrap or vinyl wrapper.
• Use dry cloth to clean the exterior of the unit. (Do not
use solvent such as benzene, thinner or alcohol.)
• Do not subject this unit to excessive smoke or dust.
• Do not keep the phone next to credit cards or
transport tickets; it can affect the information on the
magnetic strips.
L342i User guide 73

Care and Maintenance
Caring for the Battery
• You do not need to completely discharge the battery
before recharging. Unlike other battery systems,
there is no memory effect that could compromise the
battery’s performance.
• Use only LG batteries and chargers. LG chargers are
designed to maximize the battery life.
• Do not disassemble or short-circuit the battery pack.
• Keep the metal contacts of the battery pack clean.
• Replace the battery when it no longer provides
acceptable performance. The battery pack may be
recharged hundreds of times until it needs replacing.
• Recharge the battery if it has not been used for a long
time to maximize usability.
• Do not expose the battery charger to direct sunlight
or use it in high humidity, such as the bathroom.
• Do not leave the battery in hot or cold places, this
may deteriorate the battery performance.
74 L342i User guide

Technical Data
General
Product name : L342i
System : GSM 900 / DCS 1800
Ambient Temperatures
Max : +55°C
Min : -10°C
L342i User guide 75