LG L342i – страница 6
Инструкция к Сотовому Телефону LG L342i

Display Information
Icon/Indicator
Description
Message in server (iMail).
Message in server (iMMS).
(pink)Message in server (iMail/iMMS).
You have received a voice message.
You can view your schedule.
Vibrate only menu in profile.
General menu in profile.
Loud menu in profile.
Silent menu in profile.
Headset menu in profile.
Car menu in profile.
You can divert a call.
(gray) Indicates that i-mode is not active.
18 L342i User guide
Display Information
Icon/Indicator Description
(yellow) Indicates that i- mode is active.
Indicates that i- mode communication is being carried out.
Indicates that the functionality is entering DoJa.
Executing DoJa notification
DoJa Auto-launch fail notification
L342i User guide 19
Installation
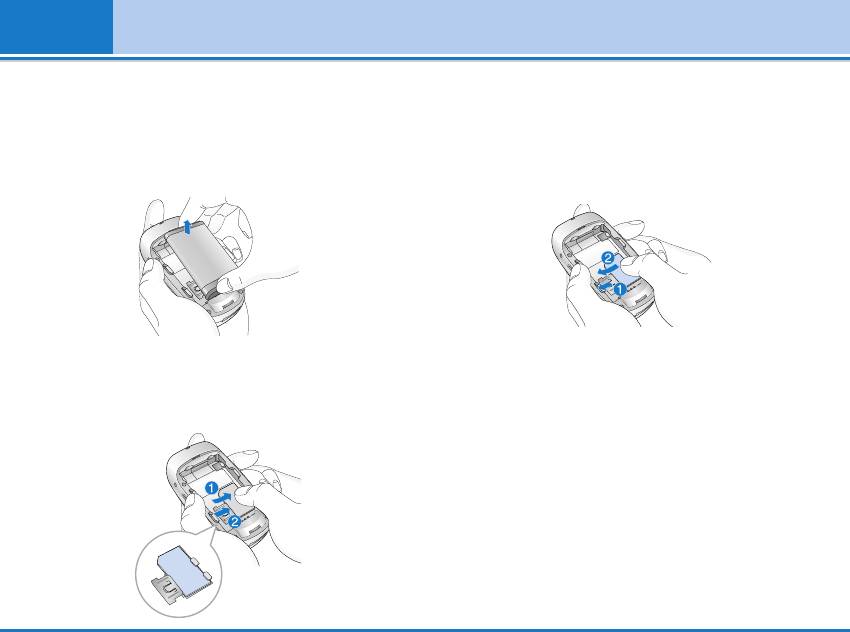
1. Inserting the SIM Card
2. Removing the SIM Card
Locate the SIM card socket in the back of the phone.
Follow the steps below to remove the SIM card.
Follow the steps below to install the SIM card.
1. Remove the battery if attached.
1. Remove the battery if attached.
2. Take out the SIM card from the slot.
Notice
2. Slide the SIM card into the slot, under the silvery
• Removing the battery from the phone whilst it is switched on
may cause it to malfunction.
holders, with the golden connectors facing down.
• The metal contact of the SIM card can be easily damaged by
scratches. Pay special attention to the SIM card when you
handle and install. Follow the instructions supplied with the
SIM card.
20 L342i User guide
Installation
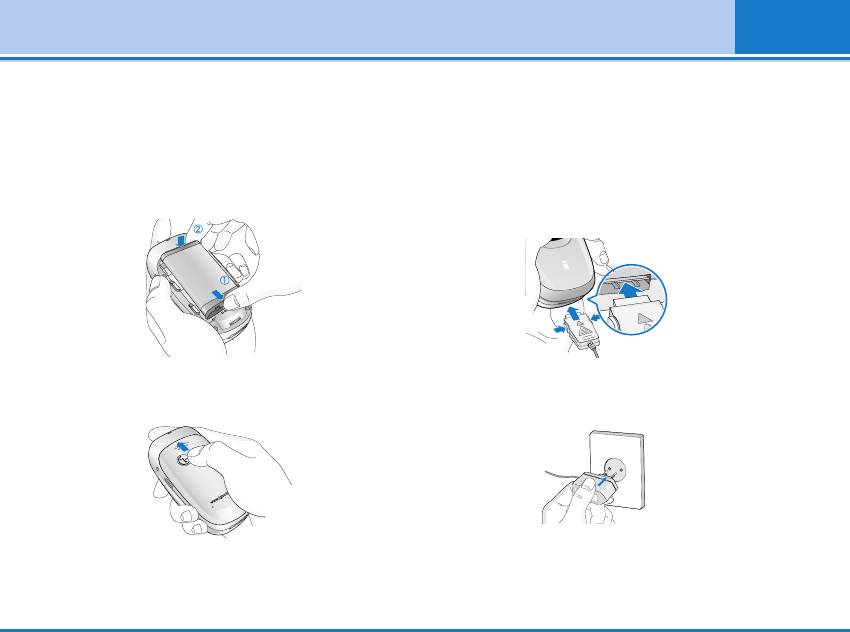
3. Installing the Battery
4. Charging the Battery
1. Position the lugs on the top of the battery into the
To connect the travel adapter to the phone, you must
retaining holder.
have installed the battery.
2. Then push the bottom of the battery into position
1. With the arrow facing you as shown in the diagram
until it clicks.
push the plug on the battery adapter into the socket
on the bottom of the phone until it clicks into place.
3. Attach back cover by sliding up into position until it
2.
Connect the other end of the travel adapter to the
clicks.
mains socket. Use only the included packing charger.
Warning
Do not force the connector as this may damage the phone
Notice
and/or the travel adapter.
When you remove the battery, you should use both hands.
L342i User guide 21
Installation
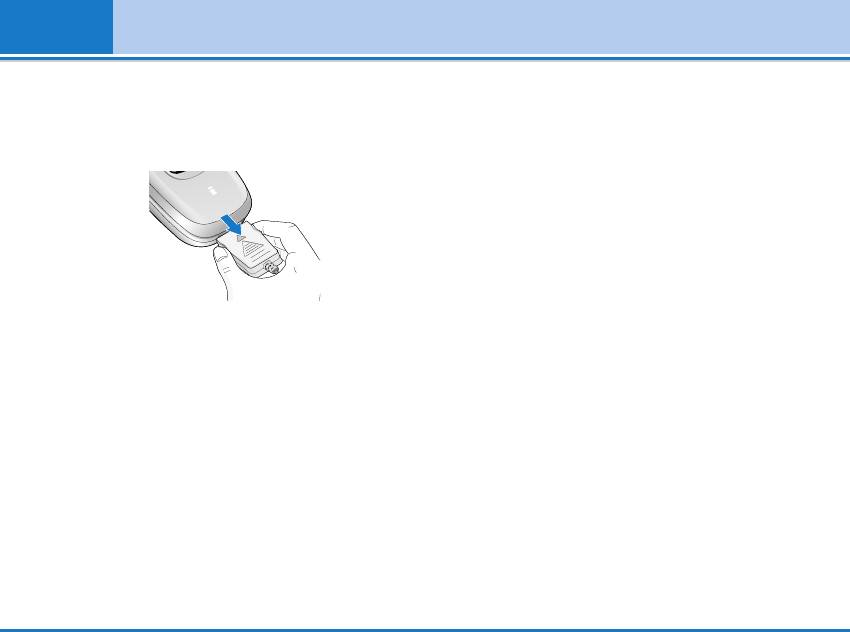
5. Disconnecting the charger
Disconnect the travel adapter from the phone by
pressing its side buttons as shown in the diagram.
Note
• Ensure the battery is fully charged before using the phone.
• Do not remove your battery or the SIM card while charging.
• The moving bars of battery icon will stop after charging is
complete.
• If the battery is completely discharged, the charge could take
some minutes before starting.
Note
If the battery does not charge,
• switch the phone off.
• ensure the battery is correctly fit.
22 L342i User guide

Making and Answering Calls
Making a call
1. Key in phone number including the area code. If you
want to delete number, press .
2. Press to call the number.
3. Press to end the call.
International Calls
1. Press and hold the key for the international
prefix. “+” character may replace with the
international access code.
2. Enter the country code, area code, and the phone
number.
3. Press .
Making a call using the Phonebook
1. Press in standby mode, then press ➞
[Contacts].
2. If you find out the desired item through searching by
a name or a number, press to call.
L342i User guide 23

In call Menu
The menu displayed on the handset screen during a
[Send] to place it on hold. When a call is held, press
call is different to the default main menu reached from
the [Send] to make it active.
the idle screen, and the options are described here.
1-2 Making a Second Call
1 During a call
You can get a dial number from phonebook to make a
Pressing the menu key during a call, you can access
second call. Press ➞➞[Contacts] then
the following menu:
select Search. To save the dial number into phonebook
Volume: Change the volume of the conversation.
during call, press ➞➞[Contacts] then
select Add new.
Hold: Hold the current call.
End all calls: End all the calls in progress.
1-3 Swapping Between Two Calls
Messages: Access the messages menu.
To switch between two calls, select [Options],
then select Swap or just press [Send] key. You
DTMF off/on: Enable/Disable the DTMF tones.
can make one of two calls focused by pressing
Mute: Mute the microphone.
up/down arrow key. If you want to end one of two
Sim Tool Kit: Access the Sim Tool Kit menu (if
calls, make the call you want to end focused, then
available in the SIM).
press [End] key when the call you want to end is
In the next pages, you’ll find all details related to call
focused.
hold and conference calls.
1-4 Answering an Incoming Call
1-1 Putting a Call on Hold
To answer an incoming call when the handset is
When a call is made or answered, press the
ringing, simply press the [Send] key.
The handset is also able to warn you of an incoming
24 L342i User guide

In call Menu
call while you are already in a call. A tone sounds in
the [Options] key then selecting Mute. The
the earpiece, and the display will show that a second
handset can be unmuted by pressing the
call is waiting.
This feature, known as Call Waiting, is
[Unmute].
only available if your network supports it. For details of
When the handset is muted, the caller cannot hear
how to activate and deactivate it see Call waiting [Menu
you, but you can still hear them.
7-4-4].
If Call Waiting is on, you can put the first call on hold
1-7 Switching DTMF Tones on During a Call
and answer the second, by pressing [Send] or by
To turn DTMF tones on during a call, for example, to
selecting [Answer], then Hold & Answer.
allow your handset to make use of an automated
You can end the current call and answer the waiting
switchboard, select [Options], then DTMF On.
call by selecting [Menu], then End & Answer.
DTMF tones can be turned off the same way.
1-5 Rejecting an Incoming Call
1-8 Calling up Messages and SIM Tool kit
main menu
When not in a call you can reject an incoming call
without answering it by simply pressing the [End].
The Messages and SIM Tool kit main menu options
can be reached from the in-call menu by
When in a call you can reject an incoming call by
selecting [Options]. SIM Tool kit menu is shown
pressing the [Menu] key and selecting
only when SIM in the handset supports SIM Tool kit
Multiparty/Reject or by pressing [End] key.
service.
1-6 Muting the Microphone
You can mute the microphone during a call by pressing
L342i User guide 25

In call Menu
2 Multiparty or Conference Calls
2-2 Setting up a Multiparty Call
The multiparty or conference service provides you
You can connect a call on hold to the currently active
with the ability to have a simultaneous conversation
call to form a multiparty call by selecting [Options]
with more than one caller, if your network service
then Multiparty / Join all.
provider supports this feature.
2-3 Putting the Multiparty Call on Hold
A multiparty call can only be set up when you have one
To put a multiparty call on hold, select [Options]
active call and one call on hold, both calls having been
then Multiparty / Hold all.
answered. Once a multiparty call is set up, calls may
be added, disconnected or separated (that is, removed
2-4 Activate the Multiparty Call on Hold
from the multiparty call but still connected to you) by
To make a multiparty call on hold active, select
the person who set up the multiparty call.
[Options] then Multiparty / Join all.
The maximum callers in a multiparty call is five. Once
2-5 Adding Calls to the Multiparty Call
started, you are in control of the multiparty call, and
only you can add calls to the multiparty call.
To join an active call to the held multiparty call,
select [Options] then Multiparty / Join all.
2-1 Making a Second Call
2-6 Displaying Callers in a Multiparty Call
You can make a second call while you are already in a
call. To do this, enter the second number and
To scroll though the numbers of the callers who make
press [Send]. When you get second call the first
up a multiparty call on the handset screen, press
call is automatically put on hold. You can swap
and keys.
between calls by selecting [Options] then Swap.
26 L342i User guide

In call Menu
2-7 Putting a Member of a Multiparty Call on
Hold
To place one selected caller (whose number is
currently displayed on-screen) of a multiparty call on
hold, select [Options] then Multiparty / Exclude.
2-8 A Private Call in a Multiparty Call
To have a private call with one caller of a multiparty
call, display the number of the caller you wish to talk to
on the screen, then
select [Options] and Multiparty / Private to put all
the other callers on hold.
2-9 Ending a Multiparty Call
The currently displayed caller of a multiparty call can
be disconnected by pressing the [End] key. To end
a multiparty call, press [Options] then select
Multiparty / End multiparty.
Selecting [Options] then Multiparty / End all, will
end all the active and held calls.
L342i User guide 27

Access Codes
You can use the access codes described in this
supplied with the SIM card. If not, contact your local
section to avoid unauthorized use of your phone. The
service provider for the code. If you lose the code, also
access codes (except PUK and PUK2 codes) can be
contact your service provider.
changed by using [Menu 7-5-5].
PUK2 code (4 to 8 digits)
PIN code (4 to 8 digits)
The PUK2 code, supplied with some SIM cards, is
The PIN (Personal Identification Number) code
required to change a blocked PIN2 code. If you lose
protects your SIM card against unauthorized use. The
the code, also contact your service provider.
PIN code is usually supplied with the SIM card. When
Security code (4 to 8 digits)
PIN code is set On, your phone will request the PIN
code every time it is switched on. On the contrary,
The security code protects the unauthorized use of
when PIN code is set Off, your phone connects to the
your phone. It is usually supplied with the phone. This
network directly without the request PIN code.
code is required to delete all phone entries and to
activate “Reset settings” menu. The default number is
PIN2 code (4 to 8 digits)
“0000”.
The PIN2 code, supplied with some SIM cards, is
required to access some functions such as Advice of
call charge, Fixed Dial number. These functions are
only available if supported by your SIM card.
PUK code (4 to 8 digits)
The PUK (PIN Unblocking Key) code is required to
change a blocked PIN code. The PUK code may be
28 L342i User guide

Menu Tree
1 Profiles
4 Organizer
1 Vibrate only
1 Scheduler
2 Silent
2 Contacts
3 General
4 Loud
5 Headset
5 Messages
6 Car
1 Write text message
2 Inbox
3 Outbox
2 Call register
4 Drafts
1Missed calls
5 Listen to voice mail
2 Received calls
6 Info message
3 Dialled calls
7 Templates
4 Delete recent calls
8 Settings
5 Call charges
6 GPRS information
3 Tools
1 Calculator
2 Unit converter
3 World time
4 Voice recorder
5 SIM Services
L342i User guide 29

Menu Tree
6 Camera
8 i-mode
1 Take picture
1 i-mode
2 Take in modes
2 Profiles
3 Take continuously
3 i-mode lock
4 My album
4 Reset profiles all
5 Settings
5 i-mode version
7 Settings
9 Multimedia
1 Alarm clock
1 My album
2 Date & Time
2 My pictures
3 Phone settings
3 My sounds
4 Call settings
4 Games & more
5 Security settings
6 Network settings
7 Reset settings
30 L342i User guide
Profiles [Menu 1]
In this menu, you can adjust and customize the phone
environment.
tones for different events and environments.
Headset [Menu 1-5]
1. Press in standby mode.
You can adjust the profile as Headset when you put on
2. Press for direct access or use and .
a headset.
3. You can also enter this menu directly by pressing
Car [Menu 1-6]
key in standby mode.
You can adjust the profile as Car when you activate
Vibrate only [Menu 1-1]
Handsfree kit.
You can adjust the profile as Vibrate only if you need
Note
vibration mode. In the mode, all kinds of alert are
Headset and Car profiles can be activated only when
Vibrate or Silent.
Handsfree kit or Ear microphone put on the handset. However,
their properties can be personalised.
Note
To activate vibration profile, it is possible to long press
Activate [Menu 1-x-1]
the key in stand-by mode.
Activates the selected Profile.
Silent [Menu 1-2]
Personalise [Menu 1-x-2]
You can adjust the profile as Silent if you are in quiet
Each has the submenus as shown below except for
place.
Vibrate only.
General [Menu 1-3]
Call alert type
You can adjust the profile as General.
Allows to select alert type such as Ring, Vibrate, etc.
Loud [Menu 1-4]
for the incoming for adjusting environment.
You can adjust the profile as Loud if you are in a noisy
L342i User guide 31

Profiles [Menu 1]
Ring tone
Power on/off volume
Allows to set the ring tone for adjusting environment.
Allows to set the power on/off volume for adjusting
environment.
Ring volume
Allows to set the ring volume for adjusting
Auto answer
environment.
This function will be activated only when your phone is
connected to the headset or handsfree kit.
Message alert type
• Off : The phone will not answer
Allows to alert when receiving a message for adjusting
automatically.
environment.
• After 5 secs : After 5 seconds, the phone will answer
Message tone
automatically.
Allows to select the alert tone for message reception.
• After 10 secs : After 10 seconds, the phone will
Keypad tone
answer automatically.
Allows to select the keypad tone for adjusting
Rename [Menu 1-x-3]
environment.
You can change the default profile name except of
Keypad volume
Vibrate only, Headset, and Car menus.
Allows to set the keypad volume for adjusting
Note
environment.
If you set the Handsfree kit to the phone, you can’t use the
vibrate mode related with Call alert type or Message alert
Effect sound volume
menu. In car menu, the following submenus are available;
Allows to set the effect sound volume for adjusting
- Call alert type : Ring
environment.
- Message alert type : Ring once, Ring periodically
32 L342i User guide
Call register [Menu 2]
Missed calls [Menu 2-1]
Last Call, All Calls, Received calls and Dialled calls in
hours, minutes and seconds. You can also reset the
This menu shows recently missed numbers. You can
call timers.
call these numbers, save and view the date and the
time.
1. Press in standby mode.
Received calls [Menu 2-2]
2. Press for direct access or use and to
enter Call register, then select Call charges.
This menu shows recently received numbers. You can
call these numbers, save and view the date and the
3. Scroll to highlight Call duration and Press
time.
[Select]. The following 5 submenus: Last call, All
Dialled calls [Menu 2-3]
calls, Received calls, Dialled calls and Reset all.
This menu shows recently dialed numbers. You can
Call costs [Menu 2-5-2]
call these numbers, save and view the date and the
time.
This function allows you to check the cost of your last
call, all calls, remaining and reset the cost. To reset
Delete recent calls [Menu 2-4]
the cost, you need the PIN2 code.
You can delete recent calls of Missed calls, Received
1. Press in standby mode.
calls, Dialled calls or All calls.
2. Press for direct access or use and to
Call charges [Menu 2-5]
enter Call register, then select Call charges.
Within these submenus, you can view the duration and
the call cost of your calls.
3. Scroll to highlight Call costs and Press [Select].
The following 4 submenus: Last call, All calls,
Call duration [Menu 2-5-1]
Remaining and Reset all.
This function allows you to view the duration of your
L342i User guide 33

Call register [Menu 2]
Note
select Change, you can change your charge limit.
The actual cost invoiced for calls by your service provider may
• Auto display
vary, depending upon network features, rounding-off for billing,
tax, and etc.
This network service allows you to see automatically
the cost of your last calls. If set to On, you can see the
Settings [Menu 2-5-3] (SIM Dependent)
last cost when the call is released.
• Set tariff
GPRS information [Menu 2-6]
You can set the currency type and the unit price.
Contact yourservice providers to obtain charging unit
You can check the amount of data transferred over the
prices. To select thecurrency or unit in this menu, you
network through GPRS. In addition, you can view how
need the PIN2 code.
much time you are online.
If you want to input @, £, $ symbol, clear all currency
Call duration [Menu 2-6-1]
strings andthen press key. If you want to change
You can check the duration of Last call and All calls.
symbol, press key again.
You can also reset the call timers.
Note
When all units have been used, no calls can be made except
Data volumes [Menu 2-6-2]
emergency calls. Depending on the SIM card, you need the
PIN2 code to et a call cost limit.
You can check the Sent, Received or All data volumes
and Reset all.
• Set credit
This network service allows you to limit the cost of
your calls by selected charging units. If you select
Read, the number of remaining unit is shown. If you
34 L342i User guide

Tools [Menu 3]
Calculator [Menu 3-1]
1. You can select one of four unit types by
pressing [Unit] key.
This contains the standard functions such as +, –, x, ÷ :
Addition, Subtraction, Multiplication, and Division.
2. Select the standard value by using , .
1. Input the numbers by pressing numeric keys.
3. Select the unit you want to convert by pressing
and .
2. Use a navigation key to select a sign for calculation.
4. You can check the converted value for the unit you
3. Then input the numbers.
want. Also, you can input a decimal number by
4. Press [Result] to view the result.
pressing .
5. Press [Reset] or enter numbers to repeat the
procedure above.
World time [Menu 3-3]
6. Use key to erase any numbers or signs.
You can view clocks of the world’s major cities.
7. If you press key, you can input a minus number.
1. Select the city belonged to the time zone by
In addition, if you press key, you can input a
pressing , key.
decimal number.
2. You can set the current time to the city time you
8. To end Calculator, press [Back].
select by pressing [Set].
Unit converter [Menu 3-2]
Voice recorder [Menu 3-4]
This converts any measurement into a unit you want.
The voice memo feature you to record up to 10 voice
There are 4 types that can be converted into units:
messages and each memo is up to 20 Seconds.
Length, Area, Weight, and Volume.
L342i User guide 35

Tools [Menu 3]
Record [Menu 3-4-1]
1. You can record voice memo in Voice recorder menu
and also holding down in the standby mode.
2. Once recording is started, the message Recording
and the remaining time is displayed.
3. If you want to finish recording, press [Save].
4. Key in Voice memo title, press [OK].
View list [Menu 3-4-2]
The phone shows voice memo list. You can Playback
and Delete the recorded voice memo.
SIM Service [Menu 3-5]
This menu depends on SIM and the network services.
36 L342i User guide
Organizer [Menu 4]
Scheduler [Menu 4-1]
Add new [Menu 4-1- -1]
When you enter this menu a Calendar will show up. On
• Schedule
top of the screen there are sections for date. Also on
Input the subject, the schedule time, the repeat, the
bottom of the screen there are sections for icons
alarm by pressing allowed keys.
(schedule, memo). Whenever you change the date, the
• Memo
calendar will be updated according to the date. And
square cursor will be used to locate the certain day. If
1. Select Add new by pressing [Select].
you see under bar on the calendar, it means that there
2. Press Memo.
is a schedule or memo that day. This function helps to
3. Input the memo and then press [OK].
remind you of your schedule and memo. The phone will
sound an alarm tone if you set this for the note.
View [Menu 4-1- -2]
To change the day, month, and year.
Shows the note for the chosen day. Use , to
Key Description
browse through the note lists. If you set alarm for the
note, Alarm watch is displayed. At that time, if you
Yearly
press [Select], you can see the note in detail.
Monthly
Press [Options] to delete, edit the note you selected.
Weekly
View all [Menu 4-1- -3]
Daily
Shows the notes that are set for all days. Use ,
Note
to browse through the note lists. You can use the
Your phone should be switched on to use this function.
same menu as “View” by pressing [Options].
L342i User guide 37

