LG G6 H870S 32Gb Black: Settings
Settings: LG G6 H870S 32Gb Black

04
Settings
Settings
You can customise the device settings in accordance with your
preferences.
Tap
Settings.
• Tap and enter a keyword in the search box to access a setting item.
• Tap to change the view mode. This user guide assumes that you are
using the Tab view.
Networks
Dual SIM card
You can configure Dual SIM settings.
1
On the settings screen, tap Networks Dual SIM card.
2
Customise the following functions:
• SIM card 1: Change the name and icon of the SIM card 1.
• SIM card 2: Change the name and icon of the SIM card 2.
• SIM card colour theme: Change the colour themes for the SIM
cards.
• Cost save mode: Activate or deactivate the cost save mode. In the
cost save mode, if you make a call to a contact to which a specific
SIM is assigned, this SIM is used for the call even if the other SIM is
active, for example, it is using mobile data.
• Mobile data: Select a SIM card you want to use for mobile data
service. You can also turn off this function.
• Data roaming: Select this option to enable the device to use mobile
data when you are roaming outside your home network area.
Settings 126
Wi-Fi
You can connect to nearby devices over a Wi-Fi network.
Connecting to a Wi-Fi network
1
On the settings screen, tap Networks Wi-Fi.
2
Tap to activate it.
• Available Wi-Fi networks appear automatically.
3
Select a network.
• You may need to enter the network's Wi-Fi password.
• The device skips this process for previously accessed Wi-Fi
networks. If you do not want to automatically connect to a certain
Wi-Fi network, touch and hold the network and then tap Forget
network.
Wi-Fi network settings
On the settings screen, tap Networks Wi-Fi.
• Switch to mobile data: If the mobile data connection function is
activated but the device cannot connect to the Internet via Wi-Fi
connection, the device automatically connects to the Internet via the
mobile data connection.
•
: Customise Wi-Fi network settings.
Settings 127
Wi-Fi Direct
You can connect your device to other devices that support Wi-Fi Direct to
share data directly with them. You do not need an access point. You can
connect with more than two devices by using Wi-Fi Direct.
1
On the settings screen, tap Networks Wi-Fi Advanced Wi-Fi
Wi-Fi Direct.
• Nearby devices that support Wi-Fi Direct automatically appear.
2
Select a device.
• Connection occurs when the device accepts the connection request.
• The battery may drain faster when using Wi-Fi Direct.
Settings 128
Bluetooth
You can connect your device to nearby devices that support Bluetooth to
exchange data with them. Connect your device to a Bluetooth headset
and a keyboard. This makes it easier to control the device.
Pairing with another device
1
On the settings screen, tap Networks Bluetooth.
2
Tap to activate it.
• Available devices appear automatically.
• To refresh the device list, tap SEARCH.
• Only devices set as visible are displayed on the list.
3
Select a device from the list.
4
Follow the on-screen instructions to perform authentication.
• This step is skipped for previously accessed devices.
Sending data via Bluetooth
1
Select a file.
• You can send multimedia files or contacts.
2
Tap Bluetooth.
3
Select a target device for the file.
• The file is sent as soon as the target device accepts it.
• File sharing processes may differ, depending on the file.
Settings 129
Mobile data
You can turn on or off mobile data. You can also manage mobile data
usage.
Turning on mobile data
1
On the settings screen, tap Networks Mobile data.
2
Tap to activate it.
Customising mobile data settings
1
On the settings screen, tap Networks Mobile data.
2
Customise the following settings:
• Mobile data: Set to use data connections on mobile networks.
• Limit mobile data usage: Set a limit for mobile data usage to block
mobile data if the limit is reached.
•
: Customise mobile data settings.
Call
You can customise call settings, such as voice call and international call
options.
• Some features may not be supported depending on the area or service
provider.
1
On the settings screen, tap Networks Call.
2
Customise the settings.
Settings 130
Share & connect
NFC
You can use the device as a transportation card or credit card. You can also
share data with the other device.
1
On the setting screen, tap Networks Share & connect NFC.
2
Tap to activate it.
• Touch your device with other device that supports NFC to allow
sharing data.
• NFC antenna may be located differently depending on the device type.
See
Parts overview
for details about the NFC antenna area.
Android Beam
You can share files by touching the back of the device to other device. You
can also share files including music, videos or contacts and open a web
page or launch an app from the other device.
1
On the settings screen, tap Networks Share & connect Android
Beam.
2
Touch the back of the device with another device.
• NFC antenna may be located differently depending on the device type.
Settings 131
File sharing
You can send and receive files between your device and other LG devices
or tablets.
• See
Sending or receiving files
for details.
1
On the settings screen, tap Networks Share & connect File
sharing.
2
Customise the following settings:
• G6: Change the device name.
• Save to: Set the destination folder to save files sent from other
devices in.
• File sharing: Permit receipt of files sent from other devices.
• SmartShare Beam: Share files with other devices via SmartShare
Beam.
• Help: You can view help on sharing files.
Media server
You can share media content on your device with nearby devices that
support DLNA.
1
On the settings screen, tap Networks Share & connect Media
server.
2
Customise the following settings:
• Content sharing: Share content on your device with nearby devices.
• G6: Set your device's name.
• Content to share: Select the type of media content to share with
other devices.
• Allowed devices: View a list of devices permitted to access content
on your device.
• Not-allowed devices: View a list of devices not permitted to access
content on your device.
Settings 132
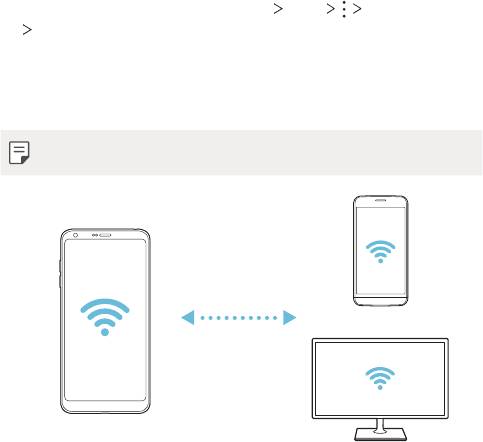
Screen sharing
You can play the screen and sound of the device on a different device,
such as a TV, that supports the Miracast function.
1
On the settings screen, tap Networks Share & connect Screen
sharing.
2
Tap to activate it.
3
Select a device from the list of nearby devices.
• If the desired device does not appear, tap SEARCH to refresh the
list.
• After connecting to the device, the device displays the screen of
your device.
• Screen sharing turns off automatically if there is no sharing-compatible
device in the vicinity.
Printing
You can connect your device to a Bluetooth printer and print photos or
documents saved on the device.
1
On the settings screen, tap Networks Share & connect Printing.
• If the desired printer is not in the list, install the printer driver from the
app store.
2
Tap to activate it.
3
Select a printer from the printer list screen.
• To add a printer, tap
Add printer.
• To search for a printer name, tap
Search.
• Tap
Settings from the printer list screen.
4
Select a file and tap Print.
• The document prints.
• If you do not have a Google account, tap ADD ACCOUNT to create an
account.
Settings 133
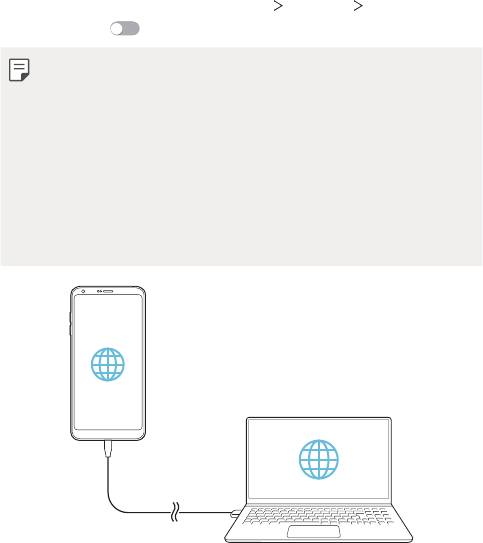
Tethering
USB tethering
You can connect the device to another device via USB and share mobile
data.
1
Connect your device and other devices via USB cable.
2
On the settings screen, tap Networks Tethering USB tethering
and then tap
to activate it.
• This option uses mobile data and may incur data usage fees, depending
on your pricing plan. Consult with your service provider for more
information.
• When connecting to a computer, download the USB driver from
www.lg.com
and install it on the computer.
• You cannot send or receive files between your device and a computer
while USB tethering is turned on. Turn off USB tethering to send or
receive files.
• Operating systems that support tethering are Window XP or higher, or
Linux.
Settings 134
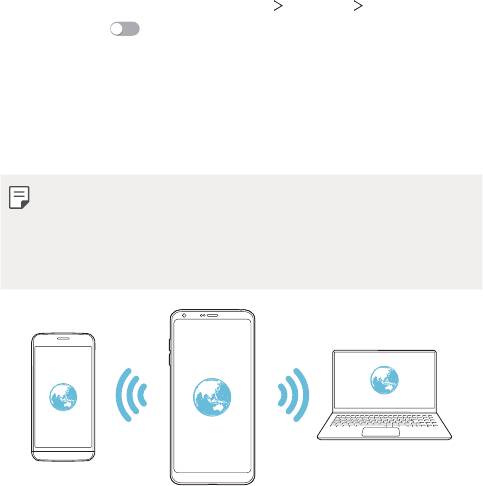
Wi-Fi hotspot
You can set the device as a wireless router so that other devices can
connect to the Internet by using your device's mobile data.
1
On the settings screen, tap Networks Tethering Wi-Fi hotspot
and then tap
to activate it.
2
Tap Set up Wi-Fi hotspot, and enter the Wi-Fi name (SSID) and
password.
3
Turn on Wi-Fi on the other device, and select the name of the device
network on the Wi-Fi list.
4
Enter the network password.
• This option uses mobile data and may incur data usage fees, depending
on your pricing plan. Consult with your service provider for more
information.
• More information is available at this web site:
http://www.android.com/tether#wifi
Settings 135
Bluetooth tethering
A Bluetooth-connected device can connect to the Internet by using your
device's mobile data.
1
On the settings screen, tap Networks Tethering Bluetooth
tethering and then tap
to activate it.
2
Turn on Bluetooth on both devices and pair them.
• This option uses mobile data and may incur data usage fees, depending
on your pricing plan. Consult with your service provider for more
information.
• More information is available at this web site:
http://www.android.com/tether#Bluetooth_tethering
Help
You can view help on using tethering and hotspots.
On the settings screen, tap Networks
Tethering Help.
More
Airplane mode
You can turn off the call and mobile data functions. When this mode is
on, functions that do not involve data, such as games and music playback,
remain available.
1
On the settings screen, tap Networks More Airplane mode.
2
Tap TURN ON in the confirmation screen.
Settings 136
Mobile networks
You can customise the mobile networks settings.
1
On the settings screen, tap Networks More Mobile networks.
2
Customise the following settings:
• Network mode: Select a network type.
• Access Point Names: View or change the access point for using
mobile data services. To change the access point, select a choice
from the access point list.
• Network operators: Search for network operators and connect
automatically to a network.
VPN
You can connect to a safe virtual network, such as an intranet. You can
also manage connected virtual private networks.
Adding VPN
1
On the settings screen, tap Networks More VPN.
2
Tap Add VPN.
• This feature is available only when the screen lock is activated. If the
screen lock is deactivated, a notification screen appears. Tap CHANGE
from the notification screen to activate the screen lock. See
Setting a
screen lock
for details.
3
Enter VPN details and tap SAVE.
Configuring VPN settings
1
Tap a VPN from the VPNS list.
2
Enter the VPN user account details and tap CONNECT.
• To save the account details, select the Save account information
checkbox.
Settings 137

Sound & notification
You can customise sound, vibrate and notification settings.
On the settings screen, tap Sound & notification and customise the
following settings:
• Sound profile: Change the sound mode to Sound, Vibrate only, or
Silent.
• Volume: Adjust the sound volume for various items.
• SIM1 ringtone/SIM2 ringtone: Select a ringtone for incoming calls.
Add or delete ringtones.
• Ringtone ID: Create a ringtone for an incoming call from a particular
contact.
• Vibration strength: Adjust the vibration intensity.
• Sound with vibration: Set the device to vibrate and play a ringtone
simultaneously.
• SIM1 vibration type/SIM2 vibration type: You can select the type of
vibration when receiving calls.
• Do not disturb: Set the time, range and app type to receive
notification messages. Receive notification messages only on particular
days of the week.
• Lock screen: Display or hide a notification message on the lock screen.
You can also hide private information.
• Apps: Select the apps that can show their notification messages on
the screen, and set the priorities of those apps in regard to notification
messages.
• More
SIM1 notification sound/SIM2 notification sound: Select a
notification ringtone. Set music saved on the device as a notification
ringtone.
• More
Vibrate on tap: Set the device to vibrate when you tap certain
items on the screen.
• More
Sound effects: Select a sound effect to play when you tap the
dialpad or keyboard, select an option, or lock or unlock the screen.
Settings 138
Display
You can customise detailed settings for each screen type.
On the settings screen, tap Display and customise the following settings:
• Home screen: Customise settings for the Home screen. See
Home
screen settings
for details.
• Lock screen: Customise lock screen settings. See
Lock screen settings
for details.
• Theme: Select a screen theme for your device.
• Home touch buttons: Rearrange Home touch buttons or change their
background colours.
• Font type: Change the font face.
• Font size: Change the font size.
• Bold text: Bold the text on the screen.
• App scaling: Adjust the screen size of apps.
• Display size: Set the items on the screen to a size easy for you to see.
Some items may change position.
• Comfort view: Set the device to reduce amount of blue light on screen
to reduce eye strain.
• Brightness: Use the slide bar to change the device's screen brightness.
To automatically adjust screen brightness according to ambient light
intensity, tap the Auto switch.
• Auto: Set the device so that the screen brightness is automatically
adjusted in accordance with the ambient light intensity.
• Always-on display: Always display information, such as the date, time
and notifications, even when the screen is turned off. For details, see
Always-on display
.
• Auto-rotate screen: Automatically rotate the screen according to the
device's orientation.
• Screen timeout: Automatically turn off the screen when the device is
left idle for a specified period of time.
Settings 139

• More KnockON: Turn the screen on or off by tapping the screen
twice.
• More
Screen saver: Display a screen saver when the device is
connected to the holder or charger. Select a screen saver type to
display.
• More
Mini view: You can make the screen size smaller to
conveniently use the device with one hand. Drag the Home touch
button at the bottom of the screen to the left or right.
General
Language & keyboard
You can customise language and keyboard settings for your device.
1
On the settings screen, tap General Language & keyboard.
2
Customise the following settings:
• Language: Select a language to apply for the device.
• Current keyboard: View the keyboard currently in use. Select a
keyboard to use when entering text.
• LG Keyboard: Customise the LG keyboard settings.
• Google voice typing: Configure the options for text dictation by
Google.
• Text-to-speech output: Configure the settings for text-to-speech
output.
• Pointer speed: Adjust the pointer speed of a mouse or trackpad.
• Reverse buttons: Reverse the right mouse button to perform
primary direct-manipulation actions.
Settings 140

Location
You can customise how your location information is used by particular
apps.
1
On the settings screen, tap General Location.
2
Customise the following settings:
• Mode: Select a method to provide your location information.
• My place: Set the device to analyse frequently visited places so that
it can automatically recognise a residential address.
• RECENT LOCATION REQUEST: View apps that recently requested
location information.
• Low power location estimation: Estimate the device location by
using low power consumption.
• Google Location History: Configure the Google location history
settings.
• Google Location Sharing: Share your real-time location with
others.
Accounts & sync
You can add or manage accounts, including a Google account. You can also
sync particular apps or user information automatically.
1
On the settings screen, tap General Accounts & sync.
2
Customise the following settings:
• Auto-sync data: Sync all the registered accounts automatically.
• ACCOUNTS: View a list of registered accounts. To view or change
details of an account, tap the account.
• ADD ACCOUNT: Add accounts.
Settings 141

Cloud
You can register a cloud account and view content saved on cloud from
the device.
1
On the settings screen, tap General Cloud.
2
Customise the settings.
Users
You can add users to share your device with them.
1
On the settings screen, tap General Users.
2
Customise the settings.
Accessibility
You can manage accessibility plug-ins installed on your device.
1
On the settings screen, tap General Accessibility.
2
Customise the following settings:
• Vision
TalkBack: Set the device to notify screen status or actions
via voice.
• Vision
Message/call voice notifications: Set the device to read
the caller information or message content via voice.
• Vision
Font size: Change the font size.
• Vision
Bold text: Bold the text on the screen.
• Vision
Display size: Set the items on the screen to a size easy for
you to see. Some items may change position.
• Vision
Touch zoom: Zoom in or out by tapping the screen three
times.
• Vision
Window zoom: Zoom in or out within a window and invert
the colour.
• Vision
Large mouse pointer: Magnify the mouse pointer.
• Vision
High contrast screen: Turn the background colour into
black for a high contrast screen.
Settings 142

• Vision Screen colour inversion: Increase the display colour
contrast for people with low vision.
• Vision
Screen colour adjustment: Adjust the display colour.
• Vision
Grayscale: Switch the screen to grayscale mode.
• Vision
End calls with the Power key: End a call by pressing the
Power/Lock key.
• Hearing
Captions: Turn on the subtitle service when playing
videos for the hearing impaired.
• Hearing
Flash alerts: Set the device to notify you with a blinking
light for incoming calls, messages and alarms.
• Hearing
Mute all sounds: Mute all sounds and lower volume on
the receiver.
• Hearing
Audio channel: Select the audio type.
• Hearing
Sound balance: Adjust the audio output balance. Use the
slide bar to change the balance.
• Motor & cognition
Touch assistant: Turn on the touch board to
make buttons and gestures easier to use.
• Motor & cognition
Touch input: Enter text by touching and
holding the screen or modify it by simply touching the screen.
• Motor & cognition
Physical keyboard: Customise the keyboard
settings.
• Motor & cognition
Auto mouse click: Automatically click the
mouse pointer in case of no movement.
• Motor & cognition
Touch and hold for calls: Answer or decline
calls by touching and holding the call button instead of dragging it.
• Motor & cognition
Screen timeout: Turn off the screen
automatically when the device is left idle for a specified period of
time.
• Motor & cognition
Touch control areas: Limit the touch area
so that only a particular portion of the screen can be controlled by
touch input.
Settings 143

• Accessibility features shortcut: Quickly access a frequently used
function by tapping
three times.
• Auto-rotate screen: Automatically change the screen orientation
according to the physical position of the device.
• Select to Speak: Allows you to tap items to hear spoken feedback.
• Switch Access: Create key combinations to control your device.
Shortcut keys
You can use the volume keys to directly launch apps when the screen is
turned off or locked.
1
On the settings screen, tap General Shortcut keys.
2
Tap to activate it.
• Press the Volume Down (-) key twice to launch the Camera app
when the screen is locked or turned off. Press the Volume Up (+)
key twice to launch Capture+.
Google services
You can use Google settings to manage your Google apps and account
settings.
On the settings screen, tap General
Google services.
Fingerprints & security
1
On the settings screen, tap General Fingerprints & security.
2
Customise the following settings:
• Fingerprints: Use your fingerprint to unlock the screen or content.
See
Fingerprint recognition overview
for details.
• Content lock: Set the method to lock files in the Gallery or
QuickMemo+.
• Encrypt SD card: Encrypt the memory card to prevent use on
another device. See
Memory card encryption
for details.
Settings 144
• Secure start-up: Protect your device with a lock when it powers on.
See
Secure start-up settings
for details.
• Set up SIM card lock: Lock or unlock the USIM card, or change the
password (PIN).
• Make passwords visible: Display a password as you enter it.
• Phone administrators: Allow privileges to restrict the control or
use of the device to particular apps.
• Unknown sources: Allow the installation of apps from non-Play
Store apps.
• Credential protection: View the type of the storage where the
security certificate will be saved.
• Certificate management: Manage the security certificate saved on
the device.
• Trust agents: View and use trust agents installed on the device.
• Screen pin: Fix the app screen so that only the currently active app
can be used.
• Usage access: View details on usage of apps on the device.
Smart settings
You can automatically change your device settings according to the usage
pattern and location.
• To use Smart settings, make sure to set the residential address. See
Location
for details.
1
On the settings screen, tap General Smart settings.
2
Activate items you want to automatically change settings for.
Date & time
You can customise date and time settings for your device.
1
On the settings screen, tap General Date & time.
2
Customise the settings.
Settings 145

Storage
You can view and manage internal storage on the device or storage space
of the memory card.
1
On the settings screen, tap General Storage.
2
Customise the following settings:
• DEVICE STORAGE: View the total storage space and free space
in the device’s internal storage. View a list of apps in use and the
storage capacity for each app.
• PORTABLE STORAGE: View the total storage space and free space
in the memory card. This option appears only when a memory card
is inserted. To unmount the memory card, tap
.
Battery & power saving
You can view the current battery information or turn on power-saving
mode.
1
On the settings screen, tap General Battery & power saving.
2
Customise the following settings:
• Battery usage: View the battery usage details. To view more details,
select a specific item.
• Battery percentage on status bar: Display the remaining battery
level as a percentage on the status bar.
• Battery saver: Reduce battery consumption by cutting down some
device settings, such as the display brightness, speed and vibration
intensity. The status bar displays
when power-saving mode is on.
• Game battery saver: Adjust the video quality to reduce battery
consumption when playing games.
Settings 146

Memory
You can view the average amount of memory usage over a certain period
of time and the memory occupied by an app.
1
On the settings screen, tap General Memory.
2
Tap to set a time slot to retrieve data.
Smart Doctor
You can use Smart Doctor to diagnose the device’s condition and optimise
it.
On the settings screen, tap General
Smart Doctor.
Apps
You can view a list of installed apps. Stop apps from running or delete
apps, if necessary.
1
On the settings screen, tap General Apps.
2
Select an app and perform actions.
Tap & pay
You can make payments with your device instead of a credit card.
On the settings screen, tap General
Tap & pay.
Backup & reset
You can back up data saved on your device to another device or account.
Reset the device, if necessary.
1
On the settings screen, tap General Backup & reset.
2
Customise the following settings:
• LG Mobile Switch: Easily transfer data the saved messages,
images, home screens and other data to a new device. See
LG
Mobile Switch
for details.
Settings 147
• Backup & restore: Back up your device data or restore data to your
device from a backup.
• Back up my data: Back up your app data, Wi-Fi password and other
settings to the Google server.
• Backup account: View the current backup account in use.
• Automatic restore: Automatically restore backup settings and data
when reinstalling an app.
• Network settings reset: Reset Wi-Fi, Bluetooth and other network
settings.
• Factory data reset: Reset all settings for the device and delete
data.
• Resetting your device deletes all data on it. Enter your device name,
Google account and other initial information again.
About phone
You can view information about your device, such as the name, status,
software details and legal information.
On the settings screen, tap General
About phone and view information.
Regulatory & Safety
You can view regulatory marks and related information on your device.
On the settings screen, tap General
Regulatory & Safety.
Settings 148
Оглавление
- Настраиваемые функции
- Основные функции
- Полезные приложения
- Параметры телефона
- Приложение
- Налаштовувані функції
- Основні функції
- Корисні програми
- Налаштування
- Додаток
- Арнайы жасалған мүмкіндіктер
- Негізгі функциялар
- Пайдалы қолданбалар
- Баптаулар
- Қосымша
- Тусгай загварын нэмэлт функцүүд
- Үндсэн функцүүд
- Хэрэгтэй аппууд
- Тохиргоо
- Хавсралт
- Custom-designed Features
- Basic Functions
- Useful Apps
- Settings
- Appendix

