LG G6 H870S 32Gb Black: Custom-designed Features
Custom-designed Features: LG G6 H870S 32Gb Black

01
Custom-designed
Features

Notes on Water Resistant
Properties
This product is water and dust resistant in compliance with the Ingress
Protection rating IP68.
Your product has undergone testing in a controlled environment and is
proven to be water and dust resistant in certain circumstances (meets
the requirements of classification IP68 as described by the international
standard IEC 60529 - Degrees of Protection provided by Enclosures [IP
Code];testconditions:15-35ºC,86-106kPa,1.5meter,for30minutes).
Do not expose the device in conditions that are different from the test
conditions. Results may vary in actual use.
WARNING
In conditions that are different from LGE’s test conditions for IP68 (as
specified in this manual), the liquid damage indicator located inside the
product changes colour. Please note that any damages that occur due to
such causes makes you ineligible for any free-of-charge repair services
provided under warranty.
Avoid exposing the product to environments with excessive dusts or
moisture. Do not use the product in the following environments.
Do not immerse the product in any liquid chemicals (soap, etc.)
other than water.
Do not immerse the product in salt water, including seawater.
Do not immerse the product in a hot spring.
Do not swim with this product.
Donotplacetheproductdirectlyonsand(suchasatabeach)or
mud.
Custom-designed Features 14

Do not immerse your product in water deeper than approximately
1.5meter.
Do not immerse your product in water for longer than 30minutes.
• If your product becomes wet be sure to wipe the microphone, speaker,
and stereo jack with a dry cloth before use.
• Should your product or your hands become wet, dry them before
handling the product.
• Do not use the product in places where it may be sprayed with high
pressure water (e.g. near a faucet or shower head) or submerge it in
water for extended periods of time, as the product is not designed to
withstand high water pressure.
• This product is not resistant to shock. Do not drop the product or
subject it to shock. Doing so might damage or deform the main unit,
causing water leakage.
• The product’s water and dust resistant features may be damaged by
dropping or receiving an impact.
• If the product gets wet, use a clean, soft cloth to dry it thoroughly.
• The touch screen and other features may not work properly if the
device is used while wet.
• Your product is water resistant only when the SIM/Memory card tray is
properly inserted into the product.
• Do not open or close the SIM/Memory card tray while the product is
wet or immersed in water. Exposing the open tray to water or moisture
may damage the product.
• The SIM/Memory card tray contains rubber [packing] to help prevent
dust, water, or moisture from entering the product. Do not damage the
rubber [packing] as this may allow dust, water, or moisture to enter
your product and cause damage.
• Failure to follow the provided instructions may invalidate your device’s
limited warranty.
Custom-designed Features 15
Video recording features
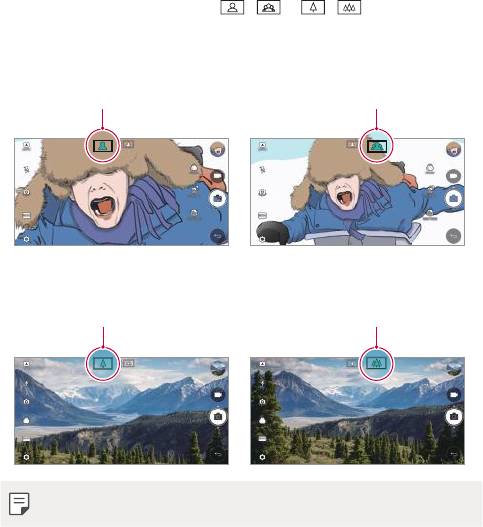
Wide-angle camera
You can take photos or record videos with a wider range than your actual
field of vision by using the wide-angle on the front and rear camera.
Launch the Camera app, then tap
/ or / to switch
between the standard and wide-angle.
Front camera
Custom-designed Features 16
Standard angle icon Wide-angle icon
Rear camera
Standard angle icon
Wide-angle icon
• See
Starting the camera
for details.
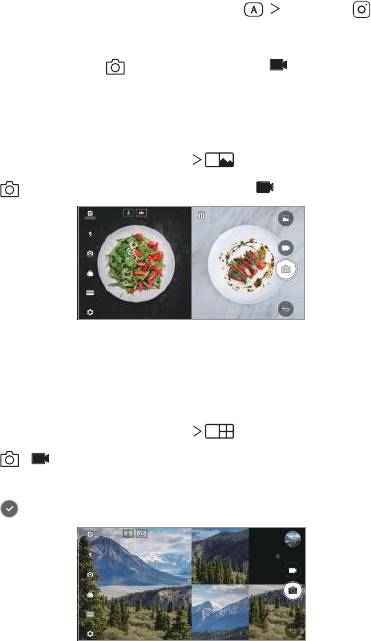
SQUARE camera mode
You can take multiple photos or videos in the form of a collage by using
the front and rear cameras. Photos and videos can be saved with different
layouts.
1
Launch the Camera app, then tap AUTO ( ) SQUARE ( ).
2
Tap MODE and select the desired camera mode.
3
To take a photo, tap . To record a video, tap .
Snap shot
You can take a photo or record a video and preview it right away.
1
In the SQUARE mode, tap MODE .
2
Tap to take photo. To record a video, tap .
Grid shot
You can take up to 4 photos or videos (max of 3 seconds) organised in a
square.
1
In the SQUARE mode, tap MODE .
2
Tap / to take photos or record videos simultaneously or
sequentially depending on the displayed layout order.
3
Tap to save.
Custom-designed Features 17
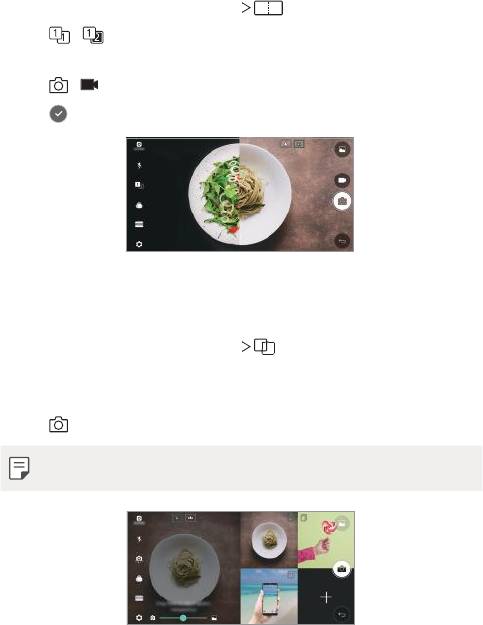
Match shot
You can take 2 photos or videos at the same time or separately.
1
In the SQUARE mode, tap MODE .
2
Tap / to take a photo or record a video at the same time or
separately.
3
Tap / to take photos or record videos.
4
Tap to save (if necessary).
Guide shot
You can take photos by following the pose of another photo.
1
In the SQUARE mode, tap MODE .
2
Select from the poses on the right to choose the one you want to
follow.
3
Tap to take a photo.
• Use the slide bar to control the background transparency.
Custom-designed Features 18
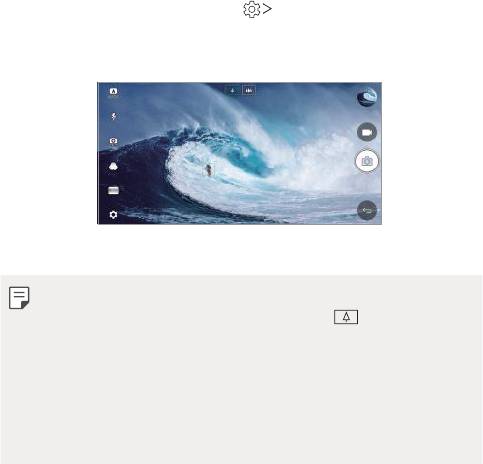
Tracking focus while using the camera
You can track and maintain focus on an object while taking photos or
recording videos.
1
Launch the Camera app, then tap Tracking focus.
2
Before recording a video or taking a photo, lightly tap the screen to
select an object to focus on.
3
Take the photo or start recording your video.
• See
Starting the camera
for details.
• To use this feature, select the standard camera ( ) for taking photos
or recording videos.
• This feature is unavailable when you use the front camera or the wide-
angle camera.
• This feature is unavailable in the following cases:
- Video size limitation: Resolution is set as UHD 16:9.
- FPS limitation: FPS is set as 60 FPS.
Custom-designed Features 19
Steady recording
You can use the Steady recording feature to minimise motion blur while
recording a video.
Launch the Camera app, then tap AUTO (
), SQUARE ( ), or MANUAL
(
) Steady recording .
• See
Starting the camera
for details.
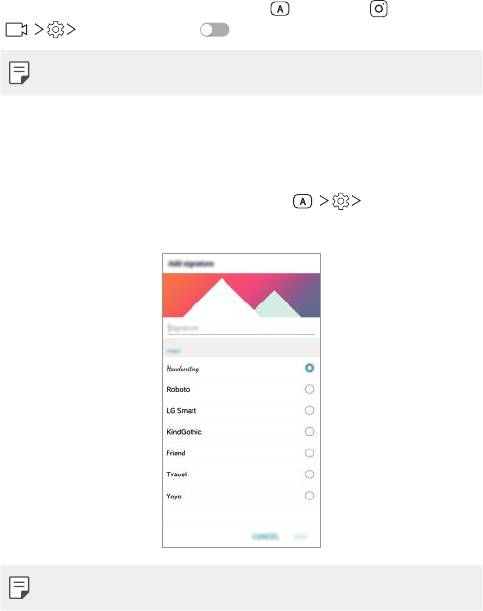
Signature
You can create a personalised photo by using your signature.
1
Launch the Camera app, then tap AUTO ( ) Add signature.
2
Enter the signature as desired and tap ADD.
• This feature is not available when you use the Manual video mode.
Custom-designed Features 20
Hi-Fi video recording
Record high quality videos by capturing higher quality sound with a wider
dynamic frequency range using 2 sensitive AOP (Acoustic Overload Point)
mics and incredible Hi-Fi recording.
Launch the Camera app, then tap MANUAL (
) Hi-Fi .
• See
Starting the camera
for details.
• Hi-Fi videos can only be played in apps that support Hi-Fi.
• This feature is unavailable when you use the front camera.
Gallery features
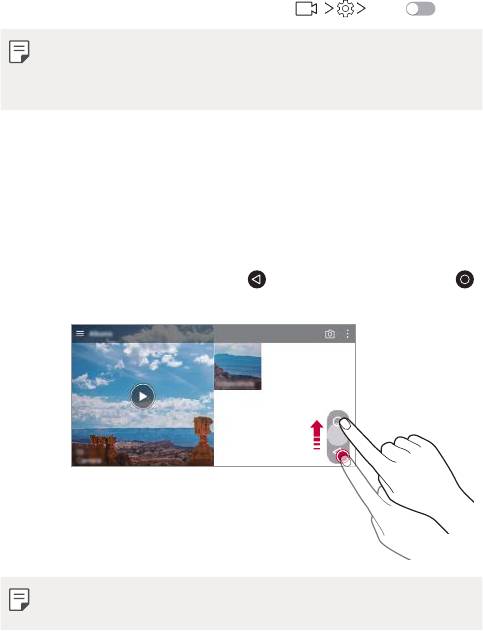
Floating button
To quickly move to the Home screen while viewing the Gallery in
landscape orientation, touch and hold
, move your finger upward to ,
then release it.
• You can move the floating button’s position by dragging it horizontally
along the bottom part of the screen.
Custom-designed Features 21
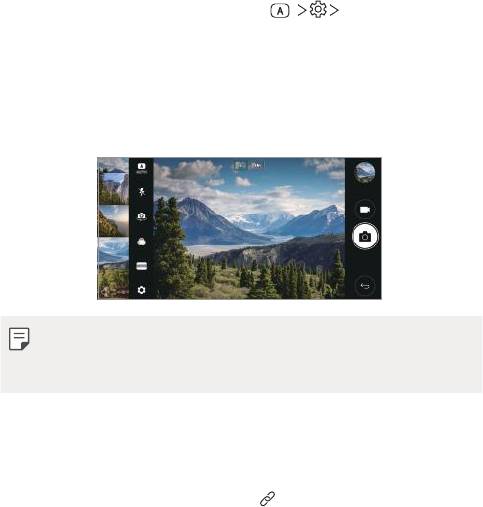
Camera roll
You can view the photos and videos you have taken on the camera
preview screen.
Launch the Camera app, then tap AUTO (
) Camera roll.
• When you take photos or record videos, you can view the thumbnails
for the saved pictures along the side of the screen.
• Scroll the thumbnail lists up or down to browse the photos and videos.
• Tap a thumbnail to view the photo or video on the camera screen.
• Tap the thumbnail again to return to the camera viewfinder.
• This feature is not supported when you take a photo or record a video in
the 18:9 aspect ratio.
• Camera roll feature is only available in Auto view mode.
Related content
You can edit and customise related content in the Gallery.
1
While viewing a picture preview, tap .
2
When the icon related with the date you took the photo appears,
touch the screen.
Custom-designed Features 22
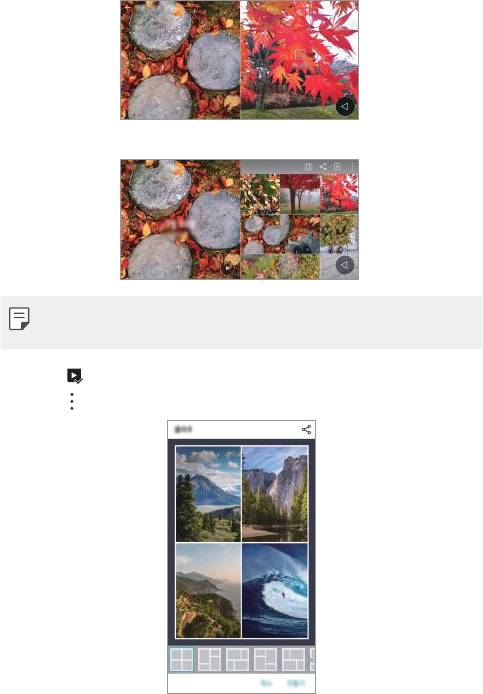
• You can view the photos related with the date you chose.
• Related content can be related to up to four combinations of ‘Memories,
Date, Place, Camera mode’.
• Tap to save the related content as a video.
• Tap to access additional options.
Custom-designed Features 23
Making a GIF
You can easily make a GIF file using recorded video.
1
At the desired starting point while watching the video, tap Create
GIF.
2
Select the length of the GIF you want to create.
• GIF is generated for the time selected from the current time.
• For videos less than 5 seconds, GIF images are automatically
generated for the remaining time.
• The GIF making feature is provided for the user’s creative activity. If you
infringe other’s copyright or defamation laws by using the GIF making
feature, you may be liable for civil and criminal liability. Be sure to not
duplicate or transfer work of others without permission. LG Electronics
cannot accept any liability for the user’s action.
Making collage wallpapers
You can make your own collage image to display it as a lock screen.
You can select multiple collage images as a wallpaper that changes each
time you turn on or off the screen.
1
Tap Settings Display Lock screen Wallpaper Collage
Wallpapers.
2
Tap and select the images you want to display as a collage.
Custom-designed Features 24
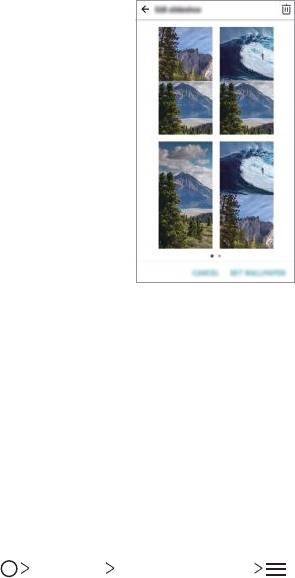
3
Edit the slideshow as desired and tap SET WALLPAPER.
Audio recording features
HD Audio Recorder overview
You can configure the audio settings manually so that you can record
audio based on the settings optimised for the selected mode.
Recording modes
You can record a high definition audio file by selecting and configuring the
audio mode to suit the recording environment.
Tap
Essentials HD Audio Recorder .
Custom-designed Features 25
Normal
You can record audio without extra settings.
Concert
You can record audio in a concert or other music events.
Custom
You can configure the desired settings to record audio.
• When you connect the earpiece to the device, appears. Tap and
then select the microphone to use.
Studio Mode
With Studio mode, you can play an audio file or music and record your
voice at the same time, create a chord by recording your voice multiple
times, and record your comments over the presenter’s or speaker’s original
audio file.
1
Tap Essentials HD Audio Recorder.
2
Select Custom.
3
Tap and select an audio file to use as background music.
4
Tap to record voice.
5
Tap to save the recorded file.
• Background music can only be played through earphones. Make sure to
plug in earphones before using this feature.
Custom-designed Features 26

Other useful features for use of the HD Audio
Recorder app
GAIN
You can adjust the sensitivity of the sound recorded by the microphone.
The higher the GAIN value is set, the more sensitively the sound is
recorded.
LCF
You can filter any low-pitched noises such as the low hum of the air
conditioner.
The higher the LCF (Low Cut Filter) value is set, the better high-frequency
noises are filtered.
LMT
It can prevent clipping of the recorded sound. The higher the LMT (Limiter)
value is set, the more low frequency sounds that will not get clipped.
• To change additional settings, tap Settings, then customise the file
type, bit depth, sampling rate and other settings.
• You can monitor sound quality with the connected earpiece while
recording audio. While recording audio in Studio mode, sound
monitoring is not supported. You can hear only the background music.
Custom-designed Features 27

Fingerprint recognition
Fingerprint recognition overview
You must register your fingerprint on your device first before using the
fingerprint recognition function.
You can use the fingerprint recognition function in the following cases:
• To unlock the screen.
• To view the locked content in the Gallery or QuickMemo+.
• Confirm a purchase by signing in to an app or identifying yourself with
your fingerprint.
• Your fingerprint can be used by the device for user identification. Very
similar fingerprints from different users may be recognised by the
fingerprint sensor as the same fingerprint.
Precautions for fingerprint recognition
Fingerprint recognition accuracy may decrease due to a number of
reasons. To maximise the recognition accuracy, check the following before
using the device.
• The device’s Power/Lock key has a fingerprint sensor. Ensure that the
Power/Lock key is not damaged by a metallic object, such as coin or
key.
• When water, dust or other foreign substance is on the Power/Lock key
or your finger, the fingerprint registration or recognition may not work.
Clean and dry your finger before having the fingerprint recognised.
• A fingerprint may not be recognised properly if the surface of your
finger has a scar or is not smooth due to being soaked in water.
• If you bend your finger or use the fingertip only, your fingerprint may
not be recognised. Make sure that your finger covers the entire surface
of the Power/Lock key.
Custom-designed Features 28
• Scan only one finger for each registration. Scanning more than one
finger may affect fingerprint registration and recognition.
• The device may generate static electricity if the surrounding air is
dry. If the surrounding air is dry, avoid scanning fingerprints, or touch
a metallic object such as coin or key before scanning fingerprints to
remove static electricity.
Registering fingerprints
You can register and save your fingerprint on the device to use fingerprint
identification.
1
Tap Settings General Fingerprints & security Fingerprints.
• A lock screen must be set in order to be able to use this feature.
• If the screen lock is not active, configure the lock screen by following the
on-screen instructions. See
Setting a screen lock
for details.
2
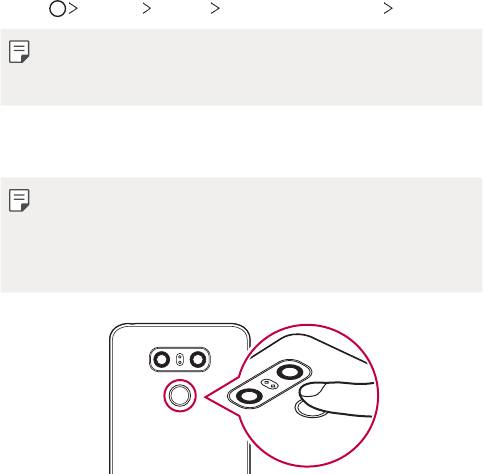
Locate the Power/Lock key on the back of the device and gently put
your finger on it to register the fingerprint.
• Gently press the Power/Lock key so that the sensor can recognise your
fingerprint. If you press the Power/Lock key with an excessive force, the
screen lock function may start or the screen may be turned off.
• Ensure that your fingertip covers the entire surface of the sensor of the
Power/Lock key.
Custom-designed Features 29

3
Follow the on-screen instructions.
• Repeat scanning the fingerprint by moving your finger little by little
until the fingerprint registers.
4
When the fingerprint registration is done, tap OK.
• Tap ADD MORE to register another fingerprint. If you register
only one fingerprint and the corresponding finger is not in a good
condition, the fingerprint recognition may not work well. As the
preventive measure against this kind of situation, register multiple
fingerprints.
Managing fingerprints
You can edit or delete registered fingerprints.
1
Tap Settings General Fingerprints & security Fingerprints.
2
Unlock according to the specified lock method.
3
From the fingerprint list, tap a fingerprint to rename it. To delete it, tap
.
Unlocking the screen with a fingerprint
You can unlock the screen or view the locked content by using your
fingerprint. Activate the desired function:
1
Tap Settings General Fingerprints & security Fingerprints.
2
Unlock according to the specified lock method.
3
On the fingerprint settings screen, activate the desired function:
• Screen lock: Unlock the screen with a fingerprint.
• Content lock: Unlock content with a fingerprint. To do this, make
sure that the content lock is set.
Custom-designed Features 30

Face Recognition
Face recognition overview
You can release the screen lock by using the saved facial data.
• This feature may be more vulnerable to security than the other screen
locks such as Knock Code, Pattern, PIN, and Password.
• When a similar face or your photo image is used, the screen lock can be
released.
• The recognised facial data is securely stored in your device.
• When the face recognition is selected for screen lock, you must enter
the Knock Code, Pattern, PIN, or Password that has been used for face
registration without directly using the face recognition after the power
is turned on. Accordingly, be careful not to forget the specified value.
• If the device cannot detect your face, or you forgot the value specified
for registration, visit the nearest LG Customer Service Centre with your
device and ID card.
Precautions for face recognition
Face recognition accuracy may decrease in the following cases. To increase
its accuracy, check the following before using the device.
• Whether your face is covered with a hat, eyeglasses, or mask, or your
face is significantly different due to heavy makeup or beard.
• Whether there are fingerprints or foreign substances on the front of
the camera lens, or your device cannot detect your face due to a too
bright or dark light.
Custom-designed Features 31
Registering facial data
Before use of the face recognition feature, register your facial data on
your device.
1
Tap Settings Display Lock screen Select screen lock
Allow face recognition.
• To use this feature, the screen lock must have been set with a Knock
Code, Pattern, PIN, or Password.
• When the screen lock is not set, register the data by following the on-
screen instructions. See
Setting a screen lock
for details.
2
Raise your device in the front of your eyes.
3
Register your face by following on-screen instructions.
• Register your face in a room that is not too bright or dark.
• Position your entire face inside the guideline on the screen, and then
adjust it by slowly moving up, down, left, or right.
4
When the face registration is done, tap OK.
Unlocking the screen with your face
You can release the screen lock with your face instead of Knock Code,
Pattern, PIN, or Password.
1
Tap Settings Display Lock screen Select screen lock.
2
Unlock the screen according to the specified method.
3
Drag to activate the face recognition feature.
Custom-designed Features 32

Improving the face recognition
You can add facial data in various conditions to improve face recognition.
1
Tap Settings Display Lock screen Face Recognition.
2
Unlock the screen according to the specified method.
3
Select Improve face recognition.
4
Register your face by following on-screen instructions.
5
When the face registration is done, tap OK.
Deleting facial data
You can delete the registered facial data and register it again if the face
recognition does not work properly.
1
Tap Settings Display Lock screen Face Recognition.
2
Unlock the screen according to the specified method.
3
Select Delete face to delete the facial data.
Unlocking the screen with your face when the screen
is turned off
With the screen turned off, raise your device and look at the front of the
screen. The device can detect your face and the screen is unlocked.
To deactivate this feature, follow the instruction below.
1
Tap Settings Display Lock screen Face Recognition.
2
Unlock the screen according to the specified method.
3
Drag Allow when screen is off to deactivate the feature.
• Face recognition feature is available only when the screen is locked.
Custom-designed Features 33
Unlocking the screen with face recognition and then
screen swiping
With the screen turned off, you can unlock the screen by performing face
recognition and then swiping the screen.
1
Tap Settings Display Lock screen Face Recognition.
2
Unlock the screen according to the specified method.
3
Drag Swipe to unlock after face recognized to activate the
feature.
Enhancing the face recognition
You can prevent your device from being unlocked by photos, images, or
videos.
1
Tap Settings Display Lock screen Face Recognition.
2
Unlock the screen according to the specified method.
3
Drag Advanced face recognition to activate the feature.
• Face recognition speed may decrease when you activate this feature.
Custom-designed Features 34
Multi-tasking feature
Multi window
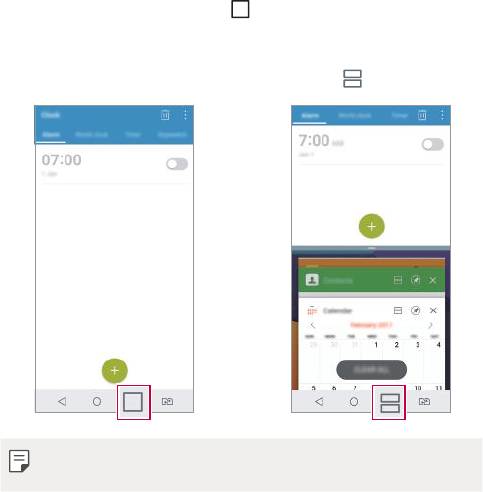
You can use two apps at the same time by separating the screen into the
multiple windows.
While using an app, touch and hold
from the Home touch buttons,
then select an app from the recently used apps list.
• You can use two apps displayed on the main screen at the same time.
• To stop the Multi window feature, touch and hold
.
• The Multi window feature is not supported by some apps, including
downloaded apps.
Custom-designed Features 35
Overview screen
The Overview screen provides a preview of your recently used apps.
To view the list of recently used apps, tap
on the Home, then tap the
displayed app.
• Touch and hold an app and drag it to the top of the screen to start the
app with the Multi-Window feature. You can also tap
at the top of
each app.
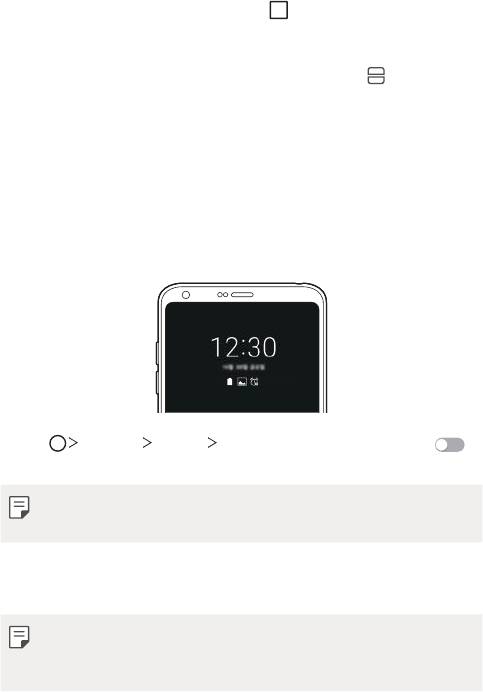
Always-on display
You can display the date, time, signature or other information on the
screen even when the main screen is turned off. Always-on display is a
useful feature in order to check the time quickly and display your own
signature.
1
Tap Settings Display Always-on display and then tap
to activate it.
• This feature may be turned on when you purchase the device.
• The default setting may vary depending on the area and service provider.
2
Tap Content and select the item you want to display when the screen
is off.
• Make sure to check that your signature does not exceed the input field.
• The battery may drain faster when you use Always-on display. Turn off
this feature to use the battery longer.
Custom-designed Features 36
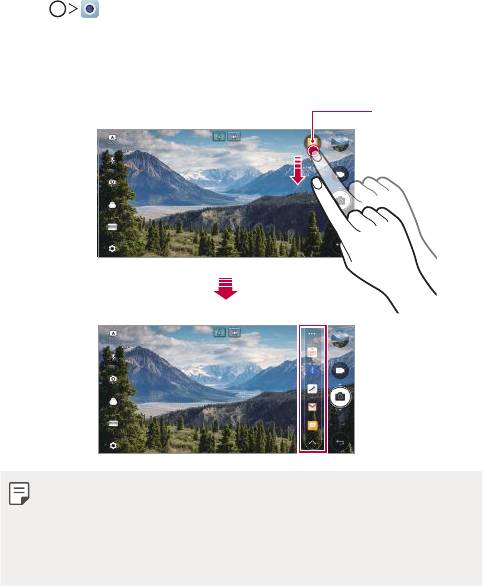
quick share
You can share a photo or video to the app you want immediately after
taking it.
1
Tap , then take a photo or record a video.
2
Tap the app icon that appears on the screen to share it using that app.
You can also swipe the icon towards the opposite direction to see
what other apps you can use to share your photos and videos.
Custom-designed Features 37
quick share icon
• The app displayed by the quick share icon may vary, depending on the
type and frequency of access to the apps installed on the device.
• You can use this feature only when you take a photo or record a video in
the AUTO and SQUARE modes. See
AUTO mode
and
SQUARE camera
mode
for details.

Quick Help
You can view help information about the main features of the device,
frequently asked questions or the user guide. Search for help information
using keywords. You can solve your problems quickly by consulting
one-on-one with a specialist.
1
Tap Quick Help.
2
Search for help information by entering keywords in the search field.
• This feature is periodically updated utilising user feedback.
• Available menu items may vary depending on the area or service
provider.
• You can view the user manual online from the Quick Help app to view
detailed information about the device’s features.
Custom-designed Features 38
Оглавление
- Настраиваемые функции
- Основные функции
- Полезные приложения
- Параметры телефона
- Приложение
- Налаштовувані функції
- Основні функції
- Корисні програми
- Налаштування
- Додаток
- Арнайы жасалған мүмкіндіктер
- Негізгі функциялар
- Пайдалы қолданбалар
- Баптаулар
- Қосымша
- Тусгай загварын нэмэлт функцүүд
- Үндсэн функцүүд
- Хэрэгтэй аппууд
- Тохиргоо
- Хавсралт
- Custom-designed Features
- Basic Functions
- Useful Apps
- Settings
- Appendix


