LG Q6 Gold: Useful Apps
Useful Apps: LG Q6 Gold

03
Useful Apps
Installing and uninstalling apps
Installing apps
Access an app store to search and download apps.
• You can use SmartWorld, Play Store or the app store provided by your
service provider.
• Some app stores may require you to create an account and sign in.
• Some apps may charge fees.
• If you use mobile data, you may be charged for data usage, depending
on your pricing plan.
• SmartWorld may not be supported depending on the area or service
provider.
Uninstalling apps
Uninstall apps that you no longer use from your device.
Uninstalling with the touch and hold gesture
On the Home screen, touch and hold the app to uninstall, then drag it over
Delete at the top of the screen.
You can touch and hold the app and release it, then tap
to uninstall.
• If apps were uninstalled within 24 hours from now, you can reinstall
them. See
App trash
for details.
Uninstalling by using the settings menu
Tap Settings General Apps, select an app, then tap Uninstall.
Uninstalling apps from the app store
To uninstall an app, access the app store from which you download the
app and uninstall it.
• Some apps cannot be uninstalled by users.
Useful Apps 62
App trash
You can view the uninstalled apps on the Home screen. You can also
reinstall apps which were uninstalled within 24 hours from now.
1
Tap Management App trash.
You can also touch and hold an empty area of the Home screen, then
tap App trash.
2
Activate the desired function:
• Restore: Reinstall the selected app.
•
: Remove the uninstalled apps permanently from the device.
• Uninstalled apps are automatically removed from the device 24 hours
after they were uninstalled. If you want to reinstall the uninstalled apps,
you must download them again from the app store.
• This feature is activated on the default Home screen only. If you
uninstall apps while using the EasyHome screen or other launcher, they
are immediately and permanently removed from the device.
Phone
Voice call
Make a phone call by using one of the available methods, such as manually
entering a phone number and making a call from the contact list or the
list of recent calls.
Useful Apps 63
Making a call from the keypad
1
Tap Dial.
2
Make a call by using a method of your choice:
• Enter a phone number and tap
.
• Touch and hold a speed dial number.
• Search for a contact by tapping the initial letter of a contact name
in the contact list, and then tap
.
• To enter "+" when making an international call, touch and hold number
0.
• See
Adding contacts
for details on how to add phone numbers to the
speed dial list.
Making a call from the contact list
1
Tap Contacts.
2
From the contact list, select a contact and tap .
Answering a call
To answer a call, drag on the incoming call screen.
• When the stereo headset is connected, you can make calls by using the
call/end button on the headset.
• To end a call simply by pressing the Power/Lock key, tap
Settings
Networks Call Common Answer and end calls, then turn on
End call with the Power key.
Useful Apps 64
Rejecting a call
To reject an incoming call, drag across the incoming call screen.
• To send a rejection message, drag the rejection message option
across the screen.
• To add or edit a rejection message, tap
Settings Networks
Call
Common Call blocking & Decline with message Decline
with message.
• When a call is coming in, press the Volume Up (+), Volume Down (-) or
Power/Lock key to mute ringtone or vibration, or to hold the call.
Checking an incoming call while using an app
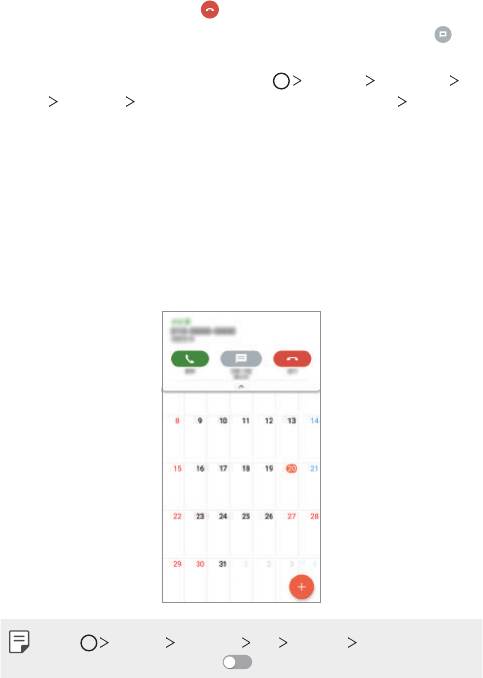
When a call comes in while using an app, a pop-up notification can be
displayed at the top of the screen. You can receive the call, reject the call,
or send message from the pop-up screen.
• Tap Settings Networks Call Common More and then tap
Incoming voice call pop-up
to deactivate it.
Useful Apps 65
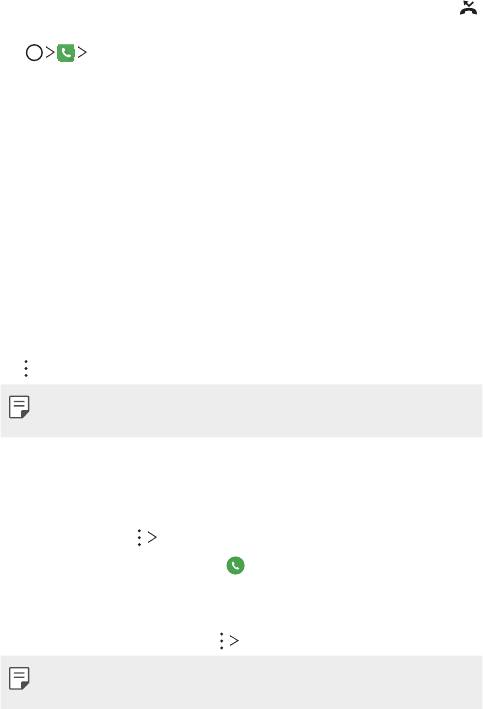
Viewing missed calls
If there is a missed call, the status bar at the top of the screen displays .
To view missed call details, drag the status bar downwards. You can also
tap
Call logs.
Functions accessible during a call
During a call, you can access a variety of functions by tapping the
on-screen buttons:
• Record: Record your call.
• End: End a call.
• Dialpad: Display or hide the dial pad.
• Speaker: Turn on the speakerphone function.
• Mute: Mute your voice so that your voice cannot be heard by the other
party.
• Bluetooth: Switch the call to a Bluetooth device that is paired and
connected.
•
: Access additional call options.
• Available settings items may vary depending on the area or service
provider.
Making a three-way calling
You can make a call to another contact during a call.
1
During a call, tap Add call.
2
Enter a phone number and tap .
• The two calls are displayed on the screen at the same time, and the
first call is put on hold.
3
To start a conference call, tap Merge calls.
• You may be charged a fee for each call. Consult with your service
provider for more information.
Useful Apps 66
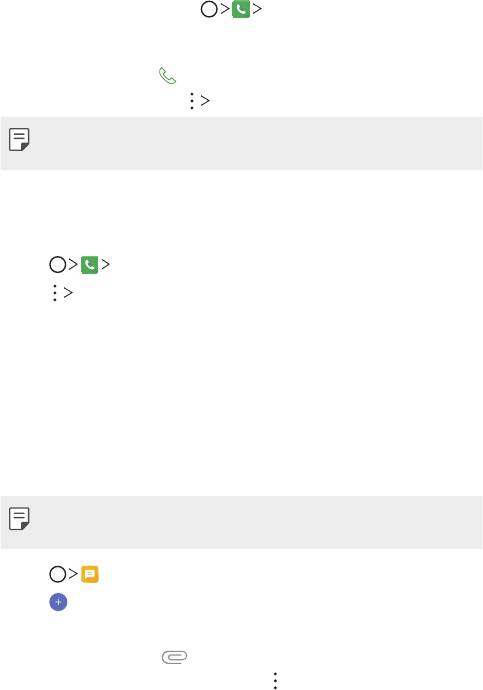
Viewing call records
To view recent call records, tap Call logs. Then, you can use the
following functions:
• To view detailed call records, select a call record. To make a call to the
selected contact, tap
.
• To delete call records, tap
Delete.
• The displayed call duration may differ from the call charge. Consult with
your service provider for more information.
Configuring call options
You can configure various call options.
1
Tap Dial or Call logs.
2
Tap Call settings and then configure the options to suit your
preferences.
Messaging
Sending a message
You can create and send messages to your contacts using the Messaging
app.
• Sending messages abroad may incur additional charges. Consult with
your service provider for more information.
1
Tap .
2
Tap .
3
Specify a recipient and create a message.
• To attach files, tap
.
• To access optional menu items, tap
.
4
Tap Send to send the message.
Useful Apps 67
Reading a message
You can view exchanged messages organised by contact.
1
Tap .
2
Select a contact from the message list.
Configuring messaging settings
You can change messaging settings to suit your preferences.
1
Tap .
2
Tap Settings from the message list.
Camera
Starting the camera
You can take a photo or record a video to cherish all of your memorable
moments.
Tap
.
• Before taking a photo or recording a video, wipe the camera lens with a
soft cloth.
• Be careful not to stain the camera lens with your fingers or other
foreign substance.
• If the battery level is lower than 5%, charge the battery before using
the camera.
• Images included in this user guide may be different from the actual
device.
• Photos and videos can be viewed or edited from the Gallery. See
Gallery
overview
for details.
Useful Apps 68
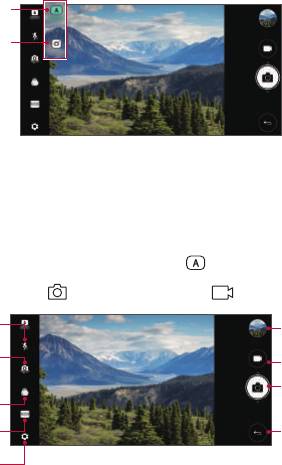
Changing the camera mode
You can select a camera mode that suits your environment to take a
photo or record a video easily and conveniently.
On the camera screen, tap AUTO mode and select the desired mode.
AUTO mode
SQUARE camera
mode
AUTO mode
You can take photos or record videos by selecting a variety of camera
modes and options.
1
Launch the Camera app, then tap AUTO ( ).
2
To take a photo, tap . To record a video, tap .
Turn the flash on
Start the Gallery.
or off.
Switch between
Record videos.
front and rear
cameras.
Take photos.
Apply a film filter
effect.
Select a camera
Back to the
mode.
previous screen.
Change the camera
options.
Useful Apps 69
Taking a photo
1
Select a camera mode and tap the subject to focus the camera on.
2
Tap to take a photo.
• You can also press the Volume Down (-) or Volume Up (+) key to
take a photo.
• When the screen is turned off or locked, start the camera by pressing
the Volume Down (-) key twice. Tap
Settings General
Shortcut keys.
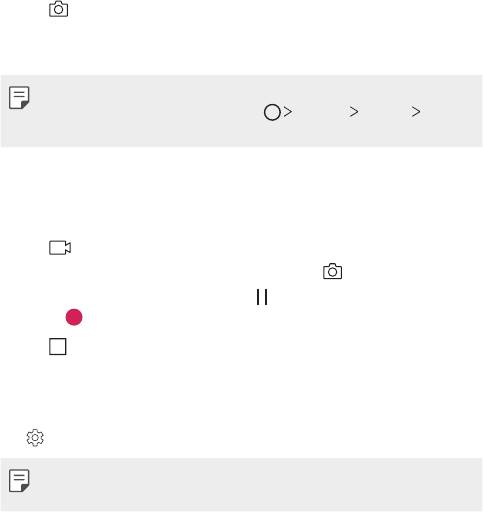
Recording a video
1
Select a camera mode and tap the subject to focus the camera on.
2
Tap .
• To take a photo while recording a video, tap
.
• To pause the video recording, tap
. To resume the video recording,
tap
.
3
Tap to end the video recording.
Customising the camera options
You can customise a variety of camera options to suit your preferences.
Tap
on the screen.
• Available options vary depending on the selected camera (front or rear
camera) and the selected camera mode.
Useful Apps 70

Photo size Select values for aspect ratio and size for taking photos.
Select values for resolution and size for recording
Video resolution
videos.
Obtain photos in vivid colours and get compensated
effects even when they are taken against the light.
HDR
These functions are provided by the high dynamic range
(HDR) technology equipped in the camera.
Set the timer to automatically take photos after a
Timer
specified period of time.
Cheese shutter Take photos with voice commands.
Steady recording Minimise motion blur while recording a video.
Tag locations Save the image with GPS location data.
Display guide grids so that you can take photos or
Grid
record videos based on the horizontal and vertical
reference lines.
Select if you want to store the pictures and videos in
Storage
the Internal storage or SD card.
(Available when the memory card is inserted.)
Simple view Hide all menus from the camera screen.
Help Provide Help for each camera menu.
Additional options on the front camera
Customise selfie shot settings.
Selfie shot
•Gesture shot: Shoot using the Gesture shot feature.
•Auto shot: Shoot when the camera detects a face.
Choose whether to use Gesture view to view the taken
Gesture view
photo immediately after taking a photo.
Save as flipped Save as flipped images after taking selfies.
Useful Apps 71
• When using the front camera, you can adjust the filter and skin tone.
Various camera modes
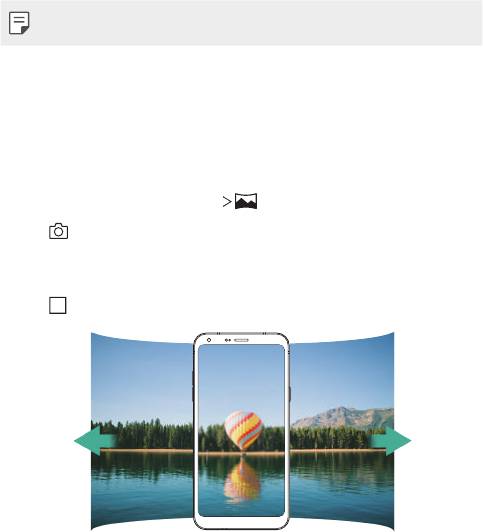
Panorama
You can create a panoramic photo by moving the camera in one direction
to photograph and stitch continuous shots of a wide view.
1
In the AUTO mode, tap MODE .
2
Tap and then slowly move the camera in one direction.
• Move the device by following the direction of the arrow in the
guideline.
3
Tap to stop capturing the panoramic.
Useful Apps 72
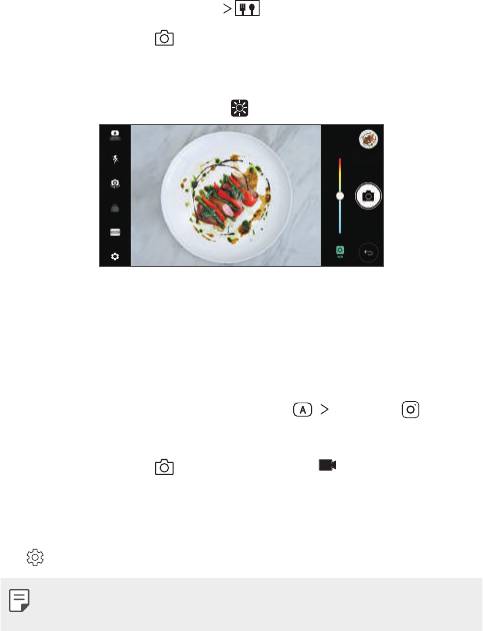
Food
You can take a photo using the control slide bar on the right of the screen.
1
In the AUTO mode, tap MODE .
2
To take a photo, tap .
• Drag the colour slide bar on the screen to adjust the white balance
and select the best colour.
• If the slide bar is invisible, tap
to adjust the white balance.
SQUARE camera mode
You can take multiple photos or videos in the form of a collage by using
the front and rear cameras. Photos and videos can be saved with different
layouts.
1
Launch the Camera app, then tap AUTO ( ) SQUARE ( ).
2
Tap MODE and select the desired camera mode.
3
To take a photo, tap . To record a video, tap .
Customising the camera options
You can customise a variety of camera options to suit your preferences.
Tap
on the screen.
• Available options vary depending on the selected camera (front or rear
camera) and the selected camera mode.
Useful Apps 73

Photo size Select values for aspect ratio and size for taking photos.
Select values for resolution and size for recording
Video resolution
videos.
Obtain photos in vivid colours and get compensated
effects even when they are taken against the light.
HDR
These functions are provided by the high dynamic range
(HDR) technology equipped in the camera.
Set the timer to automatically take photos after a
Timer
specified period of time.
Cheese shutter Take photos with voice commands.
Steady recording Minimise motion blur while recording a video.
Tag locations Save the image with GPS location data.
Display guide grids so that you can take photos or
Grid
record videos based on the horizontal and vertical
reference lines.
Select if you want to store the pictures and videos in
Storage
the Internal storage or SD card.
(Available when the memory card is inserted.)
Help Provide Help for each camera menu.
Additional options on the front camera
Customise selfie shot settings.
Selfie shot
•Gesture shot: Shoot using the Gesture shot feature.
•Auto shot: Shoot when the camera detects a face.
Save as flipped Save as flipped images after taking selfies.
Useful Apps 74
• When using the front camera, you can adjust the filter and skin tone.
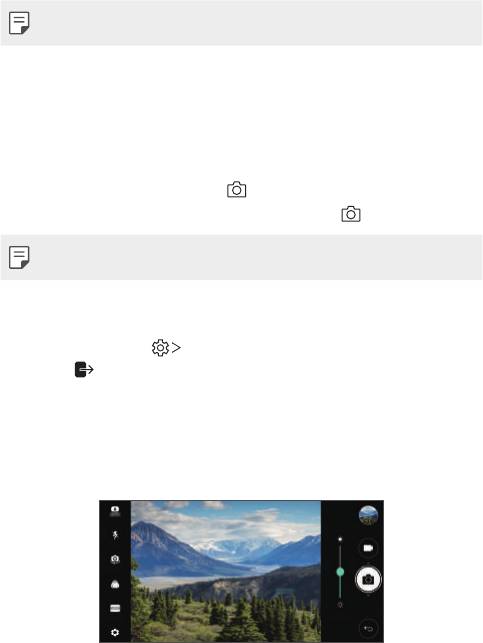
Other useful features in the Camera app
Burst shot
You can take continuous shots of photos to create moving pictures.
In the AUTO mode, touch and hold
.
• Continuous shots are taken at a fast speed while
is held down.
• Up to thirty (30) continuous photos can be taken.
Simple view
In the AUTO mode, tap Simple view to hide menus on the camera
screen. Tap
to display them.
AE/AF lock
You can fix the current exposure level and focus position by touching and
holding the screen in the AUTO mode. To turn off the feature, tap a blank
area on the screen.
Useful Apps 75
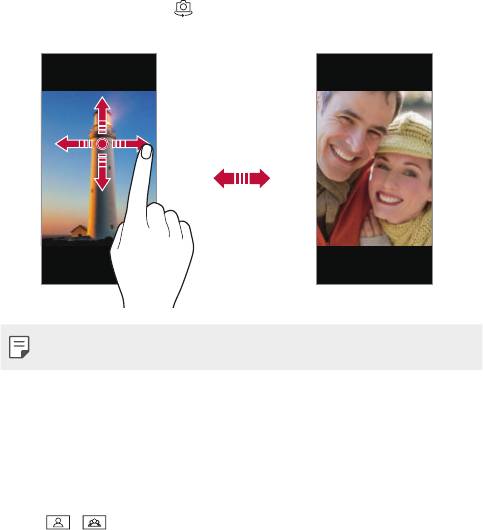
Switching between cameras
You can switch between the front and rear cameras to suit your
environment.
On the camera screen, tap
or drag the screen in any direction to switch
between the front and rear cameras.
• Use the front camera to take selfies. See
Selfie shot
for details.
Switching between standard and wide-angle
cameras
Switch between the standard and wide-angle on the front camera to take
photos or record videos to suit your preferences.
• Tap
/ to switch between the standard and wide-angle camera.
Useful Apps 76
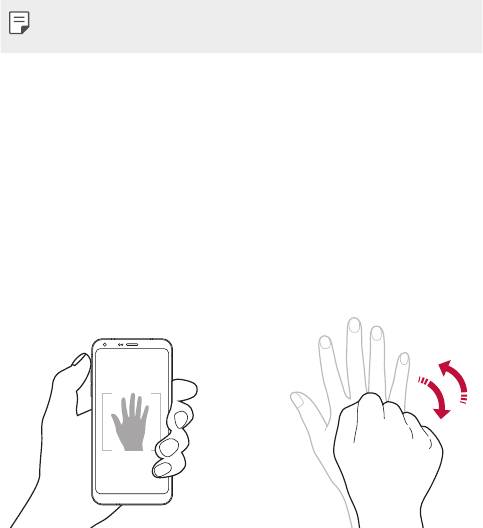
Zoom in or out
You can use zoom in or out on the camera screen while taking a photo or
recording a video.
• On the camera screen, pinch or spread two fingers to zoom in or out,
then use the displayed +/- slide bar.
• The zoom feature is not available when using the front camera in selfie
mode.
Selfie shot
You can use the front camera to view your face on the screen and take
selfies.
Gesture shot
You can take selfies by using gestures.
Show your palm to the front camera and then clench your fist.
You can also clench your fist and then open it towards the front camera.
• In three seconds, a photo is taken.
Useful Apps 77
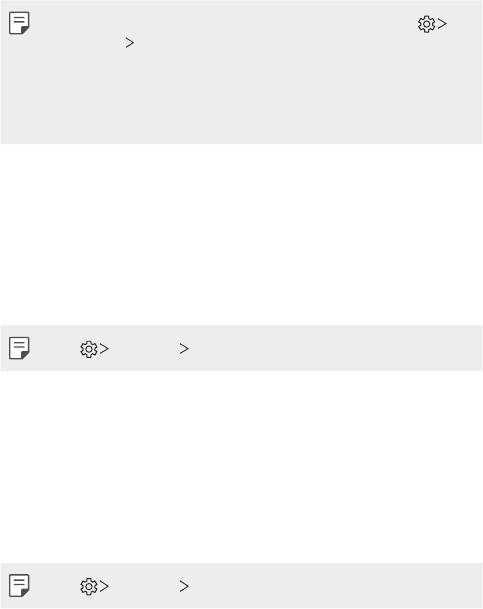
• To use this feature, switch to the front camera mode, then tap
Selfie shot
Gesture shot.
• Make sure that your palm and fist are within the reference line so that
the camera can detect them.
• This feature may not be available while using some of the camera
features.
Interval shot
You can take selfies at an interval.
While using the front camera, you can show your palm to the camera,
then clench your fist twice quickly.
• Four photos are taken at about two seconds interval after a timer
delay of three seconds.
• Tap Selfie shot Gesture shot to use this feature.
Auto shot
You can use the face detection feature to take selfies easily and
conveniently. You can set the device so that, when you look at the screen,
the front camera detects your face and takes a selfie automatically.
• The white coloured guide frame appears when the front camera
detects your face. If the subject within the guide frame stops moving,
the guide frame colour turns blue, then the camera takes a photo.
• Tap Selfie shot Auto shot to enable the Auto shot feature.
Useful Apps 78
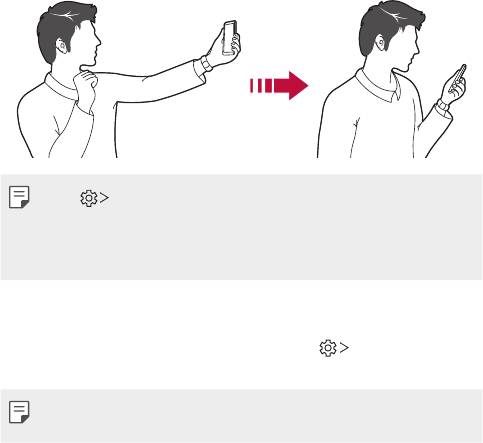
Gesture view
After taking a selfie with the front camera, you can preview the selfie
immediately by placing the screen close to your face.
• Tap Gesture view to enable the Gesture view feature.
• Only one preview is available each time a photo is taken.
• If you rotate the device while in preview screen, the screen switches to
camera mode.
Save as flipped
Before taking a photo with the front camera, tap Save as flipped.
The image is flipped horizontally.
• When using the front camera, you can change how selfies are taken in
the camera options. See
Customising the camera options
for details.
Useful Apps 79
Gallery
Gallery overview
You can view and manage photos and videos saved on your device.
1
Tap .
• Saved photos and videos are displayed by folder.
2
Tap a folder and select a file.
• View the selected file in full-screen mode.
• While viewing a photo, swipe left or right to view the previous or
next photo.
• While viewing a video, swipe left or right to rewind or fast-forward
the video.
• Some file formats may not be supported, depending on the installed
software.
• Some files may not be opened due to encoding.
• Files that exceed the size limit may cause an error.
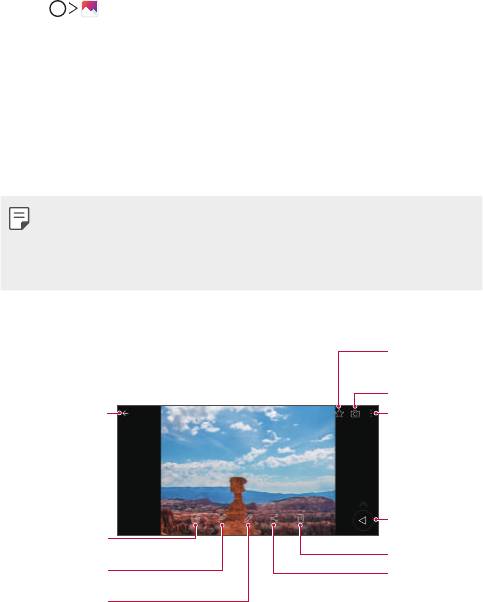
Viewing photos
Add to or remove
from your
favourites.
Start the camera.
Back to the
Access additional
previous screen.
options.
Back to the
previous screen.
Write a memo on a
photo.
Delete images.
View related
Share images.
content.
Edit images.
Useful Apps 80
• To display the menu items, gently tap the screen. To hide the menu
items, tap the screen again.
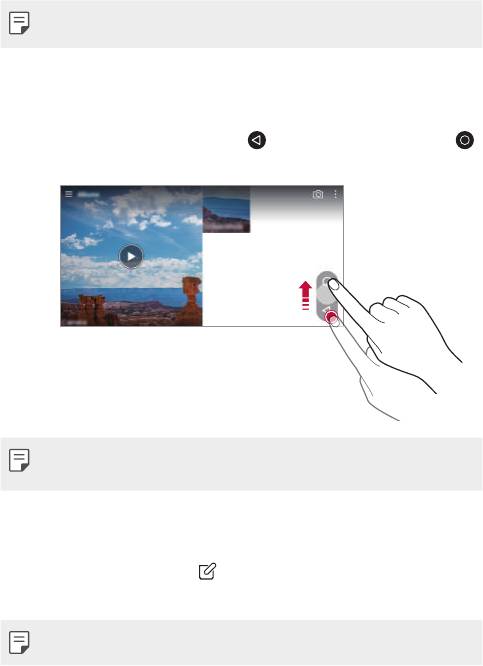
Floating button
To quickly move to the Home screen while viewing the Gallery in
landscape orientation, touch and hold
, move your finger upward to ,
then release it.
• You can move the floating button's position by dragging it horizontally
along the bottom part of the screen.
Writing a memo on the photo
1
While viewing a photo, tap .
2
Write a memo on the photo and tap SAVE.
• Some photos may not support the photo memo feature.
Useful Apps 81
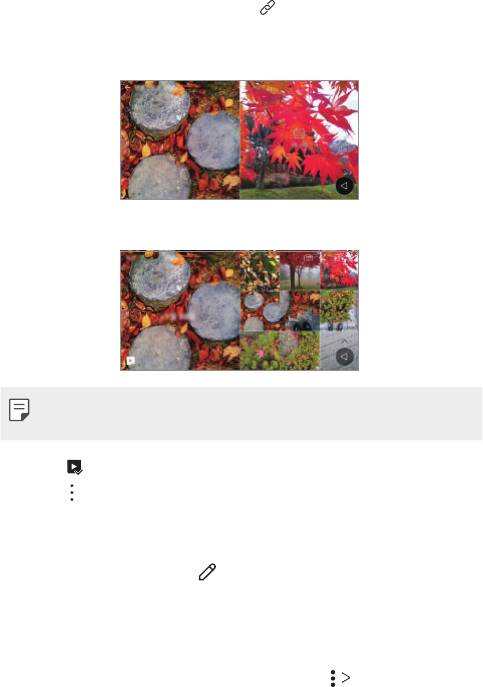
Related content
You can edit and customise related content in the Gallery.
1
While viewing a picture preview, tap .
2
When the icon related with the date you took the photo appears,
touch the screen.
• You can view the photos related with the date you chose.
• Related content can be related to up to four combinations of ‘Memories,
Date, Place, Camera mode’.
• Tap to save the related content as a video.
• Tap
to access additional options.
Editing photos
1
While viewing a photo, tap .
2
Use a variety of effects and tools to edit the photo.
3
Tap SAVE to save changes.
• The changes are overwritten to the original file.
• To save the edited photo as another file, tap
Save copy.
Useful Apps 82
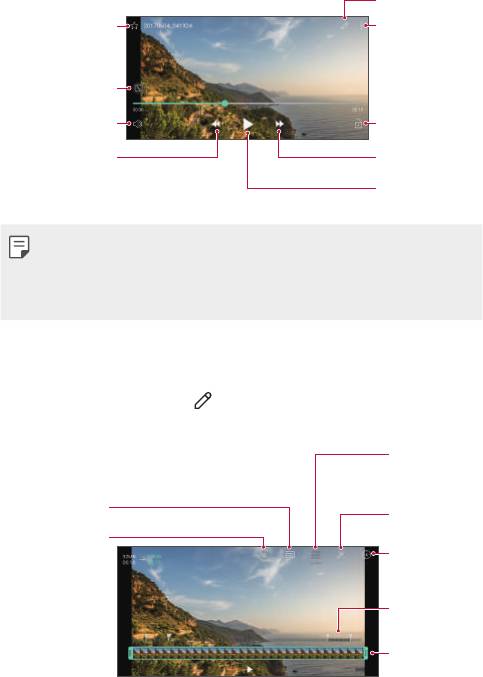
Playing a video
Edit the video.
Add to or remove
Access additional
from your
options.
favourites.
Choose screen
ratio.
Adjust the sound
Lock or unlock
volume.
the screen.
Rewind the video.
Fast-forward the
video.
Pause or play the
video.
• To adjust the sound volume, drag the right side of the video screen up
or down.
• To adjust the screen brightness, drag the left side of the screen up or
down.
Editing videos
1
While viewing a video, tap .
2
Use a variety of effects and edit tools to edit the video.
Automatically
create a 15 sec,
30 sec or 60 sec
video clip.
Adjust the
Create a movie
resolution.
using various
Revert the edit.
effects.
Launch the
KineMaster video
editor.
Select a section
to change the
play speed.
Adjust the video
duration.
3
Tap SAVE to save changes.
Useful Apps 83
Making a GIF
You can easily make a GIF file using recorded video.
1
At the desired starting point while watching the video, tap Create
GIF.
2
Select the length of the GIF you want to create.
• GIF is generated for the time selected from the current time.
• For videos less than 5 seconds, GIF images are automatically
generated for the remaining time.
• The GIF making feature is provided for the user's creative activity. If you
infringe other's copyright or defamation laws by using the GIF making
feature, you may be liable for civil and criminal liability. Be sure to not
duplicate or transfer work of others without permission. LG Electronics
cannot accept any liability for the user's action.
Related files
You can relate files by photos and videos taken with the same location or
date.
1
Select the saved photos and videos and tap .
2
Select a desired folder, then tap to create a video.
Deleting files
You can delete files by using one of the following options:
• Touch and hold a file from the file list, then tap Delete.
• Tap
from the file list and delete the desired files.
• Deleted files are automatically moved to Trash and they can be
restored to the Gallery within 7 days.
• On the Gallery, tap
Trash. Tap to completely delete the files. In
this case, the files cannot be restored.
Useful Apps 84
Sharing files
You can share files by using one of the following options:
• While viewing a photo, tap
to share the file by using the method
you want.
• While viewing a video,
Share to share the file by using the method
you want.
• Tap
from the file list to select files and share them using the method
you want.
Contacts
Contacts overview
You can save and manage contacts.
Tap
Essentials Contacts.
Adding contacts
Adding new contacts
1
On the contact list screen, tap .
2
Enter contact details and tap SAVE.
Importing contacts
You can import contacts from another storage device.
1
On the contact list screen, tap Manage contacts Import.
2
Select the source and target locations of the contact you want to
import, and then tap OK.
3
Select the contacts and tap IMPORT.
Useful Apps 85

Adding contacts to the speed dial list
1
On the contact list screen, tap Speed dial.
2
Tap Add contact from a speed dial number.
3
Select a contact.
Searching for contacts
You can search for contacts by using one of the following options:
• On the contact list screen, enter a contact name in the search box.
• Scroll the contact list up or down.
• From the index of the contact list screen, tap the initial letter of a
contact.
Contacts list
Editing contacts
1
On the contact list screen, select a contact.
2
On the contact detail screen, tap and edit details.
3
Tap SAVE to save changes.
Deleting contacts
You can delete contacts by using one of the following options:
• On the contact list screen, touch and hold a contact you want to
delete, then tap Delete contact.
• Tap
Delete on the contact list screen.
Adding favourites
You can register frequently used contacts as favourites.
1
On the contact list screen, select a contact.
2
On the contact detail screen, tap .
Useful Apps 86
Creating groups
1
On the contact list screen, tap Groups New group.
2
Enter a new group name.
3
Tap Add members, select contacts, then tap ADD.
4
Tap SAVE to save the new group.
QuickMemo+
QuickMemo+ overview
You can make creative notes by using a variety of options on this
advanced notepad feature, such as image management and screenshots,
which are not supported by the conventional notepad.
Creating a note
1
Tap QuickMemo+.
2
Tap to create a note.
•
: Save a note.
•
: Undo the last action.
•
: Redo the last action you undid.
•
: Enter a note by using the keypad.
•
: Write notes by hand.
•
: Erase handwritten notes.
•
: Zoom in or out, rotate or erase the parts of a handwritten note.
•
: Access additional options.
3
Tap to save the note.
Useful Apps 87

Writing notes on a photo
1
Tap QuickMemo+.
2
Tap to take a photo, then tap OK.
• The photo is automatically attached into the notepad.
3
Tap or to write notes on the photo.
• Write notes by hand on the photo.
• Enter text below the photo.
4
Tap to save the note.
Writing notes on a screenshot
1
While viewing the screen you want to capture, drag the status bar
downwards and then tap
.
• The screenshot appears as the notepad background theme. Memo
tools appear at the top of the screen.
2
Take notes as desired.
• Write notes by hand on the photo.
3
Tap and save the notes to the location you want.
• Saved notes can be viewed in either QuickMemo+ or Gallery.
• To save notes in the same location all the time, select the Use as
default app checkbox and select an app.
Managing folders
You can view notes grouped by type.
1
Tap QuickMemo+.
2
At the top of the screen, tap and select a menu item:
• All memos: View all notes saved in QuickMemo+.
• My memos: View notes created by QuickMemo+.
• Capture+: View notes created by Capture+.
Useful Apps 88
• Photo memos: View notes created by .
• Trash: View deleted notes.
• New category: Add categories.
•
: Rearrange, add or delete categories. To change the name of a
category, tap the category.
• Some folders do not appear when launching QuickMemo+ for the first
time. Disabled folders are enabled and appear when they contain at
least one related note.
Clock
Alarm
You can set an alarm to trigger it at a specified time.
1
Tap Essentials Clock Alarm.
2
Tap to add a new alarm.
3
Configure the alarm settings and tap SAVE.
• If you select a previously set alarm, you can edit the alarm.
• To delete an alarm, tap at the top of the screen. You can also touch
and hold the alarm.
World clock
You can view the current time in cities around the world.
1
Tap Essentials Clock World clock.
2
Tap and add a city.
Useful Apps 89

Timer
You can set the timer to trigger an alarm after a specified period of time.
1
Tap Essentials Clock Timer.
2
Set the time and tap Start.
• To suspend the timer, tap Pause. To resume the timer, tap Resume.
• To reset the timer settings, tap
.
3
Tap Stop to stop the timer alarm.
Stopwatch
You can use the stopwatch to record a lap time.
1
Tap Essentials Clock Stopwatch.
2
Tap Start to initiate the stopwatch.
• To record a lap time, tap Lap.
3
Tap Pause to suspend the stopwatch.
• To resume the stopwatch, tap Resume.
• To clear all the records and restart the stopwatch, tap Reset.
Useful Apps 90
Calendar
Calendar overview
You can use the calendar to manage events and tasks.
Adding events
1
Tap Essentials Calendar.
2
Select a date and then tap .
3
Enter event details and tap SAVE.
• If you tap a date from the calendar and the date contains events, a
pop-up window appears showing a list of the events. Tap an event
from the pop-up window to view the event details.
Syncing events
Tap Calendars to sync, and select a calendar to sync.
• When your events are saved from the device to your Google account,
they are automatically synced with the Google calendar, too. Then, you
can sync other devices with the Google calendar in order to make those
devices have the same events that your device has and to manage your
events on those devices.
Tasks
You can register tasks to your device to easily manage schedules.
1
Tap Essentials Tasks.
2
Tap to add a task.
3
Enter task details and then tap SAVE.
Useful Apps 91
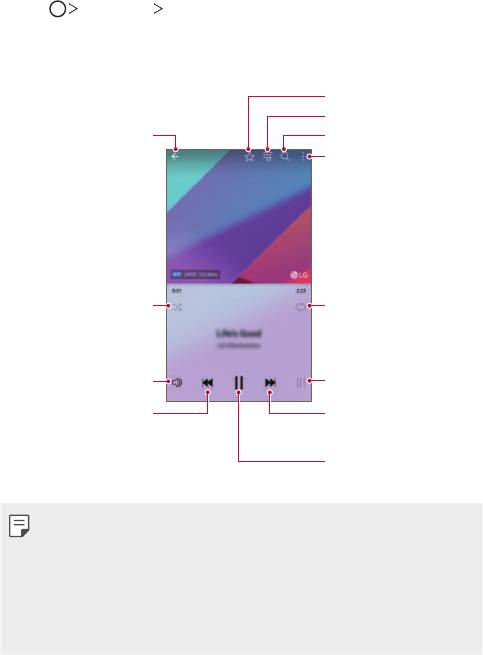
Music
You can play and manage songs or music albums.
1
Tap Essentials Music.
2
Select a category.
3
Select a music file.
Add or delete favourites.
Switch to the playlist.
Back to the previous screen.
Search for music files.
Access additional options.
Play in random order
Select a repeat mode.
Adjust the sound volume.
Set the pitch and speed.
Tap to play from the
Tap to play the next file /
beginning of the current
Touch and hold to fast
file / Double-tap to play the
forward.
previous file / Touch and
Pause or play.
hold to rewind.
• Some file formats may not be supported, depending on the installed
software.
• Files that exceed the size limit may cause an error.
• Music files may be protected by international copyright owners or
copyright laws. You may have to obtain legal permission before copying
a music file. To download or copy a music file, first check the copyright
law for the relevant country.
Useful Apps 92
Calculator
You can use two types of calculators: the simple calculator and the
scientific calculator.
1
Tap Essentials Calculator.
2
Use the keypad to make a calculation.
• To use scientific calculator, drag the green coloured slide bar located
in the right side of the screen to the left.
• To restart a calculation, touch and hold the DEL button.
E-mail overview
You can register an email account to your device and then you can check
and send emails from your device.
• If you use mobile data, you may be charged for data usage depending
on your pricing plan. Consult with your service provider for more
information.
Registering email accounts
When you use the email app for the first time, register your email account.
1
Tap Essentials E-mail.
2
Select an email service provider.
3
Enter your email address and password and then tap NEXT to register
your account.
• To manually register an email account, tap MANUAL SETUP
(if necessary).
Useful Apps 93
Managing email accounts
To view or edit your email account settings, tap Settings.
• To add an account, tap Add account.
• To delete an account, tap
Remove account.
Opening another email account
If several email accounts are registered and you want to view another
account, tap
and select another one from the account list.
Checking email
1
Tap and select a mail box.
2
Select an email from the email list.
• The email message appears.
Sending email
1
Tap .
2
Enter the recipient’s email address.
3
Enter a subject and message.
• To attach files, tap
.
• To access optional menu items, tap
.
4
Tap to send the email.
Useful Apps 94
Audio Recorder
You can record and save your voice or others’ voices from important
events. Recorded voice files can be played back or shared.
1
Tap Essentials Audio Recorder.
2
Tap .
• To pause recording, tap
.
• To insert a bookmark while making a voice recording, tap
.
3
Tap to end recording.
• The file is saved automatically and the pre-listen screen appears.
4
Tap to play the recorded voice.
• If you tap
, recorded voice files appear. You can play a recorded
voice file from the list.
FM Radio
You can listen to FM radio.
Tap
Essentials FM Radio.
• To use this app, first connect earphones to the device. The earphones
function as the radio antenna.
• This function may not be supported depending on the area.
Cell Broadcast
You can view real-time text broadcasts on emergency situations, such as
typhoons, floods and earthquakes.
Tap
Essentials Cell Broadcast.
Useful Apps 95
File Manager
You can view and manage files saved on your device or cloud.
1
Tap Management File Manager.
2
Tap and select the desired storage location.
LG Mobile Switch
Easily transfer data from a used device to a new device via LG Mobile
Switch.
1
Tap Management LG Mobile Switch.
You can also tap
Settings General Backup & reset LG
Mobile Switch.
2
Follow the on-screen instructions to select a desired method for
transfer.
• Resetting your device may delete backup files saved in storage. Make
sure to copy and store the important backup files to your PC.
• Data in a Google account will not be backed up. When you synchronise
your Google account, Google apps, Google contacts, Google calendar,
Google memo app data and apps downloaded from the Play Store are
stored on the Drive app automatically.
• Fully charge the battery before transferring data to avoid unintentional
powering off during the process.
Downloads
You can view, delete or share files downloaded via the Internet or apps.
Tap
Management Downloads.
Useful Apps 96
LG SmartWorld
You can download a variety of games, audio content, apps and fonts
provided by LG Electronics. Customise your device to suit your preferences
by using Home themes and fonts.
• If you use mobile data, you may be charged for data usage depending
on your pricing plan.
• This feature may not be supported depending on the area or service
provider.
1
Tap Services SmartWorld.
2
Tap Sign in, then sign in.
3
Select and download the desired content items.
Downloading SmartWorld app
If the SmartWorld app is not installed, follow these steps to download it.
1
Tap Settings General About phone Common Update
centre
App Updates.
2
From the list, select SmartWorld and tap Download.
RemoteCall Service
Your device can be remotely diagnosed for resolving issues. First, make a
phone call to an LG Customer Service Centre as follows:
• To use this function, first you must agree to usage of the function.
• If you use mobile data, you may be charged for data usage depending
on your pricing plan.
1
Tap Services RemoteCall Service.
2
Connect a call to an LG Customer Service Centre.
Useful Apps 97
3
After the call connects, follow the service associate’s instructions to
enter a six-digit access number.
• Your device is remotely connected and the remote support service
starts.
You can use a social networking service to update, view and share posts,
photos and videos with your online contacts.
Tap
Recommended Facebook.
Use a social networking service to capture and share your photos and
videos. You can also apply filter effects to make your photos and videos
more creative and interesting.
Tap
Recommended Instagram.
Chrome
Sign in to Chrome and import opened tabs, bookmarks and address bar
data from a computer to your device.
Google apps
You can use Google apps by setting a Google account. The Google account
registration window appears automatically when you use a Google app for
the first time. If you do not have a Google account, create one from your
device. For details on how to use an app, see the Help in the app.
• Some apps may not work depending on the area or service provider.
Useful Apps 98
Docs
Create documents or edit documents created online or from another
device. Share and edit documents together with others.
Drive
Upload, save, open, share and organise files from your device. Files
accessible from apps can be accessed from anywhere, including online and
offline environments.
Duo
Make a video call with your family, friends and anyone else who uses the
app.
Gmail
Register your Google email account to your device to check or send email.
Use the Google to search for web pages, images, news and more by
entering or speaking keywords.
Maps
Find your location or the location of a place on the map. View geographical
information.
Photos
View or share photos or albums saved on your device.
Play Movies & TV
Use your Google account to rent or purchase movies. Purchase content
and play it anywhere.
Play Music
Purchase music files from the Play Store. Play music files saved on your
device.
Useful Apps 99

Sheets
Create spreadsheets or edit spreadsheets created online or from another
device. Share and edit spreadsheets together with others.
Slides
Create presentation material or edit presentation material created online
or from another device. Share and edit presentation material together
with others.
YouTube
Search and play videos. Upload videos on YouTube to share them with
people around the world.
Google Assistant
Your device has the Google Assistant built in. Ask it questions. Tell it to do
things. It’s your own personal Google. Touch and hold the
and then you
will see “Hi, how can I help?”, after which you can say your voice command.
• The Google Assistant is not available in all languages.
Useful Apps 100
Оглавление
- Настраиваемые функции
- Основные функции
- Полезные приложения
- Параметры телефона
- Приложение
- Налаштовувані функції
- Основні функції
- Корисні програми
- Налаштування
- Додаток
- Арнайы жасалған мүмкіндіктер
- Негізгі функциялар
- Пайдалы қолданбалар
- Баптаулар
- Қосымша
- Тусгай загварын нэмэлт функцүүд
- Үндсэн функцүүд
- Хэрэгтэй аппууд
- Тохиргоо
- Хавсралт
- Custom-designed Features
- Basic Functions
- Useful Apps
- Settings
- Appendix


