Karcher B 250 R + R 120: Before Startup
Before Startup: Karcher B 250 R + R 120
-
3
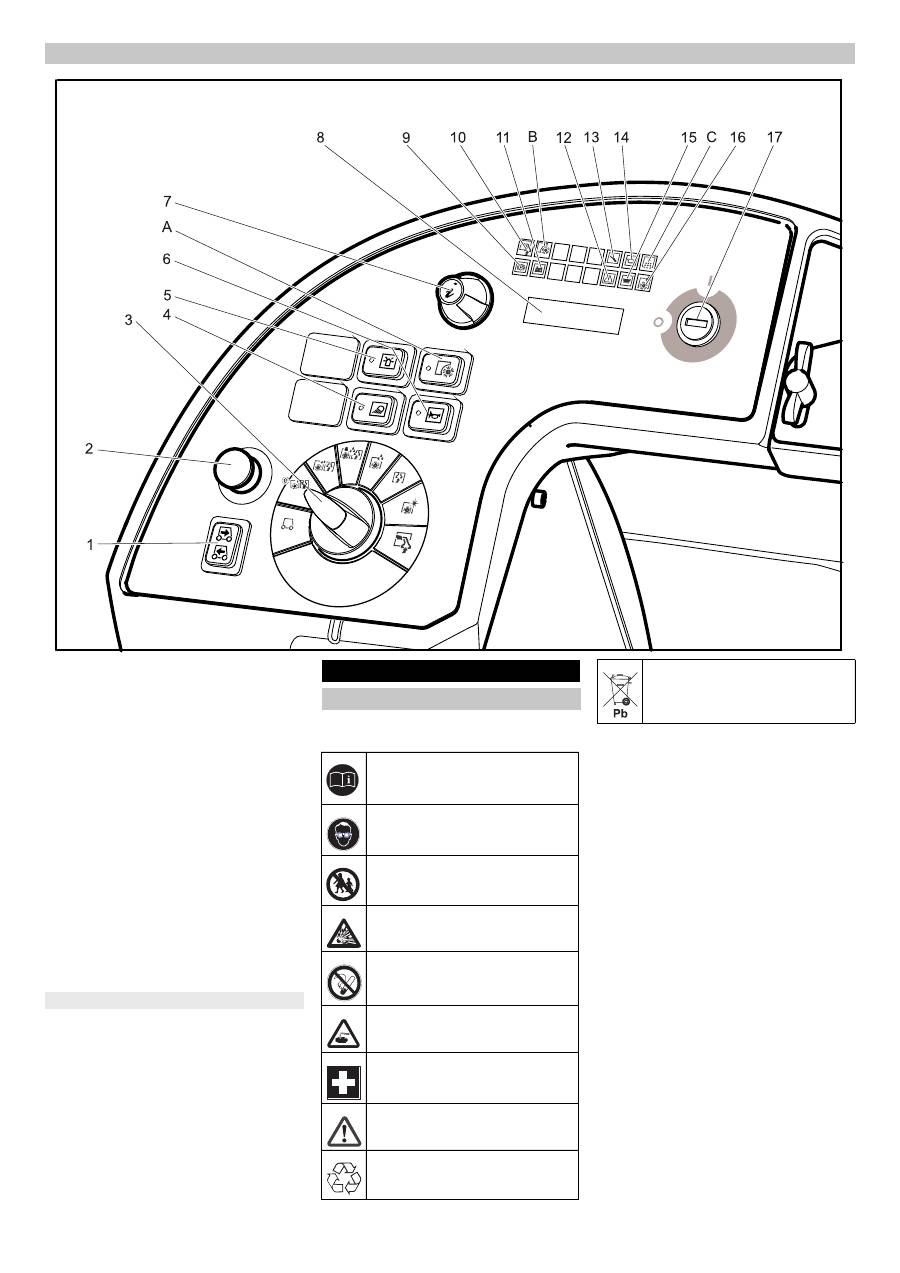
1 Driving direction switch
2 Emergency-stop button
3 Program switch
4 Working lamp button (optional)
5 Overall lamp button (optional)
6 Horn
7 Info button
8 Display
9 Indicator lamp - automatic immobilizing
brake active
10 Indicator lamp - manual cleaning pro-
gram active
11 Indicator lamp - battery monitoring
12 Indicator lamp - fault
13 Indicator lamp - service
14 Indicator lamp: deterfent tank empty
(Option)
15 Indicator lamp - Dirt water tank full
16 Indicator lamp - brush overload
17 Key switch
A Button for sweeping
B Indicator lamp for sweeping
C Indicator lamp for shaking off dust filter
Please observe the following warning notes
when handling batteries:
DANGER
Risk of explosion! Do not put tools or similar
on the battery, i.e. on the terminal poles
and cell connectors.
몇
WARNING
Risk of injury! Ensure that wounds never
come into contact with lead. Always clean
your hands after working on batteries.
Operator console
For the B 250 RI only
Before Startup
Batteries
Observe the directions on the bat-
tery, in the instructions for use and
in the vehicle operating instructions
Wear eye protection
Keep children away from acid and
batteries
Danger of explosion
Fire, sparks, naked flames and
smoking must be strictly avoided
Danger of chemical burns
First aid
Warning note
Disposal
Do not throw the battery into the
regular waste
19 EN
-
4
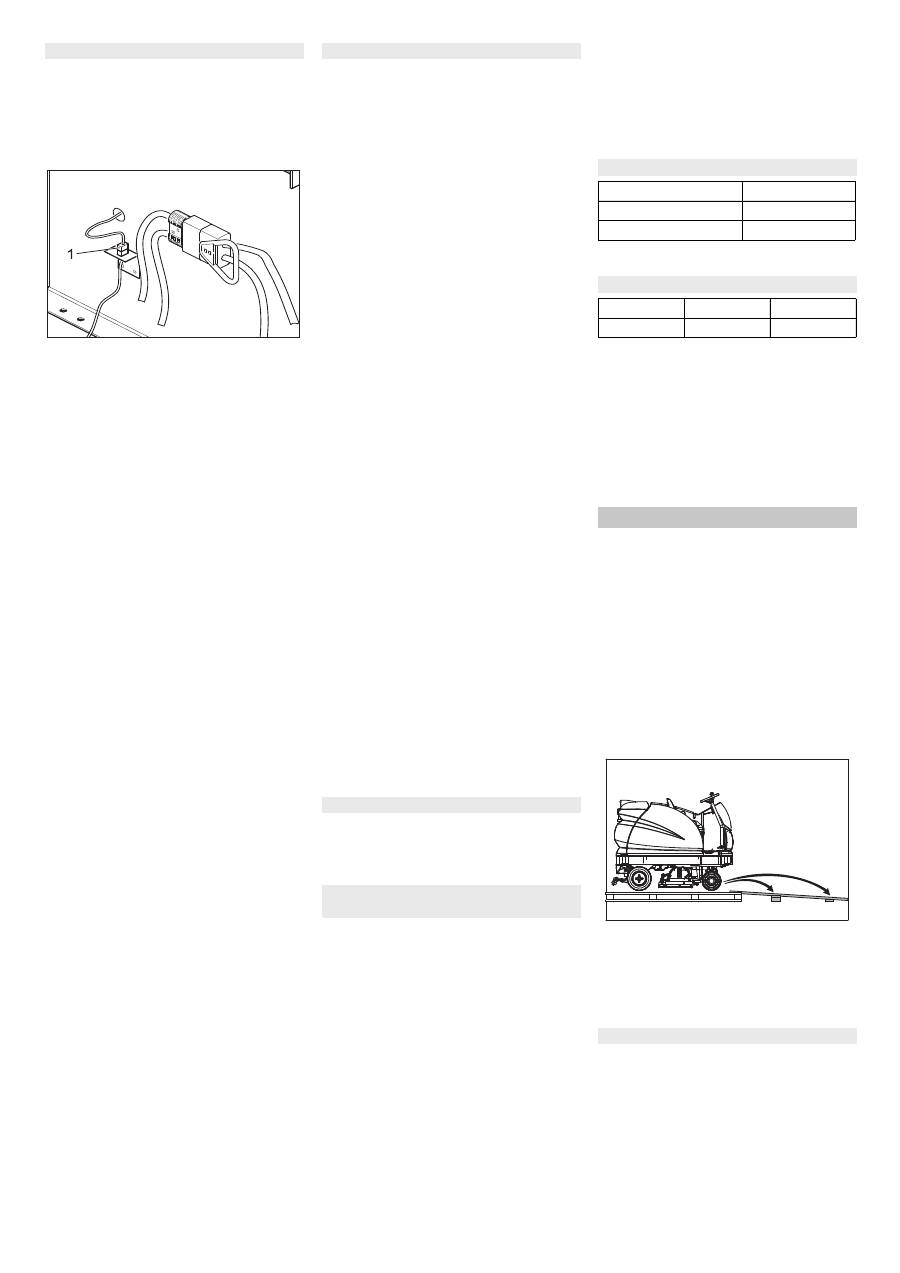
The BAT package model contains built-in
batteries.
The steering position should point to-
wards the front.
Swivel the seat to the front.
Remove screw of seat stopper.
1 Plug for seat contact switch
Pull out the plug of the seat contact
switch and push it back through the
opening.
Unlock the driver seat and pull it up-
ward.
Dismount the plug of the seat contact
switch from the holder.
Unhook the support of the seat console
and close the seat console.
Unscrew the hinges of the seat console.
Place the seat console in the foot
space.
Lift battery cover.
Dismantle fresh water tank on the right
hand side.
Dismantle the side plate of the battery
box on the right hand side.
Insert battery. Battery connections in
front direction.
ATTENTION
Pay attention to correct poles.
Connect the connection cable to the
free battery poles (+) and (-). Lay the
cables in such a way that they do not
get clamped by the seat.
Install the side plate of the battery box
on the right hand side.
Install fresh water tank on the right hand
side.
Replace battery cover.
Insert battery plug.
Position the seat console.
Tighten down the hinges of the seat
console.
Open the seat console and secure the
support for the seat console.
Mount the plug of the seat contact
switch to the holder.
Insert the seat.
Reconnect the plug of the seat contact
switch.
Install screw of seat stopper.
Swivel the seat downward.
Adjust steering wheel.
ATTENTION
Charge the batteries before commissioning
the appliance.
Note:
The device is equipped with a safety mech-
anism to prevent total discharge, i.e. when
the permissible minimum capacity is
reached, then the machine can only be
driven and existing lamps can be switched
on. In such a case, the battery monitoring
symbol on the control console glows red.
Drive the machine directly to the charg-
ing station; avoid any steep gradients in
the process.
Note:
When using other batteries (e.g. batteries
from other manufacturers), the total dis-
charge protection level for the respective
battery must be reset by the Kärcher after-
sales service.
DANGER
Danger of injury due to electric shock. Ob-
serve supply network and fuse protection -
see "Charger".
Only use the charger in dry rooms with suf-
ficient ventilation!
Note:
Average charging time is approx. 10 -12
hours.
The recommended chargers (suitable for
the batteries used) are regulated electroni-
cally and will automatically terminate the
charging process.
DANGER
Danger of explosion. The room, where the
machine is kept to charge the battery, must
feature a minimum volume and an air ex-
change with a minimum flow rate, depend-
ing on the type of battery (see "Recom-
mended Batteries").
Danger of explosion. Wet batteries may
only be charged with the seat tilted up.
Tilt the seat upward.
Remove battery plug and join it to the
charging cable.
Connect the charger to the mains and
turn it on.
Switch off the charger and remove the
plug from the socket.
Pull the battery cable from the charger
cable and connect it to the machine.
Add distilled water one hour before the
charging process comes to an end; fol-
low the correct acid level. There are
corresponding indicators on the battery.
At the end of the charging process, all
cells must gas.
몇
WARNING
Danger of causticization!
–
Adding water to the battery in its dis-
charged state can cause the acid to
leak.
–
Use safety glasses while handling bat-
tery acid and follow the safety instruc-
tions to avoid personal injury or damage
to clothes.
–
Should the acid spray on to the skin or
clothes, rinse immediately with lots of
water.
ATTENTION
Risk of damage!
–
Use only distilled or desalinated water
(EN 50272-T3) for filling the battery.
–
Do not add any substances (so-called
performance improving agents), else
warranty claims will not be entertained.
Batteries and chargers are available in spe-
cialised stores.
If you use wet batteries in the BAT model,
then follow the following instructions:
– It is necessary to conform to the maxi-
mum battery dimensions.
– While charging wet (maintenance-free)
batteries, it is necessary to tilt the seat
upward.
– While charging wet batteries, follow the
specifications of the battery manufac-
turer.
Note:
Press the emergency-stop button to imme-
diately deactivate all functions and turn the
key switch to the "0" position.
Four floor boards of the pallet are fas-
tened with screws. Unscrew these
boards.
Place the boards on the edge of the pal-
let. Place the boards in such a way that
they lie in front of the four wheels of the
machine. Fasten the boards with
screws.
Slide the four support beams included
in the packaging under the ramp.
Only BR 120/250...: Remove front
transport eyelets from the palette.
Remove the wooden bars in front of the
wheels.
Release emergency-stop button by
turning.
Set main switch to “1”.
Press the drive direction switch and
slowly move the machine down from
the ramp.
Set main switch to “0”.
Insert batteries and connect
Charge the batteries
After charging
Low maintenance batteries (wet
batteries)
Recommended batteries, chargers
Order No.
Battery set
6.654-136.0
Charger
6.654-295.0
Maximum battery dimensions
Length
Width
Height
842 mm
627 mm
537 mm
Unloading
With battery
20 EN
Оглавление
- Inhaltsverzeichnis
- Bedien- und Funktionselemente
- Vor Inbetriebnahme
- Betrieb
- Pflege und Wartung
- Hilfe bei Störungen
- Technische Daten
- EG-Konformitätserklärung
- Contents
- Operating and Functional Elements
- Before Startup
- Operation
- Maintenance and care
- Troubleshooting
- Technical specifications
- EC Declaration of Conformity
- Table des matières
- Eléments de commande et de fonction
- Avant la mise en service
- Fonctionnement
- Entretien et maintenance
- Assistance en cas de panne
- Caractéristiques techniques
- Déclaration de conformité CE
- Indice
- Elementi di comando e di funzione
- Prima della messa in funzione
- Funzionamento
- Cura e manutenzione
- Guida alla risoluzione dei guasti
- Dati tecnici
- Dichiarazione di conformità CE
- Inhoud
- Elementen voor de bediening en de functies
- Voor de inbedrijfstelling
- Werking
- Onderhoud
- Hulp bij storingen
- Technische gegevens
- EG-conformiteitsverklaring
- Índice de contenidos
- Elementos de operación y funcionamiento
- Antes de la puesta en marcha
- Funcionamiento
- Cuidados y mantenimiento
- Ayuda en caso de avería
- Datos técnicos
- Declaración de conformidad CE
- Índice
- Elementos de comando e de funcionamento
- Antes de colocar em funcionamento
- Funcionamento
- Conservação e manutenção
- Ajuda em caso de avarias
- Dados técnicos
- Declaração de conformidade CE
- Indholdsfortegnelse
- Betjenings- og funktionselementer
- Inden ibrugtagning
- Drift
- Pleje og vedligeholdelse
- Hjælp ved fejl
- Tekniske data
- EU-overensstemmelses- erklæring
- Innholdsfortegnelse
- Betjenings- og funksjonelementer
- Før den tas i bruk
- Drift
- Pleie og vedlikehold
- Feilretting
- Tekniske data
- EU-samsvarserklæring
- Innehållsförteckning
- Manövrerings- och funktionselement
- Före ibruktagande
- Drift
- Skötsel och underhåll
- Åtgärder vid störningar
- Tekniska data
- Försäkran om EU- överensstämmelse
- Sisällysluettelo
- Ohjaus- ja käyttölaitteet
- Ennen käyttöönottoa
- Käyttö
- Hoito ja huolto
- Häiriöapu
- Tekniset tiedot
- EU- standardinmukaisuustodistus
- Πίνακας περιεχομένων
- Στοιχεία χειρισμού και λειτουργίας
- Πριν τη θέση σε λειτουργία
- Λειτουργία
- Φροντίδα και συντήρηση
- Αντιμετώπιση βλαβών
- Τεχνικά χαρακτηριστικά
- Δήλωση Συμμόρφωσης των Ε . Κ .
- İ çindekiler
- Kullan ı m ve çal ı ş ma elemanlar ı
- Cihaz ı çal ı ş t ı rmaya ba ş lamadan önce
- Çal ı ş t ı rma
- Koruma ve Bak ı m
- Ar ı zalarda yard ı m
- Teknik Bilgiler
- AB uygunluk bildirisi
- Оглавление
- Защита окружающей среды Гарантия
- Описание элементов управления и рабочих узлов
- Перед началом работы
- Эксплуатация
- Уход и техническое обслуживание
- Помощь в случае неполадок
- Технические данные
- Заявление о соответствии ЕС
- Tartalomjegyzék
- Kezelési- és funkciós elemek
- Üzembevétel el ő tt
- Üzem
- Ápolás és karbantartás
- Segítség üzemzavar esetén
- M ű szaki adatok
- EK konformitási nyiltakozat
- Obsah
- Ovládací a funk č ní prvky
- P ř ed uvedením do provozu
- Provoz
- Ošet ř ování a údržba
- Pomoc p ř i poruchách
- Technické údaje
- Prohlášení o shod ě pro ES
- Vsebinsko kazalo
- Upravljalni in funkcijski elementi
- Pred zagonom
- Obratovanje
- Nega in vzdrževanje
- Pomo č pri motnjah
- Tehni č ni podatki
- ES-izjava o skladnosti
- Spis tre ś ci
- Elementy urz ą dzenia
- Przed pierwszym uruchomieniem
- Dzia ł anie
- Czyszczenie i konserwacja
- Usuwanie usterek
- Dane techniczne
- Deklaracja zgodno ś ci UE
- Cuprins
- Elemente de utilizare ş i func ţ ionale
- Înainte de punerea în func ţ iune
- Func ţ ionarea
- Îngrijirea ş i între ţ inerea
- Remedierea defec ţ iunilor
- Date tehnice
- Declara ţ ie de conformitate CE
- Obsah
- Ovládacie a funk č né prvky
- Pred uvedením do prevádzky
- Prevádzka
- Starostlivos ť a údržba
- Pomoc pri poruchách
- Technické údaje
- Vyhlásenie o zhode s normami EÚ
- Pregled sadržaja
- Komandni i funkcijski elementi
- Prije prve uporabe
- U radu
- Njega i održavanje
- Otklanjanje smetnji
- Tehni č ki podaci
- EZ izjava o uskla đ enosti
- Pregled sadržaja
- Komandni i funkcioni elementi
- Pre upotrebe
- Rad
- Nega i održavanje
- Otklanjanje smetnji
- Tehni č ki podaci
- Izjava o uskla đ enosti sa propisima EZ
- Съдържание
- Обслужващи и функционални елементи
- Преди пускане в експлоатация
- Експлоатация
- Грижи и поддръжка
- Помощ при неизправности
- Технически данни
- Декларация за съответствие на ЕО
- Sisukord
- Teenindus- ja funktsioonielemendid
- Enne seadme kasutuselevõttu
- Käitamine
- Korrashoid ja tehnohooldus
- Abi häirete korral
- Tehnilised andmed
- EÜ vastavusdeklaratsioon
- Satura r ā d ī t ā js
- Vad ī bas un funkcijas elementi
- Pirms ekspluat ā cijas uzs ā kšanas
- Darb ī ba
- Kopšana un tehnisk ā apkope
- Pal ī dz ī ba darb ī bas trauc ē jumu gad ī jum ā
- Tehniskie dati
- EK Atbilst ī bas deklar ā cija
- Turinys
- Valdymo ir funkciniai elementai
- Prieš pradedant naudoti
- Naudojimas
- Prieži ū ra ir aptarnavimas
- Pagalba gedim ų atveju
- Techniniai duomenys
- EB atitikties deklaracija
- Зміст
- Елементи управління і функціональні вузли
- Перед початком роботи
- Експлуатація
- Догляд та технічне обслуговування
- Допомога у випадку неполадок
- Технічні характеристики
- Заява при відповідність Європейського співтовариства
