LG Q6a M700 16Gb Black Gold: Basic Functions
Basic Functions: LG Q6a M700 16Gb Black Gold

02
Basic Functions

Product components and
accessories
The following items are included with your device.
• Device
• Charger
• Stereo headset
• Quick Start Guide
• USB cable
• Ejection pin
• The items described above may be optional.
• The items supplied with the device and any available accessories may
vary depending on the area and service provider.
• Always use genuine LG Electronics accessories. Using accessories made
by other manufacturers may affect your device's call performance or
cause malfunctions. This may not be covered by LG's repair service.
• If any of these basic items are missing, contact the dealer from which
you purchased your device.
• To purchase additional basic items, contact an LG Customer Service
Centre.
• To purchase optional items, contact an LG Customer Service Centre for
available dealers.
• Some items in the product box are subject to change without notice.
• The appearance and specifications of your device are subject to change
without notice.
• Device specifications may vary depending on the area or service provider.
• Be sure to use authentic accessories provided by LG Electronics. Using
third-party accessories may damage the device or cause malfunctions.
Basic Functions 27

Parts overview
Proximity/Ambient light
Earpiece
sensor
Front camera lens
Nano-SIM card tray
Touch screen
Nano-SIM/Memory card tray
Stereo headset jack
Microphone
Microphone
Rear camera lens
Flash
Volume keys (+/-)
Power/Lock key
Speaker
Charger/USB cable port
Basic Functions 28

• Proximity/Ambient light sensor
- Proximity sensor: During a call, the proximity sensor turns off the
screen and disables touch functionality when the device is in close
proximity to the human body. It turns the screen back on and enables
touch functionality when the device is outside a specific range.
- Ambient light sensor: The ambient light sensor analyses the ambient
light intensity when the auto-brightness control mode is turned on.
• Volume keys
- Adjust the volume for ringtones, calls or notifications.
- While using the Camera, gently press a Volume key to take a photo.
To take continuous photos, press and hold the Volume key.
- Press the Volume Down (-) key twice to launch the Camera app
when the screen is locked or turned off. Press the Volume Up (+) key
twice to launch Capture+.
• Power/Lock key
- Briefly press the key when you want to turn the screen on or off.
- Press and hold the key when you want to select a power control
option.
• This device has a non-removable battery. Do not attempt to remove the
back cover.
• Some functions may be restricted for access, depending on the device
specifications.
• Do not put heavy objects on the device or sit on it. Failure to do so may
damage the touch screen.
• Screen-protective film or accessories may interfere with the proximity
sensor.
• If your device is wet or is being used in a humid place, the touch screen
or buttons may not function properly.
Basic Functions 29

Turning the power on or off
Turning the power on
When the power is turned off, press and hold the Power/Lock key.
• When the device is turned on for the first time, initial configuration
takes place. The first booting time for the smart phone may be longer
than usual.
Turning the power off
Press and hold the Power/Lock key, then select Power off.
Power control options
Press and hold the Power/Lock key, then select an option.
• Power off: Turn off the device.
• Power off and restart: Restart the device.
• Turn on Airplane mode: Block telecommunication-related functions,
including making phone calls, messaging and browsing the Internet.
Other functions remain available.
Basic Functions 30
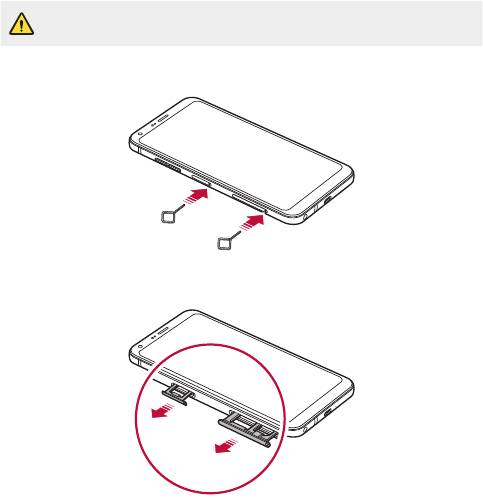
Installing the SIM card
Insert the SIM (Subscriber Identity Module) card provided by your service
provider to start using your device.
• Be careful with the ejection pin since it has a sharp edge.
1
Insert the ejection pin into the hole on the card tray.
2
Pull out the card tray.
Basic Functions 31
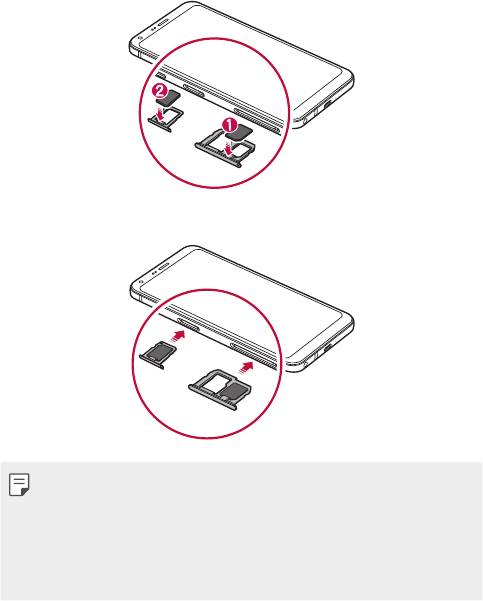
3
Put the SIM card on the card tray with the gold-coloured contacts
facing downwards.
Put the primary SIM card on the SIM card tray 1 and the secondary
SIM card on the SIM card tray 2.
4
Insert the card tray back into the slot.
• This device supports only Nano SIM cards.
• For problem-free performance, it is recommended to use the device
with the correct type of SIM card. Always use a factory-made SIM card
supplied by the operator.
• If you insert the card tray into your device while the card tray is wet,
your device may be damaged. Always make sure the card tray is dry.
Basic Functions 32
Precautions when using the SIM card
• Do not lose your SIM card. LG is not responsible for damage and other
issues caused by loss or transfer of a SIM card.
• Be careful not to damage the SIM card when you insert or remove it.
Inserting the memory card
Insert the memory card into your device.
The device can support up to a 2 TB microSD card. Depending on the
memory card manufacturer and type, some memory card may not be
compatible with your device.
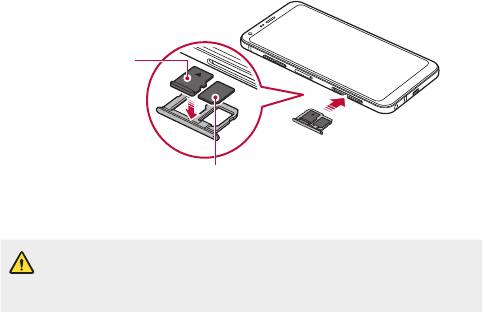
1
Insert the ejection pin into the hole on the card tray.
2
Pull out the card tray.
3
Put the memory card on the card tray with the gold-coloured contacts
facing downwards.
Memory card
SIM card
4
Insert the card tray back into the slot.
• Some memory cards may not be fully compatible with the device. If you
use an incompatible card, it may damage the device or the memory card,
or corrupt the data stored in it.
Basic Functions 33
• The memory card is an optional item and is sold separately.
• Frequent writing and erasing of data may shorten the memory card
lifespan.
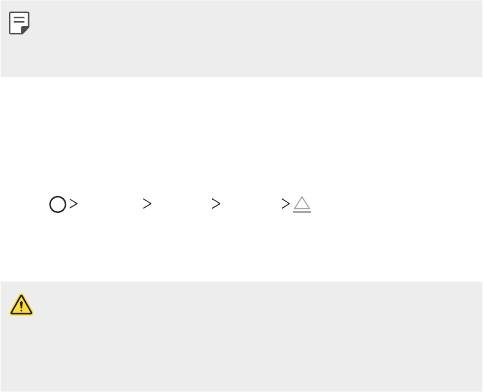
Removing the memory card
Unmount the memory card before removing it for safety.
1
Tap Settings General Storage .
2
Insert the ejection pin into the hole on the card tray.
3
Pull out the card tray and remove the memory card.
• Do not remove the memory card while the device is transferring or
accessing information. This may cause data to be lost or corrupted, or
may damage the memory card or the device. LG is not responsible for
losses that result from the abuse or improper use of memory cards,
including the loss of data.
Basic Functions 34
Battery
Charging the battery
Before using the device, fully charge the battery.
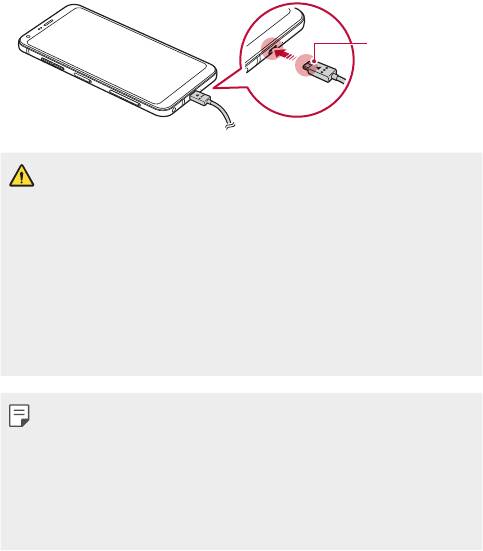
Connect one end of the charging cable to the charger, insert the other end
of the cable into the cable port, and then plug the charger into a power
socket.
Charging cable
terminal
• Do not charge while the device or charging cable is wet or contains
moisture. This can cause fire, electric shock, injury or damage to device.
• Make sure to use the USB cable provided with your device.
• Make sure to use an LG-approved charger and charging cable. Charging
the battery with a third-party charger may cause the battery to explode
or may damage the device.
• Using the device when it is charging may cause electric shock. To use the
device, stop charging it.
• This device has a non-removable battery. Do not attempt to remove the
back cover.
• Remove the charger from the power socket after the device is fully
charged. This prevents unnecessary power consumption.
• Another way to charge the battery is by connecting a USB cable
between the device and a desktop or laptop computer. This may take a
longer time than plugging the adapter to a wall outlet.
• Do not charge the battery by using a USB hub that is unable to maintain
the rated voltage. Charging may fail or unintentionally stop.
Basic Functions 35
Precautions when using the device
• Ensure that the inside of the device does not make contact with a
metallic object or water.
• Make sure to use the USB cable provided; do not use third party USB
cables or chargers with your device. The LG limited warranty does not
cover the use of third party accessories.
• Failure to follow the instructions in this guide and improper use may
damage the device.
Using the battery efficiently
Battery lifespan may decrease if you keep many apps and functions
running simultaneously and continuously.
Cancel background operations to increase battery life.
To minimise battery consumption, follow these tips:
• Turn off the Bluetooth
®
or Wi-Fi network function when not using
them.
• Set the screen timeout to as short a time as possible.
• Minimise the screen brightness.
• Set a screen lock when the device is not used.
• Check the battery usage details and close any downloaded apps that
are draining the battery.
Basic Functions 36

Touch screen
You can familiarise yourself with how to control your device by using
touch screen gestures.
Tapping
Lightly tap with your fingertip to select or run an app or option.
Touching and holding
Touch and hold for several seconds to display a menu with available
options.
Basic Functions 37

Double-tapping
Tap twice quickly to zoom in or out on a web page or map.
Dragging
Touch and hold an item, such as an app or widget, then move your finger
to another location in a controlled motion. You can use this gesture to
move an item.
Basic Functions 38
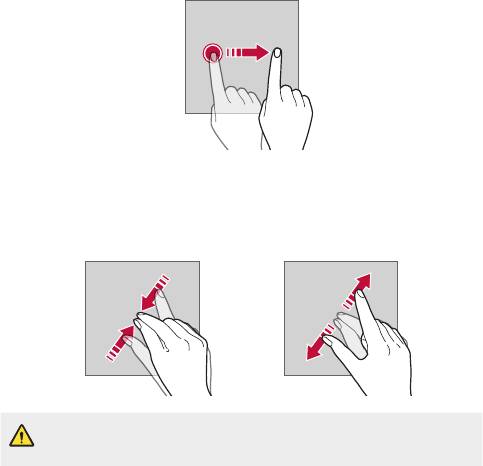
Swiping
Touch the screen with your finger and move it quickly without pausing.
You can use this gesture to scroll through a list, a web page, photos,
screens, and more.
Pinching and spreading
Pinch two fingers to zoom out such as on a photo or map. To zoom in,
spread your fingers apart.
• Do not expose the touch screen to excessive physical shock. You might
damage the touch sensor.
Basic Functions 39

• A touch screen failure may occur if you use the device near a magnetic,
metallic or conductive material.
• If you use the device under bright lights, such as direct sunlight, the
screen may not be visible, depending on your position. Use the device
in a shady location or a location with an ambient light that is not too
bright and bright enough to read books.
• Do not press the screen with excessive force.
• Gently tap with your fingertip on the option you want.
• Touch control may not work properly if you tap while wearing a glove or
by using the tip of your fingernail.
• Touch control may not work properly if the screen is moist or wet.
• The touch screen may not function properly if a screen-protective film
or accessory purchased from a third party store is attached to the
device.
• Displaying a static image for extended periods of time may result in
afterimages or screen burn-in. Turn off the screen when you do not use
the device for a long time.
Home screen
Home screen overview
The Home screen is the starting point for accessing various functions
and apps on your device. Tap
on any screen to directly go to the Home
screen.
You can manage all apps and widgets on the Home screen. Swipe the
screen left or right to view all installed apps at a glance.
Basic Functions 40
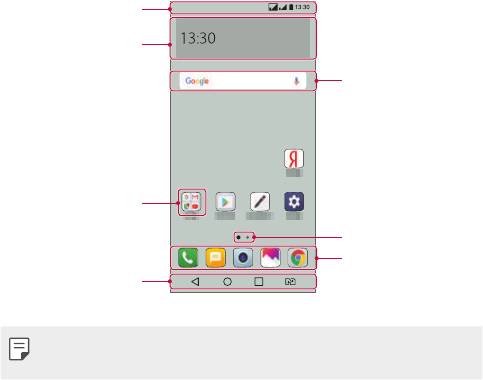
Home screen layout
You can view all apps and organise widgets and folders on the Home
screen.
Status bar
Weather widget
Google search widget
Folder
Page icon
Quick access area
Home touch buttons
• The Home screen may vary, depending on the service provider or
software version.
• Status bar: View status icons, the time and the battery level.
• Weather widget: View the information of weather and time for a
specific area.
• Google search widget: Perform a Google search by inputting spoken
or written keywords.
• Folder: Create folders to group apps by your preferences.
• Page icon: Display the total number of Home screen canvases. Tap the
desired page icon to go to the page you selected. The icon reflecting
the current canvas will be highlighted.
Basic Functions 41
• Quick access area: Fix main apps at the bottom of the screen so that
they can be accessed from any Home screen canvas.
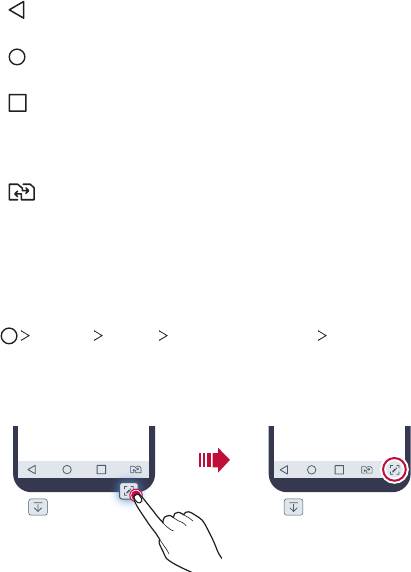
• Home touch buttons
-
: Return to the previous screen. Close the keypad or pop-up
windows.
-
: Tap to go to the Home screen. To launch Google search, touch
and hold.
-
: Tap to view a list of recently used apps or run an app from the
list. To delete all the recently used apps, tap CLEAR ALL. To use two
apps at the same time with the Multi window feature, touch and
hold the button while using an app.
-
: Choose which SIM card you are going to use. Touch and hold to
configure the Dual SIM card settings.
Editing the Home touch buttons
You can rearrange the Home touch buttons or add frequently used
functions to the Home touch buttons area.
Tap
Settings Display Home touch buttons Button
combination and customise the settings.
• Several functions, including Notification panel and Capture+, are
provided. A maximum of five items can be added.
Basic Functions 42

Status icons
When there is a notification for an unread message, calendar event or
alarm, the status bar displays the corresponding notification icon. Check
your device's status by viewing notification icons displayed on the status
bar.
No signal
Data is being transmitted over the network
Alarm is set
Vibrate mode is on
Bluetooth is on
Connected to a computer via USB
Battery level
Airplane mode is on
Missed calls
Wi-Fi is connected
Mute mode is on
GPS is on
Hotspot is on
No SIM card
• Some of these icons may appear differently or may not appear at all,
depending on the device's status. Refer to the icons according to the
actual environment and area in which you are using the device and your
service provider.
• Displayed icons may vary, depending on the area or service provider.
Basic Functions 43
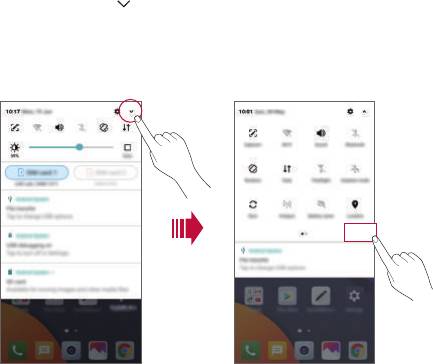
Notifications panel
You can open the notifications panel by dragging the status bar
downward on the main screen.
• To open the quick access icons list, drag the notifications panel
downwards or tap
.
• To rearrange, add, or remove icons, tap EDIT.
• If you touch and hold the icon, the settings screen for the
corresponding function appears.
EDIT
Basic Functions 44
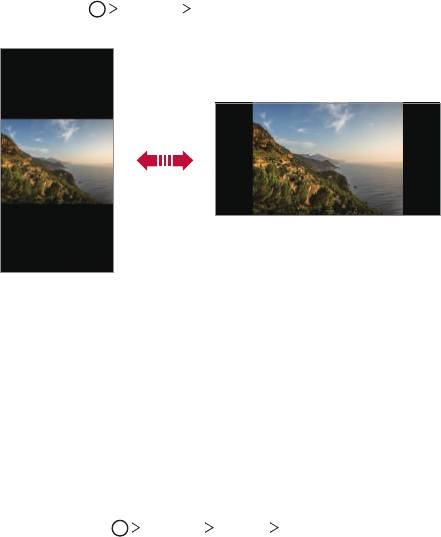
Switching the screen orientation
You can set the screen orientation to automatically switch according to
the device's physical orientation.
On the notification panel, tap Rotation from the quick access icon list.
You can also tap
Settings Display and activate Auto-rotate
screen.
Editing the Home screen
On the Home screen, touch and hold on an empty space, then select the
desired action from below.
• To rearrange the Home screen canvases, touch and hold on a canvas,
then drag it to another location.
• To add a widget to the Home screen, touch and hold on a blank area of
the Home screen, then select Widgets.
• To change a theme, touch and hold on a blank area of the Home
screen, then select Theme.
You can also tap
Settings Display Theme, then select a
theme to apply to the device.
Basic Functions 45
• To configure the Home screen settings, touch and hold on a blank area
of the Home screen, then select Home screen settings. See
Home
screen settings
for details.
• To view or reinstall the uninstalled apps, touch and hold on a blank area
of the Home screen, then select App trash. See
App trash
for details.
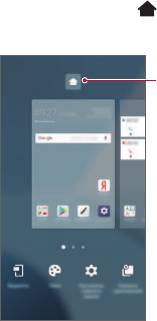
• To change the default screen, touch and hold on a blank area of the
Home screen, move to desired screen, tap
, then tap the screen once
more.
Default screen
Basic Functions 46
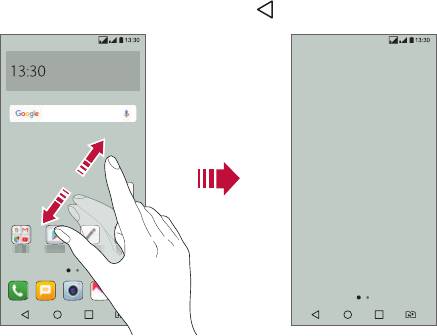
Viewing the background theme
You can view only the background image by hiding the apps and widgets
on the Home screen.
Spread two fingers apart on the Home screen.
• To return to the original screen, which displays apps and widgets, pinch
your fingers on the Home screen or tap
.
Moving apps on the Home screen
On the Home screen, touch and hold an app, then drag it to another
location.
• To keep frequently used apps at the bottom of the Home screen, touch
and hold an app, then drag it to the quick access area at the bottom.
• To remove an icon from the quick access area, drag the icon to the
Home screen.
Basic Functions 47

Using folders from the Home screen
Creating folders
On the Home screen, touch and hold an app, then drag it over another
app.
• A new folder is created and the apps are added to the folder.
Editing folders
On the Home screen, tap a folder and do one of the following actions.
• To edit the folder name and colour, tap the folder name.
• To add apps, touch and hold an app, then drag it over the folder and
release it.
• To remove an app from the folder, touch and hold the app and drag it to
outside the folder. If the removed app is the only one app that existed
in the folder, the folder is removed automatically.
• You can also add or remove apps after tapping
in the folder.
Home screen settings
You can customise Home screen settings.
1
Tap Settings Display Home screen.
2
Customise the following settings:
• Select Home: Select a Home screen mode.
• Wallpaper: Change the Home screen background wallpaper.
• Screen swipe effect: Select an effect to apply when the Home
screen canvas switches.
• Icon shape: Choose if you want icons to have square or rounded
corners.
• Sort apps by: Set how apps are sorted on the Home screen.
Basic Functions 48

• Grid: Change the app arrangement mode for the Home screen.
• Hide apps: Select which apps you want to hide from the Home
screen.
• Continuous loop: Enable to allow continuous Home screen scrolling
(loop back to first screen after the last screen).
• Search: Search by swiping down on the Home screen.
Screen lock
Screen lock overview
Your device's screen turns off and locks itself if you press the Power/Lock
key. This also happens after the device is left idle for a specified period of
time.
If you press the Power/Lock key when a screen lock is not set, the Home
screen appears immediately.
To ensure security and prevent unwanted access to your device, set a
screen lock.
• Screen lock prevents unnecessary touch input on the device screen and
reduces battery consumption. We recommend that you activate the
screen lock while not using the device.
Basic Functions 49

Setting a screen lock
There are several options available for configuring the screen lock settings.
1
Tap Settings Display Lock screen Select screen lock and
then select the method you prefer.
2
Customise the following settings:
• None: Deactivate the screen lock function.
• Swipe: Swipe on the screen to unlock the screen.
• Pattern: Draw a pattern to unlock the screen.
• PIN: Enter a numeric password to unlock the screen.
• Password: Enter an alphanumeric password to unlock the screen.
• Allow face recognition: Unlock the screen by recognising your face.
• If you incorrectly attempt to unlock the device 5 times, the screen is
blocked for 30 seconds.
Secure start-up settings
When you select Pattern, PIN or Password as a screen lock method, you
can configure your device to be locked whenever turning on the device in
order to secure your data.
• You cannot use all functions, except for emergency calls until you
unlock the device.
• If you forget your decryption password, you cannot restore encrypted
data and personal information.
Basic Functions 50

Lock screen settings
You can customise the following lock screen settings.
1
Tap Settings Display Lock screen.
2
Customise the following settings:
• Select screen lock: Select a screen lock method.
• Face Recognition: Unlock the lock screen by recognising your face.
See
Face recognition overview
for details.
• Smart Lock: Select trusted items so that if one of them occurs, the
device is automatically unlocked.
• Wallpaper: Change the lock screen background wallpaper.
• Clock: Select the position of the clock on the locked screen.
• Shortcuts: Add an app shortcut and directly access the app from
the lock screen by dragging the app shortcut on the screen.
• Screen swipe effect: Set screen transition effects to apply when
the screen is unlocked.
• Contact info for lost phone: Display emergency contact
information on the lock screen.
• Lock timer: Set the amount of idle time after which the device
automatically locks.
• Power key instantly locks: Instantly lock the screen when the
Power/Lock key is pressed.
• Available setting items may vary, depending on the selected screen lock
method.
Basic Functions 51

KnockON
You can turn the screen on or off by double-tapping the screen.
• This option is available only on the Home screen provided by LG. It may
not function properly on a custom launcher or on the Home screen
installed by the user.
• When tapping the screen, use your fingertip. Do not use a fingernail.
• To use the KnockON feature, make sure that the proximity/light sensor
is not blocked by a sticker or any other foreign substance.
Turning on the screen
Double-tap the middle of the screen.
• Tapping the top or bottom of the screen may decrease the recognition
rate.
Turning off the screen
Double-tap on an empty space on the Home screen and Lock screen.
You can also double-tap an empty space on the status bar.
Basic Functions 52
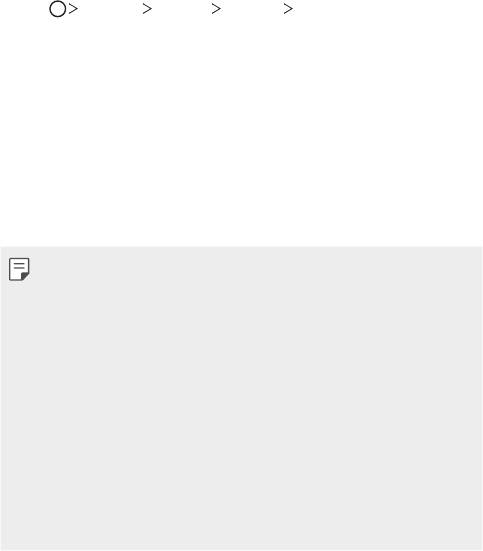
Memory card encryption
You can encrypt and protect data saved on the memory card. The
encrypted data in the memory card cannot be accessed from another
device.
1
Tap Settings General Security Encrypt SD card.
2
Read the on-screen overview of memory card encryption and then tap
CONTINUE to continue.
3
Select an option and tap ENCRYPT NOW.
• New data encryption: Encrypt only data that is saved on the
memory card after encryption.
• Full encryption: Encrypt all the data currently saved on the memory
card.
• Exclude media files: Encrypt all files, except for media files such as
music, photos and videos.
• To encrypt the memory card, make sure that a screen lock is set using a
PIN or password.
• Once memory card encryption starts, some functions are not available.
• If the device is turned off while encryption is underway, the encryption
process will fail, and some data may be damaged. Therefore, be sure to
check if the battery level is sufficient before starting encryption.
• Encrypted files are accessible only from the device where the files were
encrypted.
• The encrypted memory card cannot be used on another LG device. To
use the encrypted memory card on another mobile device, format the
card.
• You can activate memory card encryption even when no memory card
is installed into the device. Any memory card that is installed after
encryption will automatically be encrypted.
Basic Functions 53

Taking screenshots
You can take screenshots of the current screen you are viewing.
Via a shortcut
Press and hold the Power/Lock key and the Volume Down (-) key at the
same time for at least two seconds.
• Screenshots can be viewed from the Screenshots folder in the
Gallery.
Via Capture+
On the screen where you want to take a screenshot, drag the status bar
downwards, then tap
.
• When the screen is turned off or locked, you can access Capture+ by
pressing the Volume Up (+) key twice. To use this feature, tap
Settings
General and turn on Shortcut keys.
• See
Writing notes on a screenshot
for details.
Basic Functions 54
Entering text
Using the Smart keyboard
You can use the Smart keyboard to enter and edit text.
With the Smart keyboard, you can view text as you type without
bothering to alternate between the screen and a conventional keyboard.
This allows you to easily find and correct errors when typing.
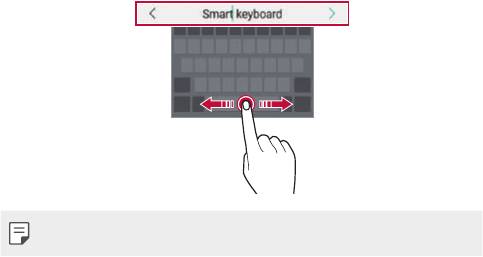
Moving the cursor
With the Smart keyboard, you can move the cursor to the exact position
you want. When typing text, touch and hold on the space bar and then
drag left or right.
• This function may not be supported for some languages.
Basic Functions 55
Suggesting words
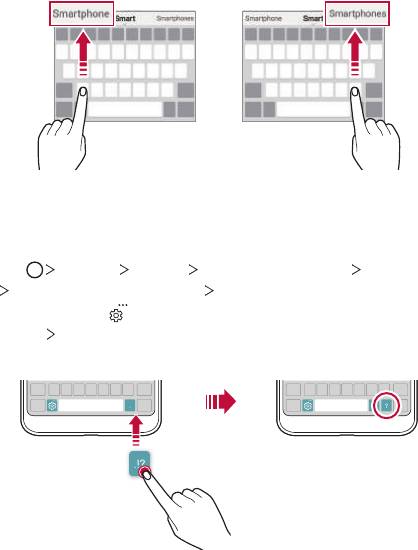
Smart keyboard automatically analyses your usage patterns to suggest
frequently used words as you type. The longer you use your device, the
more precise the suggestions are.
Enter text, then tap a suggested word or gently drag the left or right side
of the keyboard upwards.
• The selected word is automatically entered. You do not need to
manually type every letter of the word.
Changing the QWERTY keyboard layout
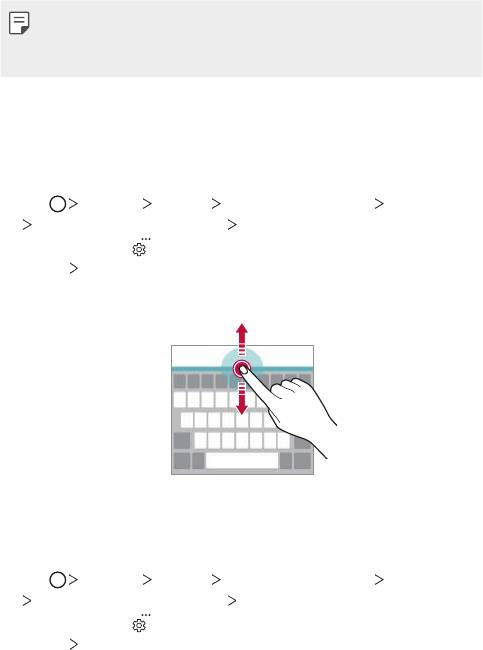
You can add, delete or rearrange keys on the bottom row of the keyboard.
1
Tap Settings General Language & keyboard LG Keyboard
Keyboard height and layout QWERTY keyboard layout.
You can also tap
on the keyboard and tap Keyboard height and
layout
QWERTY keyboard layout.
2
Tap a key on the bottom row, then drag it to another position.
Basic Functions 56
• This option is available on the QWERTY, QWERTZ and AZERTY
keyboards.
• This function may not be supported for some languages.
Customising the keyboard height
You can customise the keyboard height to maximise hand comfort when
typing.
1
Tap Settings General Language & keyboard LG Keyboard
Keyboard height and layout Keyboard height.
You can also tap
on the keyboard and tap Keyboard height and
layout
Keyboard height.
2
Adjust the keyboard height.
Selecting a landscape keyboard mode
You can select a landscape keyboard mode from several choices.
1
Tap Settings General Language & keyboard LG Keyboard
Keyboard height and layout Keyboard type in landscape.
You can also tap
on the keyboard and tap Keyboard height and
layout
Keyboard type in landscape.
2
Select a keyboard mode.
Basic Functions 57
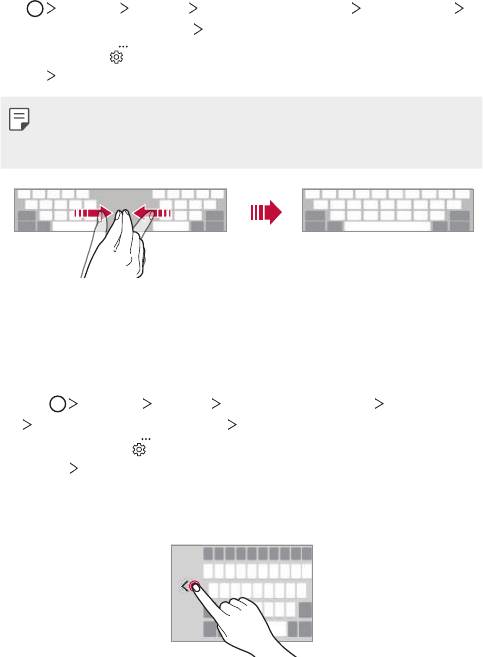
Splitting the keyboard
You can split the keyboard in half and place each piece on either side of
the screen when the screen is in landscape mode.
Tap
Settings General Language & keyboard LG Keyboard
Keyboard height and layout
Split keyboard.
You can also tap
on the keyboard and tap Keyboard height and
layout
Split keyboard.
• Rotate the device to landscape mode to split the keyboard to both sides.
To merge or split the keyboard, pinch together or spread apart your
fingers on the keyboard.
One-handed operation mode
You can move the keyboard to one side of the screen so that you can use
the keyboard with one hand.
1
Tap Settings General Language & keyboard LG Keyboard
Keyboard height and layout One-handed operation.
You can also tap
on the keyboard and tap Keyboard height and
layout
One-handed operation.
2
Press the arrow displayed next to the keyboard to move the keyboard
in the direction you want.
Basic Functions 58
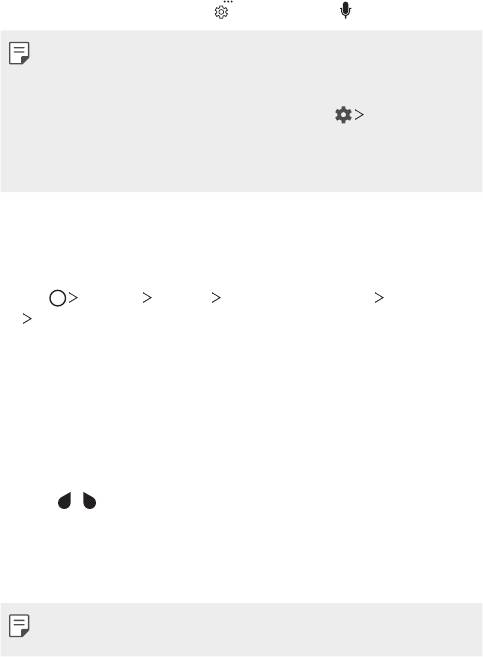
Entering text by using voice
On the keyboard, touch and hold and then select .
• To maximise the voice command recognition, speak clearly.
• To enter text with your voice, make sure that your device is connected
to a network.
• To select the language for voice recognition, tap
Languages on the
voice recognition screen.
• This function may be not supported, or the supported languages may
differ depending on the service area.
Adding languages to the keyboard
You can make additional languages available for keyboard input.
1
Tap Settings General Language & keyboard LG Keyboard
Select languages.
2
Select the languages you want to make available.
Copy and Paste
You can cut or copy text from an app, and then paste the text into the
same app. Or, you can run other apps and paste the text into them.
1
Touch and hold around the text you want to copy or cut.
2
Drag / to specify the area to copy or cut.
3
Select either CUT or COPY.
• Cut or copied text is automatically added to the clipboard.
4
Touch and hold the text input window, then select PASTE.
• If there is no item that has been copied or cut, the PASTE option will
not appear.
Basic Functions 59
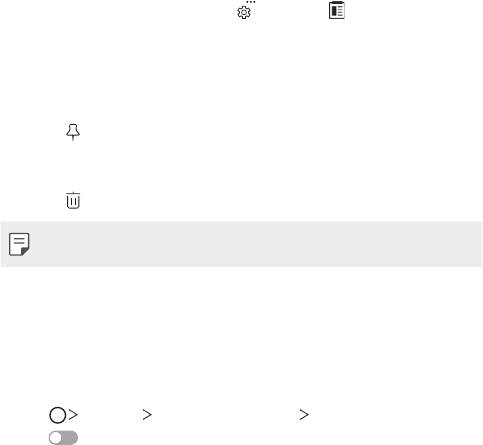
Clip Tray
If you copy or cut an image or text, it is automatically saved to the clip tray
and can be pasted to any space at any time.
1
On the keyboard, touch and hold and select .
You can also touch and hold the text input window, then select CLIP
TRAY.
2
Select and paste an item from the clip tray.
• A maximum of 20 items can be saved to the clip tray.
• Tap
to lock saved items in order not to delete them, even when
the maximum quantity is exceeded. A maximum of ten items can be
locked. To delete locked items, unlock them first.
• Tap
to delete the items saved to the clip tray.
• The clip tray may not be supported by some downloaded apps.
Do not disturb
You can limit or mute notifications to avoid disturbances for a specific
period of time.
1
Tap Settings Sound & notification Do not disturb and then
tap
to activate it.
2
Tap Sounds and vibrations and select the mode you want:
• Priority only: Receive sound or vibrate notifications for the selected
apps. Even when Priority only is turned on, alarms still sound.
• Total silence: Disable both the sound and vibration.
Basic Functions 60
Оглавление
- Настраиваемые функции
- Основные функции
- Полезные приложения
- Параметры телефона
- Приложение
- Налаштовувані функції
- Основні функції
- Корисні програми
- Налаштування
- Додаток
- Арнайы жасалған мүмкіндіктер
- Негізгі функциялар
- Пайдалы қолданбалар
- Баптаулар
- Қосымша
- Тусгай загварын нэмэлт функцүүд
- Үндсэн функцүүд
- Хэрэгтэй аппууд
- Тохиргоо
- Хавсралт
- Custom-designed Features
- Basic Functions
- Useful Apps
- Settings
- Appendix


