LG DK487: Operation
Operation: LG DK487

Operation
Playing a DVD or Video CD
General Features
Notes:
Playback Setup
Unless stated otherwise, all operations described use
the remote control. Some features may also be
1. Turn on the TV and select the video input source
available on the Setup menu.
connected to the DVD player.
2. Turn on the audio system (if applicable) and select
Moving to another TITLE/GROUP
the input source connected to the DVD player.
DVD-ADVD-V
3. Press OPEN/CLOSE to open the disc tray and
When a disc has more than one title/group, you can
load your chosen disc in the tray, with the playback
move to another title/group. Press DISPLAY while
side down.
playback is stopped then the appropriate number (0-9)
4. Press OPEN/CLOSE to close the tray. Playback
or use b / B to move to another title/group.
starts automatically. If playback does not start,
You can play any title by inputting its number while
press PLAY.
playback is stopped.
In some cases, the disc menu might appear
instead:
Moving to another CHAPTER/TRACK
DVD-V
DVD-ADVD-V
VCD
Use the b B v V buttons to select the title/chapter
When a title on a disc has more than one chapter or a
you want to view, then press ENTER to start.
disc has more than one track, you can move to
Press TITLE or DVD MENU to return to the menu
another chapter/track as follows:
screen.
• Press SKIP . or > briefly during playback to
DVD-A
select the next chapter/track or to return to the
Use the
1 22 33 44
1
buttons to select an option you
beginning of the current chapter/track.
want, then press ENTER to view the option.
• Press SKIP . twice briefly to step back to the
VCD
previous chapter/track.
Use the number buttons to select the track you
want to view and press RETURN to return to the
• To go directly to any chapter during DVD playback,
menu screen. Menu settings and operating
press DISPLAY and press v / V to select the
procedures may differ. Follow the instructions on
chapter/track icon. Then, input the chapter/track
the each menu screen. You also may set PBC to
number or use b / B.
Off (See “PBC” on page 14).
DVD-ADVD-V
VCD
Notes:
Search
• If parental control is set and the disc is not within
1. Press SCAN (
m or M) during playback.
the rating settings you must input the password.
2. Press SCAN (m or M) repeatedly to select the
(See “Lock Menu” on page 15.)
required speed.
• DVDs may have a region code. Your player does not
DVD; X2, X4, X16 or X100
play discs that have a region code different from
Video CD; X2, X4 or X8
your player. The region code for this player is 5
3. To exit SEARCH mode, press PLAY.
(five).
Note:
When using a DVD audio disc that includes pictures,
this operation may be permitted in some picture
segments.
Changing the Audio Channel
VCD
Press AUDIO repeatedly during playback to hear a
different audio channel (Stereo, Left, or Right).
16

Still Picture and Frame-by-Frame Playback
Repeat
DVD-ADVD-V
VCD
DVD-ADVD-V
VCD
You can play a title/chapter/all/track/group on a disc.
1. Press PAUSE/STEP on the remote control during
Press REPEAT during playback to select a desired
playback. Advance the picture frame-by-frame by
repeat mode.
pressing PAUSE/STEP repeatedly.
DVD Video Discs - Repeat Chapter/Title/Off
2. To exit still motion mode, press PLAY.
• Chapter: repeats the current chapter.
• Title: repeats the current title.
Note:
• Off : does not play repeatedly.
When using a DVD audio disc that includes pictures,
Video CDs - Repeat Track/All/Off
this operation may be permitted in some picture
• Track : repeats the current track
segments.
• All : repeats all the tracks on a disc.
• Off : does not play repeatedly.
Slow Motion
DVD-ADVD-V
VCD
DVD Audio Discs - Repeat Track/Group/Off
1. Press PAUSE/STEP (X) during playback.
• Track: repeats the current track.
The DVD player will now go into PAUSE mode.
• Group: repeats the current Group.
• Off : does not play repeatedly.
2. Use the SCAN (m or M) to select the required
speed: t 1/16, t 1/8, t 1/4, or t 1/2
Note:
(backward), or T 1/16, T 1/8, T 1/4, or T 1/2
• On a Video CD with PBC, you must set PBC to Off on the
(forward).
setup menu to use the repeat function (See “PBC” on
page 14).
With a Video CD, the Slow speed changes: T
• If you press SKIP (>) once during Repeat Chapter
1/16, T 1/8, T 1/4 or T 1/2 (forward).
(Track) playback, the repeat playback cancels.
3. To exit Slow Motion mode, press PLAY (N).
3D Surround
DVD-ADVD-V
VCD
Notes:
• Slow motion playbsck in reverse is not possible with
To produce a 3D surround effect that simulates multi-
Video CDs.
channel audio from two stereo speakers (instead of
• When using a DVD audio disc that includes pictures,
the five+ speakers normally required for multi-channel
this operation may be permitted in some picture
audio from a home theater system).
Operation
segments.
1. Press DISPLAY during playback.
Random
VCD
Karaoke DVD
2. Use 3 or 4 to select the sound option.
The sound option will be highlighted.
1. Press RANDOM during playback. The unit
automatically begins random playback and
3. Use 1 or 2 to to select “3D SUR”.
RANDOM appears on the menu screen.
To turn off the 3D Surround effect, select “Normal”.
2. Press RANDOM again to normal.
Time Search
DVD-V
VCD
Tip:
To start playing at any chosen time on the disc:
By pressing SKIP > during random playback, the unit
1. Press DISPLAY during playback. The time search
selects another title (track) and resumes random playback.
box shows the elapsed playing time.
Note:
2. Press v / V to select the time clock icon and “-:--:-
On a Video CD with PBC, You must set PBC to Off on the
-” appears.
setup menu to use the repeat function (See “PBC” on page
3. Input the required start time in hours, minutes, and
14).
seconds from left to right. If you enter the wrong
numbers, press CLEAR to remove the numbers
Repeat A-B
DVD-ADVD-V
VCD
you entered. Then input the correct numbers.
To repeat a sequence.
4. Press ENTER to confirm. Playback starts from the
selected time.
1. Press A-B at your chosen starting point. “ A - ”
appears briefly on the TV screen.
2. Press A-B again at your chosen end point.
“A - B” appears briefly on the TV screen and the
repeat sequence begins.
3. Press A-B again to cancel.
17

Zoom
DVD-ADVD-V
VCD
Special DVD Features
Use zoom to enlarge the video image.
Checking the contents of DVD discs: Menus
1. Press ZOOM during playback or still playback to
DVDs may offer menus that allow you to access
activate the Zoom function. The square frame
special features. To use the disc menu, press DVD
appears briefly in the right bottom of the picture.
MENU. Input the corresponding number or use the b
2. Each press of the ZOOM button changes the TV
B v V buttons to highlight your selection. Then press
screen in the sequence: 400% size → 1600% size
ENTER.
→ normal size
Title Menu
DVD-ADVD-V
3. Use the bBvVbuttons to move through the
zoomed picture.
1. Press TITLE. If the current title has a menu, the
4. To resume normal playback, press ZOOM or
menu appears on the screen. Otherwise, the disc
CLEAR button repeatedly.
menu may appear.
Note:
2. The menu offers features such as camera angles,
Zoom may not work on some DVDs.
spoken language and subtitle options, and
chapters for the title.
Marker Search
DVD-ADVD-V
VCD
3. Press TITLE to exit.
To enter a Marker
You can start playback from up to nine memorized
Disc Menu
DVD-ADVD-V
points. To enter a marker, press MARKER at the
Press DVD MENU and the disc menu is displayed.
desired point on the disc. The Marker icon appears on
Press DVD MENU again to exit.
the TV screen briefly. Repeat to enter up to nine
markers.
Camera Angle
DVD-ADVD-V
To Recall or Clear a Marked Scene
If the disc contains scenes recorded at different
1. During disc playback, press SEARCH. The marker
camera angles, you can change to a different camera
search menu appears on the screen.
angle during playback. Press ANGLE repeatedly
2. Within 10 seconds, press b / B to select a marker
during playback to select a desired angle. Note that
number that you want to recall or clear.
the number of the current angle appears on the
display.
3. Press ENTER and playback starts from the
marked scene. Or, Press CLEAR and the marker
Tip:
number is erased from the list.
The angle indicator will blink on the display window during
4. You can play any marker by inputting its number
scenes recorded at different angles as an indication that
on the marker search menu.
angle switching is possible.
Pause
DVD-ADVD-V
VCD
Changing the Audio Language
DVD-ADVD-V
1. Press PAUSE/STEP during playback.
Press AUDIO repeatedly during playback to hear a
2. To return to playback, press PLAY.
different audio language or audio track.
With DVD-RW discs recorded in VR mode that have
both a main and a Bilingual audio channel, you can
switch between Main (L), Bilingual (R), or a mix of
both (Main + Bilingual) by pressing AUDIO.
Subtitles
DVD-V
Press SUBTITLE repeatedly during playback to see
the different subtitle languages.
18
DVD Audio Discs
Moving to another GROUP
DVD Audio is a new disc format building on the
Some DVD Audio discs divide content into different
success of DVD to provide high quality,
groups. Your player enables you to quickly access
uncompressed, multi-channel audio for a new
different groups during playback via the on-screen
experience in audio quality. A DVD Audio disc can be
display.
identified by the DVD audio logo on the disc jacket or
1. Press DISPLAY during playback on in stop mode.
on the disc itself.
2. Press
3
3
/
44
to select Group icon.
DVD Audio can provide higher quality stereo than
Audio CDs with a sampling rate of up to 192kHz
3. Press 1/2 or the numbered buttons (0-9) to select
(compared to 44.1kHz for CDs). DVD Audio digital
a group number.
sound can be delivered with up to 24 bits of data
(compared to 16 bits for a standard CD).
Note:
Sometimes the author of the disc creates hidden
A typical DVD Audio disc contains up to seven times
content that can only be accessed by entering a
the data capacity of a CD. This additional space is
password. If the lock icon appears on the TV screen,
used for music, either Advanced Resolution multi-
enter the password (sometimes you’ll find it on the
channel sound quality that is closer to the artist’s
disc’s jacket cover or on a web site). This password
master recording or for longer recordings. Many DVD
control isn’t dictated by your DVD Player — it is a
Audio discs contain on-screen text, such as artist
function of the disc.
biographies, playlists, or lyrics. Some DVD Audio discs
contain photo galleries or video clips.
Since the authoring of DVD Audio Discs varies, some
of the on-screen display choices might not be
available for the disc you’re playing.
Note:
To enjoy maximum sound quality and surround effect
of DVD Audio, you must use 5.1 channel analog audio
Viewing another PAGE
output (5.1CH AUDIO OUT jacks on the DVD Player).
If you use the DIGITAL OUT (OPTICAL or COAXIAL)
Since DVD Audio discs can hold a lot of content, there
for your audio connection, the sound will only be
are various ways to see what’s available on the disc.
similar to CD-quality sound even though you’re playing
1. Press DISPLAY during playback.
Operation
a DVD Audio disc.
2. Press
33
/
44
to select Page icon.
3. Press 1/2 to select a page number.
What appears on the screen will vary from disc to
disc because the information available depends
upon the way the disc was created.
Note:
Since the authoring of DVD Audio Discs varies, some
of the on-screen display choices might not be
available for the disc you’re playing.
19
1 / 2
1 / 21
Playing an Audio CD or MP3/WMA
Disc
The DVD player can play MP3/WMA formatted
recordings on CD-ROM, CD-R, or CD-RW discs.
Audio CD
Once you insert an audio CD a menu appears on the
TV screen. Press v / V to select a track then press
PLAY or ENTER and playback starts.
MP3 / WMA
1. Press v / V to select a folder, and press ENTER
to see the folder contents.
2. Press v / V to select a track then press PLAY or
ENTER. Playback starts.
Note:
Displays path of track from the disc on the TV screen.
Tip:
• If you are in a file list on the MP3/WMA menu and want to
return to the Folder list, use the v / V to highlight and
press ENTER.
• Press and hold V / v to go to the next / previous page.
• On a CD with MP3/WMA and JPEG you can switch
MP3/WMA and JPEG. Press TITLE and MP3/WMA or
JPEG word on top of the menu is highlighted.
20
AUDIO CD
0:00:00
1 / 12
List
Program
Track1
Track2
Track3
Track4
Track5
Track6
Track7
Track8
MUSIC
0:00:00
1 / 104
List
List
Program
1-Music1
1-Music1
2-Music2
2-Music2
3-Music3
3-Music3
4-Music4
4-Music4
5-Music5
5-Music5
6-Music6
6-Music6
7-Music7
7-Music7
MP3 / WMA disc compatibility with this player is
limited as follows:
• Sampling frequency: within 8 - 48 kHz (MP3),
within 22 - 48kHz (WMA)
• Bit rate: within 32 - 320kbps (MP3),
40 - 192kbps (WMA)
• The player cannot read an MP3/WMA file that has
a file extension other than “.mp3” / “.wma”.
• CD-R physical format should be ISO 9660
• If you record MP3 / WMA files using software that
cannot create a file system (eg. Direct-CD) it is
impossible to playback MP3 / WMA files. We
recommend that you use Easy-CD Creator, which
creates an ISO 9660 file system.
• File names should have a maximum of 8 letters
and must incorporate an .mp3 or .wma extension.
• They should not contain special letters such as /
? * : “ < > l etc.
• The total number of files on the disc should be
less than 999.
This DVD player requires discs and recordings to
meet certain technical standards in order to achieve
optimal playback quality. Pre-recorded DVDs are
automatically set to these standards. There are
many different types of recordable disc formats
(including CD-R containing MP3 or WMA files) and
these require certain pre-existing conditions (see
above) to ensure compatible playback.
Customers should note that permission is
required in order to download MP3 / WMA files
and music from the Internet. Our company has
no right to grant such permission. Permission
should always be sought from the copyright
owner.

Audio CD and MP3 / WMA Disc
Random
CD
Features
1. Press RANDOM during playback. Random
Playback begins immediately and RANDOM
appears on the menu screen.
Pause
MP3CD
WMA
2. To return to normal playback, press RANDOM
1. Press PAUSE/STEP during playback.
repeatedly until RANDOM disappears from the
menu screen.
2. To return to playback, press PLAY, ENTER or
press PAUSE/STEP again.
Tip:
By pressing SKIP > during random playback, the unit
Moving to another Track
MP3CD
WMA
selects another track and resumes random playback.
1. Press SKIP (. or >) briefly during playback
Repeat A-B
CD
to go to the next track or to return to the beginning
of the current track.
1. To repeat a sequence during disc playback press
A-B at your chosen starting point. The Repeat icon
2. Press SKIP . twice briefly to go back to the
and “A” appear on the menu screen.
previous track.
2. Press A-B again at your chosen end point. The
3. You can play any track by inputting its number.
Repeat icon and “A-B” appear on the menu
screen, and the sequence begins to play
Repeat Track/All/Off
MP3CD
WMA
repeatedly.
You can play a track/all on a disc.
3. To exit the sequence and return to normal play,
1. Press REPEAT when playing a disc. The repeat
press A-B again. The Repeat icon disappears from
icon appears.
the menu screen.
2. Press REPEAT to select a desired repeat mode.
3D Surround
CD
• Track: repeats the current track
To produce a 3D surround effect that simulates multi-
• All: repeats all the tracks on a disc.
channel audio from two stereo speakers (instead of
• Off(No display): does not play repeatedly.
Operation
the five+ speakers normally required for multi-channel
Note:
audio from a home theater system).
If you press SKIP (>) once during Repeat Track playback,
1. Press AUDIO during playback.
the repeat playback cancels.
“3D SUR” appears on the menu screen.
2. To return to normal playback, press AUDIO
Search
MP3CD
WMA
repeatedly until “3D SUR” disappears from the
menu screen.
1. Press SCAN (m or M) during playback.
2. Press SCAN (m or M) repeatedly to select the
required speed: X2, X4, X8 backward or forward.
3. To exit SEARCH mode, press PLAY.
21
Repeat Programmed Tracks
Programmed Playback
You can play a title/chapter/all/track on a disc.
1. Press REPEAT when playing a disc. The repeat
The program function enables you to store your
icon appears.
favorite tracks from any disc in the player memory. A
program can contain 99 tracks (Audio CD) or 999
2. Press REPEAT to select a desired repeat mode.
tracks (MP3/WMA).
• Track: repeats the current track
1. Insert a disc.
• All: repeats all the tracks on programmed list.
• Off(No display): does not play repeatedly.
Audio CD and MP3/WMA Discs:
Audio CD or MP3/WMA menu appears as below.
Note:
If you press SKIP (>) once during Repeat Track playback,
the repeat playback cancels.
Erasing a Track from Program List
1. Use vVbBto select the track that you wish to
erase from the Program list.
2. Press CLEAR. Or, select “ ” icon then Press
Audio CD Menu MP3/WMA Menu
ENTER to place the selected track on the Program
list. Repeat to erase additional tracks on the list.
Video CD: Press PROGRAM while playback is
stopped. The program menu appears. Press
Erasing the Complete Program List
RETURN to exit the menu.
Select “ ”, then press ENTER. The complete
Note:
Program for the disc is erased.
On a Video CD with PBC, you must set PBC to Off on the
setup menu to use the programmed playback (See “PBC” on
Note:
page 14).
The programs are also cleared when the disc is removed.
Video CD Menu
2. Select a track on the List.
3. Press PROGRAM. Or, select “ ” icon then
ENTER to place the selected track on the Program
list. Repeat to place additional tracks on the list.
You can add all tracks in the disc. Select
“ ” icon then press ENTER.
4. Select the track you want to start playing on the
Program list. Press and hold v / V to move to the
next / previous page.
5. Press PLAY or ENTER to start. Playback begins in
the order in which you programmed the tracks and
“PROG.” appears on the display window. Playback
stops after all of the tracks on the Program list
have played once.
22
AUDIO CD
MUSIC
0:00:00
1 / 12
0:00:00
1 / 104
List
Program
List
List
Program
Track1
Track8
Music8
Track2
Track3
1-Music1
1-Music1
Music16
Track3
Track12
2-Music2
2-Music2
Music5
Track4
Track7
3-Music3
3-Music3
Music9
Track5
Track6
4-Music4
4-Music4
Music1
Track6
Track9
5-Music5
5-Music5
Music7
Track7
Track10
6-Music6
6-Music6
Music6
Track8
Track1
7-Music7
7-Music7
Music3
VIDEO CD
0:11:07
1 / 4
List
Program
Track1
Track2
Track2
Track3
Track3
Track4
Track4
Track1
Viewing a JPEG Disc
Moving to another File
JPEG
Using this DVD Player you can view Kodak PICTURE
Press SKIP (. or >) or cursor (
v or V) once
CDs and discs with JPEG files.
while viewing a picture to advance to the next or
previous file.
1. Insert a disc and close the tray. The PHOTO menu
appears on the TV screen.
Zoom
JPEG
Use zoom to enlarge the photo image.
(see 18 page)
To rotate picture
JPEG
Press b / B during showing a picture to rotate the
picture clockwise or counter clockwise.
To listen to MP3 music watching picture
JPEG
2. Press v / V to select a folder, and press ENTER.
A list of files in the folder appears. If you are in a
You can display files while listering to MP3 music files
file list and want to return to the previous Folder
recorded on the same disc.
list, use the v / V buttons on the remote to
1. Insert the disc containing the two types of file in
highlight and press ENTER.
the player.
3. If you want to view a particular file, press
2. Press TITLE to display PHOTO menu.
v / V to highlight a file and press ENTER or PLAY.
3. Press v / V to select a photo file.
Slide Show starts from the selected file if Speed
option is not Off.
4. Use B to select icon then press ENTER.
While viewing a file, you can press STOP to move
Playback starts. The playback will continue until
to the previous menu (PHOTO menu).
STOP is pressed.
Tip:
Tip:
• Press and hold V / v to go to the next / previous page.
When MP3 and picture are included in the same disc,
you can listen only MP3 music during watching
• There are four Slide Speed options : >>> (Fast), >>
Operation
picture.
(Normal), > (Slow) and II (Off).
Use vVbBto highlight the Speed. Then, use b / B to
select the option you want to use then press ENTER.
• On a disc with MP3/WMA and JPEG you can switch
MP3/WMA and JPEG. Press TITLE and MP3/WMA or
JPEG word on top of the menu is highlighted.
• Press RETURN, information of file is hidden.
Slide Show
JPEG
Use vVbBto highlight the (Slide Show) then
press ENTER.
Still Picture
JPEG
1. Press PAUSE/STEP during slide show.
The player will now go into PAUSE mode.
2. To return to the slide show, press PLAY or press
PAUSE/STEP again.
23
PHOTO
List
Preview
JPEG Folder 1
JPEG Folder 2
JPEG Folder 3
II
JPEG Folder 4
JPEG Folder 5
JPEG Folder 6
JPEG Folder 7
JPEG Folder 8
15U_ENG
JPEG disc compatibility with this player is
limited as follows:
• Depending upon the size and number of JPEG
files, it could take a long time for the DVD player
to read the disc’s contents. If you don’t see an on-
screen display after several minutes, some of the
files may be too large — reduce the resolution of
the JPEG files to less than 5M pixels as 2760 x
2048 pixels and burn another disc.
• The total number of files and folders on the disc
should be less than 999.
• Some discs may be incompatible due to a
different recording format or the condition of disc.
• Ensure that all the selected files have the “.jpg”
extensions when copying into the CD layout.
• If the files have “.jpe” or “.jpeg” extensions, please
rename them as “.jpg” file.
• File names without “.jpg” extension will not be
able to be read by this DVD player. Even though
the files are shown as JPEG image files in
Windows Explorer.
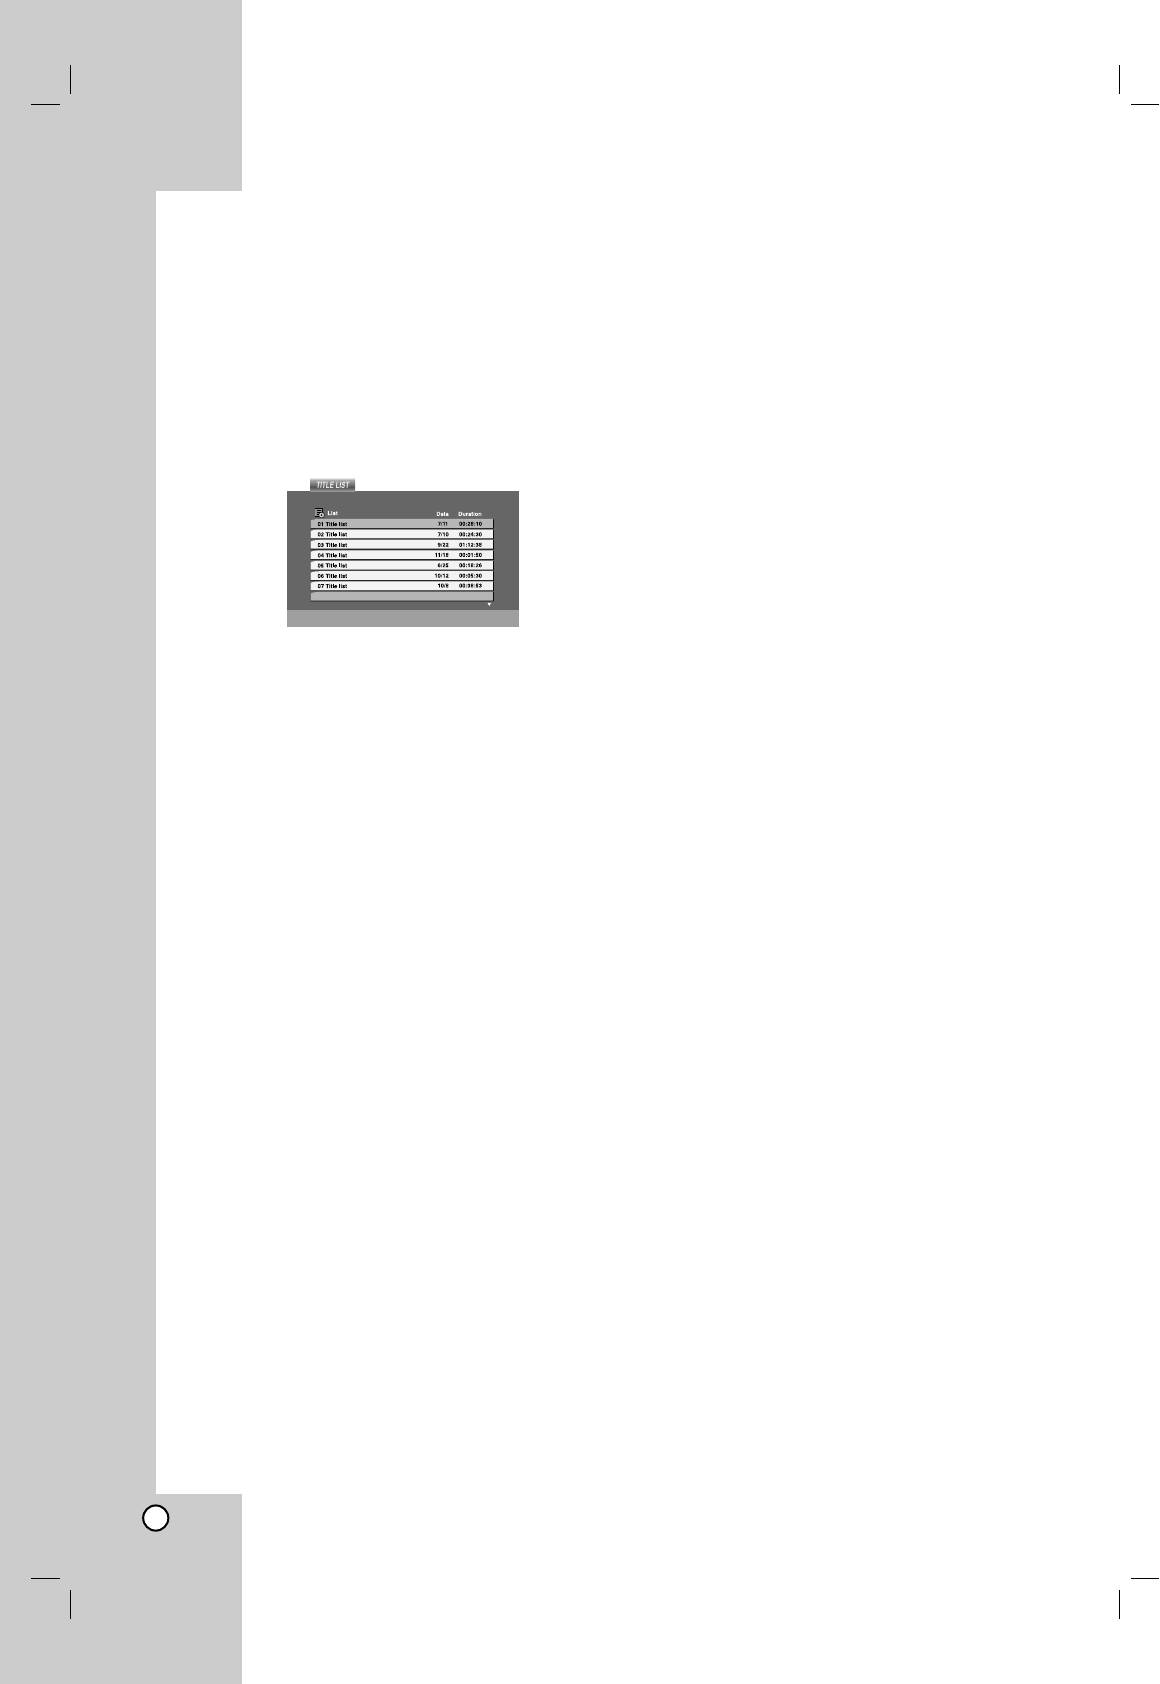
Playing a DVD VR format Disc
Maintenance and Service
This unit will play DVD-R/RW discs recorded using
Refer to the information in this chapter before
the DVD-Video format that have been finalized using
contacting a service technician.
a DVD-recorder.
Handling the Unit
• This unit will play DVD-RW discs recorded using
the Video Recording (VR) format.
When shipping the unit
1. Insert a disc and close the tray. The TITLE LIST
Please save the original shipping carton and packing
menu appears on the TV screen.
materials. If you need to ship the unit, for maximum
protection, re-pack the unit as it was originally packed
at the factory.
Keeping the exterior surfaces clean
• Do not use volatile liquids such as insecticide
spray near the unit.
• Do not leave rubber or plastic products in contact
2. Press v / V to select a track then press PLAY or
with the unit for a long period of time. since they
ENTER and playback starts.
leave marks on the surface.
Note:
Cleaning the unit
• Unfinalized DVD-R/RW discs cannot be played in this
To clean the player, use a soft, dry cloth. If the
player.
surfaces are extremely dirty, use a soft cloth lightly
• Some DVD-VR disc are made with CPRM data by DVD
moistened with a mild detergent solution.
RECORDER. Player does not support these kinds of discs
and display the “CHECK DISC”.
Do not use strong solvents such as alcohol, benzine,
or thinner, as these might damage the surface of the
What is ‘CPRM’?
unit.
CPRM is a copy protection system (with scramble system)
only allowing the recording of ‘copy once’ broadcast
programs. CPRM stands for Content Protection for
Maintaining the Unit
Recordable Media.
The DVD player is a high-tech, precision device. If the
This play is CPRM compatible, which means that you can
record copy-once broadcast programs, but you cannot
optical pick-up lens and disc drive parts are dirty or
then make a copy of those recordings. CPRM recordings
worn, the picture quality could be diminished.
can only be made on DVD-RW discs formatted in VR
Depending on the operating environment, regular
mode, and CPRM recordings can only be played on
inspection and maintenance are recommended after
players that are specifically compatible with CPRM.
every 1,000 hours of use.
For details, please contact your nearest authorized
service center.
24

Controlling other TVs with the remote control
Additional Features
You can control the sound level, input source, and
Last Scene Memory
power switch of your LG TV with the supplied remote
control.
DVD-ADVD-V
VCDCD
You can control the sound level, input source, and
This player memorizes last scene from the last disc
power switch of non-LG TVs as well. If your TV is
that is viewed. The last scene remains in memory
listed in the table below, set the appropriate
even if you remove the disc from the player or switch
manufacturer code.
off the player. If you load a disc that has the scene
title
memorized, the scene is automatically recalled.
1. While holding down TV POWER button, press the
Note:
number buttons to select the manufacturer code
This player does not memorize the scene of a disc if you
for your TV (see the table below).
switch off the player before commencing to play the disc.
2. Release TV POWER button.
Screen Saver
Code numbers of controllable TVs
The screen saver appears when you leave the DVD
If more than one code number is listed, try entering
player in Stop mode for about five minutes. If the
them one at a time until you find the one that works
Screen Saver is displayed for five minutes, the DVD
with your TV.
Player automatically turns itself off.
Manufacturer Code Number
LG / GoldStar 1 (Default), 2
System Select
Zenith 1, 3, 4
You must select the appropriate system mode for your
Samsung 6, 7
TV system. If NO DISC appears in the display window,
Sony 8, 9
press and hold PAUSE on the front panel for more
Hitachi 4
than 5 seconds to be able to select a system (PAL,
NTSC, or AUTO).
Note:
• Depending on your TV, some or all buttons may not
function on the TV, even after entering the correct
manufacturer code.
Operation
• If you enter a new code number, the code number
previously entered will be erased.
• When you replace the batteries of the remote, the code
number you have set may be reset to the default setting.
Set the appropriate code number again.
25
15U_ENG
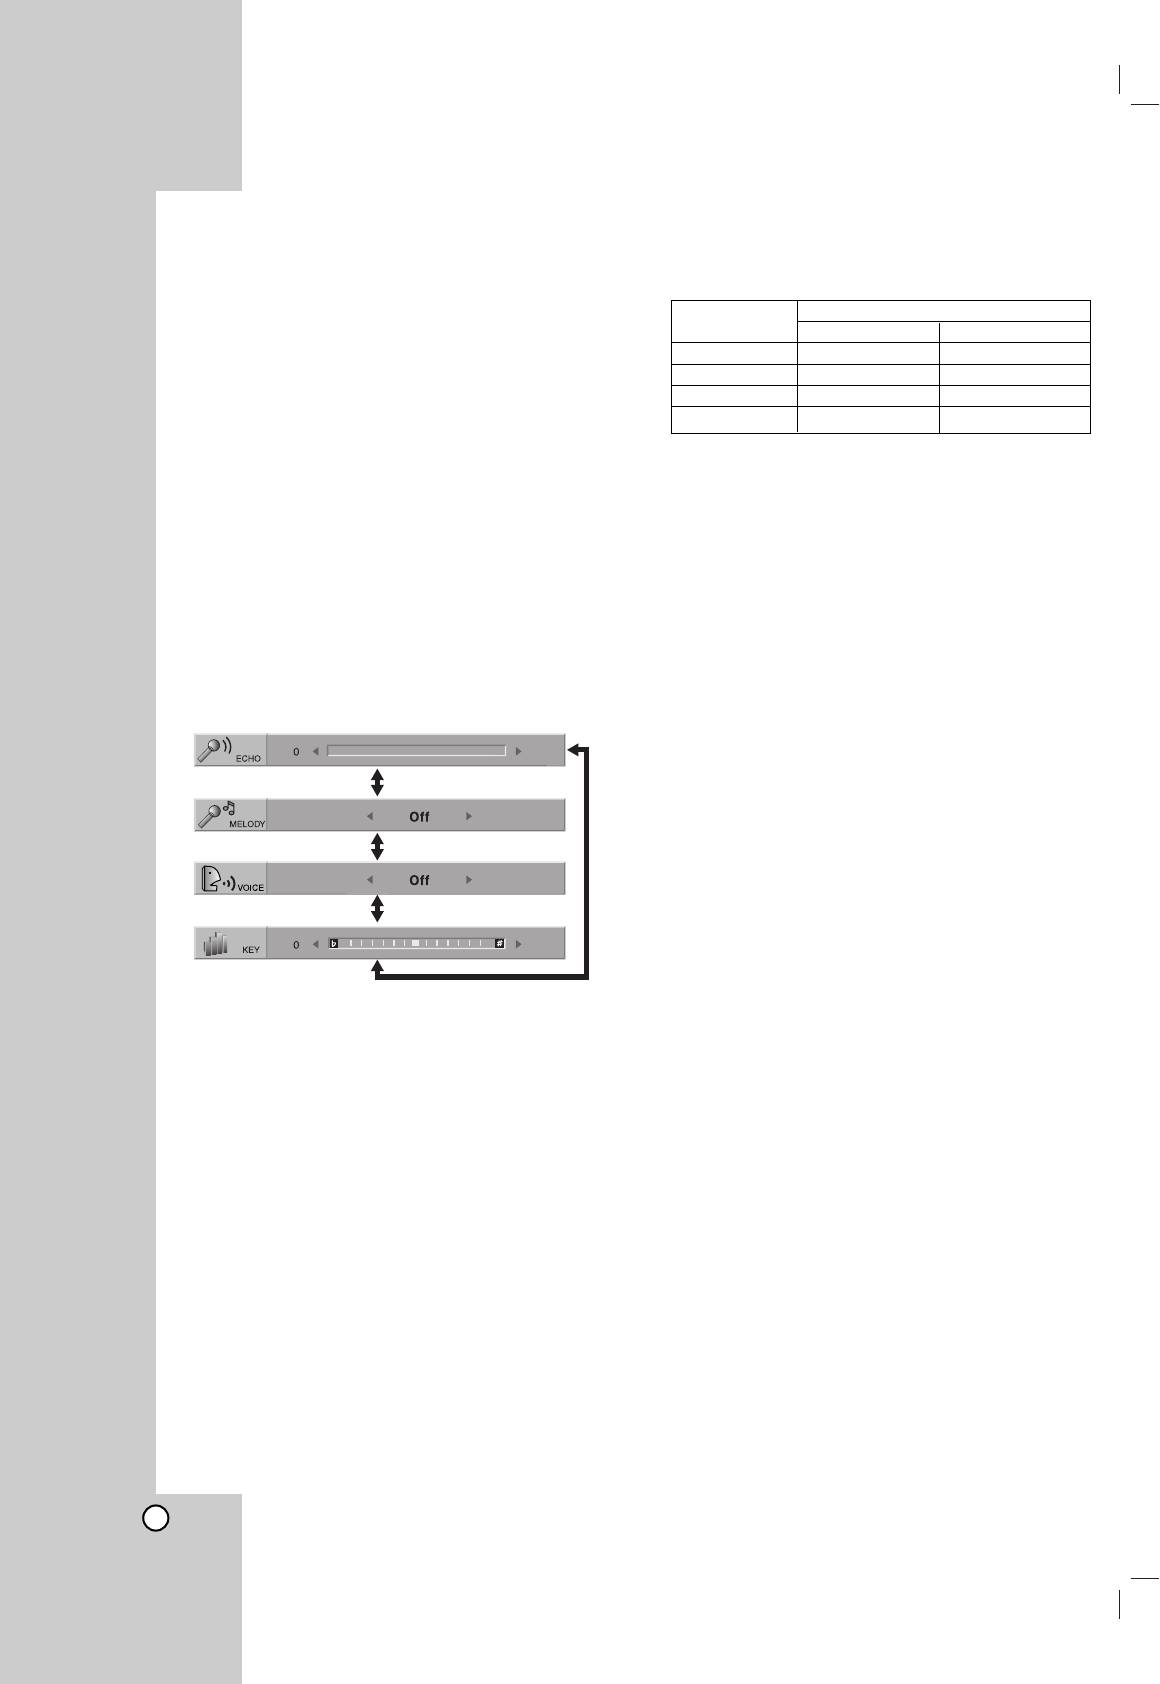
VOICE: If you wish to sing a duet with the
Using the Karaoke Function
recorded karaoke singer, select a voice you
1. Load a karaoke disc.
desire.
2. Set the MIC VOL control to the minimum level to
Output
prevent acoustic feedback (e.g. a loud howling
Voice Select
Left speaker Right speaker
sound) before connecting the microphone.
V1 Voice1 Voice1
3. Connect a microphone to MIC socket.
V2 Voice2 Voice2
V1+V2 Voice1 Voice2
Note:
Off None voice None voice
If a microphone is not connected the karaoke menu will not
appear.
KEY: You can change the key by pressing the
1
1
/
22
buttons.
4. Press PLAY to start playback.
Note:
5. Adjust MIC VOL control and then sing a song.
Controlling the key when DVD player is connected to
If you want to set KARAOKE option follow steps 6-
amplifier (receiver) with digital audio connection, may cause
8.
mute the sound of the front left/right speakers connected with
6. Press KARAOKE during playback.
amplifier (receiver).
In that case, you must change the sound mode of the
KARAOKE menu appears.
amplifier (receiver) for the output of the speakers.
7. Use 3/4 to select an desired item (ECHO,
9. Press KARAOKE to exit the KARAOKE menu.
MELODY, VOICE or KEY).
The display changes as shown in the chart below.
Note:
• The microphone may not be available during special
playback. (ex. slow)
• The karaoke feature functions only with karaoke-
compatible discs.
• The VOICE and MELODY menus may not be available on
some karaoke discs.
•For more details, refer to the information supplied with the
disc.
8. Use 1/2 to adjust value of the item
selected.
ECHO: You can adjust the echo volume by
pressing the 1/2 buttons.
MELODY: If you wish to sing only to the backing
band or orchestra unaccompanied by a vocal
guide melody, set MELODY to Off.
26

