LG KG920 – страница 8
Инструкция к Сотовому Телефону LG KG920
Selecting Functions and Options
Your phone offers a set of functions that allow you to
Selecting Functions and Options
customize the phone. These functions are arranged in
menus and sub-menus, accessed via the two soft keys
marked and . Each menu and sub-menu
1IRY
1IRY
1IRY
1IRY
1IRY
1IRY
1IRY
'SRXEGXW
'SRXEGXW
'SRXEGXW
'SRXEGXW
1IRY
1IRY
1IRY
'SRXEGXW
'SRXEGXW
'SRXEGXW
'SRXEGXW
'SRXEGXW
'SRXEGXW
allows you to view and alter the settings of a particular
function.
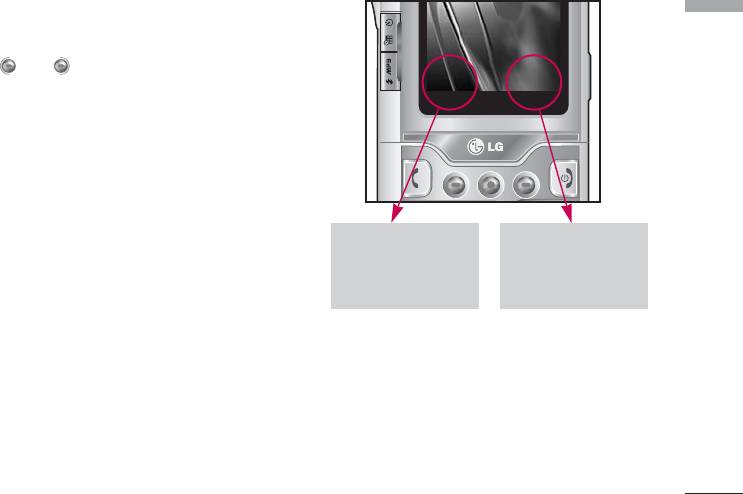
The roles of the soft keys vary according to the
current context; the label on the bottom line of the
display just above each key indicates its current role.
Press the left soft
Press the right soft
key to access the
key to access the
available Menu.
available Contacts.
31

In-Call Menu
Your phone provides a number of control functions
Making a Second Call
In-Call Menu
that you can use during a call. To access these
(Network Dependent)
functions during a call, press the left soft key
[Options].
You can get a number you wish to dial from the
Address Book to make a second call. Press the Right
soft key then select Contacts.
During a Call
Swapping Between Two Calls
The menu displayed on the handset screen during a
To switch between two calls, press key or the left
call is different than the default main menu displayed
soft key, and then select Swap.
when in idle screen, and the options are described
below.
Answering an Incoming Call
To answer an incoming call when the handset is
Speaker phone
ringing, simply press the key. The handset is also
During call you can activate speaker phone selecting
able to warn you of an incoming call while you are
Options/Speaker phone on, or by pressing OK
already on a call. A tone sounds in the earpiece, and
button. To mute speaker phone select
the display will show that a second call is waiting.
Options/Speaker phone off, or press OK button one
This feature, known as Call Waiting, is only available if
more time.
your network supports it. For details of how to
activate and deactivate it see Call Waiting (Menu
#.3.4)
If Call Waiting is on, you can put the first call on hold
and answer the second, by pressing .
32

Rejecting an Incoming Call
Conference Calls
In-Call Menu
You can reject an incoming call without answering by
The conference service provides you with the ability
simply pressing the key.
to have a simultaneous conversation with more than
one caller, if your network service provider supports
During a call, you can reject an incoming call by
this feature. A conference call can only be set up when
pressing the key.
you have one active call and one call on hold, both
calls having been answered. Once a conference call is
Muting the Microphone
set up, calls may be added, disconnected or separated
You can mute the microphone during a call by pressing
(that is, removed from the conference call but still
the [Options] key then selecting [Mute]. The handset
connected to you) by the person who set up the
can be unmuted by pressing the [Unmute]. When the
conference call. These options are all available from
handset is muted, the caller cannot hear you, but you
the In-Call menu. The maximum callers in a conference
can still hear them.
call are five. Once started, you are in control of the
conference call, and only you can add calls to the
DTMF tones while calling
conference call.
To switch on DTMF tones while calling (e.g. to use the
Making a Second Call
phone with an automatic switchboard) press the key
[Options] followed by Send DTMF – DTMF on. Select
You can make a second call while currently on a call.
DTMF off to disable DTMF tones. DTMF tones are
Enter the second number and press the . When
normally on.
the second call is connected, the first
call is automatically placed on hold. You can swap
between calls, by pressing the key.
33

In-Call Menu
Setting Up a Conference Call
Private Call in a Conference Call
In-Call Menu
To set up a conference call, place one call on hold and
To have a private call with one caller from a conference
while the active call is on, press the left soft key and
call, display the number of the caller you wish to talk
then select the Join menu of Conference call.
to on the screen, then press the left soft key. Select
the Private menu of Conference call to put all the
other callers on hold.
Activate the Conference Call on Hold
Ending a Conference Call
To activate a conference call on hold, press the
Currently displayed caller from a conference call can
key. Alternatively press the left soft key [Options] and
be disconnected by pressing the key.
select Conference/Hold all calls. Other users on hold
will stay connected. To return to conference call
mode, press the left soft key [Options] followed
by Conference call.
Adding Calls to the Conference Call
To add a call to an existing conference call, press the
left soft key, and then select the Join menu of
Conference call.
34

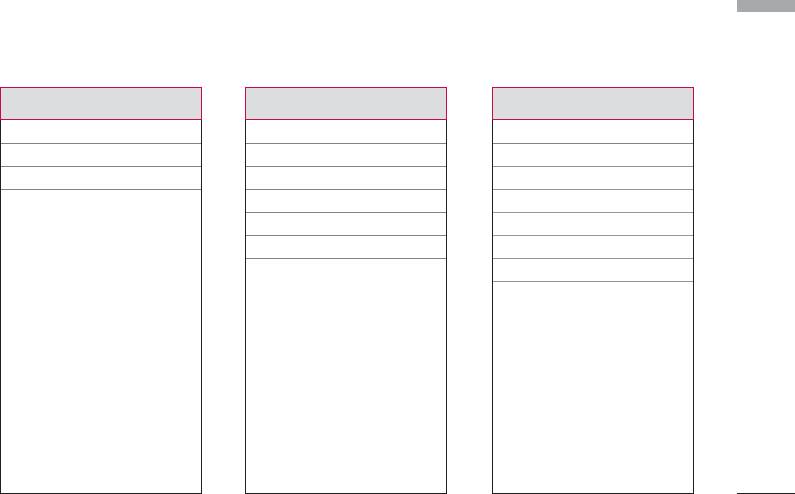
Menu Tree
The following illustration shows the available menu structure and indicates the:
Menu Tree
]
Number assigned to each menu option.
1.
Games & Apps
3. Organiser 5. Messages
1.1 Games & Apps
3.1 Calendar
5.1 New message
1.2 Profiles
3.2 Memo
5.2 Inbox
5.3 Mailbox
5.4 Drafts
5.5 Outbox
4. Multimedia
5.6 Listen to voice mail
4.1 Camera
5.7 Info message
2. Contacts
4.2 Video camera
5.8 Templates
2.
1 Search
4.3 Frame shot
5.9 Settings
2.
2 Add new
4.4 Voice recorder
2.
3 Caller groups
4.5 MP3
2.
4 Speed dial
4.6 Photo album
2.
5 Own number
4.7 Video album
2.
6 My business card
4.8 Settings
2.
7 Settings
35
35

Menu Tree
Menu Tree
6. My stuff 9. Tools
7. Display
6.1 Images
7.1 Wallpaper
9.1 Favourites
6.2 Sounds
7.2 Standby text
9.2 Alarm clock
6.3 Games & Apps
7.3 Backlight Time
9.3 Bluetooth
6.4 External memory
7.4 Brightness
9.4 Connectivity
7.5 Network name
9.5 Calculator
9.6 Unit converter
9.7 World time
8. Profiles
9.8
SIM-Menu
Vibrate only
Silent
Genneral
Loud
Headset
36
Menu Tree
*. Browser #. Settings
0. Call register
*.1 Home
0.1 Missed calls
#.1 Date & Time
*.2 Bookmarks
0.2 Received calls
#.2 Language
*.3 Go to URL
0.3 Dialled calls
#.3 Call
*.4 Settings
0.4 All calls
#.4 Security
0.5 Delete recent calls
#.5 Network
0.6 Call charges
#.6 GPRS Attach
0.7 GPRS information
#.7 Memory status
#.8 Reset settings
37

Games & Apps
Games & Apps
Games & Apps
Menu 1.1
TM
Java
, is a technology developed by Sun
• Default Games: In this menu, you can manage the
Microsystems. Similar to the way you would
Java applications installed in your phone. You can
download the Java Applet using the standard
play or delete downloaded applications, or set the
Netscape or MS Internet Explorer browsers, Java
connect option. The downloaded applications are
MIDlet can be downloaded using the WAP
organised in folders.
enabled phone. Depending on the service
Press the left soft key [Options] to open the
provider, all Java based programs such as Java
selected folder or launch the selected midlet.
games can be downloaded and run on a phone.
Once downloaded, the Java program can be
After selecting a folder, press [Options] and then sub
viewed in the My games & more menu where you
menus available to several options are displayed.
can select, execute, or delete. The Java program
]
Open: You can see the stored games.
files saved in the phone are in .JAD or .JAR format.
]
New Folder: Create a new folder.
Profiles
Menu 1.2
A profiles is the network information used to connect
to the Internet.
If you want to see the details of Profile, please refer to
(Menu *.4.1).
38

CAUTION!
Only J2ME(Java 2 Micro Edition) based
Games & Apps
Note
programs will run in a phone environment. The J2SE(Java 2
]
The JAR file is a compressed format of the Java
Standard Edition) based programs will only run in a PC
program and the JAD file is a description file
environment.
that includes all detailed information. From the
network, prior to download, you can view all
detailed file descriptions from the JAD file.
]
While being based on a standard language
(J2ME), not all Java applications are compatible
with all handsets on sale insofar as specific
libraries may be used for a telephone model.
The software may be blocked or switch itself on
when Java applications not specifically
developed for the phone this manual refers to
are downloaded, making it necessary to
“restart” the handset. We would like to point
out that these problems are caused by
incompatible applications and are not a
product fault.
39

Contacts
]
Copy to phone: You can copy an entry from SIM
Search
Contacts
Menu 2.1
to phone or from phone to SIM.
1. Select Search by press the left soft key
]
Main number: You can select the one out of
[Contacts] or [OK].
mobile, home, office that you often use. After you
2. Enter the name that you want to search.
set this, the main number will be displayed first,
when you search.
Note
]
Assign speed dial: You can assign the entry as a
]
Instant searching is available by inputting the
speed dial.
initial letter of the name or number you want to
]
View caller groups: For further details see Menu
search.
2.3.
]
Delete: You can delete an entry.
3. If you want to edit, delete, copy an entry, or to add
the voice to one, select left soft key [Options].
The following menu will be displayed.
Add new
]
Edit: You can edit the name, number, group,
Menu 2.2
character and picture by using the navigation key.
You can add phonebook entry by using this function.
]
Phone memory capacity is 1000 entries. SIM card
Write messages: After you have found the number
memory capacity depends on the cellular service
you want, you can send a text/multimedia message
provider. The number of character is SIM dependent
to the selected number.
feature.
]
Send via Bluetooth: You can send the data of
phone book to devices which is compatible with
bluetooth through bluetooth.
4040

Caller groups
Menu 2.3
Note
Contacts
]
You can list up to the members per each group. There
Maximum stored name and number length
are 7 groups you can make lists to.
depends on SIM-card type.
]
Member list: Shows the group members you have
1. Select Add new by press left soft key [Select]
selected.
or[OK].
]
Group ring tone: Allows you to specify ring tone
2. Select the memory you want to save: SIM or Phone.
for the group members’ call.
If you set to Phone, you need to select which
]
Group icon: Allows you to select the icon
number you want as a main number.
dependent on Group.
a. Press [OK] to input a name.
]
Add member: You can add group members. Each
b. Press [Save], then you can input a number.
group member shouldn’t be exceeded 20.
c. You can set a group for the entry by pressing
]
Delete member: You can remove the member from
, .
the Group member list. But the name and the
number will be remained in phonebook.
d. You can set a character and a picture for the
entry by pressing the right soft key
]
Rename: You can change a group name.
[
New Pic.
]
]
Delete all: Allows you to delete all the members in
the group.
41

Contacts
Speed dial
Own number
Contacts
Menu 2.4
Menu 2.5
You can assign any of the keys to with a
(Sim dependent)
Name list entry. You can call directly by pressing this
You can save and check your own number in SIM card.
key.
1. Open the phonebook first by pressing the right soft
key [Contacts] in standby mode.
My business card
Menu 2.6
2. Scroll to Speed dial, then press the left soft key
This option allows you to create your own business
[Select].
card featuring Name and an mobile phone number. To
create a new business card, press the left soft key
3. If you want to add speed dial, select (empty). Then,
[Edit] and enter the information into the fields.
you can search the name in phonebook.
Settings
4. After assigning the number as speed dial, you can
Menu 2.7
change and delete the entry. You can also make a
1. Press the right soft [Contacts] in standby
call or send a message by this number.
mode.
2. Scroll to Settings, then press the left soft key
[Select].
]
Default memory
Scroll to highlight Default memory, and then press
the left soft key [Select].
42

- If you select Always ask, when adding entry, the
• SIM to Phone: You can copy the entry from SIM
Contacts
phone will ask where to store.
Card to Phone memory.
- If you select SIM or Phone, the phone will store an
• Phone to SIM: You can copy the entry from
entry to SIM or phone.
Phone memory to SIM Card.
]
View options
]
Memory in use: This feature allows you to see how
many free and in-use are in your phonebook.
Scroll to highlight View options, and then press the
left soft key [Select].
]
Clear contacts
- Name only: Set the phonebook list with
You can delete all entries in SIM and Phone. This
displaying only name.
function requires Security code.
- Name & number: Set the phonebook list with
1. Press the right soft key [Contacts] in
displaying name and number.
standbymode, press [Select].
- With picture: Set the phonebook list with the
2. Then select a memory to erase.
information of character and picture.
3. Enter security code and Press the left soft key
]
Copy/Move all
[OK] or the right soft key [Back].
You can copy/move entries from SIM card memory
]
Service dial number
to Phone memory and vice versa.
Use this function to access a particular list of
1. Open the Phonebook first by pressing the right soft
services provided by your network operator (if
key [Contacts] in standby mode.
supported by the SIM card).
2. Scroll to Copy/Move all, and then press the left
soft key [Select] to enter this menu.
43
Organiser
Calendar
Add new
(Menu 3.1.1)
Organiser
Menu 3.1
Allows you to add new schedule and memo for the
When you enter this menu a calendar will show up. On
chosen day. You can store up to 20 notes.
top of the screen there are sections for date.
Whenever you change the date, the calendar will be
Input the subject and then press left soft key
updated according to the date.
[OK]. You enter the appropriate information in the
And square cursor will be used to locate the certain
follow section; Time, Repeat and Alarm.
day. If you see marked date in the calendar, it means
that there is a schedule or memo that day. This
View daily schedules
(Menu 3.1.2)
function helps to remind you of your schedule and
View all schedules and memo for the chosen day. Use
memo. The phone will sound an alarm tone if you set
, to browse through the note lists. If you
this for the note.
set alarm for the note, the alarm icon is displayed.
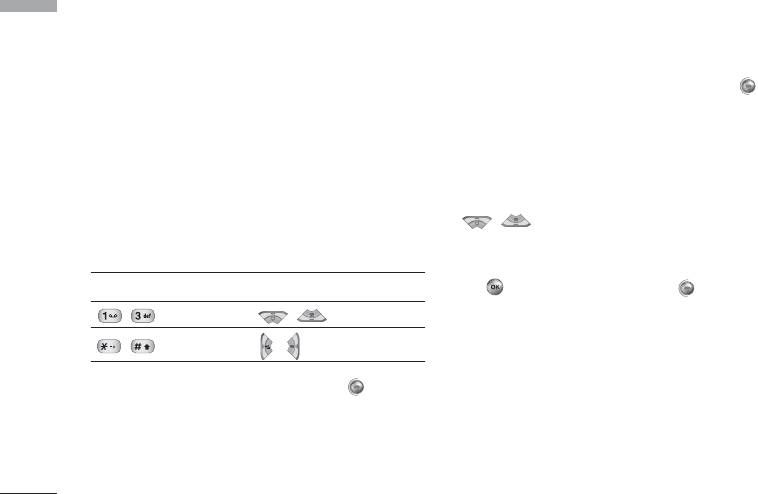
To change the day, month, and year.
If you want to view the note in detail, press left soft
Key Description Key Description
key [Select]. Press left soft key [Options] to
delete, edit the note you selected.
Yearly Weekly
Monthly Daily
Delete past
(Menu 3.1.3)
You can delete the past schedule that has been
In the scheduler mode, press left soft key
already notified you.
[Options] as follows;
Delete all
(Menu 3.1.4)
You can delete for the all notes.
44

Go to date
(Menu 3.1.5)
Organiser
You can go the chosen date directly.
Set alarm tone
(Menu 3.1.6)
You can set the alarm tone of each chosen date.
Memo
Menu 3.2
1. Select the Memo by pressing the left soft key
[Select].
2. If the entry is empty, press the left soft key
[New memo].
Note
]
If you want to change the text input mode,
press the in order.
3. Input the memo and then press left soft key
[OK].
45

Multimedia
Using the camera module built in your phone, you can
Shutter sound or video recording sound is emitted
Multimedia
take pictures of people or record video. Additionally,
even when setting mode, including silent mode .
you can send photos to other people and select photo
as wallpaper.
• To take a picture
Hold down camera button. Camera becomes
Note
ready to use after removing camera lens cover and you
]
When using the camera, power consumption
may want to rotate screen in horizontal position.
increases. If icon appears on the
- To take clear pictures, press camera button while
wallpaper, indicating battery is low, recharge
holding camera without any movement.
the battery before use.
- Appropriately adjust distance to object that you
want take picture of (more than 50 cm).
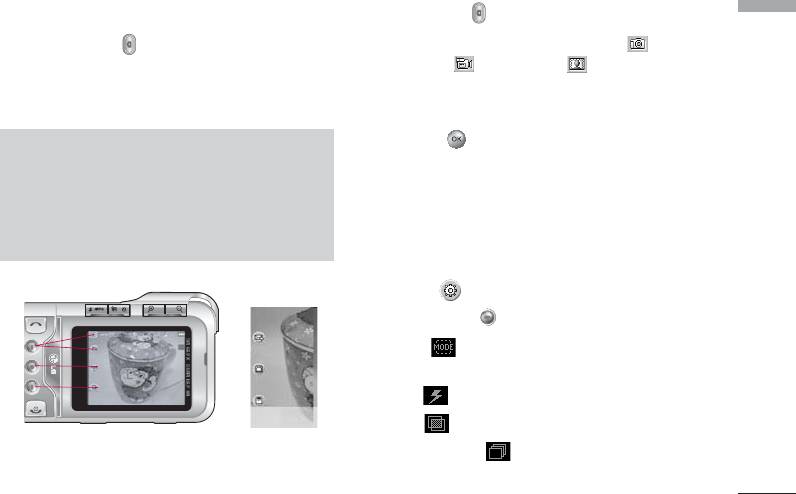
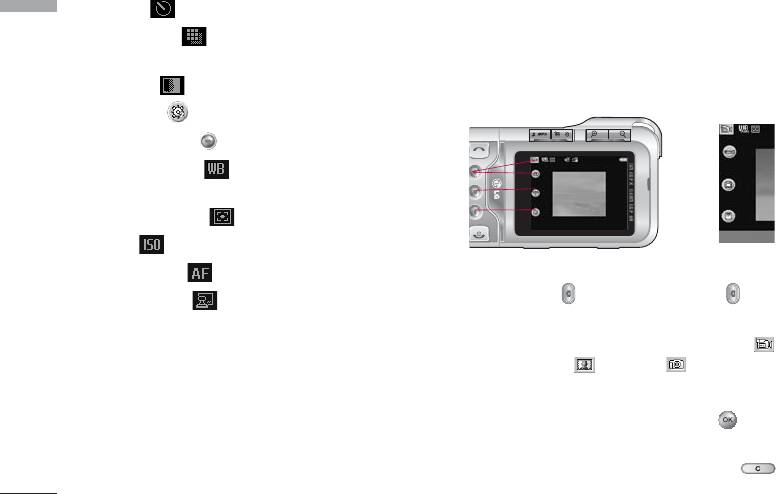
1
Select flash()
2
Timer()
- Handle carefully since camera is venerable to shock
3
/
4
Adjust zoom(-/+)
and use soft cloth when cleaning camera lens.
Rotation supported (180 )
- Do not disassemble or modify the camera as this may
lead to fire or malfunctioning.
12 34
- Auto Focus function is enabled when taking picture
Flash
or sticker shot. Press camera button half way to
adjust focus.
Camera lens
Auto Focus
sub light
Camera in rotated position
Camera cover
(when taking picture of oneself)
adjuster
46
Camera
]
Press camera button.
Menu 4.1
Multimedia
1
Hold down camera button on the wallpaper, then
Mode switching function - Camera( )/Video
camera becomes ready to take picture immediately. If
camera( )/Frame shot( )
Auto Save is selected in Camera Settings, pictures are
2
Photo album selection
saved automatically after being taken.
3
Settings selection - Settings 1/Settings 2
(press to clear Settings screen)
Note
4
Move to Sending Mail function. (However,
]
Turning-off while using may clear or initialize
when using continuous shot and external
any stored file and the shooting time varies
memory Sending Mail function is not supported.)
depending on the environment including
resolution and image quality.
5
Saves photo.
6
You can edit name of the photo.
Option 1( )
]
Press the right key.
4
1
• Mode [ ]: Auto/Close Up/Portrait/Landscape/
2
5
Sports/Dusk/Program AE
3
• Flash[ ]: Off/On/Auto/Red eye
6
• Filter[ ]: Off/Black and white/Sepia/Negative
• Sequence shot[ ]: Sequence shot1/Sequence
shot3
47
Multimedia
• Timer[ ]: Off/3 secs/5 secs/10 secs/15 secs
Multimedia
Video Camera
Menu 4.2
• Resolution[ ]: 2592
l
1944, 2048
l
1536,
Time duration which you can record video may vary
1600
l
1200,1280
l
960, 640
l
480/MMS
according to the specific condition used, including
• Quality[ ]: Normal/Fine/Super fine
resolution, image quality, etc.
Option 2 ( )
]
Press the right key twice.
4
• Whitebalance [ ]: Auto,
1
5
Incandescent,Fluorescent,Sunny,Cloudy,Shade
2
3
• Light metering [ ]: All, Center
6
• ISO [ ]: Auto, ISO 100, ISO 200, ISO 400
• Auto Focus [ ]: Center/Multi
]
Press camera button and then press button
• Date Stamp [ ]: Off/On
after taking picture.
1
Mode switching function - Video camera( )
/Frame shot( )/Camera( )
2
Video album
3
Settings selection - Settings (press to clear
Settings screen)
4
You can cancel recorded video. (or use )
48
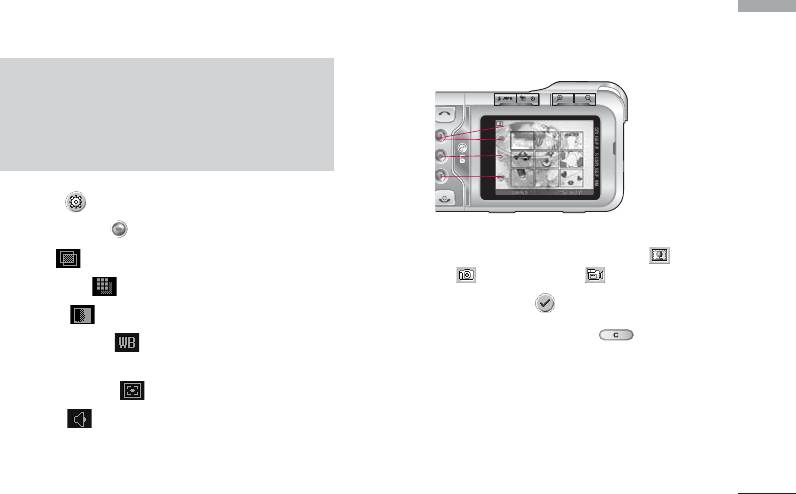
5
Saves recorded video.
Frame Shot
Menu 4.3
Multimedia
6
You can edit name of the video.
Using frame settings, you can take sticker photo.
Note
]
It should be noted that when power goes off
during operation, files in the memory could be
1
deleted or reset.
2
3
Option ( )
]
Press the right key.
1
Mode switching function - Frame shot( )/
• Filter[ ]: Off/Black and white/Sepia/Negative
Camera( )/Video camera( )
• Resolution[ ]: 320
l
240/176
l
144
2
Select background()
• Quality[ ]: Normal/Fine/Super fine
3
Select settings - cancel (or use )
• Whitebalance [ ]: Auto/Incandescent/
Fluorescent/Sunny/Cloudy/Shade
• Light metering [ ]: All/Center
• Sound [ ]: Off/On
49

Multimedia
Select background using and then press or
Option ( )
Multimedia
.
]
Press the right key.
• Flash[ ]: Off/On/Auto/Red eye
• Filter[ ]: Off/Black and white/Sepia/Negative
7
4
8
• Quality[ ]: Normal/Fine/Super fine
5
6
9
• Whitebalance [ ]: Auto/Incandescent/
Fluorescent/Sunny/Cloudy/Shade
4
Mode switching function - Camera( )/Video
camera( )/Frame shot( )
Voice recorder
Menu 4.4
5
Select photo album
The voice memo feature you to record up to 20 voice
messages and each memo is up to 20 Seconds.
6
Settings selection - Settings (press to clear
Settings screen)
Record
(Menu 4.4.1)
]
Press camera button
You can record voice memo in Voice recorder menu.
7
Moves to Sending Mail function.
1. Once recording is started, the message Recording
8
Saves photo.
and the remaining time is displayed.
9
You can edit name of the photo.
2. If you want to finish recording, press the left soft
key [Save].
3. Key in Voice memo title, press the left soft key
[OK].
50
