LG KG920 – страница 7
Инструкция к Сотовому Телефону LG KG920

•
Keep the metal contacts of the battery pack clean.
Guidelines for safe and efficient use
•
Replace the battery when it no longer provides
acceptable performance. The battery pack may be
recharged hundreds of times until it needs replacing.
•
Recharge the battery if it has not been used for a
long time to maximize usability.
•
Do not expose the battery charger to direct sunlight
or use it in high humidity, such as the bathroom.
•
Do not leave the battery in hot or cold places, this
may deteriorate the battery performance.
11
KG920 features
Parts of the phone
KG920 features
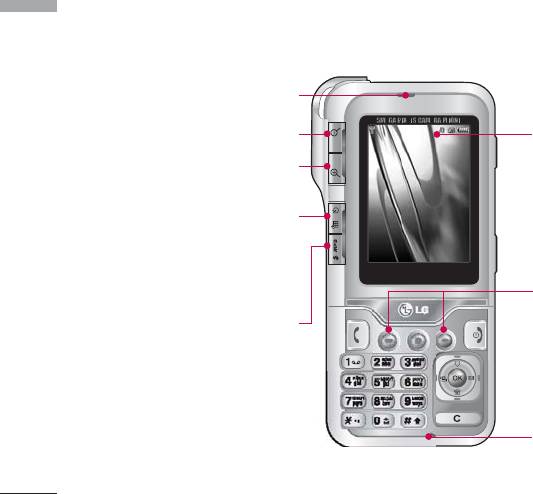
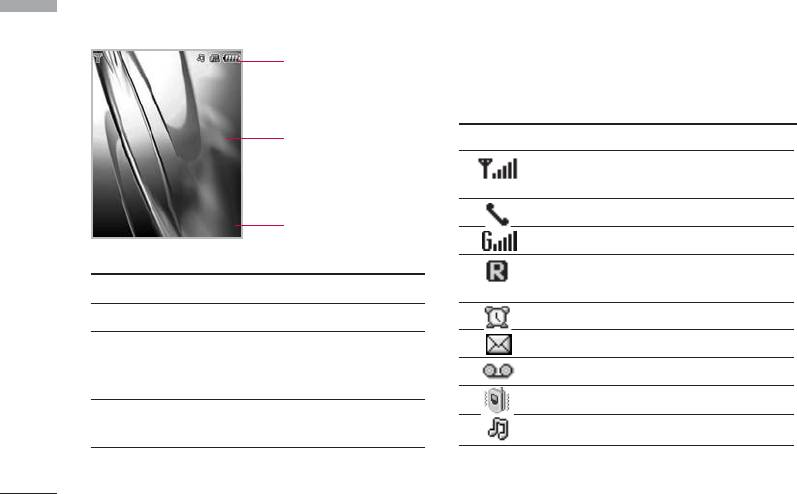
Front view
Earpiece
Zoom out
LCD
• Top: Icons showing signal strength,
Zoom in
battery level and various other
functions.
Scheduler key
• Bottom: Soft key indications
A shortcut key to the
1IRY
1IRY
1IRY
1IRY
1IRY
1IRY
1IRY
1IRY
1IRY
1IRY
1IRY
'SRXEGXW
'SRXEGXW
'SRXEGXW
'SRXEGXW1IRY
'SRXEGXW
'SRXEGXW
'SRXEGXW
'SRXEGXW
'SRXEGXW
'SRXEGXW
'SRXEGXW
'SRXEGXW
Scheduler menu.
Left soft key/ Right soft key
These keys perform the function
MP3 hot key
Indicated in the bottom of the display.
Activate the MP3
menu directly.
Microphone
12
KG920 features
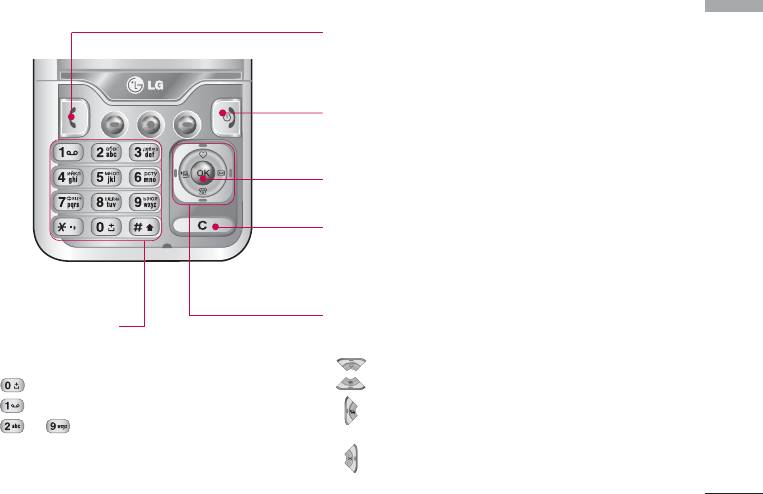
Send key
• Dial a phone number and answer a call.
• In standby mode: shows a history of calls made,
received, and missed.
End/Power key
• Switch on/off (hold down)
• End or reject a call.
Confirm key
Selects menu options and confirms actions.
Clear key
Deletes a character with each press. Hold the key down
to clear all input. Use this key to go back to a previous
screen.
Navigation keys
Alpha numeric keys
• In standby mode:
• In standby mode: Input numbers to
dial. Hold down
Briefly: List of Favourites
- International calls
Briefly: List of Contacts
- Dial Voice mail centre.
Briefly: List of Profiles
to - Speed dials
(Hold down: Activate/Deactivate Vibrate mode)
• In editing mode: Enter numbers &
characters
Briefly: List of Messages
• In menu: scroll up & down
13
KG920 features
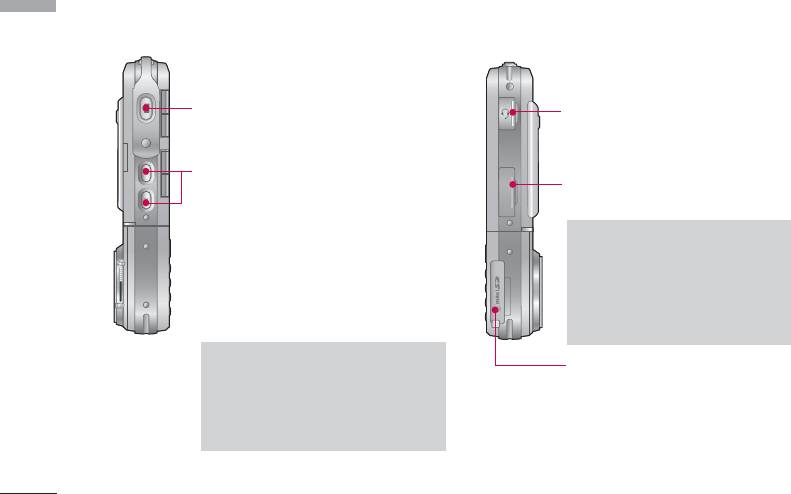
Left side view Right side view
KG920 features
Side Camera key
Handsfree slot
Side keys
Cable Connector/
]
In standby mode:
Battery Charging Connector
Volume of key tone
• In menu: scroll up & down
Note
• During a call: volume of the earpiece
]
Please ensure phone is
powered on and in idle mode
before connecting the USB
cable.
Note
Memory card slot
]
To protect the sense of hearing
while Slide open, maximum
volume level is 3.
14
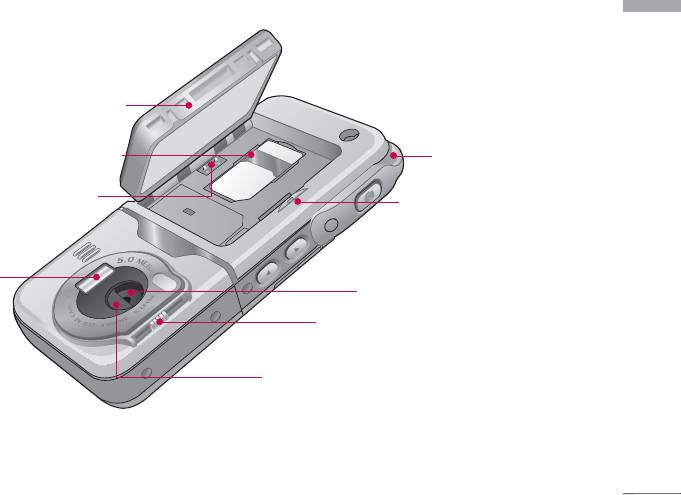
Rear view
KG920 features
Battery
SIM card socket
Holes for a
carrying strap
Battery Terminals
Battery latch
Press this button to
remove the battery cover.
Flash
Camera lens
Camera cover adjuster
Camera cover
15
KG920 features
The screen displays several icons. These are described
Display Information
KG920 features
below.
Icon area
On-Screen Icons
Text and graphic area
Icon/Indicator
Description
Tells you the strength of the network
signal.
Call is connected.
1IRY
1IRY
1IRY
1IRY
1IRY
1IRY
1IRY
1IRY
1IRY
1IRY
1IRY
'SRXEGXW
'SRXEGXW
'SRXEGXW
'SRXEGXW
'SRXEGXW
'SRXEGXW
'SRXEGXW
'SRXEGXW
'SRXEGXW
'SRXEGXW1IRY
'SRXEGXW
'SRXEGXW
Soft key indications
You can use GPRS service.
Shows that you are using a roaming
Area Description
service.
First line Displays various icons.
Het alarm is ingesteld en staat aan.
Middle lines Display messages, instructions and
You have received a text message.
any information that you enter, such
You have received a voice message.
as number to be dialled.
Vibrate only menu in profile.
Last line Shows the functions currently
assigned to the two soft keys.
General menu in profile.
16

Icon/Indicator
Description
KG920 features
Note
You have activated Bluetooth menu.
]
The quality of the conversation may change
depending on network coverage. When the
Indicate that SD card is inserted.
signal strength is below 2 bars, you may
Indicate that you are using security
experience muting, call drop and bad audio.
connection.
Please take the network bars as indicator for
your calls. When there are no bars, that means
Indicates the battery level, divided in
that there is no network coverage: in this case,
bars. The Battery indicator may
you won’t be able to access the network for
fluctuate depending on the kind of
any service (call, messages and so on).
usage of the phone. Using multimedia
functions like MP3, camera, video, etc..
the battery consumption increases, so
the battery charge expires sooner than
Icon/Indicator
Description
using common features of the phone.
Loud menu in profile.
This difference in battery consumption
Silent menu in profile.
may cause a fluctuation of 2 or 3 bars
depending on the application used.
Headset menu in profile.
You can divert a call.
Indicates that the phone is accessing
the WAP.
Indicates that you are using GPRS.
17
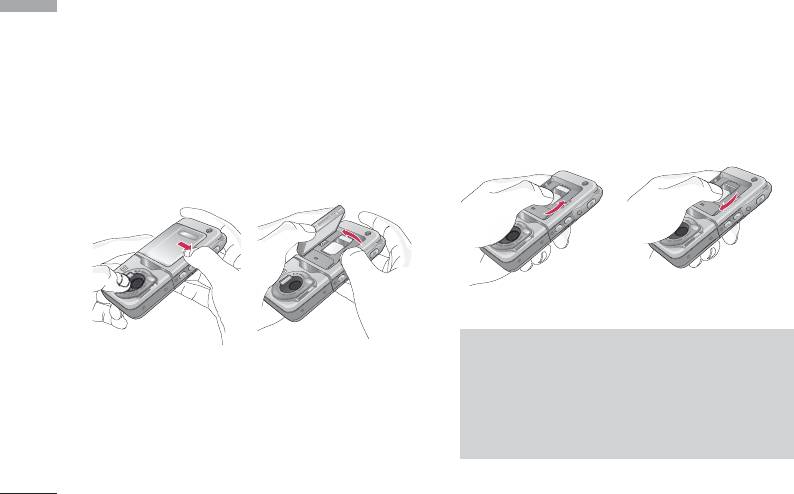
Installation
2. Install the SIM card.
Installing the SIM card and the
Installation
Insert the SIM card into the holder. Slide the SIM
handset battery
card into the SIM card holder. Make sure that the
Make sure the power is off before you remove the
SIM card is inserted properly and that the gold
battery.
contact area on the card is facing downwards. To
1. Remove the battery.
remove the SIM card, press down lightly and pull it
in the reverse direction.
Hold the top edge of the battery and lift the
battery from the battery compartment.
To insert the SIM card To remove the SIM card
Note
]
The metal contact of the SIM card can be easily
damaged by scratches. Pay special attention to
the SIM card while handling. Follow the
instructions supplied with the SIM card.
18
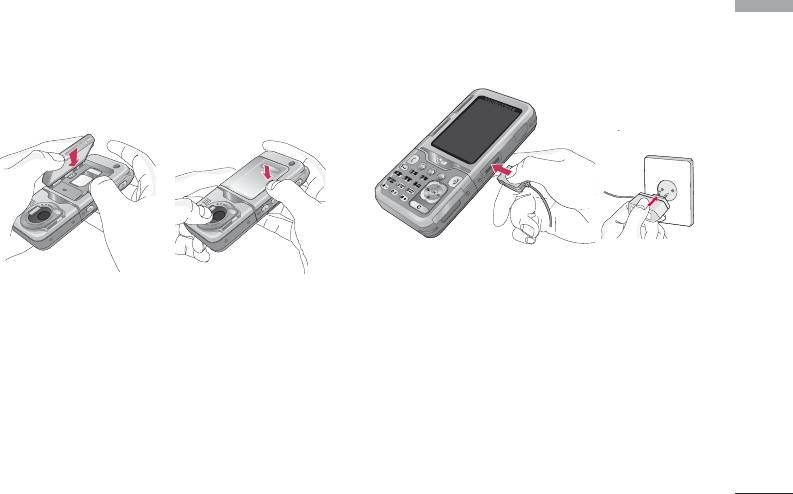
3. Install the battery.
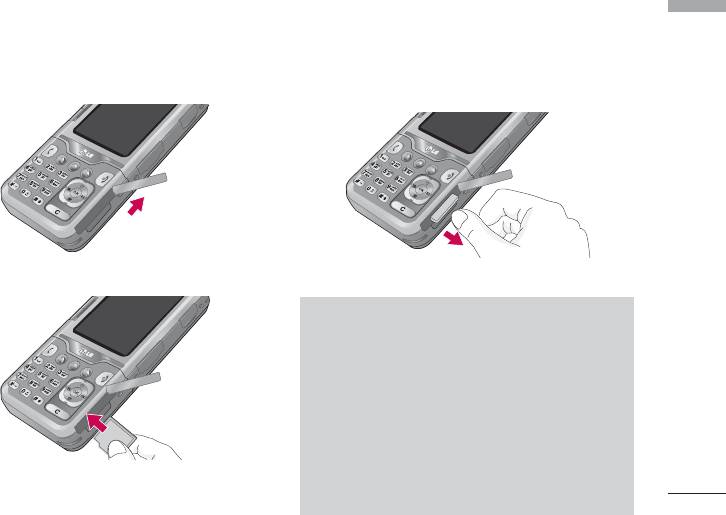
Charging the Battery
Installation
Insert the bottom of the battery first into the
Before connecting the travel adapter to the phone
bottom edge of the battery compartment. Push
you must first install the battery.
down the top of the battery until it snaps into
space.
1. Ensure the battery is fully charged before using the
phone.
2. With the arrow facing you as shown in the diagram
push the plug on the battery adapter into the
socket on the bottom of the phone until it clicks
into place.
3. Connect the other end of the travel adapter to the
mains socket. Use only the included packing
charger.
4. The moving bars of battery icon will stop after
charging is complete.
19
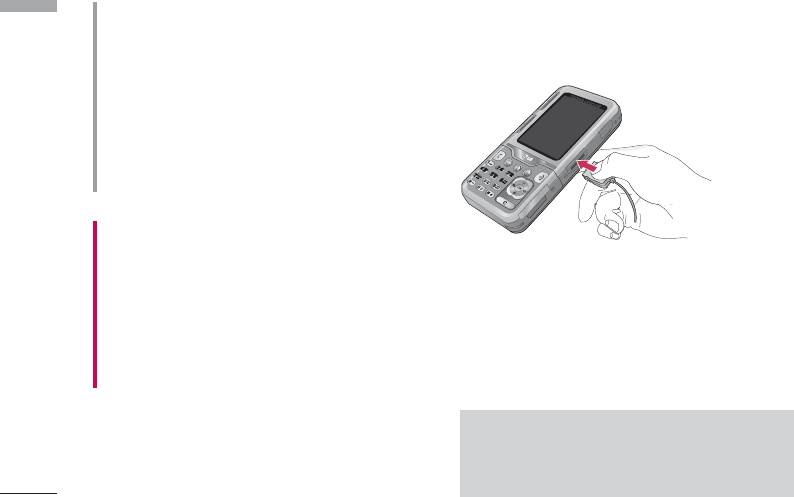
Installation
CAUTION!
Disconnecting the charger
Installation
•
Do not force the connector as this may damage the
Disconnect the travel adapter from the phone by
phone and/or the travel adapter.
pressing its side buttons as shown in the diagram.
•
Insert the battery pack charger vertically to wall
power outlet.
•
If you use the battery pack charger out of your own
country, use an attachment plug adaptor for the
proper configuration.
•
Do not remove your battery or the SIM card while
charging.
WARNING!
•
Unplug the power cord and charger during lightning
storms to avoid electric shock or fire.
•
Make sure that no sharp-edged items such as animal
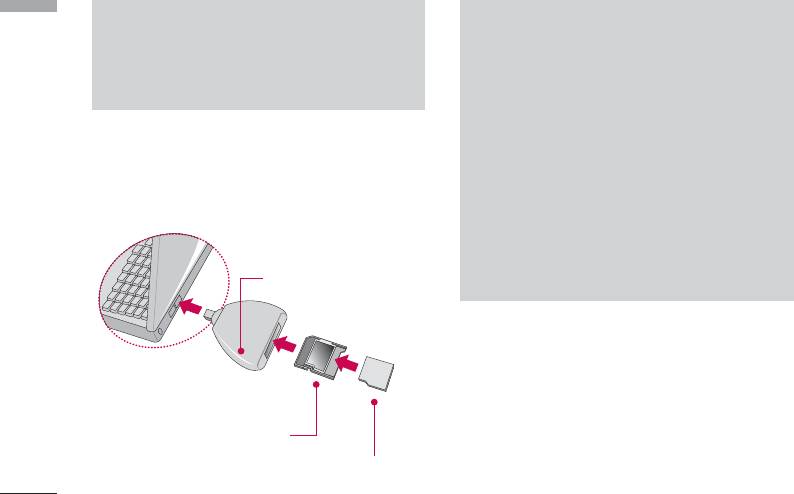
Memory card
teeth, nails, come into contact with the battery. There is a
risk of this causing a fire.
The KG920 is equipped with a slot on the side for a
memory card with a maximum of 128MB capacity.
•
Do not place or answer calls while charging the phone as
it may short-circuit the phone and/or cause electric shock
You can use this card to save data files such as photos,
or fire.
video, audio, contact point, schedule.
Note
]
Always insert/remove the memory card with
the handset power off.
20
Inserting the memory card
Removing the memory card
Installation
Insert the memory card into the slot until the memory
1. Push in memory card with the tip of your finger into
card is fully inserted into the slot, as shown in the
the slot.
figure below:
2. Carefully pull the memory card out of slot.
Open the memory card slot
Remove the memory card
Note
]
The memory card must be removed or inserted
only when necessary as its removal/insertion
may lead to failure.
]
When inserting an external memory card,
remove and insert it again if its icon appears
red. (If the icon remains red after re-insertion,
Insert the memory card
the memory card may likely be damaged, so
replace it with another one.)
21

Installation
Memory card formatting
Installation
Note
]
Before start using memory card it's necessary to format
Removal of an external memory card or
it. After you insert memory card, select Menu-Settings-
turning-off the cell phone while using the card
Reset settings-Clear external memory (Menu #.8.2),
(Store, Copy, Remove, Initialize, Play, etc.) may
then press OK. This operation should be done only
clear or initialize any stored file, which in turn
when you insert memory card for the first time. During
may lead to severe damage on the card or
formatting various folders will be created for different
malfunction of the phone.
data types.
]
It is recommended the card be initialized within
the cell phone. The memory card includes some
Note
system space for any external memory file so
]
some capacity may survive the initialization of
Please note formatting the memory card will
the memory card.
erase all data on the card.
]
]
It is advised to use the format function inherent
Use the data by storing to other device
in your phone when formatting from an external
including a PC separately.
PC with MASS STORAGE feature. Otherwise, it
may fail depending on your OS version and PC
hardware(Menu-Settings-Reset settings-Clear
external memory. See Menu #.8.2).
22

If you do not wish for this to happen, to create the
5. If you now place your memory card into your pc,
Installation
folders
those 6 folders which you have just created will be
displayed as sub folders under My Media.
on the card you need to do the following;
6. Alternately you can create the folders yourself, if
1. Insert the memory card into the slot.
you insert the new memory card into your pc.
2. Access the external memory by pressing the
following keys. Menu, My stuff (6), External
Note
Memory (6-4).
]
Please note that any extra folders/sub folders
3. 6 Folders are displayed.
you create will not be visible on the phone via
1) Videos
External memory.
2) Photos
3) Images
Memory card adapter
4) Musics
When you insert the memory card into its adapter, it
5) Sounds
can be used with other memory stick which is
6) Others
compatible with devices such as PC to exchange and
4. To create the above folders onto the memory card,
save your data without data cable.
you must open each folder individually. A "List
1. Insert the memory card into adapter.
empty" message will be displayed as you access
2. Insert the adapter into SD slot of PC.
each folder, and at the same time this folder will be
created on the card.
3. Check the status of external memory in PC.
23
Installation
Installation
Note
Note
]
Before connecting this memory card adapter to
]
Do not insert the External Memory Adapter
PC, check the status whether your PC is built in
into the Memory Card R/W with the memory
SD slot or not.
card not inserted into the adapter. Or the R/W
may be failed. Do not put any sticker on the
memory adapter or the card.
]
Stickers may be taken off inside, leading to
To connect an external memory
damage.
card to your PC:
]
Dust must not be introduced inside the
adapter.
]
Some external memory cards may not work
Memory Card Read/Write
properly.
(Purchase separately)
]
A removable external memory card can be
reused to store photos, videos and/or MP3s.
(It is compatible with 32MB,64MB,128MB,
256MB,512MB, or 1G and supports FAT
16/32. The compatibility varies depending on
manufactures so check up and then use it.)
External Memory Card
Adapter
External Memory Card
24
General Functions
Making a Call
Making International Calls
General Functions
1. Press and hold the key for the international
1. Make sure your phone is powered on.
prefix. The ‘+’ character can be replaced with the
2. Enter a phone number including the area code. To
international access code.
edit a number on the display screen, simply press
2. Enter the country code, area code, and the phone
the key to erase one digit at a time.
number.
]
Press and hold the key to erase the entire
3. Press the key.
number.
3. Press the key to call.
Ending a Call
4. When you want to finish, press the key.
When you have finished a call, press the key.
Making a Call by Send Key
Making a Call From the Contact list
1. Press the key, and the most recent incoming,
You can store names and phone numbers dialled
outgoing and missed phone numbers will be
frequently in the SIM card as well as the phone
displayed.
memory known as the Contact list.
2. Select the desired number by using the navigation
You can dial a number by simply looking up a name in
key.
the contact list. For more details on the Contacts
3. Press the key.
feature, please refer to page 30.
25
General Functions
Adjusting the Volume
General Functions
Note
During a call, if you want to adjust the earpiece
]
You can answer a call while using the Address
volume, use the side keys of the phone.
Book or other menu features. In case phone is
In idle mode, you can adjust the key volume using the
connected with PC via USB cable, incoming call
side keys.
will be rejected, but after disconnecting phone
from PC you can see Missed call window.
Answering a Call
When you receive a call, the phone rings and the
Vibrate Mode (Quick)
flashing phone icon appears on the screen. If the caller
can be identified, the caller’s phone number (or name
Vibrate Mode can be activated by pressing and
if stored in your Address Book) is displayed.
holding the left side of navigation key.
1. Open the flip and press the key or the left soft
Signal Strength
key to answer an incoming call. If the Any Key menu
option (Menu #.3.2), has been set to any key
If you are inside a building, being near a window may
press will answer a call except for the key or the
give you better reception. You can see the strength of
right soft key.
your signal by the signal indicator ( ) on your
phone’s display screen.
2. End the call by closing the phone or pressing the
key.
26

Entering Text
ABC Mode
General Functions
This mode allows you to enter letters by pressing the
You can enter alphanumeric characters by using the
key labeled with the required letter once, twice, three
phone’s keypad. For example, storing names in the
or four times until the letter is displayed.
Address Book, writing a message, creating scheduling
events in the calendar all require entering text. The
following text input methods are available in the
123 Mode (Numbers Mode)
phone.
Type numbers using one keystroke per number. To
change to 123 mode in a text entry field, press
Note
key until 123 mode is displayed.
]
Some fields may allow only one text input mode
(e.g. telephone number in address book fields).
Symbolic Mode
This mode allows you to enter special characters.
T9 Mode
Changing the Text Input Mode
This mode allows you to enter words with only one
1. When you are in a field that allows characters to be
keystroke per letter. Each key on the keypad has more
entered, you will notice the text input mode
than one letter. The T9 mode automatically compares
indicator in the upper right corner of the display.
your keystrokes with an internal linguistic dictionary
to determine the correct word, thus requiring far fewer
2. If you want to change modes, press .
keystrokes than the traditional ABC mode.
The available modes are changed.
27
General Functions
]
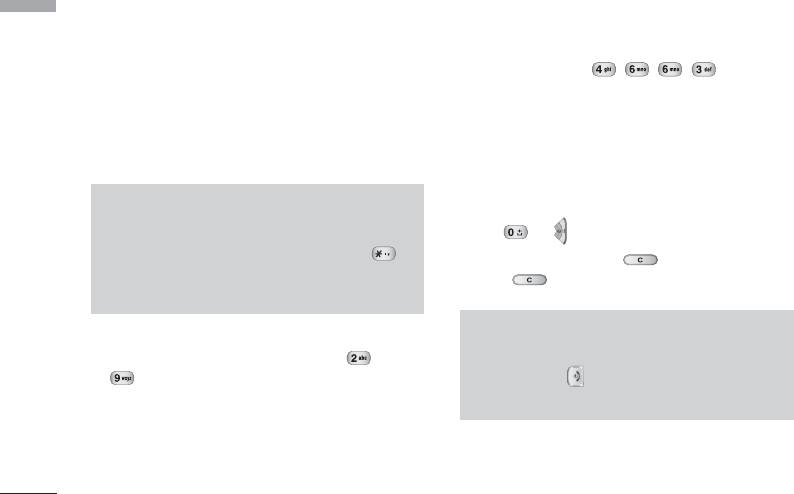
If the word is still incorrect after typing
Using the T9 Mode
General Functions
completely, press the down navigation key once
The T9 predictive text input mode allows you to enter
or more to cycle through the other word options.
words easily with a minimum number of key presses. As
Example: Press to type
you press each key, the phone begins to display the
Good.
characters that it thinks you are typing based on a
]
If the desired word is missing from the word
built-in dictionary. As new letters are added, the word
choices list, add it by using the ABC mode.
changes to reflect the most likely candidate from the
dictionary.
2. Enter the whole word before editing or deleting any
key strokes.
Note
3. Complete each word with a space by pressing the
]
You can select a different T9 language from the
key or key.
menu option or press hold down the key .
To delete let ters, press . Press and hold
The default setting on the phone is T9 disable
down to erase the letters continuously.
mode.
1. When you are in the T9 predictive text input mode,
Note
start entering a word by pressing keys to
]
To exit the text input mode without saving your
Press one key per letter.
input, press . The phone returns to the idle
screen.
]
The word changes as letters are typed-ignore
what’s on the screen until the word is typed
completely.
28
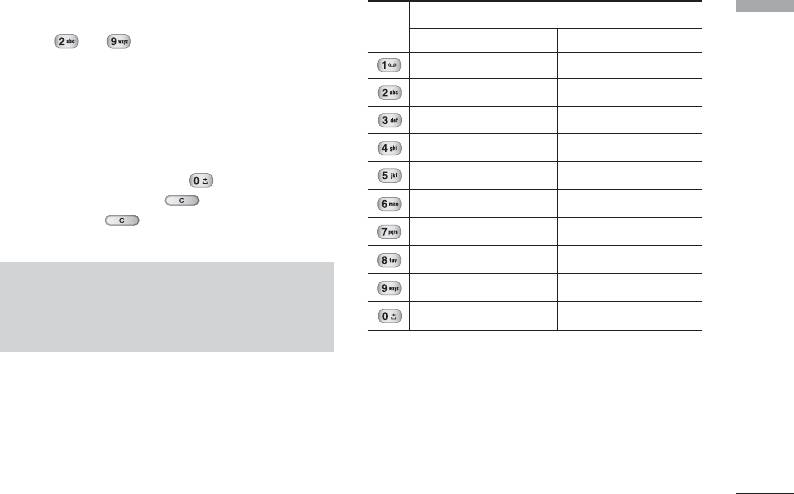
Using the ABC Mode
Characters in the Order Display
General Functions
Key
Use the to keys to enter your text.
Upper Case Lower Case
1. Press the key labeled with the required letter:
. , / ? ! - : ' " 1 . , / ? ! - : ' " 1
]
Once for the first letter.
A B C 2 a b c 2
]
Twice for the second letter.
D E F 3 d e f 3
]
And so on.
G H I 4 g h i 4
2. To insert a space, press the key once. To
J K L 5 j k l 5
delete letters, press the key. Press and
M N O 6 m n o 6
holddown the key to erase the letters
P Q R S 7 p q r s 7
continuously.
T U V 8 t u v 8
Note
W X Z Y 9 w x y z 9
]
Refer to the table below for more information
Space 0 Space 0
on the characters available using the keys.
29

General Functions
Using the 123 (Numbers) Mode
General Functions
The 123 Mode enables you to enter numbers in a text
message (a telephone number, for example).
Press the keys corresponding to the required digits
before manually switching back to the appropriate
text entry mode.
Using the Symbol Mode
The Symbol Mode enables you to enter various
symbols or special characters.
To enter a symbol, press the key. Use the
navigation keys to select the desired symbol and press
the [OK] key.
30
