LG GA-B379PVCA – страница 3
Инструкция к Холодильнику LG GA-B379PVCA

Introduction
CAUTION!
Violating this direction may cause injury or damage
house or furniture. Always be careful, please.
When you want to dispose the fridge-freezer,
contact to the down-block office.
Down-block
office
The refrigerant and insulation blowing gas
used in the appliance require special
disposal procedures. Ensure that none
of the pipes on the back of the appliances
are damaged prior to disposal.
NO
Do not touch food or containers
at the freezer with wet hands.
It may cause frostbite.
NO
Wait for 5 minutes or longer when
reconnecting the plug.
After
It may cause the operation of
5
minutes
the freezer to fail.
Do not put bottle in the freezer.
It may freeze the contents to break
the bottle to cause injury.
Pull out the power plug not by grasping
the cord but the plug of its end.
Extraction by the cord may cause
electric shock or short circuit and fire.
The supply plug of the refrigerator-freezer
should be placed in easy accessible position
for quick disconnection in emergency.
If the appliance is not to be used for a long time,
pull out the power plug.
Any deterioration in the insulation may cause fire.
Do not let children touch or play with the control
panel on the front of the appliance.
41
Introduction
CAUTION!
This appliance is not intended for use by persons
(including children) with reduced physical, sensory or
mental capabilities, or lack of experience and knowledge,
unless they have been given supervision or instruction
concerning use of the appliance by a person responsible
for their safety.
Children should be supervised to ensure that they
do not play with the appliance.
.
Keep ventilation openings, in the appliance enclosure
or in the built-in structure, clear of obstruction.
.
Do not use mechanical devices or other means to
accelerate the defrosting process, other than those
recommended by the manufacturer.
.
Do not damage the refrigerant circuit.
.
Do not use electrical appliances inside the food storage
compartments of the appliance, unless they are of
the type recommended by the manufacturer.
WARNING!
As a refrigerant is R600a or R134a.
Look at the label with the technical data on the inner
side of the refrigerating chamber to detect what
refrigerant is used in your refrigerator.
Isobutane (R600a) is a natural gas with high
environmental compatibility, but it is also combustible.
When transporting and installing the appliance,
care should be taken to ensure that no parts
of the refrigerating circuit are damaged.
Refrigerant squirting out of the pipes could ignite
or cause an eye injury. If a leak is detected, avoid
any naked flames or potential sources of ignition
and air the room in which the appliance is standing
for several minutes.
In order to avoid the creation of a flammable gas air
mixture if a leak in the refrigerating circuit occurs, the
size of the room in which the appliance may be sited
depends on the amount of refrigerant used. The room
must be 1m² in size for every 8g of R600a refrigerant
inside the appliance. The amount of refrigerant in your
particular appliance is shown on the identification plate
inside the appliance.
Never start up an appliance showing any signs of
damage. If in doubt, consult your dealer.
42
Introduction
Identification of Parts
Models:
with dispenser
GA-F3*9B*QA;
GA-F4*9B*QA
Dairy Corner,
movable
(Optional)
Removable
Glass Shelf
Door Basket
Lamp
Multi-air Flow Duct
Tray
Egg
(1 or 2)
Tray Meat
(Optional)
Refrigerator
Temperature Control
Water Tank
Vegetable Drawer
Handle
2L Bottle
Tray Ice
Door Basket
Freezer
Compartment
Removable Plinth
Leveling Screw
No t e
If you find some parts missing from your unit,
they may be parts only used in other models.
Specification of the refrigerator can be changed by
the Сompany-manufacturer without prior Notice.
43
Introduction
Identification of Parts
Models:
GA-B3*9B*СA;
GA-B3*9TG** ;
GA-B3*9P*CA;
GA-B4*9B*QA;
GA-B3*9U*CA;
GA-B4*9P*QA;
GA-B3*9B*QA;
GA-B4*9U*QA;
GA-B3*9P*QA;
GA-B4*9U*CA;
GA-B3*9U*QA;
GA-B4*9TG**
Dairy Corner,
movable
Display Board
(Optional)
(Optional)
Rotatable
Removable
Door Basket
Glass Shelf
Lamp
Multi-air Flow Duct
Tray Egg
(1 or 2)
Tray Meat
(Optional)
Refrigerator
Temperature Control
Vegetable Drawer
Handle
(Optional)
2L Bottle
Tray Ice
Door Basket
Freezer
Compartment
Removable
Plinth
Leveling Screw
No t e
If you find some parts missing from your unit,
they may be parts only used in other models.
Specification of the refrigerator can be changed by
the Сompany-manufacturer without prior Notice.
44
Installation
Climatic class
The appliance is designed to operate in a limited range
of ambient temperature, depend on climatic zones. You are
not allow to go for any lower, either from the top of the range.
Climatic class of your appliance marked on the Label
specification with technical description in inner side of the
refrigeration compartment.
Admissible ambient
Climatic class
temperature
o
o
SN
+10 С до 32 С
o
o
N
+16 С до 32 С
o
o
ST
+18 С до 38 С
o
o
T
+18 С до 43 С
Installation
1. Select a good location.
Place your fridge-freezer where it is easy to use.
2. Avoid placing the unit near heat sources,
direct sunlight or moisture.
3. To provide necessary of air circulation, you should leave
enough space behind, on each side and top of refrigerator-
freezer. Set the limit stops in the upper corners of the back
plate of the device as shown in picture 1.
4. To ensure proper air circulation around the fridge -freezer,
please maintain sufficient space on both the sides as well as top
and maintain at least 2 inches (5 cm) from the rear wall. (pic.2)
5. Please, do not remove the round stickers on the back side
of the refrigerator. They are performing decoration functions
by closing technological holes.
6. To avoid vibration, the unit must be leveled. If required, adjust
the leveling screws to compensate for the uneven floor.
The front should be slightly higher than the rear to aid in
door closing. Leveling screws can be turned easily by tipping
the cabinet slightly.
Turn the leveling screws counterclockwise ( ) to raise
forward part of a refrigerator, clockwise ( ) to lower it.
7. Before use clean your fridge-freezer thoroughly.
8. Install accessories such as ice cube box, etc., in their
proper places. They are packed together to prevent
possible damage during shipment.
9. Connect the power supply cord (or plug) to the outlet.
Don't double up with other appliances on the same outlet.
Starting
When your fridge-freezer is installed, allow it 2-3 hours at normal
operating temperature prior to filling it with fresh or frozen foods.
If power plug is disconnected, allow 5 minutes delay
before restarting.
Your fridge-freezer is now ready for use.
45
Installation
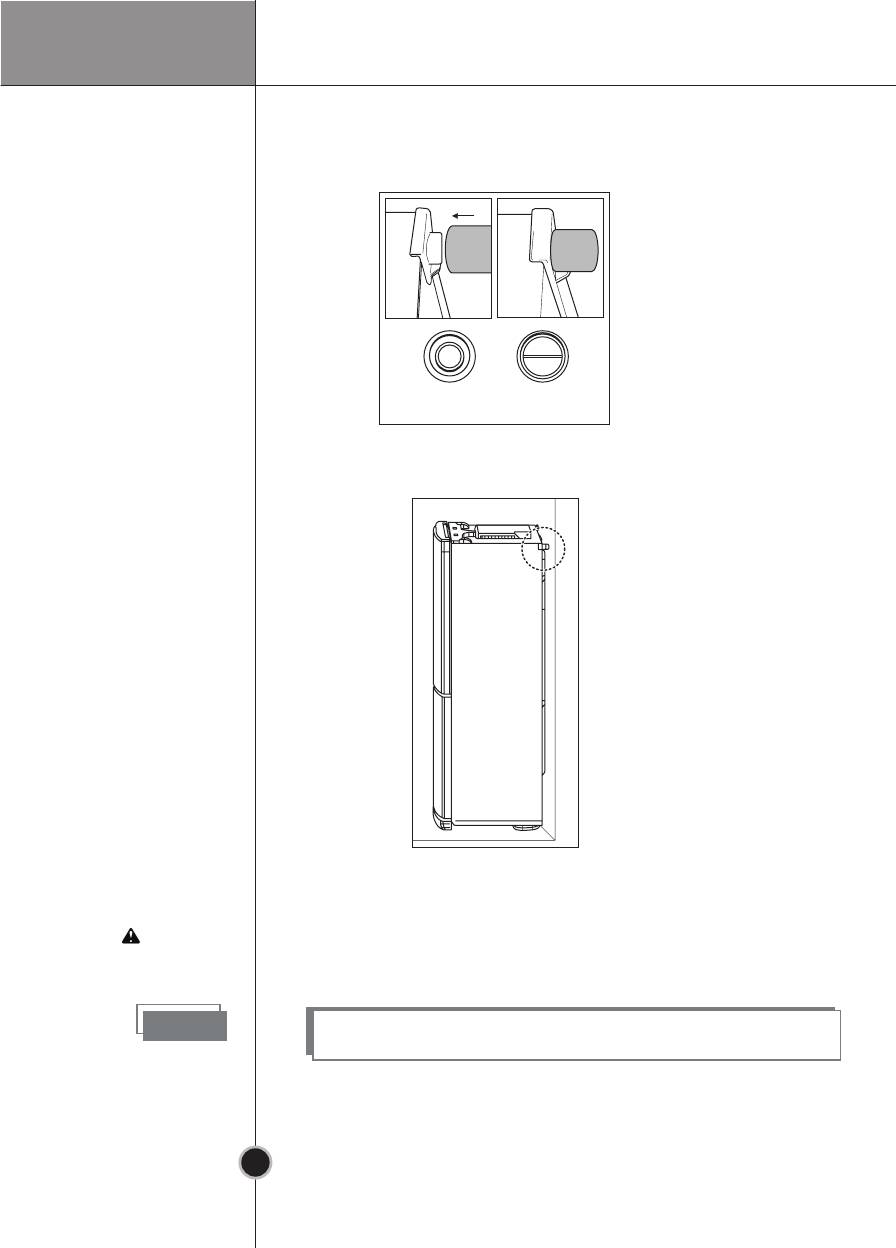
Set stoppers
1
2
Front Back
picture 1
Push 2 (Stopper) to the part of 1 until the end.
LLAW
picture 2
After attaching 2 , push the refrigerator to the end of
the wall.
WARNING!
This part must be installed for efficiency of
refrigerator.
No t e
Part 2 is located at the R room refrigerator door basket.
46

Operation
Temperature Control
Refrigerator
Your fridge-freezer has two controls that let you regulate
the temperature in the fridge and freezer compartments.
Initially set the TEMP.CONTROL
at «4». Then adjust the compartment
MAX MIN
7
1
temperature according to yourdesire.
6
If you want an inside temperature
2
5
slightly less cold or colder, turn the
4
3
knob towards MIN or MAX, respectively.
TEMP. CONTROL
When the surrounding temperature is low,
adjust the TEMP.CONTROL «MIN».
Display Panel For Temperature Control
GA-B3*9B*QA; GA-B3*9P*QA;GA-B3*9U*QA
GA-F3*9B*QA; GA-F4*9B*QA
GA-B4*9B*QA; GA-B4*9P*QA;GA-B4*9U*QA
LED (88)
LED (BAR)
Total No Frost
Total No Frost
GA-B3*9TG**; GA-B4*9TG**
LCD
Function
display
board
EXPRESS FRZ.
EXPRESS
FRZ.
3 SECS
< Exterior Type >
Super Freezer Button Lock Button
Temperature adjustment button
Vacation Button
for freezer compartment
47

Operation
< Interior Type >
< LED 88 Type >
Models:
FRZ. TEMP.
SUPER FRZ./VACATION
GA-B3*9B*СA;
GA-B3*9U*CA;
GA-B3*9P*CA;
GA-B4*9U*CA
Temperature adjustment button
Super Freezer Button/
for freezer compartment
Vacation Button
Freezer
• The initial Temperature of the Freezer Compartment
is -18°C . You can now adjust the temperature of
the compartment as you want.
< Exterior Type >
< LED 88 Type >
Models:
GA-F3*9B*QA;
GA-F4*9B*QA
Models:
< LED BAR Type >
GA-B3*9B*QA;
GA-B4*9B*QA;
GA-B3*9P*QA;
GA-B4*9P*QA;
GA-B3*9U*QA;
GA-B4*9U*QA;
< LCD Type >
Models:
GA-B3*9TG**;
GA-B4*9TG**
< Interior Type >
< LED 88 Type >
Models:
GA-B3*9B*СA;
GA-B3*9U*CA;
GA-B3*9P*CA;
GA-B4*9U*CA
• When you press the temperature control buttons,
the temperature of Freezer compartment is repeated
in the following order.
LED 88 Type (Exterior and Interior Types); LCD Type
Freezer Compartment :
-18°C → -19°C → -20°C → -21°C → -22°C → -23°C
→ -15°C → -16°C → -17°C
-18°C →
LED BAR Type Freezer Compartment :
-19°C → -21°C → -23°C → -15°C → -17°C
48

Operation
Note
The actual inner temperature varies depending on
the food status, as the indicated setting temperature
is a target temperature, not actual temperature
with in refrigerator.
Refrigeration function is weak in the initial time.
Please adjust temperature as above after using
refrigerator for minimum 2~3 days.
Function
Super/Express
•
This function is used when you want to freeze the
Freezer
foods quickly. Press the «SUPER FRZ.» (Super Freezer),
the «EXPRESS FRZ.« (Express Freezer) or the
“SUPER FRZ./VACATION” (depending on model) button
once, and then the quick freezer operation starts with
the lamp on.
•
The Super Freezer operation takes about 3 hours.
When its operation ends, it automatically returns to
the previous temperature setting. If you want to stop
the quick freeze operation, press the «SUPER FRZ.»,
the «EXPRESS FRZ.» or the «SUPER FRZ./VACATION»
button once more, the lamp goes out, and the Super Freezer
operation stops and the refrigerator returns to the previous
temperature setting.
< Exterior Type >
Models:
GA-F3*9B*QA;
GA-F4*9B*QA;
GA-B3*9B*QA;
GA-B4*9B*QA;
GA-B3*9P*QA;
GA-B4*9P*QA;
GA-B3*9U*QA;
GA-B4*9U*QA;
In selecting «On»
In selecting «Off»
Models:
EXPRESS FRZ. EXPRESS FRZ. EXPRESS FRZ.
GA-B3*9TG**;
GA-B4*9TG**
EXPRESS FRZ.
In selecting «On»
In selecting «Off»
Vacation
This function makes the fridge-freezer work in a power
saving mode which is useful for when you are away
on holiday, by reducing energy consumption as much
as possible.
Pressing «VACATION» or «SUPER FRZ./VACATION»
(depending on model) starts operation with lamp on
and pressing it again stops the operation.
49

Operation
< Exterior Type >
Models:
GA-F3*9B*QA;
GA-F4*9B*QA;
GA-B3*9B*QA;
GA-B4*9B*QA;
GA-B3*9P*QA;
GA-B4*9P*QA;
In selecting «On»
In selecting «Off»
GA-B3*9U*QA;
GA-B4*9U*QA;
Models:
GA-B3*9TG**;
GA-B4*9TG**
In selecting «On»
In selecting «Off«
< Interior Type >
Models:
/
GA-B3*9B*СA;
GA-B3*9U*CA;
«off»
GA-B3*9P*CA;
GA-B4*9U*CA
In selecting «On»
In selecting «On»
Note
Press the «SUPER FRZ./VACATION» button once «VACATION»
< Interior Type >
and display light on means energy saving function is on.
Twice press «SUPER FRZ./VACATION» button,
turns off «VACATION» function & on «SUPER FRZ.».
The super freeze operation takes about 3 hours. When its
operation ends, it automatically returns to the normal state.
The third time’s press of «SUPER FRZ/VACATION» button,
switch off all modes, information display panel goes out.
«off» → «VACATION» → «SUPER FRZ.» → «off»
Memory feature
Function to save the set temperature and vacation status.
< Interior Type >
When the power is turned on after the power failure, it will
Models:
be restored with the set temperature and vacation status.
GA-B3*9B*СA;
GA-B3*9U*CA;
GA-B3*9P*CA;
GA-B4*9U*CA
Door Alarm
When the door of the fridge is left opened for a while,
< Exterior Type >
the alarm sounds.
Models:
GA-B3*9TG**;
GA-B4*9TG**
50

Operation
Child Lock
• When «CHILD LOCK» is activated, pressing the other
buttons would not work.
• «Locking» or «Un-Locking» is repeated whenever
pressing the «CHILD LOCK» button. (For «Locking» or
«Un-Locking» press the «CHILD LOCK» button for 2 secs.)
< Exterior Type >
Models :
GA-F3*9B*QA;
GA-F4*9B*QA;
GA-B3*9B*QA;
GA-B4*9B*QA;
GA-B3*9P*QA;
GA-B4*9P*QA;
In selecting
In selecting
GA-B3*9U*QA;
GA-B4*9U*QA;
«Child Lock On»
«Child Lock Off»
Models :
GA-B3*9TG**;
GA-B4*9TG**
In selecting
In selecting
«Child Lock On»
«Child Lock Off»
Ice Making
• To make ice cubes, fill the ice
tray to the water level and place
it in the freezer.
• If ice cubes are required fast,
press the «SUPER FRZ.»,
the «EXPRESS FRZ.» or
the «SUPER FRZ./VACATION»
(depending on model) button.
• To remove ice cubes, hold the
tray at its ends and twist gently.
Tip
To remove ice cubes easily, run water on the tray
before twisting.
Defrosting
Defrosting takes place automatically.
The defrosting water flows down to the evaporating
tray and is evaporated.
51

Operation
Models:
Water Dispenser
GA-F3*9B*QA;
GA-F4*9B*QA
Features
Dispenser Pad
Grille
Drip Tray
Handle Tank
Cap Tank (Small)
Cap Tank (Big)
Water Tank
Valve Assembly
Install
Please assemble the Valve Assembly after correctly
adjusting it with a Door Hole.
Filling of
1. After turning the Handle Tank backward with the
Water Tank
Water Tank installed at the Door, Open the CapTank (Small)
and then fill water using a kettle etc.
* Fill water while watching a sight glass on the front
of the Water Tank.
* Water up to 3,0
L
can be filled.
2. Press and fix the Cap Tank (Small).
3. After filling spring water, fix the Handle Tank at
a proper position.
Drinking
1. Press the Dispenser Pad with a cup.
2. If pressing the Pad, water inside of the Dispenser is supplied.
3. If slowly removing a cup from the Pad, water will not fall down.
WARNING!
Do not use other beverage (milk, juice, carbonated
beverage etc) than spring water. Especially beverage
including grain must not be used (may result in failure).
Fill with potable water only.
52

Suggestions
on food storage
Storing Food
• Do not store food which goes bad easily at lowtemperature,
such as banana, and melon.
• Always allow hot food to cool to room temperature.
Never put hot food into refrigerator and freezer chambers.
It could spoil other food, and lead to higher electricity loss.
• When storing the food, use a container with a lid.
Thisprevents moisture from evaporating, and helps food
tokeep its taste and nutrients.
• Do not block air vents with food. Smooth circulation of cold
air keeps fridge-freezer temperature even.
• Do not open the door frequently. Frequent opening the
doors warm up temperature in the chambers which leads
to spoil other products & electricity loss.
• To adjust the temperature control easily, do not storefood
near the temperature control dial.
• Never keep too many foods in door rack, as this maystop
the door from fully closing.
• Do not store bottles in the freezer compartment - they may
break when frozen.
Note
If you keep the fridge-freezer in a hot, and humid place,
frequently open its door or put a lot of vegetables in it,
dew may form in it, which has no effect on its
performance.
Remove the dew with dust cloth free from care.
53
Suggestions on
food storage
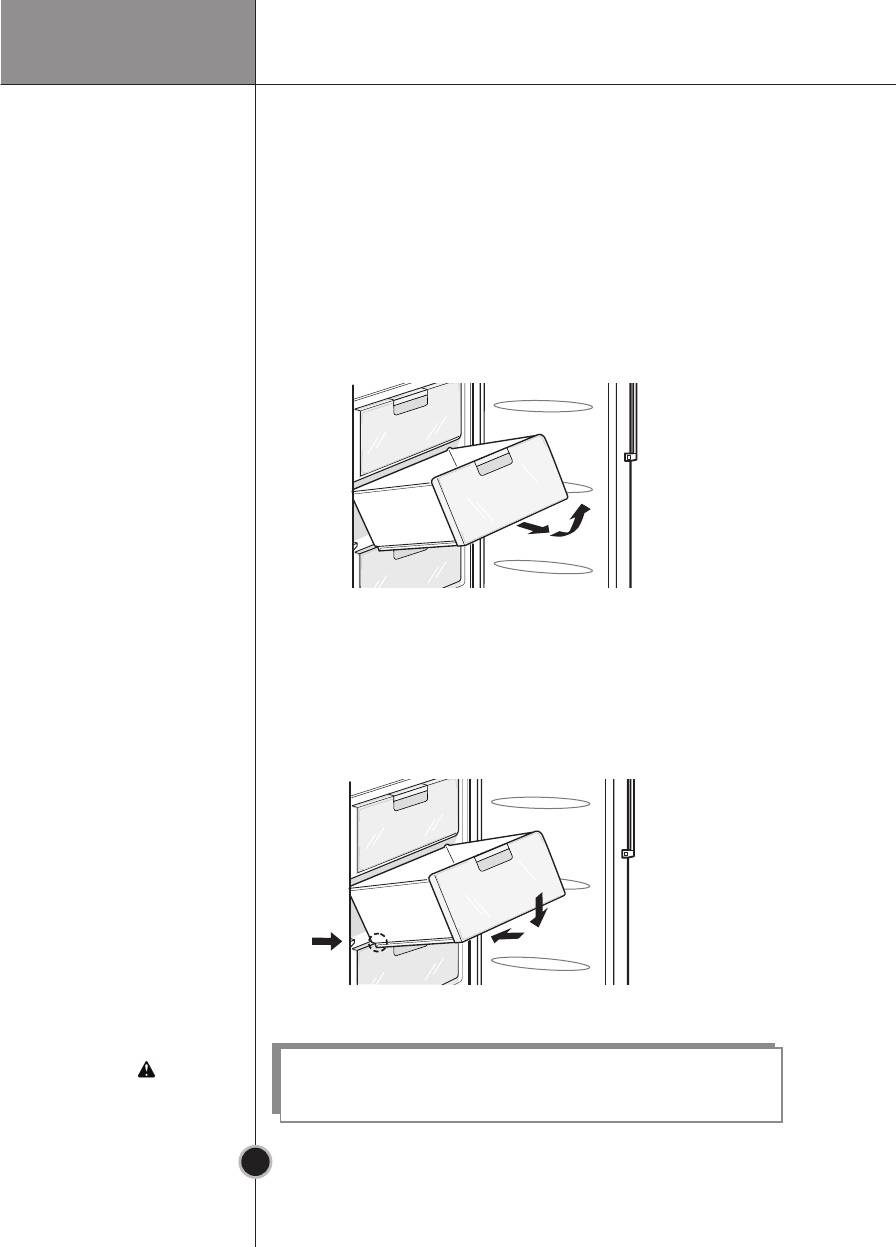
Removing /
·
To ensure good air circulation in the appliance, insert
Installing
the freezer drawers all the way.
freezer drawers
·
If large quantities of food are to be stored in the freezer
the middle drawer of the freezer compartment can be
taken out of the appliance and food can be stored right
over the food stacked in the lower drawer.
·
To remove one of the freezer drawer do the following:
1) Pull the drawer until it stops;
2) Lift the front part up and remove the drawer.
2
1
·
To install a freezer drawer back into the freezer do
the same steps in reverse order:
3) Put the drawer on the guides at the angle of 45 °;
4) Lower the front part to one level with the guides;
5) Push the drawer until it stops.
Make sure that the angle of the drawer is not skewed.
4
3
5
WARNING!
Don't apply a overwhelming effort and brute force on
drawer and shelves - it could damage the refrigerator!
54
Care and Maintenance
General Information
Power Failure
• 1~2 hour power failure does no harm to the foods stores.
Try to avoid opening and closing the door too frequently.
If You Move
• Remove all food and other items from the refrigerator. Fix the
inner movable parts (shelves, drawers and door basket) securely.
• In order not to damage of adjustable refrigerator legs turn them
counterclockwise before the transportation.
• Refrigerator should be transported in upright position by
any type of covered transport. Should safely fix the refrigerator,
in order to prevent any shock and fall inside vehicle during
transportation.
• Do not expose refrigerator to impact forces during load handling.
Anti-Condensation
• The Anti-Condensation pipe is
Anti-Condensation Pipe
Pipe
installed around the front side of
fridge-freezer as well as on the partition
between fridge compartment and
freezercompartment to prevent dewing,
which is heating during the operation
of compressor.
• Immediately after installation, and if the
room temperature is high, rear and side
walls of the refrigerator can be heated.
It is provided by design and normal.
CAUTION!
Refrigerator work features
As a result of thermal strain for components of a refrigerator
appliance can be heard crackling noise that is not a defect and
doesn’t affect efficiency of the appliance.
This special sound when the thermo-regulator and compressor
and turned on is a normal state, which appears during
the working process of appliance’s electric installation.
The gas refrigerant produces a slight noise even when
the compressor is not running (this is not a defect).
While refrigerator appliance working process can be heard:
- flick of the temperature relay;
- murmur of refrigerant flowing round cycle;
- cracking noise because of the materials deformation by
temperature.
All that is not defect and doesn’t affect efficiency of the appliance.
55
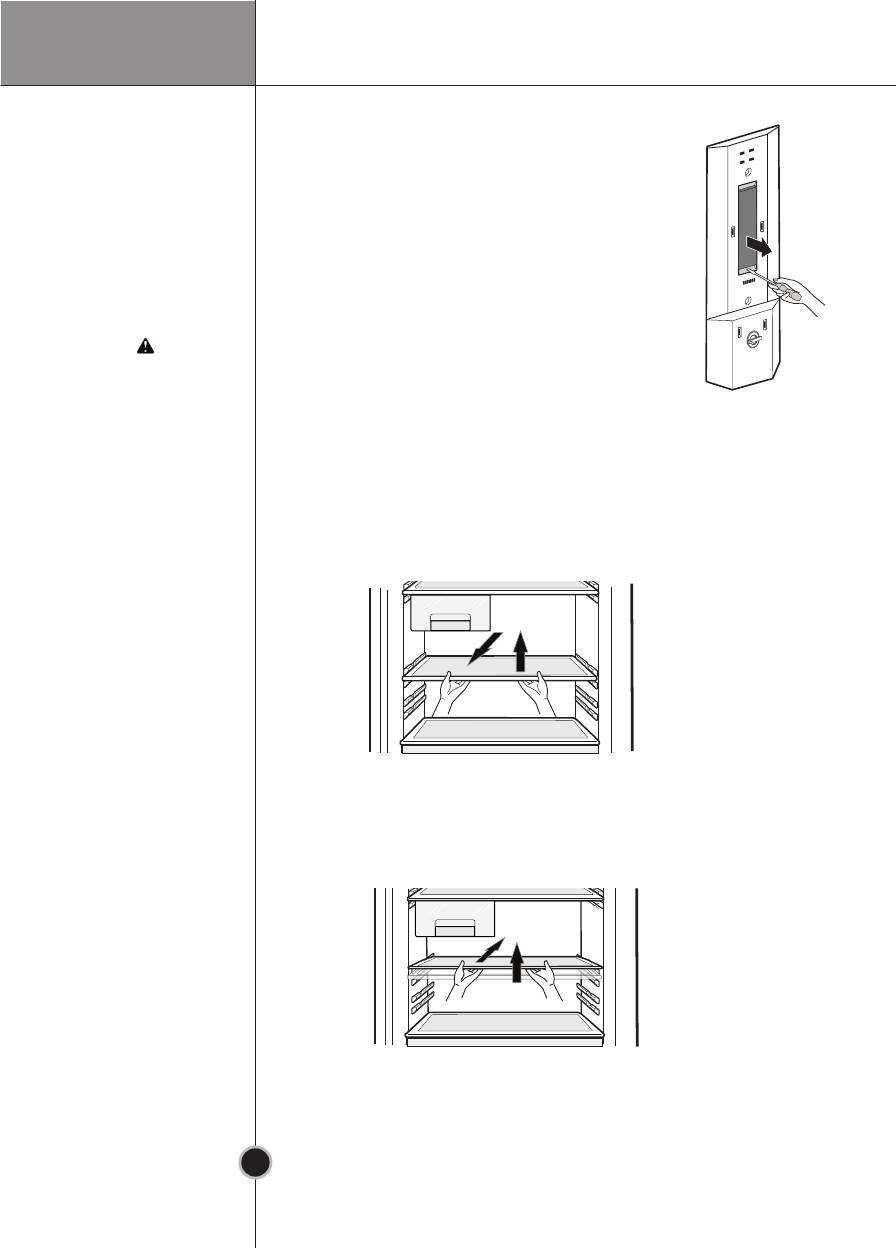
Care and
Maintenance
Lamp
1. Unplug the power cord from the outlet.
Replacement
2. Remove fridge shelves.
3. To remove the lamp cover, insert type
driver in the underside of the lamp
cover and pull it out forwards.
4. Turn the lamp counterclockwise.
5. Install the new bulb and put the cover back.
The new lamp should have same
characteristics as replaced one.
WARNING!
6. MAXIMUM rated input of lamp should
not to exceed 20 W.
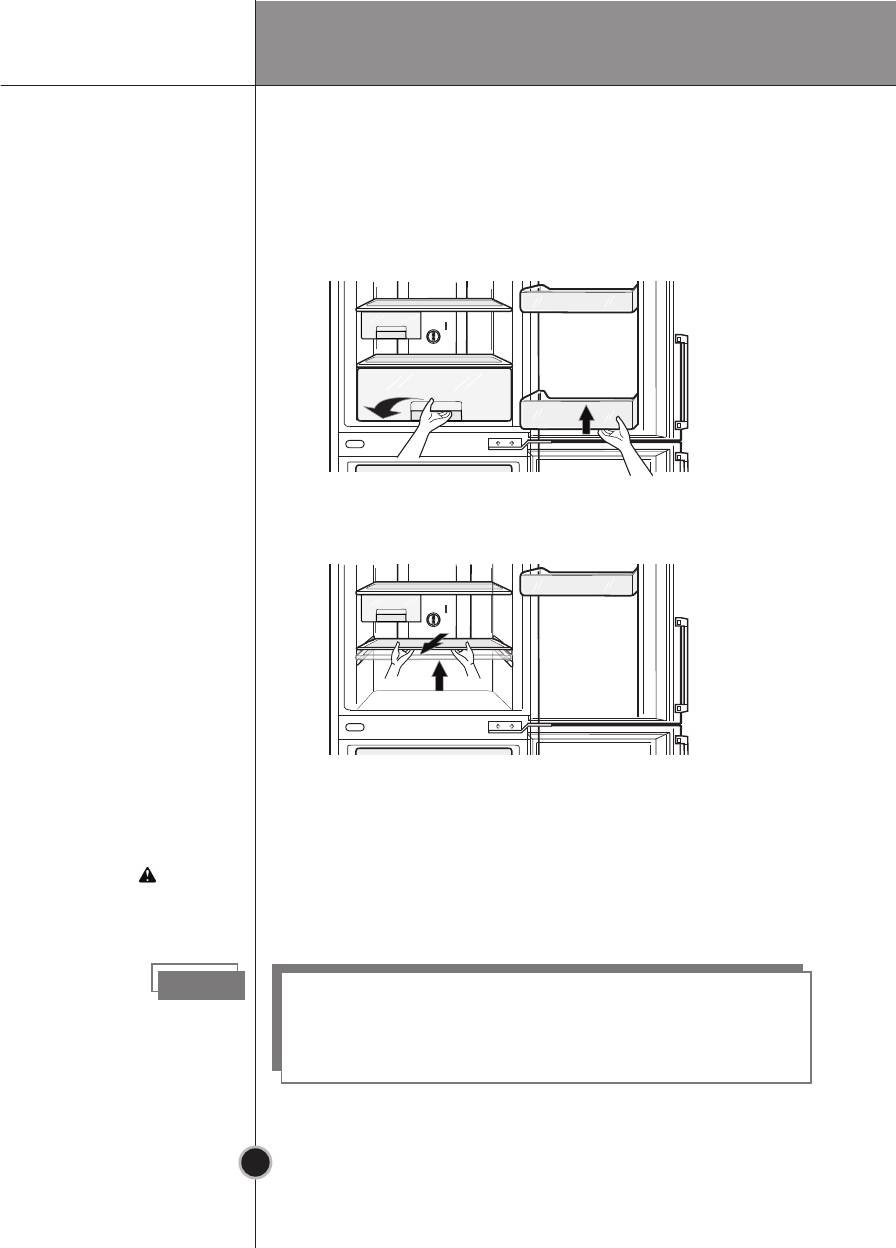
Remove/Install
• To Remove the shelf from refrigerator, at first – lift up it (1),
shelf
and then – pull it out side (2). In case of wrong removing
of the shelf, the damages of inner surfaces of refrigerator
possible.
12
• To install shelf into refrigerator follow similar: lift up
front side of the shelf at the angle (3) and then insert
it inside (4). In case of wrong installing of the shelf,
the damages of inner surfaces of refrigerator possible.
4
3
1
56
Care and Maintenance
Removing/Installing
To remove the bottom drawer from the refrigerator do
bottom drawer
the following:
of refrigerator
1) Remove the lower basket from the door by lifting it up;
2) Pull the drawer until it stops and slightly lifting it up pull
it to take it out;
2
1
3) Lift the front part of the drawer cover and pull it to remove;
4
3
4) To install the drawer back, do the same steps
in the reverse order.
WARNING!
Make sure that the angle of the drawer is not skewed.
Improper removing or installation can damage the interior
parts of the refrigerator.
Note
Warranty does not cover mechanical damage (cracks,
chips, dents and etc.) caused by the breaking of the rules
of storage, transportation, operation, maintenance of
the refrigerator, or application too much physical force.
57

Care and
Maintenance
Cleaning
Before Cleaning
Be sure to unplug the power.
Exterior
Clean the outside of the fridge-freezer with a soft cloth
soaked with hot water or liquid detergent. If you use a
detergent, be sure to wipe it with a clean wet cloth.
Interior
As above.
Grille and Drip
Remove the Grille, wipe moisture out around the Door
Tray
part and the Drip Tray using a clean cloth.
Exterior Dispenser
Wipe moisture etc out outside of Dispenser and on the
Dispenser Pad using a cloth.
Water Tank
1. Lift the Water Tank up by pressing the fixing Lever
on the bottom of Water Tank and then remove it.
2. After removing the Cap Tank (Big), clean and fully
rinse the inside/outside part of the Water Tank by
using neutral cleansing agent.
Cap Tank
Clean and fully rinse the Cap Tank (Big & Small) by using
(Big & Small)
neutral cleansing agent.
Especially for the groove part of the Cap Tank, it is
convenient to cleanse it by using a small brush.
Valve Assembly
Clean and fully rinse the Valve Assembly by using a
small brush. Rinse it while operating the bottom part of
the valve assembly. Always fix the Sealing Rubber
separated for cleansing at the existing position
(may result in water leakage).
After Cleaning
Check that the power cord is not damaged, power plug
has not overheated, and that the power plug is tightly
inserted into the outlet.
WARNING!
Be sure to dry the appliance with a cloth after washing
it with water.
Do not use abrasive, petroleum, benzene, thinner,
hydrochloride acid, boiling water, rough brush, etc, as
they may damage parts of the fridge-freezer.
58

Trouble Shooting
Before calling for service, check this list or
call in Support service of clients.
It may save your time and expense.
This list includes common occurrences that are
not the result of defective workmanship or
materials in this appliance.
Problem
Possible Causes
Fridge-Freezer
• Power plug may be unplugged from the electric outlet.
does not operate
Plug it in securely.
• House fuse has blown or circuit breaker has tripped.
Check and/or replace fuse and reset circuit breaker.
• Power cut.
Check house lights.
Fridge or Freezer
• Temperature control not set on proper position.
Compartment
Refer to Temperature Control section.
Temperature
• Appliance is placed close to heat source.
too warm
• Warm weather-frequent door openings.
• Door left open for a long time.
• Package holding door open or blocking air duct in
freezer compartment.
Vibration or
• The floor on which the fridge-freezer is installed may
Rattling or
be uneven or the fridge-freezer may beunstable.
Abnormal Noise
Make it even by rotating the leveling screw.
• Unnecessary objects placed in the back side
of the fridge-freezer.
Frost or Ice
• Door may have been left ajar or package holding
door open.
• Too frequent or too long door openings.
• Frost within package is normal.
Moisture forms on
• This phenomenon is likely to occur in a wet space.
Cabinet Surface
Wipe it with a dry towel.
59
Trouble Shooting
Problem Possible Causes
Moisture collects
• Too frequent or too long door openings.
inside
• In humid weather, air carries moisture into fridge when
doors are opened.
Fridge has odor
• Foods with strong odors should be tightly covered or
wrapped.
• Check for spoiled food.
• Interior needs cleaning.
Refer to CLEANING section.
Door not closing
• Food package is keeping door open.
properly
Move packages that keep door from closing.
• Fridge-freezer is not level.
Adjust the leveling screws.
• The floor on which the fridge-freezer is installed may be
uneven or the fridge-freezer may be unstable.
Slightly raise the front side with the leveling screw.
Interior light does
• No power at outlet.
not work
• Light lamp needs replacing.
Refer to the Lamp Replacement section.
Note
For more information about refrigerator service and use,
you can find at the official site of LG at «Frequently
Asked Questions» (www.lg.com/ru/refhelp).
Disposal of your old appliance
1. When this crossed-out wheeled bin symbol is attached to a
product it means the product is covered by the Europe an
Directive 2002/96/EC.
2. All electrical and electronic products should be disposed of
separately from the municipal waste stream via designated
collection facilities appointed by the government or the local
authorities.
3. The correct disposal of your old appliance will help prevent
potential negative consequences for the environment and
human health.
4. For more detailed information about disposal of your old
appliance, please contact your city office, waste disposal
service or the shop where you purchased the product.
60


